


When I’m photographing close to home, getting the exposure slightly wrong isn’t always a disaster. I can often return another day.
Travel photography is different.
You may have one sunset, one afternoon, or even one minute to capture a scene you’ll never see under the same conditions again.
That’s why I often bracket exposures while traveling.
Related: only a little while left for the Travel Cheat Sheets  End of Summer Sale
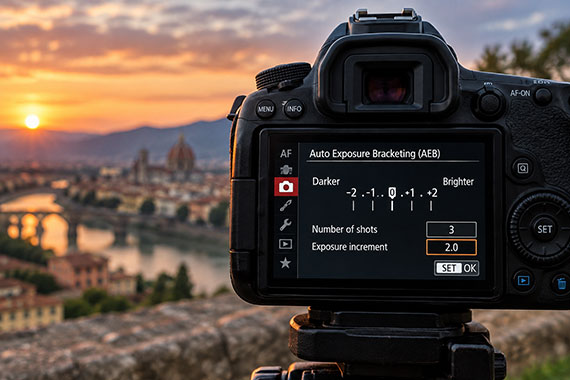
What Exposure Bracketing Does
Exposure bracketing means taking several versions of the same photograph at different exposures.
A simple bracket might be:
- One normal exposure
- One darker exposure
- One brighter exposure
Most cameras can do this automatically using Auto Exposure Bracketing (AEB). A common starting point is -2, 0, +2 EV, although -1, 0, +1 EV may be enough for less extreme scenes.
It takes only a moment, but gives you considerably more flexibility later.
Travel Scenes Can Be Difficult to Expose
Travel photography frequently puts you in challenging light.
Imagine photographing inside an old cathedral with sunlight pouring through the windows. Or standing in a shaded alley while photographing a bright city beyond it.
Expose for the shadows and you may lose the highlights. Expose for the highlights and the shadows can become extremely dark.
Bracketing gives you options.
You might use the darker exposure to preserve a colorful sky, the brighter one for cleaner shadow detail, or blend multiple exposures later.
You Don’t Have to Create HDR
This is an important point.
Bracketing doesn’t mean you have to combine the photographs.
Often, I’ll simply choose the best individual exposure afterward.
Modern cameras shooting RAW have impressive dynamic range, so a single properly exposed frame may be all you need. But when the lighting is difficult, capturing two extra exposures is cheap insurance.
Instead of making a critical exposure decision while standing on a crowded street or racing to catch a train, you can make it later on a large monitor.
When Bracketing Is Most Useful
I consider bracketing when photographing sunsets, interiors with bright windows, landscapes with deep shadows, city skylines around twilight, backlit scenes, and viewpoints I probably won’t visit again.
There is one catch: bracketing works best when the scene isn’t changing rapidly.
Moving people, waves, blowing trees, or shooting from a moving vehicle can make exposure blending difficult. In those situations, one carefully exposed RAW file may be better.
Storage Is Cheap. Returning Isn’t.
Yes, bracketing creates extra files.
But memory cards are inexpensive compared with flights, hotels, rental cars, and returning to a location on the other side of the world.
You can always delete the extra RAW files later.
You can’t recreate the moment.
That’s the real reason I bracket exposures while traveling. Sometimes you only get one chance.
When the light is difficult and the photograph matters, a few extra exposures can be some of the cheapest photographic insurance you’ll ever buy.
For Further Training:
Some shots are just harder than others. Ever struggled with vacation photos, twilight exposures, or star trails and focus stacking while you’re on the move? The Travel Photography Cheat Sheets (currently 88% off today) are built exactly for moments like that:

Showing you step by step how to dial in settings, avoid common mistakes, and get the shot — even when you’re tired, rushed, or shooting in unfamiliar conditions. Travel-ready, no Wi-Fi required, and designed to be quick to reference so you can spend less time guessing and more time shooting.
Deal ending soon: Travel Cheat Sheets End of Summer Sale
from PictureCorrect https://ift.tt/EtCmLkQ
via IFTTT


0 kommenttia:
Lähetä kommentti