keskiviikko 31. lokakuuta 2018

PictureCorrect.com: Fall Foliage: Tips For Taking Great Fall Photos

Here are some tips for creating great fall images:

1. Use Indirect Light

Try to avoid bright sunny days, which tend to increase the contrast and brightness of the colors. Instead, go for partial or full shade. Shooting on overcast or rainy days can emphasize the earth tones and the depth of color of fall trees and leaves. Raindrops on fresh fallen leaves deepen the colors and create great patterns of light.

best fall photo tips

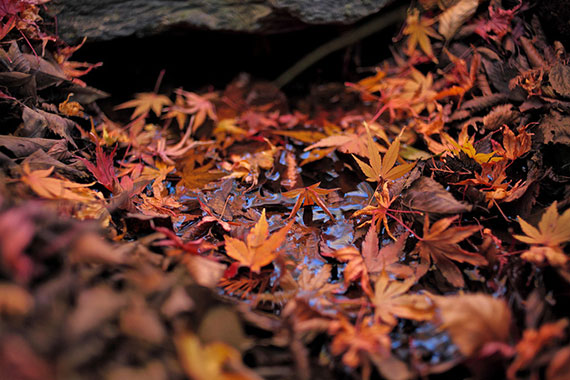
Photo by Yasunari(康就) Nakamura(中村); ISO 200, f/2.4, 1/40-second exposure.

2. See Close and Far

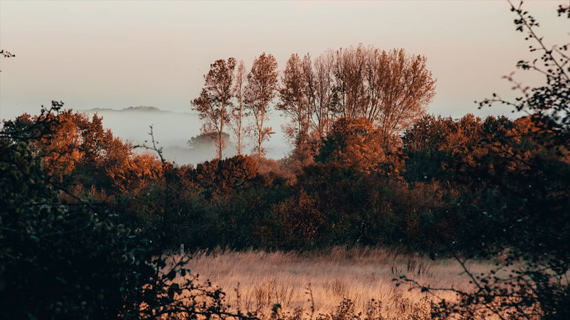
While you may be spellbound by a mountain covered in colored leaves, your camera may not capture the full detail. Try to get some detail of individual leaves or trees in the foreground.

3. Compose for Impact

Foliage is usually an emphasis on color, but you can also capture shapes, lines, and patterns through close-ups of leaves and other items.

To keep the image dynamic, consider the rule of thirds, where your object of interest is not in the center, but placed at an intersection of imaginary vertical and horizontal lines which split the viewfinder into thirds in both directions.

4. Control the Focus

A wide open f-stop (low number, e.g. f/2) will sharpen the item in focus but will blur much of the background. This is good for close-up shots of leaves and people. Point-and-shoot camera users can choose the “portrait” setting to achieve this effect. A small f-stop (large number, e.g. f/11) will put more of the background in focus, but will also lower the shutter speed and be more susceptible to blur from camera shake or object movement. Often the “landscape” setting on a point-and-shoot will set these preferences.

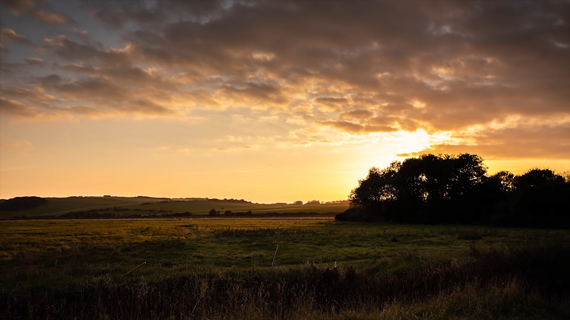
5. Balance the Brightness

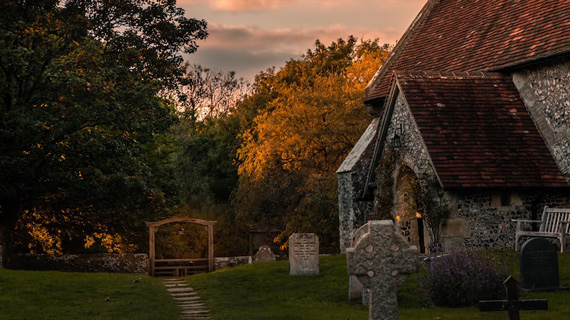
If you have people in your image, you may need a touch of fill flash to lessen the “raccoon eyes” and give them a bit of brightness compared to the background. Try to balance the brightness of their faces and the background foliage so that you don’t have one underexposed and the other too bright. If you place your subjects just at the edge of a wooded area, their faces will be lit more than the trees behind them, creating a focal point of interest.

autumn photo tips

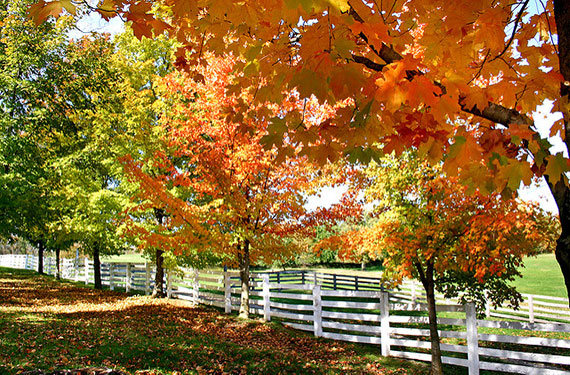
Photo by Chris Murphy; ISO 100, f/7.1, 1/125-second exposure.

6. Know the White Balance

If you can’t set a custom white balance, you may want to try the “shade” setting. Often cameras will get confused with all of that color, and you may end up with skin tones that are strange.

7. Stabilize the Camera

If your camera settings result in a shutter speed less than 1/100 second, you may want to stabilize your camera. This can be as simple as setting it on a rigid surface, such as a rock or fence post, or bring a monopod or tripod. Monopods make great hiking poles! And don’t hold your point-and-shoot out at arm’s length and expect to get a crisp shot.

8. Go for High Quality

Normally I recommend higher ISO (sensitivity) for shady or darker scenes, but in this case I recommend to keep the ISO low to capture all of the detail of the colors and leaves. Higher ISO often brings with it noise, and you want to limit that. Try for ISO 100–200 if you can.

9. Don’t Forget the Fruit

This is a great time to get some shots of fall fruit stands. Baskets of apples, squash, and grapes are great studies. So are pumpkins, haystacks, and corn. Take some time to appreciate the color and fall bounty. Mums and other fall flowers are in full bloom, as well. These images make great icons of the season.

fall or autumn photography

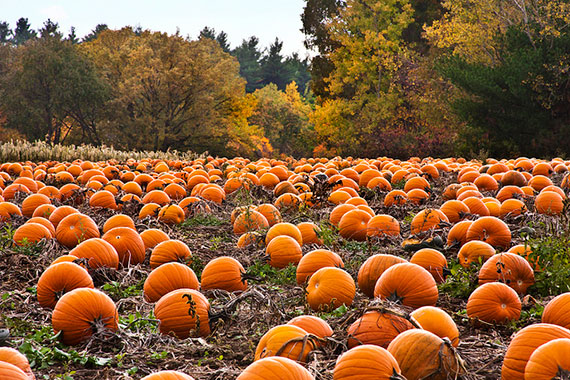
Photo by liz west; ISO 640, f/18.0, 1/80-second exposure.

10. Finish Creatively

Even though there’s lots of color, try finishing some photos in black and white and/or sepia to emphasize lines and shape. Play around with brightness, contrast, and saturation to provide more depth and interest. Consider printing and framing some images or making up some note cards to give as gifts.

To summarize, you’ll want high quality, stable shots, good lighting and composition, creative framing, and good exposure control. Use your eyes and creative talents, and capture some great fall images!

About the Author:
John Huegel is a photographer in the Erie, Pennsylvania area who specializes in seniors, dance studio, families, and other groups. He is active in many charitable and volunteer activities in the Erie area.


Go to full article: Fall Foliage: Tips For Taking Great Fall Photos

What are your thoughts on this article? Join the discussion on Facebook

PictureCorrect subscribers can also learn more today with our #1 bestseller: The Photography Tutorial eBook

The post Fall Foliage: Tips For Taking Great Fall Photos appeared first on PictureCorrect.


from PictureCorrect https://ift.tt/2xLe3OP
via IFTTT

PictureCorrect.com: Interesting Photo of the Day: Autumn Morning in Doetinchem

Autumn is an excellent time for some nature photography. The surroundings put on some colorful makeup, and the misty, hazy conditions mingled with warm sunlight are an absolute beauty to witness. The following image by landscape photographer Ingmar Hoogerhoud gives the ideal feeling of a perfect autumn morning:

fall morning netherlands

“Endless Path” by Ingmar Hoogerhoud (Via Reddit. Click image to see full size.)

Hoogerhoud managed to take this dreamy image in Doetinchem, Netherlands. The leaves changing colors and the slight misty morning gives a true feeling of autumn. Not to mention how the sun breaking through the trees adds further drama to the image. Hoogerhoud has used the path as a leading line that takes us through the woods into the mist, giving it a feeling of an endless path.


Go to full article: Interesting Photo of the Day: Autumn Morning in Doetinchem

What are your thoughts on this article? Join the discussion on Facebook

PictureCorrect subscribers can also learn more today with our #1 bestseller: The Photography Tutorial eBook

The post Interesting Photo of the Day: Autumn Morning in Doetinchem appeared first on PictureCorrect.


from PictureCorrect https://ift.tt/2PBp428
via IFTTT

PictureCorrect.com: Tips for Using Smoke Grenades in Photography

Smoke grenades can be useful for more than just producing, well, a lot of smoke. They can be fun props to use for a special type of photography. Rob & Jonas initiate you to the exciting world of smoke grenade photography:

Smoke Grenades

Smoke grenades cost 6-8 dollars each. You need about eight of them for a shoot that will last for two hours.

Location

The group decided on a heavily wooded area for the shoot.

Lighting

The timing of the shoot was also important. They deliberately attempted it at a time of the day when the sun was closer to the horizon. The sun would create a rim lighting effect around the subject’s head and shoulders while the artificial lights would light up their face.

Smoke grenade photography

The key to selecting the lights was the refresh rates and the fastest shutter speed; they needed high speed sync.

Props

how to use smoke grenades

For props, the crew members brought in a World War I era gas mask, a wedding dress, and a pair of headphones.

Smoke Movement

Flinging the smoke grenade around too fast after popping it won’t work. The movement has to be carefully choreographed.

Start off holding the smoke grenade behind you. Then slowly move it to create a background of smoke, and then bring it to the front. Again, very slow movement creates the best results. Make sure that the smoke really bellows out instead of dispersing in every direction.

adding smoke to photos

Smoke grenades can be extremely hot. Make sure to hold them at the end. Use gloves to avoid burning your hands. Above all, watch out for the sparks when you pop the grenade.

General Guidelines

add smoke to photos

With the ambient light coming in from behind, the smoke will look really textured and crisp. You can have someone else smoke up the background. That way the model can concentrate on the pose while the background (and foreground) smoke is handled by someone else.

Have you tried this out? We’d love to see your results!


Go to full article: Tips for Using Smoke Grenades in Photography

What are your thoughts on this article? Join the discussion on Facebook

PictureCorrect subscribers can also learn more today with our #1 bestseller: The Photography Tutorial eBook

The post Tips for Using Smoke Grenades in Photography appeared first on PictureCorrect.


from PictureCorrect https://ift.tt/2PFioAl
via IFTTT

tiistai 30. lokakuuta 2018

PictureCorrect.com: 7 Tips for Taking Great Travel Pictures

Taking great pictures of your vacation can be easy if you have a few basic photography skills. In this article, you will find seven travel photography tips that will help you take fantastic pictures that you’ll enjoy for years to come.

take better travel pictures

Photo by Arian Zwegers; ISO 100, f/11.0, 1/125-second exposure.

1. Add Drama to Your Pictures

By adding drama to your pictures, you make them more interesting and visually appealing. If you want to add drama to your pictures, one way is to show scale. You can do this by adding people or natural features to your photographs of big things like monuments, landscapes, or the world’s biggest Redwood.

easy travel photography ideas

Photo by jpellgen; ISO 200, f/10.0, 1/400-second exposure.

2. Clean up the Clutter

When you’re seeing exciting new things, it’s easy to ignore the background. But before you hit the shutter release button, look at what you’re really photographing. In some cases, moving a few feet could eliminate unwanted clutter like power lines, billboards, or people walking through your picture.

travel photography made simple

Photo by inefekt69; ISO 4000, f/1.8, 1/125-second exposure.

3. Photograph the Locals

No matter where you are traveling in the world, learn how to say some basic things like, “May I please take your picture?” in the local language. Offer to send those you photograph a copy; make sure to have a small notebook or pencil to jot down names, addresses, or emails.

travel photo techniques

Photo by Alberto Lama Photography; ISO 200, f/2.8, 1/3200-second exposure.

4. Look for Unique and Candid Photos

Candid shots when traveling are the best, but occasional portraits of the family in front of spectacular views and famous landmarks are part of almost every vacation album. Don’t forget to get in the vacation pictures too by using the self timer or remote shutter.

techniques for better travel photography

Photo by sandeepachetan.com travel photography; ISO 100, f/4.5, 1/500-second exposure.

Always take pictures of things that interest you instead of taking pictures of things “you have to take”—like those shown on postcards in the gift store. You can always pick up some postcards to add to your vacation souvenirs. Unique subjects make great travel pictures, so look out for these opportunities.

methods for better travel photos

Photo by Theophilos Papadopoulos; ISO 200, f/7.1, 1/100-second exposure.

5. Remember That Every Photo Has a Story

You may want to tell your vacation story by using your photographs from the time you departed to your return home, so make sure to capture these moments, too. Include highlights like your campground neighbors, an unusual meal you had, activities, the look on a family member’s face when he or she saw something for the first time. Once you get home and look at all of the pictures, select those pictures that best reflect your trip and frame them on your wall to remember.

ways to make your travel photos pop

Photo by Rosanetur; ISO 200, f/5.6, 1/1000-second exposure.

6. Get the Kids in on the Act

If you are traveling with children, give each child a camera and encourage them to take pictures, too.

how to capture your vacation in photographs

Photo by Modes Rodríguez; ISO 200, f/1.4, 1/1100-second exposure.

Then when you return home you can create a fun photo album to remember your vacation. While on your vacation, make sure to make notes so you can later add captions to your photos.

7. Be Aware of Camera Logistics

If you’re going to be near or in the ocean, bring a waterproof camera. Watch out for salt water and sand as they can wreak havoc on your camera.

Remember that not every picture will turn out well; even the seasoned photographer take bad pictures from time to time. The best solution is to bring extra memory cards and have a way to upload your photos each day while you’re away.

And don’t forget to prepare your camera for the next day by recharging the batteries and replacing the memory card. By doing this, you’ll be ready to go in the morning!

As you can see, taking great travel and vacation pictures can be a lot of fun and relatively easy just by following these seven tips. By the time you return home you will have a lot of fantastic pictures to share with your friends and family.

About the Author:
Autumn Lockwood is a writer for Your Picture Frames (www.yourpictureframes.com) and loves taking pictures. Your Picture Frames makes it easy for you to find just the perfect frame for your photo or artwork.


Go to full article: 7 Tips for Taking Great Travel Pictures

What are your thoughts on this article? Join the discussion on Facebook

PictureCorrect subscribers can also learn more today with our #1 bestseller: The Photography Tutorial eBook

The post 7 Tips for Taking Great Travel Pictures appeared first on PictureCorrect.


from PictureCorrect https://ift.tt/2Dc6CaL
via IFTTT

PictureCorrect.com: Interesting Photo of the Day: Owl Swoops Over Camera

Wildlife photographers put in a lot of effort. Their work doesn’t even stop during the night while they rest. The following image by Roy Rimmer is a great example of a nature photographer’s patience paying off:

perfect owl swoop

“Perfect Owl Swoop” by Splucer (Via Reddit. Click image to see full size.)

The photographer used bait and a trigger release to get this well-planned shot of an owl swooping in. The composition is spot on, as the bright white owl takes flight with the dark night sky in the background. Further, the foliage on the ground perfectly frames the owl, giving a great sense of frame within a frame.

Another interesting aspect of the image is how the owl is looking directly at the camera.


Go to full article: Interesting Photo of the Day: Owl Swoops Over Camera

What are your thoughts on this article? Join the discussion on Facebook

PictureCorrect subscribers can also learn more today with our #1 bestseller: The Photography Tutorial eBook

The post Interesting Photo of the Day: Owl Swoops Over Camera appeared first on PictureCorrect.


from PictureCorrect https://ift.tt/2RsMILJ
via IFTTT

PictureCorrect.com: 5 Tips for Better Autumn Photography

Autumn is a beautiful time of year, and most photographers love to get out and capture the season’s gorgeous light and colors. However, with shortened days and erratic weather it can be a bit challenging to photograph in the fall. To help you get you out and shooting, Gareth from Park Cameras runs through five tips to improve your autumn photography:

1. Vary Your Shots

Autumn being a season of change, the weather conditions can vary drastically. One day it’s warm and sunny, and the next it might get foggy and cold. And before you know it, it can turn back to cloudy and moody. With so many different weather conditions, you have the opportunity to shoot a wide variety of images within a small window of time.

misty autumn environment

You can also vary the way you compose your shots. Either go wide and capture the colorful and misty environment or isolate a leaf by shooting from a closer range. You can even shoot high to show the sun breaking through the trees, or shoot a dramatic low shot if there is some mist or fog on the ground.

2. Add Human Interest

Adding human interest to show the interaction of living beings with nature is a great way to make a photo more interesting. While it’s not always necessary, it can do wonders to uplift a boring image. Try having someone play with the autumn leaves,or walk down a path with colorful trees in the background.

model in autumn forest

3. Scout Out Your Location

Location scouting is something that you can do anytime when you’re traveling. If you happen to come across a tree that’s changing colors, you can have a look around the location and get a sense of lighting in that area. Then revisit the location when the lighting is best.

location scout for autumn photography

4. Check Sunset Times

Golden hour is a great time to shoot during any time of the year. But it gets even more special during autumn. Soft light helps in accentuating the varying colors of the leaves. Even the sky pulls out dramatic colors during autumn, making it a dream come true for photographers.

autumn sunset

However, as the sun starts setting earlier in autumn, be aware of the sunset timing. This will help you to be at the location a bit earlier and plan out the shot. Also, keep in mind that the area where the sun sets in summer starts to change in autumn. You need to be aware of the sunset location if you really want to nail your sunset shot.

And when it comes to sunrise, it happens at a more “reasonable” time. While the sun rises super early during summer, it waits until a more doable time in autumn so you can sleep in a little and still get great shots.

5. Adjust HSL

HSL stands for Hue Saturation Luminance. This tip is more concerned with editing colors, and HSL can make a huge difference in this regard. For instance, if you have a photo of a tree with brown leaves and you want to make it look more golden, you can tweak the hue adjustment. If you haven’t tried it yet, try using the HSL adjustments a bit and see for yourself how it can bring out the colors in your photos.

without hsl

with hsl

I hope these tips will be of help if you’re planning to explore the beauty of autumn with photography.


Go to full article: 5 Tips for Better Autumn Photography

What are your thoughts on this article? Join the discussion on Facebook

PictureCorrect subscribers can also learn more today with our #1 bestseller: The Photography Tutorial eBook

The post 5 Tips for Better Autumn Photography appeared first on PictureCorrect.


from PictureCorrect https://ift.tt/2CRc164
via IFTTT

maanantai 29. lokakuuta 2018

PictureCorrect.com: Top 12 Image Editing Skills Every Photographer Should Know

Before you start editing, make sure that you have a good image work flow. This means saving originals in a separate place to prevent you from damaging or destroying the original image. And get familiar with your program’s UNDO capability–usually the Ctrl-Z key is a shortcut to undo the most recent image change. Don’t forget Save As, which allows you to save a copy of the image with another name so you don’t disturb the original.

post processing landscape

Photo by Shawn Clover; ISO 100, f/8, 1/60-second exposure.

Crop. This tool allows you to remove some of the image. Generally, you shape a rectangle around the area you want to keep and the rest is removed. The area inside the rectangle becomes your new image. Related to this tool are the rotate and straighten tools. Rotate allows you to rotate the image, and Straighten does a similar task, allowing you to specify a horizon line or reference point. I recommend to rotate first and then crop after you have the proper orientation.

Brightness and Contrast. This tool lets you increase or decrease the relationship between brights and darks (contrast), and increase or decrease the overall brightness of the image. Combinations of brightness and contrast settings can have very dramatic impact to your image, adding extra “punch” or softening the visual impact. It can also add emphasis to sunsets and other scenic shots. If your image appears flat or dull, this is a good tool to try.

Saturation. This tool is used to increase the color of an image. Used to excess, the result can be artificial, and skin tones can be made to look unnatural. But for floral and outdoor images, this tool can be used to sweeten the color impact of an image.

Resize. This tool is used to change the size and number of pixels, or image dots, in an image file. When sending something to a website for instance, you may want to reduce the image size so that it does not take too long to load. When sending an image to be printed on a large size, you may want to size it larger. Many programs will try to fill in the missing spaces if you attempt to resize an image beyond its original pixel dimensions. Called interpolation, this program can deliver mixed results if you are trying to increase the images size too far beyond its original dimensions. Combined with Crop, this is a good way to preview and prepare an image to be printed in a specific paper size.

Color Temperature/Color Adjust. This tool lets you adjust the image’s color temperature. If your camera’s white balance was not matched up to the color temperature of the predominant light source, the resulting image can have a color cast that is undesirable. Using this tool, you either choose a color neutral selection (white or grey) in the photo and let the tool shift the color balance to match, or you tweak some settings or sliders to make the image “warmer” or “cooler”. It’s better to get it right in the camera, but this tool can help rescue photos that otherwise have improper color casts.

post processing portrait

Photo by Farrukh.

Curves and Levels. These tools are a more sophisticated version of the Brightness and Contrast tools. Levels allows you to change the white, mid and black points of an image and it will shift the image accordingly. It is useful in pushing darks darker, whites whiter, and adding some lightness to midtones. It is useful to bring up skin tones on faces while keeping very bright elements unchanged. Curves is even more flexible, where you can describe a very sophisticated transformation of the original image’s characteristics. Both of these tools can also be used to excess, and the result is often surreal or abnormal in appearance.

Clone/Rubber Stamp. This tool lets you remove items from the image or otherwise retouch the image. For example if you have a telephone pole in an otherwise perfect rural image, you can use this tool to duplicate the part of the picture next to the pole and paint over the pole with that section. With some practice, you can edit out glare on glasses, braces, background objects and much more. Related tools include Scratch Remover and Object Remover in some programs.

Eraser. This tool lets you remove sections of an image. This leaves behind a blank spot or hole. It’s useful to isolate an object to place on another image, for example, to cut out a person so you can drop them into a location that was not in the original image. A variant of this tool is the Background Eraser.

Layers. Learning to use layers opens up an entirely new world in editing. Basically you create two or more overlays that can have varying amounts of transparency so that you create a new image combining parts of these layers. You can specify how the layers interact with each other, so that one may enhance the color of another. That feature is called the “blend mode”. You can also use layers to superimpose items on each other, for example to put your subject in a new location.

Sharpen. This tool lets you increase the edge contrast of the image, which makes small features stand out more. You will generally sharpen only as a last step after resizing, because sharpening emphasis will change with the image size. You can selectively sharpen parts of the images, such as eyes, to draw attention to them. You can also apply a sharpening to the overall image. The Unsharp Mask will let you specify just how small and how much to apply the sharpening effect.

post processing cityscape

Photo by Kokorowa Shinjin.

Channel Mixer. This is a tool that allows you to change the amount of red, green and blue in the image. But its real value is in being able to tailor a black and white conversion to include specific amounts of red, green and blue. If you choose “monochrome” as the output, you can mix the red green and blue channels to bring out features that a straight black and white conversion will not be able to do. The defaults include 33% each of red, blue and green. Experiment with 80%/10%/10% of various modes and see how elements like bricks or blue sky or green leaves will change from dark to light in relation to other objects in the image.

1-Step Fix/Smart Fix. This tool often combines much of the above tools into an easy to use dialog that will let you play with many things at once to improve an image. Even if you use this tool most of the time, remember that the individual elements above can be utilized individually to create image enhancements that the simpler tools cannot provide.

Want to learn more? Take a handful of images that you are not totally pleased with, and spend some time using each tool to see how you can expand your creative and editing skills to produce truly great works of photographic art!

About the Author:
John Huegel is a photographer in the Erie, Pennsylvania area who specializes in Seniors, Dance Studio, Families and other groups (jhphotomusic.com). He is active in many charitable and volunteer activities in the Erie area.


Go to full article: Top 12 Image Editing Skills Every Photographer Should Know

What are your thoughts on this article? Join the discussion on Facebook

PictureCorrect subscribers can also learn more today with our #1 bestseller: The Photography Tutorial eBook

The post Top 12 Image Editing Skills Every Photographer Should Know appeared first on PictureCorrect.


from PictureCorrect https://ift.tt/2Ocvikk
via IFTTT

PictureCorrect.com: Interesting Photo of the Day: Busy Day at the Bird Feeder

Composite photography opens up new doors for the creative photographer. You can make the impossible seem possible. You can turn vivid and wild dreams into a reality. The possibilities are endless. Just take a look at this image for proof:

backyard birdfeeder

Busy Day at the Bird Feeder (Via Imgur. Click image to see full size.)

The photographer has a busy bird feeding station in his backyard, and when he wanted to create a photograph of all the different kinds of birds that visited the feeder, he called on composite photography. After taking many photographs of all the birds, he stacked the frames on top of one another in Photoshop to create this awesome photo.


Go to full article: Interesting Photo of the Day: Busy Day at the Bird Feeder

What are your thoughts on this article? Join the discussion on Facebook

PictureCorrect subscribers can also learn more today with our #1 bestseller: The Photography Tutorial eBook

The post Interesting Photo of the Day: Busy Day at the Bird Feeder appeared first on PictureCorrect.


from PictureCorrect https://ift.tt/2vIgHah
via IFTTT