torstai 31. lokakuuta 2019

PictureCorrect.com: 5 Tips for Becoming More Instinctive With Portrait Photography

The main challenge with portrait photography is, without a doubt, producing a portrait that does not leave the subject looking rigid, anxious, or just simply uncomfortable.

natural portrait

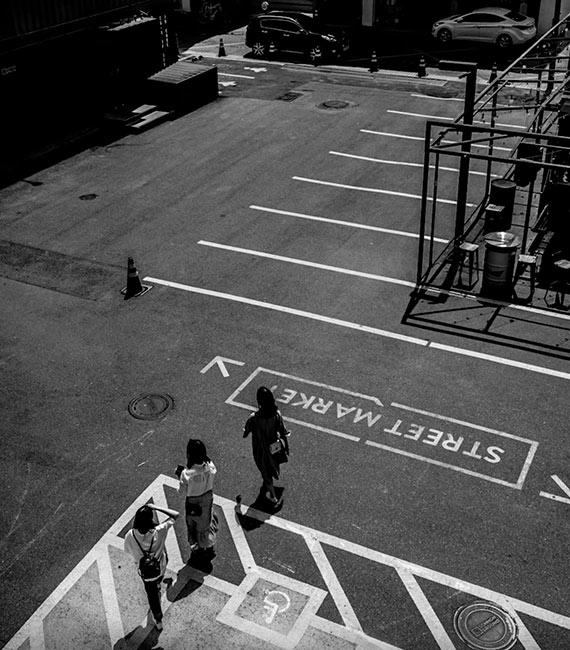
“Untitled” captured by MOTOKI Plasticboystudio

A portrait photographer must gain his or her subject’s trust to help them loosen up and become actively involved in the sitting. The results will be more natural and the subject will be pleasant to work with. The result will be portraits that are not only attractive but also vibrant with the subject’s true nature memorialized in the image.

relaxed portrait

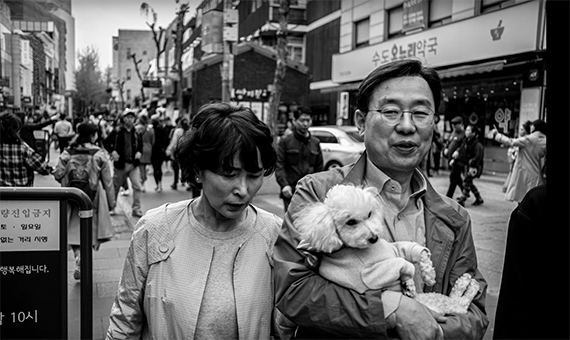
“People – The Joy of Happiness” captured by Daniel Condurachi

How can the portrait photographer involve their subject in such a way that they will be their most natural self and the photo session completed in an easy and natural manner?

Here are five tips for a productive portrait photography session:

Occupy the Hands

Portrait photography primarily involves a head and shoulders shot. One of the primary stressors for the subject is what to do with the hands. Giving the person something to hold will keep their mind away from concentrating on their posture, resulting in a much more relaxed piece of work. Since some portraits may be full body photos, including an object that is comfortable but not distracting can put the subject at ease.

street portait

“Maggie #295” captured by Peter McConnochie

Use a Chair

For some reason, people are uncomfortable standing in front of a camera. Consequently, portrait photographers will usually have a chair available. A chair could possibly be the handiest tool a photographer can have when taking portrait images. With this prop, there exists more of a casual atmosphere.

portrait with chair

“RC Chair” captured by Oscar Rethwill

Know Your Subject

Your subject has an idea in their mind what a portrait should look like. It is the portrait photographer’s responsibility to utilize their professional skills to bring the subject’s ideas to reality. Allow some interaction time so you can talk about subjects of interest or about the things your model is passionate about. You will be amazed how that special glint in the eye will come through and their face will light up.

personal portrait

“Rebecca ’13 | First Chair” captured by Sean Molin

As the portrait photographer, you and your subject will interact to create that special mood and ambiance. You will discover that using a handheld camera will allow you to capture unique angles and expressions that you cannot achieve with a fixed location camera. Using these techniques, you will be shifting the attention away from the lights and equipment to concentrating on the person photographed.

Involve Your Subject

The portrait photographer needs to remember that this is the client’s portrait and not that of the photographer. Respect for the individuals involved is mandatory. You should be aware of any time constraints the client might have. And you should also have a good understanding as to what the subject wishes.

If you are trying something the subject does not understand, be sure to explain why you are taking such actions. You do not want to catch your clients off guard, as that confusion will end up appearing in the final product.

Be Prepared

Be sure all equipment is set up and in good working order prior to your subject’s arrival. Nothing will raise the level of anxiety more than having the client suffer through times of setting up proper lighting and ensuring everything is working. Find out some general information about the subject of the shoot. What are they anticipating from this session? Is the scene free from external distractions? Allowing the appropriate amount of time for the shoot will prevent rushing to complete the task at hand and will leave the photographer with a much happier customer.

In portrait photography, all five tips above are essential if you desire your subjects or clients to be more at ease in front of the camera resulting in the most natural portraits possible.

About the Author:
Raleigh Conrad has always had a fascination for consumer electronics. His site is at rockingchairwisdom.com. The purchase of his first digital camera opened up a completely new world of interest.


Go to full article: 5 Tips for Becoming More Instinctive With Portrait Photography

What are your thoughts on this article? Join the discussion on Facebook

PictureCorrect subscribers can also learn more today with our #1 bestseller: The Photography Tutorial eBook

The post 5 Tips for Becoming More Instinctive With Portrait Photography appeared first on PictureCorrect.


from PictureCorrect https://ift.tt/34kHGr2
via IFTTT

keskiviikko 30. lokakuuta 2019

PictureCorrect.com: Why I Shoot in Manual Mode

When it comes to consistency, manual exposure mode is the best mode among the various exposure modes. Other exposure modes include Aperture Priority and Shutter Priority, but I use Manual and Aperture Priority exclusively.

camera modes

“D70s mode dial” captured by Salim Fadhley

Why Shoot in Manual Mode?

Imagine you’re shooting a group of people at 12 p.m. in a shaded porch. This group of people are standing in a circle, facing one another, and you’re right in the middle of this circle. You have a wide-angle lens (about 35mm in focal length), and you want to take individual shots of each person, without using any flash. If you’re using Aperture Priority (the natural choice for some people), you will end up with half of the pictures underexposed—the face of the person will be too dark. Why does this happen?

In Aperture Priority mode, the camera is guided by its exposure meter in order to choose a shutter speed that will give a correct exposure. A correct exposure judged by the exposure meter will not be accurate if you are shooting a person who has his back to the sun, especially if you’re using a wide angle lens.

backlit portrait

“Remember the Mane!” captured by Garry Wilmore

This will result in underexposure because the exposure meter does not know whether the subject is the person (whose face is in the shade) or the background (which is very bright compared to the face of the person).

But once you point your camera at a person who has his back facing the door of the house, Aperture Priority gives you a correct exposure, and the person’s face will be correctly exposed.

Of course, you can use Exposure Compensation to “compensate” for the inaccuracy of the exposure meter, but this is largely a hit-and-miss exercise, depending on which person you are shooting. If you’re using a +2 for one person, you might need to use only +1 for someone else who is standing closer to the door. Finally, you will be using zero compensation for the person whose back is directly facing the door.

The solution to this inconsistency in exposure is to use Manual exposure mode.

First, point the camera at the person whose back is to the door, because you know that the camera will give you the correct exposure for this scenario. The exposure meter works well in this scenario because the light level on the person’s face is very similar to the light levels in the background, which is the door and wall of the house, not the brightly lit outdoors.

In Manual mode, choose an ISO, aperture, and shutter speed based on the exposure meter’s guidance. You will now be able to take individual pictures of each person, no matter where they are standing within the circle, without needing to adjust anything, and each shot will have a consistent exposure.

If there are any slight exposure inaccuracies using this method, it will be because of one of these two possible reasons:

1. The time of shooting is between 3 p.m. and 6 p.m., or between 6 a.m. and 9 a.m., when the sun is shining at an angle onto the subject of your baseline exposure (the person whose back is facing the door).

angled lighting

“Freedom… Maybe” captured by Alan L.

2. The lens you are using is not able to handle backlighting without resulting in loss of contrast (typical in a low-cost kit lens).

About the Author:
Andy Lim (SimpleSLR) runs a profitable photography business that spans wedding photography, commercial photography and conducting photography workshops.


Go to full article: Why I Shoot in Manual Mode

What are your thoughts on this article? Join the discussion on Facebook

PictureCorrect subscribers can also learn more today with our #1 bestseller: The Photography Tutorial eBook

The post Why I Shoot in Manual Mode appeared first on PictureCorrect.


from PictureCorrect https://ift.tt/2BZEs00
via IFTTT

PictureCorrect.com: Interesting Photo of the Day: Colorful Autumn in Maine

Autumn might just be the most beautiful of seasons. Foliage that was once lush green transforms into vivid oranges, yellows, and reds. This image by photographer Ryan Resatka gives a sense of just how beautiful autumn can be in Maine:

autumn in Maine

“Autumn in Maine” by Ryan Resatka (Via Reddit. Click image to see full size.)

What’s eye-catching about this image the mix of green, yellow, and red that emits a fairy tale feeling. The erratic color patterns mixed with the sunlight patches make the image even more exciting.

The river at the center of the image draws the eyes through the woods and on to the mountains in the background. And looking at the car crossing the bridge, you can imagine how joyous the ride could be this time of the year.


Go to full article: Interesting Photo of the Day: Colorful Autumn in Maine

What are your thoughts on this article? Join the discussion on Facebook

PictureCorrect subscribers can also learn more today with our #1 bestseller: The Photography Tutorial eBook

The post Interesting Photo of the Day: Colorful Autumn in Maine appeared first on PictureCorrect.


from PictureCorrect https://ift.tt/34ed36v
via IFTTT

PictureCorrect.com: The Philosophy of a Street Photographer

There’s not much more captivating than well-executed street photography. However, approaching the candid genre can be a major challenge. Though photographer Hyun Ralph Jeong may not make his living off of street shots, he’s passionate about getting out and about with his camera. Here, he shares his motivations and personal philosophy in hopes that you may be able to draw some direction to guide your own work:

First and foremost, what is street photography?

In truth, there’s no hard definition for what street can or cannot be. You can focus on architecture or animals. Street photography is just as much about the people inhabiting a place as it is about the place itself. Believe it or not, street photography can focus on something as simple as the way colors combine or light rests along a surface.

According to Jeong, there are two ways of approaching street photography. Either you can focus on the composition and environment, or you can seek out subjects.

Focusing on composition is a waiting game, for the first part. Once you find an area that’s visually compelling you watch for the right moment to happen. Perhaps that means patiently waiting for the right person to walk by. It may mean revisiting in a few hours to capture a better quality of light.

composition-based-street-photography

In contrast, focusing on subjects takes a bit more initiative and instinct. In any town or city, there’s an endless parade of interesting characters weaving in and out of our paths. Finding them is simply a matter of opening your eyes and having your shutter finger at the ready. You’ll likely have to stay on the move, and you may have to talk to strangers. However, the fruit of your labor often comes in the form of a dynamic, engaging photograph.

subject-based-street-photography

Sometimes, you’ll get lucky and manage to grab an interesting subject in an interesting environment. However, having it all isn’t always necessary to getting a powerful shot. Work intuitively and don’t overthink—otherwise, you may miss out on a great moment.

compelling-street-photoggraphy

“When I meet new people on the streets or when I’m traveling, I’m inspired by their honesty and candidness and the stories that they might share. “

One of the greatest factors in becoming a great street photographer is learning to find beauty in the world around us. Not every scene has to be over the top. There’s always something compelling in the women who sell vegetables on the street, always something to be learned in watching children play games with their friends. Look for the extraordinary in ordinary subjects.

travel-street-photography

Keep in mind that you don’t have to be a journalist or a humanitarian in order to pick up a camera. You don’t even have to make money. As long as you’re finding inspiration in the streets, you’re doing something valuable in bringing your camera along for the ride.

street-photograph-in-motion

In the age of social media, a lot of images focus on building a brand or identity. There’s a certain amount of honesty in simply photographing what you encounter without a filter. At the very least, street photography is a means of teaching and showing what a certain corner of the world is like. Through each other’s eyes, we can learn image by image more about our surroundings and the world at large.


Go to full article: The Philosophy of a Street Photographer

What are your thoughts on this article? Join the discussion on Facebook

PictureCorrect subscribers can also learn more today with our #1 bestseller: The Photography Tutorial eBook

The post The Philosophy of a Street Photographer appeared first on PictureCorrect.


from PictureCorrect https://ift.tt/36hX60U
via IFTTT

PictureCorrect.com: New: The Photography Super Bundle 2019

What do you get when you put together world-class photography instructors and their most essential and invaluable teaching resources and products? The Ultimate Photography Bundle, back by popular demand, this year it includes 12 eCourses, 6 eBooks, templates & presets at 97% off but only for a few days! Ending soon here: The Photography Super Bundle 2019

ultimate photography bundle

The Photography Super Bundle 2019 (See What’s Inside)

Using Your Camera

  • Photography Start: Ultimate Training Guide for Beginning Photographers by Improve Photography (eCourse)
    The ultimate training guide for budding photographers who want to master shooting in manual mode without thinking, capture tack-sharp photos every time, and want to learn to take advantage of the functions of their cameras.
  • The Capture Course: Photographing With Ease In Manual Mode by Lindsay Davenport (eCourse)
    Will take you from clueless to confident in manual mode with your camera.
  • The Ultimate Beginner Canon DSLR Photography Course by Rebecca McGonigle (eCourse)
    Learn how to use your Canon DSLR camera and get the fantastic photos you have always wanted.
  • The Ultimate Beginner Nikon DSLR Photography Course by Rebecca McGonigle (eCourse)
    Learn how to use your Nikon DSLR camera and get the fantastic photos you have always wanted.

Editing

  • Album Templates by Birdesign (Templates)
    Beautiful customizable photoshop album templates.
  • The Beauty: Portrait & Lifestyle Lightroom Presets by Ellie Moreno (Presets)
    This series consists of 50 presets that can give your images a sharp look and a contemporary fashion mood, whether you are shooting portraits or scenes of everyday life you can apply the effects contained to give a consistent style to your images.
  • The Insta 25: Lightroom Presets by Laura Orlando (Presets)
    A collection designed to effortlessly edit your photographs in just one click – whether it’s for a family photo album or a Facebook moment, you’ll be happy & confident in showing off your photographs.

Lifestyle Photography

  • Beginners Guide to Memorable Vacation Photos by Courtney Slazinik (eCourse)
    Learn how to capture candid vacation memories in a meaningful way.
  • How to Get Flattering Photos with Your Baby by Vicki Knights (eCourse)
    Get 3 tips for flattering photos, including how to avoid the dreaded double chin.
  • How to Photograph Your Baby’s First Year by Niki Strbian (eCourse)
    All you need is your baby and a phone.
  • The Wanderlust Photo Lab by Addie Gray (eCourse)
    Finally get off auto mode and take great travel photos.
  • So You Want to Be a Wildlife Photographer? by Will Nicholls (eBook)
    An in-depth, beginner’s guide to wildlife photography that will help you decode this challenging genre of nature photography.
photography products

Explore the Photography Products Inside

Lighting & Composition

  • Shoot Stunning Natural Light Portraits by David Molnar (eCourse)
    A 2 hour video course designed to be the only course you need to turn professional with your portraits.
  • The Authentic Portrait: A Parent’s Guide to Documenting Childhood by Katie Donnelly (eBook)
    The easy guide to get you started making amazing portraits (and documenting those fleeting childhood moments) of your kids.
  • The Compelling Photograph: Books 1 & 2 by Anne McKinnell (eBooks)
    Designed to teach a combination of camera skills, the elements of good image design, and creative photography techniques to give you a solid foundation on which to base your vision.

Phone Photography

  • Create. Capture. Conquer by Kayla Marie Butler (eCourse)
    Phone Photography – because the best tool is the one you have
  • iPhone Photography Boss: How To Get Amazing Pictures From Your iPhone by Snap Happy Mom (eCourse)
    Your iPhone is more than a point & shoot camera – learn how to use it like a boss and take amazing photos.
  • Picture Play by Jill Krause (eBook)
    Learn how to use your phone and free & cheap apps to take and edit photos you will LOVE, want to print and share.

Organization

  • Photo Organizing for Absolute Beginners by Melissa Shanhun (eCourse)
    Wish you could find any photo instantly? Forget the mess of folders – use automatic tools to manage your photos, in minutes not hours.
  • The Ultimate Guide To Organized Photos by Brea of Capture Your Days (eBook)
    Learn a FAST and SIMPLE system for getting your photos organized and printed without spending hours in front of your computer.
photography tutorials

The Photography Bundle 2019

How to Get All These Photography Products at 97% Off Today:

The entire photography training and resource bundle—valued at over $1,200—is available at 97% off until midnight EST on November 4.

Deal ending soon: The Photography Super Bundle 2019


Go to full article: New: The Photography Super Bundle 2019

What are your thoughts on this article? Join the discussion on Facebook

PictureCorrect subscribers can also learn more today with our #1 bestseller: The Photography Tutorial eBook

The post New: The Photography Super Bundle 2019 appeared first on PictureCorrect.


from PictureCorrect https://ift.tt/2v1z0nC
via IFTTT

tiistai 29. lokakuuta 2019

PictureCorrect.com: Interesting Photo of the Day: Dawn in The Netherlands

If you’re in the right place at the right time, some moments can feel so magical that you start questioning reality. A beautiful sunrise is one example. nikbru captured the following beautiful moment in Ermelo, Netherlands:

pink morning in Ermelo Netherlands

“A Pink Morning in Ermelo, Netherlands” by Nikbru (Via Reddit. Click image to see full size.)

Nikbru took this photo at the Ermelosche Heide 20 minutes before sunrise. The magical light has the sky turning pinkish, and the fog has added further drama to the image. While the pretty colors add a sense of cheerfulness, the foggy conditions give it a mysterious look.

The way Nikbru has composed the image is quite compelling. The path in the foreground works as a strong leading line, drawing viewers into the fog and the colorful sky in the background. A wonderful example of the basic principles of composition at work to create a beautiful image.


Go to full article: Interesting Photo of the Day: Dawn in The Netherlands

What are your thoughts on this article? Join the discussion on Facebook

PictureCorrect subscribers can also learn more today with our #1 bestseller: The Photography Tutorial eBook

The post Interesting Photo of the Day: Dawn in The Netherlands appeared first on PictureCorrect.


from PictureCorrect https://ift.tt/36iwQn2
via IFTTT

PictureCorrect.com: Location Portrait Tips to Add Character

When photographing on-location, the location itself plays an important role in telling a story. Besides the location, your choice of models, use of props, and lighting are some other important factors that add to the character. In this video, photographer Gavin Hoey from Adorama has some simple tips for you to maximize the character in location portrait shoots:

Location

The location is by far the most important element that shapes the character in your image. It acts as the backdrop and sets up the mood for the image. So, when scouting for a location, be sure to choose the one that complements what you have in mind.

“The location is the key to getting your character, but then there’s other thing as well.”

Model

The next important factor that affects the character of your image is the model. How they portray themselves will affect the way your images come out.

When deciding on the styling, you have two options: either complement the location or do exactly the opposite. In Hoey’s case, instead of going for a grungy look to complement the location, he has gone for a stylish red dress.

Lighting

If the lighting on-location is perfect and matches what you have in mind, you can simply go ahead and shoot with what’s available. Or, you can add artificial light to add more character.

Hoey starts by taking a test shot that has a beautiful light on the background, a bit of light on the foreground, but not much on the model.

exposing for ambient light on location

As the model is totally underexposed, he adds in a light matching the camera settings. As you can see, the image immediately looks moodier.

on location portrait with flash

on location portrait using flash

Props

“So location, styling, and lighting can get you quite a long way to add some character to your pictures, but ultimately you’re going to need some props.”

Props add a sense of excitement to the story. They help big time in telling your story and give the model something to do. And when the model has something to do.

using props to add character

props to add character to portrait

Post-Processing to Add Character

“When it comes to character in your images, post-processing can play a really large part of the process, or it could be used to fine tune what you’ve already shot.”

While Hoey tried to get most things right in-camera, there were a few things that needed fine-tuning. For instance, in the following image, the model’s safety boots were showing, and a large blue item on the back needed to go.

To get rid of the boots, Hoey uses the Patch tool in Photoshop. Here’s how you can do it:

  • Create a new layer.
  • Choose the patch tool and draw around the boot.
  • Once done, move the selection over to another portion of the dress, and let go.

patch tool in photoshop

  • Hit Ctrl + D (Command + D for Mac Users) to lose the selection.

Next, to do away with the blue object in the background, Hoey decides to repaint it in Photoshop with a color that matches the rest of the scene:

  • Create a new layer.
  • Select the portion of the image that you want untouched. Hoey makes a selection around the model using the Quick Selection Tool.
  • Once done with the selection, invert it by going to Select > Inverse.
  • Go to Select > Modify > Feather… and enter a smaller value like 2 to give a feathered edge to your selection. This prevents the occurrence of hard edges and gives a more realistic effect.
  • Using the color picker tool, select a color that’s mostly present in the image. In his case, Hoey selects brown and paints over the object. The selection ensures that you will not be able to paint over the model.

painting over distracting background

  • Once done painting over the distracting object, change the blending mode to Color, and adjust the transparency of the layer to blend it.

adding character to on location portraits

“There’s how you can add some character to your location portraits. The location, the styling, the props, and having an awesome model makes all the difference.”


Go to full article: Location Portrait Tips to Add Character

What are your thoughts on this article? Join the discussion on Facebook

PictureCorrect subscribers can also learn more today with our #1 bestseller: The Photography Tutorial eBook

The post Location Portrait Tips to Add Character appeared first on PictureCorrect.


from PictureCorrect https://ift.tt/2JvrxXE
via IFTTT

maanantai 28. lokakuuta 2019

PictureCorrect.com: Wildlife Photography: Eliminating Bad Backgrounds

Wildlife photography inspires professional and amateur photographers alike. The possibilities of our natural world provide an endless source of fascination.

Choosing a good subject for a wildlife photo is never difficult. The variety of characters in the animal kingdom provides a never-ending source of material. Even better, some of the best subjects can be found in the city, even in our own backyards. You don’t have to be an intrepid world traveler to enjoy a satisfying hobby as a wildlife photographer.

best background tips for wildlife photography

Photo by Ricardo’s Photography (Thanks to all the fans!!!); ISO 200, f/5.6, 1/20000-second exposure.

It can be a real challenge to capture a natural looking photo in a suburban setting. If you can eliminate any man-made distractions from your photo, you can create the illusion of an image captured in a totally natural environment.

A bad background can really spoil the impact of a good wildlife subject, but how do we avoid it? Of course these days there are plenty of people who would just edit it out using a computer, but (believe it or not) most people still prefer to rely on their camera skills rather than on software.

Simple Tips to Help You Eliminate a Bad Background

Position yourself to find the best angle to take your photo.

Imagine you are trying to photograph a bird in a tree. From one angle, you might be able to see power lines or the roof of the house in the background. If you move to a better angle, you may be able to capture the green foliage of the tree as your background instead.

This may seem obvious, but one reason so many photos fail is because the photographer doesn’t bother to make this small extra effort.

how to shoot background wildlife photography

Photo by Ali Arsh; ISO 400, f/5.6, 1/00-second exposure.

Reduce the amount of background that is visible in your photo.

This can be as simple as getting as close as possible to the subject and using your largest lens. This is a very easy technique. Moving closer ensures the subject fills as much of the frame as possible. Your largest lens (or the largest zoom on your lens) narrows the field of view in a photo so that the focus in on the subject, not on the surroundings.

The extra advantage of a telephoto lens is that it has a naturally small depth of field. This means while your subject is in focus, everything in front and behind is a blur. So not only does the telephoto lens reduce the amount of background that is visible in your photo, what you can see should be completely out of focus.

Open the aperture as wide as possible.

This is simple photography theory; a wide aperture produces a narrow depth of field. So if you are already using a large lens, and you add a narrow aperture as well, you reduce your depth of field to its absolute minimum. Now you should be able to produce an almost three dimensional image, with your sharply focused subject emerging from a totally out-of-focus background.

As you can see from the simplicity of these guidelines, it is easy to reduce the distraction of an unattractive background. It doesn’t take fancy equipment or a diploma in photography. All it takes is a little extra effort, and understanding how to use the camera you have.

best wildlife photography backgrounds

Photo by hehaden; ISO 800, f/5.6, 1/1000-second exposure.

Now consider all the situations where these tips can improve your photos. When taking photos in your backyard, at the zoo, or out in the street, you can use these simple methods to create the illusion that they were taken in the wild. Even if your background is not that ugly, it can provide a distraction from the main subject. By putting the background out of focus, it becomes a soft palette of colour that makes the subject really stand out.

Best of all, these are techniques you can try today—so happy snapping!

About the Author:
Andrew Goodall writes for http://www.naturesimage.com.au and is a nature photographer based in Australia. He manages a gallery in Montville full of landscape photography from throughout Australia.


Go to full article: Wildlife Photography: Eliminating Bad Backgrounds

What are your thoughts on this article? Join the discussion on Facebook

PictureCorrect subscribers can also learn more today with our #1 bestseller: The Photography Tutorial eBook

The post Wildlife Photography: Eliminating Bad Backgrounds appeared first on PictureCorrect.


from PictureCorrect https://ift.tt/2BNbY9H
via IFTTT