via 500px https://ift.tt/RzbVn9M


Night photography has a way of exposing every weakness in your technique.
Photos that looked perfectly sharp on your camera screen suddenly appear blurry. Colors look muddy. Highlights blow out. Shadows become noisy. And those stars you hoped would be crisp points of light turn into streaks.
The good news? Most disappointing night photos aren’t caused by expensive gear—they’re caused by a handful of common mistakes. If you stop making these errors, your night photography will improve dramatically.
Reminder: only a little while left for the Milky Way Photo Guide  Summer Nights Sale
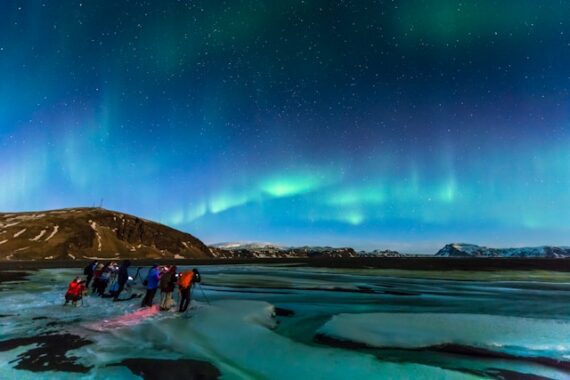
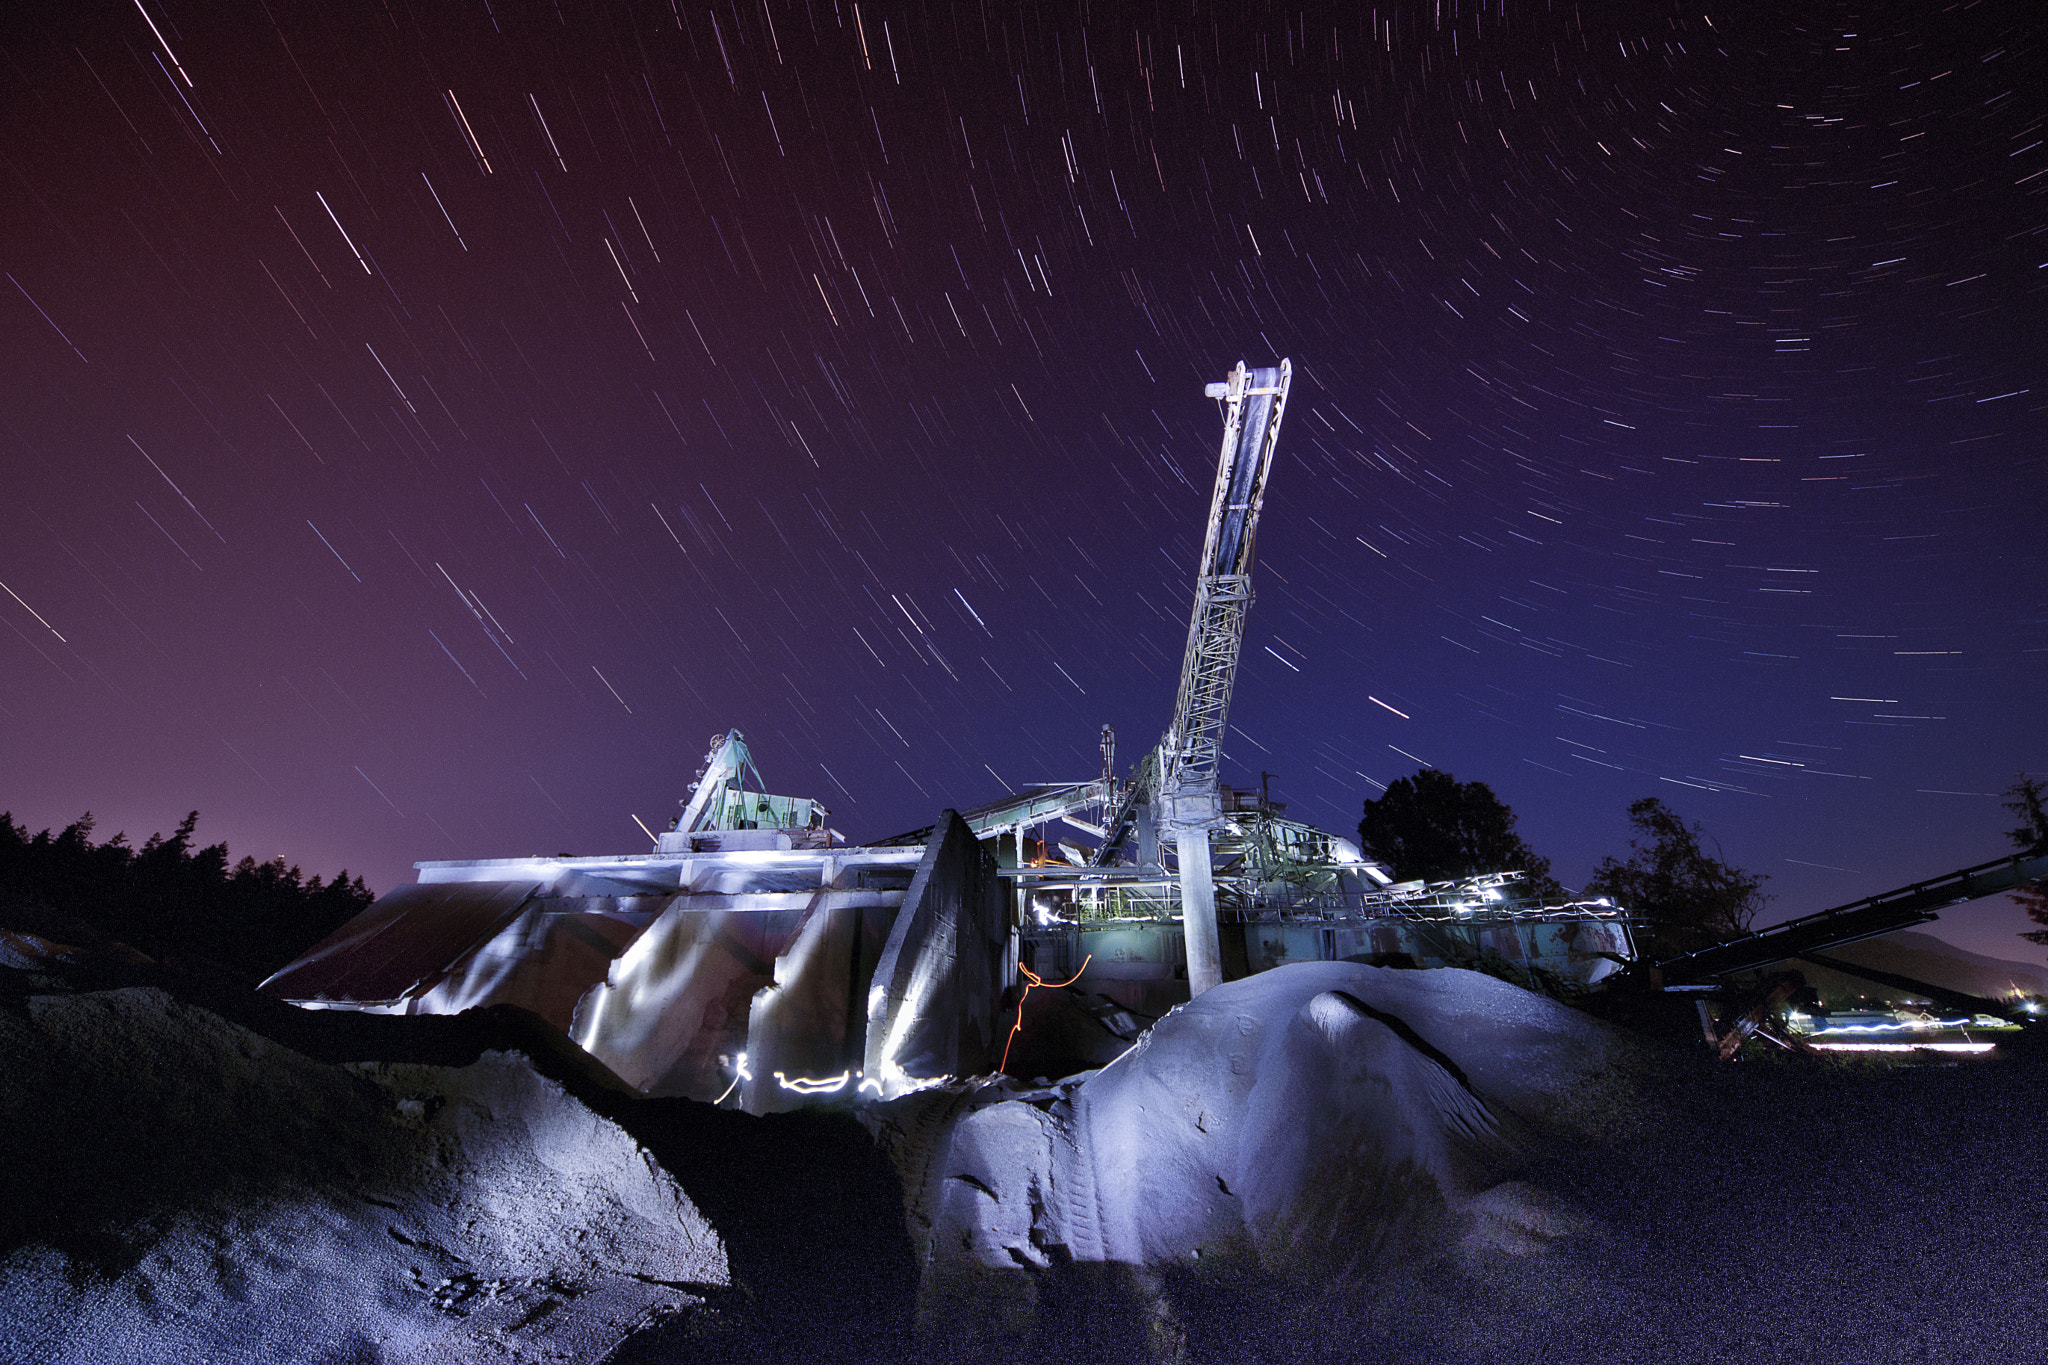
Photo captured by Ken Cheung
Unless you’re intentionally shooting handheld street scenes, trying to handhold your camera at night is usually a recipe for blurry images.
As light levels drop, shutter speeds become much longer.
Even the slightest movement from your hands can soften an otherwise beautiful image.
Instead:
A stable camera is the foundation of sharp night photography.
Your camera has no idea what kind of night photo you’re trying to create.
It may:
Night photography almost always benefits from Manual Mode or Priority Modes.
You gain complete control over:
Learning these settings is one of the biggest upgrades you can make.
Autofocus systems rely on contrast, and at night there often isn’t enough of it.
Your camera may hunt back and forth or lock onto the wrong object entirely.
Instead:
Many blurry night photos are simply the result of missed focus.
Many photographers assume ISO 100 is always the best choice.
While that’s often true during the day, it can force shutter speeds that are far too long once the sun goes down.
Sometimes increasing your ISO produces a cleaner final image because it allows you to use a faster shutter speed.
Don’t be afraid of ISO 800, 1600, or even 3200 if the situation calls for it.
A little noise is usually much easier to fix than motion blur.
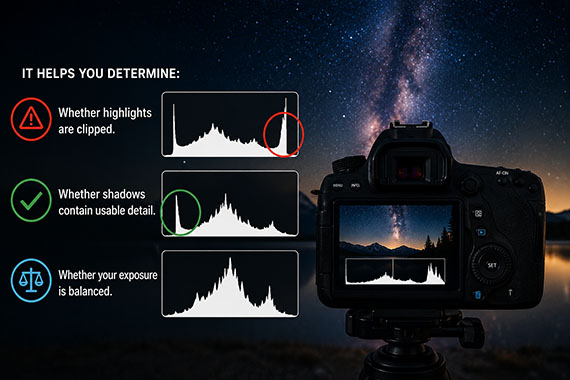
Your camera’s LCD can be misleading in the dark.
It often makes photos appear brighter than they really are.
Instead of judging exposure by the screen alone, check the histogram.
It helps you determine:
The histogram is a much more reliable guide than your eyes in low light.
Many lenses become softer at their widest aperture.
While settings like f/1.4 or f/1.8 let in more light, they can also reduce corner sharpness and increase optical imperfections.
If your scene allows it, try stopping down by about one stop.
The small loss in light is often worth the increase in image quality.
Auto White Balance often struggles under artificial lighting.
Streetlights, LEDs, neon signs, and moonlight can all produce different color casts.
Instead:
A carefully chosen white balance can make your night photos look far more natural.
Darkness makes it tempting to point your camera at the brightest subject and press the shutter.
Instead, slow down and evaluate the scene.
Ask yourself:
The best night photos combine technical precision with thoughtful composition.
Image stabilization is incredibly useful for handheld photography.
However, on some cameras and lenses it can actually introduce small movements when mounted on a tripod.
Photo captured by Roger Ce
If your camera is securely mounted:
Some newer cameras automatically detect tripod use, so check your camera’s manual to see how yours behaves.
Night scenes often contain an enormous range of brightness.
One exposure may preserve the city lights while another captures shadow detail.
Taking multiple exposures gives you more flexibility during editing and increases the odds of coming home with a keeper.
It costs almost nothing to take a few extra frames.
You don’t need the newest camera or the fastest lens to create beautiful night photographs.
In many cases, simply avoiding these common mistakes can produce noticeably sharper, cleaner, and more professional-looking images.
The next time you’re shooting after dark, remember to:
Night photography rewards patience. The more deliberate your approach, the more consistently you’ll capture images that truly reflect the beauty of the scene.
If you want a simple, field-ready way to get all of this right, the Milky Way Photography Field Guide breaks it down step-by-step.
Inside, you’ll learn when the Milky Way is visible, where to look, how the galactic core moves across the sky, which camera settings to use, and photo editing tricks.
Right now, it’s part of our Summer Nights Sale—timed perfectly for the months when most photographers start planning their Milky Way shoots.
Deal ending soon: Milky Way Photography Guide Summer Nights Sale
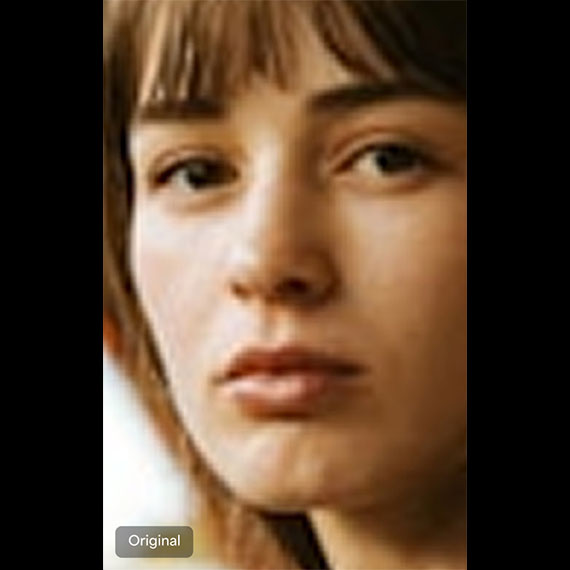
If you’ve ever wished you could sharpen a soft image, reduce noise, and increase its resolution all at once, Topaz Photo AI’s new Wonder 3 model makes it incredibly simple.
The latest version is designed to restore fine details while maintaining a natural, photorealistic look. It excels at recovering textures like hair, skin, feathers, and fur, while also improving older, noisy, or lower-resolution images that need an extra boost.
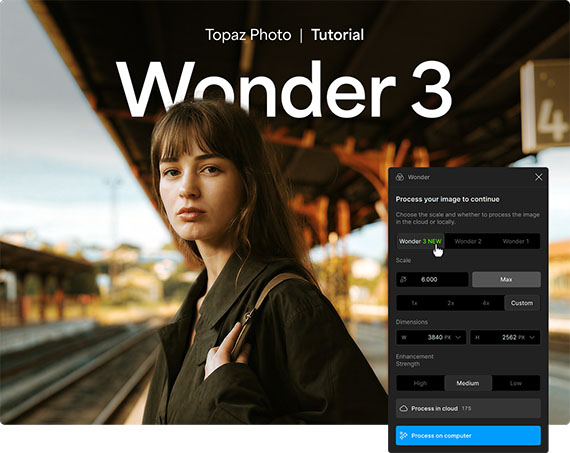
Open Topaz Photo AI on your computer. Make sure you’re using the latest version so you have access to the newest Wonder 3 model and its latest improvements.
Drag and drop your photo directly into the application, or click Browse to select an image from your computer. Topaz Photo AI supports a wide range of image formats, including RAW files from many cameras.
From the enhancement models, choose Wonder, then select Wonder 3. This model combines upscaling, sharpening, and noise reduction into a single workflow, making it one of the quickest ways to improve image quality without having to apply multiple adjustments manually.
Use the Scale slider to determine how much you want to enlarge the image, and the Strength control to fine-tune the enhancement. Start with the default settings, then make small adjustments while comparing the before-and-after preview to achieve a natural-looking result.
When you’re happy with the preview, click Process. You can choose to enhance the image locally on your computer using your own hardware or in the Topaz Cloud, which can provide faster processing depending on your system and available cloud credits.

Wonder 3 makes photo enhancement remarkably straightforward. Instead of juggling separate tools for sharpening, denoising, and upscaling, you can accomplish all three in a single step while preserving realistic detail. Whether you’re working on portraits, wildlife, landscapes, or older photos, it’s an excellent way to give your images a cleaner, sharper, and higher-resolution finish.
Try it on Your Photo: New Wonder 3 Tool in Photo AI
Many photographers switch to Manual mode because they want complete control over their camera. Ironically, one of the best ways to stay in control is to let your camera handle one setting automatically.
That’s where Auto ISO comes in.
When configured properly, Auto ISO can react to changing light far faster than you can. Instead of constantly adjusting ISO as clouds pass overhead or your subject moves between sunlight and shade, you can concentrate on composition and timing while your camera keeps the exposure where it needs to be.
The trick is knowing how to set it up for different types of photography.
Quick reminder: today’s lesson is based on one of the Fundamental Camera Cheat Sheets which are currently 80% off for a  Summer Sale.

ISO controls how sensitive your camera’s sensor is to light. Lower ISO values generally produce the cleanest images, while higher values allow you to shoot in darker conditions at the cost of increased noise.
With Auto ISO enabled, your camera automatically raises or lowers the ISO as lighting changes while respecting the exposure settings you’ve chosen.
Most modern cameras also let you customize:
These three settings determine how intelligently Auto ISO behaves.
For casual photography, travel, and family outings, Auto ISO is one of the easiest ways to avoid missed shots.
A good starting point is:
This setup keeps image quality high while allowing your camera to respond quickly as lighting changes throughout the day.
When photographing people, preventing motion blur is usually more important than keeping ISO as low as possible.
Recommended settings:
If your subject is moving around, increase the minimum shutter speed to 1/500 sec to keep expressions sharp.
Wildlife often appears without warning, making Auto ISO incredibly valuable.
Recommended settings:
In wildlife photography, sharpness usually matters far more than a little extra image noise.
Fast-moving athletes require very fast shutter speeds.
Recommended settings:
Your camera will automatically raise ISO whenever the light drops, helping you freeze the action.
Street scenes can change from bright sunlight to deep shade in seconds.
Recommended settings:
This combination allows you to react instantly without stopping to adjust settings.
Landscape photographers generally have more time to work, so Auto ISO isn’t always necessary. However, it can still be useful when shooting handheld.
Recommended settings:
If you’re using a tripod, simply disable Auto ISO and shoot at your camera’s base ISO for the best possible image quality.
Tiny movements become exaggerated at close distances.
Recommended settings:
Auto ISO helps maintain fast shutter speeds as you move between sun and shade.
Auto ISO can be useful for handheld night photography but is generally less helpful for tripod-based long exposures.
For handheld shooting:
For landscapes, Milky Way photography, or cityscapes on a tripod, it’s usually better to disable Auto ISO and select your ISO manually.
One of the most powerful techniques is combining Manual exposure mode with Auto ISO.
You choose:
Your camera adjusts only the ISO to maintain the proper exposure.
This gives you complete creative control while allowing the camera to compensate for changing light automatically.
Many professional sports, wildlife, and event photographers work this way because it lets them concentrate on capturing decisive moments instead of constantly adjusting exposure.
A common mistake is limiting the maximum ISO too aggressively.
For example, setting a maximum ISO of 800 might sound like a good way to avoid image noise, but if the light gets too dim, your camera has nowhere else to compensate. Instead, it will begin using slower shutter speeds, which often results in blurry photos.
In most situations, a sharp image with a little noise is far more useful than a blurry image with perfect image quality.
Auto ISO isn’t about giving up control—it’s about letting your camera handle repetitive adjustments while you focus on creativity.
Once you’ve customized the minimum shutter speed and maximum ISO for the type of photography you’re doing, Auto ISO becomes one of the most valuable tools your camera offers.
Give it a try the next time you’re shooting in changing light. You may find yourself spending less time adjusting settings and more time capturing great photographs.
Have you ever wanted to photograph an amazing moment but missed the shot because you didn’t know the right camera settings to use? That’s where our popular cheat sheets come in. They are currently 80% off for a Summer Sale which ends soon if you want to check them out.

Print a Cheat Sheet Whenever You Need It
Whether you’re a seasoned professional or just starting out, photography cheat sheets can be a valuable resource for improving your skills and taking your photography to the next level. The perfect companion for any photographer. Print one out whenever you need it.
Summer sale ending soon: The Camera Cheat Sheets at 80% Off
The black card technique is used in long exposure photography and can be particularly effective for shooting fireworks. The goal is to prevent overexposure and to capture multiple bursts of fireworks in a single frame.
Related reminder: only 1 day left for the Fireworks Photography Guide July 4 Sale
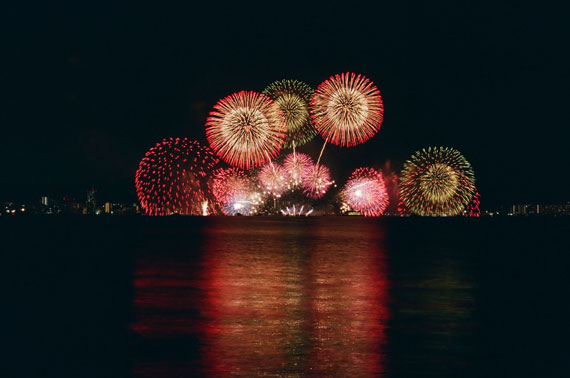
Photo captured by Mio Ito
Here is how you can use this technique:
Setting up: First, set up your camera on a tripod. The location should be in a spot where you have a good view of the sky where the fireworks will explode.
Focus: Before the fireworks start, set the focus. If you’re mainly interested in the fireworks, you can manually focus your camera at a distance where you expect the fireworks to burst. Switch off auto-focus to ensure your camera doesn’t try to refocus every time you take a picture.
Camera Settings: Set your camera to a low ISO (like ISO 100 or 200) to reduce noise. Set your aperture to a mid-range value (like f/8 or f/11) for optimal sharpness. Since fireworks are bright, these settings should provide enough light for the shot.
Shutter Speed: Since we are aiming for long exposure to capture multiple bursts, you need to set your camera in Bulb mode. This mode allows you to keep the shutter open for as long as you press the shutter release button.
The Black Card: Hold the black card in front of your camera lens. You’ll want it close enough to cover the lens but not so close that you risk bumping the camera.

Photo captured by Giorgio Trovato
Shooting the Fireworks: As the fireworks show starts, press and hold the shutter release button to open the shutter. Keep the black card in front of the lens. When a firework burst that you want to capture happens, remove the black card from in front of the lens, exposing it to the light from the firework. Once the burst fades, replace the card. Repeat this each time there is a burst you want to capture. When you’re done capturing all the bursts you want in a single frame, release the shutter button to close the shutter and complete the exposure.
Experiment: This technique requires a bit of practice and experimentation. Don’t be discouraged if your initial shots are not what you expected. Play around with the timing of when you remove and replace the card, as well as the settings on your camera, until you get results that you are happy with.
Remember to review your shots and adjust your settings as needed. Factors such as the brightness of the fireworks, ambient light, and the desired effect may necessitate adjustment of your aperture, ISO, or how long you keep the shutter open.
With 4th of July Independence Day celebrations quickly approaching, we have been receiving requests for more training on how to photograph fireworks. Fireworks photography is indeed one of the most daunting types of photography. This in-depth tutorial eBook explains the process from start to finish, everything from gear and camera settings to composition and post-processing to achieve great results with fireworks of any kind. Currently 55% off to help photographers prepare for the July 4th!
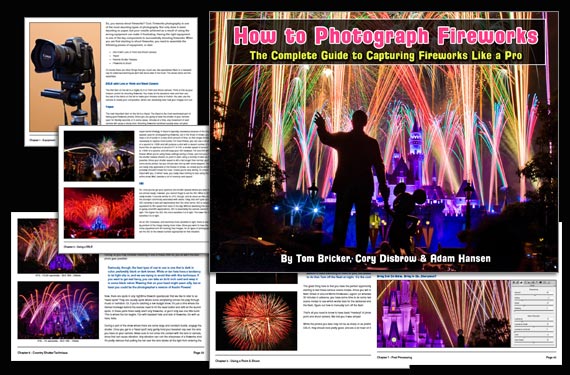
The How to Photograph Fireworks eBook
A common result of photographers new to fireworks photography is capturing nothing but bright white spots instead of colorful bursts. But with the guidance of this eBook in hand, you should be fully prepared to photograph brilliant fireworks displays.
Offer ending soon: How to Photograph Fireworks Guide at 55% Off
Capture beautiful circular star trails without needing perfectly dark skies or hours of shooting.
This simplified exercise is designed for photographers living near towns or cities where light pollution makes traditional astrophotography difficult.
Relevant note: only a little while left for the Photography Exercises  June Flash Sale
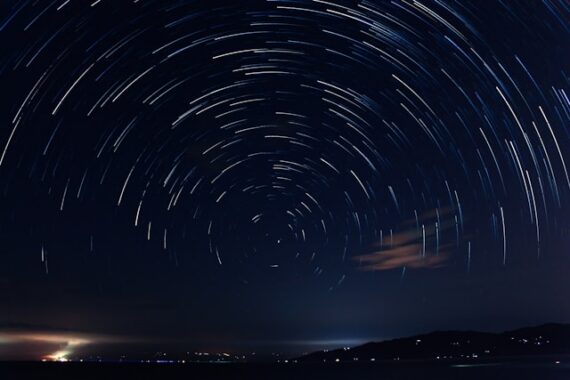
Photo captured by Reign Abarintos
Intermediate
Instead of attempting one extremely long exposure, capture many shorter exposures that can later be combined into smooth star trails.
Your objective is to photograph:
Even under moderate light pollution, you’ll still record plenty of star movement.
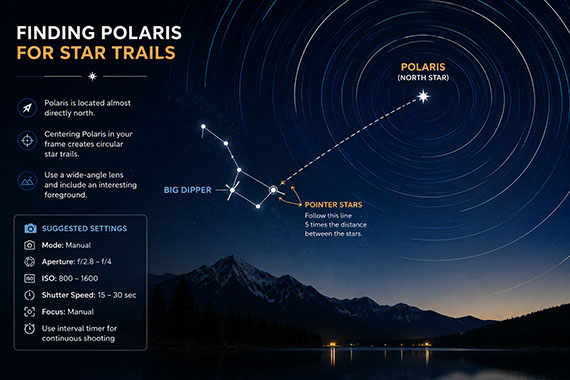
Mode: Manual
Turn off autofocus once focus is set.
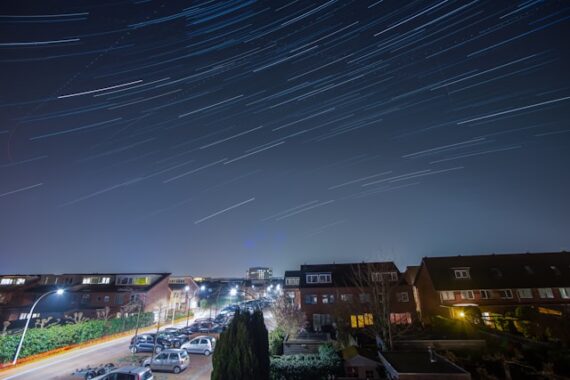
Great star trail photos are really landscape photographs first.
Look for:
The foreground gives viewers something to anchor the image.
If your camera has an interval timer, set it to capture one frame immediately after the previous one with little or no delay.
Find Polaris, the North Star, if you’re in the Northern Hemisphere.
Centering Polaris in your composition creates beautiful circular trails.
If Polaris isn’t visible, simply point your camera in another direction to create sweeping arcs across the sky.
Ask yourself:
Try repeating the exercise:
You’ll quickly see how shooting direction changes the appearance of the trails.
Many photographers assume they need perfectly dark skies for star trails.
In reality, moderate light pollution often works surprisingly well, especially when the foreground is illuminated by nearby city glow. The combination of bright foreground details and visible star movement can create dramatic images that would be difficult to achieve in complete darkness.
Small improvements in location, composition, and shooting time often make a bigger difference than driving hours to find perfectly dark skies.
If you want more exercises like this—clearly structured, easy to follow, and designed to build real shooting instincts—the June Flash Sale on the Photography Exercises is wrapping up tomorrow. It’s a practical way to keep improving, even when winter limits your time and motivation to shoot.
A practical way to build confidence for challenging shooting situations that often trip photographers up. Each exercise focuses on real-world scenarios—difficult light, motion, exposure decisions, and creative problem-solving—so you learn how to take control instead of relying on auto settings.
Only 1 day left: PictureCorrect Photography Exercises June Flash Sale
For many smartphone photographers, Live Photos are one of those features that get turned on by accident and forgotten about entirely.
After all, if you’re trying to take a still photograph, why would you want a tiny video attached to every image?
The truth is that Live Photos can be surprisingly useful—and even creative—when you know how to take advantage of them.
Instead of thinking of Live Photos as short videos, think of them as a way to capture a few extra moments before and after you press the shutter. Those extra moments can open up several creative possibilities that ordinary photos simply can’t provide.
Relevant: only a little while left for the Smartphone Photography Guide Summer Sale
Anyone who has photographed children, pets, or groups of people knows how difficult it can be to capture the perfect facial expression.
Someone blinks.
Someone looks away.
A smile appears a fraction of a second too late.
With Live Photos, your phone records a brief sequence of frames surrounding the moment you take the picture. This allows you to choose a different frame afterward if the exact shutter moment wasn’t ideal.
That means you can often rescue a photo that would otherwise be unusable.
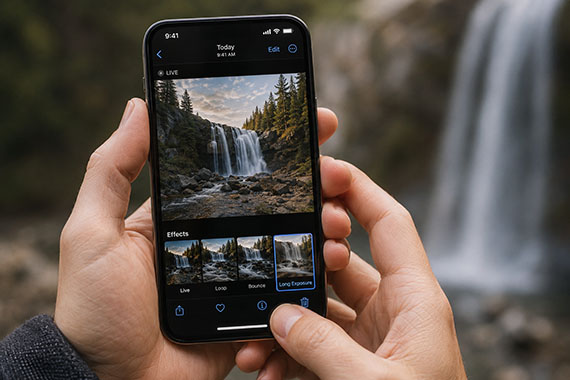
One of the most powerful—and least known—Live Photo features is the ability to create long exposure effects.
When viewed in the Photos app on an iPhone, a Live Photo can be transformed into a simulated long exposure image with a simple swipe and effect selection.
This works particularly well for:
While it won’t completely replace a tripod and dedicated camera setup, it can produce surprisingly attractive results directly from your smartphone.
Sometimes a still image doesn’t fully capture the feeling of a scene.
A flag waving in the wind.
Leaves rustling on a trail.
A child blowing out birthday candles.
A dog excitedly running toward the camera.
These moments often feel more alive when viewed as a Live Photo rather than a frozen frame.
Instead of sharing a traditional image, consider sharing the Live Photo itself when the motion helps tell the story.
Live Photos can also be converted into looping animations.
The Loop effect continuously repeats the captured motion, creating an eye-catching result that often feels more engaging than a static image.
Some subjects work particularly well:
The key is finding motion that naturally repeats itself.
Another creative effect available in the Photos app is Bounce.
Rather than looping continuously in one direction, Bounce plays the motion forward and backward repeatedly.
This effect can create fun and playful results with:
Used sparingly, Bounce can make ordinary moments feel more dynamic and entertaining.
Many photographers treat Live Photos as a safety net.
Because multiple frames are being recorded, you often have a better chance of capturing the decisive moment.
This can be particularly useful when photographing:
Instead of relying entirely on perfect timing, Live Photos give you a small buffer that can help save the shot.
Despite their benefits, Live Photos aren’t always the best choice.
You may want to disable them when:
Since each Live Photo stores additional image data, they consume more storage than traditional still photographs.
Live Photos are often dismissed as a gimmick, but they’re actually a surprisingly versatile creative tool.
Whether you’re rescuing a missed expression, creating long exposure effects, generating looping animations, or simply capturing a little more life in your images, Live Photos can add possibilities that standard photographs can’t.
The next time you’re tempted to turn the feature off, try experimenting with it instead. You may discover that those few extra seconds before and after the shutter click can lead to some of your most interesting smartphone photos.
The Summer Sale on the Smartphone Photography Guide is wrapping up soon, and it’s a great chance to finally unlock what your phone camera can really do.

The guide walks through real, usable techniques—manual controls, motion blur, low-light shooting, and creative effects—so you’re not just relying on auto mode and luck. If this post helped, the guide goes much deeper.
Deal ending soon: Smartphone Photography Guide Summer Sale