sunnuntai 31. maaliskuuta 2019

PictureCorrect.com: Camera Sensor Dust: Good Photographs Ruined

As I excitedly sat down to process hundreds of images taken during an extended landscape photo shoot I was shocked to find spots and specks on almost all of my images! And the later the shot was taken the more there were. It soon became apparent it was caused by the camera’s dirty sensor. Fortunately, after many hours spent cleaning the images up in post-processing, while beating myself up mentally for letting this happen, I was able to salvage most of the images to a degree that I was satisfied. A hard lesson learned.

How did I allow this to happen? Well, due to my inexperience and laziness I was changing lenses on my DSLR in the field without taking a few basic precautions, which allowed all kinds of dust, dirt, pollen, moisture, etc. into the body of the camera. All this was building up on the camera’s sensor.

This is commonly referred to as “sensor dust.” It can cause spots, specks, smudges, color distortion, reduced clarity, etc. on an image. And by the time you realize it has happened, it’s too late as it has already affected the quality of the image.

Every time a lens is removed from the camera body it becomes an open window for all manner of particles to get in. Also, as the mirror and shutter are mechanisms with moving parts they can throw off oil and other debris. When the shutter is activated all this is stirred up and redistributed inside the camera. When the camera is on, the sensor becomes statically charged so it attracts all these unwanted particles like a magnet.

The term “sensor dust” is a bit of a misnomer as there is at least one filter that sits in front of the actual sensor. Dust accumulates on the filter, not on the sensor. And “dust” refers to any type of unwanted foreign matter such as dirt, lint, dust, pollen, oil, grease, etc. Whatever it is called, “dust” can build up to a degree where it can degrade the quality of an image.

Checking for Sensor Dust

Sensor dust is almost impossible to see with the naked eye. Even with a loupe, you may only see the large pieces of dust. The best way to see if and how much sensor dust is present is to view an image that would clearly show any dust on the sensor.

There are a few methods to utilize from simple (will do in a pinch) to a bit more extensive (recommended).

The technique is pretty basic and it only takes a few minutes. To start you will need to take a shot of a brightly lit, clean, solid-white piece of paper taped to the wall. (You can also take a shot of a cloudless sky but I prefer the paper-on-wall method.)

Set the aperture at f/11. This setting is a good place to start. Smaller and larger aperture settings show different results. The smaller aperture will provide a better view of the dust that is on the sensor while a larger aperture will show fewer dust spots. You may wish to take three images: smallest, mid-range and largest aperture to see the difference. I usually take the image at f/11 as that is right around the “sweet spot” of my lenses. This provides a good view of how any sensor dust will affect my final images.

Next, adjust the manual focus to infinity, and position the camera a few feet away from the paper. You want the image to be out of focus so only the details of the dust on the sensor will show up on the image, not any spots that may be on the paper. Shoot an image making sure that only the paper is in view, not past the edges of the paper.

From this point, there are two different paths to take to review the image for sensor dust. The first is to look at the image on the monitor on the camera. Zoom in a few clicks to enlarge the image and then scroll back and forth and up and down and look for specks throughout the image. This will provide a quick check (though not thorough) to detect sensor dust as only large pieces sensor dust will be able to be seen.

Another technique, which I believe is the far better way to check for sensor dust, is the “visual spots” method. To use this method, you will need to import the test image to Lightroom. This method can also be utilized in Photoshop and Camera Raw, but I prefer using Lightroom as it’s a quicker and simpler method.

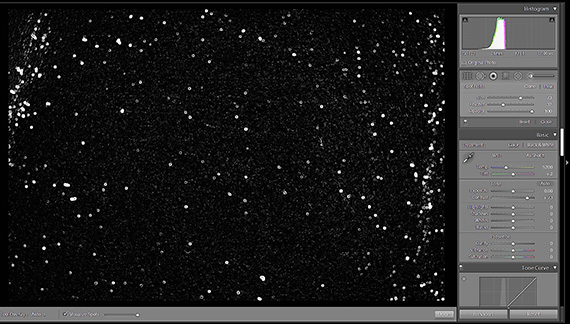
Open the image in the Develop mode, set the size of the image to Fit or Fill, and activate the Spot Removal tool. Check the Visualize Spots box. Then move the slider located to the right of the Visualize Spots box back and forth to adjust the amount of background noise. You can also fine tune the image by adjusting the Contrast and Dehaze sliders. You may also want to zoom in on areas for a closer look. This will provide a detailed view of any debris on the sensor.

Here is an example of what a dirty sensor looks like in Lightroom with the above viewing adjustments applied:

how to identify sensor dust

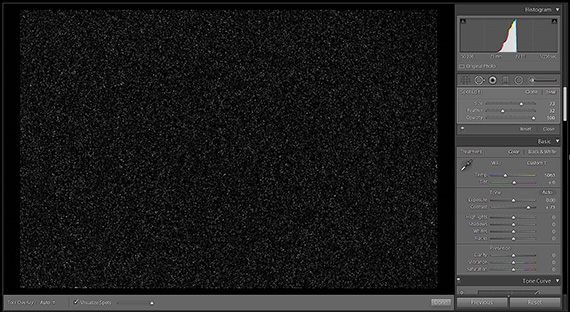
A clean sensor should look something like this using the Visualize Spots tool:

visualize spots

Another way to detect sensor dust is by simply viewing the image in any photo viewing application. Open the image, zoom in, and scroll around checking for spots:

detect sensor dust

The same view utilizing the Visualize Spots tool in Lightroom:

lightroom visualize spots

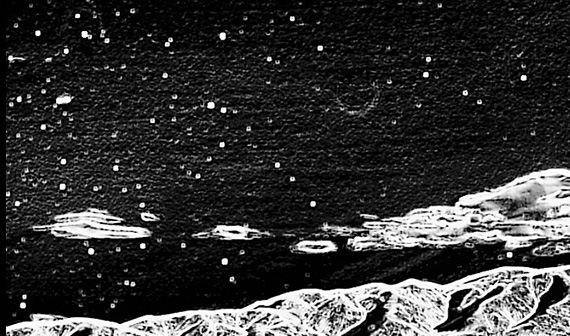
You can plainly see the true degree of sensor dust using the Visual Spots tool in Lightroom.

Cleaning a Camera Sensor

If you do find that sensor dust is affecting the quality of your images, it’s decision time. Can you get by with a few specks on the sensor and just clean them up in post-processing using the Spot Removal tool? Or does the sensor need to be cleaned?

If you believe the sensor is in need of cleaning you can either do it yourself or take it to a camera repair source. I recommend spending a short amount of time learning how to clean your camera sensor. It’s a quick process. If you have a steady hand and are able to follow a few simple instructions and precautions you should do fine. Cleaning your sensor only takes a few minutes. You not only can do it anytime and anywhere but it also keeps the cost of camera maintenance down. Also, it will cut down the time spent removing spots in post-processing and provide an overall better image.

If you’re not comfortable with working on the inside of your camera then, by all means, take it to a camera repair source for cleaning. Sensor cleaning runs from about $35 to $75.

Sensor dust is inevitable so even if you feel more comfortable taking it to someone for cleaning there are still some things you can do to help to keep your sensor clean. These are discussed in the Prevention section toward the end of this article.

Keeping the sensor clean is an ongoing consideration and if you can learn the basics of how to help keep sensor dust to a minimum and learn how to clean the sensor when needed you will be a much happier photographer.

Sensor Cleaning Tools and Products

Here is a list of the basic tools and products you will need in order to maintain a clean sensor. Some kits include the main items and you can supplement them with other items as needed.

  • Hand blower. Purchase a high-quality hand blower. Cheap blowers can release chunks of rubber onto the sensor. Consider the ones with filters.
  • Photo lens brush. Used to dust off the sensor. Again, purchase a high-quality brush made specifically for lens cleaning that can be kept covered or sealed when not in use.
  • Sensor cleaning swabs. Used in the most common method of sensor cleaning. These come in different sizes. It’s important to use the correct size for the dimension of the sensor in the camera you will be cleaning. Here is a link to find the correct size swab by camera brand and model: https://photosol.com/swab-sizes.
  • Sensor cleaning fluid. For wet-cleaning the sensor. You want a product that is specifically made for cleaning camera sensors, dries quickly, and will not leave streaks or residue.
  • Sensor loupe with lighting. Useful during the cleaning process.
  • Lint-free wipes. Helpful in cleaning the outside and inside of the camera. Not recommended for cleaning the sensor directly.
  • Lint-free gloves. Recommended in helping keep dust and lint to a minimum when cleaning the sensor. Why add to the problem.
  • Canned air. Optional but useful.

More about canned air. Many photographers suggest never using canned air for cleaning inside the camera chamber because the propellants may have oil, moisture, or contaminants that can end up on the sensor. On the other hand, my camera repairman uses compressed canned air when cleaning cameras and their sensors. If you do use canned air, keep it pointed at a 45-degree angle when spraying to reduce the risk of releasing contaminants. Never shake the can. Use a gentle pressure spray (as a strong blast of air may damage camera parts inside the chamber).

I do not believe there is any canned air product that is 100 percent contaminant free. Use it accordingly and be prepared to use the wet-swab method described below if you use a canned air product. A hand blower is much preferred for removing loose particles from the mirror chamber and sensor area.

Optional tools include lens pens, gel sticks, and spinning brushes. These are discussed at the end of the Cleaning Methods section.

Prior to Sensor Cleaning

Before starting the cleaning process make sure the camera’s battery is at least 50 percent charged. The camera shutter mechanism will be activated in order to access the sensor. You could risk damage to the mechanism if the shutter closes due to a low battery while you’re cleaning. Some cameras won’t allow you to access the sensor area if the battery is weak. Do not set the camera to Bulb or long exposure timer settings when cleaning the sensor as the shutter may close unexpectedly and cause damage as stated above.

To minimize further dust getting on the sensor, do your cleaning in a dust-free environment, turn off any ceiling fans or heating or air conditioning units, and wear lint-free gloves. Wipe off the lens and camera prior to removing the lens. Always keep the camera body pointing downward when removing the lens to help prevent dust and debris from settling into the camera.

The first step is to use a hand blower (or canned air) to remove any dust or debris in the mirror area. With the camera off and pointed downward, remove the lens and blow any dust off and out of the chamber. You want to get rid of any dust or debris so it doesn’t fall on the sensor once the sensor area is accessed. Sensors may be scratched by dragging debris across them with a brush or cleaning swab so it is important to try to remove as much debris as possible before any cleaning tools come in direct contact with the sensor.

Sensor Cleaning Methods

Below is an overview of sensor cleaning products and methods. You should fully follow the instructions provided with each product prior to attempting cleaning your camera’s sensor.

There are two kinds of sensor dust. There’s dust that simply sits on the sensor’s surface and can be removed by blowing or brushing it off or using a dry swab. And there’s dust that may have become “welded” on due to moisture, grease, oil, etc. This usually requires sensor cleaning using the wet swab method.

Depending on how dirty the sensor is you may wish to do each step individually and then check the cleanliness of the sensor. Or you may just wish to make some or all these steps part of your routine with each sensor cleaning.

Blowing

Turn the camera on and set it to “Cleaning Mode” or “Lockup Mirror for Sensor Cleaning.” These options are accessed through the camera’s menu. With the camera pointed downward, position the tip of the hand blower close to but not inside the camera body and blow on the sensor a few times. If you will be using canned air use the same positioning and spray gently, keeping the can at a 45-degree angle. Do not place the blower or canned air nozzle tip into the camera body; the sensor is a delicate piece of equipment and can easily be scratched or damaged. Never allow anything to touch the sensor except appropriate cleaning tools such as a brush or sensor cleaning swabs.

Brush Method

With the camera in Cleaning Mode and the sensor exposed, simply move the brush across the sensor a few times to remove any debris. Some brushes are statically charged to help pick up any debris from the sensor.

Don’t let the cleaning brush come in contact with any other part of the inside of the camera or with your skin. It may pick up oil, dust, etc. and spread it onto the sensor.

After using the brush method you may wish to blow off the sensor to help remove any residual dust.

Swab Methods

The swab method uses a specialized cleaning tool that is wiped across the sensor. This can be done with a dry or wet swab.

Only use the appropriate size swab for the size sensor that you are cleaning and only purchase swabs that come in individually sealed packaging.

If you touch the cleaning end of the swab with your bare skin throw it away; debris or oil from your skin may be transferred to the swab and then onto the sensor.

Dry Swab Method

As mentioned earlier it is important to remove any loose particles off the sensor using a hand blower or canned air as dragging debris across the surface of your sensor with your cleaning swab may cause scratches.

Using a new clean swab, swipe the sensor from one side then, without lifting the swab, swipe it back to the other side. Do this only once and discard the swab. Reusing a swab may cause undesired results such as scratching the sensor. For best results, you may need to do this more than once using a new swab each time.

Wet Swab Method

Some sensor dust may have become “welded” onto the sensor which may require the wet swab method. This is done in the same manner as the dry swab method except that a cleaning fluid that is specifically made for sensor cleaning is applied to the sensor swab.

Apply only one or two drops of the sensor cleaning fluid on the tip of the swab as too much fluid may create unfavorable results. Again, swipe the sensor from one side then without lifting the swab swipe it back to the other side. Do this only once and discard the swab. As with the dry swab method, it may require using multiple swabs to get a clean sensor.

Re-check the results of your completed cleaning using the methods described above.

Optional Cleaning Methods Using Other Tools

  • Lens Pen. A generic term for a tool that has a brush on one end and a small chamois cleaning tip on the other end.
  • Sensor Gel Stick. A stick with a gel cube on one end that has a sticky substance that picks up dust and other particles from the sensor or lenses. Never drag or wipe the gel stick across the sensor or lens as it may leave a sticky substance behind.
  • Spinning Brushes. The thought of anything spinning placed on the sensor makes me a bit nervous. When using any brush inside the camera chamber you run the risk of it picking up any oil or grease on the walls inside the camera chamber and then spreading it onto the sensor. Then you may have made a bigger mess to clean up. The best way to remove grease or oil from the sensor is by cleaning it using the wet swab method described above.

I haven’t been impressed with the results of the optional products mentioned. You may wish to read reviews on the internet and decide if these methods and products would work for you.

Of course, there are quite a few articles and video tutorials on the internet on how to clean sensors. You may want to review some of those prior to cleaning the sensor on your camera.

How Often Should My Sensor Be Cleaned?

The simple answer is, whenever it needs it. And you won’t know that unless you do a sensor dust check. Here are some factors that determine how often the sensor needs cleaning:

  • how often the camera is used
  • the number of shutter actuations
  • how many lens changes are done
  • environmental conditions (wind, dust, high pollen count, humidity, etc) of lens changes
  • the prevention measures you take when changing lenses

Some photographers check before every shoot assignment while others not so often.

Prevention

The best way to remove sensor dust is to prevent it.

Here are some tips for helping keep your sensor as dust-free as possible.

  • When removing the lens always point the camera body downward.
  • Have the next lens ready to install prior to removing the existing lens.
  • Only change lenses in an area that is not windy or dusty. If you do need to change lenses in that environment consider using a “lens changing bag”.
  • Keep the lens body, base and CPU contacts clean using a lint-free wipe.
  • Periodically blow out the camera’s mirror chamber to keep dust in that area to a minimum.
  • If your camera offers “Sensor Shake” or some of sensor cleaning method you may consider using that to help remove any dust that has gotten on the sensor.
  • In post-processing utilize the Visual Spots tool to keep tabs in the cleanliness of the sensor.
  • If you know there is sensor dust and you are not able to clean it right away consider shooting at a lower f-stop to minimize the number of dust spots that will show up on an image.

As a side note, if the sensor gets to a point where it needs to be replaced because of scratches or can no longer be completely cleaned, it may be possible to have just the filter replaced, not the complete sensor unit. This is a much less expensive alternative. Some camera repair shops will tell you that the whole sensor unit needs to be replaced. But an internet search of “sensor filter replacement” will yield results of reputable camera repair companies that offer that service.

A clean sensor will greatly reduce the amount of time spent in post-processing and improve the quality of your images.

A clean sensor helps make for a happy photographer.

About the Author:
Adrian Skiles is a freelance photographer based in Atlanta, GA. He has been a photographer for most his life, specializes in real estate and landscape photography, and has written numerous photography articles.


Go to full article: Camera Sensor Dust: Good Photographs Ruined

What are your thoughts on this article? Join the discussion on Facebook

PictureCorrect subscribers can also learn more today with our #1 bestseller: The Photography Tutorial eBook

The post Camera Sensor Dust: Good Photographs Ruined appeared first on PictureCorrect.


from PictureCorrect https://ift.tt/2UlCdyH
via IFTTT

PictureCorrect.com: Interesting Photo of the Day: Italian Dolomites Through the Fog

German landscape photographer Andreas Wonisch hiked up to the Italian Dolomites with six other photographers. But they’d grossly underestimated the trek: the nearest accommodation was a kilometer away and up a steep trail. In order to catch a sunrise shot, the group needed to hike up for longer than an hour through pitch-black midnight with all their gear. Of the seven, only one didn’t back out. Wonisch was not among them:

italian dolamites in fog

(Via Flickr. Click image to see full size.)

The next year, Wonisch returned to the same spot—the same mountain, the same accommodation. Only this time, he was prepared. Here’s the story, via his Flickr page:

“When I woke up in the middle of the night it was pitch black and there was thick fog. You couldn’t see for more than 10 meters. But I knew that I at least had to try this time. Luckily I already knew the way up and arrived in time half an hour before sunrise. At this point I felt that all the effort was in vain because it was still extremely foggy. But just before the sun came out the fog suddenly lifted and unveiled the majestic mountaintops. It felt like a great breakthrough and I quickly took as many photos as I could. A few minutes later everything was again covered in fog. But I went happily back to the hut—knowing, that I finally had captured the photo I wanted.”


Go to full article: Interesting Photo of the Day: Italian Dolomites Through the Fog

What are your thoughts on this article? Join the discussion on Facebook

PictureCorrect subscribers can also learn more today with our #1 bestseller: The Photography Tutorial eBook

The post Interesting Photo of the Day: Italian Dolomites Through the Fog appeared first on PictureCorrect.


from PictureCorrect https://ift.tt/2zdNTKo
via IFTTT

PictureCorrect.com: How to Dodge and Burn in Photoshop with Adjustment Layers

Photographers have been dodging and burning since the age of film photography. When using this technique, you brighten certain highlights and darken certain shadows. This effectively adds depth and dimension to the image. Photoshop expert Aaron Nace from Phlearn guides you through this technique by using curves adjustment layers:

While you could use the dodge and burn tools in Photoshop for the process, Nace teaches you how you can do it with curves adjustment layers in a non-destructive way.

“It uses the lights and darks of your photograph to determine where to dodge and burn.”

Nace uses the following image for demonstration purposes:

image before dodging and burning

Before

How to Dodge and Burn with the Curves Adjustment Layer

Start with the dodging process:

  • Open the image in Photoshop.
  • Go to Layer > New Adjustment Layer > Curves.
  • Make the image brighter by moving the mid-point of the curve upward.
  • Press Ctrl/Cmd + I to invert the layer mask.
  • Select a soft brush and paint over the areas you want to brighten with white. This will perform the dodge function.
  • To make the effect blend properly with the image, click on the layer mask and go to Image > Apply Image and click OK.

dodging in photoshop using curves

Once done, go on with the burning process:

  • Go to Layer > New Adjustment Layer > Curves.
  • Make the image darker by moving the mid-point of the curve slightly downward.
  • Press Ctrl/Cmd + I to invert the layer mask.
  • Using a soft brush, paint over the areas you want to make darker with white. This will perform the burn function.
  • To make the effect blend properly with the image, click on the layer mask and go to Image > Apply Image. This time, make sure that the Invert box is checked and click OK.

burning in photoshop using curves

“The best thing about this technique is I can always adjust my dodge and burn levels afterwards.”

To make any adjustments to the dodge or burn levels, double-click on the curves adjustment layer. This will make the curve appear wherein you can make your required adjustments.

You can see the final image below. It looks much punchier than the original, right?

image after dodging and burning

Give this technique a shot and I’m sure you’ll see an instant improvement.

For further training: The Fundamental Photo Editing Guide at 52% Off


Go to full article: How to Dodge and Burn in Photoshop with Adjustment Layers

What are your thoughts on this article? Join the discussion on Facebook

PictureCorrect subscribers can also learn more today with our #1 bestseller: The Photography Tutorial eBook

The post How to Dodge and Burn in Photoshop with Adjustment Layers appeared first on PictureCorrect.


from PictureCorrect https://ift.tt/2FDju8u
via IFTTT

lauantai 30. maaliskuuta 2019

PictureCorrect.com: Quick Photography Lighting Considerations

Refined photography uses distinct lighting strategies. Knowing what to look for is essential when the goal is a unique and artistically stylized photograph. To be creative you have to know the basics. Creating a foundation from which to build on your basic expertise requires close attention, experimentation, patience, and passion for your media. Photography sets the tone for many moments in time and is a representation of merriment, beauty, nature, perseverance, growth, knowledge, resistance, change, and many other aspects related to a viewer’s perception. Choosing the right lighting strategy in a photograph sets the right mood to enhance perceptions and deliver stronger messages.

Here are some photography lighting strategies that will help differentiate your photos from mediocre snapshots and will help you master key fundamentals in no time at all:

  • Projecting a wider light source generates a softer light and subdues shadows. Casting a narrower light generates a harder light and sharper shadows. The wider light source diffuses the scene de-emphasizing shadows, textures, and contrast. The narrower light can enhance features by creating sharper shadows, increasing contrast in color, shape, and form, and accentuating textures to give them a three-dimensional look.
  • Diffusion disperses a light source, making it wider and softer. Clouds are a perfect example of a natural diffuser. When a cloud covers the sun’s natural light, it softens a shadow’s crispness. Three types of diffusion are clouds, overcast skies, and fog.
  • Intentionally bouncing or directing a light source pointed toward a matte surface such as a ceiling or a white wall can also act as a diffuser. The light will spread and cover a wider area.
  • The light’s distance from the subject determines how soft or hard the light will be. When the light is closer to the subject matter, it is wider and creates a softer light source. When the light source is farther away, it is narrower and harder.
considerations photography light

Photo by Georgie Pauwels

  • Shadows create form. They give the subject a three-dimensional perspective by creating and increasing the intensity between highlights, midtones, and shadows. Adding shadow intensity through lighting strategies makes your subject an object in space rather than a shape on a two-dimensional plane.
  • Fall off occurs when you place the light source a long distance away from the subject. The light source gets dimmer on the subject, and you can vary the amount of light the subject is receiving, thereby creating more artistic photos. The effects of light fall off can be used to vary the intensity or relationship between the subject and the background. A closer light creates more contrast between the subject and the background, while a more distant light makes the background brighter and less contrasting from the subject.
  • Subject to background harmony makes the picture believable. All the lighting in the world won’t help a scene that doesn’t connect with the viewer. Make sure your background ties to your subject matter and the message you’re trying to portray while enhancing the event or point in time.

About the Author
Gabriela Dare is a designer based in the Detroit area.


Go to full article: Quick Photography Lighting Considerations

What are your thoughts on this article? Join the discussion on Facebook

PictureCorrect subscribers can also learn more today with our #1 bestseller: The Photography Tutorial eBook

The post Quick Photography Lighting Considerations appeared first on PictureCorrect.


from PictureCorrect https://ift.tt/2FHp0qu
via IFTTT

PictureCorrect.com: Flash Photography: 4 Ways Photographers See Light

Ever wonder why your flash photography looks, well, a bit too “flashy”? Perhaps you’re great at balancing the flash with ambient light but have never really looked beyond that. In this video, wedding photographer Robert Hall explains the four ways we see light and how we can control how our images come out:

Most of us use a flash with ambient light to add fill light and/or to get the exposure settings we want. But there’s a lot more that can be done with a flash, and understanding the principles behind how we see light can really help us not only balance out our photos more easily but also inject more creativity into our scenes.

Luckily, these principles aren’t particularly complicated. In fact, according to Hall, they exactly mimic what we already know from just experiencing the world.

“If you just apply what you already know from seeing your environment to your flash photography, then you’ll realize that it’s a lot easier to execute your vision.”

Here are the four ways we see light and how they impact flash photography.

1. Brightness

Brightness is the most obvious of the four ways we see light. It’s the element that first catches our attention in a scene. It’s also the area of greatest contrast. Light up a subject much brighter than the background, and the flash will be obvious.

Using bright light to contrast with the dark background

Light the subject so the flash merely fills in the shadows, and the flash will blend in much better.

Matching the brightness to the environment

One way isn’t better than the other, but it’s important to know what kind of look you’re going for and how to get it.

2. Quality

How hard or soft your light is will also have a great impact on your image. A hard light transitions from light to shadow very quickly, creating strongly defined shadows and edges:

Hard light with lots of contrast

A soft light transitions slowly with a lot of tones in between:

Soft light has many tones in the transition for light to dark

The difference lies in both the size of the light and how far away it is from the subject. Most people go for softer light sources when using a flash, but hard light can also be used to great effect. It all depends on whether you want to match the ambient light or create contrast with it.

3. Direction

Direction is something most of us get intuitively. Shadows will look out of place if they come from a different direction than those from the natural light. So for a balanced image, we would normally go for matching the direction of the natural light.

For a more stylized look, however, coming from a different or opposite direction can be quite effective.

Light coming roma different direction

4. Color

Color is probably the most challenging (and neglected) aspect of using flashes. Daylight flashes are designed to shoot between 5000 and 5500 Kelvin, and that’s doesn’t always match the ambient light. The two most glaring circumstances are when your indoor lighting is designed to match tungsten lighting at 3200K and shooting in the shade where the tones are much bluer.

Tungsten light won't match your flash

A flash will look very obvious in a tungsten environment without color correction.

Shade has more of a blue color, so flashes really stand out

Shade has more of a blue color, so flashes really stand out here as well.

The key is having a vision and knowing how to get there. That’s where independently thinking about the direction, intensity, quality, and color of your lighting will help you take better control of the final outcome.

“When choosing your light source to add into an environment, it’s best to determine whether you want to match that environment or you want to provide contrast to the environment.”

Having creative control over your flash photography

One aspect Hall left out, however, is the duration of the flash. It can also have a huge impact on the final outcome. Did he miss any others?


Go to full article: Flash Photography: 4 Ways Photographers See Light

What are your thoughts on this article? Join the discussion on Facebook

PictureCorrect subscribers can also learn more today with our #1 bestseller: The Photography Tutorial eBook

The post Flash Photography: 4 Ways Photographers See Light appeared first on PictureCorrect.


from PictureCorrect https://ift.tt/2U5yC8F
via IFTTT

PictureCorrect.com: Practical Tips for People and Travel Photography

People add life to an image and make it more relevant to viewers. But how do you approach complete strangers to take their photo? Moreover, if you’re traveling and don’t speak their language, how do you communicate? Professional travel and documentary photographer Mitchell Kanashkevich shares some great tips:

One Common Sense Rule

“Be a human being before a photographer.”

Having a camera with you doesn’t grant you the right to interfere with others. Be sure to treat others with respect and put yourself in the place of the person you want to photograph. This should help you in avoiding many problems.

Prepare Mentally

When photographing people, the subject may feel that you are invading their personal space. This can sometimes create misunderstandings and nuisances. You must be mentally prepared to face and overcome such hurdles.

Build Up Your Confidence

When photographing people, it is important to be confident about getting good results. You can’t expect to get great results in places where photographing is viewed negatively. Instead, look for photo opportunities in places where people are in a happy and celebratory mood and expect to be photographed. Collecting positive experiences can help you thrive as a photographer.

image of people in celebration mood

Turn on the Mental  Switch

You definitely need to break out of your comfort zone to take photographs of strangers. It can feel terrifying but you need to challenge yourself to enter into their space and open yourself up to let them into your space.

“I find that to make people photos it’s like there’s a mental switch that you have to turn on. When you turn on the switch you’re basically saying to yourself, ‘I will take photos of people and I will do what’s necessary to get those photos.'”

people photo

Have a Purpose in Mind

Have a purpose for every photo that you take. Share your purpose with your potential subject to help establish some credibility. This can further help you to raise your own confidence. Your confidence will reflect on the subject in front of your camera and they’ll feel at ease.

“If you never have a purpose when you photograph strangers, you need to think of one right one.”

subject comfortable with photographer

What to Say

“If you speak the language it makes a whole lot of sense to the people who you are photographing but don’t just talk about yourself or things that they have no idea about.”

Start a conversation from the little things and try to build a connection. Once you feel that a connection is established, you can then talk about photography. Building a good rapport can make the subject feel much more comfortable and they end up giving you more access. This drastically increases the chances of getting a good photograph.

people travel photo

But if you do not speak the language and happen to be in a photo-friendly country, be sure to spread some positive vibes.

“Smile, be open, curious, friendly, of course respectful. As a foreigner, you are often on the receiving end of people’s hospitality. People will let you into their lives.”

Bridge the Gap and Gain Access in a Foreign Culture

If you know the language, it can be an important key to a culture. But if you don’t, it can be a huge barrier. In the latter case, it becomes important that you get help from someone who is from the same culture and speaks the language, professionally they’re called a fixer.

“A fixer is your bridge between yourself, your creative vision, and the culture that you are working with.”

A fixer can help you with the language and also gain access for you in places where the action really takes place. This can open up a new world for you to photograph.

image taken with the help of fixer

Get People to be Natural

As we already discussed above, being friendly with people, establishing a bridge, talking to them, having a purpose and sharing it with them, and having a fixer is all important to get natural photos of people. Besides these, you can also try the following tips:

  • Photograph people while they’re indulged in their regular activities. If the subject looks at your camera, ask them not to. You can at least learn how to say this in their local language.

people involved in their work

  • Photograph the moment after their pose or in between poses.
  • Photograph people during your conversation. You can get your fixer to talk to them while you take their photos. This helps in getting their focus off of the camera.
  • Stick around with your subjects longer—a few extra minutes or even days depending on your project. People tend to get natural when they’re used to someone else’s presence. They then stop paying attention to the camera.

Find People Photo Opportunities

Finding the moment to photograph is really important. Here are some ideas to create photographic opportunities:

  • Photograph the people you transact with. When you’re buying an item or a service from someone, you can build rapport with that person and then ask for a photo.

taxi driver

  • Homestays can be great for getting intimate photo opportunities.
  • Sometimes the magic happens precisely when things go to plan. Go with the flow and grab the opportunity to photograph the moment.
  • Having your own transport comes in handy when looking for people photo opportunities. It helps you conveniently look around the locality.

Should You Always Ask Before You Photograph?

It’s not always necessary to ask to take someone’s photo in a public place. This can rarely get you into trouble. And if someone does object, it’s best to comply and delete the photos. In Kanashkevich’s experience, he doesn’t ask people for photos in the following cases:

  • the person doesn’t take up a significant part of the image
  • he can’t make out the person’s face
  • people are in the middle of doing something or interacting with each other
  • he sees a person with an interesting pose
silhouette image

If you cannot make out the subject’s face, getting permission is not necessary.

Should You Pay for Photos?

Being a travel or people photographer is about documenting life. This means no setting up the scenes for photos and no paying, either. However, if you’re in for a commercial project, it’s a different story altogether. Some places will need you to pay for access—entry fees for example. That’s okay. But if you try to capture magic moments with people by paying them, you may not get them.

“I’ve got no issue with helping the people I photograph. Doesn’t need to be money either. But, doing it in exchange for a photo makes it less special for both sides.”

image in a church in Ethiopia

Kanashkevich paid for access to the church in Ethiopia but not for this image.

The next time you’re traveling, be sure to try out some of these tips!


Go to full article: Practical Tips for People and Travel Photography

What are your thoughts on this article? Join the discussion on Facebook

PictureCorrect subscribers can also learn more today with our #1 bestseller: The Photography Tutorial eBook

The post Practical Tips for People and Travel Photography appeared first on PictureCorrect.


from PictureCorrect https://ift.tt/2V5jO6B
via IFTTT

perjantai 29. maaliskuuta 2019

PictureCorrect.com: Tips for Better Pet Photography

For taking top-class snapshots of your pet, you don’t have to be a professional photographer. Just by keeping a few essential things in mind, you can easily capture outstanding shots. Let’s learn how to take better digital photographs of pets.

tips for pet photography

“The Stare” captured by PictureSocial member Ryan

Try to capture your pet’s unique personality

Each pet has a unique personality. Some are lazy, quiet and docile, while others are hyperactive, energetic, and inquisitive. Try to take shots when your pet is sleeping, eating, playing or just jumping around. Every activity that your pet indulges in showcases their personality and you should surely capture such unforgettable moments.

Pay attention to location and background

Always choose the location carefully. Your pet should be comfortable at that place, and it should also evoke emotions, not only in your pet, but also in you. The next important thing that you should take into account is the background. With respect to pet photography, the best location is one that is plain and simple like a patch of green grass or a well-lit room with white walls and red carpet.

Get down to their level and shoot them closely

Avoid taking snapshots while standing up and looking down at the pet. Instead, get down to his level and look into his eyes. Also try to shoot him as closely as possible. If your pet is active and likes to move around, then it will be exceedingly difficult to get close to him. In such a case, you should buy a camera that is equipped with a zoom lens.

Lighting is important

Lighting is an important factor with regards to pet photography. The usage of flash will either distract the animal or scare him away. In some instances, it also creates the problem of red eye. Thus, natural and artificial light sources are better options. Use flash only if your pet has dark fur; it will help to highlight even the smallest details.

pet photo techniques

“Sadie” captured by PictureSocial member Emily Bechler

Use sports mode for active pets

If you’re not comfortable using full manual mode, then sports mode is just for you. In this mode, you can easily capture excellent snapshots of your overtly active pet. Alternately, you can use shutter priority mode, where you have to set the shutter speed, and the camera will do the rest of the things automatically.

Catch them unaware

If you wish to take natural photographs, then make an effort to catch your pet unaware. It is unusually difficult to persuade the animal to pose properly. Hence, paparazzi style photos are the best bet.

Let them play around

Let your pet play around with toys, and capture their playfulness. The photo shoot should be enjoyable for both you and your pet.

dog and baby

photo by spilltojill

Include owner and others

If you want your digital photographs to look real, then don’t forget to include yourself and other family members. When the animal interacts with his owner, genuine emotions are evoked, which are worth capturing.

Checkout different perspectives

Try out different angles and different perspectives. Apart from full body shots, you can capture three-quarters of the body or focus on single features like eyes, nose, ears, and so forth.

puppy portrait

“doxie” captured by PictureSocial member Ron Sicat Felicitas

Don’t hesitate to experiment

Remember, expertise only comes from experimentation. For this reason, don’t hesitate to experiment. You will only end up with a few bad shots, and nothing else is going to happen. On the contrary, continued experimentation will make you a perfect professional pet photographer in a short span of time.

About the Author:
This article was written by Patrick Laundy. He manages an online photo album called OurPhotos. The idea was to keep things as simple and uncluttered as possible while providing a fully-functional photo sharing service.


Go to full article: Tips for Better Pet Photography

What are your thoughts on this article? Join the discussion on Facebook

PictureCorrect subscribers can also learn more today with our #1 bestseller: The Photography Tutorial eBook

The post Tips for Better Pet Photography appeared first on PictureCorrect.


from PictureCorrect https://ift.tt/2Wr3xZU
via IFTTT