maanantai 31. lokakuuta 2022

PictureCorrect.com: Interesting Photo of the Day: Rolling Meadows

When you think of paradise, what is the image that comes to your mind? Not everyone thinks of the same place. Everybody has their own imagination. However, have a look at the following image taken by photographer Hari V Iyer and you’ll agree that it is no less than a paradise itself:

rolling meadows of San Francisco

“Rolling Meadows of San Francisco” by Hari V Iyer (Via Reddit. Click image to see full size.)

Iyer shot the image with a Sony A7RII and the Canon 24-105 f/4 lens at 82mm, f/11, 1/3th of a second and ISO 50. He took the image at Livermore, near Morgan Hill Regional Park in San Franciso, California, during spring. While many travelers might have come across this landscape, they sometimes fail to recognize it because of how adversely it is affected by local weather conditions. It’s only during spring that the hills appear lush green. Come winter they’re all covered in snow. And during the summer, all of this green landscape turns golden yellow.

The beautiful interaction of light with the rolling hills makes this image very interesting to look at. The patches of light and shadow on the hills add a beautiful texture and inject a sense of depth. The hazy atmosphere mixed with the golden sunlight gives a surreal mood to the image.

Doesn’t the inner child in you want to run down these meadows with joy?

- - - - - - - - - - - - - - - - - - - - - - - - - - - - - - - - - - - - - - - - - - - - - - - - - - - - - - - - - - - - - - - - - - - - - - - - - -

Did you appreciate this newsletter? Please help us keep it going by Joining Our Patreon Supporters

What are your thoughts on this article? Join the discussion on our Facebook Page

PictureCorrect subscribers can also learn more today with our #1 bestseller: The Photography Tutorial eBook

- - - - - - - - - - - - - - - - - - - - - - - - - - - - - - - - - - - - - - - - - - - - - - - - - - - - - - - - - - - - - - - - - - - - - - - - - -

The post Interesting Photo of the Day: Rolling Meadows appeared first in the Photography Tips category on PictureCorrect.


from PictureCorrect https://ift.tt/Fj9peL6
via IFTTT

PictureCorrect.com: At Work With a Photographer on a Wedding Day

Wedding days are one of the most special days of a married couple’s life. That’s why hiring a professional photographer to capture the day is usually top of their list. Lindsay Coulter’s husband trailed her as she photographed a full wedding day, from getting ready to the reception. Here are some of the tips and tricks Lindsay shared to ace your first wedding day shoot!

Pack A Variety of Equipment

When shooting a wedding, you’re likely to be taking many types of shots, from full-body to close-up portraits and details. That’s why Lindsay always packs various lenses, as well as multiple cameras and some additional indoor lighting equipment. On this particular wedding day shoot, she’s packed her mirrorless 4K Canon R6 camera.

Plus, her old-school Canon AE-1 film camera for some vintage shots. Her preferred lens is her Canon RF 35mm F1.8, as it’s not as limited as her 50mm. She can take both candids and portraits with the 35mm, as long as they are not too close-up, as the image may distort. She’s also packed her Samyang 85mm F1.4, Canon RF 50mm F1.8, and Canon RF 16mm f2.8 lens in case. Additionally, her Godox V860 II flash for lighting up her getting-ready photos indoors flatteringly.

Be Prepared

Lindsay likes to come prepared for every shoot, particularly weddings. She always shows up at the door or suite exactly 10-15 minutes early. Otherwise, the wedding guests tend to worry she isn’t going to arrive. Who can blame them?

… I’m going to tell you one thing that I think is very important. If you don’t show up at least ten minutes early for a wedding, the couple will think that you’re not coming. It’s just a fact…

Being there early eases the tension, allowing you to take those all-important details shots before the party gets ready. Of the dress, shoes, bouquet, wedding bands, and any other special wedding accessories, for example.

Then, the bridal party and groomsmen getting ready afterward, stress-free. Two essentials Lindsay suggests bringing with are tools to hang dress and frame items. And a checklist listing all the poses and images you’d like to capture.

Know Your Wedding Shot Compositions

To compile a wedding photography checklist, you need to know which poses to take. Think about the various compositions beforehand, and run them by the bride and groom, too. They will likely have a general idea of the types of poses they prefer or want to leave out.

Some examples of typical wedding events, scenarios, and poses to photograph include:

  • Getting ready – the bride and groom, mom and dad, and getting ready details.
  • Couple’s pre-wedding photos – the first look and posing together at the ceremony venue.
  • Wedding party photos – guests, pre-ceremony interaction, and arrivals.
  • Venue & arrivals – venue details, wedding party arrival, and guests being seated.
  • The ceremony – coming down the aisle, vows, and post-vow kiss.
  • Family photos – after-ceremony posed portraits with bride, groom, and family.
  • Post-ceremony couples photos – creative couple shoots, trash the dress, or dress/outfit change.
  • Reception photos – party, dinner, drinks, dancing, and after-ceremony festivities.
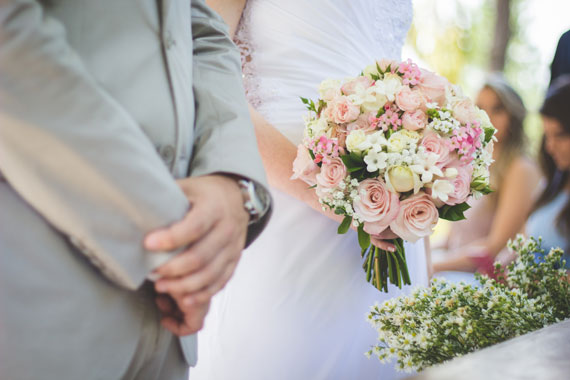
wedding photograph

Wedding photo captured by Luis Tosta

Know How to Pose Your Subjects

When taking photographs of people — specifically at a wedding — it’s important to know how to guide poses. Unlike models, most regular couples and wedding guests have little to no knowledge of how to pose naturally. Or which poses are most flattering or show off their best side.

As such, it’s important to both train your eye and practice working on your communication and posing request mannerisms.

Many subjects are shy and afraid of getting their photo taken. So being warm, positive, and encouraging, as well as giving compliments, is highly recommended. You can also share your best snaps in between shots to build the couple’s and wedding guests’ confidence.

Use Presets

Presets are an excellent way to get that perfect look for wedding photos. There are so many different ones available online — for free or paid. You can even create custom presets to apply to your photos yourself in Adobe Lightroom or other similar photo editing software.

Playing around with complimentary tones, black & white, pastel, and glowy sunset shades is sure to produce results. You should match the image shades to the event details and theme; be it an autumnal wedding or a bright spring affair.

Conclusion

Photographing weddings isn’t just nerve-wracking for brides, grooms, and wedding guests but for photographers, as well. Yes, wedding shoots can be very lucrative. But also quite social, being both physically and emotionally demanding, as following Lindsay on this shoot clearly illustrates. They also require plenty of forward planning and a diverse skill set and photography gear to perfectly capture the day.

- - - - - - - - - - - - - - - - - - - - - - - - - - - - - - - - - - - - - - - - - - - - - - - - - - - - - - - - - - - - - - - - - - - - - - - - - -

Did you appreciate this newsletter? Please help us keep it going by Joining Our Patreon Supporters

What are your thoughts on this article? Join the discussion on our Facebook Page

PictureCorrect subscribers can also learn more today with our #1 bestseller: The Photography Tutorial eBook

- - - - - - - - - - - - - - - - - - - - - - - - - - - - - - - - - - - - - - - - - - - - - - - - - - - - - - - - - - - - - - - - - - - - - - - - - -

The post At Work With a Photographer on a Wedding Day appeared first in the Photography Tips category on PictureCorrect.


from PictureCorrect https://ift.tt/HWnkBla
via IFTTT

sunnuntai 30. lokakuuta 2022

PictureCorrect.com: Short Lighting for Portrait Photography

Short lighting, by definition, refers to when the main light illuminates the side of the face that is turned away from the camera. This lets light fall on the narrow side of the face leaving a shadow on the broad side of the face, which is facing the camera. The actual position of the light or lights will depend on the style and mood of the portrait anticipated.

short lighting photography

Short Lighting Diagram

The positioning of lights when shooting portrait photographs is by no means an exact science. There are many variables which affect the final outcome. These include: the model’s facial features, the exact position of the head, the position of the camera, and the position of the lights.

Positioning of the light in relation to the subject and camera

Starting point

Start by placing the subject in the center of an imaginary circle. Place the light and the camera on the circle perimeter so that a ninety degree angle is formed when you draw a line from the camera to the subject and from the subject to the light. At all times the subject, light, and camera remain within one quadrant of the circle. Set both the light and the camera to the subject’s eye level. When the subject faces the camera directly, you will have half the face lit and the other half in shadow. In effect, this is side lighting.

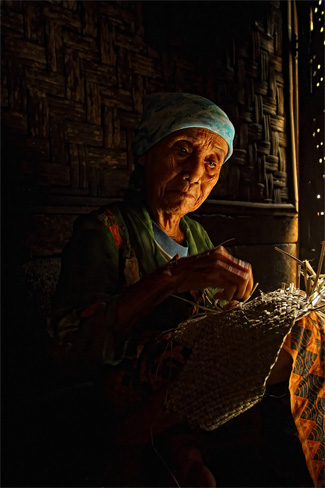
portrait short lighting

Photo captured by PictureSocial photographer Kustiyah

Short lighting

When the set-up has been achieved, ask the subject to turn his or her head to camera right, or subject left, which exposes the broad side of the face to the camera and the narrow side of the face to the light. This is how the term short lighting is derived (the short side of the face is closer to the key light). This exercise is best done with a constant light.

This can be your studio flash’s model light or a light similar to a redhead (used in television). This will allow you to see the effect of the light position on your subject immediately. Using a flash only will mean lots of trial and error, which is enormously time consuming.

How does short lighting affect the portrait?

  • Face appears slim when the shadow is on the broad side
  • Adds character to portraits
  • Suits masculine portraits through exploitation of texture

The effect of short lighting technique will depend on:

  • The facial features of your subject
  • The horizontal angle of the light
  • The vertical angle of the light (how high or low the light is in relation to the subject)
  • The exact position of the face (especially for Rembrandt lighting where the nose shadow must meet the shadow on the broad side of the face to create the famous Rembrandt Triangle)
  • The distance of the light from the subject
  • The quality (hard, soft)
  • The amount of fill
  • The position of the fill

Pay attention to each shot

Short light requires precise attention to detail when shooting portraits. It is easy to change the lighting mode to broad lighting by accidentally moving the key light in relation to the subject, but even more so, by the subject subtly changing poses. It only takes a small movement in the wrong direction to affect the desired outcome.

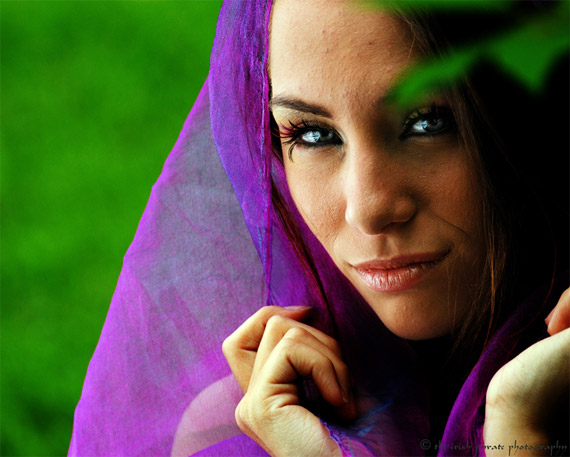
portrait lighting short type

“Charlene 6” captured by PictureSocial photographer Daniel L

Short lighting must be compared to other lighting techniques

Exposing the key light to the narrow side of the face is one of many lighting techniques which should also be studied. These include:

  • Rembrandt
  • Butterfly
  • Beauty
  • Broad
  • High key
  • Low key

This will help you make the best choice for your particular portrait needs.

About the Author:
Rob Gray from FacetMedia teaches television production as well as photography bringing over forty years of experience.

- - - - - - - - - - - - - - - - - - - - - - - - - - - - - - - - - - - - - - - - - - - - - - - - - - - - - - - - - - - - - - - - - - - - - - - - - -

Did you appreciate this newsletter? Please help us keep it going by Joining Our Patreon Supporters

What are your thoughts on this article? Join the discussion on our Facebook Page

PictureCorrect subscribers can also learn more today with our #1 bestseller: The Photography Tutorial eBook

- - - - - - - - - - - - - - - - - - - - - - - - - - - - - - - - - - - - - - - - - - - - - - - - - - - - - - - - - - - - - - - - - - - - - - - - - -

The post Short Lighting for Portrait Photography appeared first in the Photography Tips category on PictureCorrect.


from PictureCorrect https://ift.tt/ESdpcZX
via IFTTT

PictureCorrect.com: Learn How to Use ND and Graduated ND Filters

You’re probably already aware of filters and the amazing creative potential they bring to your photography. A lot has already been written on this website about different types of filters and their specific uses. If you’re still trying to figure out if you need one, Doug McKinlay shares this informative video. By the end of the video you might be convinced that filters are just what you’ve been missing in your landscape photography:

For this video, McKinlay uses the LEE filter system. He chooses them because of their reliability. There are obviously other brands, and you may find them equally good in quality. It’s entirely up to you which brand you choose. McKinlay selects the 100mm x 100mm LEE system. There are a wide variety of these filters and for this video he selects only the standard and the graduated neutral density filters.

Standard ND Filters

In the image below, McKinlay holds up a two-stop standard ND filter with his right hand and a ten-stop one on the other. The standard ND filters are opaque photographic glasses and their job is to stop light. They’re available in different stops: two-stops, four-stops, and so on. The higher the number, the more light they stop.

Standard ND filters

Standard ND filters

Graduated ND Filters

Graduated filters, on the other hand, are not uniformly opaque. There is a slight delineation from opaque to clear. These are also available in different light stopping powers. They are available in two varieties: hard and soft. The hard ones have the delineation more pronounced than the softer ones, which are more gradual. These filters are widely used for balancing out light in a landscape scene.

Grad ND filters

Grad ND filters

Tripod and Accessories

A tripod is essential when using either of the above filters. These filters are predominantly used to stop light and are used in tandem with a slow shutter speed to capture motion blur. Without a tripod such creative photography would be impossible.

LEE 100mm x 100mm system filters attach themselves to the lens via an adapter. Pick an adapter that matches with the lens’ filter thread diameter. Once the adapter is in place attach the bracket (these have guide rails on them for sliding the filters into place).

You will also need a remote cable release, because when using filters most of your exposure times will be in excess of one minute, and you’ll have to use the bulb mode. Using a remote cable release reduces the chances of camera shake when using the shutter release button. Go for the ones that are directly attached to the camera.

Camera Settings

Set your camera to manual mode. Set the shutter release delay to two second or ten second. Don’t forget to turn on mirror lock-up. This will take care of any lingering jerks even after the tripod dampens out most of them.

shooting long exposures with filters

Use the mirror lock-up position

McKinlay suggests that the f-number should remain somewhere around f/11. At higher f-numbers, lens diffraction sets in and the relative advantages of deeper depth of field tend to go away.

McKinlay also suggests that a graduated filter should go on first followed by the standard filter, which slides between the grad filter and the lens. Once you have the composition set and the filters in place, take a meter reading.

Lee cheat sheet for long exposure

Use the LEE cheap sheet for quick results

Pro Tip

The viewfinder is a prime candidate for leaking light when making long exposures. Take the viewfinder cover off. On the camera strap you have this little cover which you can now use to seal off the viewfinder.

Light leakage

Block your viewfinder to stop light leakage

Voila! No more light leakage! If you camera strap does not come with a cap, don’t fret. Use tape or anything else that you can find to do the job.

Long exposure photography
creative long shutter speed

Neutral density filters allow you to take long exposures even in somewhat bright lighting conditions. What other tricks do you use for long exposures?

- - - - - - - - - - - - - - - - - - - - - - - - - - - - - - - - - - - - - - - - - - - - - - - - - - - - - - - - - - - - - - - - - - - - - - - - - -

Did you appreciate this newsletter? Please help us keep it going by Joining Our Patreon Supporters

What are your thoughts on this article? Join the discussion on our Facebook Page

PictureCorrect subscribers can also learn more today with our #1 bestseller: The Photography Tutorial eBook

- - - - - - - - - - - - - - - - - - - - - - - - - - - - - - - - - - - - - - - - - - - - - - - - - - - - - - - - - - - - - - - - - - - - - - - - - -

The post Learn How to Use ND and Graduated ND Filters appeared first in the Photography Tips category on PictureCorrect.


from PictureCorrect https://ift.tt/FpzD1fb
via IFTTT

PictureCorrect.com: Interesting Photo of the Day: A Bird’s-Eye Wedding Portrait

It’s what every couple wants from a wedding photographer: someone dedicated and passionate, who goes above and beyond expectations. Here’s one that takes that philosophy dangerously literally:

wedding photography from a tree

(Via Imgur. Click for larger image.)

The shot was snapped by South Dakotan wedding photographer Wes Eisenhaur, whose style of rustic simplicity feels at once classic and strikingly contemporary. He’s clearly got an eye for odd angles:

“They thought I was crazy when I climbed the tree….I’m always climbing on things, or getting really low and laying on the ground in some compromising position to get a shot. It’s an easy way to get an interesting perspective. Ultimately, I want to go above and beyond for anyone I work with.”

- - - - - - - - - - - - - - - - - - - - - - - - - - - - - - - - - - - - - - - - - - - - - - - - - - - - - - - - - - - - - - - - - - - - - - - - - -

Did you appreciate this newsletter? Please help us keep it going by Joining Our Patreon Supporters

What are your thoughts on this article? Join the discussion on our Facebook Page

PictureCorrect subscribers can also learn more today with our #1 bestseller: The Photography Tutorial eBook

- - - - - - - - - - - - - - - - - - - - - - - - - - - - - - - - - - - - - - - - - - - - - - - - - - - - - - - - - - - - - - - - - - - - - - - - - -

The post Interesting Photo of the Day: A Bird’s-Eye Wedding Portrait appeared first in the Photography Tips category on PictureCorrect.


from PictureCorrect https://ift.tt/6IQzVCD
via IFTTT

lauantai 29. lokakuuta 2022

PictureCorrect.com: Interesting Photo of the Day: Beautiful Morning in Bali

Early morning landscapes are truly magical. It’s not just the soft, golden light but also the natural elements that play so well together during the early hours of the day to make them look magnificent. Photographer Malthe Zimakoff got lucky one morning in Bali, Indonesia and captured this near perfect fairytale moment:

sunrise in Bali

“Beautiful Morning in Bali” by Malthe Zimakoff (Via Reddit. Click image to see full size.)

Zimakoff created this image by stitching multiple frames to form a panorama. And what he’s captured is truly beautiful.

The sunrise brushing off the top of the trees contrasts well with the darker regions of the image. Furthermore, the way the mist leads us from the foreground toward the mighty Mount Agung volcano in the background is an example of a well thought out composition. And to add to the mystical nature of the image, we have the beautiful golden glow of the early sunrise.

- - - - - - - - - - - - - - - - - - - - - - - - - - - - - - - - - - - - - - - - - - - - - - - - - - - - - - - - - - - - - - - - - - - - - - - - - -

Did you appreciate this newsletter? Please help us keep it going by Joining Our Patreon Supporters

What are your thoughts on this article? Join the discussion on our Facebook Page

PictureCorrect subscribers can also learn more today with our #1 bestseller: The Photography Tutorial eBook

- - - - - - - - - - - - - - - - - - - - - - - - - - - - - - - - - - - - - - - - - - - - - - - - - - - - - - - - - - - - - - - - - - - - - - - - - -

The post Interesting Photo of the Day: Beautiful Morning in Bali appeared first in the Photography Tips category on PictureCorrect.


from PictureCorrect https://ift.tt/0mBTxOc
via IFTTT

PictureCorrect.com: How to do a Scary Halloween Photo Shoot in a Home Studio

Halloween is a great time for some spooky portraits. So why not take inspiration from Halloween and do some spine-chilling photo shoot? Photographer Gavin Hoey from Adorama takes us through how to get some scary images in a small home studio:

Props for Halloween Photo Shoots

Get the look of a blood-soaked bandage by soaking a clean bandage in some coffee and then staining it with fake blood. There are many types of fake blood on the market, but be sure to test them out before applying them on the model.

Also, clean clothes don’t scream scary, do they now? Use old clothes that you don’t use anymore, get them dirty, and cut them up for a creepy look.

Lighting

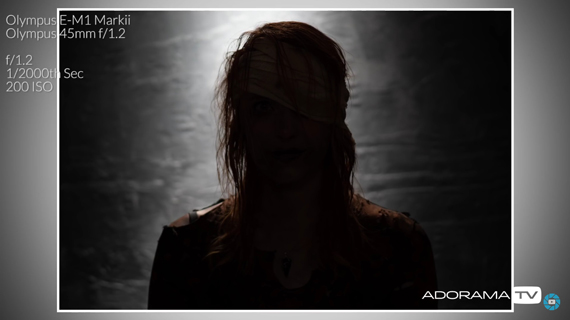
Hoey uses a simple two-light setup for the shoot. He places a grid on the first light to create a shaft of light on the background.

background lighting

He uses a second eVOLV 200 with a grid a key light to light up the model. Be sure to place the light so that it highlights the spooky bits. In this case, to properly light the bloody eye, Hoey asked the model to turn her face toward the light.

key light for halloween photoshoot

Scary Poses

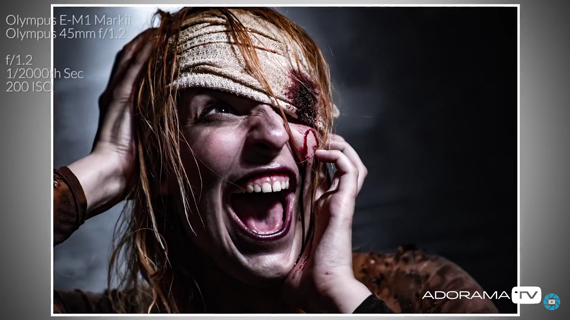
A horror photo shoot wouldn’t be complete without some scary expressions. Ask your model to ham it up and go for expressions that scream fear and horror.

scary halloween pose

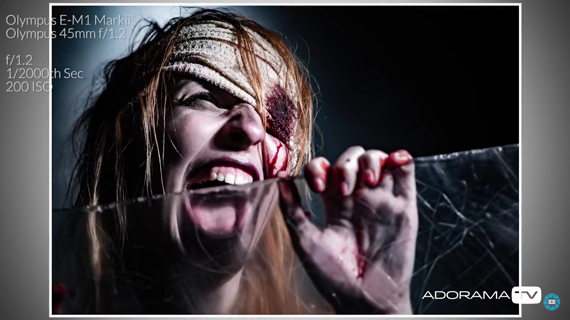
Hoey adds in a window and stains the model’s hands with fake blood to give the images that extra horror factor.

spooky pose for halloween photoshoot

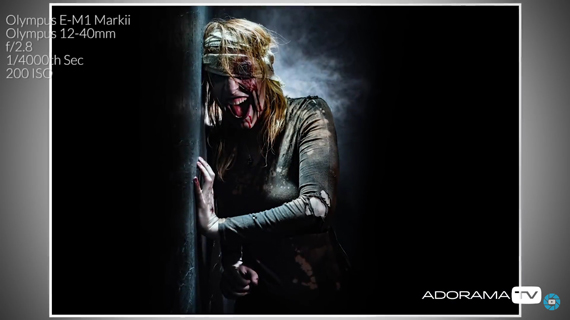
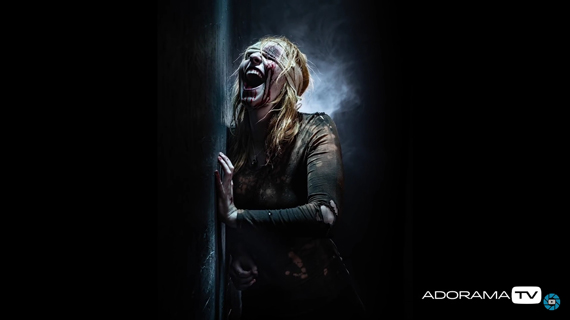
And to give a feeling that the scary model is trying to escape from the basement, Hoey makes some small adjustments to the setup. He has the model turn toward the background. He then adjusted the key light accordingly to light up her face. Finally, he adds a third light to highlight the smoke.

spooky halloween image

Post Processing

For a successful Halloween photo shoot, everything has to come together, including the makeup, props, outfit, lighting, and expressions. And to add a cherry on top, we can always go for some extra post-processing. Hoey uses Adobe Camera Raw to make slight adjustments to his photos. Here’s a gist of what he does:

  • Take the color temperature down to give the image a cold, spooky look.
  • Add some contrast by using the dehaze tool so that it cuts through the smoke.
  • Enhance sharpness and texture by using the clarity adjustment.
  • Check if the dehaze tool has messed up the colors. Use the saturation and vibrance sliders to counter the effect.

However, every picture will require personalized adjustments so it’s not necessary that you follow the exact adjustments.

final image from halloween photoshoot

What spooky ideas do you have for your scary Halloween photo shoot?

- - - - - - - - - - - - - - - - - - - - - - - - - - - - - - - - - - - - - - - - - - - - - - - - - - - - - - - - - - - - - - - - - - - - - - - - - -

Did you appreciate this newsletter? Please help us keep it going by Joining Our Patreon Supporters

What are your thoughts on this article? Join the discussion on our Facebook Page

PictureCorrect subscribers can also learn more today with our #1 bestseller: The Photography Tutorial eBook

- - - - - - - - - - - - - - - - - - - - - - - - - - - - - - - - - - - - - - - - - - - - - - - - - - - - - - - - - - - - - - - - - - - - - - - - - -

The post How to do a Scary Halloween Photo Shoot in a Home Studio appeared first in the Photography Tips category on PictureCorrect.


from PictureCorrect https://ift.tt/e1QSTlb
via IFTTT

perjantai 28. lokakuuta 2022

PictureCorrect.com: Real Estate Photo Editing Tutorial in Lightroom

You could consider real estate photography to be a sort of product photography. That’s because the intention of both genres of photography is to help businesses sell. It is thus equally important in architecture photography that you present the final image in the best way possible. Editing thus becomes a key part of the process.

If you’re looking to get started with editing real estate photos, we have the right video for you today. Photographer Anthony Turnham shows you how you can edit architecture photos using Lightroom:

If you’re curious about how professionals edit their real estate photos, you’re in luck. Turnham, in this video, explains in exquisite detail all the steps that he follows when editing real estate photos. In the process, he also talks about why he makes certain decisions. This will further help you understand the editing process in detail and expand your knowledge of the process.

Before jumping into the editing process it is important to know how to take the real estate photos so as to capture maximum details. As Turnham explains in the video, the best choice is to bracket the shots using multiple exposures. Then, using Lightroom, you can use the “Merge to HDR” function to create a single digital negative file that has loads of details for you to play around with.

Moving on, Turnham shows you how he edits the real estate photo in two phases:

  • Global adjustment
  • Local adjustment

Global adjustment is when you make adjustments that affect the overall look and feel of the image. For instance, if you move over to the Develop module in Lightroom and start playing around with the exposure, contrast, shadows, or any other adjustments, what do you notice? You can see that they affect the overall image. Like Turnham demonstrates in the video, it is a good practice to start with global adjustments to give an overall attractive look to the image.

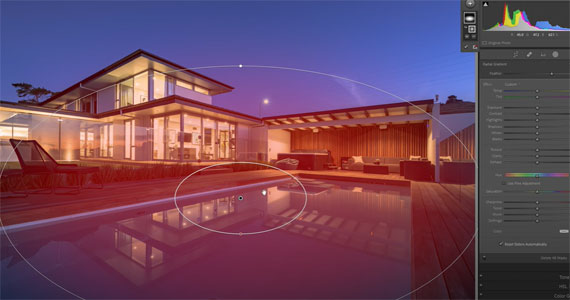
photo edit lightroom

But when it comes to giving the image a finished look, local adjustments are what you should turn to. Using local adjustment tools like the brush tool and masks, you can ensure that the changes you make affect only a certain region of the image. This makes a whole world of difference and makes the image appear so much more polished. In the video, you can see how Turnham uses multiple local adjustment brushes and masks to fine-tune his image. If you want to be a pro at editing real estate photos, make sure to master this technique.

While we have barely scratched the surface here in this article, you’ll definitely learn a lot more in detail once you watch the complete video. If you’re looking to get started with editing real estate photos, make sure to go through it. You’ll definitely learn a lot.

For further training: Picture Perfect Properties Course

- - - - - - - - - - - - - - - - - - - - - - - - - - - - - - - - - - - - - - - - - - - - - - - - - - - - - - - - - - - - - - - - - - - - - - - - - -

Did you appreciate this newsletter? Please help us keep it going by Joining Our Patreon Supporters

What are your thoughts on this article? Join the discussion on our Facebook Page

PictureCorrect subscribers can also learn more today with our #1 bestseller: The Photography Tutorial eBook

- - - - - - - - - - - - - - - - - - - - - - - - - - - - - - - - - - - - - - - - - - - - - - - - - - - - - - - - - - - - - - - - - - - - - - - - - -

The post Real Estate Photo Editing Tutorial in Lightroom appeared first in the Photography Tips category on PictureCorrect.


from PictureCorrect https://ift.tt/f7Qrwcz
via IFTTT

PictureCorrect.com: How to Achieve Multiple Catchlights in a Portrait Subject’s Eyes

Here’s my two cents on the “you don’t have to have expensive lights to create beautiful portraits” topic—an attempt to harness multiple catchlights in a subject’s eyes.

"Tori Tracy" captured by Julia Kuzmenko McKim.

“Tori Tracy” captured by Julia Kuzmenko McKim.

I’ve been shooting at Dale Heise‘s studio with some awesome Profoto lighting equipment for a while. Right now, Dale is in the process of moving into another space, so I’m shooting wherever I can with whatever I have and can find. In this blog post I’m going to try and come up with an interesting lighting setup using my own lighting equipment and other affordable light sources.

Here’s what I own:

  • I still shoot with Canon 5D Classic (update: I got my pretty little Canon 5D Mark III now.)
  • Speedlights: Canon Speedlite 580EX II Flash and Canon Speedlite 430EX II
  • Einstein E640 with a silver beauty dish
  • Elinchrom Skyport Speed Trigger Set
  • Westcott 5-in-1 Reflector Kit
  • A few Heavy Duty Light Stands and tons of color gels which are actually just rolls of colored cellophane ($3–5 each at craft stores like Hobby Lobby, Michael’s, and $1–2 on Amazon)

Beforehand, I bought a box of warm white Philips LED lights at Target ($12), found a large piece of cardboard in the garage, and bought a sheet of thick white paper at Michael’s.

Building the Light

When our model, Tori, and my assistant and new photographer at OIP, Shelby, arrived I handed the lights, cardboard, scissors, tape, and a handful of binder clips to Tori to make our lighting instrument, while Shelby and I were busy setting up my MacBook Pro to shoot tethered into Lightroom.

multiple-catchlights-1

Tori drew a circle around my biggest lens cap in the middle of the cardboard and paper clipped it together. She then cut out a hole, taped the cardboard and paper together, and clipped the lights to our new white board.

multiple-catchlights-2

The Lighting Setup

When we were ready to shoot, I set my Einstein to my left and turned the slave off, so that I could use only the modeling lamp and focus properly.

“Tori Tracy” captured by Julia Kuzmenko McKim.

After plugging in the board to turn on the lights, Shelby held the plugged in board for me right in front of Tori’s face as I shot through the hole in the board. I had a few lenses available to use, including a Canon 24–70mm f/2.8, a 50mm f/1.4, and a 100mm Macro f/2.8. Since these particular LED lights were pretty weak, so I ended up shooting with the 50mm, bumped ISO up to 800, and opened the aperture to f/1.6 (it’s difficult to nail focus on the eyes, especially when you’re so close to the model’s face, with f/1.4).

Tip: If you decide to try this out, find stronger/brighter LED lights and an extra extension cord to make sure you’re not stuck by the power outlet because the LED lights’ cord is very short.

Adding the Final Touches

To finish the images I added a few touches in Photoshop, and we’ve got these stunning portraits with interesting catchlights in the eyes and magical soft light.

If you decide to try this out for yourself, I would love to see your results. Feel free to post them in the comments section below.

About the Author:
Julia Kuzmenko is a Los Angeles based beauty photographer & retoucher.

- - - - - - - - - - - - - - - - - - - - - - - - - - - - - - - - - - - - - - - - - - - - - - - - - - - - - - - - - - - - - - - - - - - - - - - - - -

Did you appreciate this newsletter? Please help us keep it going by Joining Our Patreon Supporters

What are your thoughts on this article? Join the discussion on our Facebook Page

PictureCorrect subscribers can also learn more today with our #1 bestseller: The Photography Tutorial eBook

- - - - - - - - - - - - - - - - - - - - - - - - - - - - - - - - - - - - - - - - - - - - - - - - - - - - - - - - - - - - - - - - - - - - - - - - - -

The post How to Achieve Multiple Catchlights in a Portrait Subject’s Eyes appeared first in the Photography Tips category on PictureCorrect.


from PictureCorrect https://ift.tt/1XvzIZF
via IFTTT

PictureCorrect.com: Interesting Photo of the Day: Down the Narrows

If you’ve visited Zion National Park in Utah, chances are that you’re familiar with the Narrows. The Narrows is, as you can imagine, the narrowest section of the Zion Canyon with walls a thousand feet tall and the river about twenty to thirty feet wide. This is also one of the most popular areas of the park. And since there’s no trail to hike to the Narrows, you’ll need to get your feet wet walking in the Virgin River. This makes the hike quite an interesting and thrilling one. Photographer TJ Drysdale took the following image of his girlfriend at the Narrows which appears no less than a scene straight out of some wizard movie:

“Down the Narrows” by TJ Drysdale (Via Reddit. Click image to see full size.)

Drysdale took this image at Wall Street in the Narrows at Zion National Park. He shot it at around 4 pm when it was getting dark in the canyon. He used a Sony A7RIV camera with the 28-75mm lens at 75mm and f/3.5 to get this shot.

Some may argue that the colors of the rocks and the water is quite different from reality. But, we must accept that the color grading does full justice to the image. Even the choice of the cloak is perfect as its bright color is striking against the dark background.

And the fact that the subject is turned away from the camera, looking into the water adds a greater sense of mystery in the image. It’s almost as if she’s looking to summon a bridge out of nowhere. Awesome fantasy vibes!

This is truly a phenomenal work by the photographer. What do you think of the image? Let us know in the comments.

- - - - - - - - - - - - - - - - - - - - - - - - - - - - - - - - - - - - - - - - - - - - - - - - - - - - - - - - - - - - - - - - - - - - - - - - - -

Did you appreciate this newsletter? Please help us keep it going by Joining Our Patreon Supporters

What are your thoughts on this article? Join the discussion on our Facebook Page

PictureCorrect subscribers can also learn more today with our #1 bestseller: The Photography Tutorial eBook

- - - - - - - - - - - - - - - - - - - - - - - - - - - - - - - - - - - - - - - - - - - - - - - - - - - - - - - - - - - - - - - - - - - - - - - - - -

The post Interesting Photo of the Day: Down the Narrows appeared first in the Photography Tips category on PictureCorrect.


from PictureCorrect https://ift.tt/bB5oXGQ
via IFTTT

torstai 27. lokakuuta 2022

PictureCorrect.com: Interesting Photo of the Day: Lake Te Anau Sunset

The town of Te Anau in the southern region of New Zealand is quite popular among travelers. While it’s notorious for activities such as kayaking, cycling, and even jet boar riding, one cannot leave the region without appreciating its spectacular views. Home to photographer William Patino, the views are a truly magical:

sunset reflection in Te Anau lake

“Sunset Reflections in Lake Te Anau, New Zealand” by William Patino (Via Reddit. Click image to see full size.)

Patino has truly captured a magical moment in this image. While the soft light of the golden hour plays a role in making this image interesting, it’s just one part of the equation. The snow patterns on the mountain in the foreground act as wonderful leading lines to draw viewers into the image. In the mid-ground, we have the beautiful Te Anau Lake with the gorgeous reflection of the dramatic sky and amazing clouds. Then, at the background, we have the colorful sky and the mighty mountains of Fiordland to complete the image.

This photo is a perfect example of how a basic composition guide can be used to create a powerful image.

- - - - - - - - - - - - - - - - - - - - - - - - - - - - - - - - - - - - - - - - - - - - - - - - - - - - - - - - - - - - - - - - - - - - - - - - - -

Did you appreciate this newsletter? Please help us keep it going by Joining Our Patreon Supporters

What are your thoughts on this article? Join the discussion on our Facebook Page

PictureCorrect subscribers can also learn more today with our #1 bestseller: The Photography Tutorial eBook

- - - - - - - - - - - - - - - - - - - - - - - - - - - - - - - - - - - - - - - - - - - - - - - - - - - - - - - - - - - - - - - - - - - - - - - - - -

The post Interesting Photo of the Day: Lake Te Anau Sunset appeared first in the Photography Tips category on PictureCorrect.


from PictureCorrect https://ift.tt/i0z9Eh4
via IFTTT

PictureCorrect.com: Beginner to Pro Bird Photography Tips

Birds — with their multi-colored plumage and unique behaviors — make fascinating subjects to photograph. That said, they can be tricky to capture, particularly when in flight or even alert on land. Award-winning photographers Tony & Chelsea Northrup have some handy tips to share. Whether you’re just starting out or a pro, they can help you level up your craft.

Beginner Backyard Bird Photography Tips

Are you wondering how to get into bird photography? The good news is that you may not even need to leave your backyard to get started.

Chelsea recommends you:

  • Plant native plants, hang bird feeders, and install a bird bath in your garden to attract birds.
  • Always keep your camera on hand and set up to shoot.
  • Share your pictures on social media and photography sites to build your confidence.
  • Spend time with the birds that visit your garden to get them acclimatized to you.
  • Don’t make direct eye contact with birds, as they see this behavior as predatory.
Ideal Beginner Cameras, Lenses, and Equipment:

A higher-resolution camera and telephoto lens are ideal for bird photography. To start, a beginner DSLR and 70-300mm, 100-400mm, or 70-200mm lens should suffice.

Advanced Bird Photography Tips

Once you’ve gotten good at photographing birds on your property, it’s time to challenge yourself. Upgrading your photography equipment, trying some new techniques, and heading outdoors are a must.

Tony advises you:

  • Visit popular birding locations such as national parks to photograph a wider range of birds.
  • Find and get to know your favorite destinations, including the weather, lighting, and seasonal changes there.
  • Choose clear days when the sun is lower (sunrise or mid-afternoon), as these are the best times to shoot.
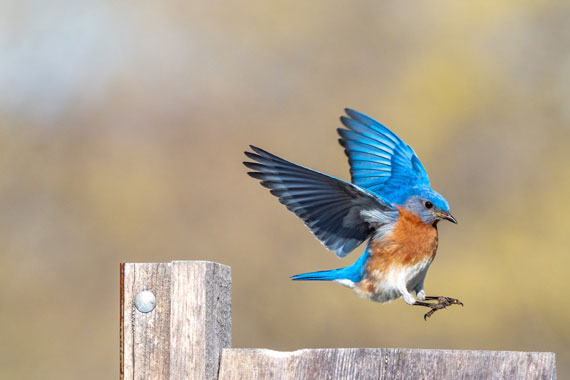
  • Challenge yourself by taking action shots of birds in motion or flying at higher shutter speeds (1/1000-1/3000).
  • Leverage advanced camera settings and photography techniques like manual mode, shutter speed priority, and panning.
bird image

Photo captured by Patrice Bouchard; 420mm, ISO 800, f/7.1, 1/2500s.

Ideal Advanced Cameras, Lenses, and Equipment:

For advanced bird photography, superior photography equipment is a must. Upgrade your photography equipment to an APS-C or high-res DSLR and 150/200-600mm or 150-500mm lens.

Professional Bird Photography Tips

Pro nature, wildlife, and bird photography enthusiasts take their craft seriously. As such, using the best photography equipment and perfecting their technique are their main priorities.

Chelsea advises that you:

  • Learn the unique bird behaviors of the birds you wish to photograph (eating, flying, sleeping, feeding, and nesting patterns).
  • Invest in regional bird books to find out more about subjects to photograph and their behavior.
  • Get up early to ensure you’re the early bird that catches the worm (or the best image).
  • Start submitting photography to stock sites and show and sell prints to earn money.
  • Use apps to track weather, tides, precipitation, daylight hours, and more.
  • Level up your images by learning and using post-production editing software.
  • Photograph as many different subjects in as many conditions as possible to advance your skills.
  • Vary your shutter speed to capture motion (>1/500) and faster (<1/3000) or slower (>1/1500) flying birds.
  • Play with time-lapse, stacking, and other pro techniques to compose unique images.
Ideal Professional Cameras, Lenses, and Equipment:

Use a powerful 500/600/800mm f4 or f5.6 telephoto lens and >36- or < 24-megapixel teleconverter. To save money, you can buy older or second-hand models. Additional support gear, such as a tripod with a gimbal, is also recommended.

To Conclude:

Beginner and pro photographers approach photography differently. Whether you’re just starting out photographing birds or are more experienced, there’s always more you can do to improve. Follow the tips in Chelsea and Tony’s insightful vlog to up your bird photography game.

- - - - - - - - - - - - - - - - - - - - - - - - - - - - - - - - - - - - - - - - - - - - - - - - - - - - - - - - - - - - - - - - - - - - - - - - - -

Did you appreciate this newsletter? Please help us keep it going by Joining Our Patreon Supporters

What are your thoughts on this article? Join the discussion on our Facebook Page

PictureCorrect subscribers can also learn more today with our #1 bestseller: The Photography Tutorial eBook

- - - - - - - - - - - - - - - - - - - - - - - - - - - - - - - - - - - - - - - - - - - - - - - - - - - - - - - - - - - - - - - - - - - - - - - - - -

The post Beginner to Pro Bird Photography Tips appeared first in the Photography Tips category on PictureCorrect.


from PictureCorrect https://ift.tt/TxWLouz
via IFTTT

tiistai 25. lokakuuta 2022

PictureCorrect.com: How to Take Macro Wildlife Photos in a Rainforest

When we think of taking macro photos in nature, most of us imagine photographing flowers and other vegetation, or even some insects. But that’s not what we’re talking about in today’s exciting video. Today we have photographer Colby Brown who’ll show you how you can take your macro photography to the next level by working with wildlife. Let’s join him as he talks about macro photography gear, settings, techniques, and more:

“Macro wildlife photography is the idea of photographing amphibians, snakes, insects, and spiders – all the things that mostly people find to be misunderstood.”

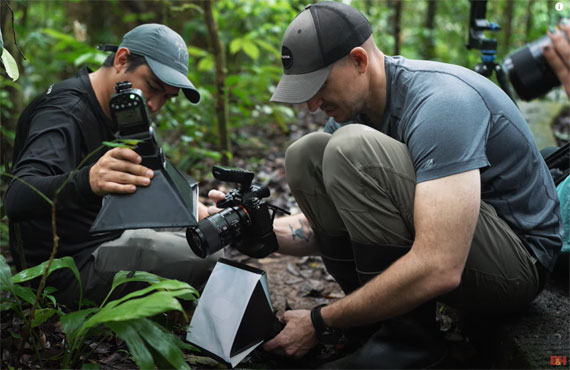
In this resourceful video, Brown walks you through everything that you need to know about taking macro photos out in the wild. To start off, he talks about the gear, especially the lens. To be able to take proper macro photos, you’ll need to have a macro lens that gives you a 1:1 ratio and has a close focusing distance. And since you’ll be working with quite narrow aperture settings when taking macro shots, flashes will come in quite handy for the photography process. Brown also shows you the sort of diffusers you can use to soften the light and get better results.

Brown also shares the standard settings that he uses to take macro photos. And as he admits, the interesting thing is that the settings don’t change that much.

“When it comes to most of my macro images, most of my creativity comes from the choice of lighting, the direction of light, and the power of light mixed in with my choice of composition.”

macro wildlife rainforest

When working with live animals, it becomes crucial that you pay attention to safety and ethics. Don’t handle the creatures yourself. If need be work with professionals who can handle them safely. This is not just for your safety, but for the safety of the animals as well. Also, limit your time with the animals as you don’t want to stress them out.

If you’ve been wanting to get better at macro photography, be sure not to miss this complete video. You’ll definitely gain a lot of insights on the photography genre.

- - - - - - - - - - - - - - - - - - - - - - - - - - - - - - - - - - - - - - - - - - - - - - - - - - - - - - - - - - - - - - - - - - - - - - - - - -

Did you appreciate this newsletter? Please help us keep it going by Joining Our Patreon Supporters

What are your thoughts on this article? Join the discussion on our Facebook Page

PictureCorrect subscribers can also learn more today with our #1 bestseller: The Photography Tutorial eBook

- - - - - - - - - - - - - - - - - - - - - - - - - - - - - - - - - - - - - - - - - - - - - - - - - - - - - - - - - - - - - - - - - - - - - - - - - -

The post How to Take Macro Wildlife Photos in a Rainforest appeared first in the Photography Tips category on PictureCorrect.


from PictureCorrect https://ift.tt/HSyxFN1
via IFTTT

PictureCorrect.com: Interesting Photo of the Day: A Vortex of Light

Chris Matthew Brady’s images are filled with the kind of stuff that makes up a kid’s dream. Dinosaurs, lasers, fires and spinning stars in the sky—you couldn’t ask for more. This particular image by Brady, however, was about glow sticks and burning steel wool:

Light vortex

“A Controlled Spin” by Chris Matthew Brady (Via Reddit. Click image to see full size.)

Brady explains,

“This is me swinging a string of glow sticks with burning steel wool at the end.”

The best part, however, was not even captured in the image. A bunch of kids were at the beach when this image was made. Brady says,

“Their oohs and aahs made me think of fireworks shows when I was a kid.”

- - - - - - - - - - - - - - - - - - - - - - - - - - - - - - - - - - - - - - - - - - - - - - - - - - - - - - - - - - - - - - - - - - - - - - - - - -

Did you appreciate this newsletter? Please help us keep it going by Joining Our Patreon Supporters

What are your thoughts on this article? Join the discussion on our Facebook Page

PictureCorrect subscribers can also learn more today with our #1 bestseller: The Photography Tutorial eBook

- - - - - - - - - - - - - - - - - - - - - - - - - - - - - - - - - - - - - - - - - - - - - - - - - - - - - - - - - - - - - - - - - - - - - - - - - -

The post Interesting Photo of the Day: A Vortex of Light appeared first in the Photography Tips category on PictureCorrect.


from PictureCorrect https://ift.tt/zacv5qF
via IFTTT

maanantai 24. lokakuuta 2022

PictureCorrect.com: 8 Ways to Step Up Your Fall & Autumn Photography

It’s easy enough to make a pretty autumn image. With cascades of color overtaking the foliage, the time of year simply lends itself to beauty. Unfortunately, a pretty picture often isn’t enough to stand out. The secret to getting a photograph that truly wows audiences is by trying out different strategies. Photographer Nigel Danson shares a few unconventional pointers for making an autumn image that defies the norm:

1. Get a hold of a polarizer

By reducing reflections on leaves, water, and more, a polarizer makes for a photograph that really concentrates on contrast and color. You don’t have to break the bank for this small piece of equipment—even something cheap will make an impact.

2. Experiment with a different lens

If you’re out and about with your camera often, chances are that you have a go-to lens. Try leaving it at home and giving a more neglected piece of glass a little bit of love. Doing so will quite literally change your perspective and perhaps encourage you to make photographs in an entirely different way. While you’re shooting, open up your aperture and crank up your ISO so that you can handhold and experiment with angles and vantage points. Should you come across a photograph that you’d really like to perfect, you can always adjust your settings accordingly to get the cleanest shot possible.

3. Utilize back lighting

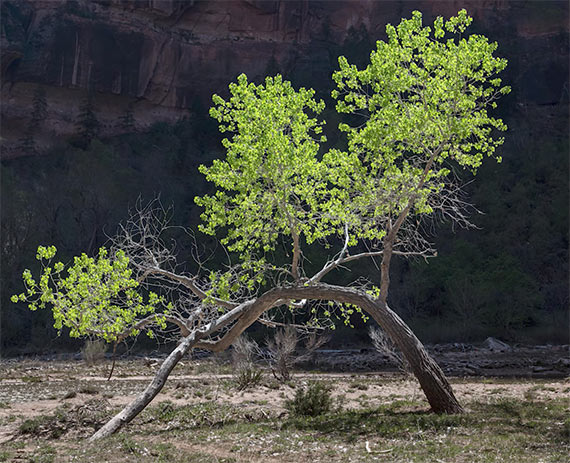
Back lighting is particularly useful for separating subjects from backgrounds. When used in conjunction with an open aperture, you hold quite a bit of power in where the viewer’s eyes land. Furthermore, the shadows cast from a main back light and autumn’s vibrant colors can make for a truly unique abstract image.

backlighting sample

4. Bring in some water

If you’re wandering through a wooded area for nature shots, you’re almost certainly bound to run into some sort of stream. Don’t settle for a simple shot of water flowing over rocks; this can potentially make for a rather boring image. Instead, study the directions in which the water flows. Look for “swirling” patterns and interesting twists and turns in the current that could bring something different to the composition.

5. Shoot through trees and leaves

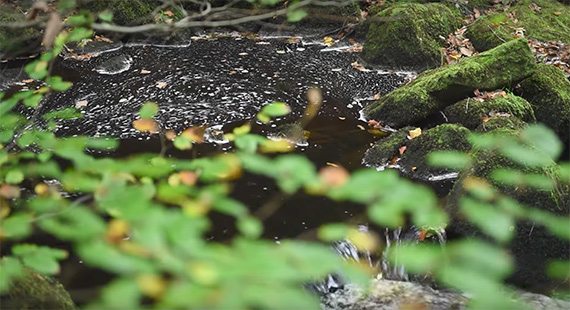
Shooting through elements in nature instantly makes a composition more interesting. For one, it adds a sense of depth by layering compositional elements. It also creates a frame, naturally drawing attention and constructing a point of interest.

Shooting through foiliage

6. Think about color contrast

Neutrals shades can do an excellent job of bringing out more colors to their fullest. Try to pick out neutral, less distracting elements in your environment to use as backgrounds or foils to the louder reds, greens, oranges, and yellows of fall.

7. Go macro

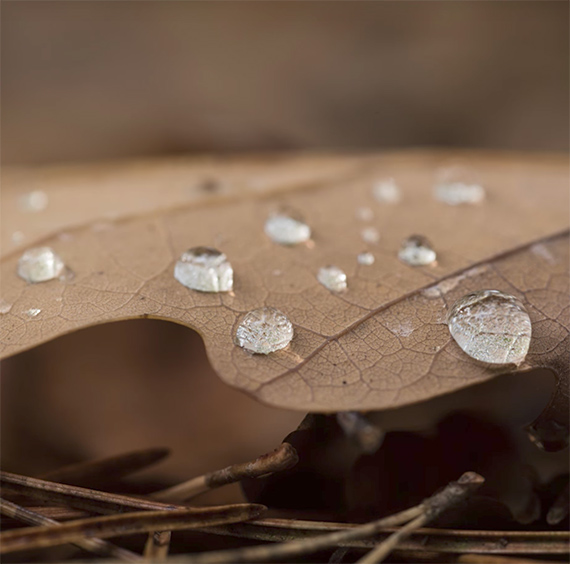
It’s almost never a bad idea to see what getting a little bit closer to a subject can do for a photograph. Macro often helps image makers bring out elements that would simply disappear in a more expansive scene. Using a long focal length narrows your depth of field and assists in focusing on minute details. With a macro lens in tow, even debris resting on the forest floor can become interesting.

long focal length lens sample

8. Try Intentional Camera Movement

More often than not, you probably take precautions to make sure that your photographs are crystal clear and your camera is securely in place. However, purposely moving a camera during an exposure can sometimes significantly enhance a shot. This especially holds true when you’ve got a lot of colors going on that could potentially interact with one another. Just keep in mind that it’s still important to keep some element of the photo in focus. Try experimenting with a shutter speed between 1/30 and 1/5 of a second for best results.

- - - - - - - - - - - - - - - - - - - - - - - - - - - - - - - - - - - - - - - - - - - - - - - - - - - - - - - - - - - - - - - - - - - - - - - - - -

Did you appreciate this newsletter? Please help us keep it going by Joining Our Patreon Supporters

What are your thoughts on this article? Join the discussion on our Facebook Page

PictureCorrect subscribers can also learn more today with our #1 bestseller: The Photography Tutorial eBook

- - - - - - - - - - - - - - - - - - - - - - - - - - - - - - - - - - - - - - - - - - - - - - - - - - - - - - - - - - - - - - - - - - - - - - - - - -

The post 8 Ways to Step Up Your Fall & Autumn Photography appeared first in the Photography Tips category on PictureCorrect.


from PictureCorrect https://ift.tt/2QZD5nM
via IFTTT

sunnuntai 23. lokakuuta 2022

PictureCorrect.com: 3 Factors That Control Depth of Field

When we hear the phrase depth of field, most of us instantly relate it to aperture. Yes, aperture plays an important role in controlling depth of field, but it’s not the only factor. Adorama‘s Mark Wallace explains that there are three main factors that control how much of an image is in focus:

1. Aperture

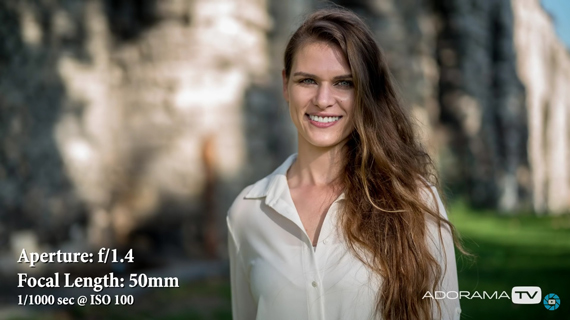
The relationship between aperture and depth of field is something that most photographers learn during their early days with the camera. If you set your aperture wide open using values like f/1.4 or f/1.8, the lens can only focus within a very thin zone; it will have a very shallow depth of field. The foreground and background will be blurred out while the subject will be in focus.

wide aperture for shallow depth of field

But if you close down the aperture by using values like f/16 or f/22, the lens will have most of the scene in focus; it will have a greater depth of field. The resulting image will thus have less blur in the foreground and background.

narrow aperture for greater depth of field

2. Focal Length

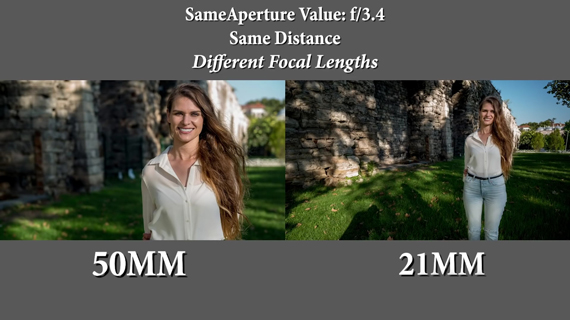
If the camera-to-subject distance and the aperture are kept the same, a lens with a longer focal length has shallower depth of field than a lens with a shorter focal length (i.e., the longer focal length will have less of the area in focus and produce more blur than a lens with a shorter focal length). Compare the background blur in the images below:

variance of depth of field with focal length

Focal Length

3. Camera to Subject Distance

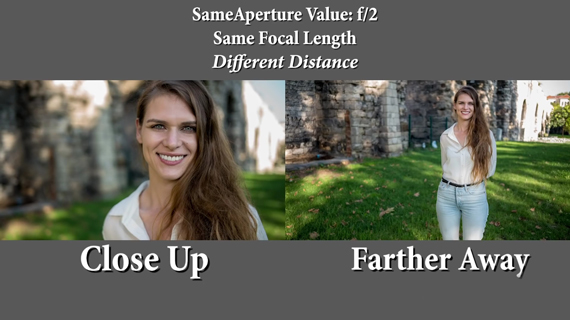
All lenses have minimum focusing distance. They produce greater blur when the subject-to-camera distance is close to the minimum focusing distance. If the aperture and focal length are kept the same, the same lens will produce more blur when the subject is close to it than when the subject is farther away. This is to say that a lens will have greater depth of field when the subject is farther away and a shallower depth of field when it is close to the subject.

variance of depth of field with distance

Go ahead and try out the combination of these three factors to gain better control over depth of field.

- - - - - - - - - - - - - - - - - - - - - - - - - - - - - - - - - - - - - - - - - - - - - - - - - - - - - - - - - - - - - - - - - - - - - - - - - -

Did you appreciate this newsletter? Please help us keep it going by Joining Our Patreon Supporters

What are your thoughts on this article? Join the discussion on our Facebook Page

PictureCorrect subscribers can also learn more today with our #1 bestseller: The Photography Tutorial eBook

- - - - - - - - - - - - - - - - - - - - - - - - - - - - - - - - - - - - - - - - - - - - - - - - - - - - - - - - - - - - - - - - - - - - - - - - - -

The post 3 Factors That Control Depth of Field appeared first in the Photography Tips category on PictureCorrect.


from PictureCorrect https://ift.tt/gCe7xz1
via IFTTT

lauantai 22. lokakuuta 2022

PictureCorrect.com: 4 Reasons to Bring Your Tripod When You Travel

International flights have strict baggage limitations. Anything over and above and you have to pay extra. It is thus imperative for a traveler to pack carefully to stay within the limits set by airlines. But why are we even talking about something unrelated to photography? Because, baggage regulations severely limit what photography equipment you can carry. In this video, Mark Wallace gives you four pretty convincing reasons to make room for your tripod:

1. Low Light

Wallace chose his tripod over a flash for his trip to Quito in order to improve his ability to shoot images in low light. The image below is a good illustration of why he made the choice:

advantages of a tripod

Low light photo of Quito

Had he used a flash, there would have been no way to properly illuminate the subject, which is the city. But the presence of the tripod allowed him to use a long shutter speed at a low ISO and create a blur-free, noise free capture.

2. Creative Use of Slow Shutter Speeds

A tripod really gives you that edge allowing you to capture amazing images using slow shutter speeds. Wallace expressed his love for capturing moving water using slow shutter speeds, neutral density filters, etc. Without a tripod, captures like the one below would be impossible.

Slow shutter speed photos of moving water

A tripod allows you to drag the shutter speed.

3. Shooting Video

Most DSLRs shoot full HD videos. That’s one of the primary reasons travelers prefer shooting with these cameras. However, when you shoot hand-held, big cameras tend to wobble. The resulting footage is anything but great. When you throw in a tripod into the mix, however, things improve by leaps and bounds. The jerky movements are gone and the footage is pleasant to watch.

4. HDR Photography

HDR photography is no longer a niche; everybody seems to be doing it these days. A tripod is essential for shooting HDR as you need your camera to be absolutely stable when getting those two, three, or more shots at different exposure values.

HDR photography

HDR Photography

A tripod is essential for a number of other genres of photography. For example, this image of the stars shot by Wallace would have been impossible without a tripod.

benefits of using a tripod

Capturing stars using a tripod

Interestingly Wallace mentions,

“More notably, none of those (images) would have been possible with a flash. So, for me, my options for travel photography are much greater with a tripod than they are with a flash. That’s why I chose that one.”

Can’t argue with that!

- - - - - - - - - - - - - - - - - - - - - - - - - - - - - - - - - - - - - - - - - - - - - - - - - - - - - - - - - - - - - - - - - - - - - - - - - -

Did you appreciate this newsletter? Please help us keep it going by Joining Our Patreon Supporters

What are your thoughts on this article? Join the discussion on our Facebook Page

PictureCorrect subscribers can also learn more today with our #1 bestseller: The Photography Tutorial eBook

- - - - - - - - - - - - - - - - - - - - - - - - - - - - - - - - - - - - - - - - - - - - - - - - - - - - - - - - - - - - - - - - - - - - - - - - - -

The post 4 Reasons to Bring Your Tripod When You Travel appeared first in the Photography Tips category on PictureCorrect.


from PictureCorrect https://ift.tt/6j38iPo
via IFTTT

perjantai 21. lokakuuta 2022

PictureCorrect.com: Layer Photo Editing Tricks in Capture One

Today’s tutorial kindly comes to us from Capture One Hidden Features. Our readers can use coupon code pc10 for a discount on the full eBook.

In recent years, the Layers tool in Capture One has drastically evolved. You can now create complex masks in a couple of clicks and perform all the editing in layers. Here are my favorite unobvious features of layers!

Taking Full Control Over Gradients
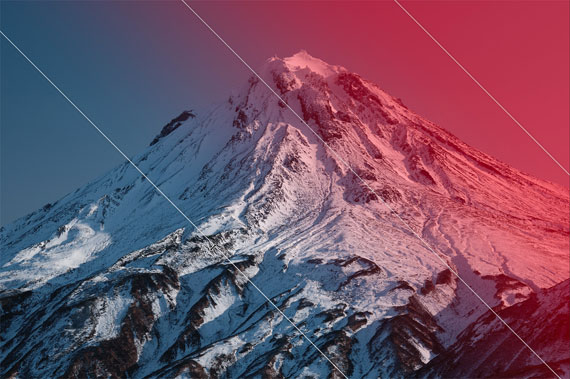
layer gradient

Use these simple tricks to gain full control over gradients:

  • To change a gradient smoothness – hold down Shift and move lines.
  • To relocate a gradient – hold down Cmd (Ctrl in Windows) and drag a mask.
  • To move lines separately – hold down Alt and move lines.
  • To rotate a gradient by a 45-degree angle – hold down Shift and rotate the radial gradient.
  • To change the shape of a radial gradient — move one of the anchor points.
  • To lock the opposite point and change the shape of a radial gradient — hold Alt and move one of the anchor points.
  • To change the scale of a radial gradient — hold Shift and move one of the anchor points.
  • To lock the opposite point and change the scale of a radial gradient — hold Alt + Shift and move one of the anchor points.

Brush Shortcuts

You can change all the brush settings with shortcuts and cursor
movements. For instance, to adjust brush size, simply hold down Ctrl, Opt,
and left-click-n-drag mouse or trackpad.

Here is the full list of the quick control keys:

Mac

  • Size: Ctrl + Opt + left-click and horizontal drag (right/left)
  • Hardness: Ctrl + Opt + left-click and vertical drag (up/down)
  • Opacity: Shift + Ctrl + Opt + left-click and horizontal drag
  • Flow: Shift + Ctrl + Opt + left-click and vertical drag (up/down)

Windows

  • Size: Alt + right-click and horizontal drag (right/left)
  • Hardness: Alt + right-click and vertical drag (up/down)
  • Opacity: Shift + right-click and horizontal drag (right/left)
  • Flow: Shift + right-click and vertical drag (up/down)

BTW, the same shortcuts work with Magic Brush as well!

Brush Icon

You can quickly understand whether you’re adjusting the main image or a layer merely by checking this brush icon:
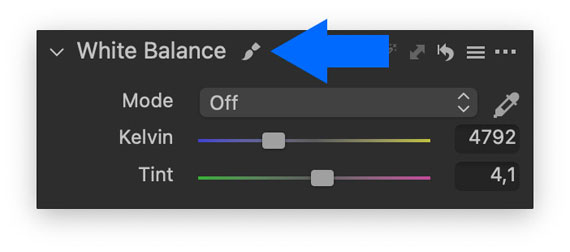
brush icon

The brush icon will appear on most Capture One tools if you have selected a layer.

Finishing Gradients with Brush and Eraser

Gradients in Capture One can be edited just like regular masks, and I use this feature a lot! The only thing you need to do is rasterize a layer with a gradient. You can then easily erase a part of a gradient to exclude an unwanted element from the mask or reduce layer impact on it.

Rasterizing Luma Range Mask

Speaking of rasterizing, there is a curious feature of the Luma Range tool. Luma Range doesn’t transform your mask. It simply hides parts of the mask according to the selected luminosity range.

Why is this important? Your layer mask stays the same; thus, you can’t refine the Luma Range mask. Fortunately, you can easily avoid this restriction by rasterizing the mask. With rasterizing, you truly transform it into a regular mask so that you can perform all kinds of layer actions.

The same feature allows you to create a new filled layer, apply Luma Range and copy/paste it to a group of images. The mask will look differently on every image:
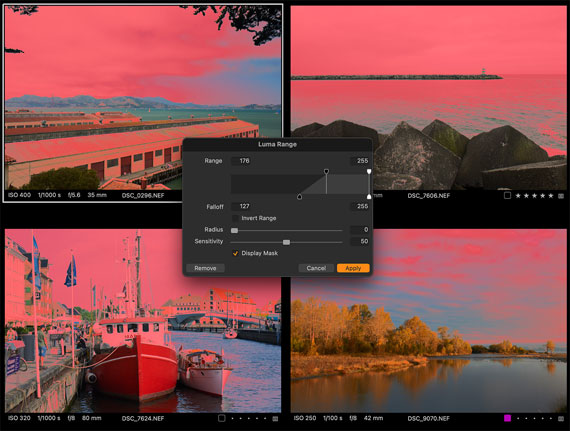
luma range

Duplicate a Layer Mask with Adjustments

There is a simple life hack to duplicate a layer mask with adjustments:

  1. Create a clone variant of your image
  2. Copy/paste layers from an original image

You’ll get the same image with duplicated layers.

Black & White in Layers

Unfortunately, the Black & White tool doesn’t support layers. However, there is a workaround to get a pretty similar effect.

The main feature of the Black & White tool is the ability to adjust color channels in B&W mode. You can get similar control over color by desaturating an image in Color Editor and using Lightness sliders.
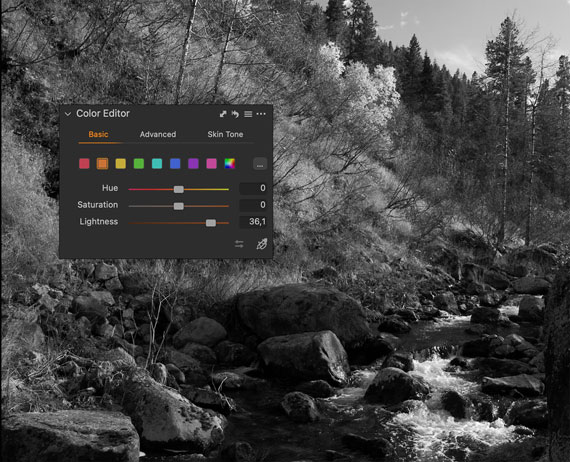
black white layers

Keep in mind that Basic Color Editor is always a safe choice; you can’t ruin an edit with it. Advanced mode offers more editing freedom, but you have to know what you are doing.

The effect will slightly differ from the B&W tool, but it will allow you to use it in layers!

How to Skip Copying Layers

Sometimes you might need to skip layers when copying adjustments. By default, Capture One applies all the adjusted settings, and first, you need to turn it off here:

copying layers

Next, in Adjustments Clipboard, manually select all the tools you usually copy, except for Layers. Now, you can copy adjustments using Copy/Apply shortcuts, and it will not affect layers on your images.

BTW, in the final part of the book, I’ll show you how to create a macro that removes layers during copying automatically.

Batch Masks from Color

Mask from color can be created for a bunch of images simultaneously. Simply select all the required images and run the process — each image will get a unique mask!
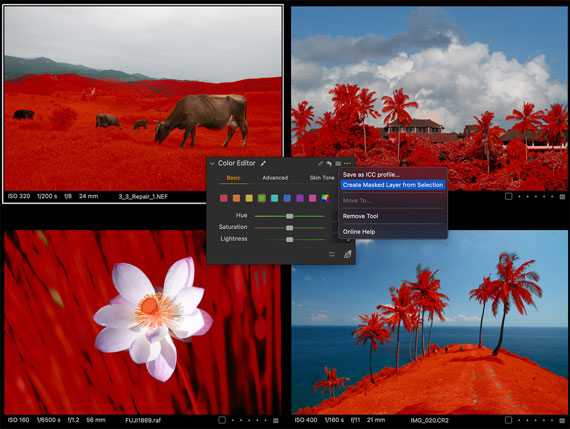
masks from color

Drawing Two Gradients on a Single Layer

Technically, Capture One allows drawing only one gradient per layer. However, a radial gradient in Capture One supports a significant level of transformation, and you can quickly form it into an elongated shape, making two gradients out of one.
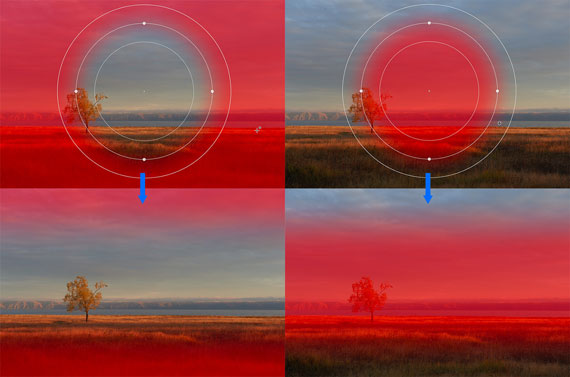
two gradients on layer

Mixing Layer Features

Finally, all layer features work just perfectly together.

For example, you can create a mask from color, refine it, and then remove some parts from this mask with Luma Range. Rasterize this mask, and you can now erase some objects, copy the mask, or invert it.

This is the key to efficient layer workflow in Capture One. It’s not just about making some local adjustments. You can get fantastic results if you re-adjust your mindset to incorporate all these features into your editing.

For Further Training:

Capture One Hidden Features is a collection of more than 200 pro hints to improve your Capture One workflow structured into an easy-to-read book.

capture one features

Capture One Hidden Features eBook (peek inside)

The book has four parts; each is designed to uncover hidden features of different areas of Capture One workflow. Try the coupon code pc10 for a discount.

Found here: The Capture One Hidden Features Guide

- - - - - - - - - - - - - - - - - - - - - - - - - - - - - - - - - - - - - - - - - - - - - - - - - - - - - - - - - - - - - - - - - - - - - - - - - -

Did you appreciate this newsletter? Please help us keep it going by Joining Our Patreon Supporters

What are your thoughts on this article? Join the discussion on our Facebook Page

PictureCorrect subscribers can also learn more today with our #1 bestseller: The Photography Tutorial eBook

- - - - - - - - - - - - - - - - - - - - - - - - - - - - - - - - - - - - - - - - - - - - - - - - - - - - - - - - - - - - - - - - - - - - - - - - - -

The post Layer Photo Editing Tricks in Capture One appeared first in the Photography Tips category on PictureCorrect.


from PictureCorrect https://ift.tt/A9isx24
via IFTTT

PictureCorrect.com: Interesting Photo of the Day: Milky Way Seascape

When you think of interesting Milky Way compositions, seascapes may not be the first thing to come to mind. Marcin Zajac, an award-winning landscape photographer, thinks differently. In this unique photograph — part astrophotography, part seascape — he shows off his skills and familiarity with the California Coastline. He also perfectly illustrates the rule of thirds. Placing the focal point — where the shore, water, and Milky Way meet — in the top third of the image.

“The Milky Way rising vertically over the Pacific Ocean on the California coast” by Marcin Zajac (Via Reddit. Click image to see full size.)

I’m gonna start with a disclaimer – no, the night sky doesn’t look this vibrant and detailed to the naked eye. Modern camera technology paired with long exposure times allows us to capture much more than our eyes can see.

For this image, Marcin used his Nikon D810 and long-exposure and shutter drag techniques. Capturing both The Milky Way and the movement of the water streaming through the crag in the rock in this way. For the sky, he opted for a 1-minute tracked exposure and a 1s shutter speed for the water.

- - - - - - - - - - - - - - - - - - - - - - - - - - - - - - - - - - - - - - - - - - - - - - - - - - - - - - - - - - - - - - - - - - - - - - - - - -

Did you appreciate this newsletter? Please help us keep it going by Joining Our Patreon Supporters

What are your thoughts on this article? Join the discussion on our Facebook Page

PictureCorrect subscribers can also learn more today with our #1 bestseller: The Photography Tutorial eBook

- - - - - - - - - - - - - - - - - - - - - - - - - - - - - - - - - - - - - - - - - - - - - - - - - - - - - - - - - - - - - - - - - - - - - - - - - -

The post Interesting Photo of the Day: Milky Way Seascape appeared first in the Photography Tips category on PictureCorrect.


from PictureCorrect https://ift.tt/yo1mr4H
via IFTTT
PictureCorrect.com: How to Photograph Bathrooms for a Real Estate Gig

Ever shared or been privy to more detail than you should when viewing or posting real estate photographs? Unwanted reflections on glass and mirrors can be both embarrassing and unattractive. Joe Gustafson has some clever tips to share on how to remove the glare in your shower and bathroom photography.

Step 1: Shoot With Artificial Light

When taking photographs of real estate, you can use artificial lighting to improve your results. A handheld strobe or flashlight is particularly useful for showers. Take multiple photos, including naturally-lit base images and others with your artificial light.

Ideally, hold the light inside and above the shower to give the best results. You can then layer or stack these images using photo editing software like Photoshop. Remember to shoot with a tripod and not move it or your camera, so your images line up perfectly.

Step 2: Choose The Best Images

Before you start stacking your images in Photoshop or your editing software, go through them. Choose the best shots as far as clarity, sharpness, and lighting are concerned. You’ll need an ambient layer free from artificial light as your base.

Plus, at least one artificially lit-up image to stack it with to create a composite image. Once you have selected your images in Lightroom, you can export them to Photoshop or similar editing software.

Step 3: Create Your Composite Image

It’s time to stack your images to create them into a reflection-free composite image:

  • To start, your ambient or base layer should be at the top of your stack.
  • Switch it off and create a layer mask on the other artificially lit images.
  • Use command I to invert each layer mask.
  • Then, select the white color for your brush.
  • You also want to set your flow to lower (around 5) for a gentler, subtler, slower, more controllable edit.
  • Use it to paint yourself or any artificial lighting equipment out, including on mirrors and reflective surfaces.
  • Next, select your ambient or base layer, add a mask to it, and invert it, too.
  • Paint any sections with the same brush settings to improve the overall lighting and brightness balance.
  • Then, flatten the image.

Step 4: Edit Out Any Final Reflections

At this point, there may be some smaller, more subtle reflections you wish to edit out. To do so, first duplicate the composite image. You can use the patch tool to highlight and slide any darker reflections out. Try to focus on the most obvious ones, as you may not need to eliminate them all. Joe also uses the dodge tool to brighten darker reflective patches afterward.

Step 5: Final Lightroom Edits

Once the reflective edits are done, you want to flatten them and move the composite image back into Lightroom. Here, you can add the final lighting edits. Adjust the brightness, exposure, tone, and more to create a real-estate-worthy snap. Though time-consuming, the results are well worth it!

…and that’s gonna separate you from the rest of the photographers out there… If you can provide images for them that look like this, that’s going to one-up yourself in the competition…

To Conclude:

Real estate photography really puts the pressure on photographers to capture properties in their best light. Sometimes, it’s necessary to bend the rules — and bring in a little artificial lighting and post-production editing into the mix — in order to get those results. Joe’s reflection and glare removal technique is a surefire way to level up your game!

- - - - - - - - - - - - - - - - - - - - - - - - - - - - - - - - - - - - - - - - - - - - - - - - - - - - - - - - - - - - - - - - - - - - - - - - - -

Did you appreciate this newsletter? Please help us keep it going by Joining Our Patreon Supporters

What are your thoughts on this article? Join the discussion on our Facebook Page

PictureCorrect subscribers can also learn more today with our #1 bestseller: The Photography Tutorial eBook

- - - - - - - - - - - - - - - - - - - - - - - - - - - - - - - - - - - - - - - - - - - - - - - - - - - - - - - - - - - - - - - - - - - - - - - - - -

The post How to Photograph Bathrooms for a Real Estate Gig appeared first in the Photography Tips category on PictureCorrect.


from PictureCorrect https://ift.tt/8vCeY75
via IFTTT