lauantai 30. marraskuuta 2019

PictureCorrect.com: Developing Your Eye for Photography

Related reminder: Black Friday sale ending soon for iPhone Photo Academy

Although there is much pleasure to be derived from taking a technically excellent photograph, there is a strong argument that a truly great shot depends most on your eye.

Look at the photographs you see every day in magazines, the press, or on display in a gallery. The shots you really take note of are the unexpected–the ones that catch a moment that could have been unnoticed and missed forever.

techniques to spot perfect photo opportunities

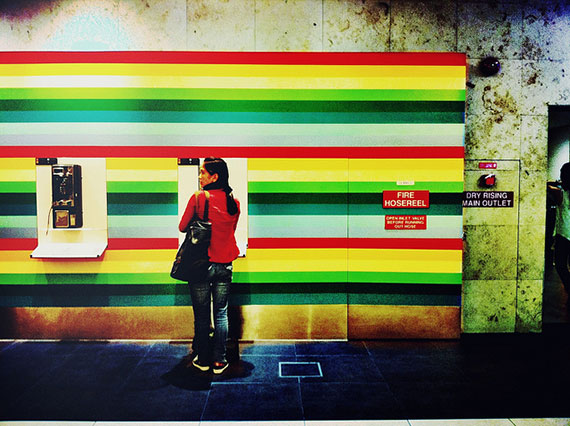
Photo by Flugflugfunmangel; ISO 100, f/9.9, 1/125-second exposure.

So for most beginning–but serious–photographers, you need to work at developing your eye.

Most of us–and probably all of us who hanker after taking a memorable photograph–can recognize a great view or a breathtaking sight. After all, this is why there are scenic routes, lookout points, and sightseeing trips all over the world. However, how many of the photographs taken at such set opportunities fail to grab you in the same way that the actual scene does? Often it’s because the picture has a clichéd air to it: it’s the same view of the same scene that a thousand other photographers have snapped before.

Look for an aspect of a shot that others will have missed. A different angle, something incongruous that only you have noticed, a certain shadow… Quite often this happens by accident, and you only see how good or how average your photograph is when you upload it and start editing. So take multiple shots in each session, and then study them critically to see how cropping, adjusting the colors and other editing techniques can turn an ordinary photograph into a great one.

eye for photography explained

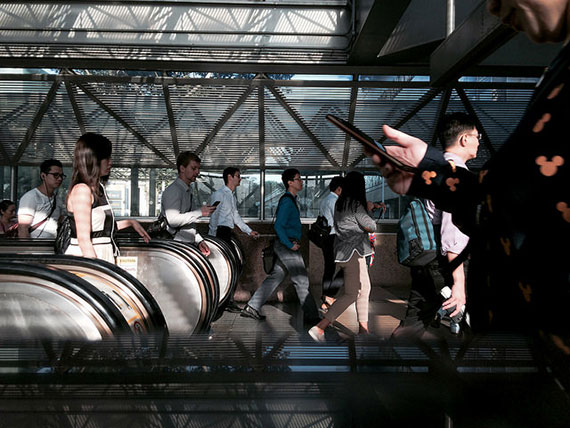
Photo by John Getchel; ISO 100, f/8.0, 1/125-second exposure.

You also need to develop your ability to look at ordinary scenes with a fresh eye, to spot the beautiful or unexpected in ordinary surroundings. Heading for a well-known beauty spot is in itself clichéd, and unlikely to produce a memorable picture. However, how many people take photographs around the place you live? How many people take photographs on your street?

how to capture the best photos

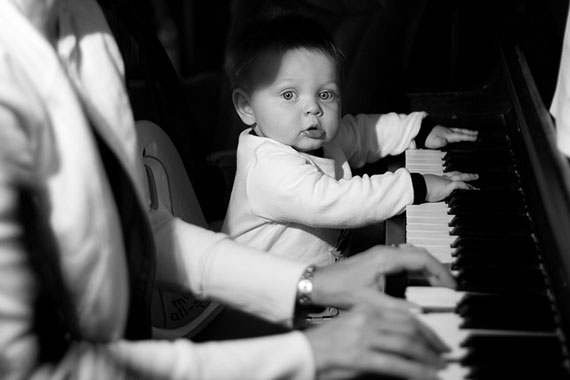
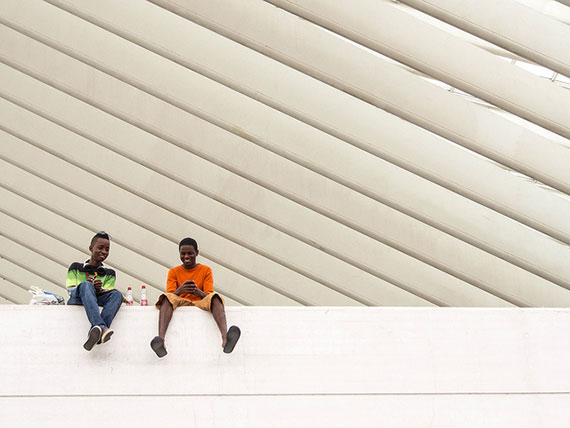
Photo by Andrew Sutherland; ISO 100, f/16.0, 8-second exposure.

Look local, get out and about in your area, finding the less well-trodden path the over-looked backwater, and see what your eyes are showing you. Remember to change your viewpoint; as shots taken low down or looking down are often the most dramatic and unusual. Look up too, as it amazes me how many people just look around themselves at eye level, never spotting the architecture and life that is going on above their head.

developing an eye for photography

Photo by Dávid Sterbik; ISO 100, f/3.1, 1/85-second exposure.

Once you have found the sort of photography that means the most to you, whether that is landscape, action, wildlife, urban, macro or portraiture, you can learn more about the techniques and equipment need to take better and better shots. Your eye and your ability to see a good shot come first.

About the Author:
Margaret Cranford (alecarte) is a photographed based in Clevedon, North Somerset in the UK (redbubble.com/people/magsart). She creates and sources watercolour paintings, photographs and prints.

For Further Training, Black Friday Sale Ending Soon:

iPhone Photo Academy is an in-depth online course that will show you how to take incredible iPhone photos. With the right knowledge an iPhone can be used to take photos that are so good that most people would never even believe that they were taken with a phone. It is currently 90% off for their Black Friday sale which ends soon!

iphone photo tutorials

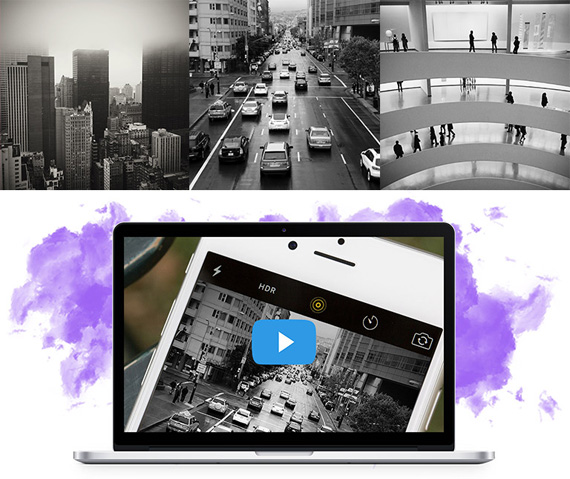
iPhone Photography Tricks (Click to See More Examples)

The best camera is the one that is always with you. But having the iPhone with you is only half of the equation. The other half is knowing how to use it to take outstanding photos.

Deal found here: The iPhone Photography Academy at 90% Off


Go to full article: Developing Your Eye for Photography

What are your thoughts on this article? Join the discussion on Facebook

PictureCorrect subscribers can also learn more today with our #1 bestseller: The Photography Tutorial eBook

The post Developing Your Eye for Photography appeared first on PictureCorrect.


from PictureCorrect https://ift.tt/2lEVJmB
via IFTTT

PictureCorrect.com: Interesting Photo of the Day: Philadelphia Long Exposure

Ready to see the city of Philadelphia in a brand new light? Check out this breathtaking scene captured by Toronto-based photographer Michael Sidofsky.

“Philly by Night” by Michael Sidofsky (Via Reddit. Click image to see full size.)

Taken from the iconic art museum steps Sylvester Stallone jogged in the 1976 classic Rocky, Sidofsky actually used a combination of images bracketed together to get the final result shown above. Using a Sony a7Riii, he captured the city scene with three exposures measuring 30 seconds, 8 seconds, and 2 seconds. In post, these images were blended together to create a base image.

Then, Sidofsky made an additional 167 second exposure (with 6-stop ND filter) to capture the light trails created by rush-hour traffic. Stacked on top of the base after the fact, the image above was born.

Thanks to a powerful 70-200mm telephoto lens, the entirety of city hall is compressed into this stellar scene. The Washington Monument fountain watches over the bustling Ben Franklin Parkway, perfectly capturing the vibrant spirit of Philadelphia in one magnificent moment.

Whether you call Philly home or live hundreds of miles away from the birthplace of America, this is one photograph that inspires you to seek out beauty in the buildings and streets that every city has to offer!


Go to full article: Interesting Photo of the Day: Philadelphia Long Exposure

What are your thoughts on this article? Join the discussion on Facebook

PictureCorrect subscribers can also learn more today with our #1 bestseller: The Photography Tutorial eBook

The post Interesting Photo of the Day: Philadelphia Long Exposure appeared first on PictureCorrect.


from PictureCorrect https://ift.tt/35RjX2p
via IFTTT

PictureCorrect.com: How Sensor Size Affects Composition

APS-C lenses have a slightly longer reach than full-frame lenses even though they have the same focal length because of the difference in sensor size. If you’re looking for similar results when using an APS-C lens and a full-frame lens, you need to compose accordingly. Photographer Julia Trotti compares the results of some prime lenses on an APS-C body and a full-frame body and shows you how you can get similar results:

Full-frame sensors cover a greater area of the image circle formed by the lens. On the contrary, APS-C lenses cover a relatively small area, more toward the center of the image circle. This is the reason why APS-C cameras have a greater reach than full-frame cameras when using the same lens.

To give perspective on how different prime lenses perform on an APS-C body compared to a full-frame body, Trotti uses her 24mm, 35mm, 50mm, 85mm, and135mm with a Canon 7D Mark II APS-C camera. She then compares the results with the images from her full-frame Canon 5D Mark IV.

Fixed Distance Between the Subject and the Camera

Trotti takes multiple images using her different prime lenses while maintaining a constant distance between the model and herself. The field of view is much wider in the case of the full-frame camera.

Sigma 24mm Prime Lens

24mm apsc vs full frame

Canon 35mm f/1.2 Mark II Prime Lens

35mm apsc vs full frame

Canon 50mm f/1.2 Prime Lens

50mm apsc vs full frame

Canon 85mm f/1.2 Prime Lens

85mm apsc vs full frame

Canon 135mm f/2 Prime Lens

135mm apsc vs full frame

Full Body Composition in Portrait Orientation

Next, Trotti asks the model to stay in the same spot while she herself moves around to fill the frame in a portrait orientated full-body composition with her 7D Mark II. Then, from the same spot, she takes an image with the 5D Mark IV to demonstrate the difference in the field of view.

Using Sigma 24mm Prime Lens

24mm apsc vs full frame

Canon 35mm f/1.2 Mark II Prime Lens

35mm apsc vs full frame

Canon 50mm f/1.2 Prime Lens

50mm apsc vs full frame

Canon 85mm f/1.2 Prime Lens

85mm apsc vs full frame

Canon 135mm f/2 Prime Lens

135mm apsc vs full frame

“Out of these full body tests, my favorite focal lengths on crop frame were the 35mm and 50mm.”

Landscape Orientation Mid-Frame Composition

Again, Trotti has the model stay put in a spot and composes with the model in the center of the landscape orientation using her 7D Mark II. Then, from the same spot, she switches over to her 5D Mark IV to show the difference in coverage.

Sigma 24mm Prime Lens

24mm apsc vs full frame

Canon 35mm f/1.2 Mark II Prime Lens

35mm apsc vs full frame

Canon 50mm f/1.2 Prime Lens

50mm apsc vs full frame

Canon 85mm f/1.2 Prime Lens

85mm apsc vs full frame

Canon 135mm f/2 Prime Lens

135mm apsc vs full frame

Extreme Close-up Head-shots

For the final test, Trotti composes so as to have as much of the model’s face in the frame using her 7D Mark II. Then again, from the same spot, she takes the image using her 5D Mark IV.

Sigma 24mm Prime Lens

24mm apsc vs full frame

There’s a good amount of distortion in both of these images because wide-angle lenses tend to exaggerate features when the subject is close to the lens.

Canon 35mm f/1.2 Mark II Prime Lens

35mm apsc vs full frame

“By the 35mm shot, you can see a lot of distortion on the full frame but not so much in the crop.”

Canon 50mm f/1.2 Prime Lens

50mm apsc vs full frame

At 50mm, the effects of distortion are almost gone in the crop frame. However, with the full-frame, there’s still a bit of distortion visible.

Canon 85mm f/1.2 Prime Lens

85mm apsc vs full frame

Canon 135mm f/2 Prime Lens

135mm apsc vs full frame

“My absolute favorite focal length on crop frame is the 50mm, which isn’t a surprise since my favorite lens for these kinds of close-ups on full frame is the 85. My close second favorite would be the 85mm on crop.”

Which setup do you think produces the best result? Let us know.


Go to full article: How Sensor Size Affects Composition

What are your thoughts on this article? Join the discussion on Facebook

PictureCorrect subscribers can also learn more today with our #1 bestseller: The Photography Tutorial eBook

The post How Sensor Size Affects Composition appeared first on PictureCorrect.


from PictureCorrect https://ift.tt/2OEmQhr
via IFTTT

Axminster Photography Group Photos: Sand and Seaweed


via Axminster Photography Group Photos Feed https://ift.tt/33xk7uk

Axminster Photography Group Photos: Magenta Primula


via Axminster Photography Group Photos Feed https://ift.tt/2LauGgi

Axminster Photography Group Photos: Palm


via Axminster Photography Group Photos Feed https://ift.tt/2DviPVZ

perjantai 29. marraskuuta 2019

PictureCorrect.com: What is Lens Diffraction? (Video Tutorial)

Lens diffraction is something that every landscape photographer has to deal with. Whether you’re using a top of the line lens or a very cheap one, lens diffraction is undeniably going to impact your images. So, what is lens diffraction? Photographer Steve Perry explains:

“When a light wave hits an obstacle like the edge of an aperture blade, it starts to disperse. This has the effect of changing the various wavelengths so that they travel different distances and they begin to interfere with each other. When this happens there is a loss of sharpness.”

This is lens diffraction. The smaller the lens opening, the softer the image becomes.

This is probably best understood using the airy disk analogy. Think of an image as being composed of numerous small pinpoints of light. When the aperture is big, the points of light are not diffracted and the projected dots of light are sharp and clean.

understanding lens diffraction

Larger f-stop produces a clear image devoid of diffraction

As the aperture is stopped down, diffraction sets in and the airy disks begin to blur and merge, meaning your image becomes soft.

diffraction and image softness

Smaller f-stop results in diffraction, resulting in image softness

Though all lenses are prone to the effects of diffraction, lower resolution sensors tend to get affected by diffraction much later. This is because with tiny packed sensors (higher resolution) even a small amount of blurring of the air disks means they overlap. This is why with lower resolution cameras (pixels not closely packed) you can easily use the lens stopped down to another one to two full stops before you experience a similar loss of sharpness.

Image sharpness and depth of field are not the same thing. Though smaller f-stops give you a bigger depth of field (more of the frame in focus), actual image sharpness actually decreases.

depth of field and image sharpness

The sweet spot of a lens produces the biggest depth of field with minimum diffraction

Another tip—if you stop down the lens to about one to two stops from wide open, you’ll get better sharpness; chromatic aberration and other imperfections tend to get corrected when you stop a lens down one to two stops.

Lens diffraction shouldn’t deter you from using a smaller f-stop. But you should be aware of the downsides. Ideally, you should always try get the balance right between depth of field and image sharpness.


Go to full article: What is Lens Diffraction? (Video Tutorial)

What are your thoughts on this article? Join the discussion on Facebook

PictureCorrect subscribers can also learn more today with our #1 bestseller: The Photography Tutorial eBook

The post What is Lens Diffraction? (Video Tutorial) appeared first on PictureCorrect.


from PictureCorrect https://ift.tt/2OAe5F1
via IFTTT

PictureCorrect.com: 6 Tips for Getting Great Pictures With a Basic Camera

Great pictures don’t necessarily come from high-end cameras and expensive lenses. Here are tips that you can apply even when using cameras like the one on the iPhone. If you can use these principles to get great pictures using basic cameras, imagine how much better a photographer you’ll be with serious photography gear!

1. Use Available Light

Available light usually means natural sunlight, but it can also include available sources of artificial light, e.g. an overhead dining table lamp. With the light positioned correctly, you can get professional looking pictures without any additional flash equipment.

photography tips for people with regular camera

ISO Joyce Latham; ISO 400, f/1.8, 1/60-second exposure.

2. Mind Your Composition

One element usually found in great pictures is great composition. Looking at the LCD, you’ll be able to see where you could ask your subject to move or move yourself so that you avoid having a tree jutting out from behind the subject’s head. This is even more crucial in basic cameras where you are unable to control depth of field to make the tree go out of focus.

iphone and other basic camera photo tips

Photo by Sherry Chen

3. Use Complementary Light Sources

Take advantage of your surroundings when traveling. Imagine you want to take a picture of your spouse on a busy street in Hong Kong at night. Instead of resorting to using the built-in flash, get her/him to move closer to the rows of brightly-lit shop signs so that they become the light source. Not only will they give a more natural color cast in relation to the surroundings, the light distribution on your subject’s face should also be more flattering.

4. Know Which Direction To Shoot

If you are taking a picture of a person with the sun behind you, you’ll be able to get blue skies in an outdoor scene, assuming you actually have a blue sky on that day. If the sun is shining at you, instead of behind you, you may get a washed out sky, with only very light tones of blue. This is because the auto metering on basic cameras will try to expose for both the person and the background, rarely achieving a good exposure for either one.

5. Anticipate the Right Moment

Pictures with people usually benefit from having some element of emotion. Even with the best camera, emotion in pictures is not possible if the photographer does not know when to press the shutter button, or is not ready when the emotional moment happens.

tips for better photography with your basic camera or phone

Photo by Tong Chai Siew; ISO 32, f/2.2, 1/320-second exposure.

6. Avoid Clutter

In a scene that has too much clutter, look for a plain wall to place your subjects against. Plain colored backgrounds like a plexiglass panel, a wooden door, or a brightly colored red wall also work well. For shooting still life, try reflective surfaces like a glass table or textured surfaces for an interesting background.

tips and tricks for basic camera use in photography

Photo by Georgie Pauwels

Keep these simple principles in mind on your next photo opportunity, and you’ll be on your way to producing great pictures even with the most basic of camera gear.

About the Author
Andy Lim (www.simpleslr.info) runs a profitable photography business that spans wedding photography, commercial photography and conducting photography workshops.


Go to full article: 6 Tips for Getting Great Pictures With a Basic Camera

What are your thoughts on this article? Join the discussion on Facebook

PictureCorrect subscribers can also learn more today with our #1 bestseller: The Photography Tutorial eBook

The post 6 Tips for Getting Great Pictures With a Basic Camera appeared first on PictureCorrect.


from PictureCorrect https://ift.tt/2UYPtXN
via IFTTT