keskiviikko 30. syyskuuta 2020

PictureCorrect.com: Interesting Photo of the Day: Tunnel Di Pini, Italy

Tunnel Di Pini, just outside of Pisa in Italy, is often hailed as one of the best tree tunnels in the world. For photographers in the area, its hard to resist. Even non-photographers will love the mile-long walk among the epic, ancient trees. If you have no idea about the place, just have a look at the following image taken by photographer TJ Drysdale. If this image doesn’t make you feel like visiting the place, we don’t know what will:

a girl running in Tunnel Di Pini

“Tunnel Di Pini, Italy” by TJ Drysdale (Via Reddit. Click image to see full size.)

As you can see, the beautiful arrangement of trees is really something. It looks like a fairy tale.

Besides the beautiful location, the way Drysdale has taken the photograph is pretty amazing as well. An excellent choice was getting the subject to wear a bright-colored dress: she stands out beautifully from the surroundings thanks to her outfit.

Then there’s the pose that adds so much value to this image. Her innocent pose, running into the woods, emits vibes of youth, joy and an embrace of nature. Although we cannot see her face, she sure seems to be excited and happy to be there.

Wouldn’t you love to visit the place?


Go to full article: Interesting Photo of the Day: Tunnel Di Pini, Italy

What are your thoughts on this article? Join the discussion on Facebook

PictureCorrect subscribers can also learn more today with our #1 bestseller: The Photography Tutorial eBook

The post Interesting Photo of the Day: Tunnel Di Pini, Italy appeared first on PictureCorrect.


from PictureCorrect https://ift.tt/2HFIJLX
via IFTTT

PictureCorrect.com: Smartphone Photography: 10 Tips for Good Results

Smartphones have become an essential part of our daily lives. And with camera quality  in smartphones getting better with every iteration, most of us have very capable cameras in our pockets. While taking photos with a smartphone is a simple point-and-shoot job, a little attention to detail can help you take amazing photos. Members of team moment share simple photography hacks to help you take better images with your smartphone:

1. Clean Your Lens

Sounds pretty basic right? But when it comes to smartphone cameras, we tend to ignore cleanliness a lot. The smartphone regularly comes in contact with dust and lint. When we handle it, the lens can come in contact with our sweat and grease. To cut it short,  the lens can get very dirty causing the image to look faded and hazy.Use a good quality brush or a micro-fiber cloth to clean the lens when taking a photo.

2. Lock Your Exposure

When using your smartphone camera in auto-mode, the camera makes all the exposure decisions. As you move the camera around, it continually changes the exposure to try and get an evenly lit image. If you feel the need to lock your exposure when moving the camera around, simply press and hold-down on the screen in your iPhone. This will let you set your exposure by moving the slider up or down and keep it locked. In case of an Android phone, have a look at your camera settings for a similar option as the option can vary with manufacturers.

locking exposure in smartphone

3. Underexpose Images

Smartphones in general have a tendency to over-expose images. To prevent any potential loss of data due to clipping, it is a good idea to slightly underexpose your images. You can later recover the shadow details while editing.

4. Shoot RAW

Modern smartphones have the ability to shoot in RAW format. RAW images store more data and give you greater flexibility when editing. See if your smartphone supports this feature. You may need to use a third party app to enable this feature. However, keep in mind that RAW files need to be processed a  bit. Otherwise, they appear very flat which is unflattering.

5. Change Your Angle

Shooting from eye-level is too mainstream. With the flexibility and convenience that smartphones have to offer,  try out different angles to get images from a unique perspective.

shoot from a lower perspective

6. Tele-Pano

Using an add-on tele lens for your smartphone camera, shoot a micro-panorama. This helps you to get a wider shot with a nice compression and depth which the wide native lens lacks. You can later crop the image in any aspect ratio you like.

7. Use Grids

Be sure to enable the grids in your smartphone camera. They work as guides to help you get properly aligned images.

8. Water Bottle Tripod

You can’t carry a tripod for your smartphone everywhere you go, right? In case you need support for your smartphone while photographing or taking videos, use a coffee cup or a water bottle instead. You can simply lean the smartphone against the cup or bottle while the camera takes photos or records a vide0s.

9. Don’t Shoot at the Sun

Ever noticed some weird bright dots or streaks in your images when shooting directly into the sun? Well, they are called flares and they can be distracting at times. If you notice flares in your images, slightly changing the angle you are shooting at can help you get rid of it. Not so difficult right?

flare in image taken with smartphone

Which one is your favorite tip from the bunch?


Go to full article: Smartphone Photography: 10 Tips for Good Results

What are your thoughts on this article? Join the discussion on Facebook

PictureCorrect subscribers can also learn more today with our #1 bestseller: The Photography Tutorial eBook

The post Smartphone Photography: 10 Tips for Good Results appeared first on PictureCorrect.


from PictureCorrect https://ift.tt/2ENtOOV
via IFTTT

tiistai 29. syyskuuta 2020

PictureCorrect.com: Better Sunset Photography

Basked in golden light as the sun shimmers over the water, the sunset can truly be a magnificent sight. When you are traveling or even exploring your local area, try to be a little more creative with your sunset photography. Too often we see the standard sunset shot with little to remind us of where it was taken.

how to take better pictures of the sunset

Photo by Paul Carmona; ISO 100, f/14.0, 1.3-second exposure.

Although it can be tempting to have a clear sunset shot, you are really missing creativity and visual reminders of where the shot was taken. If you are away on holiday or somewhere new, try to capture the essence of the place you are visiting. Framing the shot with a little thought can turn a nice sunset into a spectacular, memorable photo.

Setting up for the perfect sunset shot

Sunset photography can be a little tricky, and if you let your camera think for you, i.e. leave it on automatic, then this can often provide undesirable results. Silhouettes are often the creative realm of the sunset. Of course, this is because the sun is such an overpowering light source. And this is where the problem begins if your camera is in automatic mode. Although letting the camera lower the exposure can be desirable to allow for the silhouette, you are often left with just an outline and no detail.

sunset camera setup

Photo by Jakub Gorajek; ISO 100, f/4.0, 1/400s

Using exposure compensation can help bring some detail back into the foreground objects or people. Nearly all cameras (even many compacts) will allow you to set a +1 EV compensation. Just be aware that if you are in shutter priority this will often change the f-stop rather than the exposure time. If you are using a DSLR camera, I highly recommend you use bracketing. We will delve into the world of bracketing at another time.

Take the sun component away

That big bright sun dominating the horizon causes all complications. You can simplify fix this by not including the sun in the image or hiding it behind an object in the frame. Not having the sun dominating the frame allows for less extreme lighting conditions, and as such, you should end up with a shot that transitions from foreground to background much more evenly.

techniques for better sunset photography

Photo by sandeepachetan.com travel photography; ISO 100, f/7.1, 1/500-second exposure.

The right white balance

I refer now to the advantage of shooting in RAW. White balance is a key consideration when shooting the sunset. If you let your camera do the thinking for you, it will often set an incorrect white balance–normally to the cool end of the scale.

This is because the camera believes there is far too much red and yellow in the shot. But of course, this is exactly what we are looking for in the first place. A good rule of thumb is to set a daylight white balance. This will give you the warm tones you are looking for. Shooting in RAW allows for white balance changes during post-processing and will allow for finding the optimum temperature.

Bringing back the detail in people

If you are using a person in the foreground for a sunset portraiture shot, I refer back to the problem of complete silhouette and no detail. This can be a good time to break out the flash for a little fill in light.

sunset portrait

Photo by Warren Wong; ISO 100, f/1.8, 1/320-second exposure.

Another technique I have often used (although a little unusual) is a torch. Some of the new LED torches offer a great subtle light source perfect for these situations. I often find flash very harsh, and it is not very practical to take lighting stands and umbrellas to the beach. You would be amazed at how handy the humble flashlight can be for shedding a little light on the subject.

About the Author:
This articles was written by Patrick Ryall from BetterPhotoSchool. Previously a tips and tutorial site and photographers social network.


Go to full article: Better Sunset Photography

What are your thoughts on this article? Join the discussion on Facebook

PictureCorrect subscribers can also learn more today with our #1 bestseller: The Photography Tutorial eBook

The post Better Sunset Photography appeared first on PictureCorrect.


from PictureCorrect https://ift.tt/2moHJxS
via IFTTT

PictureCorrect.com: Interesting Photo of the Day: High-Key Zebras in Rwanda

Zebras prove the minimalist credo that you don’t need to flaunt vibrant colors to be attractive. In fact, if you are looking to photograph black and white wildlife photos, what better subject could you find than zebras? Take the following image that was captured by photographer Matt Horspool. The image is an excellent example of how zebras can be an excellent choice for some high-key photography:

three zebras in Rwanda

“High Key Zebras” by Matt Horspool (Via Reddit. Click image to see full size.)

The most admirable aspect of this image has to be the symmetry in the composition. Horspool happened to catch them at the right time, with all three zebras looking identically in the same direction. What do you think grabbed the zebras’ attention? Was it just another safari truck? Or are they alert because they spotted a lion? We can only guess.

Of course, the image is spectacular especially because of its intense contrast. By overexposing the image, the photographer has intentionally blown out the sky and some parts of the ground. However, thanks to the blacks in the zebras, they stand out wonderfully.

“They make the best black and white subjects and it was the middle of the day so what better time to overexpose!”

This image is a perfect example of how it is not always necessary for your image to be technically correct to be amazing. You just need to have an idea in mind, know what you are looking for and be ready with your camera.


Go to full article: Interesting Photo of the Day: High-Key Zebras in Rwanda

What are your thoughts on this article? Join the discussion on Facebook

PictureCorrect subscribers can also learn more today with our #1 bestseller: The Photography Tutorial eBook

The post Interesting Photo of the Day: High-Key Zebras in Rwanda appeared first on PictureCorrect.


from PictureCorrect https://ift.tt/2Goxkzr
via IFTTT

PictureCorrect.com: 10 Classic Street Photographers to Inspire You

In every genre of photography, there are famous photographers who have helped define the field. Maybe it’s their unique process, their way of telling stories, their compositional eye or their penchant for playing with light and shadows. Whatever it was that made them famous, photographers today would do well to seek out these greats to get inspired. In today’s video, we have photographer Ted Forbes who talks about 10 well-known street photographers who inspire him. Let’s have a look at their work:

Forbes cites some of the well-known names in the world of street photography, such as Henri Cartier-Bresson, W. Eugene Smith, Robert Frank and Saul Leiter, as well as Charles Negre, Karmoinge, Ted Cronner and Loise Fraurer, who are not as well known.

Forbes highlights what it is about these photographers’ work that inspires him. With some, it is the power of the message they were able to convey. In other cases, it is the beautiful composition of their images. In any case, you can learn a lot from studying their lives and work.

If you’re a street photographer but don’t look up to anyone’s work in particular, check out the video above. You might just find yourself a new idol.


Go to full article: 10 Classic Street Photographers to Inspire You

What are your thoughts on this article? Join the discussion on Facebook

PictureCorrect subscribers can also learn more today with our #1 bestseller: The Photography Tutorial eBook

The post 10 Classic Street Photographers to Inspire You appeared first on PictureCorrect.


from PictureCorrect https://ift.tt/30iXdYQ
via IFTTT

Axminster Photography Group Photos: Afternoon Pint


via Axminster Photography Group Photos Feed https://ift.tt/3kVEhad

Axminster Photography Group Photos: Colyton Church


via Axminster Photography Group Photos Feed https://ift.tt/2HxJuXo

Axminster Photography Group Photos: Mooring Ring


via Axminster Photography Group Photos Feed https://ift.tt/347mWo5

Axminster Photography Group Photos: Boats at low tide


via Axminster Photography Group Photos Feed https://ift.tt/36jN6GS

Axminster Photography Group Photos: Legg's Lane in Winter


via Axminster Photography Group Photos Feed https://ift.tt/2SaxXiM

Axminster Photography Group Photos: Sunset Over Seaton Bay


via Axminster Photography Group Photos Feed https://ift.tt/2HxJuGS

Axminster Photography Group Photos: Legg's Lane in Winter_23


via Axminster Photography Group Photos Feed https://ift.tt/2HH6TWD

Axminster Photography Group Photos: Solitude


via Axminster Photography Group Photos Feed https://ift.tt/3iciHMY

Axminster Photography Group Photos: Rope Wrap


via Axminster Photography Group Photos Feed https://ift.tt/349bjwN

Axminster Photography Group Photos: Long time locked


via Axminster Photography Group Photos Feed https://ift.tt/3l18XqR

Axminster Photography Group Photos: Axmouth Village


via Axminster Photography Group Photos Feed https://ift.tt/3ie5C5G

Axminster Photography Group Photos: Sunset Over Seaton Bay_23


via Axminster Photography Group Photos Feed https://ift.tt/3kUvyFq

Axminster Photography Group Photos: Branscombe Forge


via Axminster Photography Group Photos Feed https://ift.tt/3cRDoNr

Axminster Photography Group Photos: Heritage Railway - Pontrieux


via Axminster Photography Group Photos Feed https://ift.tt/3kXTS9u

Axminster Photography Group Photos: It's how I see it


via Axminster Photography Group Photos Feed https://ift.tt/36iaIvM

Axminster Photography Group Photos: Graceful Grass


via Axminster Photography Group Photos Feed https://ift.tt/347KQ2P

Axminster Photography Group Photos: Telegraph Talk


via Axminster Photography Group Photos Feed https://ift.tt/3mWY4YZ

maanantai 28. syyskuuta 2020

PictureCorrect.com: Photography Tips for Mist, Fog, Condensation, and Hail

Soon we will be considering photography tips on waves, waterscapes, waterfalls, reflections, abstracts, splash ‘n spray, foam, bubbles, and puddles as remedies for the photo doldrums. But, water can provide even more photo ops! Regularly check your local weather forecasts and keep a notebook of the special places you find in your neighborhood that provide good locations for shots that include the following:

mist fog rain condensation photography tips

Photo by Karsten Wentink; ISO 200, f/8.5, 1/8-second exposure.

1. Mist

In the early morning or late evening, mist or groundfog can generate “artist’s light” as masses of water vapor condense from coolness near ponds, rivers, etc. or down in ravines and valleys. It burns off quickly though, so you have to anticipate it and get there early. Look for things extending above the mist—or visible through openings in it—as it swirls about.
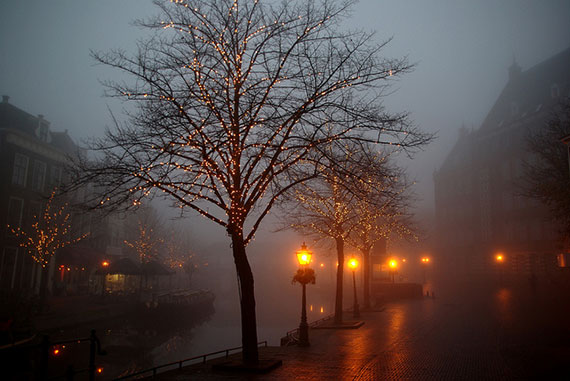
2. Fog

Fog can make all the difference between ordinary and exceptional images. In foggy scenes, include foreground objects for silhouettes and interesting contrasts. Just remember that you generally have to increase your exposure by 1/2 to 3/4 of a stop to avoid a picture that’s too dark.

3. Condensation

Perhaps more often associated with man-made things—cold objects amid warm, moist air—condensation is an often overlooked source of interesting pictures. Watch out for cold water pipes and surfaces in warm places. Or, open your fridge and check out the food containers with clear plastic lids. Are there any condensed water droplets on the underside of the lids? Remove the lid without disturbing the droplets, (Tip: Leave the lids just sitting on top instead of clicked down tight) and gently place it down on a flat surface suitable for a background. Set up your camera to shoot straight down on the lid for over-all sharpness.
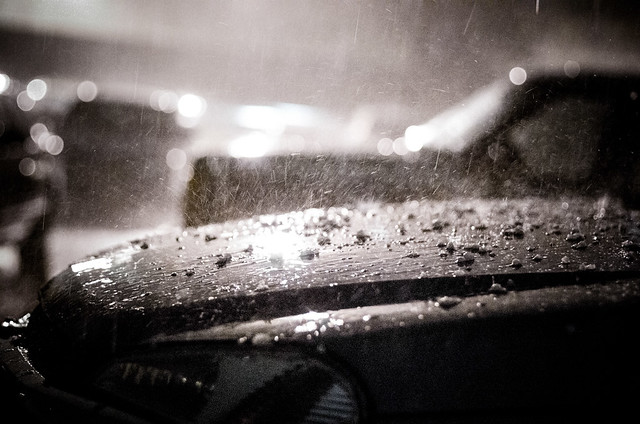
4. Hail

Hail is possible with most thunderstorms as it is usually produced at the leading edge of a severe storm system and usually falls within two miles of its parent storm, during the summer months, in the afternoon and evening hours. Hail-producing clouds are often identifiable by their green coloration and hailstorms normally last about 3-15 minutes. Hailstones can vary from less than pea-size to larger than four inches. Place a hailstone over a slightly smaller hole in black cardboard and shine a light up through the hole and the hailstone, and photograph the hailstone’s interior structure. Or picture assorted stones along with coins, etc. for size comparison on a dark background. Or photograph it after a heavy fall where ever it lays, amid the damage it may cause.

hail photography

“Hail & Rain” captured by Kurt Bauschardt

Self-Assignments

Choose the projects that interest you most. Follow the photography tips conscientiously. Re-shoot when you aren’t satisfied. Do it until you are satisfied. It’ll take all your patience and passion. Your skills and eye will improve with the practice. Shoot especially in early and late light. Use a tripod as much as possible. Edit your results relentlessly. Pin small samples on the wall for a few days to study before making final prints for wall art.

Mist: When the weather forecast predicts ground fog, have a rural scenic spot in mind to go to that has higher and lower sections within it and shoot it just as the sun comes up.

Fog: When the weather forecast predicts fog, have a scenic spot in mind to go to and shoot a portion of it that has things that recede from you into the fog, with some leaves hanging down into the top of the frame as silhouettes.

Condensation: If you have a container of yogurt with a clear plastic lid in your fridge, just sit the lid on top of the container and don’t click it down tight. When water drops from condensation form a pattern of circles on the underside of the lid, gently take the lid and place it down on a table or counter top, without disturbing the drops. Shoot straight down on it and make a close-up of a part of the pattern.

tips for taking photos of mist fog rain condensation

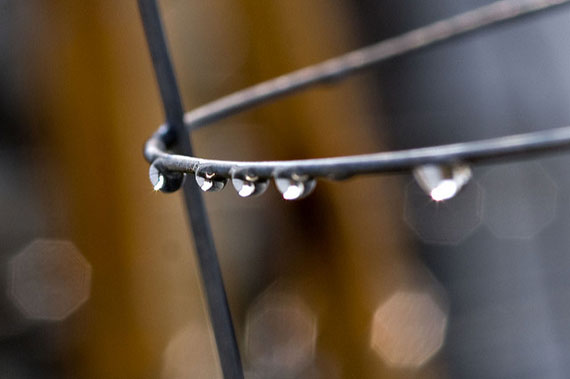
Photo by PhotoJeff; ISO 100, f/8.0, 1/125-second exposure.

Hail: When a thunderstorm is in the forecast, keep an eye out for hail. Find a safe place to shoot from and shoot the hail as it falls and bounces off of things, using both fast and slow shutter speeds.

In the next article of this set we’ll consider photography tips about water’s cold season photo ops to remedy the photo doldrums.

About the Author:
John Maxymuik from AmbienceImages authored this article which is 1 of a set of 6 on Photography Tips for the Photo Doldrums providing tips to break the grip of the photo doldrums using the “ideal photo subject”. Maxymuik previously operated a website at ambienceimages.


Go to full article: Photography Tips for Mist, Fog, Condensation, and Hail

What are your thoughts on this article? Join the discussion on Facebook

PictureCorrect subscribers can also learn more today with our #1 bestseller: The Photography Tutorial eBook

The post Photography Tips for Mist, Fog, Condensation, and Hail appeared first on PictureCorrect.


from PictureCorrect https://ift.tt/3iedX9H
via IFTTT

PictureCorrect.com: Interesting Photo of the Day: Morning Deer

Good photographs convey a story, but photographs are even better when they can convey a feeling. Have you ever come across an image that gives you a feeling of calmness? Something that simply relaxes you? If you haven’t, today might be your lucky day. Photographer Jordan Kimmons took the following image, which looks like a scene straight out of a fairy tale:

silhouette of a deer against a lake

“A Perfect Morning” by Jordan Kimmons (Via Reddit. Click image to see full size.)

Kimmons captured the image with a Sony A7III with a Sigma 35mm f/1.4 lens at around 5:30 in the morning. It’s beautiful how he managed to capture the doe right at the spot where the lake is reflecting the morning sky. This creates a beautiful silhouette, with a magical and mysterious touch added to the image. You can feel how peaceful and quiet it must’ve been there just by looking at the photo.

“My friends and I saw the deer walk along the shore 10 or so minutes prior, so this was just a few minutes later as we were hoping it would walk back.”

The colors, the lighting, the composition, the subject—everything about this image is so serene. Don’t you think it would be a perfect way to start your day like this?


Go to full article: Interesting Photo of the Day: Morning Deer

What are your thoughts on this article? Join the discussion on Facebook

PictureCorrect subscribers can also learn more today with our #1 bestseller: The Photography Tutorial eBook

The post Interesting Photo of the Day: Morning Deer appeared first on PictureCorrect.


from PictureCorrect https://ift.tt/2GlRevi
via IFTTT