Recently an intern joined me and drove me up the wall with questions about manual settings for photography. Questions like ”What zoom range should I adjust my lens to shoot a portrait and a group photo. Isn’t shutter speed useless?” drove me absolutely nuts! Before I shunned him away, I realized that there are no wrong questions, and I’ve been telling him that for a while now, especially when it comes to photography.
Have you ever asked a professional photographer, “What are the best settings to take a photograph?” More often than not, the reply is so vague. “Depends… on the lighting,” or “What are you shooting?” And you might have thought to yourself, “{facepalm} OK, that’s not helpful at all.”
I’ve been working on professional photography productions for over two decades. I’ve been lucky to work with some of the top photographers on shoots for major brands. And I’d like to share my story about how I started clicking better pictures.
Like most beginners, I’ve met with vague answers to my photography questions on how to get started. I’ve been guilty of asking the most stupid questions about camera settings for photography, too.
DISCLAIMER: The settings below don’t guarantee you the perfect shot. They are only to help beginners to get acclimated to shooting with a point of reference for manual settings.
Shutter speed, aperture, and ISO can confuse the s*it out of any beginner to photography. Before we get started, I’d like to share a quick tip on how to get familiar with manual camera settings for photography noobs.
If you were wondering why your photographs come out blurry or why all the highlights are blown out, here’s a tip to give you a clue.
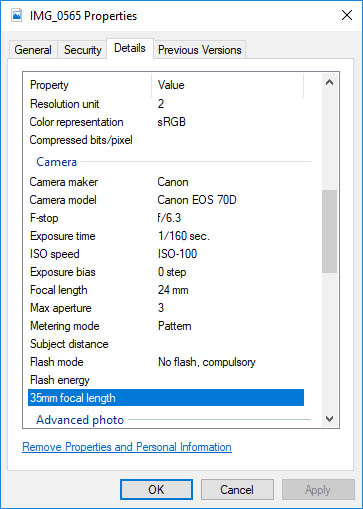
Quick Tip 1: Metadata
Check your metadata. When you have a picture that makes you wonder what went right or wrong, the metadata has oodles of information. Pure gold. Simply right-click on your photograph and get properties or info and check the last tab. You’ll be able to locate data for the shutter speed, aperture, and white balance on that photo.
Metadata
A good way to go forward from here is to make a note of different settings that worked best for you. When you attempt a similar capture you can start with those settings. Be open to fiddling about with all the knobs and dials to fine tune your settings a little.
Why Go Manual?
“Real men shoot manual?” Not really… But they do.
Although, the auto settings do a pretty good job, they might not be the best settings that do justice to your photograph or story.
Basic photography is all about saving light. And using manual settings can help you get the best exposure, stability, and lowest noise in any situation.
How do you understand aperture, shutter speed and ISO?
When you first get started these settings can be very overwhelming. It’s a steep learning curve and if you’re like me, you’ll have made some pretty bad mistakes before you get a hang of things.
Quick Tip 2: Make Mistakes
Make mistakes. Take some horribly wrong pics. Commit to taking gigs as a second shooter. Shadow a professional photographer or an experienced friend when they have gigs. Making huge mistakes and blunders helps you remember better. If I open up the aperture too wide, my pics might be brighter but a lot of stuff is going to be out of focus. Or if I have a higher shutter speed, it’s easier to get sharper pictures, especially when there is movement in my frame.
I ventured out on small trips to the park, longer trips to popular travel destinations with my friends, and even to professional studios to try some photography. My pictures looked pretty good on camera. I’d usually be quite satisfied with the framing and symmetry. But when I got home and pulled them onto our large screen, the horror! Blurry, out of focus, and over exposed. Sometimes noisy and over exposed, too. How did I even manage that? I wasn’t getting sharp, crisp images.
YouTube video tutorials and traveling trips weren’t doing me any good. Adding a speedlight to the mix was just a hot mess, because I didn’t know how to work lighting either.
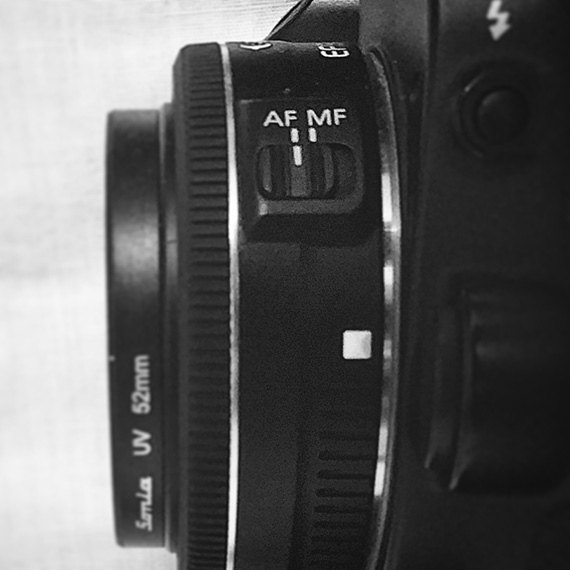
Things were really bad. When I first tried my hand at photography with my DSLR camera, I didn’t even know the difference between the focus ring and the zoom ring on the lens. And I’d turn the wrong ring and mess up a shot quite often.
Quick Tip 3: Practice Manual Settings Before a Shoot
It’s good to do a couple of small exercises to get familiar with all the knobs, buttons, and rings for your manual settings. You could keep a couple of reference settings and practice about changing your settings a couple of times before every shoot.
Let’s look at an easy quick workflow to manual settings on any DSLR camera.
Focus First
The first lesson I learned was auto focus. Don’t bother with manual focusing. Professionals very rarely depend on manual focus. But things could go wrong when you auto-focus, too. The camera could decide to choose any focus point on your background rather than your subject. As a beginner, I’ve done that often too—lots of really nice shots that I clicked were “out.”
What do you do when your camera refuses to focus on your talent or your point of interest?
This is what some called the pull focus and re-frame technique.
Focus and Re-frame
Look through your camera settings menus and choose the focus point at the center of your frame. (I set mine to the 1pt AF to use one autofocus point to find focus.) This sets your primary point of interest for focus right at the center of your frame.
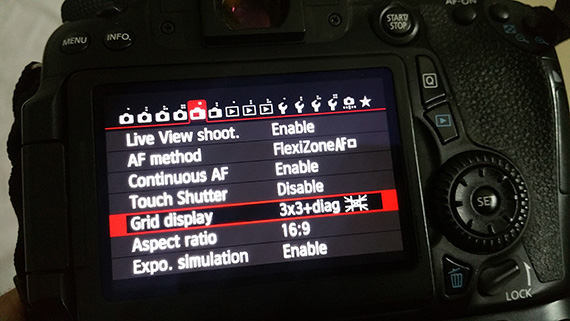
Frame your subject to have your talent’s eyes or your subject’s leading lines converge right in the center of your frame. Half press your shutter until you hear a beep (enable beeps from your camera menu settings if they’re off). This will ensure focus on your subject. Now re-frame your picture while your hand is still half pressed on the shutter button. I usually use the one third rule for framing (again it’s good if you have your grid display on). Re-frame until your subject coincides with the one third lines on the grid, hold still, and completely squeeze your shutter button and release.
Center frame, pull focus, reframe, click.
Manual Settings
Now let’s get to a quick basic understanding of all these complex manual settings.
Let’s look at them one at a time.
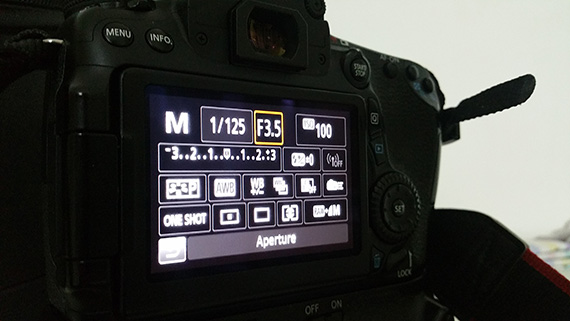
All your settings will have dials or buttons. On bridge cameras you might have to use the menu or touch screen display. Any settings will have two options. You can dial a setting up or dial a setting down. As a result of changing any setting your image becomes brighter or darker. That’s really most of what there is to it, but let’s look a little deeper because there is more.
Sometimes little changes can make huge differences.
Shutter Speed
You can start with a shutter speed of about 1/125 if you’re not sure where to keep it.

If your images look shaky or leave trails, then your shutter speed settings might be a tad bit low. A higher shutter speed will give you sharper images and compensate for some mild shake or jitters too; but will make your image darker. Sometimes you’ll need a speedlight or external strobe light to compensate for low light.
When you shoot at a lower shutter speed (e.g. 1/30) try using a tripod for stability.
Shutter speed is the amount of time taken for the the shutter to close when you click a photograph. In other words, shutter speed is the time the picture is exposed for.
This is why, when your shutter speed is too slow and if there is movement either in your picture like people walking or if your hand shakes even, you can expect some kind of overlap or blurriness on your image.
Aperture
As a shutterbug, have you ever been crazy mesmerized by shallow depth of field. Do you love that beautiful bokeh in your backgrounds? This is what aperture controls.
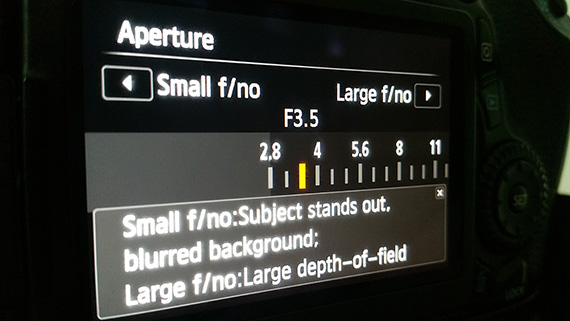
As your aperture is set higher (e.g. f/6.0), backgrounds or areas that are not in focus start to become sharper. When you dial aperture down (f/2.0) the shallow depth of field increases and your backgrounds go even more out of focus.
Aperture controls the amount of light to the sensor. Controlling the aperture of your camera is like squinting your eye to get a sharper image or reducing the intensity of light when the sun hits your face directly. As you close your aperture by increasing the aperture value (e.g. increase 1.8 to 3.5), less light bounces off your camera’s sensor and your image gets darker.
ISO
If you’re shooting in lower light you could set your ISO to about 800 but if you chose to shoot outdoors in the day, you could even dial it down to ISO 100.
ISO is the standard for setting the sensitivity of your camera. It used to have to do with the film standards back in the day.
Most cameras have a native ISO. You might also want to fix your ISO at this number and then play with the other settings to get a good exposure of your scene. When you are shooting in low-light you could rely on the ISO to pump up the brightness. But you’ll notice that as you start to increase your ISO there is an increase in noise levels, too. So you don’t want to go too far.
Reference Manual Settings
Here are some default or rather reference settings you can look at if you don’t know how or where to get started:
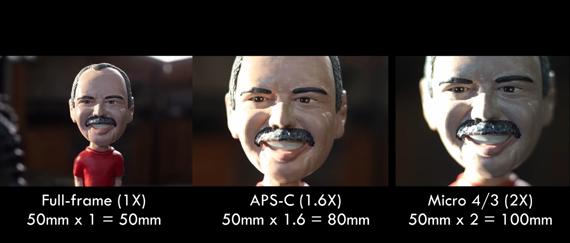
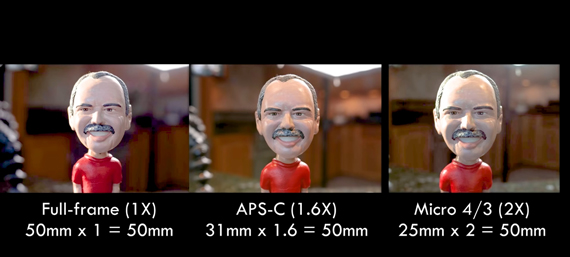
Zoom Range
70mm for portraits.
24mm for wide landscapes.
Aperture
f/3.5 so that your subject is in focus and the shallow depth of field isn’t too overwhelming.
With kit lenses as you zoom in the aperture is variable and increases.If you’re working with a kit lens you might want to shoot a bit wide so that you may accommodate a lower aperture setting.
White Balance
3000k for a neutral white balance.
5600k for a warm colour temperature.
You could also leave it at auto.
If you shoot in raw you’ll be able to fiddle with the white balance quite easily while post processing.
You could leave your white balance to something around 3300k to get a neutral white color. Feel free to tweak these settings to get a color temperature that looks as close to what you see.
Shutter Speed
1/125 will give you nice crisp image.
If you want to shoot a long exposure shot you could set it to way lower but you’ll want to mount your camera on a tripod.
ISO
800 for lower light settings.
100 for outdoors and day shots.
So there you have it—some sample settings to get you started.
Steps for Manual Camera Settings
- Set your focus to auto.
- Adjust ISO.
- Set your zoom to about 70mm for portraits or 24mm to 35mm for landscapes.
- Set your aperture to about f/3.5. You could go lower or higher to play with depth of field and control the amount of light.
- Set your shutter speed to 1/125.
- Center frame your image, focus by half pressing your shutter, re-frame to one-third rule, and click.
The settings above are only a reference to start with. In almost all situations you will need to dial in some changes for most of the settings to get a well exposed image.
Let’s face it. The truth is we read a ton of stuff and then when we go out in to the field, all the theory goes out the window. The best way to learn is go out there make some horribly horrible mistakes. Take your worst photos. Learn why they came out so bad. Learn lessons and when you’re done taking your worst photographs you can start to consistently make great ones.
Do let me know in the comments below if you find these tips useful. Or if you have some more of your own first time experiences and tips that you’d like to share.
About the Author:
Mark is a corporate filmmaker at Web Interactive Films.
Go to full article: Manual Settings for Beginner Photographers
What are your thoughts on this article? Join the discussion on Facebook
PictureCorrect subscribers can also learn more today with our #1 bestseller: The Photography Tutorial eBook
The post Manual Settings for Beginner Photographers appeared first on PictureCorrect.
from PictureCorrect https://ift.tt/3fVHmGP
via
IFTTT


 How to Use Auto Exposure Lock on a DSLR Camera

 Light Art Performance Photography Tutorial