perjantai 31. maaliskuuta 2023

PictureCorrect.com: Interesting Photo of the Day: Arctic Fox Stare Down

Wildlife photography interests many people because animals act naturally in their habitats, unlike their counterparts in zoos. For example, a lion at a zoo can be seen pacing nonstop, often to the bemusement of visitors watching nearby. That doesn’t make such an interesting photo! In the wild however, photographers carefully plan their approach and wait until key moments happen such as hunting, eating, fighting and playing amongst the lions. The important aspect is capturing these images in their natural setting and finding an appealing way to do so. In this case, a chance encounter with an arctic fox stops it in its tracks as it poses for a photo:

wildlife photography foreground exposure

“Arctic Fox” by Kevin Rawlings (Via Reddit. Click image to see full size.)

Photographer Kevin Rawlings captured this stunning image of an arctic fox having a stare down with him while he approached to get a better picture. The detail shows as you zoom in and notice each individual hair poking out from the fox’s body. Just look at those eyes, too! The clean background pushes the attention to the front where the fox calmly sits on the ledge. It is a perfect setting for this photograph because the colors complement the fox’s silver-grey coat. Without the clear background, it wouldn’t be as easy to spot this little guy.

- - - - - - - - - - - - - - - - - - - - - - - - - - - - - - - - - - - - - - - - - - - - - - - - - - - - - - - - - - - - - - - - - - - - - - - - - -

Did you appreciate this newsletter? Please help us keep it going by Joining Our Patreon Supporters

What are your thoughts on this article? Join the discussion on our Facebook Page

PictureCorrect subscribers can also learn more today with our #1 bestseller: The Photography Tutorial eBook

- - - - - - - - - - - - - - - - - - - - - - - - - - - - - - - - - - - - - - - - - - - - - - - - - - - - - - - - - - - - - - - - - - - - - - - - - -

The post Interesting Photo of the Day: Arctic Fox Stare Down appeared first on PictureCorrect.


from PictureCorrect https://ift.tt/H75YcWE
via IFTTT

PictureCorrect.com: How to Keep Your Camera Gear Clean in Dusty Conditions

Your camera and lenses are equipment that help you to capture a moment in time. If you’re a professional, they’re the tools that help you get the job done. And no, you don’t have to treat your gear like your babies. But it’s important that you handle them with care. And care becomes even more important when you’re traveling. You don’t want to end up with non-functioning equipment in a new place. Photographer Janine Krayer from Pangolin Photo Safaris shares some simple measures to care for your photography gear when you’re traveling:

You really don’t need to carry around professional kits to clean your camera gear by yourself. A basic camera kit works just fine. Krayers demonstrates how you can keep the body and the front element of the lens clean along with certain precautionary measures. And it’s not only the outside that gets dirty right? Sensor spots are a common bother that many of us face when shooting in dusty conditions. Krayers also explains how you can get rid of the dust on the camera’s sensor using a simple air blower.

“If you come from a really dusty safari, you should clean your equipment literally daily to keep it nice and spotless.”

And if you’re one of those people on the clumsy side and tend to bump your equipment regularly, consider getting a silicone protective cover. They work like the case that we put on our phones to protect them.

What other techniques do you use to take care of your photography equipment?

- - - - - - - - - - - - - - - - - - - - - - - - - - - - - - - - - - - - - - - - - - - - - - - - - - - - - - - - - - - - - - - - - - - - - - - - - -

Did you appreciate this newsletter? Please help us keep it going by Joining Our Patreon Supporters

What are your thoughts on this article? Join the discussion on our Facebook Page

PictureCorrect subscribers can also learn more today with our #1 bestseller: The Photography Tutorial eBook

- - - - - - - - - - - - - - - - - - - - - - - - - - - - - - - - - - - - - - - - - - - - - - - - - - - - - - - - - - - - - - - - - - - - - - - - - -

The post How to Keep Your Camera Gear Clean in Dusty Conditions appeared first on PictureCorrect.


from PictureCorrect https://ift.tt/o7jkNhn
via IFTTT

torstai 30. maaliskuuta 2023

PictureCorrect.com: How to Take Panoramas with an iPhone

In this blog post, we will be discussing the most important takeaways from Emil Pakarklis‘ video on capturing amazing panoramic photos with your iPhone. Pakarklis demonstrates how to create breathtaking panoramic photos using the iPhone’s camera features while shooting in a stunning location – Gauja National Park:

Key Takeaways:

Find the right location: A breathtaking panoramic photo needs a captivating location. Pakarklis chose Gauja National Park, with its giant river bend and unique perspective from a cliff, as the ideal spot for this tutorial.

Using the ultra-wide lens: When the scene is too big to capture in one frame, you can switch to the ultra-wide lens (0.5X). This enables you to capture most of the scene in one shot, but it still may not convey everything due to the vastness of the landscape.

Taking a panoramic photo: To capture the entire width of a scene, you can take a panoramic photo. Rotate your iPhone vertically, swipe right to left twice to enter the pano mode, and decide whether to start from the left or right based on the brightness and interest of the scene.

Choosing the right lens: Before taking a panoramic photo, pre-visualize the scene by rotating your phone from left to right and vice versa without capturing. Choose the lens (1X or 0.5X) that gives you the desired view of the scene.

Capture the panorama more than once: Always take more than one panoramic photo to account for potential stitching errors. This ensures that you have at least one perfect panorama of your chosen scene.

panorama photo

Experiment with different lenses: Try taking panoramic photos with both the 1X and ultra-wide lenses to see which captures the scene best. In Pakarklis’ example, using the ultra-wide lens allowed him to capture both the river and the interesting foreground.

Be ready for unexpected opportunities: Sometimes, the best photographic opportunities appear unexpectedly and don’t last long. When the sun came out during Pakarklis’ shoot, he took advantage of the fleeting moment and captured an amazing shot using the 2X lens.

By following these tips and always being ready for unexpected opportunities, you can create breathtaking panoramic images that showcase the beauty of your surroundings.

For further training: The iPhone Photography Academy at 80% Off

- - - - - - - - - - - - - - - - - - - - - - - - - - - - - - - - - - - - - - - - - - - - - - - - - - - - - - - - - - - - - - - - - - - - - - - - - -

Did you appreciate this newsletter? Please help us keep it going by Joining Our Patreon Supporters

What are your thoughts on this article? Join the discussion on our Facebook Page

PictureCorrect subscribers can also learn more today with our #1 bestseller: The Photography Tutorial eBook

- - - - - - - - - - - - - - - - - - - - - - - - - - - - - - - - - - - - - - - - - - - - - - - - - - - - - - - - - - - - - - - - - - - - - - - - - -

The post How to Take Panoramas with an iPhone appeared first on PictureCorrect.


from PictureCorrect https://ift.tt/NR9YMXk
via IFTTT

keskiviikko 29. maaliskuuta 2023

PictureCorrect.com: Camera Modes Photography Exercise

Related reminder: only 1 day left for the Fundamental Photo Cheat Sheets at 75% Off

This article is to help photographers gain expertise in utilizing the most important camera modes, enabling them to adapt to different shooting situations and take their photography skills to the next level.

camera modes

This exercise consists of four parts, each focusing on a specific camera mode: Manual (M), Aperture Priority (A/Av), Shutter Priority (S/Tv), and Program (P). By the end of this exercise, participants should have a comprehensive understanding of each mode’s strengths and limitations, allowing them to make informed decisions about which mode to use in various situations.

Part 1: Manual Mode (M)

  1. Find a scene with a mix of light and shadow. Set your camera to Manual Mode (M).
  2. Choose an ISO value that best suits the lighting conditions (e.g., 100 for bright sunlight, 800 for overcast conditions).
  3. Take a photo using your current settings, making a note of the aperture, shutter speed, and ISO.
  4. Experiment with different aperture and shutter speed combinations while maintaining the same exposure level. Take note of how each combination impacts depth of field and motion blur.
  5. Repeat steps 3 and 4 for at least five different aperture and shutter speed combinations.

Part 2: Aperture Priority Mode (A/Av)

  1. Choose a subject with varying depths, such as a row of trees or a group of people.
  2. Set your camera to Aperture Priority Mode (A/Av) and select an ISO value suitable for the lighting conditions.
  3. Experiment with different aperture values (e.g., f/2.8, f/5.6, f/11), observing how each value affects the depth of field. Take note of the shutter speed chosen by the camera in each case.
  4. Analyze how the camera’s automatic shutter speed selection impacts the overall exposure and motion blur in each photo.
  5. Repeat steps 3 and 4 for at least five different aperture values.

Part 3: Shutter Priority Mode (S/Tv)

  1. Find a scene with moving subjects, such as a busy street or a sports event.
  2. Set your camera to Shutter Priority Mode (S/Tv) and select an ISO value suitable for the lighting conditions.
  3. Experiment with different shutter speeds (e.g., 1/30s, 1/125s, 1/500s), observing how each speed impacts motion blur. Take note of the aperture chosen by the camera in each case.
  4. Analyze how the camera’s automatic aperture selection affects the overall exposure and depth of field in each photo.
  5. Repeat steps 3 and 4 for at least five different shutter speeds.

Part 4: Program Mode (P)

  1. Choose a scene that presents various lighting conditions and subjects.
  2. Set your camera to Program Mode (P) and select an ISO value suitable for the lighting conditions.
  3. Take a photo and note the aperture and shutter speed chosen by the camera.
  4. Experiment with the Program Shift feature (if available), altering the aperture and shutter speed combinations while maintaining the same exposure level.
  5. Compare the results to those achieved in Manual, Aperture Priority, and Shutter Priority modes.

Reflection:

After completing the exercise, review your notes and photos. Consider the following questions:

  1. Which camera mode(s) did you find the most helpful for achieving the desired results in specific situations?
  2. In which situations did you prefer to use Manual mode, and why?

For a handy cheat sheet on camera modes that you can print out for reference, you may want to check out this launch sale before it is over.

Have you ever wanted to photograph an amazing moment but missed the shot because you didn’t know the right camera settings to use? That’s where our new cheat sheets come in. They are currently 75% off for the launch sale if you want to check them out.

fundamental photography sheets

New: Fundamental Photography Cheat Sheets

Whether you’re a seasoned professional or just starting out, photography cheat sheets can be a valuable resource for improving your skills and taking your photography to the next level. The perfect companion for any photographer. Print one out whenever you need it.

Only 1 day left: The Fundamental Camera Cheat Sheets at 75% Off

- - - - - - - - - - - - - - - - - - - - - - - - - - - - - - - - - - - - - - - - - - - - - - - - - - - - - - - - - - - - - - - - - - - - - - - - - -

Did you appreciate this newsletter? Please help us keep it going by Joining Our Patreon Supporters

What are your thoughts on this article? Join the discussion on our Facebook Page

PictureCorrect subscribers can also learn more today with our #1 bestseller: The Photography Tutorial eBook

- - - - - - - - - - - - - - - - - - - - - - - - - - - - - - - - - - - - - - - - - - - - - - - - - - - - - - - - - - - - - - - - - - - - - - - - - -

The post Camera Modes Photography Exercise appeared first on PictureCorrect.


from PictureCorrect https://ift.tt/AiqWh8c
via IFTTT

PictureCorrect.com: How to Photograph Star Trails Tutorial

Star trail photography is an interesting way to depict the earth’s rotation on its axis. Polaris is a star that’s aligned with the earth’s axis of rotation – hence it’s called the pole star. So, if we capture a long exposure of the sky, it will seem as if all the other stars are revolving around Polaris. This creates a very interesting look, which we call star trails. In this video, photographer Alyn Wallace shares everything you need to know about photographing stunning star trails:

In this elaborate video, Wallace takes us through the gear, photography techniques, and the editing process to take breathtaking star trail photographs. One important thing that you need to pay attention to is the exposure duration. It’s a risky idea to take a single long exposure photo with an exposure time of multiple minutes, or even hours. If just one little thing goes wrong, the whole image is ruined.

A better alternative is thus to take shorter exposures, and stack them up in post. Doing so has two benefits: it allows you to create a star trail composite, and you also make a timelapse video. As Wallace elaborately demonstrates in the video, you can use Lightroom to touch up the exposure, StarStaX to align the images, and Photoshop to clean up the final image.

A good thing about shooting star trails is that you can try it out even if you live in a area with a fair amount of light pollution. If you plan to try it, be sure to choose a night when the moon is the least distracting. New moon nights are best.

Are you interested in astrophotography? If you are, this is a good place to start. Try staying up late for a shoot. The results will be well worth it.

- - - - - - - - - - - - - - - - - - - - - - - - - - - - - - - - - - - - - - - - - - - - - - - - - - - - - - - - - - - - - - - - - - - - - - - - - -

Did you appreciate this newsletter? Please help us keep it going by Joining Our Patreon Supporters

What are your thoughts on this article? Join the discussion on our Facebook Page

PictureCorrect subscribers can also learn more today with our #1 bestseller: The Photography Tutorial eBook

- - - - - - - - - - - - - - - - - - - - - - - - - - - - - - - - - - - - - - - - - - - - - - - - - - - - - - - - - - - - - - - - - - - - - - - - - -

The post How to Photograph Star Trails Tutorial appeared first on PictureCorrect.


from PictureCorrect https://ift.tt/PlSJKxp
via IFTTT

tiistai 28. maaliskuuta 2023

PictureCorrect.com: Photographing Yosemite’s Firefall

Every February, nature enthusiasts, photographers, and tourists gather in Yosemite National Park for a truly magical phenomenon – the Firefall. During this two-week period, if the conditions are right, a waterfall appears to flow like molten lava as the sun sets, casting a fiery glow upon El Capitan’s face. Photographer Chris Brockhurst embarked on a journey to capture this breathtaking event, and in this video, we will follow his adventure, learning about the challenges and triumphs along the way:

Capturing the Firefall requires careful planning and a bit of luck. Weather conditions, permits, and timing all play a crucial role in determining whether a trip will be successful. Chris and his team decided to try their luck at two different vantage points – the popular El Capitan Picnic Area and the more challenging Four Mile Trail. Armed with permits and equipment, they set off on their journey, eager to witness the mesmerizing event.

The Unexpected Challenges

The team faced numerous challenges, from navigating an electric vehicle with limited charging options to discovering that their preferred vantage point, the Four Mile Trail, was closed. Undeterred, they decided to settle for the more popular El Capitan Picnic Area, where they would join the throngs of other photographers vying for the perfect shot.

The Moment of Truth

As the sun began to set, anticipation grew among the crowd of photographers. The waterfall began to glow, turning a fiery red as the sunlight hit it at just the right angle. Chris and his team captured the breathtaking event, but they couldn’t help but feel that they could have achieved a better angle had they been able to access the Four Mile Trail.

photographing firefall

The Journey Is the Cake

Despite the challenges and the desire for a different angle, Chris and his team were grateful for the opportunity to capture the Firefall. They realized that the journey itself was the real reward, and the stunning photograph of the glowing waterfall was simply the icing on the cake.

Yosemite’s Firefall is a remarkable natural phenomenon that attracts thousands of visitors every year. Chris Brockhurst’s adventure serves as a reminder that, while capturing the perfect shot is an incredible feat, the journey and the memories created along the way are just as valuable.

- - - - - - - - - - - - - - - - - - - - - - - - - - - - - - - - - - - - - - - - - - - - - - - - - - - - - - - - - - - - - - - - - - - - - - - - - -

Did you appreciate this newsletter? Please help us keep it going by Joining Our Patreon Supporters

What are your thoughts on this article? Join the discussion on our Facebook Page

PictureCorrect subscribers can also learn more today with our #1 bestseller: The Photography Tutorial eBook

- - - - - - - - - - - - - - - - - - - - - - - - - - - - - - - - - - - - - - - - - - - - - - - - - - - - - - - - - - - - - - - - - - - - - - - - - -

The post Photographing Yosemite’s Firefall appeared first on PictureCorrect.


from PictureCorrect https://ift.tt/9I5gkOY
via IFTTT

PictureCorrect.com: How Moonlight Affects Night Photos

This article is based on concepts from Collier’s Guide to Night Photography. Our readers can currently get a discount by using the promo code picturecorrect at checkout.

When photographing at night, the moon will often be your primary source of light. It is therefore very important to know how your photos will appear under different moon phases. Photographing under a full moon can produce drastically different results than shooting under no moon.

You can check the moon phases and the times and locations it will set and rise with an app like PhotoPills or The Photographer’s Ephemeris (TPE).

Shooting Under No Moon

The biggest advantage of shooting under no moon is that your camera can capture more stars since moonlight obscures fainter stars. This is particularly important if you want to capture dramatic shots of the Milky Way.

no moonlight

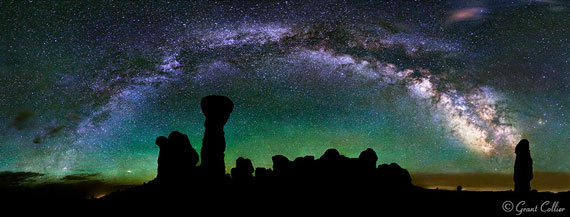
Garden of Eden in Arches National Park under no moon, 70 images stitched at 50mm, f1.2, 10 seconds, ISO 6400.

The biggest disadvantage of shooting under no moon is that less light enters your camera and there will be more noise visible in the photographs.

Photographs taken under no moon and with no light painting will usually render foreground objects as dark silhouettes. This can be good for objects with interesting shapes, like a saguaro cactus, a gnarled tree, or some of the bizarre rock formations in America’s Desert Southwest. It probably won’t work as well for things with less distinct shapes, like mountains or canyons.

If you want to do light painting with a flashlight, you generally want to do this under no moon. However, I personally don’t do light painting much anymore, as I believe it can produce unnatural-looking results. I prefer stacking images if I want to render detail in the foreground under no moon. This is beyond the scope of this article, but I provide detailed explanations on how to do this in my night photography book.

Shooting Under a Gibbous Moon

The advantages and disadvantages of shooting under a full or gibbous moon are the reverse of shooting under no moon. With the bright light of a full moon, you will get less noise in your images. This can be advantageous if you are using an older digital camera or if you don’t have a lens with a wide aperture that can let in more light.

Another potential advantage of shooting under a full moon is that it will illuminate the foreground and bring out the color and detail in the scene, in much the same way as the sun would. If the foreground is the most important part of your image and you’re not as concerned with capturing a dramatic starscape, you might consider shooting under a full moon.

some moonlight

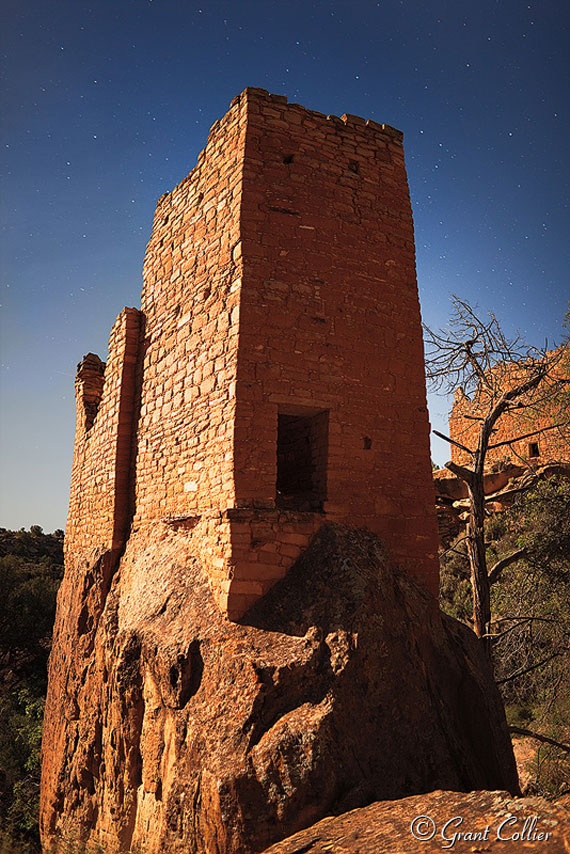
Ruin in Hovenweep National Monument under a bright gibbous moon, 24mm, f1.6, 20 seconds, ISO 600.

The biggest disadvantage of shooting under a full moon is that it obscures the light from the stars, and the skies will not look as impressive.

It generally best to photograph with the moon behind you so that it illuminates the front of the object you are photographing. Also, it is usually better to shoot with the moon low in the sky. If it is high in the sky, it can produce harsh light, just like the sun does during the day. Shooting with the moon behind you and low in the sky will also keep the part of the sky you are photographing a little darker and more stars will be visible.

Shooting Under A Crescent Moon

While there can be some advantages to shooting under a full moon, I find that the bright light usually obscures the stars too much. Also, with newer cameras and fast lenses, noise is not as big of an issue as it used to be. I therefore find shooting under a crescent moon preferable if I want to render detail in the foreground and capture more stars in the sky.

crescent moonlight

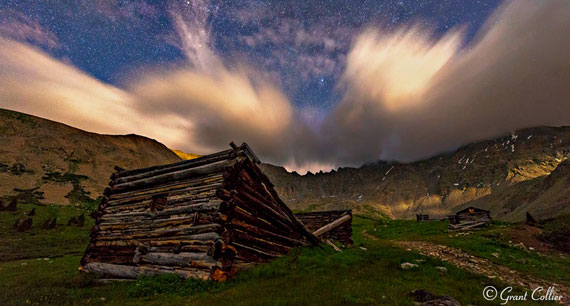
Colorado ghost town under a crescent moon, 14mm, f2.8, 25 seconds, ISO 6400.

I generally like shooting under a crescent moon that is 15%-35% illuminated. This provides just enough light to illuminate the foreground, while only somewhat obscuring the stars. Also, a crescent moon sets fairly early in the night, so if you also want to take shots under no moon, you can do so after it sets.

If the moon is more than 50% illuminated, I find that it starts to drown out the light from the stars too much. I therefore usually plan my photography trips so that they end after the first quarter moon.

For Further Training on Night Photography:

In this fully-updated 2nd edition, Grant Collier sheds light on how to capture these otherworldly images by sharing secrets he has learned over the past 17 years. He explains how to take photos of the Milky Way, northern lights, meteors, eclipses, lightning, and much more.

night photography guide

New: Night Photography Guide 2nd Edition

Our readers can get a discount by using the promo code picturecorrect at checkout which ends soon.

Found here: Night Photography Guide 2nd Edition

- - - - - - - - - - - - - - - - - - - - - - - - - - - - - - - - - - - - - - - - - - - - - - - - - - - - - - - - - - - - - - - - - - - - - - - - - -

Did you appreciate this newsletter? Please help us keep it going by Joining Our Patreon Supporters

What are your thoughts on this article? Join the discussion on our Facebook Page

PictureCorrect subscribers can also learn more today with our #1 bestseller: The Photography Tutorial eBook

- - - - - - - - - - - - - - - - - - - - - - - - - - - - - - - - - - - - - - - - - - - - - - - - - - - - - - - - - - - - - - - - - - - - - - - - - -

The post How Moonlight Affects Night Photos appeared first on PictureCorrect.


from PictureCorrect https://ift.tt/wSIa9K8
via IFTTT

PictureCorrect.com: Interesting Photo of the Day: Timelapse Engagement

Believe it or not, today’s interesting photo is not ripped straight from a Disney film. Rather, critically acclaimed photographer Alex Nye used his craft to turn one of the most important moments of his life into something downright magical:

wildflower engagmenet

“Proposing to my girlfriend on a flower-covered mountain at sunset” by Alex Nye (Via Reddit. Click image to see full size.)

Reaching the peak of California’s Grass Mountain is no small feat, as the path quickly becomes steep and unruly. One can only imagine that the trek becomes even more challenging when clad in khakis and a button-down, towing along a camera and tripod. However, those willing to make the journey are rewarded with a commanding view of the sprawling Santa Ynez Valley. During a small window in spring, the 4.5 mile trail comes alive with vibrant poppies and lupine in bloom.

Under the guise of setting up for a timelapse landscape, Nye had his fiancee fooled that he was up to business as usual when he positioned his DSLR several yards away. So, when he did get down on one knee and present a ring amidst the beautiful scenery, the unsuspecting woman was as speechless as any other bride-to-be.

We wish the happy couple all the best in the years to come! Thanks to Nye’s precise planning and artistic prowess, this scene is one that we’re sure the two will treasure for a lifetime.

- - - - - - - - - - - - - - - - - - - - - - - - - - - - - - - - - - - - - - - - - - - - - - - - - - - - - - - - - - - - - - - - - - - - - - - - - -

Did you appreciate this newsletter? Please help us keep it going by Joining Our Patreon Supporters

What are your thoughts on this article? Join the discussion on our Facebook Page

PictureCorrect subscribers can also learn more today with our #1 bestseller: The Photography Tutorial eBook

- - - - - - - - - - - - - - - - - - - - - - - - - - - - - - - - - - - - - - - - - - - - - - - - - - - - - - - - - - - - - - - - - - - - - - - - - -

The post Interesting Photo of the Day: Timelapse Engagement appeared first on PictureCorrect.


from PictureCorrect https://ift.tt/WhmdpZT
via IFTTT

maanantai 27. maaliskuuta 2023

PictureCorrect.com: How to Get the Most Out of Your Wide Angle Lens

Wide angle lenses are an obvious choice when it comes to landscape and street photography. They offer a wide angle of view thereby getting everything (with a capital E) in the frame. That’s an excellent thing. However, it also has its downsides. Photographer Mark Wallace shares a few simple tips on how to get the best images with your wide angle lens:

Getting everything in front of you in the picture is an exciting proposition if you’re a landscape or street photographer. You would think getting the ‘big picture’ could never be wrong. However, as Wallace explains in this video, sometimes when you aspire to get everything in the shot, you don’t have a clear picture. There’s no obvious subject and your images are just clutter. These are three tips that you can use to improve your wide angle lens results.

1. Have a dominant subject in your photos

As you might have realized by now, getting everything in the frame isn’t always a great thing. Having a dominant subject in the frame, however, is. A dominant subject is often the difference between chaos and order.

tips on using a wide angle lens

Machu Pichu

dominant subject

Use a dominant subject in your wide angle compositions

The photo of Machu Pichu was shot using a Canon 16–35mm f/2.8 L lens. The ruins themselves stand out as the dominating subject in the photo. So, although the image gets almost everything in it, it still does have a dominant subject. The second shot has the boats as the dominating subject.

2. Get close to your subject

wide angle lens

A shot captured by Wallace with a wide angle

A wide angle lens compels you to get close to your subject. It’s a requirement for filling the frame. Wallace, carries a Leica mirrorless digital rangefinder camera, which he admits won’t let you get too close with a wide angle lens. But if you’re using a DSLR with a wide angle lens, you can get within inches of your subject and capture a stunning perspective. The following images also show that with a short focal length you can get extremely close to your subject.

using a wide angle lens

Getting close when using a wide angle lens allows you to fill the frame

composition tips for wide angle lens

A wide angle lens allows you to get a close perspective

3. Use leading lines in your compositions

leading lines in compositions

wide angle lenses allow you to use leading lines in your compositions

Just because a wide angle lens is well, so wide, it tends to encompass a lot of the scene. That works to our advantage when we want to incorporate simple rules of composition such as leading lines in our photos. As Wallace puts it, “Try to frame your shots so that lines are leading us into your image.” What tips do you have for wide angle photography?

- - - - - - - - - - - - - - - - - - - - - - - - - - - - - - - - - - - - - - - - - - - - - - - - - - - - - - - - - - - - - - - - - - - - - - - - - -

Did you appreciate this newsletter? Please help us keep it going by Joining Our Patreon Supporters

What are your thoughts on this article? Join the discussion on our Facebook Page

PictureCorrect subscribers can also learn more today with our #1 bestseller: The Photography Tutorial eBook

- - - - - - - - - - - - - - - - - - - - - - - - - - - - - - - - - - - - - - - - - - - - - - - - - - - - - - - - - - - - - - - - - - - - - - - - - -

The post How to Get the Most Out of Your Wide Angle Lens appeared first on PictureCorrect.


from PictureCorrect https://ift.tt/quZ8BtA
via IFTTT

sunnuntai 26. maaliskuuta 2023

PictureCorrect.com: Exposing to the Right: When and Why

Exposure to the Right (ETTR) is a term often debated among photographers, and Chris Niccolls from DPReview aims to demystify this topic in his YouTube video. In this blog post, we will discuss the key takeaways from the video and provide a summary of the important aspects of ETTR:

What is ETTR?

ETTR stands for Exposure to the Right, which primarily refers to the histogram on your camera. The histogram displays the tones in your image, with the left side representing darker tones and the right side representing brighter tones. ETTR aims to push the exposure towards the right (brighter) side of the histogram, which can offer some benefits in image quality.

Who Should Use ETTR?

ETTR is most beneficial for photographers who shoot in RAW format and are willing to edit their photos in post-processing software. If you shoot in JPEG, ETTR may not be as useful to you, and you may want to stick to a natural, balanced exposure.

Benefits of ETTR

By pushing the exposure towards the right side of the histogram, you increase the amount of light captured by the camera sensor, leading to a better signal-to-noise ratio and lower noise levels in the final image. However, it’s crucial to use actual light, not just increasing the ISO, to achieve this effect.

ETTR in Practice

In the video, Chris demonstrates how ETTR can be used to create a moody portrait with less noise and better tonal quality. By overexposing the image while maintaining important highlights, and later bringing down the exposure in post-processing, the final image has less noise and improved image quality.

exposing to the right

However, ETTR may not always be possible or necessary, depending on the situation. In cases where you need a fast shutter speed, a specific aperture, or have to use a higher ISO, it may not be feasible to use ETTR. Furthermore, in some cases, exposing to the right may actually result in underexposing the image, especially in scenes with high dynamic range, such as landscapes with bright skies.

Conclusion

ETTR is a technique that, when used appropriately, can improve image quality and reduce noise levels in your photographs. It’s important to understand how exposure works and to be aware of the limitations of your camera’s histogram. Additionally, it would be beneficial for camera manufacturers to include better histograms and ETTR functionality in their cameras to help photographers achieve optimal exposure.

- - - - - - - - - - - - - - - - - - - - - - - - - - - - - - - - - - - - - - - - - - - - - - - - - - - - - - - - - - - - - - - - - - - - - - - - - -

Did you appreciate this newsletter? Please help us keep it going by Joining Our Patreon Supporters

What are your thoughts on this article? Join the discussion on our Facebook Page

PictureCorrect subscribers can also learn more today with our #1 bestseller: The Photography Tutorial eBook

- - - - - - - - - - - - - - - - - - - - - - - - - - - - - - - - - - - - - - - - - - - - - - - - - - - - - - - - - - - - - - - - - - - - - - - - - -

The post Exposing to the Right: When and Why appeared first on PictureCorrect.


from PictureCorrect https://ift.tt/wSUuith
via IFTTT

PictureCorrect.com: Interesting Photo of the Day: Fairy Tale Japanese Maple

The Portland Japanese Garden is considered to be one of the most authentic Japanese gardens outside of Japan. Built in 1963 to commemorate the friendship between Japan and the United States, the garden is a haven of tranquil beauty in all four seasons. A Japanese maple tree was planted there in 1968; today, it has grown to be one of the most photographed trees in the world. Photographer Nicholas Morris shot the following image of the tree to showcase its splendor:

“The Famous Maple Tree in Portland Japanese Garden” by Nicholas Morris (Via Reddit. Click image to see full size.)

Morris shot the image using a Sony A7RIII from a narrow staircase where he kept having to pick up his tripod to let others walk past him. Nevertheless, the image has come out spectacular and has a couple of talking points.

“Contrary to popular belief, this type of maple tree is actually fairly small. It was only about eight feet tall or so.”

The immediate thing you’ll notice is how branched out and wavy the shape of the tree is. One could even confuse it with an aerial shot of a river system. The variety of colors are also inherently fascinating.

The frame composition and masterful lighting manipulate the sense of spatial dimension, adding mystical power. This also draws viewers right into the image. It is truly an extraordinary shot.

Don’t you feel like resting under this tree? Let us know.

- - - - - - - - - - - - - - - - - - - - - - - - - - - - - - - - - - - - - - - - - - - - - - - - - - - - - - - - - - - - - - - - - - - - - - - - - -

Did you appreciate this newsletter? Please help us keep it going by Joining Our Patreon Supporters

What are your thoughts on this article? Join the discussion on our Facebook Page

PictureCorrect subscribers can also learn more today with our #1 bestseller: The Photography Tutorial eBook

- - - - - - - - - - - - - - - - - - - - - - - - - - - - - - - - - - - - - - - - - - - - - - - - - - - - - - - - - - - - - - - - - - - - - - - - - -

The post Interesting Photo of the Day: Fairy Tale Japanese Maple appeared first on PictureCorrect.


from PictureCorrect https://ift.tt/1HReJQX
via IFTTT

lauantai 25. maaliskuuta 2023

PictureCorrect.com: Street Photography Silhouette Tutorial

In his latest YouTube video, street photographer Rupert Vandervell shares valuable tips and insights for capturing stunning high contrast photographs using silhouettes. Silhouettes have the ability to create powerful images and emphasize the human form against intricate backdrops, making for captivating fine art photography.

Key Takeaways:

Importance of Light and Dark Balance: In high contrast fine art photography, the balance between light and dark is crucial. Black and white photography is ideal for showcasing this style, as it allows for pushing the tonal ranges to the extreme.

Capturing the Human Form: Silhouettes emphasize the human form against geometric shapes and street scenes. For maximum impact, look for people with interesting shapes, such as those wearing hats, flowing coats, or carrying bags.

Backlit Scenes and Subject Placement: Backlit scenes work best for shooting silhouettes. Place subjects prominently against the backdrop and anticipate their movements, using continuous shutter mode to capture a wide range of poses.

Exposure Techniques: Expose for the lightest areas in the frame to create high contrast images. Generally underexpose by a third of a stop to increase contrast. Lock the exposure, reframe the composition, and shoot.

Unusual Backdrops: Look for unique backdrops to create interesting silhouettes. For example, water fountains can provide a beautiful backdrop as they catch the light.

street silhouettes

Working with Groups: Groups of people can create interesting images, especially when set against a contrasting backdrop such as a church. Be ready to capture these moments by constantly adjusting your position and exposure.

Bold Shadows: Deep shadows can enhance the impact of the shapes and forms in the image. Use shadows as a framing device to isolate parts of the image and strengthen the focal point.

Shooting Silhouettes at Night: Nighttime silhouettes offer plenty of opportunities to create intriguing images. Expose for the lighter areas in the scene to ensure dark silhouettes and shadows.

Silhouettes are an exciting and effective way to create high contrast fine art photography. By exposing for the lighter areas of the scene, focusing on interesting shapes and forms, and experimenting with unique backdrops, photographers can create captivating images that stand out.

- - - - - - - - - - - - - - - - - - - - - - - - - - - - - - - - - - - - - - - - - - - - - - - - - - - - - - - - - - - - - - - - - - - - - - - - - -

Did you appreciate this newsletter? Please help us keep it going by Joining Our Patreon Supporters

What are your thoughts on this article? Join the discussion on our Facebook Page

PictureCorrect subscribers can also learn more today with our #1 bestseller: The Photography Tutorial eBook

- - - - - - - - - - - - - - - - - - - - - - - - - - - - - - - - - - - - - - - - - - - - - - - - - - - - - - - - - - - - - - - - - - - - - - - - - -

The post Street Photography Silhouette Tutorial appeared first on PictureCorrect.


from PictureCorrect https://ift.tt/4QArTFP
via IFTTT

PictureCorrect.com: Camera Drive Modes

Drive modes refer to the different ways in which a digital camera can take pictures. Drive modes can be useful for different types of photography, such as action photography or group shots. Let’s take a look at the most common ones you should know.

camera drive modes

Photo captured by Atharva Tulsi

Single shot: In this mode, the camera takes one picture with each press of the shutter button. This is the default mode for most cameras and is suitable for most types of photography.

Continuous or Burst mode: In this mode, the camera takes multiple pictures in rapid succession as long as the shutter button is held down. This is useful for capturing fast-moving subjects or for taking a series of shots to choose from later.

Note: Buffer size and memory card speed work together to determine how many shots can be taken before the camera needs to pause and save the images to the memory card. And image quality determines how large the images are and therefore how much space they take on the buffer and memory card.

Self-timer mode: In this mode, the camera delays taking a picture for a few seconds after the shutter button is pressed, allowing the photographer time to get into the frame. This can be useful for group shots, selfies or long exposure photography so you don’t have to touch or shake the camera.

Remote mode: A camera drive mode that allows you to control the camera remotely using a separate device. It can be useful in situations where it’s not practical or possible to physically press the buttons on the camera. Or for long exposure photography when you don’t want to touch or shake the camera.

Silent or Quiet mode: Some cameras offer this mode that is used to minimize the amount of noise made by the camera when taking pictures. This can be useful in situations where the camera’s normal operation noise would be disruptive, such as during a wedding ceremony, a concert, or when trying to photograph wildlife or other animals.

Mirror lock-up mode: Is a camera drive mode on some DSLR cameras that is used to minimize camera shake when taking pictures. When the mirror lock-up drive mode is enabled, the mirror that reflects light from the lens to the camera’s sensor will be locked up, or raised, before the picture is taken. This prevents the movement of the mirror from causing camera shake. This mode is unnecessary on Mirrorless cameras.

Here is a photography exercise to improve your skills in using continuous shooting mode to capture fast-moving subjects and decisive moments.

bird flight photo

Photo by Jacques Le Henaff

Procedure:

  1. Find a location with dynamic subjects, such as a park, busy street, or sports event.
  2. Set your camera to continuous shooting mode and adjust the burst rate (if available) to a suitable setting.
  3. Choose a fast-moving subject, such as birds, pets, people, or vehicles.
  4. Practice the following techniques:
  5. Panning: Keep the camera focused on the subject while following its movement horizontally. This creates a sense of motion with a sharp subject and a blurred background.
  6. Freeze action: Use a fast shutter speed (e.g., 1/1000s or faster) to capture crisp, sharp images of your subject in motion.
  7. Review your images, noting the success rate of capturing decisive moments, and identify areas for improvement.
  8. Repeat this exercise regularly to enhance your ability to capture action shots and improve your understanding of continuous shooting mode.

To make the most of camera drive modes, photographers should familiarize themselves with the specific drive modes available in their camera, experiment with each mode in different situations, and learn when to switch between modes to achieve the desired result.

For a handy cheat sheet on Drive Modes and many other fundamental camera topics, you may want to grab a set of these cheat sheets. They are currently 75% off for the launch sale which ends soon if you want to check them out.

picturecorrect cheat sheets

Print a Cheat Sheet Whenever You Need It

Whether you’re a seasoned professional or just starting out, photography cheat sheets can be a valuable resource for improving your skills and taking your photography to the next level. The perfect companion for any photographer. Print one out whenever you need it.

Launch sale ending soon: The Fundamental Photography Cheat Sheets at 75% Off

- - - - - - - - - - - - - - - - - - - - - - - - - - - - - - - - - - - - - - - - - - - - - - - - - - - - - - - - - - - - - - - - - - - - - - - - - -

Did you appreciate this newsletter? Please help us keep it going by Joining Our Patreon Supporters

What are your thoughts on this article? Join the discussion on our Facebook Page

PictureCorrect subscribers can also learn more today with our #1 bestseller: The Photography Tutorial eBook

- - - - - - - - - - - - - - - - - - - - - - - - - - - - - - - - - - - - - - - - - - - - - - - - - - - - - - - - - - - - - - - - - - - - - - - - - -

The post Camera Drive Modes appeared first on PictureCorrect.


from PictureCorrect https://ift.tt/Or0SVGy
via IFTTT

perjantai 24. maaliskuuta 2023

PictureCorrect.com: Interesting Photo of the Day: Long Exposure of a Night Hike

Nature is beautiful, there’s no denying that. But with nature photography done the right way, you can take a breathless scenery and make it perfect. As we’ve said time and time again, photography can take a single moment and make it last forever, and it can take hours and make them pass in the blink of an eye. The following photo will show you what I mean by that:

long exposure of star trails and night hike

Stacked Exposures. Camera settings: f/2.8, 30s, ISO 1600. (Via Imgur. Click image to see full size.)

The photo was taken by Zach Becker with a Canon Rebel T3i and a Tokina 11-16mm lens. Using Magic Lantern, a custom Canon firmware, he set the camera to take a series of interval photographs as he hiked around for three miles, then he stacked all of the exposures together to create the stunning image you see above. In fact, no less than 94 pictures were stacked for this image alone!

Have you tried this sort of project? How did it go?

- - - - - - - - - - - - - - - - - - - - - - - - - - - - - - - - - - - - - - - - - - - - - - - - - - - - - - - - - - - - - - - - - - - - - - - - - -

Did you appreciate this newsletter? Please help us keep it going by Joining Our Patreon Supporters

What are your thoughts on this article? Join the discussion on our Facebook Page

PictureCorrect subscribers can also learn more today with our #1 bestseller: The Photography Tutorial eBook

- - - - - - - - - - - - - - - - - - - - - - - - - - - - - - - - - - - - - - - - - - - - - - - - - - - - - - - - - - - - - - - - - - - - - - - - - -

The post Interesting Photo of the Day: Long Exposure of a Night Hike appeared first on PictureCorrect.


from PictureCorrect https://ift.tt/HkIa4Kh
via IFTTT

PictureCorrect.com: 5 Tips to Improve Your Wildlife Photography with a DSLR

Welcome to another insightful blog post, inspired by wildlife photographer Paul Miguel‘s most recent video, where he shares five useful tips for improving your wildlife photography using a DSLR. Although he has recently switched to mirrorless cameras, these tips are valuable for any DSLR user looking to enhance their skills:

Focus Points

One of the challenges with DSLRs is the limited focus points, especially compared to mirrorless cameras. If you find your DSLR struggling with focus, particularly when using focus points closer to the edge of the frame, consider using the center focus point. This point is generally more accurate and responsive. To maintain your desired composition, you can use a single shot focus (AFS or one shot on Canon) to lock the focus on your subject and then recompose the image before taking the shot.

Moving Subjects

When photographing moving subjects like birds in flight or running animals, it’s crucial to stay slightly ahead of the subject to help the autofocus keep up. This technique is particularly helpful if your lens isn’t the fastest or your DSLR’s autofocus feels sluggish. By staying ahead of the subject, you can ensure better focus and prevent yourself from falling behind in capturing the perfect shot.

Sound

DSLRs can be noisy, which can be problematic when photographing wildlife. Mirrorless cameras offer the advantage of being silent or nearly silent, but there are ways to muffle the sound of your DSLR. You can use a fleece or old coat to cover the camera and lens, or even use a hat or balaclava in a pinch. Alternatively, try getting your subject accustomed to the sound of your camera by making clicking noises to mimic the shutter sound.

Histogram

Unlike mirrorless cameras, which provide a real-time histogram in the viewfinder, DSLRs require you to check the histogram and exposure on the back of the camera. While it’s not necessary to do this constantly, checking your exposure and histogram periodically can help you make adjustments as needed to ensure the best possible image quality.

dslr wildlife

Flip-out Screen

While some DSLRs have flip-out screens, many do not. This feature can be quite useful in difficult or awkward shooting situations. If your DSLR lacks a flip-out screen, consider investing in an angle finder. This accessory attaches to your camera’s viewfinder and allows you to view your subject from a more comfortable angle, saving your neck from strain and making it easier to shoot in challenging positions.

Conclusion

DSLRs may have their limitations compared to mirrorless cameras, but with these five tips, you can significantly improve your wildlife photography. From focus points to managing sound and mastering the histogram, these suggestions will help you get the most out of your DSLR in any situation. If you have any more tips or tricks for optimizing your DSLR for wildlife photography, feel free to share them in the comments below. Happy shooting!

- - - - - - - - - - - - - - - - - - - - - - - - - - - - - - - - - - - - - - - - - - - - - - - - - - - - - - - - - - - - - - - - - - - - - - - - - -

Did you appreciate this newsletter? Please help us keep it going by Joining Our Patreon Supporters

What are your thoughts on this article? Join the discussion on our Facebook Page

PictureCorrect subscribers can also learn more today with our #1 bestseller: The Photography Tutorial eBook

- - - - - - - - - - - - - - - - - - - - - - - - - - - - - - - - - - - - - - - - - - - - - - - - - - - - - - - - - - - - - - - - - - - - - - - - - -

The post 5 Tips to Improve Your Wildlife Photography with a DSLR appeared first on PictureCorrect.


from PictureCorrect https://ift.tt/LolP02Q
via IFTTT

torstai 23. maaliskuuta 2023

PictureCorrect.com: Interesting Photo of the Day: Cormorant Fishing

There are some places where time stands still. Places seemingly free of modern technologies and distractions, where the lines between the past and the present blur. UK-based photographer Greg Annandale had the opportunity to capture one of those rare locales during a trip to China, when he observed the ancient tradition of cormorant fishing one early, foggy morning:

cormorant fishing china

“Fisherman on the Li River” captured by Greg Annandale (Via Imgur. Click image to see full size.)

Cormorant fishing, where fishermen use trained cormorant birds to catch and retrieve fish, is thought to have been in practice in China since about 960 AD. Although the tradition is now mostly displayed as a tourist attraction in China, the process likely looks much the same as it did over 1,000 years ago.

The fisherman, wearing a traditional bamboo hat, pushes a simple raft up the river with a wooden pole by the light of a lantern, accompanied by his four feathered fishing partners.

Camera: Canon EOS 5D Mark II with a wide-angle lens at the following settings: ƒ/4.0, 1/40 of a second shutter speed, ISO 1250
Location: Lijiang River, Yangshuo, Guilin, China

Annandale captured the photo during the “blue hour,” giving the composition an even more other-worldly atmosphere:

“We were up at 4am to meet with the fisherman at our arranged spot. The limestone karsts in the background along with the bamboo forest lining the banks of the river made for quite an impressive location to say the least. Cormorant fishing was once commonplace throughout China & Japan, especially here along the Lijiang river in Yangshuo. These days its use is limited, more often used to demonstrate ancient ways of life to visitors and tourists.”

- - - - - - - - - - - - - - - - - - - - - - - - - - - - - - - - - - - - - - - - - - - - - - - - - - - - - - - - - - - - - - - - - - - - - - - - - -

Did you appreciate this newsletter? Please help us keep it going by Joining Our Patreon Supporters

What are your thoughts on this article? Join the discussion on our Facebook Page

PictureCorrect subscribers can also learn more today with our #1 bestseller: The Photography Tutorial eBook

- - - - - - - - - - - - - - - - - - - - - - - - - - - - - - - - - - - - - - - - - - - - - - - - - - - - - - - - - - - - - - - - - - - - - - - - - -

The post Interesting Photo of the Day: Cormorant Fishing appeared first on PictureCorrect.


from PictureCorrect https://ift.tt/Q9FwBqG
via IFTTT

PictureCorrect.com: Top 5 Bird Photography Tips From a Pro

Bird photography is undoubtedly one of the most challenging genres of photography. Your subject is usually small and fast, and if you are not fully prepared, the results will disappoint you. On the other hand, get things right, and your end product will be truly rewarding. To help you out in the field, we have wildlife photographer Kristi Odom from B&H with five top tips that’ll help you get some impressive bird photos:

While you might have already come across a ton of bird photography tips that focus on camera settings, Odom’s tips are a bit different. After all, on-the-field expertise pays higher dividends than being a settings geek.

As with photographing any species of wildlife, understanding the behavior of the bird you’re after is necessary. Knowing what they like to feed on, where they go to drink or even what their mating calls sound like will open up unique opportunities for you.

“It’s always good to take your photo past the typical portrait and tell people something about your subjects.”

Odom also shares some behavioral tips you can adopt for improving your bird-photography skills. They include not flocking in a group, respecting wildlife and not shying away from uncooperative weather. Be sure to watch the complete video to get a better understanding.

“Some of my favorite shots of birds have been in the rain and in the snow. I love seeing how birds react when they’re in the middle of a rainstorm.”

Lastly, she also shares the importance of knowing your camera inside-out, so that you can make the most out of the technology that the camera packs. Since you need to be quick when photographing birds, you could benefit from the camera’s capabilities. It could help you increase your success rate.

- - - - - - - - - - - - - - - - - - - - - - - - - - - - - - - - - - - - - - - - - - - - - - - - - - - - - - - - - - - - - - - - - - - - - - - - - -

Did you appreciate this newsletter? Please help us keep it going by Joining Our Patreon Supporters

What are your thoughts on this article? Join the discussion on our Facebook Page

PictureCorrect subscribers can also learn more today with our #1 bestseller: The Photography Tutorial eBook

- - - - - - - - - - - - - - - - - - - - - - - - - - - - - - - - - - - - - - - - - - - - - - - - - - - - - - - - - - - - - - - - - - - - - - - - - -

The post Top 5 Bird Photography Tips From a Pro appeared first on PictureCorrect.


from PictureCorrect https://ift.tt/BbVKliv
via IFTTT

keskiviikko 22. maaliskuuta 2023

PictureCorrect.com: Quick Tips for Photographing Glass

Photographing reflective surfaces can be a nightmare, or not, depending on how you set up your lights. David Bergman demonstrates how to light glass:

Avoid firing a flash straight at the wine glass.

wine glass photography tips

Direct Flash

Direct flash results in reflections from the flash in the glass.

The solution is to place the light behind the glass.

How to Light and Photograph Wine Glasses

Place your light behind the glass.

A big softbox works well for lighting glass from behind. But you can also bounce your flash off of a white reflector or white piece of paper.

How to Light and Photograph Wine Glasses

Backlighting

With a completely white background, it’s hard to define the edges of the glass. You can use negative fill to darken the edges.

How to Light and Photograph Wine Glasses

Use black foam core to define glass edges.

To accentuate the edges of the glass, use black foam core or anything dark to surround your subject.

no negative fill

Without negative fill

black foam core for wine glass

Negative fill helps to define glass edges.

To reverse the look, place the black foam core in front of the white background so that the light slips out from the sides.

How to Light and Photograph Wine Glasses

This creates a beautiful rim lighting effect.

How to Light and Photograph Wine Glasses

What do you think of this tutorial? Share with us your thoughts in the comments below.

- - - - - - - - - - - - - - - - - - - - - - - - - - - - - - - - - - - - - - - - - - - - - - - - - - - - - - - - - - - - - - - - - - - - - - - - - -

Did you appreciate this newsletter? Please help us keep it going by Joining Our Patreon Supporters

What are your thoughts on this article? Join the discussion on our Facebook Page

PictureCorrect subscribers can also learn more today with our #1 bestseller: The Photography Tutorial eBook

- - - - - - - - - - - - - - - - - - - - - - - - - - - - - - - - - - - - - - - - - - - - - - - - - - - - - - - - - - - - - - - - - - - - - - - - - -

The post Quick Tips for Photographing Glass appeared first on PictureCorrect.


from PictureCorrect https://ift.tt/Rc45aGU
via IFTTT

PictureCorrect.com: Interesting Photo of the Day: Suspension Bridge at Night

People have mixed feelings as far as suspension bridges are concerned. Some don’t care and simply cross it, while for others it is no less than a thrilling adventure. In any case, we must admit that they surely are spectacular. While crossing it is one thing, standing on it admiring the beautiful view whilst the bridge sways slightly with the wind is another extraordinary experience. It’s definitely not for the faint of heart though. Photographer Nico Schuth shot this rather unusual image of the Geierlay suspension bridge in Sosberg, Germany and we can agree that even those who loath suspension bridges would love to get on this one:

Geierlay suspension bridge with LED lights at night

“Suspension Bridge at Night Lit by LED Lights” by Nico Schuth (Via Reddit. Click image to see full size.)

The composition on this image is quite simple, yet really effective. With the suspension bridge placed right on the center, Schuth has created a leading line that draws the viewers right into the image. And considering that he took the image at night, there’s darkness all around giving it a kind of creepy feel. To illuminate the bridge, Schuth and his team themselves placed the LED lights on it.

“It took us around 3 hours. The bridge is 360m long and each cable is 10m long. So we needed 72 in total.”

Would you dare to cross the bridge in pitch darkness?

- - - - - - - - - - - - - - - - - - - - - - - - - - - - - - - - - - - - - - - - - - - - - - - - - - - - - - - - - - - - - - - - - - - - - - - - - -

Did you appreciate this newsletter? Please help us keep it going by Joining Our Patreon Supporters

What are your thoughts on this article? Join the discussion on our Facebook Page

PictureCorrect subscribers can also learn more today with our #1 bestseller: The Photography Tutorial eBook

- - - - - - - - - - - - - - - - - - - - - - - - - - - - - - - - - - - - - - - - - - - - - - - - - - - - - - - - - - - - - - - - - - - - - - - - - -

The post Interesting Photo of the Day: Suspension Bridge at Night appeared first on PictureCorrect.


from PictureCorrect https://ift.tt/dQzbZHc
via IFTTT

tiistai 21. maaliskuuta 2023

PictureCorrect.com: Woodland Landscape Photography Tips

Photographer Michael Shainblum takes us on a journey through the woods of Madeira in his latest video. In this adventure, he shares tips and techniques, as well as the challenges he encountered while photographing the stunning landscape:

One of the main challenges he faced was the weather, with the fog constantly dissipating and then returning, and the wind making it hard to focus. He also admits to not being a morning person, and finding it harder to be creative during sunrise. However, he encourages his viewers to let him know in the comments if they are more of an early riser or a sunset photographer.

Here are some key takeaways from the video:

  1. Finding the right position for trees is crucial in landscape photography.
  2. Scouting and building upon compositions can create interesting images.
  3. Relaxing and going with the flow can help manage the stress of changing conditions.
  4. Using a wide-angle lens can add depth to compositions.
  5. Shooting handheld can provide versatility in compositions.
  6. Experimenting with framing elements can create unique compositions.
  7. Film photography can add a unique and timeless look to images.
  8. Photographers should consider their personal creative peak times, such as early morning or sunset.
  9. Fog can add drama and simplify backgrounds.
  10. Using foreground elements can add interest to compositions.

Throughout the video, Shainblum showcases a variety of images, from minimalist shots with fog-covered backgrounds to more complex compositions with foreground elements. He also switches it up by shooting on his 35mm film camera for some images, which gives a unique and timeless look to the photographs.

woodland photography

One of the standout compositions features two trees, one leaning into the other, with the fog separating them, creating a beautiful depth of field. Shainblum also experiments with framing elements, using openings in trees to create unique compositions.

Overall, Michael Shainblum’s video is a masterclass in landscape photography, showcasing the importance of scouting, building upon compositions, and relaxing in the face of changing conditions. His stunning images of the woods of Madeira are a testament to the beauty of the natural world and the power of photography to capture and share it.

- - - - - - - - - - - - - - - - - - - - - - - - - - - - - - - - - - - - - - - - - - - - - - - - - - - - - - - - - - - - - - - - - - - - - - - - - -

Did you appreciate this newsletter? Please help us keep it going by Joining Our Patreon Supporters

What are your thoughts on this article? Join the discussion on our Facebook Page

PictureCorrect subscribers can also learn more today with our #1 bestseller: The Photography Tutorial eBook

- - - - - - - - - - - - - - - - - - - - - - - - - - - - - - - - - - - - - - - - - - - - - - - - - - - - - - - - - - - - - - - - - - - - - - - - - -

The post Woodland Landscape Photography Tips appeared first on PictureCorrect.


from PictureCorrect https://ift.tt/KhbjnSP
via IFTTT

maanantai 20. maaliskuuta 2023

PictureCorrect.com: Tripods for Photography: Everything You Need to Know

Tripods may seem like one of the simpler items in the photographer’s toolkit, but there are actually a lot of things to know about them. Even the more knowledgeable among us might be surprised to find that there’s a number of tips and tricks to choosing the right one, learning to use tripod features, and avoiding mistakes that can vary from the merely annoying to the disastrous. That’s why photography instructor Phil Steele has but together the rather extensive tutorial below, covering everything you didn’t know that you didn’t know about this most essential piece of gear:

Tripods don’t quite come in as many variations as the flavors of ice cream, but sometimes it can certainly seem that way. From which head to get, to “twisties” vs. “flippies”, to what the tripod is made of, choices abound. If this is your first real tripod purchase, you’ll have to weigh all of these considerations carefully.

The first thing you’ll need to ask yourself (other than what your budget is) is what you’ll be using it for. This will inform just about every other decision.

  • Is it for the studio or will you be lugging it around?
  • What kind of camera do you intend to use with it (especially important here is size and weight).
  • Will your subjects be moving around a lot or will they be mostly stationary?

Once you know the answers to these questions it’ll be easier to narrow down your options.

Tripod Features to Consider

  • Type of head (ball, 3-way, gimbal, etc.)
  • Type of locking mechanisms on the legs
  • Weight
  • Stability
  • Type of quick release
  • Center column
  • Size/portability
  • Feet
  • Material it’s made of (not just whether it’s aluminum or carbon fiber, but also whether the components are made of cheap plastic or something more durable)
A Ball head can be adjusted quickly

The ball head can be adjusted quickly and is the head of choice for those looking for portability.

“Twisties” or “Flippies”?

The photography world is rife with strong opinions about the different aspects of tripods, but one that tends to get the most heat is what kind of locking mechanism to use on the legs. There honestly doesn’t seem to be a lot of middle ground on this one–people will swear by whichever type works best for them. Still, it’s a key choice you’ll need to make.

Twisties

Pros: compact, quiet, don’t get caught on your bag or other things

Cons: slower to work with (for some people–there are some tricks to using twisties quickly that weren’t shown here), it’s hard to know if they’re fully locked down as it’s important not to over tighten them

Flippies

Pros: you can always know whether they’re open or locked, for some folks they’re faster than twisties

Cons: they can get caught on things, they make noise when they snap into place, bulkier than twisities

Feet

Many tripods have interchangeable feet

One thing that’s often neglected when choosing a tripod is whether it has interchangeable feet.

One thing that many first-time tripod buyers might not know to consider is whether the tripod they’re interested in has interchangeable feet. Believe it or not, this can make a huge difference. Just imagine doing a shoot indoors on a beautiful wooden floor and only having the spikes shown in the picture above as your feet. Or trying to do an amazing shoot outdoors, only to find that your tripod feet won’t grip. (As a landscape photographer, I’ve been ever so grateful for having the outdoor feet in my kit!)

Marking your quick release plate

If your quick release plate is asymmetrical, save yourself a bunch of time by marking which end goes where.

Tripod Tips and Tricks

There were many, many tips and tricks covered in this video. Here are just a few:

  • When tightening the legs, tighten starting at the top and loosen starting at the bottom.
  • If you’re using a large lens, make sure one of the tripods legs is directly underneath. One way to ensure this is to make sure that a tripod leg is always facing your subject.
  • For the greatest stability, use the center column only after the legs have been fully extended.
  • If using a DSLR, learn how to lock the mirror or shoot in live view mode.
  • If you don’t have a remote shutter release and are using the self-timer, choose 10 seconds rather than just 2. Often there are vibrations too fine to be seen with naked eye still occurring after just 2.
  • Secure the camera strap so that it doesn’t blow in the wind or get caught on things.
  • When using a tripod, turn your stabilizers off—both on the lens and in camera.
  • If your tripod has a ball head, check to see if your camera has a leveling mode.
  • If you use more than one camera, keep some extra quick release plates in your kit.
In-camera leveling

Your camera’s leveling mode will take the guesswork out of trying to figure out if your horizon is level when using a ball head tripod.

The truth is, no matter how informative videos like these are, the best way to make an informed decision is to get real-time experience with different tripods and figure out what works for you and what doesn’t. This could mean borrowing a friend’s for a couple of days or renting one, but merely testing one out in the store for a few minutes isn’t going to give you all the information you need. Go out, get shooting, and try out as many different types of tripods as possible in the field before buying.

For further training: Understanding Your Camera Course

- - - - - - - - - - - - - - - - - - - - - - - - - - - - - - - - - - - - - - - - - - - - - - - - - - - - - - - - - - - - - - - - - - - - - - - - - -

Did you appreciate this newsletter? Please help us keep it going by Joining Our Patreon Supporters

What are your thoughts on this article? Join the discussion on our Facebook Page

PictureCorrect subscribers can also learn more today with our #1 bestseller: The Photography Tutorial eBook

- - - - - - - - - - - - - - - - - - - - - - - - - - - - - - - - - - - - - - - - - - - - - - - - - - - - - - - - - - - - - - - - - - - - - - - - - -

The post Tripods for Photography: Everything You Need to Know appeared first on PictureCorrect.


from PictureCorrect https://ift.tt/LHEUbJl
via IFTTT

torstai 16. maaliskuuta 2023

PictureCorrect.com: Tips for Shooting a Family Portrait with a Newborn

Adding a new member to your family is a pure delight. It’s only logical that parents will want to take family portraits with their new bundle of joy. But getting these tiny new humans to sit still is a whole other challenge: they squirm and wiggle constantly, and their eyes are rarely open. In today’s video, we have photographer Kelly Brown demonstrating how she has her clients pose for a family portrait with their newborn:

As Brown demonstrates in the video, the big trick is to guide the parents into pose so you can get a photo taken quickly. Compassion is also critical: new parents can look frazzled, and postpartum mothers may be uncomfortable about their bodies. As a photographer, it’s up to you to try and convince them that these memories will be worth commemorating in a beautiful photo.

“When people are in front of the camera, they don’t know what to do. You’ve got to tell them, guide them and communicate with them get the interaction between all of them.”

Pose the family in a way that emphasizes the family’s intimacy, love and excitement. In the process, also pay attention to how you’re lighting the family. Since you’ll be shooting a group, make sure you set the aperture right. You’d want all of the family members to be in focus, and not just the newborn.

Be sure to go through the entire video to see how Brown works with a family of four. As an additional challenge, she also has a two-and-a-half-year-old in the set. You’ll be amazed by how quickly she gets the shoot done.

- - - - - - - - - - - - - - - - - - - - - - - - - - - - - - - - - - - - - - - - - - - - - - - - - - - - - - - - - - - - - - - - - - - - - - - - - -

Did you appreciate this newsletter? Please help us keep it going by Joining Our Patreon Supporters

What are your thoughts on this article? Join the discussion on our Facebook Page

PictureCorrect subscribers can also learn more today with our #1 bestseller: The Photography Tutorial eBook

- - - - - - - - - - - - - - - - - - - - - - - - - - - - - - - - - - - - - - - - - - - - - - - - - - - - - - - - - - - - - - - - - - - - - - - - - -

The post Tips for Shooting a Family Portrait with a Newborn appeared first on PictureCorrect.


from PictureCorrect https://ift.tt/j21lvMQ
via IFTTT