


One of the most enjoyable parts of creating black and white images is what comes after the actual black and white conversion.

Because once it’s in B&W, all that remains is light and shape.
From there the process becomes a matter of painting light onto shapes you want to accentuate, and away from shapes you want to de-emphasize.
It’s a surprisingly and satisfyingly simple process to virtually redefine the appearance of shapes and surfaces based on how and where you apply simple brightening or darkening adjustments.
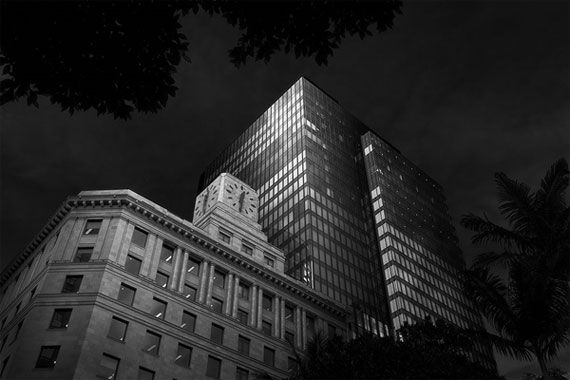
Take the image above for example. Where and how the light has been applied totally transforms the original image so much more than a “regular” black and white conversion would have.
Here it is again, preceded by how it looked after a standard B&W conversion:
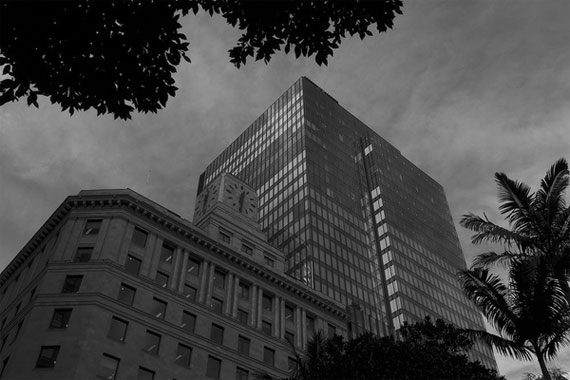
Above – Basic B&W conversion before creative edits.
Below – Finished creative B&W edit.
After making the initial black and white conversion, the editing techniques used to achieve results like the finished image above are relatively simple.
The process can be broadly broken down into the following steps:
Step 1:
In Photoshop, create selections for every surface in the image that you want to make changes to. This is the most time-consuming part, so working on images of buildings where there are lots of straight edges that are easy to “cut out” is a great place to start!
Save each selection in the Channels Panel so you can come back and load them later when making your actual edits.
Step 2:
Decide on your preferred technique for lightening and darkening something in PS (eg. Curves adjustment layers, dodging and burning etc.
If starting out, I recommend adding a new empty layer to your document and setting its blend mode to Overlay or Soft Light.
Next, load one of your saved selections from the Channels Panel and then add a layer mask to the new layer you just created.
(Adding a layer mask to a layer whilst the selection is active will make the layer mask restrict the layer to only being shown within the boundaries of the selection)
Step 3:
With the brush tool (low opacity, 0% hardness) and either a black or white foreground colour, begin “painting light” into the layer you just created.
Step 4: Go To Step 2
Repeat this process for each surface you created a selection for.
Use the example image above for reference and think about how and where the light and shadows were applied to create the finished effect.
It’s a fun process and can turn out some surprisingly awesome results!
If you’d like me to teach you my process in full, then check out my Creative Black & White Editing Course below.

Creating great-looking B&W images is about more than just removing color via “desaturate”, or moving a few sliders up and down with a black and white adjustment layer. Landscape photographer Steve Arnold created this course to help photographers master the critical concepts. We were able to arrange a 40% discount for PictureCorrect readers for a limited time if you want to check it out.
Deal ending soon: The Creative Black & White Editing Course at 40% Off
- - - - - - - - - - - - - - - - - - - - - - - - - - - - - - - - - - - - - - - - - - - - - - - - - - - - - - - - - - - - - - - - - - - - - - - - - -
Did you appreciate this newsletter? Please help us keep it going by Joining Our Patreon Supporters
What are your thoughts on this article? Join the discussion on our Facebook Page
PictureCorrect subscribers can also learn more today with our #1 bestseller: The Photography Tutorial eBook
- - - - - - - - - - - - - - - - - - - - - - - - - - - - - - - - - - - - - - - - - - - - - - - - - - - - - - - - - - - - - - - - - - - - - - - - - -
The post Painting Light in Black and White appeared first on PictureCorrect.
from PictureCorrect https://ift.tt/reDGZTo
via IFTTT


0 kommenttia:
Lähetä kommentti