lauantai 30. syyskuuta 2023

PictureCorrect.com: Aperture Adjustment in iPhone Portrait Mode Post-Capture

In photography, aperture is a crucial element that controls the amount of light entering the lens, affecting both brightness and depth of field. Although traditionally associated with DSLR and mirrorless cameras, modern smartphones like the iPhone now offer adjustable aperture settings, even after a photo has been taken. This feature is especially useful in portrait photography, where achieving the perfect balance between subject sharpness and background blur (bokeh) is key. In this post, we’ll delve into the steps and tips for adjusting the aperture in iPhone portraits post-capture.
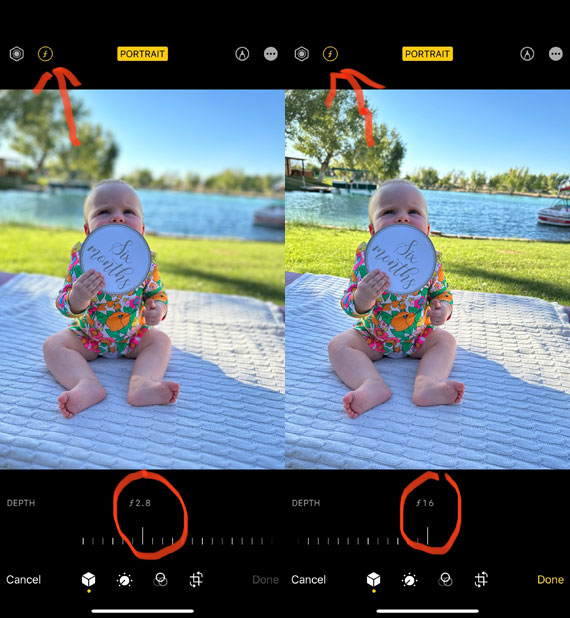
aperture adjustment

Understanding Aperture in iPhone Photography:

The iPhone’s adjustable aperture feature relies on computational photography. Unlike traditional cameras, where aperture adjustment is achieved mechanically, the iPhone uses software to simulate various aperture values. This digital flexibility allows photographers to fine-tune the depth of field effect after the shot has been captured.

Steps to Adjust Aperture Post-Capture:

1. Open the Photos app:

Locate and open the Photos app on your iPhone to find the portrait photo you wish to adjust.

2. Select the desired photo:

Browse through your photos and tap on the portrait photo you want to edit.

3. Tap ‘Edit’:

In the upper right-hand corner, you will find the ‘Edit’ button. Tap on it to enter the editing mode.

4. Adjust the Depth Control:

You will see a depth control slider (indicated by an ‘f’ symbol followed by a number) at the bottom of the screen.
Drag the slider left or right to adjust the aperture value. Moving it to the left (lower f-stop numbers) will create a shallower depth of field, blurring the background more. Conversely, sliding to the right (higher f-stop numbers) will increase the depth of field, making more of the scene in focus.

5. Compare Before and After:

Use the ‘Before and After’ feature by pressing and holding on the photo to see how your adjustments have changed the image.

6. Save Your Edits:

Once satisfied with the adjustment, tap ‘Done’ to save your edits.

Tips for Better Aperture Adjustment:

  • Understanding the Effect: Familiarize yourself with how aperture affects your photos. Experiment with different settings to see how they impact the depth of field and the overall look of your portraits.
    Consider the Lighting: Lighting conditions can significantly impact how the aperture adjustment will look. Ensure there’s adequate lighting to get the desired effect.
    Utilize Third-Party Apps: Explore third-party apps like Focos or Halide that provide more advanced depth and aperture control, allowing for even more creative flexibility in your portrait photography.

Here’s a breakdown of how it operates:

Depth Mapping:

When you take a photo in Portrait mode, the iPhone’s dual or multi-lens camera system captures the scene from slightly different angles. This data is used to create a depth map of the scene, understanding which objects are closer and which are farther away.

Computational Photography:

The depth information is then utilized by the software to apply a depth effect to the image. The term computational photography refers to the use of software algorithms to enhance or extend the capabilities of digital photography.

Simulated Aperture Adjustment:

  • When you adjust the aperture post-capture, what you’re essentially doing is instructing the software how much blur to apply to the different areas of the image based on the depth map.
  • A lower f-stop number (e.g., f/1.4) will result in more blur, simulating a shallower depth of field, while a higher f-stop number (e.g., f/16) will result in less blur, simulating a deeper depth of field.
  • This is a simulation of what adjusting the aperture on a traditional camera lens would do. However, unlike a traditional camera, the iPhone is using software algorithms to achieve this effect, not a physical change in the lens aperture.

Real-Time Preview and Adjustment:

The iPhone allows you to see these changes in real-time as you slide the depth control slider, making it easy to find the exact look you want.
Saving the Adjustment:

Once you’ve adjusted the aperture to your liking, you can save the image, and the software renders the final image with the chosen depth of field effect.

Adjusting the aperture post-capture on your iPhone is a powerful tool to enhance your portrait photographs. With a bit of practice and experimentation, you can master this feature and significantly up your photography game.

For Further Training:

iPhone Photo Academy is an in-depth online course that will show you how to take incredible iPhone photos. With the right knowledge an iPhone can be used to take photos that are so good that most people would never even believe that they were taken with a phone. It is currently 84% off which ends soon!

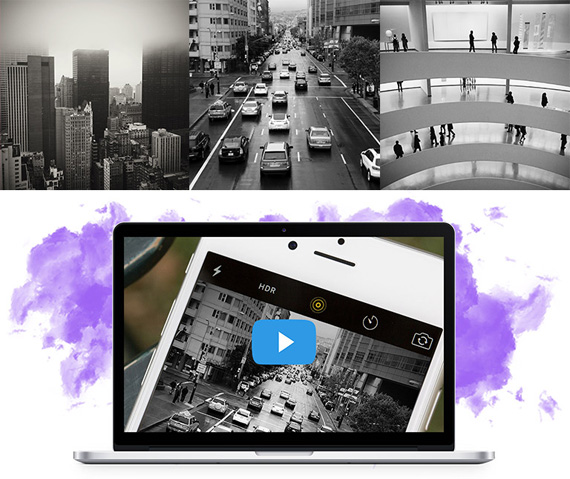
iphone photo tutorials

iPhone Photography Tricks (Click to See More Examples)

The best camera is the one that is always with you. But having the iPhone with you is only half of the equation. The other half is knowing how to use it to take outstanding photos.

Deal ending soon: The iPhone Photography Academy at 84% Off

- - - - - - - - - - - - - - - - - - - - - - - - - - - - - - - - - - - - - - - - - - - - - - - - - - - - - - - - - - - - - - - - - - - - - - - - - -

Did you appreciate this newsletter? Please help us keep it going by Joining Our Patreon Supporters

What are your thoughts on this article? Join the discussion on our Facebook Page

PictureCorrect subscribers can also learn more today with our #1 bestseller: The Photography Tutorial eBook

- - - - - - - - - - - - - - - - - - - - - - - - - - - - - - - - - - - - - - - - - - - - - - - - - - - - - - - - - - - - - - - - - - - - - - - - - -

The post Aperture Adjustment in iPhone Portrait Mode Post-Capture appeared first on PictureCorrect.


from PictureCorrect https://ift.tt/8IFfmst
via IFTTT

perjantai 29. syyskuuta 2023

PictureCorrect.com: How to Photograph Auroras

Final day: only hours left to get the Photo Adventure Cheat Sheets at 80% Off

Auroras, also known as the Northern and Southern Lights, are one of nature’s most breathtaking displays. These shimmering curtains of light, dancing across the night sky, are a dream subject for many photographers. Capturing their ethereal beauty can be challenging, but with the right knowledge and equipment, you can immortalize these celestial wonders. Here’s a comprehensive guide to help you photograph auroras.

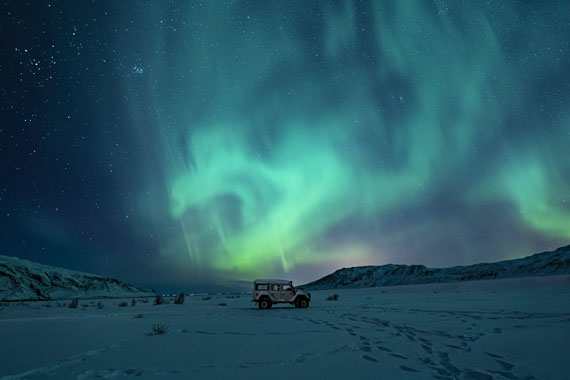
aurora photograph

Photo captured by Jonatan Pie; 20mm, f/3.2, 13 seconds, ISO 1250

1. Understand the Science

Auroras are caused by charged particles from the sun colliding with Earth’s magnetic field. The Northern Lights, or Aurora Borealis, are visible in the Northern Hemisphere, while the Southern Lights, or Aurora Australis, are visible in the Southern Hemisphere. Their appearance and intensity are influenced by solar activity, so it’s beneficial to understand the solar cycle and monitor space weather forecasts.

Aurora Forecasting and Apps:

  • Space Weather Websites: Websites like the NOAA Space Weather Prediction Center and the Space Weather Live provide forecasts and real-time data on geomagnetic activity.
  • Mobile Apps: Apps like “Aurora Forecast” and “My Aurora Forecast” can provide real-time predictions, alerts, and best times to view the lights based on your location.

2. Choose the Right Location

  • Latitude: The closer you are to the poles, the better your chances. Popular locations include Norway, Iceland, Canada, and Alaska for the Northern Lights, and Australia, New Zealand, and Antarctica for the Southern Lights.
  • Darkness: Avoid light pollution. Move away from city lights and find a spot with a clear, unobstructed view of the horizon.
  • Weather: Clear skies are essential. Monitor local weather forecasts and aim for nights with minimal cloud cover.

3. Timing is Everything

  • Time of Year: Winter months offer longer nights and often clearer skies. In the far north, the polar night provides 24 hours of darkness, maximizing your chances.
  • Solar Activity: Monitor the Kp-index, a measure of geomagnetic activity. Higher values (4 and above) indicate stronger auroral activity.
  • Moon Phases: A darker sky provides better contrast for auroras. Planning your trip around the new moon phase can be beneficial.

4. Gear Up

  • Camera: A DSLR or mirrorless camera with manual settings is ideal.
  • Lens: A fast wide-angle lens (e.g., f/2.8 or faster) is preferable. It allows more light in and captures a broader swath of the sky.
  • Tripod: Essential for stability during long exposures.
  • Extra Batteries: Cold conditions can drain batteries quickly.

5. Camera Settings

  • Focus: Set your lens to manual focus and adjust it to infinity. Some photographers use a bright star or distant light to help set focus.
  • Aperture: Use the widest setting (smallest f-number) to allow maximum light.
  • Shutter Speed: Start with 5-20 seconds. If the aurora is moving quickly, you might need a shorter exposure to capture details.
  • ISO: Begin with 800-1600. Adjust as needed based on the aurora’s brightness and desired noise levels.
  • White Balance: Set to daylight or auto. However, you can adjust this in post-processing if shooting in RAW.

6. Composition

  • Foreground Interest: Including an interesting foreground (e.g., trees, mountains, or reflective water bodies) can add depth and scale to your images.
  • Rule of Thirds: Position the aurora along one of the imaginary lines dividing your frame into thirds for a balanced composition.

7. Be Patient and Persistent

Auroras can be unpredictable. You might wait hours without any activity, only to witness a sudden burst of light. Stay patient, keep warm, and be ready to adjust your settings as the display evolves. Stay flexible, it might be helpful to have a flexible itinerary if you’re traveling specifically to see them. This allows you to move to different locations based on the forecast or cloud cover.

8. Post-Processing

  • RAW Files: Shooting in RAW gives you more flexibility in post-processing. Adjust exposure, white balance, and clarity to bring out the best in your aurora images.
  • Noise Reduction: Use software like Topaz Photo AI, Adobe Lightroom or Photoshop to reduce noise resulting from high ISO settings.

Photographing auroras is a blend of preparation, understanding, and a touch of luck. With the right approach and a bit of persistence, you can capture the mesmerizing dance of lights that few get to witness in person. Whether you’re a seasoned pro or a budding enthusiast, the thrill of capturing an aurora is an experience like no other. Happy shooting!

For Further Training, Offer Ending Tonight:

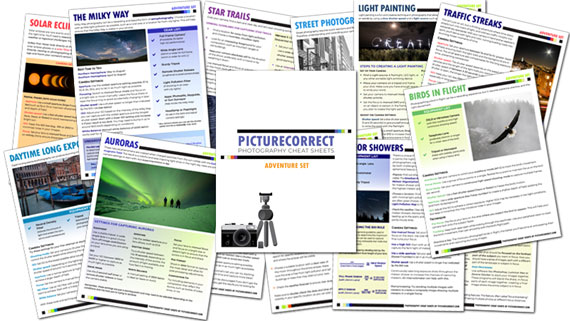
For help remembering these concepts and more help on the Most Difficult Photography Situations, this new set of Photography Adventure Cheat Sheets have you covered. They are currently 80% off until the end of the month, September 30, if you want to check them out.

photography adventure

New! Cheat Sheets for Your Photography Adventures (see how they work)

The perfect companion for any photographer. Print one out whenever you need it. Whether you’re going on vacation or seeking out a specific photography adventure, these cheat sheets can provide you with the knowledge and inspiration you need to create your best work yet.

Only hours left: The Photography Adventure Cheat Sheets at 80% Off

- - - - - - - - - - - - - - - - - - - - - - - - - - - - - - - - - - - - - - - - - - - - - - - - - - - - - - - - - - - - - - - - - - - - - - - - - -

Did you appreciate this newsletter? Please help us keep it going by Joining Our Patreon Supporters

What are your thoughts on this article? Join the discussion on our Facebook Page

PictureCorrect subscribers can also learn more today with our #1 bestseller: The Photography Tutorial eBook

- - - - - - - - - - - - - - - - - - - - - - - - - - - - - - - - - - - - - - - - - - - - - - - - - - - - - - - - - - - - - - - - - - - - - - - - - -

The post How to Photograph Auroras appeared first on PictureCorrect.


from PictureCorrect https://ift.tt/MhLk5XY
via IFTTT
torstai 28. syyskuuta 2023

PictureCorrect.com: Airshow Preparation and Photography Tutorial

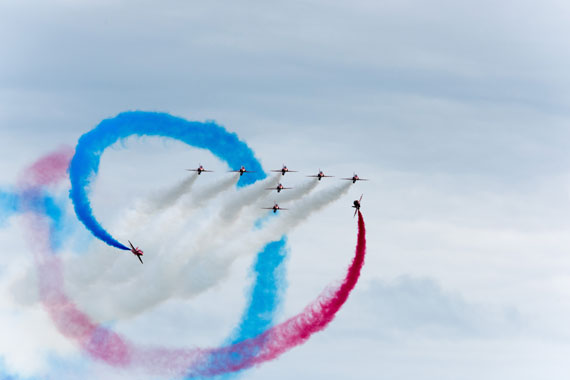
Airshows are a visual spectacle, showcasing the marvels of aviation, the skill of pilots, and the beauty of flight. For photographers, capturing these moments can be both challenging and rewarding. Here’s a comprehensive guide to help you prepare for an airshow and capture stunning photographs.

Reminder – only 1 day left! For a cheat sheet on this topic that you can print out to remember, venture over to the new Photography Adventure Cheat Sheets Launch Sale

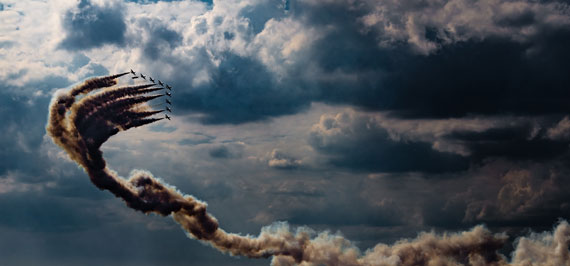
airshow photo

Photo captured by Richard R. Schünemann; 78mm, f/13.0, 1/1500s, ISO 200

Pre-Airshow Preparation:

  • Research the Show: Before you head out, research the airshow. Know the schedule, the performers, and the types of aircraft that will be there. This will help you anticipate the action.
  • Check the Weather: Weather can greatly affect your shots. Overcast skies can offer soft, diffused lighting, while sunny days can create harsh shadows. Plan your settings accordingly.

Attending an airshow requires more than just your camera gear. Given the outdoor nature of these events and the loud noise from the aircraft, it’s essential to be well-prepared. Here’s a quick packing list to ensure you have everything you need:

Camera Gear:

  1. Camera: DSLR or mirrorless camera.
  2. Lenses: Telephoto lens (e.g., 70-200mm or 100-400mm) and a wide-angle lens.
  3. Memory Cards: Multiple high-capacity cards.
  4. Batteries: Spare batteries for your camera.
  5. Tripod/Monopod: Especially useful for heavy lenses.
  6. Camera Bag: To keep all your gear organized and protected.
  7. Lens Cleaning Kit: Dust and dirt can be a nuisance during outdoor events.

Personal Comfort and Safety:

  1. Ear Protection: Aircraft, especially jets, can be extremely loud. Consider earplugs or noise-canceling earmuffs.
  2. Hat: A wide-brimmed hat to shield your face and neck.
  3. Sunglasses: Preferably polarized to reduce glare.
  4. Sunblock: Broad-spectrum SPF 50 or higher. Remember to reapply every 2 hours.
  5. Lip Balm with SPF: Protect your lips from getting chapped or sunburned.
  6. Water Bottle: Staying hydrated is crucial, especially on hot days.
  7. Snacks: Energy bars or nuts can keep you energized.
  8. Comfortable Clothing: Wear layers so you can adjust to the temperature. Comfortable shoes are a must.
  9. Portable Chair or Blanket: If you plan to be there for the entire day, having something to sit on can be a relief.
  10. Backpack or Tote: To carry your personal items and any purchases from the event.
  11. First Aid Kit: Basic items like band-aids, pain relievers, and any personal medications.
  12. Cash and ID: Some vendors might not accept cards.

Optional but Useful:

  1. Binoculars: Get a closer look at distant aircraft or static displays.
  2. Notepad and Pen: Jot down details or sequences of the show.
  3. Portable Charger: For your phone or other electronic devices.

Remember, while it’s essential to be well-prepared, you don’t want to overburden yourself. Pack smart, prioritize based on your needs, and enjoy the airshow!

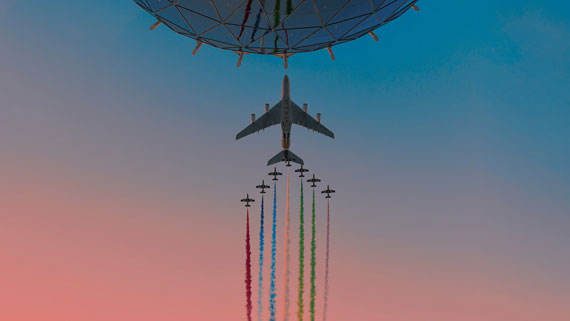
airshow photography

Photo captured by Abed Ismail; 24mm, f/5.6, 1/6400s, ISO 1250

On the Day:

  • Arrive Early: This allows you to scout the location, check the light, and set up your equipment.
  • Choose Your Spot: Position yourself with the sun behind you to illuminate the aircraft. Consider the show’s center as most maneuvers are based around this point.
  • Stay Aware: Keep an ear out for announcements. They often provide cues about upcoming performances.

Photography Tips:

  • Shutter Speed: For propeller-driven aircraft, use a slower shutter speed (1/125s to 1/250s) to capture the motion of the propellers. For jets, you can use faster speeds (1/1000s or faster).
  • Aperture: An aperture of f/8 to f/11 will generally provide sharp images with a decent depth of field.
  • ISO: Keep it as low as possible for the best quality. Increase only if necessary.
  • Continuous Shooting Mode: This mode allows you to capture multiple frames in quick succession, ensuring you don’t miss any action.
  • Panning: To capture aircraft in motion, use a technique called panning. Move your camera to follow the aircraft, keeping it in the same position in your frame. This can create a sharp subject against a blurred background, emphasizing motion.
  • Focus: Use continuous or servo autofocus mode. This allows the camera to keep adjusting focus as the aircraft moves.
  • Composition: While it’s tempting to always zoom in on the aircraft, sometimes pulling back to include the environment (clouds, crowd, other aircraft) can create a more compelling image.
airshow capture

Photo captured by Daniel Klein; 400mm, f/11.0, 1/3200s, ISO 800

Post-Processing:

  • RAW Format: Shoot in RAW. This gives you more flexibility in post-processing.
  • Editing: Use software like Lightroom or Photoshop. Adjust exposure, contrast, sharpness, and saturation to bring out the best in your shots.
  • Noise Reduction: If you had to increase your ISO, use noise reduction tools to clean up your image.
  • Cropping: Sometimes, you can’t get as close as you’d like, or an aircraft might be positioned awkwardly in your frame. Cropping can help improve composition.

Respect Safety and Regulations:

Always follow the rules set by the airshow organizers. Stay in designated areas, listen to announcements, and respect barriers.

Airshow photography can be challenging, but with preparation and practice, you can capture breathtaking images. Remember to enjoy the experience, be patient, and keep experimenting with different settings and compositions. The sky’s the limit!

For Further Training:

For help remembering these concepts and more help on the Most Difficult Photography Situations, this new set of Photography Adventure Cheat Sheets have you covered. They are currently 80% off for the launch sale which ends soon if you want to check them out.

photography adventure

New! Cheat Sheets for Your Photography Adventures (see how they work)

The perfect companion for any photographer. Print one out whenever you need it. Whether you’re going on vacation or seeking out a specific photography adventure, these cheat sheets can provide you with the knowledge and inspiration you need to create your best work yet.

Only 1 day left: The Photography Adventure Cheat Sheets at 80% Off

- - - - - - - - - - - - - - - - - - - - - - - - - - - - - - - - - - - - - - - - - - - - - - - - - - - - - - - - - - - - - - - - - - - - - - - - - -

Did you appreciate this newsletter? Please help us keep it going by Joining Our Patreon Supporters

What are your thoughts on this article? Join the discussion on our Facebook Page

PictureCorrect subscribers can also learn more today with our #1 bestseller: The Photography Tutorial eBook

- - - - - - - - - - - - - - - - - - - - - - - - - - - - - - - - - - - - - - - - - - - - - - - - - - - - - - - - - - - - - - - - - - - - - - - - - -

The post Airshow Preparation and Photography Tutorial appeared first on PictureCorrect.


from PictureCorrect https://ift.tt/poCV19A
via IFTTT
keskiviikko 27. syyskuuta 2023

PictureCorrect.com: How to Photograph Traffic Streaks

Quick reminder: only a few days left for the Photo Adventure Cheat Sheets at 80% Off

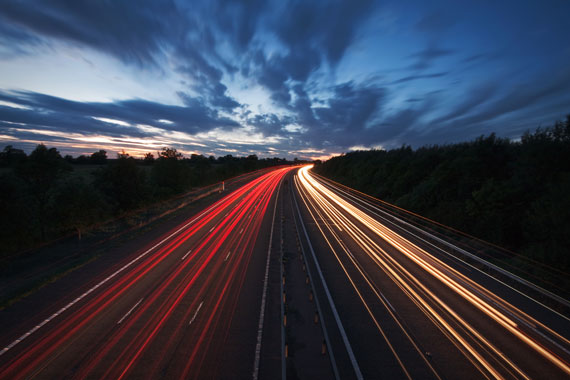
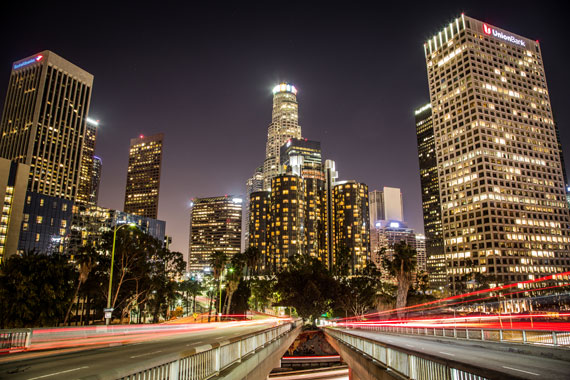
Capturing the dynamic motion of traffic streaks can transform an ordinary cityscape into a vibrant, energetic scene. These streaks, created by the movement of vehicles’ lights during long exposures, can add a sense of motion and drama to your photographs. Here’s a step-by-step guide on how to photograph traffic streaks effectively.

traffic streaks

1. Equipment You’ll Need

  • Camera: A DSLR or mirrorless camera with manual mode capability.
  • Tripod: Essential for stabilizing your camera during long exposures.
  • Wide-angle lens: Ideal for capturing expansive cityscapes.
  • Remote shutter release: To avoid camera shake when pressing the shutter.
  • Neutral Density (ND) filter: Useful for longer exposures in brighter conditions.

2. Choosing the Right Location

  • Overpasses and Bridges: These provide an elevated perspective, allowing you to capture the flow of traffic below.
  • Busy Streets: Opt for streets with a consistent flow of traffic to ensure continuous light trails.
  • Landmarks: Incorporating recognizable landmarks can add context and interest to your shot.

3. Camera Settings

  • Mode: Switch to Manual mode (M) for complete control.
  • Aperture: Use a small aperture (f/8 to f/16) for a deeper depth of field.
  • Shutter Speed: Start with a 10-30 second exposure and adjust based on the traffic speed and desired streak length.
  • ISO: Keep it low (ISO 100 or 200) to reduce noise.
  • Focus: Use manual focus. Autofocus might struggle in low light. Focus on a point where the traffic will be, or use a distant light or landmark.

4. Shooting Techniques

  • Time of Day: Blue hour, the period just after sunset or before sunrise, is ideal. The ambient light balances with the traffic lights, creating a harmonious blend.
  • Composition: Use the rule of thirds, leading lines, and other compositional techniques to guide the viewer’s eye.
  • Multiple Exposures: Take several shots and blend them in post-processing for denser light trails or to remove unwanted elements.

5. Post-Processing Tips

  • Blending: Use software like Photoshop to blend multiple exposures for a composite image with richer light trails.
  • Noise Reduction: Long exposures can introduce noise. Use noise reduction tools to clean up the image.
  • Contrast and Saturation: Boosting these can make the light trails pop and give the image a more dynamic feel.
  • Sharpening: Apply subtle sharpening to enhance details without introducing artifacts.

6. Challenges and Solutions

  • Interrupted Light Trails: If a vehicle stops or changes lanes, it can break the light trail. Solution: Use multiple exposures and blend them for continuous trails.
  • Overexposed Highlights: Bright areas, like streetlights, can become overexposed. Solution: Use an ND filter or blend exposures in post-processing.
  • Camera Shake: Even slight movements can blur the image. Solution: Use a sturdy tripod and a remote shutter release.

7. Safety First

Always prioritize safety. If you’re on an overpass, bridge, or busy street, be aware of your surroundings. Avoid obstructing traffic or putting yourself in a dangerous position.

Photographing traffic streaks can be a rewarding experience, turning the mundane into the extraordinary. With the right equipment, settings, and techniques, you can capture the pulsating energy of city life in a single frame. So, venture out during the blue hour, set up your gear, and let the city’s lights paint your canvas.

For Further Training:

For help remembering these concepts, and more cheat sheets on the Most Difficult Photography Situations, this new set of Photography Adventure Cheat Sheets have you covered. They are currently 80% off for the launch sale until the end of the month, September 30, if you want to check them out.

adventure cheat sheets

New! Cheat Sheets for Your Photography Adventures (see how they work)

The perfect companion for any photographer. Print one out whenever you need it. Whether you’re going on vacation or seeking out a specific photography adventure, these cheat sheets can provide you with the knowledge and inspiration you need to create your best work yet.

Only a few days left: The Photography Adventure Cheat Sheets at 80% Off

- - - - - - - - - - - - - - - - - - - - - - - - - - - - - - - - - - - - - - - - - - - - - - - - - - - - - - - - - - - - - - - - - - - - - - - - - -

Did you appreciate this newsletter? Please help us keep it going by Joining Our Patreon Supporters

What are your thoughts on this article? Join the discussion on our Facebook Page

PictureCorrect subscribers can also learn more today with our #1 bestseller: The Photography Tutorial eBook

- - - - - - - - - - - - - - - - - - - - - - - - - - - - - - - - - - - - - - - - - - - - - - - - - - - - - - - - - - - - - - - - - - - - - - - - - -

The post How to Photograph Traffic Streaks appeared first on PictureCorrect.


from PictureCorrect https://ift.tt/sWSjXzu
via IFTTT
tiistai 26. syyskuuta 2023

PictureCorrect.com: Shooting from the Hip: Street Photography Tips for Travelers

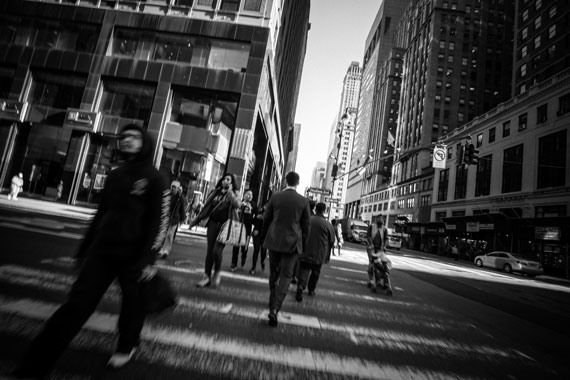
Street photography is an art form that captures the candid moments of life, often in urban settings. For travelers, it offers a unique way to document the essence of a place, its people, and its culture. One popular technique in street photography is “shooting from the hip,” which involves taking photos without raising the camera to the eye. This method can yield spontaneous and unposed shots, but it also comes with its own set of challenges, ethics, and safety concerns. Let’s delve into the world of hip-level street photography for travelers.

shooting from the hip photo

Photo captured by Richard Schneider

1. What is “Shooting from the Hip”?

Shooting from the hip is a technique where the photographer takes a photo without looking through the viewfinder or at the screen. The camera is typically held at waist level, and the shot is taken discreetly. This approach allows for more candid shots, as subjects often don’t realize they’re being photographed.

2. Why Use this Technique?

  • Candidness: People act more naturally when they don’t know they’re being photographed. This can lead to more authentic and spontaneous images.
  • Discretion: In busy streets or markets, raising a camera can attract attention. Shooting from the hip can be more discreet.
  • Unique Perspective: Photos taken from waist level offer a different viewpoint than those taken from eye level, adding variety to your shots.

3. Tips for Shooting from the Hip

When shooting from the hip in street photography, you’ll want to optimize your camera settings to ensure you capture sharp, well-exposed images, especially since you won’t be using the viewfinder or screen to compose or focus. Here are some recommended settings:

Aperture (f-stop):

  • Wide Depth of Field: Use a smaller aperture (larger f-number) like f/8 or f/11. This provides a wide depth of field, ensuring that more of the scene is in focus. This is especially useful since you’re not looking through the viewfinder to focus.

Shutter Speed:

  • Freeze Motion: To ensure sharp images, especially in bustling street scenes, use a faster shutter speed. A good starting point is 1/125s, but if there’s a lot of movement or you’re walking, consider going faster, like 1/250s or 1/500s.

ISO:

  • Adaptable ISO: If you’re shooting in manual mode, adjust the ISO to achieve the correct exposure given your chosen aperture and shutter speed. In brighter conditions, a lower ISO (e.g., ISO 100 or 200) is ideal. In lower light, you might need to increase the ISO.
  • Auto ISO: Many modern cameras offer an Auto ISO feature. When using this, the camera will automatically adjust the ISO based on the lighting conditions, ensuring a proper exposure. This can be handy for street photography where lighting can change frequently.

Focus:

  • Zone Focusing: Pre-focus your lens to a specific distance (e.g., 8-10 feet) and use a smaller aperture to maximize depth of field. This way, everything within a certain range will be in focus.
  • Autofocus: If you trust your camera’s autofocus system, set it to continuous autofocus (often labeled AF-C or AI Servo). This will continuously adjust the focus as subjects move. Pair this with a center or wide-area focus point setting.

Drive Mode:

  • Burst Mode: Also known as continuous shooting mode, this allows you to take several shots in quick succession by holding down the shutter button. This increases the chances of getting a well-composed and sharp image.

Lens Choice:

  • Wide-Angle Lens: A lens with a focal length between 24mm and 35mm (on a full-frame camera) is ideal. It offers a broad field of view, which is forgiving when shooting without looking.

Camera Mode:

  • Aperture Priority (Av or A): This mode lets you set the desired aperture, and the camera will automatically adjust the shutter speed. It’s a good balance between control and adaptability.
  • Manual (M): If you’re comfortable with it and the lighting conditions are relatively consistent, manual mode gives you full control over both aperture and shutter speed.

Image Stabilization:

  • If your camera or lens offers image stabilization (IS or VR), consider turning it on. It can help reduce the effects of camera shake, especially if you’re moving.
    Remember, these settings are starting points. Street photography often requires adaptability, so be ready to adjust based on the specific conditions and scenes you encounter. With practice, adjusting these settings will become second nature, allowing you to focus on capturing the moment.

hip camera settings

4. Ethics in Street Photography

Street photography can be invasive, so it’s essential to approach it with sensitivity and respect.

  • Respect Privacy: Avoid taking photos of people in vulnerable situations or compromising positions. If someone indicates they don’t want to be photographed, respect their wishes.
  • Be Transparent: If confronted, be honest about what you’re doing. Offer to show or delete the photo if someone is uncomfortable.
  • Research Local Customs: In some cultures, taking photos without permission is considered highly disrespectful or even illegal. Always be aware of local customs and norms. Here are some examples:

France: While you can take photos in public, France has strict privacy laws. It’s illegal to publish or distribute photos of people without their consent, even if they were taken in a public space. This means that while you can take candid shots, sharing them without the subject’s permission can lead to legal complications.

Germany: Similar to France, Germany values individual privacy. You can take photos in public, but publishing images without the subject’s consent can be problematic, especially if the person is the main subject or focus of the image.

Hungary: In 2014, Hungary introduced laws that made it necessary to get permission from everyone in a photograph before it’s taken, even if it’s shot in a public place. However, the interpretation and enforcement of this law can vary.

Austria: While public photography is generally allowed, if the person is recognizable and the image is published without their consent, it can lead to legal issues.

South Korea: Taking candid photos without consent can be considered a violation of a person’s portrait rights, especially if the image is shared or published.

Japan: While street photography is popular in Japan, there are concerns about “portrait rights.” It’s generally advised to seek permission if you intend to publish or sell the photo.

Saudi Arabia: It’s crucial to be cautious when taking photos in public, especially of people, government buildings, palaces, and even some public streets. Taking an unauthorized picture can sometimes constitute a crime.

United Arab Emirates: Taking photos of people, especially women, without permission can be considered disrespectful and can lead to legal issues.

Greece: Taking photos of people without their consent for commercial use is prohibited. While personal use might be more lenient, it’s always best to be cautious.

Quebec (Province in Canada): Quebec’s civil law protects a person’s image, meaning you could face legal issues for taking and publishing a photo of someone without their consent.

5. Safety Concerns

  • Stay Aware: When you’re focused on photography, it’s easy to become oblivious to your surroundings. Always be aware of traffic, obstacles, or potentially unsafe situations.
  • Avoid Risky Areas: Especially when traveling, be aware of areas that might be unsafe for tourists. Always prioritize your safety over getting a shot.
  • Secure Your Gear: Use a strap to secure your camera. Be aware of pickpockets, especially in crowded areas.

Shooting from the hip in street photography offers travelers a unique way to capture the essence of a place. While it can lead to incredible, candid shots, it’s essential to approach the technique with respect, ethics, and safety in mind. With practice and sensitivity, you can document your travels in a way that truly reflects the spirit of the places you visit.

- - - - - - - - - - - - - - - - - - - - - - - - - - - - - - - - - - - - - - - - - - - - - - - - - - - - - - - - - - - - - - - - - - - - - - - - - -

Did you appreciate this newsletter? Please help us keep it going by Joining Our Patreon Supporters

What are your thoughts on this article? Join the discussion on our Facebook Page

PictureCorrect subscribers can also learn more today with our #1 bestseller: The Photography Tutorial eBook

- - - - - - - - - - - - - - - - - - - - - - - - - - - - - - - - - - - - - - - - - - - - - - - - - - - - - - - - - - - - - - - - - - - - - - - - - -

The post Shooting from the Hip: Street Photography Tips for Travelers appeared first on PictureCorrect.


from PictureCorrect https://ift.tt/WkGnMD6
via IFTTT
maanantai 25. syyskuuta 2023

PictureCorrect.com: Capturing Nature’s Flash: How Lightning Triggers Work for Photography

Capturing the raw power and beauty of a lightning strike is a dream for many photographers. However, the unpredictability and speed of lightning make it a challenging subject. Enter lightning triggers: devices designed to help photographers capture these fleeting moments. In this blog post, we’ll delve deep into how lightning triggers work and provide tips for using them effectively.

Only a few days left: for a cheat sheet on this topic that you can print out to remember, venture over to the new Photography Adventure Cheat Sheets Launch Sale

lightning photography

Photo captured by Dan Aragón

1. What is a Lightning Trigger?

A lightning trigger is a device that detects a lightning strike’s initial flash and instantly triggers a camera’s shutter. This allows photographers to capture lightning with precision, without relying on luck or continuous shooting.

2. How Does a Lightning Trigger Work?

a. Detection Mechanism:

Most lightning triggers use an infrared (IR) or visible light sensor. When a sudden increase in light intensity is detected (indicative of a lightning strike), the device sends a signal to the camera to take a picture.

b. Response Time:

The key to a good lightning trigger is its response time. Lightning strikes are over in a matter of milliseconds, so the trigger needs to be fast. High-quality triggers can respond in less than a millisecond.

c. Sensitivity Adjustment:

Some triggers allow users to adjust sensitivity. This is useful in varying lighting conditions. For instance, during the day, a trigger might need to be more sensitive than at night.

3. Using a Lightning Trigger Effectively

a. Mount on a Tripod:

Given the long exposure times often required for lightning photography, it’s essential to have a stable setup. A tripod ensures that your camera remains steady, preventing blurry images.

b. Manual Focus:

Autofocus can struggle in low light conditions or with distant subjects like lightning. Set your lens to manual focus and focus on a distant object to ensure clarity.

c. Camera Settings:

  • Aperture: A mid-range aperture (f/8 to f/11) is often ideal. It provides a good depth of field and sharpness.
  • Shutter Speed: If you’re not using a trigger, long exposures at night (e.g., 10-30 seconds) can work, where you are essentially trying to get lucky. With a trigger, you can use shorter exposures, like 1/4 second up to 2 seconds, since the trigger will capture the lightning instantly.
  • ISO: Keep it low (e.g., 100 or 200) to reduce noise.

d. Positioning:

Safety first! Stay inside a vehicle or a safe structure. Position your camera to have a wide view of the sky, anticipating where lightning might strike.

e. Test the Trigger:

Before the storm arrives, test your trigger to ensure it’s working and that your camera settings are correct.

photographing lightning

Photo captured by Natalya Letunova

4. Limitations and Considerations

a. Day vs. Night:

Lightning triggers can be more effective at night when a lightning strike provides a significant contrast against the dark sky. During the day, the sensitivity might need adjustment.

b. False Triggers:

Sudden changes in light, like car headlights or other flashes, can cause the trigger to activate. It’s essential to be aware of your surroundings.

c. Battery Life:

Using a lightning trigger can drain both the trigger’s and the camera’s batteries faster. Always have spare batteries on hand.

Conclusion

Lightning triggers are invaluable tools for photographers looking to capture the majesty of a storm. While they can significantly increase the chances of getting that perfect shot, it’s essential to understand their workings and limitations. With the right equipment, settings, and safety precautions, you’ll be well on your way to capturing nature’s spectacular light show.

For Help You Can Print Out and Take With You:

For help remembering these concepts and more help on the Most Difficult Photography Situations, this new set of Photography Adventure Cheat Sheets have you covered. They are currently 80% off for the launch sale which ends soon if you want to check them out.

photography adventure

New! Cheat Sheets for Your Photography Adventures (see how they work)

The perfect companion for any photographer. Print one out whenever you need it. Whether you’re going on vacation or seeking out a specific photography adventure, these cheat sheets can provide you with the knowledge and inspiration you need to create your best work yet.

Only a few days left: The Photography Adventure Cheat Sheets at 80% Off

- - - - - - - - - - - - - - - - - - - - - - - - - - - - - - - - - - - - - - - - - - - - - - - - - - - - - - - - - - - - - - - - - - - - - - - - - -

Did you appreciate this newsletter? Please help us keep it going by Joining Our Patreon Supporters

What are your thoughts on this article? Join the discussion on our Facebook Page

PictureCorrect subscribers can also learn more today with our #1 bestseller: The Photography Tutorial eBook

- - - - - - - - - - - - - - - - - - - - - - - - - - - - - - - - - - - - - - - - - - - - - - - - - - - - - - - - - - - - - - - - - - - - - - - - - -

The post Capturing Nature’s Flash: How Lightning Triggers Work for Photography appeared first on PictureCorrect.


from PictureCorrect https://ift.tt/OSgAP4d
via IFTTT
sunnuntai 24. syyskuuta 2023

PictureCorrect.com: Sunset Phases for Photography

Sunsets are nature’s canvas, painting the sky with a myriad of colors and offering photographers a golden opportunity to capture breathtaking moments. Understanding the different phases of a sunset can significantly enhance the quality of your photographs, allowing you to anticipate changes in light and color. Let’s delve into these phases and explore the unique characteristics of each.

Quick reminder: for a cheat sheet on this topic that you can print out to remember, venture over to the new Photography Adventure Cheat Sheets Launch Sale

sunset phases

1. Golden Hour

The golden hour is a magical time for photographers. Occurring roughly an hour before sunset (and similarly after sunrise), this phase is characterized by a warm, golden glow. The sun’s rays, traveling through a thicker portion of the Earth’s atmosphere, scatter, producing this enchanting light. The resulting soft and diffused illumination is perfect for various photography genres:

  • Portraits: The flattering light minimizes skin imperfections and casts gentle shadows.
  • Landscapes: The elongated shadows add depth and dimension to the terrain.
  • Cityscapes: Buildings glow with a soft luminescence, adding character to urban scenes.

2. Civil Twilight

As the sun dips below the horizon, we enter the phase of civil twilight. Lasting until the sun is 6 degrees below the horizon, the sky undergoes a transformation. The warm hues of the golden hour give way to cooler blues and purples. With reduced contrast and minimal shadows:

  • The atmosphere becomes serene, perfect for capturing tranquil landscapes and reflective waters.
  • City lights begin to twinkle, offering a balanced interplay between natural and artificial light.

3. Blue Hour

Contrary to its name, the blue hour is brief, occurring when the sun is between 4 and 6 degrees below the horizon. The sky adopts a deep blue hue:

  • City lights shine brightly, creating a stark contrast against the darkening sky.
  • Landscapes take on a moody ambiance, perfect for evocative imagery.

4. Nautical Twilight

Named for its use by sailors for navigation when the horizon is still discernible, nautical twilight occurs when the sun is between 6 and 12 degrees below the horizon. The sky deepens in color:

  • Blues and purples become more pronounced, adding drama to the scene.
  • The first stars might make an appearance, hinting at the celestial show to come.
  • Silhouettes become prominent, offering creative opportunities for compositions against the vibrant backdrop.

5. Astronomical Twilight

As the sun retreats further, between 12 to 18 degrees below the horizon, we enter astronomical twilight. The sky turns very dark:

  • Most stars become visible, paving the way for astrophotography.
  • The Milky Way might make its grand appearance, allowing for mesmerizing captures.
  • Landscapes under starry skies can create ethereal compositions.

To truly harness the beauty of a sunset, preparation is key. Plan your shots, scout your locations, and be ready with your equipment. Remember, the exact timing and characteristics of each phase can vary based on your location, the season, and prevailing weather conditions. With knowledge and anticipation, you can immortalize the fleeting moments of nature’s grand spectacle.

For Further Training:

For help remembering these concepts and more help on the Most Difficult Photography Situations, this new set of Photography Adventure Cheat Sheets have you covered. They are currently 80% off for the launch sale which ends soon if you want to check them out.

photography adventure

New! Cheat Sheets for Your Photography Adventures (see how they work)

The perfect companion for any photographer. Print one out whenever you need it. Whether you’re going on vacation or seeking out a specific photography adventure, these cheat sheets can provide you with the knowledge and inspiration you need to create your best work yet.

Launch sale ending soon: The Photography Adventure Cheat Sheets at 80% Off

- - - - - - - - - - - - - - - - - - - - - - - - - - - - - - - - - - - - - - - - - - - - - - - - - - - - - - - - - - - - - - - - - - - - - - - - - -

Did you appreciate this newsletter? Please help us keep it going by Joining Our Patreon Supporters

What are your thoughts on this article? Join the discussion on our Facebook Page

PictureCorrect subscribers can also learn more today with our #1 bestseller: The Photography Tutorial eBook

- - - - - - - - - - - - - - - - - - - - - - - - - - - - - - - - - - - - - - - - - - - - - - - - - - - - - - - - - - - - - - - - - - - - - - - - - -

The post Sunset Phases for Photography appeared first on PictureCorrect.


from PictureCorrect https://ift.tt/eGb5FH3
via IFTTT
lauantai 23. syyskuuta 2023

PictureCorrect.com: How to Create Studio Light Effects in Luminar Neo

Studio Light is an innovative new tool designed for portrait photographers to effortlessly recreate the striking lighting effects typically reserved for costly studio equipment. This remarkable tool rejuvenates older photos and imparts a fresh and captivating dimension to your portrait photographs. Use this tool to apply an accent of light to your portraits.

Understanding Studio Light settings

Before we start, let’s pause briefly to explore and grasp the intricacies of each Studio Light setting. Here’s a breakdown of the Studio Light settings:

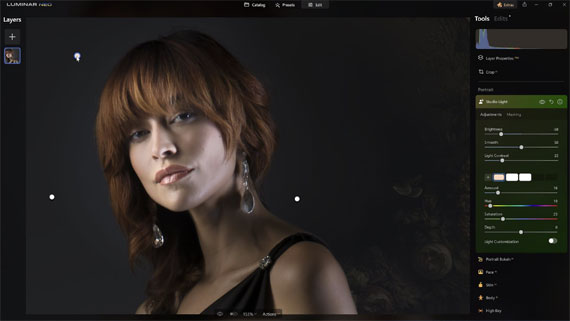
  • Brightness: This setting allows you to adjust the overall image’s brightness, making it brighter or darker.
  • Smooth: Use this option to fine-tune the shape of the shadows cast upon the subject.
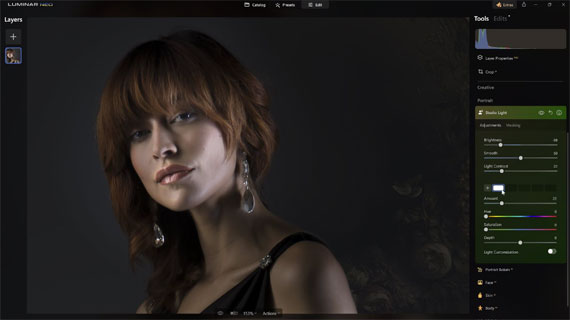
  • Light Contrast: This adjustment modifies the contrast of the light applied to the entire image.
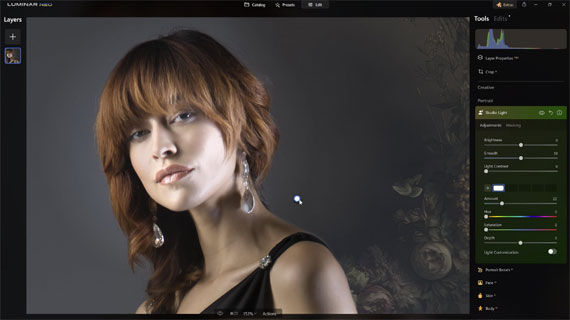
  • Plus Icon: Click the plus icon to apply additional light sources to the image—Right-click on a square to hide or remove a light source.
  • Amount: Adjust the Amount to apply a light source that shines on the subject.
  • Hue: Alter the Hue setting to change the light source’s color, illuminating the subject.
  • Saturation: Saturation determines the intensity or strength of the Hue.
  • Depth: This setting allows you to make the light’s texture and pattern on the subject either softer or sharper.

Start with a light source pin

Begin by placing a light source pin on the image. To introduce the desired illumination level onto the subject, manipulate the Amount slider. It’s worth noting that the Amount setting specifically controls the strength of the light on the subject rather than affecting the entire image. When you add a light pin to the image, you can fine-tune its placement. By moving the pin closer to or farther from the subject, you can precisely control the positioning of the light source. This action influences how the light is distributed across the subject, mimicking the behavior of studio lights or flashes.

studio light

Adjust the light for the overall image

Adjust the lighting settings for the entire composition to achieve a darker and moodier image. To darken the overall image, reduce the Brightness to a negative value and raise the Light Contrast. This will result in a general darkening effect, causing the added light source on the subject to become more pronounced. Additionally, you can fine-tune the “Smooth” setting to control the shape and positioning of shadows on the subject.

adjust light

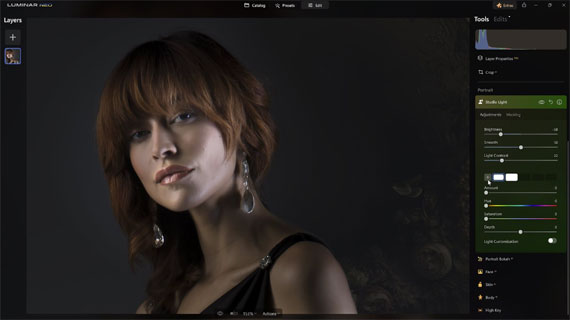
Apply a second light source

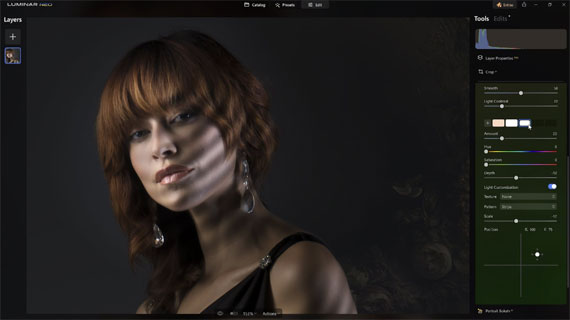
Select the plus icon and modify the “Amount” setting to introduce an extra light source into the image. Shift the pin’s position to illuminate the subject’s face, simulating the effect of incorporating an additional studio light or flash. You can independently modify the strength and power of each light source.

apply second light source

second light

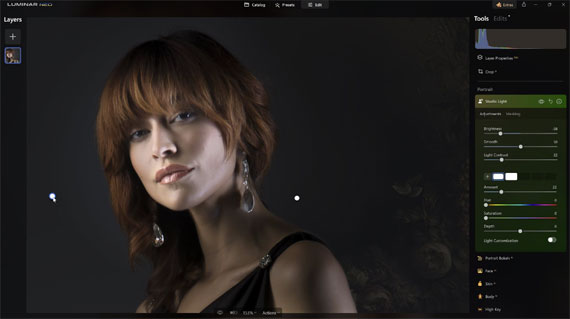
Apply a third light source and add color

Let’s incorporate a third light source and infuse some color into the scene. Like before, click on the plus icon and adjust the “Amount” setting to add a light source to the image. Position the pin to cast light on the subject’s head. For a touch of color, begin by fine-tuning the Saturation strength and then choose a Hue.

third light source

Light Customization

Each of the added light sources can be independently customized. Click the last box in the row next to the Plus Icon. The most recent light source is in the front, and the first is at the end, Now that the light source is selected, toggle on the Light Customization option. Four additional settings are available: Texture, Pattern, Scale, and Position. Let’s explore the purpose of each of these settings.

  • Texture: Refers to the visual quality of light between the light source and the subject. In portrait photography, this element is often called a Gobo or Go-Between. You can choose from various textures or even incorporate your custom ones. For now, let’s keep this setting at “none.”
  • Pattern: Shapes the light source on the subject. Choose between Strips or Dots.
  • Scale: This enables you to amplify or diminish the pattern applied to the subject.
  • Position: Allows for precise light source adjustment along the XY axis for accurate positioning.

light customization

Adding the final touches

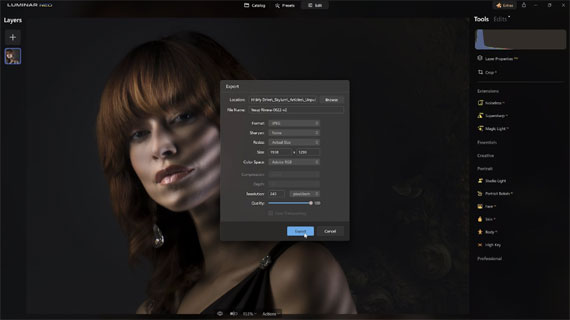
To refine the light sources, click on each one next to the Plus Icon. The adjustments you apply are specific to each light source, giving you complete control. Additionally, you can use other Luminar tools to enhance your image further. Once you’ve completed your adjustments, you can export your image for sharing on social media or safekeeping.

final touches

Key Takeaways

Studio Light provides a versatile toolkit for refining the lighting in your images. Starting with a light source pin, you can finely control the illumination on your subject by adjusting the Amount slider, emulating the behavior of studio lights or flashes to achieve your desired lighting effect.

To further enhance your composition, you can manipulate the overall image’s lighting settings by modifying Brightness, Light Contrast, and Smooth. This allows you to create moodier and more captivating images while highlighting the subject’s lighting.

Adding multiple light sources is also a straightforward process with Studio Light. By using the plus icon and adjusting the Amount setting, you can introduce extra light sources and position them precisely to illuminate different parts of your subject. This level of customization enables you to craft dynamic and visually stunning photographs.

Furthermore, Studio Light offers the flexibility to customize each light source independently. You can experiment with textures, patterns, scales, and positions, giving you the creative freedom to create unique and captivating lighting effects. Whether aiming for realism or artistic expression, Studio Light empowers you to bring your vision to life.

Try it for yourself: Studio Light in Luminar Neo

- - - - - - - - - - - - - - - - - - - - - - - - - - - - - - - - - - - - - - - - - - - - - - - - - - - - - - - - - - - - - - - - - - - - - - - - - -

Did you appreciate this newsletter? Please help us keep it going by Joining Our Patreon Supporters

What are your thoughts on this article? Join the discussion on our Facebook Page

PictureCorrect subscribers can also learn more today with our #1 bestseller: The Photography Tutorial eBook

- - - - - - - - - - - - - - - - - - - - - - - - - - - - - - - - - - - - - - - - - - - - - - - - - - - - - - - - - - - - - - - - - - - - - - - - - -

The post How to Create Studio Light Effects in Luminar Neo appeared first on PictureCorrect.


from PictureCorrect https://ift.tt/EZc1i9k
via IFTTT

perjantai 22. syyskuuta 2023

PictureCorrect.com: Travel Photography Packing List

Travel photography is a beautiful blend of art and adventure, capturing moments and memories as you explore new terrains. But, being on the move requires a balance between being prepared for any photographic opportunity and not being weighed down by excessive gear. Here’s our recommended general packing list for travel photography, emphasizing mobility and versatility.

photography packing list

Photo captured by Andrew Neel

Camera Equipment

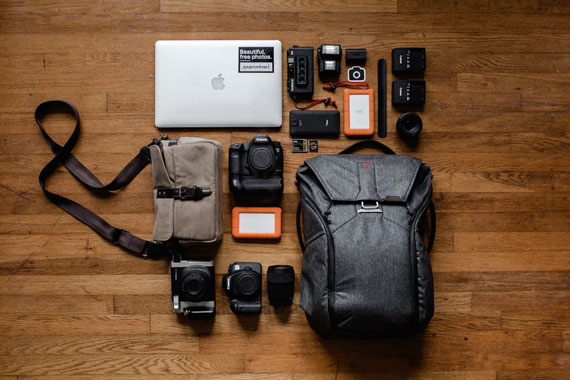
1. Camera Body: Your trusty sidekick! Whether you’re a DSLR enthusiast, a mirrorless camera aficionado, or someone else entirely, ensure it’s comfortable to carry and use for extended periods.

2. Lenses: Instead of carrying a myriad of lenses, select one or two that offer versatility. The 24-70mm f/2.8 (for full-frame cameras) stands out. It’s dubbed the “walk around” lens due to its adaptability, making it perfect for capturing wide landscapes or zooming in on intricate details.

3. Power: Nothing is worse than spotting a perfect shot and having a dead battery. Bring extra batteries, a charger, and power adapters suitable for your travel destination.

4. Storage: Multiple memory cards will ensure you don’t run out of space.

5. Accessories: Depending on the kind of shots you aim to capture, consider lens filters like polarizing, ND, and UV filters. A remote shutter release is invaluable for long exposures, ensuring sharp images without camera shake.

6. Tripod: While not always essential, a lightweight and robust tripod can be a game-changer, especially for landscape or low-light shots.

Protection and Maintenance

1. Carrying Solutions: A good camera bag or backpack not only organizes but also protects. Opt for something waterproof or with a rain cover to guard against unpredictable weather.

2. Maintenance Tools: A lens cleaning kit keeps your images sharp, and lens caps protect against scratches when not in use.

3. Weather-Proofing: Unexpected showers? Having rain protection ensures you can continue shooting without a glitch.

Backup and Storage

While you might diligently backup once home, on the go, consider a portable hard drive or SSD. Alongside, a card reader (if not integrated into your laptop or tablet) makes transferring images a breeze.

Insurance

Travel isn’t without its risks. Securing a travel insurance policy that specifically covers your photography equipment can give peace of mind, letting you focus on your art.

Remember, travel photography is as much about the journey as it is about the final image. Packing light ensures you remain agile, covering more ground and capturing more shots. Always prioritize based on the essence of your trip and your photographic goals. And as a final reminder for those jet setters, always stash your camera equipment in your carry-on luggage to safeguard against potential mishaps. Here’s to capturing the world, one frame at a time!

- - - - - - - - - - - - - - - - - - - - - - - - - - - - - - - - - - - - - - - - - - - - - - - - - - - - - - - - - - - - - - - - - - - - - - - - - -

Did you appreciate this newsletter? Please help us keep it going by Joining Our Patreon Supporters

What are your thoughts on this article? Join the discussion on our Facebook Page

PictureCorrect subscribers can also learn more today with our #1 bestseller: The Photography Tutorial eBook

- - - - - - - - - - - - - - - - - - - - - - - - - - - - - - - - - - - - - - - - - - - - - - - - - - - - - - - - - - - - - - - - - - - - - - - - - -

The post Travel Photography Packing List appeared first on PictureCorrect.


from PictureCorrect https://ift.tt/PZ0b8Dz
via IFTTT
PictureCorrect.com: 4 Basic Ideas for Photographing Birds

Relevant sale ending tonight: only hours left for Topaz Photo AI 2 at $40 Off

Like many photographers, I enjoy taking pictures of birds. Occasionally, I’m asked about my methods and thoughts for catching my images. Here is what has worked for me—a sort of photo philosophy, if you will, of some basics of bird photography.

Photograph the Ordinary

First of all, appreciate backyard birds and other local fauna. In my opinion at least, most of the best bird shots show an emotion, expression or behaviors, not necessarily the more exotic critters. And don’t forget, what may be commonplace and boring to you may be interesting to someone from a different area.

grackle photography

Grackles are usually dismissed as just some blackbird. Get them in the right light and they can be surprisingly iridescent.

Be Quick

When you’re watching a flock or some other group, recognize where the energy is concentrated among individuals. You are more likely to catch the interesting behavior shots, but be quick! A great shot typically lasts a fraction of a second. As photographers, we all know it’s all about that decisive moment.

geese photography

Disciplining an unruly gosling only lasts a fraction of a second, but it can yield an interesting image.

Listen

After talking to other photographers, I believe one of the most basic and yet underrated skills is simply taking time for listening to the birds around you. Learn to filter individual voices. You can learn a lot about your surroundings by what they tell you. You don’t think you can understand? Nonsense! Listen to the tones and become aware of the impression you feel. Think of those murmured, indistinct conversations you encounter at the local coffee shop or other public areas. You might not be able to hear individual words, but you can get a gist of how the participants are feeling by the tone and pattern of the sounds. You can quickly sense if the conversation is becoming intense or fearful even if it’s muffled or in a foreign language. Consider a sporting event. You can easily tell if something important happened if you hear crowd reactions, even if you are outside the arena or in a next room from the action. Just listen. Learn to see with your ears. Birds have tremendous emotion and variety in their communications. Soon you will easily distinguish the repetitious birdsong for territory versus flocks of individuals keeping track of each other, or warning of something. You may hear several birds sounding agitated, and if you pause and listen, you might hear other similar birds coming closer, repeating the same urgent sounding calls. Chances are they spotted a predator and are calling attention to it and mustering reinforcements to help drive it away.

hawk photography

A family of blue jays who live in my back yard alerted me to this red tailed hawk as they noisily drove her off.

Choose a Regular Location

Keep going back to the same areas. It will give you a consistent way to really practice and learn more subtle differences in camera settings and what works best for you. You will be more comfortable in a familiar surrounding and be able to notice and concentrate on the details of shooting techniques. You can plan your goals and practice effectively and efficiently as you learn what options are available for what you wish to accomplish with your images. You will learn more about your subject in its environment and be better able to anticipate actions.

egret photography

This great egret provided beautiful motivation as I struggled to learn how to expose for moving white feathers in various weather conditions, and became familiar with my camera.

These general tips are a great start, but there’s always more to learn. Share your own tips for basic bird photography in the comments below!

About the Author:
Sue Lindell is an amateur photographer who is an active member of the Des Plaines Camera Club in Illinois. Further examples of her work can be found at LindellImagery.

For Help With Sharpness and Clarity:

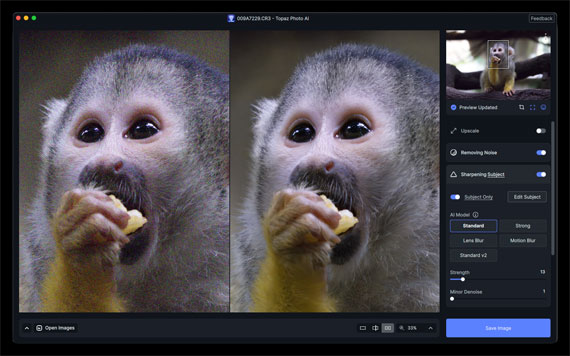
In photo editing news, Topaz Photo AI 2 was just released and is incredibly powerful for bird photographers. The company has marked it down $40 off until September 22 to celebrate the milestone.

photo ai

New: Topaz Photo AI 2 (see how it works)

Sharpen, remove noise, and increase the resolution of your photos with tomorrow’s technology. Topaz Photo AI 2 supercharges your image quality so you can focus on the creative part of photography.

Only hours left: Topaz Photo AI 2 at $40 Off

- - - - - - - - - - - - - - - - - - - - - - - - - - - - - - - - - - - - - - - - - - - - - - - - - - - - - - - - - - - - - - - - - - - - - - - - - -

Did you appreciate this newsletter? Please help us keep it going by Joining Our Patreon Supporters

What are your thoughts on this article? Join the discussion on our Facebook Page

PictureCorrect subscribers can also learn more today with our #1 bestseller: The Photography Tutorial eBook

- - - - - - - - - - - - - - - - - - - - - - - - - - - - - - - - - - - - - - - - - - - - - - - - - - - - - - - - - - - - - - - - - - - - - - - - - -

The post 4 Basic Ideas for Photographing Birds appeared first on PictureCorrect.


from PictureCorrect https://ift.tt/x9vzKqM
via IFTTT
keskiviikko 20. syyskuuta 2023

PictureCorrect.com: Pixels and Displays: A Photographer’s Guide to Understanding PPI

Relevant reminder: only 1 day left for Topaz Photo AI 2 at $40 Off

Every photographer understands the importance of sharpness and clarity when it comes to their images. However, how an image appears on a screen is not solely determined by its resolution but also the pixel density of the display. Enter the world of PPI (Pixels Per Inch). In this article, we will dive deep into what PPI is and how it impacts images, especially on varying screens from regular to high-density, including Apple’s Retina displays.

ppi photography

Photo captured by Victor

What is PPI?

PPI stands for “Pixels Per Inch.” It’s a measurement of how many pixels a screen can display in a one-inch line. In essence, PPI tells you the density of pixels on a screen. The greater the PPI, the denser the pixels, which generally translates to a crisper and clearer display of your images.

Regular Screens vs. High-Density Displays

Regular Screens:

  • These are traditional displays where the PPI is generally lower, often around 72-100 PPI.
  • At typical viewing distances, images and text appear reasonably clear.
  • However, when viewed closely, individual pixels can be discerned.

High-Density Displays:

  • Also termed “Retina” by Apple, though other brands have similar technology with different names.
  • Typical PPI values can range from 200 to over 400.
  • Due to the increased pixel density, images appear sharper, and text is clearer. Even upon closer inspection, individual pixels are hard to distinguish.

Implications for Photographers

  • Image Detail & Sharpness: On a high-density display, images can appear much sharper because of the increased pixel density. This can be both a blessing and a curse. While your high-resolution photos will look stunningly clear, any imperfections in the image will also be more evident.
  • Image Resizing & Display: The same image can appear differently on screens with varying PPI. For instance, a 600×600 pixel image will physically appear larger on a 72 PPI screen than on a 300 PPI screen.
  • Editing & Retouching: High PPI screens can be beneficial during post-processing. The finer details are more visible, making tasks like spot removal or fine retouching more accurate.

Navigating the Retina Display

Apple’s Retina display is a brand name for their high PPI screens. But what makes it unique?

  • Double the Pixels: A key aspect of Retina technology is that for each ‘square’ on a regular screen, a Retina display uses four squares (twice the height and twice the width). This makes images appear super sharp.
  • Considerations for Web: If you’re displaying images online, consider using higher resolution images for Retina displays. An image that is 1000 pixels wide for standard displays might need to be 2000 pixels wide for Retina screens to maintain sharpness.
  • File Sizes: Higher resolution images for Retina screens also mean larger file sizes. It’s essential to strike a balance between resolution and file size, especially for web usage.

Conclusion

Understanding PPI and how it varies between screens is crucial for photographers in the digital age. It not only affects how your photos are displayed but also has implications for editing, web design, and storage. By being aware of these factors, photographers can ensure their work looks its best, regardless of the display it’s viewed on.

Remember, while PPI is a vital aspect of image display, it’s just one piece of the puzzle. Always consider the context in which your image will be viewed, and optimize accordingly.

For Help With Increasing Image Resolution:

In photo editing news, Topaz Photo AI 2 was just released. The company has marked it down $40 off for a short time to celebrate the milestone.

photo ai

New: Topaz Photo AI 2 (see how it works)

Sharpen, remove noise, and increase the resolution of your photos with tomorrow’s technology. Topaz Photo AI 2 supercharges your image quality so you can focus on the creative part of photography.

Only 1 day left: Topaz Photo AI 2 at $40 Off

- - - - - - - - - - - - - - - - - - - - - - - - - - - - - - - - - - - - - - - - - - - - - - - - - - - - - - - - - - - - - - - - - - - - - - - - - -

Did you appreciate this newsletter? Please help us keep it going by Joining Our Patreon Supporters

What are your thoughts on this article? Join the discussion on our Facebook Page

PictureCorrect subscribers can also learn more today with our #1 bestseller: The Photography Tutorial eBook

- - - - - - - - - - - - - - - - - - - - - - - - - - - - - - - - - - - - - - - - - - - - - - - - - - - - - - - - - - - - - - - - - - - - - - - - - -

The post Pixels and Displays: A Photographer’s Guide to Understanding PPI appeared first on PictureCorrect.


from PictureCorrect https://ift.tt/KqvDiP0
via IFTTT
tiistai 19. syyskuuta 2023

PictureCorrect.com: Cityscape Photography Tips

Cityscape photography, often viewed as the urban cousin of landscape photography, captures the man-made wonder of our urban environments. Whether you’re aiming to capture the grandeur of towering skyscrapers, the dance of city lights, or the daily buzz of urban life, the right techniques and tools can make a world of difference.

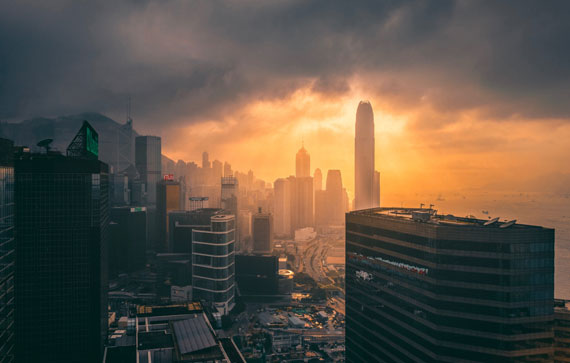
cityscape

Photo captured by Richard Schneider; f/9.0, 20 seconds, ISO 320, 24mm

Understanding Cityscape Photography

At its core, cityscape photography encapsulates the beauty, architecture, and vibrancy of urban landscapes. From the neoclassical edifices of Europe to the cutting-edge skyscrapers of Asia, cityscapes tell stories of progress, history, and human ambition.

Essential Equipment for Cityscape Photography

Lenses:

  • Wide-angle lens (10-24mm): Ideal for capturing sweeping vistas of urban jungles.
  • Telephoto lens (70-200mm): Perfect for zooming in on intricate architectural details or isolating subjects against a vast city backdrop.

Tripod: A sturdy tripod is invaluable. For shots with long exposures, like capturing the streaks of cars or the gentle flow of water, a tripod ensures your camera stays still and your images are crisp.

Helpful Filters:

  • Polarizer: Helps to reduce reflections, particularly useful for buildings with glass facades.
  • Neutral Density (ND) filter: Essential for achieving long exposure effects during bright daylight.

Optimal Camera Settings for Cityscapes

  • Mode: Opt for Manual (M) if you’re familiar with settings or Aperture Priority (Av/A) if you’d like the camera to determine the shutter speed.
  • Aperture: A range of f/8 to f/16 offers a good depth of field, ensuring both foreground and background elements are in focus.
  • Shutter Speed: This will vary based on your desired effect. For capturing light trails, you’ll need longer exposures. To freeze the bustle of the city, opt for faster speeds.
  • ISO: To keep images noise-free, aim for ISO 100-400. Only increase the ISO in situations where light is limited and using a tripod isn’t feasible.

Timing is Everything

  • Blue Hour: This magical time, either before sunrise or after sunset, provides a serene blue tint to the sky, making city lights truly pop.
  • Golden Hour: Occurring shortly after sunrise or just before sunset, this time bathes the city in a warm and soft light, perfect for capturing the city’s glow.
  • Night: As cities come alive with lights, shooting at night can showcase the city’s vibrant nocturnal personality.

Photo captured by Jason Wong

Pro Tips for Exceptional Cityscapes

  • Bracketing: This involves taking several shots of the same scene at different exposures. Later, these can be blended in post-processing to achieve a balanced and detailed image, also known as High Dynamic Range (HDR) imaging.
  • Focusing in Low Light: When the camera struggles to autofocus in dim settings, switch to manual focus. Using the Live View mode, zoom in on a well-defined part (like a building’s edge) and adjust the focus manually.
  • Depth of Field: If your scene includes a prominent foreground element, like a statue or fountain, consider focus stacking. This technique involves taking multiple shots with different focus points and merging them in post-production to achieve an image that’s sharp from front to back.

Cityscape photography, like all art forms, thrives on experimentation. While these guidelines provide a solid starting point, the true essence and vibe of a city can best be captured when photographers bring their unique perspective and creativity into play. So, head out, explore the urban wilderness, and most importantly, enjoy the process of immortalizing cityscapes. Happy shooting!

- - - - - - - - - - - - - - - - - - - - - - - - - - - - - - - - - - - - - - - - - - - - - - - - - - - - - - - - - - - - - - - - - - - - - - - - - -

Did you appreciate this newsletter? Please help us keep it going by Joining Our Patreon Supporters

What are your thoughts on this article? Join the discussion on our Facebook Page

PictureCorrect subscribers can also learn more today with our #1 bestseller: The Photography Tutorial eBook

- - - - - - - - - - - - - - - - - - - - - - - - - - - - - - - - - - - - - - - - - - - - - - - - - - - - - - - - - - - - - - - - - - - - - - - - - -

The post Cityscape Photography Tips appeared first on PictureCorrect.


from PictureCorrect https://ift.tt/t3ezbUu
via IFTTT

maanantai 18. syyskuuta 2023

PictureCorrect.com: How to Use the Blur Tool in Luminar Neo

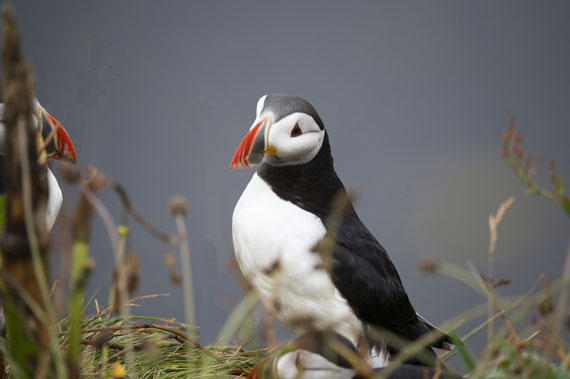
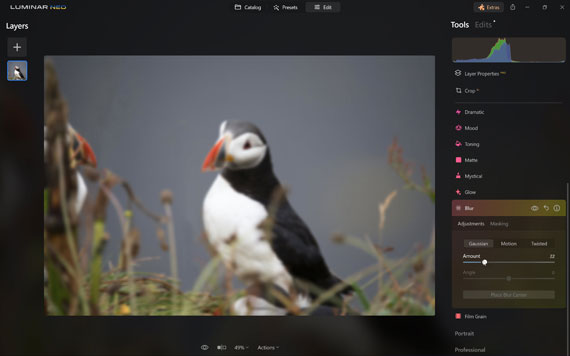
The Blur tool effortlessly incorporates three distinct blur styles into your photos: Gaussian, Motion, and Twisted. Additionally, you can fine-tune the blur effect’s intensity, angle, and position while using masking to target your image’s specific areas. Blur serves a dual purpose, enabling you to rectify issues within your image or apply a creative touch. Here’s a quick exploration of the tool and its applications in Luminar Neo.

Gaussian Blur

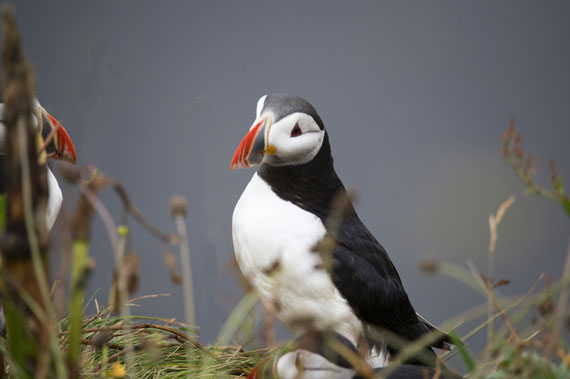
Gaussian blur is a blurring technique that creates a soft and smooth effect by averaging pixel values within a specified radius. It’s commonly used to reduce noise, enhance skin tones, or create a gentle, dreamy atmosphere in photos.

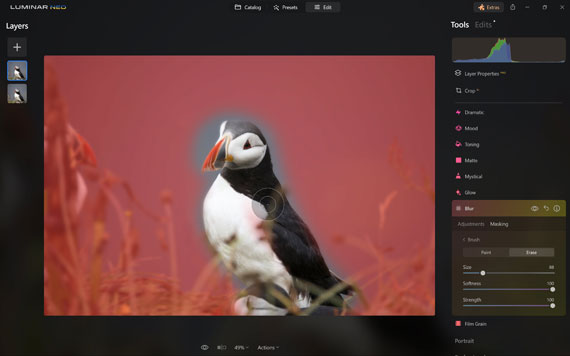
Here’s a step-by-step guide for applying Gaussian Blur to your image to enhance focus on the subject while softening the background:

  1. Access the Edit tab to reveal the editing tools within the window.
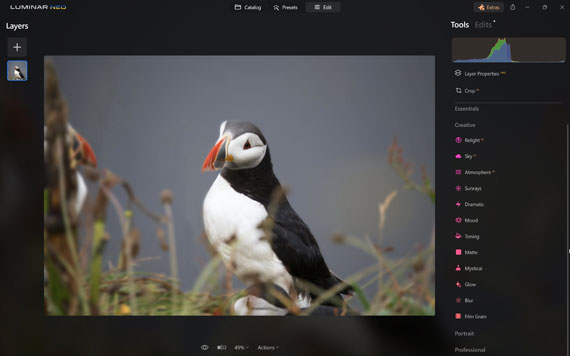
  2. Next, navigate to the Creative Tools section and opt for the Blur tool.
  3. Select the Gaussian Blur option and gently apply a small amount of blur until the background and surrounding areas achieve the desired softness.
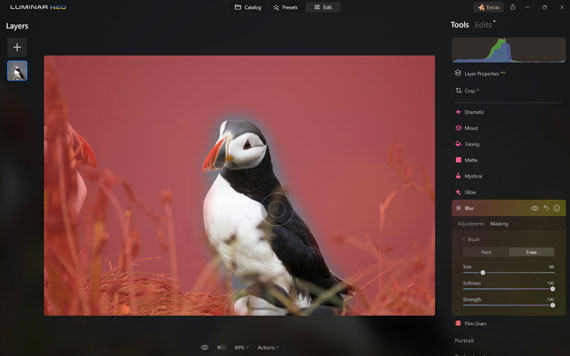
  4. Now, let’s eliminate the blur effect from the main subject by employing a masking technique. Click on the Masking option, and then choose the Brush tool.
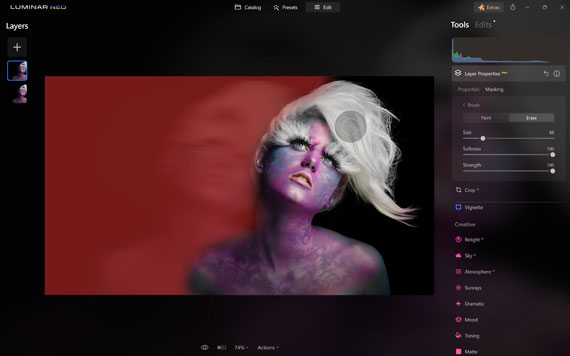
  5. Confirm that your brush settings are configured with both softness and strength set at 100%, and fine-tune the brush size for precise targeting of the subject. To eliminate the blur effect, switch to the Erase mode.
  6. As you paint over the subject with the brush, observe how the surrounding areas become beautifully soft while your main subject remains sharply in focus.

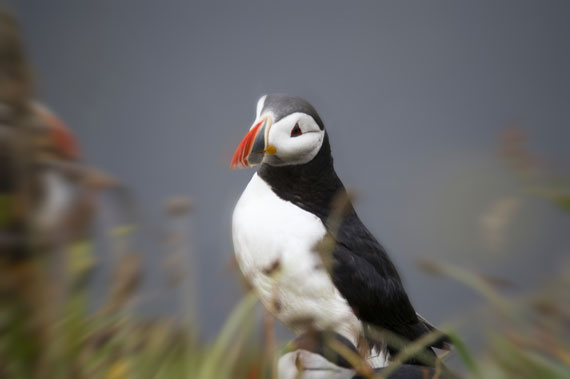
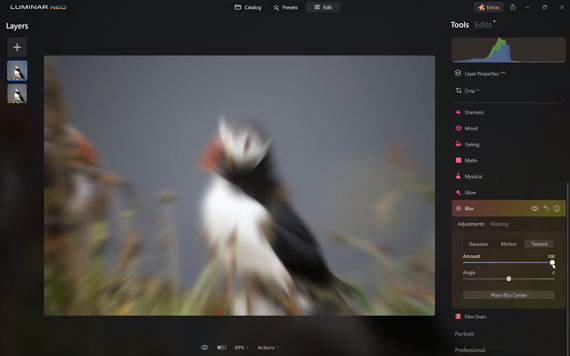
Twisted Blur

Twisted blur is a more artistic and unconventional blur effect. It distorts the image by twisting and distorting pixel data, resulting in a surreal, swirling, or vortex-like appearance. This effect can be used for creative and abstract purposes, turning ordinary photos into visually captivating works of art.

Here’s a step-by-step guide to getting creative with your image:

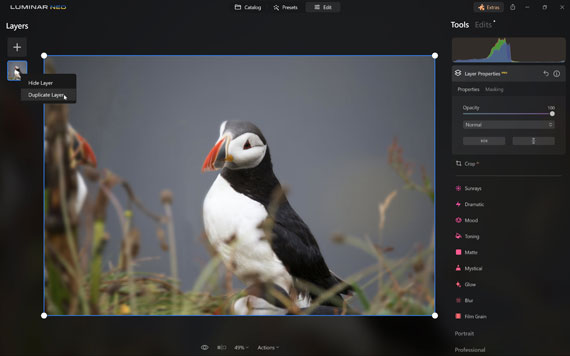
  1. Begin by duplicating the layer. Right-click on the layer and choose the “Duplicate” option.
  2. Now, you’ll be working on the new duplicated layer. Select the Blur Tool once more.
  3. This time, opt for the “Twisted” blur type and apply it at a strength of 100%. You can adjust the angle and center of the blur if needed, but the default settings look good for this image.
  4. Take note of the artistic effect created in the surrounding areas due to the Twisted blur.
  5. Just as before, mask out the subject to reveal the bottom layer. Make sure you’re in “Erase Mode” when doing this.

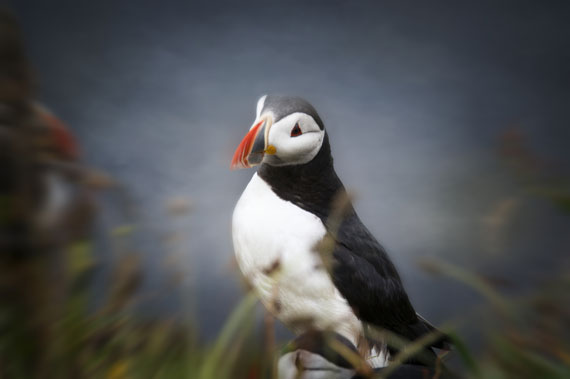
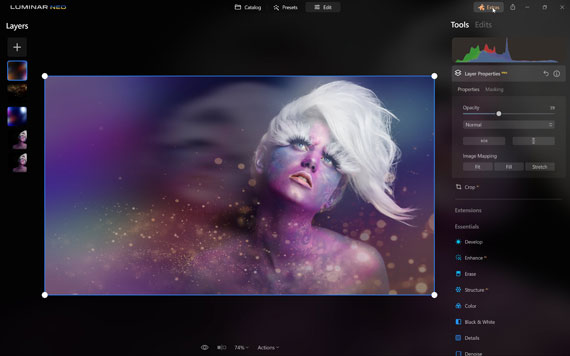
Feel free to embark on further experimentation to enhance the artistic appeal of your image. Consider incorporating additional elements, such as a texture layer, which can introduce intriguing depth and tactile qualities to your composition. Additionally, don’t forget to explore the possibilities of adding a vignette, a subtle shading, or a border effect, which can frame your image beautifully and draw attention to the focal point, adding a finishing touch to your artistic vision.

Motion Blur

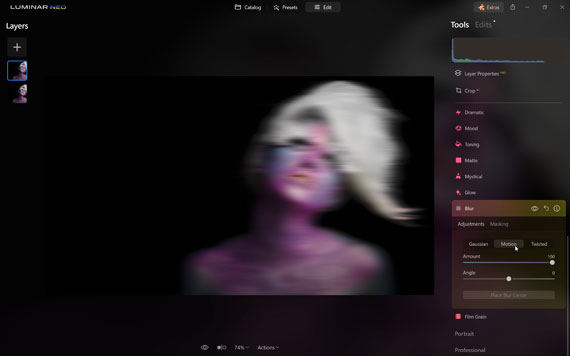
Motion blur replicates the visual effect of objects in motion, such as a speeding car or a swiftly moving subject. It generates streaks or trails in the direction of motion, adding a dynamic and kinetic quality to the image, often employed in sports or action photography.

Here’s a step-by-step guide to adding a creative motion effect to an image:

  1. Begin by duplicating the layer. Right-click on the layer and select the “Duplicate” option.
  2. Next, head to the Creative Tools section and choose the Blur tool.
  3. Within the Blur tool options, select “Motion Blur” and set the amount to 100%. Keep the angle at its default value of 0.
  4. To make the motion effect more prominent, close the Blur Tool by clicking the “Blur” title and reopen it.
  5. Reapply the same settings with a 100% blur amount.
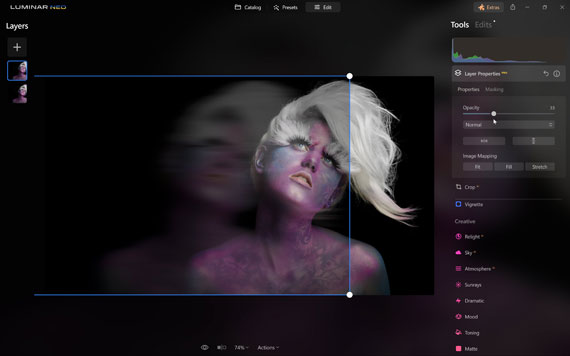
  6. Now, stretch the duplicated layer. Open the Layer to reveal a bounding box around it. Click on the center point along one side and drag it outward to elongate the image. You can also move the image to the left to reveal the bottom layer.
  7. Lower the opacity of the stretched layer to reveal the bottom layer more prominently. Adjust the position as needed.
  8. Like the previous tutorial, mask the subject’s face on the top layer to maintain clarity.

Consider adding light leaks and overlays to enhance the effect further for a creative finishing touch.

Final takeaway

The Blur tool provides a versatile and powerful set of tools for enhancing your photos. With the ability to seamlessly apply Gaussian, Motion, and Twisted blur styles and precise control over intensity, angle, and positioning, this tool offers both practical and creative possibilities. The masking feature allows for selective application, ensuring your edits are tailored to your image’s unique requirements. Whether you’re looking to fix imperfections or infuse artistic flair, the Blur tool is a valuable asset in your photo editing toolkit. This quick exploration has merely scratched the surface of its potential, inviting you to explore further and unlock the boundless possibilities it offers for your image enhancement endeavors.

Learn more: The Luminar Neo Photo Editor

- - - - - - - - - - - - - - - - - - - - - - - - - - - - - - - - - - - - - - - - - - - - - - - - - - - - - - - - - - - - - - - - - - - - - - - - - -

Did you appreciate this newsletter? Please help us keep it going by Joining Our Patreon Supporters

What are your thoughts on this article? Join the discussion on our Facebook Page

PictureCorrect subscribers can also learn more today with our #1 bestseller: The Photography Tutorial eBook

- - - - - - - - - - - - - - - - - - - - - - - - - - - - - - - - - - - - - - - - - - - - - - - - - - - - - - - - - - - - - - - - - - - - - - - - - -

The post How to Use the Blur Tool in Luminar Neo appeared first on PictureCorrect.


from PictureCorrect https://ift.tt/DlX4cZz
via IFTTT