sunnuntai 31. lokakuuta 2021

PictureCorrect.com: Seeing the Image as a Photographer

As photographers in the digital age, we are totally spoiled for choice when it comes to equipment, accessories, software, hardware, and you name it. Added to this is the vast amount of information freely available on the web. It’s all a big step up from the age of film photography.

artistic photography

Or is it?

Whatever our equipment—film or digital, professional quality or entry level. Whatever our experience. The key to photography is our vision of the world and how we decide to interpret it and to capture it with whatever equipment we have—film camera, cell phone, SLR, mirrorless, compact, whatever.

seeing an image

As photographers we tend to love technical details about equipment, about technique, about post-processing. However, without the vision to ‘see’ the image it can all be in vain, and we can land up with a multitude of pretty, boring images.

The digital age has brought the ability to mindlessly produce images of an acceptable quality. Photography has become a global flood of freeze-frames; millions of images are uploaded every minute.

millions of uploaded images

We need to make sure that we enjoy the effort of adding our own vision and creativity.

Good pictures demand care—even with digital. And really good pictures are hard to make. The camera doesn’t do it all for you! You need your own personal vision.

“A camera is an instrument that teaches people how to see without a camera.” –Dorothea Lange

“Photography is an art of observation. It has very little to do with the things you see and everything to do with the way you see them.” –Elliot Erwitt

Crucial to that vision is to begin looking at the world through the eyes of a child. A child sees everything with a sense of wonder. Everything is fresh, new and exciting.

how a child sees the world

“A child’s world is fresh and new and beautiful, full of wonder and excitement. It is our misfortune that for most of us that clear-eyed vision, that true instinct for what is beautiful and awe-inspiring, is dimmed and even lost before we reach adulthood.” –Rachel Carson

“Every child is an artist. The problem is how to remain an artist once we grow up.” –Pablo Picasso

Take a standard photographic debate: Do we want to have pictures of ruins without people?

landmark photo without people

Or with people?

landmark photography with people

But the real question is: Of all those hundreds of people with cameras taking pictures, how many of them saw the poppies?

poppies

Developing a child-like vision can give a wonderful new perspective on life. And not only when we are taking photographs—it will help us to see more of life and the world around us.

your photography vision

Photography should be an enjoyable, life enhancing journey and not just a destination. Enjoy a fresh view on life and have fun!

About the Author:
Roger Lee is a Johannesburg based photographer who runs a popular one day course based on the idea that “we don’t want to drown in detail; we just want to know how to use our cameras and enjoy ourselves!”


Go to full article: Seeing the Image as a Photographer

What are your thoughts on this article? Join the discussion on Facebook

PictureCorrect subscribers can also learn more today with our #1 bestseller: The Photography Tutorial eBook

The post Seeing the Image as a Photographer appeared first on PictureCorrect.


from PictureCorrect https://ift.tt/3Cx1GYN
via IFTTT

lauantai 30. lokakuuta 2021

PictureCorrect.com: Shutter Speed Determination for Hand-held Landscape Photos

Now generally I recommend a tripod for landscape photography, however, I do shoot a fair bit of hand-held landscapes too and trust me, I have had more than my share of blurry photos in my 15 odd years of photography.

Is there anything worse than a Blurry Masterpiece?

In my opinion, there is nothing worse than zooming into the best shot of the day, the miracle shot that captured the moment perfectly, only to discover it’s blurry.

Ok, so how do we shoot hand-held in tough conditions and make sure our photos have a good chance of being sharp?

landscape hold camera

Photo by Daniel Lincoln; ISO 100, f/4.5, 1/100s, 16mm.

Shutter speed is critical when shooting without a tripod. We need to shoot fast enough so that any camera shake is not visible in our final photo.

But what shutter speed is fast enough to avoid camera shake?

Interestingly, it varies depending on the focal length of the lens you are shooting with.

Wide-angle lenses are much easier to get sharp hand-held photos than telephoto, as you will see below

The rule of thumb that I use is:

2 times the focal length you are shooting is a good minimum shutter speed as a guide. Of course, the faster – the better chance of a good result.

You may find that with modern stabilized cameras and lenses that you can go even lower, however, I feel that 2x the focal length is a good minimum to start at.

Now you might be thinking, “what on earth is he talking about”.

Hopefully, this clears it up:

  • 20mm lens: 2 x 20 = 1/40th of a second as your minimum shutter speed for a 20mm lens.
  • 50mm lens: 2 x 50 = 1/100th of a second as your minimum shutter speed for a 50mm lens.
  • 100mm lens: 2 x 100 = 1/200th of a second as your minimum shutter speed for a 100mm lens
  • 400mm lens: 2 x 400 = 1/800th of a second as your minimum shutter speed for a 400mm lens.

Of course, the faster the better, if you can.

This won’t guarantee sharp photos every time but it will get you on the right track as far as shutter speed is concerned.

Below are further tips for the perfect hand-held Landscape photo.

• Raise your ISO to achieve at least the minimum shutter speed above.
• Brace yourself against a solid object to reduce camera shake.
• Choose a lens or camera with Image Stabilization.
• Set your camera to multiple shot mode and fire 3-4 consecutive shots. Generally, camera shake is at its highest on the first photo as we press the shutter and will settle down in the 2nd-3rd-4th shots of the sequence.

For Help with Photo Editing, Offer Ending Soon:

If you are working on photo editing these days you may want to delve into the full in-depth course. It is currently 84% off which ends soon. Learn the Photoshop art of alchemy, the skills to transform the most ordinary of photos into extraordinary photographic masterpieces.

photoshop workflow bundle

Ultimate Photoshop Workflow Bundle

Not only will this workflow bring out and enhance the breathtaking natural beauty of your photos, it will also give you the freedom to take your photos in any creative direction you choose.

Deal found here: The Ultimate Photoshop Workflow Bundle at 84% Off


Go to full article: Shutter Speed Determination for Hand-held Landscape Photos

What are your thoughts on this article? Join the discussion on Facebook

PictureCorrect subscribers can also learn more today with our #1 bestseller: The Photography Tutorial eBook

The post Shutter Speed Determination for Hand-held Landscape Photos appeared first on PictureCorrect.


from PictureCorrect https://ift.tt/3jO35CT
via IFTTT

perjantai 29. lokakuuta 2021

PictureCorrect.com: 10 Tips on How to Survive as a Freelance Photographer

Freelance photography can be a rewarding and fun career, even if you just pursue it part time, but it’s a jungle out there with endless competition. Here are some quick tips to help you get started:

worried model

1. Always work.

You won’t always have paying customers, but that shouldn’t stop you from working. Go out and photograph anything you can. Find important public events and notice your city, whether it’s architecture or street photography. Your home town has plenty of subjects you haven’t covered yet. Try conceptual photography if you feel tempted—experience fine art maybe. Anything you can photograph will be useful someday.

city view stock photo

2. Get yourself out there.

Get serious about social media and your web presence. If you are having trouble finding clients, perhaps they’ll find you via social media. Build an online portfolio and a social following. Without these, you don’t exist as a photographer.

fine art photography

3. Get passive income.

Whether you have paying customers or not, passive income will always be there for you. The best way to get a steady flow of passive income is to build a stock photography portfolio. You’ll see how useful those photographs I talked about in point one really are.

venice

4. Do some networking.

Get as many contacts as you can from every place or situation you get yourself into. The more online and offline contacts you have, the more chances you’ll have to succeed.

moulin rouge

5. Be informed.

Always be in-the-know to what’s going on around you and in the world. Go to industry-related fairs and workshops, read blogs, buy books, and follow your competitors’ feeds. If someone is looking for a photographer in your area and you didn’t see the ad, you don’t get the job. It’s as simple as that. Information is power, but even more importantly in the freelancing world, information is money.

clouds

6. Invest in yourself.

You’re your own boss, so don’t expect someone else to invest in your business. With each paying job you get, direct 10 to 20 percent of the income to improve your equipment and your presence. Always try to buy better lenses, a better camera, better looking clothes, better business cards, better online promotions, etc. Set the percent you want to invest and stick with it, even if you need to cut some personal expenses for it.

flowers bokeh

7. Keep it legal.

Try not to skip any legal requirements for conducting a photography business. You have competition, and even if they’re friendly, they won’t hesitate to put you out of business if that means getting a chunk for themselves. You’re on your own, so if anything goes wrong, no big corporation with expensive lawyers will have your back just to keep their image clean. Contracts, insurance, releases for models—get everything in order.

forest photo

8. Identify needs.

This goes hand-in-hand with the previous point. Don’t spam people with your offers, but try to think constructively and identify potential buyers’ needs. Is the local basketball team having a good year, but fans are missing their games? Maybe their online presence is weak, or maybe they don’t communicate with the community very well. Write them and offer your services as a photographer. It won’t work every time, and it doesn’t apply to every situation, but you should always try to identify a need and come up with an offer. Isn’t that how the economy works anyway? Wherever there’s a need, there will be an offer. And it better be yours.

latte pie chart

9. Be awesome and over-deliver.

You’re scheduled to be there at 10am? Be there at 9.30am. You need to deliver 50 photos? Deliver 75. They expect decent photos? Deliver awesome photos. Make them talk good about you. Make them be your marketing agents.

baby in window stock photography

10. Be jolly.

Yes, be a pleasant person. Smile, be polite, and try not to talk back even if you’re right. Avoid internet beef, recommend other people when you can, and offer your advice only when you’re asked. Everybody’s trying to surround themselves with good people. Be that good company that everyone is looking for.

About the Author:
Viorel Dudau is a photo editor for Dreamstime.


Go to full article: 10 Tips on How to Survive as a Freelance Photographer

What are your thoughts on this article? Join the discussion on Facebook

PictureCorrect subscribers can also learn more today with our #1 bestseller: The Photography Tutorial eBook

The post 10 Tips on How to Survive as a Freelance Photographer appeared first on PictureCorrect.


from PictureCorrect https://ift.tt/3mrEk1l
via IFTTT

torstai 28. lokakuuta 2021

PictureCorrect.com: Engagement Photography Tips and Techniques

The precursor to the actual event, engagement photography is what helps show the couple’s spark with each other and creates widespread awareness of their upcoming wedding. As the photographer, it is important for you to do your research so that the couple’s engagement pictures will be creative, interesting, entertaining, love-struck, and most of all, satisfying for the couple themselves.

engagement photography tips

Photo by sergey mikheev; ISO 100, f/8, 1/1250s.

1. Preview the couple

No, I don’t mean to actually screen the couple before you decide to work with them. (Although in some cases, this might actually be a smart idea.) Get to know who these people are in advance. Meet with them over coffee, for lunch, or just chat a while on the phone. The best way for you to get the engagement photos that this couple wants is to figure out what it is that they actually want. Get a feel for their personality and their chemistry together.

2. Keep them connected

This engagement picture tip basically speaks for itself. Keep the couple connected with each other. Sure, they are going to be somewhat nervous (especially if they are not super comfortable with you just yet), but do your best to keep them into one another. This leads me to my next pointer.

photographing couples

photo by Sean McGrath

3. PDA is Okay (and necessary!)

Because an engagement photo session is completely different from a normal headshot, model, or family photo shoot, you have to remember that the overall theme for these pictures is love. Make the couple comfortable and aware that they should kiss, hug, hold hands, be playful, be silly, and be touchy-feely mushy gushy all they want! It makes the pictures more personal and personable!

4. As always…”Burst mode!”

This seems to be recurring theme in my articles. Definitely make a point to use burst mode while doing engagement photography. The couple will be nervous, so after they do their initial and stiff pose for the camera (thinking they look natural!), they will loosen up, smile, laugh, look at each other. Those are the moments you want to catch more than anything.

5. Location is Crucial

If you have been doing photography, especially engagement photography, for a while, you may know of some great places around your town to take engagement pictures. Prepare yourself with a list of locations and interesting places beforehand that you can suggest to the couple. They most likely will be open and willing to consider anything you have to say! Also, couples frequently travel to other towns for their engagement pictures, so make sure you have tracked down some hot spots that will be aesthetically pleasing.

engagement location

Photo by Stephen Leonardi; ISO 1600, f/3.5, 1/1000s, 70mm.

6. Do Your Research!

The only way for you to actually be as knowledgeable and prepared as you want to be (and want the couple to think you are) is to do your research. As with the previous engagement photo tip, research locations for engagement pictures. Look up creative engagement picture poses that you could suggest to the couple during the shoot. Learn what clothing options will be wise to suggest for them to wear.

7. Clothing Optional (well, not quite)

They might be committed to just one person, but make sure this couple has options! Tell them to bring a few changes of clothes so that you can get some different engagement shots in different locations. You want to give them variety and creativity. Also, let them know what colors not to wear. Examples: white, khakis, light colors, etc. Depending on the background, certain colors and prints may not mesh.

pre-wedding photo clothing

photo by // jonCates

8. Suggest an event shoot

Most couples won’t think of this amazing idea for engagement pictures, so you should suggest it to them! Offer the idea to go along and shoot a date night for the couple. Have them go to the place where they met, their favorite restaurant, or out doing their favorite hobby. Another fabulous engagement photo shoot idea is taking pictures at their engagement party! We just did an engagement shoot like this and the pictures are priceless. Friends, family, and most importantly, the couple, were all included!

9. Shoot in RAW (vs. JPEG)

This helpful hint is especially important when shooting indoors! Shooting in RAW gives you the liberty of having a wider range of exposure adjustments during the editing process. Some may prefer one format over another, but on our engagement photo shoots, we want to make sure we have the most options possible so we can come out with the best engagement pictures possible.

10. Don’t Focus on the Face

This hint sounds ludicrous for engagement pictures, right?! Well, of course you should take pictures of the couple’s faces! But on the flip side, try focusing on things other than just those. Have the bride-to-be lift her foot as if they were kissing, and snap a picture of their shoes from the knee down. Make absolute positive you get that engagement ring in some pictures! Catch her whispering something in his ear. Shoot them from the neck down. All of this is interesting and innovative for the eye.

creative couples photography

photo by Julita B.C.

11. Be vocal (they won’t!)

Finally, one of the most important engagement pictures tips I can give you is to be vocal. Have fun with the couple and suggest poses for them to try. Have general conversation to loosen them up. Tell a few jokes (if you happen to be funny) and create a warm friendly atmosphere. Direct them and they will take direction. Many couples want you to hold their hand along the engagement picture path and lead the way. Take advantage of this power! You have the liberty to come up with something new, creative, and fantastic. They will appreciate this when the editing process is over!

About the Author:
Callie Colleen Smith can provide more information about wedding photography, family pictures, engagement, or modeling headshots. Smith is an assistant photographer who works with Shane Messer and Raychle Searfoss at Shane and Raychle Photography in Nashville, TN and Louisville, KY.


Go to full article: Engagement Photography Tips and Techniques

What are your thoughts on this article? Join the discussion on Facebook

PictureCorrect subscribers can also learn more today with our #1 bestseller: The Photography Tutorial eBook

The post Engagement Photography Tips and Techniques appeared first on PictureCorrect.


from PictureCorrect https://ift.tt/3Cpl7Tt
via IFTTT

PictureCorrect.com: The Importance of Constructive Feedback in Photography

Most of us have received critiques of our work at some point of our life. Some of the most subjective feedback is that directed at works of art. Photography is no exception.

With a lot of people picking up photography as a hobby, it’s no wonder that a lot of photography related forums are created with the purpose of sharing. And one of the popular subjects of these groups is critique, where members get to give “constructive” comments with the hope that it will help the image maker. The reverse is also true where a photographer posts his best shot and hopes to get constructive and helpful criticism in order to learn from the more experienced photographers.

photographer feedback

Photo by Woody Kelly.

When I took a course on image analysis with the Photographic Society of America (PSA), when I first started photography, the most important aspect I learned about giving constructive feedback is to put it forth as my own point of view.

Why is this “own point of view” so important?

Photography is so subjective that an image can gather equal amount of “likes” and “dislikes” at the same time. My tutor told me that it is subjective to the point of being ridiculous. Each and every one of us perceives beauty in our own way. Not just beauty, but almost everything in life, right? Some of us like eating steak, while some would rather stay away from meat. Some of us like to remain single, while some would rather marry and have 10 children.

That being said, the image maker, too, perceives beauty differently from the one critiquing the work. To the one posting the image, it might be his best shot and he thinks of it as being perfect. I’ve been there when I started photography. I thought what I’d shot was very good. Boy was I wrong. If I were to look back at my very first batch of photographs, I would be appalled and would give myself the harshest of critiques. But hey, we were all once amateurs. And everyone is learning all the time and wants to improve. So the main thing is not to belittle anybody, because we were most likely in their shoes at some point.

So, if we don’t have the “eyes” now to critique and comment on our current work, what better way than to ask those who have been there done that. A word of caution: when you put your work out there in the open, be prepared and open minded to receive comments and criticism from those who have not been there done that.

screen pointing

Photo by John Schnobrich.

Sometimes, you can get ideas spinning off from even those who are very new to the art of photography.

Back to the subject of “own point of view,” it’s imperative that we start off our critiques with preambles. Not those legal mumbo-jumbo kind of preambles, but something as simple as, “In my opinion…” This is to tell the reader that whatever is going to be said is purely your own opinion. It’s nothing personal.

Avoid Rules

What I’ve learned from PSA is to look at different aspects of photography when giving criticism and comments. And also avoid rules like the rule of thirds. Stay away from these rules of photography when giving comments, because they’re not prerequisites when making a photo. Nothing is ever fixed in the world of art. Why should it be? We would live in a world of zero creativity if everything was so rigid. So stay away from giving comments like, “It would be better if you had used the rule of thirds to compose this image.”

Oh yeah, and stay away from, “It would be better… ” and the super imposing, “If I were you…”

street photography

Photo by Adrian Cabrero; ISO 100, f/2, 1/2000 exposure.

What to Look for in a Photo

What are the aspects to look for? Here are some…

  • Creativity
  • Originality
  • Noise and/or Grain
  • Composition
  • Line
  • Eye Movement
  • Lighting
  • Focus, depth of field
  • Exposure
  • Dimension
  • Perspective
  • Tonal Range
  • Color
  • Impact
  • Balance

During the course, I was asked to comment on one of Henri Cartier-Bresson’s most revered images. I didn’t know this person or his work at that time. So I just gave my comments. Luckily for me, I started off the critique with, “I think… “, “In my opinion… “, and “To me… ” Only when my tutor told me that prints of the image are being sold at galleries for $10,000 each, and that it is okay to comment as long as it is our opinion, did I begin to reflect upon the fact that art is so subjective.

In essence, write your comments with the preamble, be nice with your words, and never be a jerk.

Another note in “courteous” critiquing would be to separate our good comments and suggestions. Try to put across all the good points first, then give your suggestions. Do not say something like, “I personally feel that the image is well done, but…”

It’s the BUT that is the pain in the BUTT.

gallery photographer

Photo by Tetiana Shevereva.

Say your suggestions separately, so that the image maker can keep all the positive comments and then learn from the critique.

And last but not least, although sometimes it’s better to keep quiet if what we are going to say could potentially offend someone, it’s also important to note that constructive criticism can teach us a thing or two about our own work. Most of the time saying what we already know reinforces our knowledge and can open doors to new knowledge. Do it with tact and humility.

Someone once said that we don’t live long enough to be anything but amateurs.

So when putting across what you think, say it like you know it, but make it sound like you know nothing.

Good luck!

About the Author:
Fauzi Anuar (https://www.zeeandmarina.com/) is a qualified master photographer (AMPA) specialising in portraiture, interiors and food.


Go to full article: The Importance of Constructive Feedback in Photography

What are your thoughts on this article? Join the discussion on Facebook

PictureCorrect subscribers can also learn more today with our #1 bestseller: The Photography Tutorial eBook

The post The Importance of Constructive Feedback in Photography appeared first on PictureCorrect.


from PictureCorrect https://ift.tt/3vRpnZv
via IFTTT

tiistai 26. lokakuuta 2021

PictureCorrect.com: Photographing a SpaceX Rocket Streaking Across the Night Sky

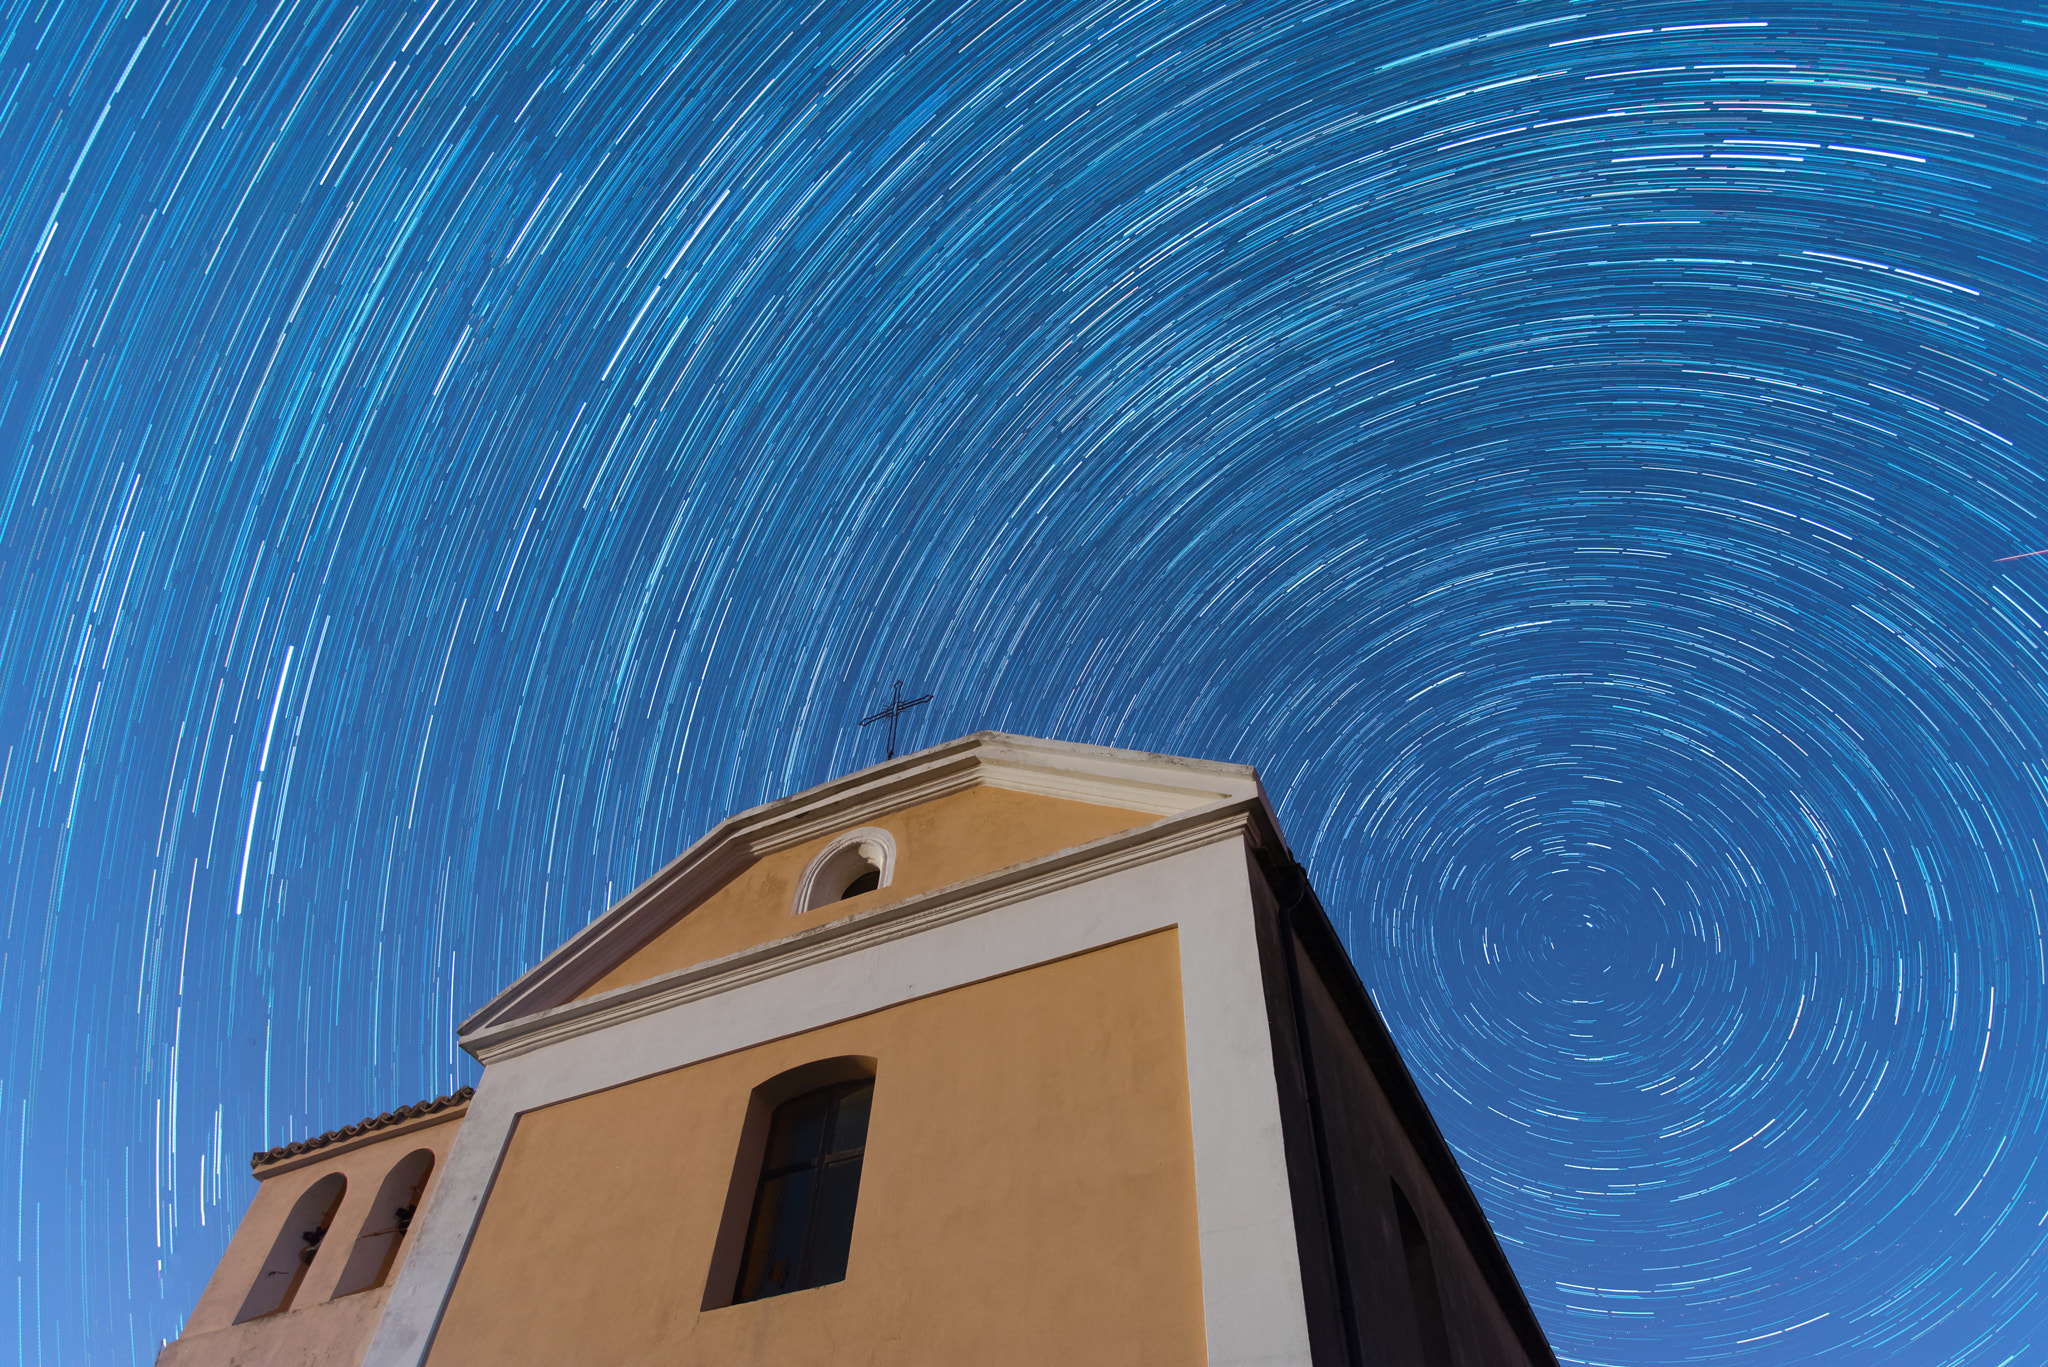
What you see here is the 2nd Stage Burn with the 1st Stage Re-entry Burn, which is used to initially slow down to begin the landing process, appearing under the tree limb.

rocket landing

During a past launch, at 1:21 am SpaceX continued its run of aerospace brilliance with a night mission of its Falcon 9 rocket, carrying its Japanese communication satellite payload to geostationary orbit. The most spectacular portion of this event was the first successful night landing of the Falcon 9’s first stage onboard their floating platform called “Of Course I Still Love You.” While this was not the first successful landing for SpaceX, it was the first one at sea at night and also one that they predicted to have a high probability of failure due to the dynamics involved with the much higher energy needed to send the satellite to a higher orbit than previous launches.

What does that have to do with me? Well, at the time, I was on Hunting Island in the southern portion of South Carolina doing what I love to do, shooting the Milky Way…. and I captured the moment!

final spacex image

This was my 3rd time out with my new gear, the Sony a7R II and Zeiss Otus 28mm f/1.4 and I can’t tell you how ecstatic I am with both of them in this early honeymoon stage, as they are providing me with the sharpest, most beautiful night skies I’ve ever seen without using star tracker equipment.

This was very reminiscent of my capture of the International Space Station a couple of years ago. If you’ve followed me at all you might remember the night I went out to shoot star trails above Weaver’s Needle in the Superstition Mountains just outside of Phoenix, Arizona, and the ISS photobombed me. Maybe I have a knack for being in the right place at the right time.

star trails

Weaver’s Needle and the ISS

My current method of nightscape shooting involves capturing a series of images and then doing some advanced stacking techniques in Photoshop to remove the noise (rather than using Adobe or other 3rd party noise removal software) and Sony’s mirrorless line of cameras has a decent application that you can install directly on the camera (called Sony PlayMemories Time-lapse) that allows you to automatically capture a series of images, like I want, without having to resort to an external intervalometer. I’m all for less gear, so I’ve been doing it this way for a few weeks now. The downside is that the minimum number of images the application allows is 30, and while that’s more than I need, it still works out to only about 5 minutes of shooting (I’ve settled into 10 second exposures with my current setup) and I’m never going to complain about having extra data just in case.

Sorry for the sidetracking there, where was I? Right. I got out of my tent around midnight as the Milky Way was beginning to rise to the east and headed down to the pitch black beach where there is a plethora of trees slowly getting swallowed up by the sea. It’s an incredible environment to shoot in, but there’s a little wrinkle in all of this and it has to do with turtles. This time of year is sea turtle season in the southeast and the threatened turtles that come up on the beach to lay their eggs (and any little ones that hatch) are highly sensitive to light and often get turned around and disoriented by lights on the beach. For that reason, South Carolina (and presumably other states in the area) has instituted a no lights on the beach policy. Luckily there’s enough light pollution that you can at least navigate without a problem, but not being able to use a flashlight to help with focusing, adjusting camera settings, etc., is a bit of an annoyance. I’m all for helping the turtles though, so I fully support this mandate. And the Sony a7R II is configurable enough so that you can view everything through the EVF. After adding some gaffer’s tape to the lights on the outside I’m able to operate in complete no-light stealth mode.

night sky long exposure

milky way

Capturing the Moment

At around 1:10am I set up by a particular tree that I was interested in and started capturing data for an ISO invariance test, unbeknownst to the countdown happening 250 miles to the south. Since I was still new to the Sony a7R II, I wanted to know what its sweet spot was for ISO settings. I’ve been using ISO 6400 almost exclusively (with some minor exceptions on particular nights) with my old Canon 5D Mark III, but I expect that the Sony can shoot higher without any problem. I still need to work up that data, but it’s coming soon. Since I was already set up on a tree that I sort of liked, I figured I might as well capture my normal Milky Way data. So at 1:17am I turned on the Sony PlayMemories Time-lapse app to fire off 30 frames with a 1 second interval. I stepped back, looked up, and let the sky take me in for five minutes while my camera did its thing. As the camera slowly ticked down to its final few frames, I saw out of the corner of my eye what looked like a firework going off in the distance. I could make out a vertical red trail going straight up to the south of me. From the horizon, it was maybe a couple of fists tall before it disappeared and my timelapse completed while I shrugged my shoulders, wondering.

rocket landing

As I stood there thinking, I remembered two other guys were out shooting as well and I initially thought that maybe they were playing around with a drone because I knew those typically have red lights on them. But I stood and watched for a few seconds and even though the red trail was gone, I could still make out some movement in the sky. It was very reminiscent of a satellite in orbit so I got to thinking that maybe, just maybe, it was some sort of rocket launch. Too bad it was almost due south and I was facing to the east. So I stood there dumbfounded… and waited for about two minutes before I came to grips with what was unfolding. The rocket was no longer going up, but had made a turn and was maneuvering towards my frame. Without hesitation, I hit the shutter button and started another 5 minute timelapse.

By the time it was complete, I could tell that the rocket was long gone. In my haste, I grabbed my tripod and set out to find the other photographers to see if they saw it too. In hindsight, this was a mistake. I always try to take a couple of longer, lower ISO, higher f-stop images with the foreground in focus so that I can blend it in later in post. It always make a more pleasing image when everything looks in focus. So yeah, when I got home and realized that I forgot to do that, I was a little frustrated in myself. But luckily there are some (limited) ways around it, which I’ll get into.

Processing the Image

The next morning, I groggily got out of my tent and drove home to recharge my batteries and see what I had captured on the big screen. The first step in the process is obviously importing the images into Lightroom. I’m running things on a Surface Pro 3 i7 with a 256 GB SSD and 8 GB RAM. I love it for just about everything except image processing. With my old Canon, RAW files were only around 29 MB per file, and it did a rather admirable job in keeping up with my workflow. But the 42MP Sony a7R II RAW files are clocking in at 84 MB per file. If things are settled down, previews have been created, and I’m not zooming in and out constantly, Lightroom can handle it, but the fan kicks in quite a bit and we get to take plenty of breaks while it thinks about things. Taking it one step further, most of my image processing is actually done in Photoshop after I do my initial RAW editing in Lightroom, and once you multiply 84 MB by 30 images, well you’re talking a couple of gigabytes of files in Photoshop, and the short breaks turn into long ones. So it looks like a dedicated desktop mega-editing workstation is in my future, but that’s neither here nor there. Back to the image processing….

First I edit in Lightroom. I don’t want to take away any thunder from working pros who put out impressive video tutorials on how to process images in Lightroom, so I’ll leave that to Google (or I can make recommendations). Here’s what the first image looks like after I complete this stage. I try to mainly focus on the sky with a little bit of shadow recovery in the foreground. I know I can do a little more fine tuning in Photoshop, so I just try to get it close at this point.

Then I sync the settings to all 30 images.

syncing images in post-processing

Finally, I highlight them all and right-click on the first one, click Edit In -> Open as Layers in Photoshop. The first thing I usually do at this point is to highlight all of the layers and set their blending mode to Lighten. This allows the brightest part of each layer to shine through to the layer above it. In landscape astrophotography terms, it creates the star trail effect.

star trail effect

Over the course of five minutes of shooting, the stars are moving through the sky. In reality, the earth is rotating on its axis, but from our perspective, it’s the stars that are moving. If I were looking for true authenticity in my final image, this would be where I would start. But as I looked at it, I decided to deviate a little. The star trail portion of the image was too much because the Milky Way is such a dense part of the sky. My goal was to represent the rocket trail and I felt that the smeared look of the Milky Way was too distracting of an element. I realize this might ruffle some feathers, but at the end of the day I’m trying to create an image that tells the story I want it to tell. And I wanted to tell the story of a rocket launch. So I decided to ditch the star trails and show the rocket launch as an overlay on a clean Milky Way sky. My image, my choice. Here’s my plan:

  1. Clean up the foreground
  2. Clean up a single Milky Way image
  3. Clean up the rocket trail
  4. Combine (1), (2), and (3), add magic pixie dust, crack open a beer and smile at my creation

Foreground

As I was saying earlier, I screwed up. I forgot to take an in-focus shot of my foreground. Not that it would have been easy. Over the next two nights I continued to struggle taking in-focus foreground shots due to the no-lights-on-the-beach mandate. Trying to yoga-ize myself into a position where I could see through an EVF that was low to the ground and pointing up at the sky was painful. And then trying to make out detail on a tree limb in pitch blackness was near impossible. Anyways, that’s not part of this story. I found out a way to get some sharpness out of an out-of-focus image. It’s not perfect, but for an image that has a lot of noise and darkness in it anyways, I can get away with it. That and the tree isn’t the point of the image, so you really shouldn’t be looking at it in the first place.

foreground

To do it was pretty simple. I took the first frame out of my layer stack and applied an unsharp mask and high pass filter to it. Then, to complete the foreground process, I took the top four layers, made copies, converted them to a smart object, and then applied a median stack filter to it. This does a fantastic job of eliminating noise and smoothing things out. Here’s a before and after of the tree and surrounding beach. I think it’s a remarkable improvement on the foreground.

foreground improvement

To finish the foreground, I also used Nik’s Dfine noise removal software (Google made all of the Nik tools free, download them!) to do just a little bit more. It was very minor, but I knew it needed a little more. I also planned on adding this filter to the Milky Way so that the whole image would match up. The hardest part of this process is usually trying to get the foreground and background to match up without there being a distracting demarcation line of no-noise to lotsa-noise.

astrophotography noise

Milky Way

Most of my Milky Way processing is initially done in Lightroom, so for the most part it’s already complete by the time I get here, though there are some additional color, curves, levels, and brightness adjustments that I tend to do in Photoshop to finish all of my images. At this point, there wasn’t much that I did because I knew I’d be doing more once the rest of the image was put together. But to be fair, and to show where I started, here’s the first image in the stack that I used as my base Milky Way image with the clean foreground masked in.

milky way masked in

Rocket Trail

The Falcon 9 rocket raced through the sky for at least 7 minutes before disappearing from view. If you’ve been paying attention, you know that I missed the first 2 of those minutes. But, there’s a reward at the 6 minute mark… the landing, or at least the landing approach, of the first stage of the Falcon 9 rocket. As the rest of the rocket continued to motor on to orbit behind the second stage, the first stage dropped off and successfully landed on a floating platform out at sea. How cool is that?

Props to the SpaceX sleuths on Reddit for determining the high-probability that this is just the re-entry burn. However, they also deem it to be remarkable that it was visible from over 700km of atmosphere.

This is probably the final part of where I used my personal creative freedom in creating my image. The drawback to shooting multiple frames instead of just doing long five minute exposures is that there is a short delay between frames where the camera is clearing the buffer and starting the next exposure. When you combine the layers, you’ll see those gaps between star trails and, in this particular case, the rocket trail. Because of how bright the rocket trail is, I knew I had to fill in the gaps to make it look right. So after some careful clone stamping on each layer to extend the trail over the gaps and then some more extremely careful masking to just select the trails out of each image, I was able to come up with a layer that looks like this, only without the white background. One thing to note… I am TERRIBLE at masking. I don’t want to hear any comments about that. I already know it and need to work on it. It doesn’t really show in the final image because the sky gets put back in behind the rocket trail, but still. It’s a part of the image that I’m not totally proud about it.

rocket trail

The Final Image

The final step in the process is to combine all of the elements and clean things up. The base layer was the Milky Way from the first frame, with a Nik Dfine filter applied to it to smooth out a very small amount of noise without totally degrading the image. The Sony+Zeiss combo is extremely sharp and the noise is well within the bounds of being acceptable and pleasing, so I didn’t need to do much. Then I added two Color Balance adjustment layers, one to the whole layer and then one to just the sky to balance the color out.

From there, the rocket trail was added back in as well as the new foreground layer that showed a little bit more detail in the tree. I added another Color Balance adjustment layer to only this foreground layer since it had a little bit of a color difference from the bottom layers and I wanted to bring it back in line.

The final adjustments were global without masking anything and were a Vibrance layer (added some vibrance, subtracted some saturation) a Brightness/Contrast layer (added a little brightness, subtracted a little contrast), a final Levels layer where I pulled in the white and black points to extend the image to both ends of the histogram and add some extra punch to it, and a light vignette because I like vignettes sometimes.

final spacex image

Final Thoughts

I figure this will probably get lost in the 2500 words above it, but the whole point of this is not to show you how to process your own image, but to give you an insight as to my thought process when I’m processing my images. The specifics of each step won’t help you, but hopefully you’ll come to realize that you’re probably having the exact same conversations in your head that I usually am. And at the end of the day, it’s your story to tell… and this was mine.

Now if you’ll excuse me, time to crack open a beer.

About the Author:
Zach Grether is a photographer who hopes his images will help preserve the night sky in a matter fitting of its greatness. Follow him on Facebook, and Instagram.


Go to full article: Photographing a SpaceX Rocket Streaking Across the Night Sky

What are your thoughts on this article? Join the discussion on Facebook

PictureCorrect subscribers can also learn more today with our #1 bestseller: The Photography Tutorial eBook

The post Photographing a SpaceX Rocket Streaking Across the Night Sky appeared first on PictureCorrect.


from PictureCorrect https://ift.tt/3pFbOLz
via IFTTT

PictureCorrect.com: Hats in Portrait Photography?

Today I have a photo tip that actually breaks the rules. I’m going to talk about including hats in portrait photography.

Hats can say a lot about a person’s personality and are a good prop to use – if they actually DO fit the subject’s personality.

hat portraits photos

Photo by Fred Kearny

But, be careful of the lighting. You don’t want the eyes to be shadowed so you need to lower the light. But if you lower it too far, you can get “horror movie” lighting and shadows. Be careful.

If you are doing a quick snapshot just for fun let your model goof off and wear whatever they want. If they want to wear a funny looking clown hat or a jester’s hat with the jingling bells – or even a deerstalker for the Sherlock Holmes fans… go for it! (I’ve done them all.)

In this article, I’m not talking about funny snapshots. I’m talking about portrait photography that tells the story of who this person is – and will stand the test of time.

If you are trying to create something special that will be on the wall (and liked) 20 years from now, you need to be careful and plan every detail. You DO want to show the model’s personality and who they are – so sometimes hats come into play. Just be sure you NEED it to tell the story.

BTW – in case you aren’t aware, the reason for caution is that a hat has the capacity to draw the viewer’s eye away from the face and that is the ultimate bad thing.

If you are shooting a professional baseball player – can you imagine telling their story without a baseball cap?

How about a rodeo cowboy? Can you really tell the story of who they are without a cowboy hat? They wear a hat ALL the time.

Aside from the hats’ ability to disguise the radical difference between their tanned cheeks and fish belly white forehead – it is a natural part of this subject. They would look like something is missing if you shot them without their hat.

Now that I think of it that could be our rule. Would they look like something is missing without the hat?

I’ve written quite a few articles where I continuously harp on the fact that you should never include something that will draw the viewer’s eye off the face… but hats can be an exception to that rule.

What about the young girl who NEVER wears a hat, but is having a bad hair day! You guessed it – no hat. Find a way to fix her hair or even postpone the shoot. No matter how “cute” she looks, that portrait is not going to make it to the wall. It’s just not her.

There IS one time when you SHOULD shoot the model in a hat, even if that’s the only hat they have ever put on!

It’s the mortarboard that graduating seniors wear. THAT one is a must! (And it will make it to the wall – no question.) As I write this it is graduation time – that’s why I thought of what may be the only exception to the hat problem.

By the way, do you know how wearing the mortarboard originated? It’s kind of a fascinating story.

Back in the day – (the renaissance era), the only two ways for an artist to make any money was to be commissioned by the church or a very wealthy patron.

hat portrait photos

Photo by Alireza Esmaeeli

If they were doing a religious painting for the church, the most important and most holy person in the photo was emphasized by putting them in the center and putting a gold, circular shape behind their head – indicating a halo. It was a solid shape, not the ring shape we now associate with a halo.

This immediately separated them from the crowd and defined them as a very important person.

When the rich dudes came along and wanted a portrait. They wanted a halo too! Egos of wealthy people were every bit as over the top then (or even more so) as they are now. They wanted to be the center of attention and “important” too!

Unfortunately, putting a halo on a non-holy subject was considered sacrilegious. The rich folks had the cash and power to avoid problems, but the starving artists had a way of getting burned at the stake. (Or tortured and killed in some other gruesome fashion.)

What to do?

The problem was resolved by using a solid circular shape for holy figures and a solid square shape for the rich and famous. If you look at one of the paintings, it appears that they are wearing a gold colored mortarboard!

And that is how it came about. The mortarboard is a symbol indicating the importance of the day and the graduate!

In portrait photography, avoid a hat unless it is truly needed to “tell the story.” But if it is part of their personality – put it in there even though it may technically be against the rules. Take care when setting up your lighting and you are good to go. Photo tips are guidelines and should be broken from time to time.

About the Author:
Dan Eitreim writes for OnTargetPhotoTraining. He has been a professional photographer in Southern California for over 20 years. His philosophy is that learning photography is easy if you know a few tried and true strategies.


Go to full article: Hats in Portrait Photography?

What are your thoughts on this article? Join the discussion on Facebook

PictureCorrect subscribers can also learn more today with our #1 bestseller: The Photography Tutorial eBook

The post Hats in Portrait Photography? appeared first on PictureCorrect.


from PictureCorrect https://ift.tt/3vOJF5L
via IFTTT

maanantai 25. lokakuuta 2021

PictureCorrect.com: How to Take Food Photography in Restaurants

We’ve all been there. Sitting in a dark, corner table of a fantastic restaurant, wishing that we had more light, so we didn’t have to use that terrible built-in flash. Perhaps the meal was one of the best we’ve ever eaten and the one thing that would have made it better is gorgeous photos to post to our website, Facebook page, or blog.

how to take food photos in restaurants

Photo by Daniel Lee; ISO 800, f/3.5, 1/80-second exposure.

When we get home the results are less than spectacular. Usually, the flash creates hot-spots on anything reflective on the table. Including, stemware, cutlery and crockery. The grain from the high ISO used also is a very annoying factor in low-light, restaurant photography. There are some easy solutions to this.

How to capture great photos in any setting:

1. Diffused sunlight – The quickest and easiest way to get great photos is to shoot with available, indirect sunlight. This could be choosing a table outside, under an umbrella, where the sunlight would be diffused by the umbrella. This method is by far the best for achieving excellent photos.

2. Get a table by the window – If there are no outdoor tables available, or it’s too cold, rainy, etc. there are other methods. One trick is to ask the reservations desk if you can have a table by the window when booking. If they say no, than ask when the next available seating is when a window is available. Don’t be embarrassed to push it and insist. They are there to serve you.

3. Use fast lenses – Outdoor and window tables work during the daylight, but what about dining in the evening, when the sun is down and there’s nothing but the available light in the restaurant? This is where it gets tricky. For those with point-and-shoot cameras you don’t have many options. To achieve really brilliant results indoors, using dim light, you need to get yourself a DSLR (digital single lens reflex) camera or mirrorless camera, which has the ability to swap lenses. That is, one that doesn’t just have a single fixed lens. The lens is really what matters. You want a fast lens. Meaning, a lens which lets in a lot of light. One that has a large aperture, (amount of light let in reflects aperture size) f1.8, or f2.8 lets in lots of light and are called large apertures, or fast lenses. Despite their small numbers. Anything smaller (f4.0 and above) and you’re going to have trouble. Unless you have IS (image stabilization) on your lens.

easy tips for restaurant food photos

Photo by Nick Nguyen; ISO 100, f/4.0, 1/125-second exposure.

4. Use image preview – I have found that having image preview on my camera works very well for restaurant photography. This is built-in to almost all point-and-shot cameras, but is still very limited on DSLRs. The reason I find it so helpful is because I don’t have to hold the camera up to my face to shoot. This can be very distracting when taking photos in nice restaurants especially. With image preview, you look at the LCD screen on the back of the camera and focus your photograph without having to bring the camera above your food.

5. Shoot at table level, not eye level – When shooting food you want to always strive to photograph at an angle which is 10-40 degrees from the table. Meaning, don’t take food shots at eye level. We humans always see our food at eye level and it’s more intriguing when we see it at the actual level the food is at. About 10 degrees above the plate is perfect.

6. Get in close – I see way too many food bloggers shooting with wide-angle lenses and as a result the photographs aren’t attractive. There is way too much going on in the foreground and background, when really, all we want to see is the food. So unless you want to highlight some specific areas of the table, or the restaurant, get in close.

7. Don’t use your built-in flash – Built-in flash tends to flatten an image and make it dull. Try to utilize one of the methods above first and if all else fails, flip that flash, but only in an emergency.

taking pictures of your meal in restaurants

Photo by Mack Male; ISO 100, f/3.2, 1/60-second exposure.

And finally, don’t discount your photo editing software. Even bland, flat images can be saved using the curves function.

Today you can find top quality, used equipment for a fraction of the price new. Get yourself a good DSLR and 50mm f1.8 lens and your restaurant and food photography will really start to shine.

About the Author:
This article was written by Taylor Young Photography. “Whether I am shooting weddings, portraits, landscapes, architecture, interiors, or food for a restaurant, I constantly strive for perfection in order to ensure that my clients stand out and look their very best.”


Go to full article: How to Take Food Photography in Restaurants

What are your thoughts on this article? Join the discussion on Facebook

PictureCorrect subscribers can also learn more today with our #1 bestseller: The Photography Tutorial eBook

The post How to Take Food Photography in Restaurants appeared first on PictureCorrect.


from PictureCorrect https://ift.tt/3CeMGif
via IFTTT

PictureCorrect.com: Interesting Photo of the Day: Giant Spider Silhouetted Against the Moon

Nature can present itself in the most unexpected ways. To the photographer’s delight, it can also bless us with a few ‘too-good-to-be-true’ moments. This eerie yet magnificent photo was captured by Simon Christen, who noticed the small spider perfectly silhouetted against the summertime moon:

spider-silhouette-moon

Spider Silhouette (Via Imgur)

The Swiss born photographer began his love affair with the visual arts after reading National Geographic magazines as a child. He moved from graphic design to Pixar animation, then urban photography to nature and landscapes.

“My love for nature and adventure has fueled my passion for photography even more. I have been fortunate to travel to some truly breathtaking places around the world, visiting almost every continent.”

Christen explains that his backyard spider friend seems happy and healthy:

“She builds a new web every night and seems to do pretty well for herself.”


Go to full article: Interesting Photo of the Day: Giant Spider Silhouetted Against the Moon

What are your thoughts on this article? Join the discussion on Facebook

PictureCorrect subscribers can also learn more today with our #1 bestseller: The Photography Tutorial eBook

The post Interesting Photo of the Day: Giant Spider Silhouetted Against the Moon appeared first on PictureCorrect.


from PictureCorrect https://ift.tt/3Ee44nQ
via IFTTT