


Black and white is an old style of photography which you might say is outdated, but it’s now more popular than ever and still used by amateur and professional photographers alike. It has a dramatic edge that color just doesn’t achieve, and it can turn a lifeless color photo into a stunning black and white one.
Visualize
The key to shooting in black and white is being able to visualize what your final image will look like in black and white. This can be a difficult thing to do, because converting a color image into black and white can have unexpected results if you don’t know what to look for. A good color photo won’t necessarily look good in black and white, and a bad color photo may look good in black and white.
Things to consider that we’ll cover are how colors translate into shades of grey, how these will contrast, and shape and texture.
Color
Taking your photos in color is important; don’t be tempted to use the black and white mode on your DSLR, because you’ll lose all the color information you can use to tweak your photo in post processing. If you use photo editing software, such as Lightroom or Photoshop, the best way to convert your photos to black and white is to use the channel mixer, which allows you to change the shades of individual colors in black and white.
Contrast
High contrast is a big factor in creating a dramatic black and white image. Things to look out for are dark black areas, like shadows, and bright white areas, such as clouds for landscapes or light skin tones for portraits.
There are a few ways to increase the contrast in photo editing software, such as changing the brightness/darkness of individual colors with the channel mixer, playing with the blacks and whites sliders if you use Lightroom, or changing the levels.
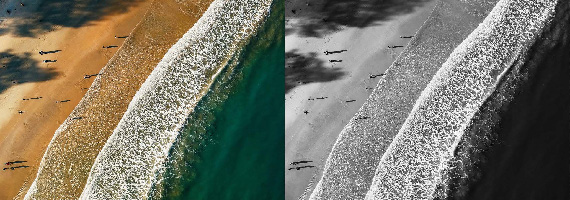
Contrasting colors won’t necessarily contrast in black and white and can even look identical in black and white. So look out for light and dark shades of colors, which contrast more in black and white.
High Key and Low Key
High key and low key are two common black and white styles which are very much related to contrast.
A high key photo is comprised of mostly white tones and some light shades of grey. They are usually low contrast and can be achieved with a high exposure.

High Key
Low key images on the other hand are very contrasting images, with mostly dark blacks and some strong shades of white.
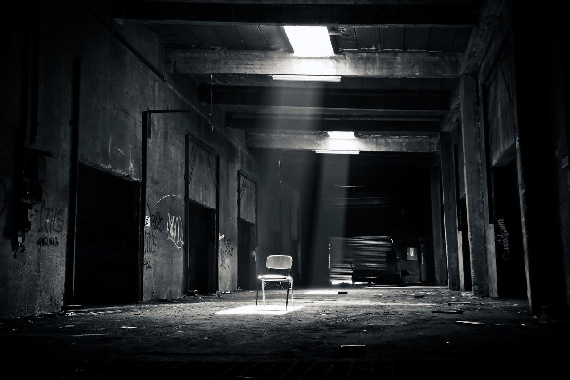
Low Key
Shapes
Curves and lines are very effective when they contrast with a simple background, especially when they have strongly contrasting shades of grey.
Lines are useful to lead the viewer’s eye through points of interest and so can be used to your advantage to keep the viewer’s attention and interest.
Common types of lines used in photography are lead in lines. They usually start in the foreground and at the bottom of your image and move up through the photo to the main subject. They can be anything, such as train tracks, a path, or a river.
Composition
Composing your shot incorporates all the techniques explained in this post, including shapes, textures, and contrast. A few things to try out to help you compose your shots are the rule of thirds, leading lines, visual weight, and balance.
- The rule of thirds is a technique in which you split the photo into thirds with two vertical and two horizontal lines. You then place a point of interest along the lines or where they overlap.
- Leading lines, as already explained, are straight lines or curves usually starting in the foreground and moving upward through the scene to a point of interest.
- Visual weight is the focal point or main subject in an image that attract the viewer’s eye. These may be bigger, more contrasting, in the foreground, and subjects such as people or objects.
- Balance is how elements in your photo are weighted in different parts of the photo. For example, a well balanced photo would have subjects with equal weight in all areas of the photo, but an unbalanced one would have higher weighted subjects in one area of the photo.
File Format
The file format you choose is dependent on whether you intend on editing your photos or using the black and white setting on your camera.
JPEG
If you use the black and white setting on your camera then JPEG is the best option.
RAW
If, on the other hand, you intend to convert the image to black and white in post processing, RAW is the best option; it retains more color information to allow more tweaking of the image.
RAW+JPEG
If you want both a black and white image and an image to edit, then RAW+JPEG is the best setting. This will give you a black and white JPEG if you choose the black and white setting and a RAW file in color, which is best for editing.
Filters
There are a few filters that can be useful to get the most out of your photos. The most commonly used are the polarizer, neutral density graduated (ND Grad) filter, and color filters.
- The polarizer is often used for color photography to darken certain colors and increase saturation. But this can benefit black and white too, by increasing the contrast.
- The ND Grad is used to darken part of an image, usually the sky, to create a more moody, dramatic photo and also to avoid overexposing the sky.
- Color filters come in a range of colors and are often used in black and white photography. The most common ones are red, orange, yellow, green, and blue. These have the effect of blocking certain colors from passing through the filter to make them appear darker and other colors lighter. But this can all be done in photo editing software.
About the Author:
Jake Turner from MonoImages has been shooting photos for over a decade, with a special interest in black and white.
Go to full article: Black and White Photography for Beginners
What are your thoughts on this article? Join the discussion on Facebook
PictureCorrect subscribers can also learn more today with our #1 bestseller: The Photography Tutorial eBook
The post Black and White Photography for Beginners appeared first on PictureCorrect.
from PictureCorrect https://ift.tt/2ItlZuv
via IFTTT


0 kommenttia:
Lähetä kommentti