tiistai 31. tammikuuta 2023

PictureCorrect.com: Interesting Photo of the Day: Twilight Double Rainbow in Amsterdam

Known to the world by his Instagram name, Pie Aerts, this Dutch travel photographer has captured some of the most picturesque Nordic landscapes you could image. His enchanting images showcase both amazing new ways to look at man-made objects and the natural beauty of Mother Nature, which you can witness yourself in his captivating double rainbow:

amsterdam double rainbow photo

Double Rainbow (Via Imgur. Click image to see full size.)

Often, this rare event of nature goes without pomp and circumstance. However, after a heavy downpour came to an end in Amsterdam, Pie Aerts came home to this spectacular sight. Grabbing his camera, he was able to shoot this breathtaking double rainbow that appeared over the city from his roof terrace in Amsterdam-West.

- - - - - - - - - - - - - - - - - - - - - - - - - - - - - - - - - - - - - - - - - - - - - - - - - - - - - - - - - - - - - - - - - - - - - - - - - -

Did you appreciate this newsletter? Please help us keep it going by Joining Our Patreon Supporters

What are your thoughts on this article? Join the discussion on our Facebook Page

PictureCorrect subscribers can also learn more today with our #1 bestseller: The Photography Tutorial eBook

- - - - - - - - - - - - - - - - - - - - - - - - - - - - - - - - - - - - - - - - - - - - - - - - - - - - - - - - - - - - - - - - - - - - - - - - - -

The post Interesting Photo of the Day: Twilight Double Rainbow in Amsterdam appeared first in the Photography Tips category on PictureCorrect.


from PictureCorrect https://ift.tt/fQJjCw1
via IFTTT

PictureCorrect.com: Beauty Lighting Tutorial in a Home Photo Studio

Beginner photographers often spend much of their time fumbling around with lights. Although lighting is a fundamental part of the photographic equation, it can take quite some time to truly understand the basics of how different qualities and quantities of light impact a subject. What many beginners don’t realize is that getting the right lighting doesn’t have to be an exhausting process of trial and error. In fact, it’s possible to get stunning results with just a few strategically placed tools. Expert image maker Gavin Hoey goes over one of his go-to one light, one reflector setups. With minimal hassle, it’s possible to replicate this look in just about any home studio or close quarters with ease:

The first order of business, of course, is to set up your light source. To get the perfect beauty light, it’s important to make sure that your source is positioned above your model for an even, natural look. That’s not to say that you should place the source directly overhead. Doing so will cast hard, contrasty shadows and cultivate an entirely different mood and feel. Though there is a time and place for the dramatic feelings that a bit of darkness under the eye can conjure up, the look is not especially well suited for a flattering glamour shoot.

how to light a model

Instead of positioning your light directly overhead, move it back a few feet and angle it so that the source is illuminating all of your model’s face evenly. It doesn’t matter what sort of light or modifier you have in place. Regardless of circumstances, a beauty light’s defining characteristic is that it floods a scene with light and leaves very little hidden in shadows.

When you think you have everything in place, take a few test shots and use a light meter to ensure that your shot is properly exposed. So long as your model is evenly lit and there’s a nice catch light twinkling in the eye, you’re good to go.

flattering light setup

Although one light independently can certainly accomplish a lot, there’s just a bit more that goes into Hoey’s setup. Even with the softest modifiers in place, you’ll find that quite a bit of shadowing will still occur under the chin when there’s any sort of overhead light in use. The easiest way to solve this problem? Bring in a reflector.

If you’d like to fill in problem shadows underneath a model’s chin, simply pop in a reflector just below the face (positioning in a way such that the reflector is just out of the camera’s field of view). Keep in mind that the size and color of your reflector will impact the quality of light bouncing onto your model. As seen below, Hoey demonstrates in this segment the stark visual differences that occur when using a white and a silver reflector, respectively.

beauty lighting tutorial

Once you have the shot, all that’s left to do is make adjustments in post. In this step, you may apply as many or as few changes as you’d like. Hoey utilizes Nik plugin software to soften his model’s skin after fixing up a few blemishes with the help of Photoshop’s healing brush. However, in contrast to the consistency this lighting setup provides, models bring in a lot of variables to a photo shoot. Keep in mind that every individual has different problem areas that may need attention, and cater your edits to suit the situation.

There’s no way around it; tinkering with expensive pieces of lighting equipment can be one of the single most intimidating tasks to tackle for those just starting out. But, as this tutorial proves, a little can take a person a long way. Furthermore, this lighting scenario in particular does a fantastic job at illustrating the fundamentals of how studio equipment functions. So don’t be afraid to bring out the best in your subject. Give this beauty light a shot!

- - - - - - - - - - - - - - - - - - - - - - - - - - - - - - - - - - - - - - - - - - - - - - - - - - - - - - - - - - - - - - - - - - - - - - - - - -

Did you appreciate this newsletter? Please help us keep it going by Joining Our Patreon Supporters

What are your thoughts on this article? Join the discussion on our Facebook Page

PictureCorrect subscribers can also learn more today with our #1 bestseller: The Photography Tutorial eBook

- - - - - - - - - - - - - - - - - - - - - - - - - - - - - - - - - - - - - - - - - - - - - - - - - - - - - - - - - - - - - - - - - - - - - - - - - -

The post Beauty Lighting Tutorial in a Home Photo Studio appeared first in the Photography Tips category on PictureCorrect.


from PictureCorrect https://ift.tt/90JCvm7
via IFTTT

PictureCorrect.com: Light Painting Words Photography Tutorial

Today’s tutorial kindly comes to us from Gim Liu, author of the new book After Dark Photography (readers outside the US can also get the book here).

In this tutorial you will learn how to create a photo whereby words are painted with light. In short, you will be using the light of a torch in near to complete darkness to draw words in the air facing the camera while it is taking a long exposure photo.

An in-depth step-by-step guide is provided for you to follow which steers you through the entire process. This is done through applying the after dark photography formula seen in chapter 4 to provide a firm understanding. Each step you need to take within all four stages is outlined in order to explain all aspects that are involved to create the photo.

To maximize your understanding, a running example of light painting two words is given alongside the instructions you are following. You can either copy the running example or choose your own word/words to paint. However, I recommend copying the running example to start with and paint a different word/words next time.

At the end of every step and throughout the entire process, my example is illustrated in green italics which are sometimes accompanied by a photo and/or a diagram. The running example can always be found after your instructions have been given for that particular step.

Now that all the theory is done, let’s get into the fun practical part!

Stage 1 – Plan

(A) Decide what kind of photo you want to create or capture.

Firstly, you must choose what word/words you would like to paint with light. If this is your first try at light painting or you are relatively new, start off by painting words with not so many letters. Once you become more experienced you can try longer words.

For the example, the words I painted were ‘long expo’ which is short for long exposure.

(B) Location – choose where you will take the photo.

Secondly, you must decide on the location. Ideally you should choose somewhere that is in total darkness or has very low levels of artificial light. Once starting off I recommend that you practise in your own home. This is simply for convenience. Here you can be comfortable and turn the light off to be in darkness.

The location I chose to light paint was in my living room.

(C) Equipment – gather all necessary equipment that is needed for the shot.

Lastly, you need to get together all the equipment needed to create the photo. For this particular shot, you will need all of the essential items in Table 6 and some or all of the optional items.

I used both essential items and a wireless camera remote from the optional items to light paint the example photo.

light painting gear

Stage 2 – Set up

(A) Positioning – If you are going to be in the shot, decide where you will stand OR decide where your camera must be placed so it can capture what is intended. After that, place the tripod down so the camera can sit on top and be aimed at the chosen frame. Next, put the camera on top of the tripod, turn it on and line up the frame as necessary.

Firstly, you must decide where you will position yourself to walk sideways while light painting the letters of your word. This should be at a minimum distance of three metres away from the camera and I suggest that you try this distance. Once your position is chosen remember this place or put something on the floor to mark your position.

After that, place your tripod down (about three metres away) so your camera can be put on top and aimed at where you will light paint. Put your camera on top of your tripod, turn it on and, if needed, zoom out so you can see the area where your word will begin and end.

Then, look through the viewfinder on your camera to check the following three things:

  1. Nothing is in the shot that you don’t want such as anything that is obstructing or getting in the way of the frame
  2. The frame is reasonably straight
  3. The camera is positioned exactly in the centre by taking into consideration where the middle letters of your word will be.

I light painted approximately three metres away from the camera.

(B) Camera settings – set the ISO, aperture, shutter speed and select the self timer.

Secondly, the camera settings need to be set. First, put your camera into manual mode. This allows you to set the ISO, aperture, shutter speed as you want them. Second, set the ISO to 100 (standard ISO used for most long exposures). Third, set the aperture to 3.5 (standard aperture used for most long exposures). If your camera allows you to go below aperture 3.5 set it to the lowest number. Fourth, set the shutter speed to 20 seconds (this should be enough time to light paint all the letters in your word). Fifth, set your camera to self timer/remote mode.

All of these settings can be adjusted accordingly when taking test shots at the final step in this stage and also in stage 4. The settings given here should be used as a starting point. Your camera screen should look something like Figure 23;

camera settings for painting words

Figure 23: On screen camera settings for light painting words

These were the settings that I used and this is how my camera screen appeared when all settings were made.

(C) Focus – Use your camera’s autofocus to focus on the central area of the frame or the general area of where the action will occur. After this has been achieved, turn your camera onto manual focus.

Thirdly, you need to get your camera in focus. Ensure the autofocus function is turned on; this is usually a switch labelled ‘AF’ on the side of your camera lens. Now, use the autofocus function to focus on the general area where you will light paint your word. This can be accomplished by looking through the viewfinder on your camera and pressing the autofocus button. While doing this you will see autofocus points appear.

If your location is in a room, carry this out with the light turned on and when you see the autofocus points appear in the middle of the frame you are ready.

If your location is somewhere you don’t have a light that can be turned on, use a torch to shine a light at the middle of the area where you will light paint your word then press the autofocus button. Once the autofocus points appear in the middle of the frame you are ready.

Either way, once the autofocus points appear on the general area of where you will light paint your word, turn your camera onto manual focus to lock the focus you made.

Figure 24 shows how the autofocus points appeared on my camera. I used a torch to light up the centre of the shot while using the autofocus button.

autofocus points

Figure 24: Light painting words autofocus points

(D) Take test shots – with positioning decided on, the focus made and the initial camera settings set, test shots need to be taken to determine everything is ready. Take several test shots adjusting (B) and/or (C) until you get a photo that looks suitable.

Lastly, to finish the set up stage you need to take some test shots. This will make you become aware that everything is set and in place for you to move onto the next stage. The test shots are to determine that your camera is in focus and to establish the camera settings are producing a photo that is not too light or too dark. When taking test shots you need to shine a torch for about 5 seconds around the centre of the frame.

When examining your test shots, if they are not clear, adjust the focus and take another photo. Repeat the readjusting of focus until you get a photo that is clear. Also, if your photo appears too light or too dark, adjust either the ISO and/or the aperture from the initial camera settings provided until you get a photo that has similar lighting as Figure 25. Repeat the readjusting of the ISO and/or the aperture until you get a photo that is similar.

test photograph

Figure 25: Appropriate looking light painting words test shot to proceed

Generally, the camera settings ISO 100, aperture 3.5 and shutter speed 20 seconds are perfect for this kind of photo and will not need to be adjusted. However, if they do need to be adjusted, it will only be the ISO and/or the aperture that needs increasing slightly.

Once you get a photo that has suitable lighting and is in focus, you are ready to move onto the execute stage.

Figure 25 shows how my test shot looked which provided me with the confirmation that I was ready to move onto the execute stage. You should aim to get a photo looking similar to this.

Stage 3 – Execute

(A) Just before the moment you want to capture, set off the self timer OR set off the self timer then go to your position OR go to your position then press the button on the remote to trigger your camera to take the photo.

Having sorted out all the necessary aspects in relation to your camera at stage 2, you are ready to paint your word with light. If you are using a remote, take your position then press

the button on the remote to trigger your camera to take the photo. If you are not using a remote, set off the self timer then go to your position.

(B) Either wait for the camera to capture the photo or perform the action needed to create the photo.

Once you hear the sound the camera makes when it has started taking a photo, this is where you proceed to light paint your word with the torch.

Two important points regarding the execution:

(1) Each letter of the word/words you choose must be painted backwards. Figure 26 has been created to illustrate how each letter in the alphabet is light painted backwards to make life much easier for you. ‘ON’ indicates when to turn your torch on and ‘OFF’ indicates when to turn your torch off. Most letters only require one stroke but there are some that require two or three. For those that have two or three strokes, the order of the strokes is indicated by a number next to the word ‘ON’. To move to the starting position of the next stroke, the grey arrow shows where to move your torch to while it is off.

how to paint letters

Figure 26: How to light paint all letters in the alphabet backwards

(2) When light painting at a distance of three metres from the camera, you should aim to paint each letter approximately the size of an A4 piece of paper. The further away from the camera you paint, the bigger you will need to paint each letter.

As illustrated by Figure 27, I light painted ‘long expo’ backwards starting from the top of the L and ending on the O at a distance of three metres from the camera. I painted each letter the size of an A4 piece of paper.

word painting illustration

Figure 27: Light painting words illustration

Figure 27: Light painting words illustration

Stage 4 – Analyse

(A) Examine photo – once the camera has finished taking the photo, look at the screen to see what you have captured.

After completing the light painting of your word, you must examine the photo you have taken. This allows you to recognise any mistakes that you can correct in your next attempts. It also allows you to pick up on any adjustments that need to be made to the camera settings.

Rather than taking just one photo and checking it straight away, you could take several before looking. Take photos in sets of four or five or six as this saves you from running back and forth from the camera.

I took photos in sets of five before analysing.

(B) Make adjustments – after analysing your photo, make adjustments if any are necessary. You may need to adjust (A) and/or (B) and/or (C) from stage 2.
After examining your photos it should become apparent if any adjustments need to be made. Any adjustments needed to be made could be a combination of the following:

(1) Distance from the camera – you may need to move closer or further away from the camera.

(2) Focus – the photo/s taken might be blurry and you may have to refocus.

(3) Brightness – the photo/s you took might be too bright or too dark.

If they are too bright, to make the photo darker you can either decrease the shutter speed slightly but this means you will have to paint your word faster. Or you can increase the aperture.

If they are too dark, to make the photo brighter you can either increase the shutter speed or increase the ISO. However, I recommend that you only increase the shutter speed. This is because when the ISO is increased to higher numbers, images become grainy and therefore the quality decreases. If you choose to increase the ISO, try not to go above ISO 400.

(4) Speed of your painting – word may be unfinished. If you are painting your letters too slowly, either do it faster or increase the shutter speed to a longer time such as 25 seconds.

(5) Space between the letters – the space between the letters may be either too small or too big so adjust accordingly.

(6) Sizing of the letters – the size of the letters painted may be either too small or too big so adjust accordingly.

I did not need to make any adjustments in relation to the camera. My camera focus was set perfectly and the settings of ISO 100, aperture 3.5 and shutter speed of 20 seconds were ideal. However, I realised that I kept messing up the letter ‘G’. This was due to the difficulty of the extra stroke I was doing to complete the ‘G’ with a line across the middle. To solve this problem, I simplified the letter ‘G’ by making it one stroke. It turned into the one that you can see in Figure 26. Another issue was that I needed to improve on my spacing between letters because some of the gaps were unsatisfactory.

(C) Repeat stage 3 (execute) and stage 4 (analyse) until you are satisfied with the photo.

Simply repeat the execution from stage three and analysis from stage four until you create a photo that you are pleased with.

After a considerable amount of attempts, I finally got my photo. This took some time as sometimes the spacing between the letters was not correct and/or some letters did not join up. Figure 28 is my final light painting words photo;

light painted words

Figure 28: Final light painting words example photo

Conclusion to chapter

Learning how to paint with light is very beneficial to your ability to take other types of long exposure photos. The skills and knowledge gained from this chapter provides you with what you need to explore long exposure photography further. It is a great starting point because light painting is one of the more simple and straightforward types to undertake.

It is important to become familiar with the light painting process because the principles are the same for the rest of the photos explained in the proceeding chapters and beyond. For instance, no matter what kind of long exposure photo you take, the planning, setting up and analysis is always the same. The only stage that differs is the execution. Therefore, it is highly advantageous to learn the light painting process inside out. In doing so, it will provide you with a solid foundation to move forward with long exposure photography.

Before this chapter comes to a final conclusion you are being left with six valuable tips. These tips will help you to progress and take better photos. They will also improve your overall efficiency when undertaking light painting photos in the future.

  1. Be patient! It may take some time to get the photo you want so be prepared to have numerous attempts at it.
  2. Always start with your settings on ISO 100, aperture 3.5 and shutter speed 20 seconds. After you see how this looks adjust accordingly.
  3. Think of and then memorise how to paint each letter of your word backwards in advance. This will help you to reduce the amount of attempts to produce the photo you want.
  4. When painting the next letter in your word, try to visualise the position and size of the last letter you painted. This will enable you to paint your word with the correct spacing and have all the letters in your word the same size.
  5. Other than just painting words, also try to light paint different strokes and shapes like in the photos shown in chapter 1.
  6. A smaller torch light will help you paint more precise strokes and patterns.

About the Author:
Gimagery is an internationally known, multitalented professional photographer based in the UK. Although his extensive portfolio comprises of hospitality, commercial, travel, landscape and architectural photography, he is a long exposure specialist and has established himself as an expert in his field. As a renowned photographer he has been featured by some of the biggest entities in the photography industry such as Digital Photography Review, Light Stalking, Photographycourse Net, The Photo Argus, PhotoWhoa and PictureCorrect.

Having attracted a considerable following, he became best known for his artistic creativity by using techniques that result in producing unique images that intrigue and captivate. His supporters have become accustomed to his trademark use of light sources to create the illusion/impression of movement in his photos and bringing static objects to life. He is the pioneer of two long exposure photo types he created which are outlining and trajectory.

In the photography world, Gimagery’s greatest desire and ambition is simply to inspire creativity. This aim is facilitated by enlightening readers of his articles and clientele of his one-to-one experience packages to the discipline of long exposure photography. They receive expert knowledge and are left fully equipped with the skills to create eye-catching images. Taught with the reputable and self-developed after dark photography formula, he ensures an in-depth theoretical and practical understanding of the process is acquired. Readers and clients appreciate his comprehensive systematic approach, easy-to-understand writing and teaching style along with the ability to give explanation on complex and often confusing aspects of photography.

You can see his work on his Instagram @gimagery_ and he offers photography services along with fine prints on his website gimagery.net.

For Further Training:

A Beginner’s Guide to After Dark Photography enlightens you to the discipline of long exposure photography in a way that has never been done before. It provides in-depth step-by-step guides with interactive running examples on how to take five different types of long exposure photos; light painting words, vehicle light trails, steel wool, outlining and trajectory.

Readers outside the United States can find the book here. The six main objectives of the book are; introduce what to expect, provide a firm understanding of the theory and practical side to the entire process, prepare you for all aspects in relation to camera and photography equipment, outline safety measures and precautions, get you to apply all knowledge acquired whilst following individual guides to successfully take the photos and to equip you with knowledge and skills to further explore this discipline.

Found here: After Dark Photography Book

- - - - - - - - - - - - - - - - - - - - - - - - - - - - - - - - - - - - - - - - - - - - - - - - - - - - - - - - - - - - - - - - - - - - - - - - - -

Did you appreciate this newsletter? Please help us keep it going by Joining Our Patreon Supporters

What are your thoughts on this article? Join the discussion on our Facebook Page

PictureCorrect subscribers can also learn more today with our #1 bestseller: The Photography Tutorial eBook

- - - - - - - - - - - - - - - - - - - - - - - - - - - - - - - - - - - - - - - - - - - - - - - - - - - - - - - - - - - - - - - - - - - - - - - - - -

The post Light Painting Words Photography Tutorial appeared first in the Photography Tips category on PictureCorrect.


from PictureCorrect https://ift.tt/7DFVWo8
via IFTTT

maanantai 30. tammikuuta 2023

PictureCorrect.com: Interesting Photo of the Day: View from the Mast

One brave photographer climbed to the top of the mast of a boat to capture this dizzying shot. We can’t decide whether this is a gorgeous shot of the sail boat below or a nauseating shot for those with a fear of heights. However this photo makes you feel, I think we can all agree that it’s quite a unique point of view:

photo from ship mast

Photo captured by Edina Szalai (Via Imgur. Click image to see full size.)

Check out those gorgeous Caribbean blues and the sea floor beneath the water. Imagine the climb down—or maybe even a jump with a waterproof camera? To what heights will you go for that perfect shot?

- - - - - - - - - - - - - - - - - - - - - - - - - - - - - - - - - - - - - - - - - - - - - - - - - - - - - - - - - - - - - - - - - - - - - - - - - -

Did you appreciate this newsletter? Please help us keep it going by Joining Our Patreon Supporters

What are your thoughts on this article? Join the discussion on our Facebook Page

PictureCorrect subscribers can also learn more today with our #1 bestseller: The Photography Tutorial eBook

- - - - - - - - - - - - - - - - - - - - - - - - - - - - - - - - - - - - - - - - - - - - - - - - - - - - - - - - - - - - - - - - - - - - - - - - - -

The post Interesting Photo of the Day: View from the Mast appeared first in the Photography Tips category on PictureCorrect.


from PictureCorrect https://ift.tt/43jLxVM
via IFTTT

PictureCorrect.com: Camera Lens Focus Tutorial

Focus is critical in any kind of photo. You may be able to recover some details in post if you miscalculate your exposure. Or crop the image to adjust your composition. But if it’s out of focus, there’s no cure. So it’s crucial for every photographer to understand how focus works. Photographer Micael Widell explains how focus works and how you can use the distance scale on a lens:

Focus and Focal Plane

Widell uses a simple and effective tool to visualize how focus works: the gradient tool in Photoshop. If you’ve ever used the gradient tool, you may have noticed that it’s darkest at the center and gradually fades off on either side. Focus works in a similar way.

Focus is gradual. The plane in which you place your focus point, called the focal plane, is actually very thin. And as we move away from the plane, the subject gets immediately out of focus. But since focus is gradual, the out of focus areas do not become immediately noticeable to the human eye, and it becomes more prominent as we look at a significant distance from the focal plane.

how camera focus works

It is also very important to understand that if your plane of focus is very close, like in the case of macro photography, or when the subject is close to the minimum focus distance of the lens, the focal plane gets thinner. This is why we get more background blur when shooting something close to the camera.

So remember, focal plane is thinner close to the sensor and wider far from the sensor. If you feel that you’re not getting a blurry background when taking photos of subjects that are far away, try to move in closer and see if that helps.

thin focal plane

Relation Between Aperture and Focus

Aperture is the opening in the lens through which light enters the camera. Besides controlling the amount of light entering the camera, aperture also controls the depth of filed.

Depth of field is the range of area in acceptable focus. Wider apertures, like f/1.4 or f/1.8, have a very shallow depth of field (i.e., the focal plane is very narrow). This results in an image where only a small area is in focus, while the other areas in front and back of the focal plane turn out to be blurry.

On the other hand, narrower apertures, like f/8 or f/11, have a greater depth of field (i.e., the focal plane is relatively wider, resulting in a image where most of the areas are in focus).

Hyperfocal Distance

Have you ever noticed some images where the image seems to be in good focus from the foreground up to the distant background? Chances are that it was shot by setting focus at the hyperfocal distance. Hyperfocal distance is actually the focusing distance at which the depth of field becomes maximum, allowing you to have the frame in acceptable focus up to infinity. Hyperfocal distance is mostly used by landscape photographers to capture images that are sharp from the foreground to the background.

If you happen to have a lens with a distance scale, it is quite convenient to calculate the hyperfocal distance. Just follow these simple steps:

  1. Set the aperture using the aperture ring. For example, let’s say you set it at f/16.
  2. Now pay attention to the distance scale just above the aperture ring. Rotate the focus ring so that the infinity sign coincides with the value 16 on the right (because we have our aperture at f/16).
  3. Note the value that coincides with the value 16 on the left side. Let’s say it’s 5 meters.

Then in this case, it would mean that under these settings, the camera will have everything in focus from 3.5 meters up to infinity.

using distance scale for hyperfocal distance

You may be confused about whether to set your focus on infinity or use the hyperfocal distance when shooting landscapes. As Widell demonstrates, if you have a subject in the foreground and need a shot that is acceptably sharp from the foreground far up to the background, it’s a better idea to use the hyperfocal distance. However, if you’re not concerned about the foreground and need to have the distant subject in focus, set the focus to infinity.

We hope that you learned something from all of these discussions on focus, focal plane, aperture, and hyperfocal distance.

- - - - - - - - - - - - - - - - - - - - - - - - - - - - - - - - - - - - - - - - - - - - - - - - - - - - - - - - - - - - - - - - - - - - - - - - - -

Did you appreciate this newsletter? Please help us keep it going by Joining Our Patreon Supporters

What are your thoughts on this article? Join the discussion on our Facebook Page

PictureCorrect subscribers can also learn more today with our #1 bestseller: The Photography Tutorial eBook

- - - - - - - - - - - - - - - - - - - - - - - - - - - - - - - - - - - - - - - - - - - - - - - - - - - - - - - - - - - - - - - - - - - - - - - - - -

The post Camera Lens Focus Tutorial appeared first in the Photography Tips category on PictureCorrect.


from PictureCorrect https://ift.tt/szkVyle
via IFTTT

sunnuntai 29. tammikuuta 2023

PictureCorrect.com: Interesting Photo of the Day: Silhouettes Among Stars

Deep in southern California’s Colorado Desert, photographer Jack Fusco managed to capture today’s simple, sweet, celestial self portrait alongside two of his favorite traveling companions. More impressively, Fusco managed to capture this moment in a single exposure rather than relying on the composite techniques commonly used to create stellar nightscapes:

silhouette in front of night sky

photo by Jack Fusco (Via SmugMug. Click image to see full size.)

Using a Sony A7RII equipped with a Sigma 14–24mm f/2.8 ART lens, Fusco cranked the camera’s ISO up to 3200, allowing him to shave his exposure time to just 6 seconds. While that proved to be a sufficient period for capturing the details of the brilliant night sky, it’s still a short enough time span to remain still enough to produce a clear set of silhouettes.

Of course, if you’re considering traveling to Anza Borrego Desert State Park to recreate this shot, you’ll have to find patient subjects. Taking all the elements into account, the most impressive part of this entire composition may very well have been Fusco’s ability to keep his boxer, Kona, completely still for the entirety of the exposure!

- - - - - - - - - - - - - - - - - - - - - - - - - - - - - - - - - - - - - - - - - - - - - - - - - - - - - - - - - - - - - - - - - - - - - - - - - -

Did you appreciate this newsletter? Please help us keep it going by Joining Our Patreon Supporters

What are your thoughts on this article? Join the discussion on our Facebook Page

PictureCorrect subscribers can also learn more today with our #1 bestseller: The Photography Tutorial eBook

- - - - - - - - - - - - - - - - - - - - - - - - - - - - - - - - - - - - - - - - - - - - - - - - - - - - - - - - - - - - - - - - - - - - - - - - - -

The post Interesting Photo of the Day: Silhouettes Among Stars appeared first in the Photography Tips category on PictureCorrect.


from PictureCorrect https://ift.tt/vUPysYc
via IFTTT

PictureCorrect.com: Photography Sharpness Checklist

Sharp photos are a goal for many photographers but can be a challenge, especially for beginners. In this video, professional nature and wildlife photographer Simon d’Entremont offers a checklist to help diagnose and solve sharpness issues:

A photography sharpness checklist:

  • Shooting in the best light – Direct sunlight or an external light source will give the best micro contrast, while dull overcast weather can lead to flat photos with low contrast and potentially noisy images.
  • Adequate shutter speed – To freeze the movement of the subject, you need to have enough shutter speed. It also helps to mitigate camera movement when hand-holding the camera.
  • Focus – Make sure the subject or area you want to be sharp is in focus. The right autofocus system should be used for static or moving targets.

You may also want to consider heat haze – shooting through heat-radiated bodies like bodies of water or open fields can create waves of heat that cause blurry images. Shooting earlier in the day or in the shade can mitigate this issue.

“To get the best sharpness in your photos, you need to shoot in the best light both in quantity and quality, as sharpness is often perceived as the difference between sharp, bright and dark areas of micro contrast.”

camera holding technique

Another important technique is holding the camera steady with both hands and suggests using your left hand to support the lens and your right hand to hold the camera body for stability. He also suggests tucking in your elbows to minimize camera movement.

Using these tips can help you take sharper photos and improve your photography.

- - - - - - - - - - - - - - - - - - - - - - - - - - - - - - - - - - - - - - - - - - - - - - - - - - - - - - - - - - - - - - - - - - - - - - - - - -

Did you appreciate this newsletter? Please help us keep it going by Joining Our Patreon Supporters

What are your thoughts on this article? Join the discussion on our Facebook Page

PictureCorrect subscribers can also learn more today with our #1 bestseller: The Photography Tutorial eBook

- - - - - - - - - - - - - - - - - - - - - - - - - - - - - - - - - - - - - - - - - - - - - - - - - - - - - - - - - - - - - - - - - - - - - - - - - -

The post Photography Sharpness Checklist appeared first in the Photography Tips category on PictureCorrect.


from PictureCorrect https://ift.tt/hLu06Hf
via IFTTT

lauantai 28. tammikuuta 2023

PictureCorrect.com: Exposure Settings for Concerts & Spotlights

Taking photos at a concert, regardless of who’s on the stage, can be a tricky thing to master. There are a number of things to consider. But the one thing that you need to give the most importance to is the spotlight, as David Bergman explains:

Spotlights create an intense beam of light that completely overpowers all the other lights on the stage. It takes some effort to negotiate the spotlight and get away with good exposures. The spotlight is also the most consistent of all the lights. The other production lights may change color and intensity, but the one light that stays pretty much constant throughout the concert is the spotlight.

Spotlights can expose a face rather well. But as they tend to drown out the rest of the lights, everything else appears dark. The camera’s built-in meter will try to raise the exposure and in doing so over-expose for the subject’s face.

photographing live performances

There’s no such thing as a golden formula for exposure settings at a concert. Every concert has a different lighting setup. And therefore the same exposure details will not be applicable for all situations

how to shoot better images in concert

First of all, don’t set your camera on auto exposure. This will overexpose the performer’s face.

The correct approach is to figure out what the exposure should be for the face (lit by the spotlight) and then lock it in manually. Of course you have to switch to manual before you do that and stay in that mode for the entire duration of the shoot.

You must be wondering, at this point, how to come up with that correct exposure for the face. The easiest way, according to Bergman, is to start from any ball park number and then correct yourself by taking a few test shots.

tips for concert photography

Use these guidelines to make things a little easier:

  • Set your ISO as high as your camera permits without noise making everything garbage.
  • Set your f-stop as wide as your lens permits.
  • Adjust the shutter speed, considering the previous two settings. Use the highest shutter speed you can so that your images don’t turn out blurry.

how to take photos of a concert

Once you’e locked in the right exposure for the subject’s face, forget it. There’s no point in fidgeting with the camera after this. Just shoot as many frames as you can. The idea is to enjoy what you’re doing, soak in the atmosphere, and shoot great images.

- - - - - - - - - - - - - - - - - - - - - - - - - - - - - - - - - - - - - - - - - - - - - - - - - - - - - - - - - - - - - - - - - - - - - - - - - -

Did you appreciate this newsletter? Please help us keep it going by Joining Our Patreon Supporters

What are your thoughts on this article? Join the discussion on our Facebook Page

PictureCorrect subscribers can also learn more today with our #1 bestseller: The Photography Tutorial eBook

- - - - - - - - - - - - - - - - - - - - - - - - - - - - - - - - - - - - - - - - - - - - - - - - - - - - - - - - - - - - - - - - - - - - - - - - - -

The post Exposure Settings for Concerts & Spotlights appeared first in the Photography Tips category on PictureCorrect.


from PictureCorrect https://ift.tt/t2aClMj
via IFTTT

perjantai 27. tammikuuta 2023

PictureCorrect.com: 10 Easy Steps to Photographing Birds for Beginners

Today’s article is based on concepts from the new Bird Settings Photography Field Pack if you want to check it out for further training.

I’d be lying if I told you that bird photography is easy. No. It isn’t. It’s one of the toughest photography genres out there – perhaps the toughest.

However, what I’m going to reveal today are ten easy steps to take better photos of birds no matter your experience and skill level. If you incorporate these ten steps into your daily routine, you’ll invariably get better results.

All that I’m asking is that you follow these ten steps and see if they work or not. If they work, great! If for some reason they don’t for you, of course feel free to look elsewhere. What I’d like you to know is that these are ten steps that I’m distilling from my eleven years of experience. So they can’t be too bad!

With all that said, here are the ten easy steps for beginners to photograph birds.

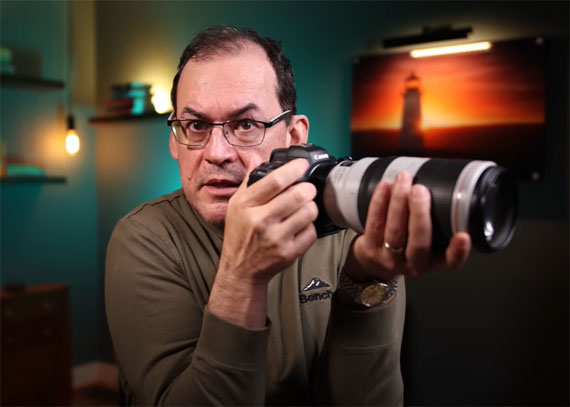
Step #1: Use a Longer Telephoto Lens

This goes without saying, but this is for those photographers who are still contemplating whether they can do good bird photography using a 70-300mm lens, a 300mm prime lens or some other short focal length lens.

While you can photograph birds using any lens you want, the shorter focal length extremely limits your photo opportunities. Unless you live in a place where birds are cooperative, which is rare, it’s best to have that longer lens.

If you’re just starting out, or you have been using a shorter focal length lens all these years, I strongly recommend you to invest in a good long telephoto lens like the Nikon 200-500mm, the Tamron/Sigma 150-600mm lens or something similar. I feel the Canon 100-400mm lens is also short. Basically, the longer the focal length, the better it is. This is because, invariably, you’ll end up using the longest focal length for most of your shooting.

using maximum focal length for bird photography

It took me about 5-6 years to realize that almost all (>95%) of my bird photographs were taken at the maximum focal length. I mean, whenever I used 100-400mm lens, I shot invariably at 400mm. That’s because most often birds are very far and we are never satisfied with the focal length that we have.

In simple terms, the reach trumps everything else in bird photography.

Step #2: Go to Birding Hotspots

Most photographers, trying to drive home a point, say you can take great photographs simply in your backyard. That’s deceiving if you ask me. It’s like saying you can get breathtaking landscape images in your hometown, no matter where you live. If you live in a place like Bangalore, which is the Silicon Valley of India, you just can’t get a breathtaking landscape.

Location is the key to taking great images. In fact, you should always contemplate location, location, location. That should be your mantra. If you want to get some great practice and possibly good to great images, you better go to birding hotspots where you can find birds in abundance.

You want to go to a place where you have a great variety of birds and good lighting conditions. It’s better to spend a couple of days to a week in the birding hotspots once or twice a year than to do the whole year in your backyard. This is because, invariably, you’ll get great results in the birding hotspots.

photo taken at bird sanctuary

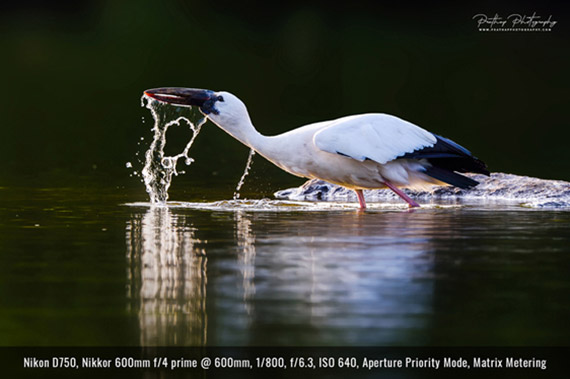
This photo of the Open-billed Stork was taken in a Birding Hotspot called Ranganathittu Bird Sanctuary near Mysore, Karnataka, India.

Remember that almost all the professional photographers would shoot those photographs that you love in these birding hotspots. Otherwise, why would they conduct the workshops in the birding hotspots and not in their backyards?

Step #3: Always Shoot in Great Light

You might be bored of hearing that it’s best to shoot in great light. I can understand. It’s hard to escape when photographers everywhere love to talk about that great light.

frontal light on bird

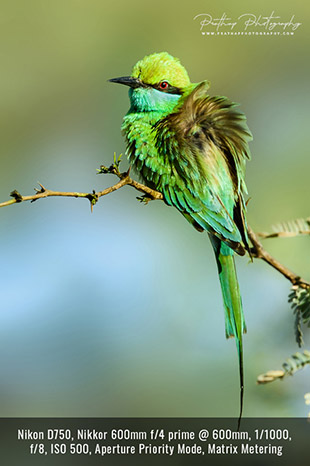
The frontal light helped me to capture all the details on the bird’s plumage as well as the great colors. Notice the catchlight in the eyes.

Instead of telling you about the quality and the direction of light, which you already might know, let me give you six solid reasons to shoot in soft frontal light for bird photography:

1. You’ll get perfect and well-balanced exposure in the soft front light.
2. You’ll get faster shutter speeds.
3. You can shoot at ISO 400 or above without really introducing too much noise.
4. Your autofocus will work like a charm due to the ideal contrast between the bird and the rest of the scene.
5. You won’t have to contend with shadows or only very soft shadows during these hours, which will help you bring out the texture and the color in the birds.
6. You’ll get catchlight in the bird’s eye, which is the critical component in making the bird look lively.

As you can see, with bird photography, there’s really no better choice than to shoot in soft frontal light.

Step #4: The Background Makes the Picture

Imagine if this black text you’re reading now was printed against a grey background. It would be very difficult to read, wouldn’t it? You’re able to read these words clearly because there’s a high level of contrast between the positive space (the text) and the negative space (the white space).

In other words, it’s the negative space (the background) which defines the positive space (the text). It’s nothing different when it comes to photography. It’s the negative space (the background) which defines the positive space (the subject like a person, a bird, a mammal, etc.).

In essence, it’s the background that makes the picture.

So, the moment you finalize on which bird to photograph, you should constantly look for the background that compliments the bird. In fact, you should look for a great background and wait for the bird to come! This is because the bird is always on the move, which is really a blessing in disguise. It’s funny that most beginner bird photographers hate the fact that the birds move, when it can actually work to their advantage.

The background should always help to emphasize the bird and to help the bird to stand out.

beautiful background for bird photo

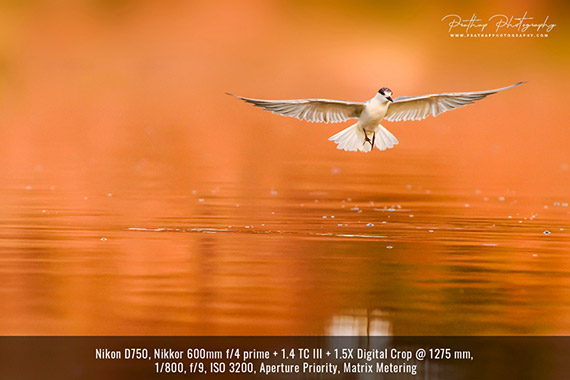
While the bird itself is beautiful to watch in mid-air with its wings fully spread, it’s the setting sun’s reddish orange light reflected off of the pond that really makes this picture work.

It’s usually very easy for bird photographers to get a good background as most of our photographs would have a clear out-of-focus background. However, care should be taken to keep an eye on any distracting elements like shiny objects or branches that cut through the bird, etc. because they will ultimately distract the viewer’s eye in the photo.

All this is to say that if you can make sure to get great background, your photographs will invariably look beautiful.

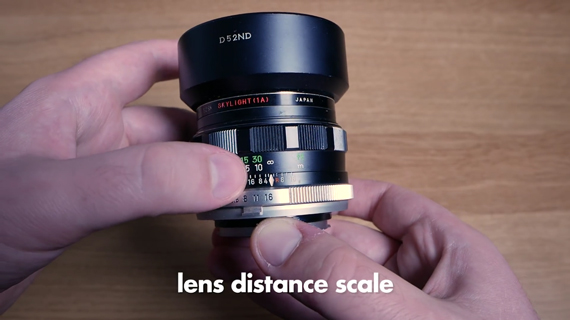
Step #5: Stop Down the Aperture

If you’re shooting with a telephoto zoom lens like 100-400mm, 200-500mm, 150-600mm, etc., you might have noticed that your photos turn out to be softer at the maximum aperture opening. That’s common. Most lenses are soft when opened to the max. This effect is more pronounced with telephoto zoom lenses.

You can combat this issue by stopping down the aperture at least by 1/3 , 2/3 or 1 stop to get sharper results. For instance, if you’re using a Tamron 150-600mm f/5 to 6.3 at 600mm, try and shoot with an aperture of f/7.1-8 and see if you get sharper results.

stopping down the aperture in bird photography

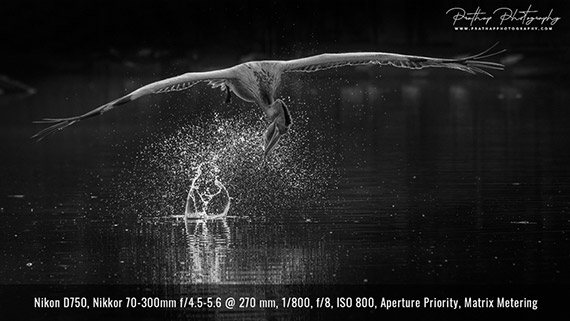
You can see that I’ve used a 70-300mm lens to shoot this photo. That’s because I was teaching my students and we were on a boat in this sanctuary which allows us to stay close to the birds. However, it’s interesting to note that I’m using f/8, both to make sure the image is sharp enough and to make sure the entire bird is also in sharp focus.

Of course, stopping down the aperture results in a slightly deeper depth of field, but that’s a tradeoff that you should learn to live with. If you make sure the background is far off from the bird, this shouldn’t be a problem at all.

Step #6: Shoot at ISO 400

I know this sounds crazy if you’re just starting out in bird photography because you were always taught to use the lowest ISO possible, which is usually ISO 100. But, when we are talking about fast-action photography like bird photography, we can’t always afford to shoot at ISO 100.

In fact, it wasn’t until about 5-6 years in that I started shooting at ISO 400 regularly.

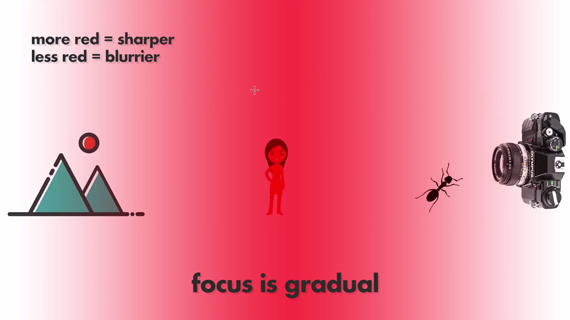
The idea is this: Getting a super clean photo of a blurred bird is of no use. Instead, you should aim to get a sharper image that’s probably not ultra-clean.

If you can make sure to shoot in a great light as I mentioned before, you can safely shoot at ISO 400 and still manage to get good quality images. This is because the ISO noise is predominantly seen in the shadow regions, uniform regions, and in low light conditions. And when the light is great, you have the best-case scenario. Even if you do see some noise in the uniform regions like the sky, you can easily remove it in post-processing.

And the result of using ISO 400 is that you’ll get higher shutter speeds, which is great! Of course in bird photography, faster shutter speeds are a big boon indeed.

using ISO 400 for bird photography

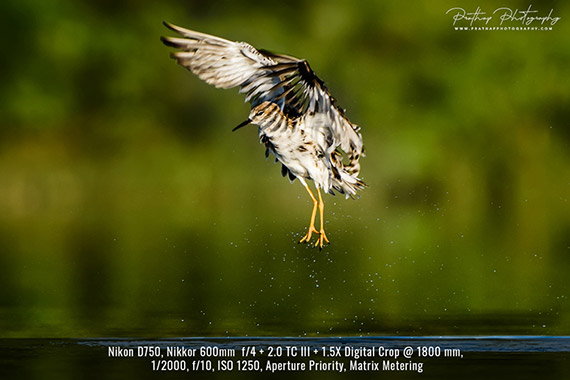
I was using a 2.0X Teleconverter on my 600mm f/4 prime lens, which meant that I had to stop down the aperture a bit to get sharper results and also aim for a faster shutter speed to freeze the action. So, I have used an Aperture of f/10 and a higher ISO of 1250 to get a shutter speed of 1/2000th of a second. Noise wasn’t that apparent as I was using a full-frame camera and the light was great.

If you aren’t shooting at ISO 400 yet, now is your chance to crank it up and get some excellent images of birds with faster shutter speeds.

And if you’re using a full-frame camera or a pro-version camera, you might as well push it all the way up to ISO 800 whenever needed, and you’ll still pull out some good shots. But, I’d recommend you to start with ISO 400.

Step #7: Shoot from the Bird’s Eye Level

This goes without saying for a bird photographer. However, I don’t see many people doing it – especially the beginners as it’s either very awkward to lie down in front of other people, or because they don’t know the effect of shooting from the bird’s eye level.

It took me a few years before realizing it too. We were all there at some point or another.

If you want to make some intimate and gorgeous looking photographs of birds, you better shoot from the bird’s eye level. As most birds are pretty small, even tiny, shooting from a higher point of view would make them unappealing to the viewer. By lying down on the ground, which might seem a bit awkward and inconvenient, you’ll automatically separate the bird from the background because the background will be far off now instead of the ground. And once you see the results you’ll never want to shoot standing up. I guarantee it.

shooting bird photo at its eye level

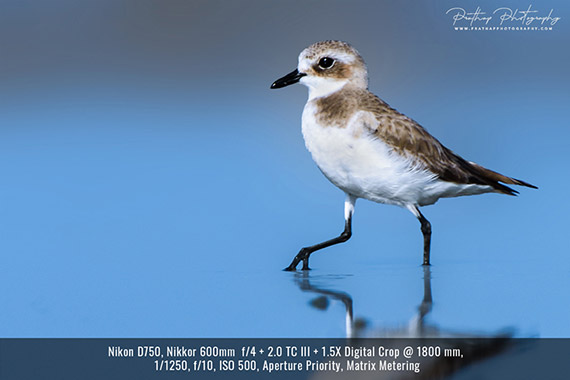
You can see that most of my images are shot from eye level. This is another picture that gives you a clear idea of what a tiny little bird like this would look like when you lay flat on the beach and take a photo. Notice how the tiny bird has got an authoritative look and feel to it. That’s the beauty of eye-level photography.

There are several advantages to photographing a bird at eye level, but the three most important ones are:

1. You’ll invariably get a smooth out-of-focus background which resembles nothing similar to the way you have ever seen through your own eyes.
2. Viewers can connect with the birds on an intimate level as they are now looking at the bird in a whole new way.
3. Birds get comfortable in your presence when your form is not threatening which leads to some amazing opportunities.

Would you try it the next time, provided you don’t have any physical condition? I hope so.

Step #8: Follow the Rule of Thumb

Here’s a rule of thumb, which I strictly follow for shooting birds in flight:

Track — Focus — Wait — Shoot

Here’s how it works:

1. Track the bird while it’s still far off.
2. Wait for the autofocus to achieve focus on the bird.
3. Wait for the bird to assume a position where you get the best light and the background.
4. Shoot in bursts of photos.

If you follow this advice strictly, I can almost guarantee you to get sharper results of birds in flight.

using a rule of thumb for bird photo

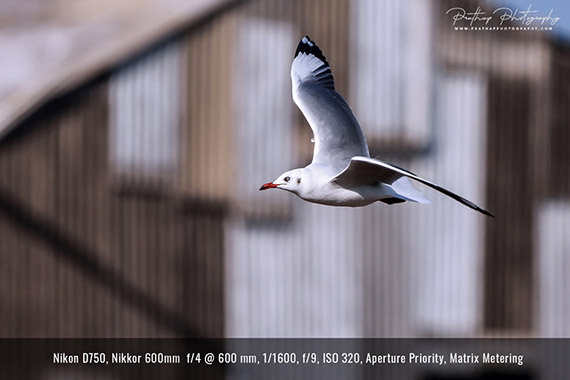
This photo is an excellent example of how following my rule of thumb can make your image look “thoughtfully composed” rather than just haphazardly shot. There were a few gulls flying around in this location on a beautiful morning. I spotted this old shed and liked the pattern there, so I knew I wanted to use it as the background. Then all I had to do was track the seagull, achieve the focus, wait until it came to the position I wanted, and take bursts of shots.

Step #9: Use Center Autofocus Points

Again this advice goes against the grain because normally you’re suggested to move the autofocus points to get the perfect composition in the field.

But when you’re just starting out, you’re better off concentrating on getting sharper results more than getting better composition. And in the case of bird photography, when you hardly have time to get a decent photograph, you can’t afford to meddle with the autofocus points much.

While you can focus on composing very well for the static/perched birds, which you should, in my opinion you’re better off using center autofocus points for action and flight shots. There are two vital reasons why you should use center autofocus points:

1. You never know which side the bird will move when the action is taking place.
2. The center autofocus points are the most sensitive and most accurate of all other focus points which helps in tracking the bird’s movements.

You can always compose the shot later in the post-processing stage, which is usually what most photographers would do.

using autofocus in bird photography

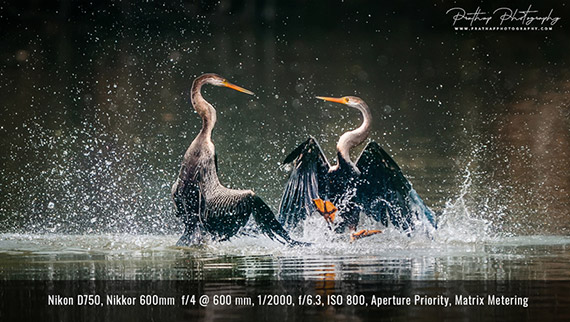
While photographing birds in action, you normally don’t know which side they might move. So, you’re better off using autofocus points at the center in order to allow the autofocus system to track the movements quickly. This was a tricky situation where there were two birds involved in a fight. In such cases, it’s best to put the autofocus points on just one bird and track it throughout your shots.

Also, try to use a 5-point, 9-point or 15-point zone autofocus system for action or flight shots. You don’t want to use the 3-D tracking, 51-point or higher focus points because it’ll only confuse the autofocus system and it’ll start hunting for the bird all over the place. You just have to make sure that you have fair enough autofocus points on the bird for the autofocus to keep track of any movements.

Step #10: Learn to Post-Process Like a Pro

In the beginning, you might feel that post-processing is manipulation, not ethical and so on. There are a lot of wrong assumptions about post-processing, unfortunately.

But let me tell you that whatever is your skill in making some incredible images in the field, you have to the give final touches to it in post-processing to bring out the sheer beauty of the bird as well as its surroundings. Post-processing is a vital part of the image-making process. It’s not an afterthought and not unethical in any regard.

Learning post-processing just a few years ago when it was just Photoshop, was a mammoth task. Even if you decided to swim in the Photoshop ocean for years, you’d still be confused. But not anymore with Lightroom and other simple software. The learning curve has been reduced dramatically so that you can be up and running in a matter of hours and days. So, start embracing it today to bring out the sheer beauty in your RAW files.

Make sure to start shooting in RAW + JPEG, if you aren’t already doing so. Until you master the post-processing, you can keep sharing the JPEGs. But when you become good in post-processing, you can shoot in RAW.

showing the importance of post processing

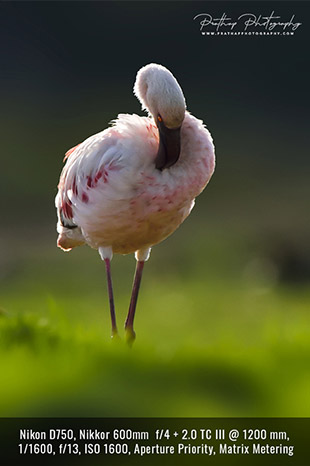
If you want to produce consistently good results, you have to learn to post-process like a master. This photo of the flamingo in backlight was definitely great in-camera. But what you see as the end result is not the way it was when I saw the RAW file. Your vision of how you want the end result to look is as important as what you got in the field.

Remember that getting good at post-processing can take a considerable amount of time. Just keep at it until you master it. Without post-processing, you’ll always be short of bringing the best results from your RAW files, no matter what the naysayers claim.

Don’t forget that you are expressing yourself and your vision through your photographs. And you can express yourself the best possible way through the combination of field techniques and the post-processing prowess.

Now you know my ten easy steps to photograph birds!

I hope you’re all pumped and ready to put these steps into action. I’m sure you can use them in your next visit to a birding hotspot and share those incredible images with your friends and family members.

I wish you all the very best.

One last thing, in case you’re interested – I’ve put my eleven years of field experience into a one-of-a-kind guide – Bird Photography Settings Field Pack – A Printable Pack of 50 Professional Field Techniques. While most photographers wouldn’t tell you their specific settings, I’ve distilled all my settings for 50 different field scenarios that I personally use into highly-compact, easy-to-follow, printable field cards.

bird-photography-sheets

New: The Bird Photography Settings Field Pack

All you have to do is use the settings and follow the field techniques on the cards for much easier super sharp bird photography.

Found here: Bird Photography Settings Field Pack

Any comments or questions? Please share them in the comments section.

About the Author:
Prathap is a professional photographer and founder of Nature Photography Simplified blog. He’s the go-to guy for bird, wildlife and nature photography.

- - - - - - - - - - - - - - - - - - - - - - - - - - - - - - - - - - - - - - - - - - - - - - - - - - - - - - - - - - - - - - - - - - - - - - - - - -

Did you appreciate this newsletter? Please help us keep it going by Joining Our Patreon Supporters

What are your thoughts on this article? Join the discussion on our Facebook Page

PictureCorrect subscribers can also learn more today with our #1 bestseller: The Photography Tutorial eBook

- - - - - - - - - - - - - - - - - - - - - - - - - - - - - - - - - - - - - - - - - - - - - - - - - - - - - - - - - - - - - - - - - - - - - - - - - -

The post 10 Easy Steps to Photographing Birds for Beginners appeared first in the Photography Tips category on PictureCorrect.


from PictureCorrect https://ift.tt/yrJUfw9
via IFTTT

PictureCorrect.com: Interesting Photo of the Day: Rainbow Night Sky

Editing an image can sometimes lead to exaggerated colors, textures, and light. With a lot of time and learning, editing becomes quicker and you start to get a feel for the influence that you want in your images. For landscape photography with a starry night sky, photographers often brighten the foreground and increase the color to reach the final product. Editing beyond that is sometimes criticized as overkill, but if the original shot is great, there’s no need to change much. This image shows proof of that theory:

exposure saturation contrast light

“Rainbow Road” by Marc Leatham (Via Reddit. Click image to see full size.)

Photographer Marc Leatham captured this long exposure with a Rokinon 14mm f2.8 wide angle lens on a Sony a7 camera. He noticed this scene as he was driving through the desert in Arizona and stopped to get his camera out. The settings were a 25 second exposure, f/3.2, and ISO 3200. In order to edit, he did a stack of four photos together, reduced the noise, and increased the contrast and saturation. What an amazing shot!

- - - - - - - - - - - - - - - - - - - - - - - - - - - - - - - - - - - - - - - - - - - - - - - - - - - - - - - - - - - - - - - - - - - - - - - - - -

Did you appreciate this newsletter? Please help us keep it going by Joining Our Patreon Supporters

What are your thoughts on this article? Join the discussion on our Facebook Page

PictureCorrect subscribers can also learn more today with our #1 bestseller: The Photography Tutorial eBook

- - - - - - - - - - - - - - - - - - - - - - - - - - - - - - - - - - - - - - - - - - - - - - - - - - - - - - - - - - - - - - - - - - - - - - - - - -

The post Interesting Photo of the Day: Rainbow Night Sky appeared first in the Photography Tips category on PictureCorrect.


from PictureCorrect https://ift.tt/iTFvaRY
via IFTTT

PictureCorrect.com: What Judges Look for in Wildlife Photography Competitions

Isn’t it frustrating when you participate in wildlife photography competitions but never find your name on the winners’ list? You must wonder about the parameters on which judges evaluate the submissions. In today’s insightful video, award-winning photographer and photography judge Janine Krayer shares five great wildlife photography contest tips and outlines the common mistakes that photographers make in competitions.

Photography is subjective, meaning not everyone will have the same feeling toward a particular artwork. We don’t recommend taking Krayer’s tips as gospel truth. Rather, her tips will help you to choose your best image to submit in competition and to narrow down your selection.

“At the end, it is most important that you like your image as it is, and no one can tell you not to.”

Krayer shares quite a lot of helpful tips regarding a judge’s expectations. She sheds light on the mistakes that many wildlife photographers make when composing an image. She also emphasizes the importance of negative space and cropping. She adds that it is not wrong to crop the animal, as long as it doesn’t seem accidental. It has to be intentional and the crop has to make sense.

Also, we can get rid of many distractions with cropping. But if the distraction is right behind the subject, cropping might not help. The only time to help is before you press the shutter release: ensure that there aren’t any distractions in the background or immediate foreground.

“Your background is just as important as your subject itself.”

Krayer also talks about some of the post-processing mistakes that photographers generally make. She shares some insightful tips on detail adjustments, noise reduction and sharpening. She also demonstrates how using local adjustment tools can be a better alternative to fine-tune your images.

We really hope that you’ll keep Krayer’s tips in mind when submitting your images to the next wildlife photography competition. These tips will help you out for sure to a great extent.

- - - - - - - - - - - - - - - - - - - - - - - - - - - - - - - - - - - - - - - - - - - - - - - - - - - - - - - - - - - - - - - - - - - - - - - - - -

Did you appreciate this newsletter? Please help us keep it going by Joining Our Patreon Supporters

What are your thoughts on this article? Join the discussion on our Facebook Page

PictureCorrect subscribers can also learn more today with our #1 bestseller: The Photography Tutorial eBook

- - - - - - - - - - - - - - - - - - - - - - - - - - - - - - - - - - - - - - - - - - - - - - - - - - - - - - - - - - - - - - - - - - - - - - - - - -

The post What Judges Look for in Wildlife Photography Competitions appeared first in the Photography Tips category on PictureCorrect.


from PictureCorrect https://ift.tt/Et2FaoD
via IFTTT

torstai 26. tammikuuta 2023

PictureCorrect.com: 10 Photography Tricks to Make Your Landscapes Stand Out

Landscape photography can be a challenging but rewarding hobby. In this video, photographer Mads Peter Iversen shares 10 quick and essential photography tricks for making your landscape photos stand out from the average Joe with a mobile phone:

One of the first tricks is to try different and unique perspectives. Instead of just photographing a scene from eye level, try getting low to the ground or climbing to a higher vantage point. Using a wide angle lens can also emphasize an interesting foreground.

Another important aspect of landscape photography is light. The optimal light is always relative to the scene of photographing, sometimes front light is necessary, especially if you want to photograph rainbows, sometimes side light is beneficial for highlighting shapes of mountains and sometimes backlight is what you want.

Proper placement of objects in landscape photography is essential for creating a visually pleasing and dynamic composition. The way elements are arranged within the frame can affect the overall balance and harmony of the image as well as the viewer’s eye movement and attention.

Use compositional tools, there are many compositional tools to use in landscape photography, such as lines, balance, and anchoring points.

landscape photo tricks

Landscape photographer captured by Annie Spratt

Moody overcast days with texture-rich clouds and maybe rain works great for photography although it can be meh to get out in it can deliver some absolutely insane photos photos that Average Joe is not taking because average due doesn’t go out and Rain.

“The most important thing is to never stop learning and growing.”

Keep experimenting with different perspectives, pay attention to light and shadow, and work on your compositional skills to take your landscape photography to the next level.

- - - - - - - - - - - - - - - - - - - - - - - - - - - - - - - - - - - - - - - - - - - - - - - - - - - - - - - - - - - - - - - - - - - - - - - - - -

Did you appreciate this newsletter? Please help us keep it going by Joining Our Patreon Supporters

What are your thoughts on this article? Join the discussion on our Facebook Page

PictureCorrect subscribers can also learn more today with our #1 bestseller: The Photography Tutorial eBook

- - - - - - - - - - - - - - - - - - - - - - - - - - - - - - - - - - - - - - - - - - - - - - - - - - - - - - - - - - - - - - - - - - - - - - - - - -

The post 10 Photography Tricks to Make Your Landscapes Stand Out appeared first in the Photography Tips category on PictureCorrect.


from PictureCorrect https://ift.tt/nNAtHbE
via IFTTT

PictureCorrect.com: Interesting Photo of the Day: Star Trails over the Canary Islands

A time vortex? The gateway to another world? As sci-fi as this capture looks, it’s really just the creative result of some time (six hours), several hundred still photographs (620 35-second exposures), and a little processing (in ProStack and Photoshop):

star trails photography

“Star trails over Observatorio del Teide” by Bartosz Wojczynski. (Via Imgur. Click image to see full size.)

Photographer Bartosz Wojczynski took the photographs at Teide Observatory, which is located on Tenerife, one of Spain’s Canary Islands. The observatory’s prime location (close to the equator) and clear, dark night skies offer stargazers and astrophotographers full views of the northern hemisphere. Here, Wojczyński was able to position Polaris, the North Star, at the center of his star trail rings.

He used a Nikon D5100 camera with a Samyang AE 10mm lens at f/4.8 and ISO 1600 on a Baader Astro & Nature tripod.

- - - - - - - - - - - - - - - - - - - - - - - - - - - - - - - - - - - - - - - - - - - - - - - - - - - - - - - - - - - - - - - - - - - - - - - - - -

Did you appreciate this newsletter? Please help us keep it going by Joining Our Patreon Supporters

What are your thoughts on this article? Join the discussion on our Facebook Page

PictureCorrect subscribers can also learn more today with our #1 bestseller: The Photography Tutorial eBook

- - - - - - - - - - - - - - - - - - - - - - - - - - - - - - - - - - - - - - - - - - - - - - - - - - - - - - - - - - - - - - - - - - - - - - - - - -

The post Interesting Photo of the Day: Star Trails over the Canary Islands appeared first in the Photography Tips category on PictureCorrect.


from PictureCorrect https://ift.tt/TzSG8d1
via IFTTT

keskiviikko 25. tammikuuta 2023

PictureCorrect.com: How to Improve Your Photography Composition with Any Camera

Composition has the power to make or break your photos. Photographer Marcin Lewandowski demonstrates in this short video:

Camera technology has evolved at a mind-boggling pace over the last few years. So much so that even the simplest of cameras on the market will outmatch a professional model from not so long ago. But the objective of this video is to look beyond your hardware. Lewandowski uses his smartphone to illustrate all of the composition techniques he recommends.

Frame the Scene with Your Fingers

better composition vs better camera

Look through a rectangle created by your fingers.

The camera frame is a rectangular shape, and whatever you shoot is captured within that rectangular space. A good way to visualize your image is to create a rectangle (as demonstrated above) with your fingers and look at a scene through it.

This allows you to look at something interesting from the perspective of your camera. You can practice this with or without a camera around. It’s an interesting way to look for ideas, pre-visual an image, and store references for your ‘visual vocabulary’—as Lewandowski puts it. He uses this visual vocabulary later on when he uses his camera to shoot images.

Know the Rule of Thirds

basic composition tips

Rule of Thirds

The rule of thirds is easy to understand. Look at the picture above. The frame has been cut into nine equal pieces using two vertical and two horizontal lines. Many cameras have a feature that shows these gridlines in-camera.

The fundamental goal of using this rule is to place the most important aspect of your image at one of the intersecting points.

golden rule in photography

Golden Rule

A modification of the rules of thirds is the phi grid. This also divides a frame into nine boxes but in a slightly different way, as demonstrated below.

phi grid in composition

The Phi Grid

You can check your existing images to see if they comply with the golden rule by going into Lightroom’s Development panel and clicking on the Crop tool (Shortcut R). Additionally, you can press ‘O’ and cycle between the various views.

Use of Fibonacci sequence in photography

Checking composition in Lightroom

You can also change the direction of the Fibonacci grid direction by pressing Shift + ‘O’.

Hopefully, these tips have helped you to get a better understanding of how to improve your photography. What other composition techniques do you use?

- - - - - - - - - - - - - - - - - - - - - - - - - - - - - - - - - - - - - - - - - - - - - - - - - - - - - - - - - - - - - - - - - - - - - - - - - -

Did you appreciate this newsletter? Please help us keep it going by Joining Our Patreon Supporters

What are your thoughts on this article? Join the discussion on our Facebook Page

PictureCorrect subscribers can also learn more today with our #1 bestseller: The Photography Tutorial eBook

- - - - - - - - - - - - - - - - - - - - - - - - - - - - - - - - - - - - - - - - - - - - - - - - - - - - - - - - - - - - - - - - - - - - - - - - - -

The post How to Improve Your Photography Composition with Any Camera appeared first in the Photography Tips category on PictureCorrect.


from PictureCorrect https://ift.tt/xEJIrYq
via IFTTT

tiistai 24. tammikuuta 2023

PictureCorrect.com: Storytelling Photography

A while back I visited the George Eastman Museum of Photography where there was an exhibition on travel photography. It was a great experience to see the world’s best photographs showcased in a two hour tour of the exhibition halls. After looking at most of the photos, I found an intangible element in almost all the photos. It’s the “story” behind the photo.

goa village

Photo by Ramnath Bhat.

We all have emotions within us, and a careful shot of a scene can make us laugh, cry, or even get angry. This is the magic of a photo that tells a story. When a person feels an emotion the person will hardly be able to forget the specific thing, process, or event that triggered the emotion, be it positive or negative feelings. The same holds true when a person sees a photograph. A photograph always tells us a story—actually there can be multiple stories associated with one photo. But it’s in the mind of the photographer to direct the minds of the viewers to a particular, strong, and appealing story. And if the photographer is not successful in this endeavor then the photograph loses its distinctiveness and falls under the average category.

This topic is closely linked to travel, street photography, and photo journalism, but it doesn’t have to be limited to only those fields. Actually everything that happens around us has some background story linked to it, unless you’re a computer geek sitting in front of computer and surfing the Internet for 23 hours a day. Even a photo of such a geek sitting amid gadgets and looking at the computer screen busily typing can make an excellent story-telling photo. Who knows, this might be the winner at the “Best Geek Photo” of the millennium contest. Of course, you will get “better” real life shots when you are out in a public place (street photography) or a tourist place (travel photography) or an event location (photo journalism).

harry potter photo

Photo by Brett Kiger; ISO 200, f/8, 1/800 exposure.

So now you have an idea of what a story telling photo is and why it’s so important to make the viewers feel an emotion when they look at your photos.

Now let’s get to work. First of all, story telling in itself is very creative and it’s difficult to formulate any specific “techniques” to tell good stories. But definitely there’s a structure. The same holds true for photography. The next thing to keep in mind is if you are not satisfied with the photograph’s capability of imprinting a story in your mind, it probably won’t have any effect on any other viewer’s mind either.

As any other properties of storytelling, a photo should comprise of one or more of five elements:

  1. Mood
  2. Emotion
  3. Narrative
  4. Ideas
  5. Messages

Let’s elaborate on each of these characteristics one by one.

1. Mood

Mood can be achieved using correct background (objects or effects like blurring). The background should have a “relationship” with the subject in order to bring the mood. Even the objects can be inter-linked to build up the thought process of the viewer in a particular guided path.

2. Emotion

The emotion can be demonstrated through facial expressions of a person as well as activity being performed by the subject(s).

emotional photograph

Photo by Thomas Hawk; ISO 6400, f/2, 1/100 exposure.

3. Narration

The narrative property in a photo comes to life when the viewer can easily visualize what happened “before” the shot was taken from what is happening in the photograph (similar to narrating a story to demonstrate the flow of events). This can be successfully demonstrated by including or excluding certain elements into or from your photograph. For example, a person talking to someone outside the frame. Thus it is very important to decide on what you should include in the frame and what should be excluded in order to let the viewer figure out the rest of the story that preceded the current moment of the photograph. Generally the more detailed the photo is the more narrative quality the photograph possesses.

4. Idea

The idea is kind of difficult to illustrate, but if you have something in your mind that you want to show the viewers through a photograph, it shouldn’t be too tough. The key is to already have in your mind what you’re looking for. This is more demonstrated through abstract photography which is nothing but a completely different way of looking at something very common.

5. Message

Finally the message is the “future” of what the viewer is currently seeing and conceiving in the photograph. This is often dictated by the theme of the photograph. The theme can be visual (color/pattern), style (macro/zoom/panorama), relation (objects in the photo), location (room, market, open space) or a combination of the above. In most famous photographs, the photographer intentionally leaves a lot of things unsettled so that the viewers have an open idea of what is going to happen next.

sports photography

Photo by Paul McGeiver; ISO 200, f/4, 1/1000 exposure.

The key is to grab the attention of the viewer with a subject and then instantly pass on the idea/message/narration to the viewer so that s/he can feel the same emotion and mood as the photographer felt when taking the photograph. The work of a photographer then is successful, fulfilling, and truly complete.

In conclusion, I would like to say that the creativity of building up a story in a photograph can be a difficult task, but with practice and keeping the above in mind, you will be able to generate more interesting photos that will be appreciated by the viewers.

Someone told it right: A picture is worth a thousand words.

About the Author:
Sudipta Shaw is a software professional and a self-made photographer. He also likes to teach and mentor.

- - - - - - - - - - - - - - - - - - - - - - - - - - - - - - - - - - - - - - - - - - - - - - - - - - - - - - - - - - - - - - - - - - - - - - - - - -

Did you appreciate this newsletter? Please help us keep it going by Joining Our Patreon Supporters

What are your thoughts on this article? Join the discussion on our Facebook Page

PictureCorrect subscribers can also learn more today with our #1 bestseller: The Photography Tutorial eBook

- - - - - - - - - - - - - - - - - - - - - - - - - - - - - - - - - - - - - - - - - - - - - - - - - - - - - - - - - - - - - - - - - - - - - - - - - -

The post Storytelling Photography appeared first in the Photography Tips category on PictureCorrect.


from PictureCorrect https://ift.tt/xDkWqdC
via IFTTT