
via 500px https://ift.tt/lKRxdqc


Landscape photographers often want the same thing: sharp detail from the foreground all the way to the horizon.
Two techniques can get you there—hyperfocal distance and focus stacking—but they work very differently.
Quick reminder: Our top deal of the month ends tomorrow. There’s just 1 day left to get the Tack Sharp Photography Guide at 70% Off
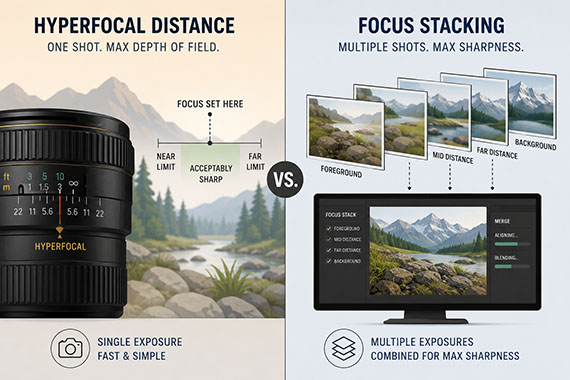
Hyperfocal focusing means focusing at a distance that gives you the greatest usable depth of field, rather than simply focusing on the background.
With the right focal length and aperture—often around f/8 to f/11—you can keep much of the scene acceptably sharp in a single exposure.
It’s especially useful when:
The key word, however, is acceptably sharp. Objects near the limits of your depth of field aren’t actually in perfect focus.
Focus stacking takes a different approach.
You capture several photographs while moving the focus point through the scene:
Foreground → Middle Distance → Background
The sharpest portions of those images are then blended together in software.
Because each part of the scene gets its own focused exposure, focus stacking can produce better edge-to-edge sharpness than hyperfocal focusing.
It’s particularly useful when something important is very close to your lens—such as flowers or rocks—while the background extends to infinity.
You can also shoot around f/8 rather than relying on f/16 or f/22 for extra depth of field, helping avoid sharpness loss from diffraction.
Use hyperfocal distance when you want simplicity, need a single exposure, or have movement in the scene.
Use focus stacking when the camera is on a tripod, the scene is relatively still, and maximum sharpness from foreground to background is the priority.
There’s one easy rule to remember:
Hyperfocal distance gives you more acceptable sharpness in one shot. Focus stacking gives you maximum sharpness across multiple shots.
Neither technique is always better.
But when you have an extremely close foreground combined with a distant background, focus stacking is often the technique that can take your landscape sharpness to the next level.
If you’re ready to stop guessing why your photos aren’t sharp, our new Tack Sharp Photography Guide (currently 70% off until the end of the month for a  Summer Sale) will walk you through the complete system for capturing consistently crisp images.
Inside, you’ll learn how to choose the right camera settings, master autofocus, eliminate camera shake, maximize lens sharpness, develop an efficient editing workflow, and prepare your photos for stunning prints. Whether you shoot landscapes, wildlife, travel, portraits, macro, or sports, the techniques apply to virtually every style of photography.
Only 1 day left: The Tack Sharp Photography Guide at 70% Off
Have you ever opened a photo that looked perfectly sharp on the back of your camera—only to get it onto your computer and think:
Why does this look so soft?
Your first instinct might be to reach for the Sharpening slider. But sometimes the photo isn’t actually blurry at all.
It simply lacks local contrast.
And there’s a quick editing trick that can make it appear dramatically sharper.
Related reminder: Our top deal of the month is almost over – only 2 days left for the new Tack Sharp Photography Guide at 70% Off
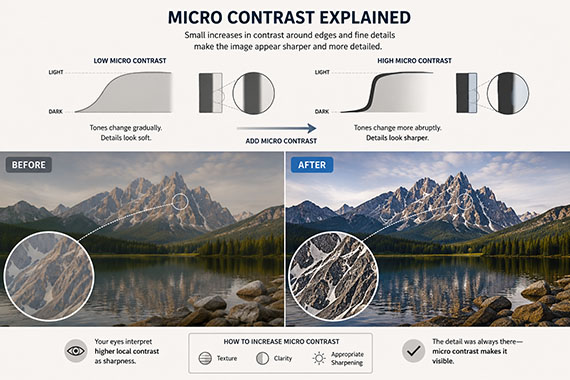
We tend to think of sharpness as a technical issue: focus accuracy, shutter speed, lens quality, or camera shake.
But our eyes also judge sharpness by looking at contrast along edges and fine details.
If neighboring tones are too similar, details can appear soft—even when they’re perfectly in focus.
That’s why a RAW file straight from the camera can sometimes look surprisingly flat.
The detail is there. It just isn’t being emphasized.
In Lightroom or Adobe Camera Raw, try increasing Texture and Clarity slightly.
These controls aren’t the same as traditional sharpening.
Texture enhances smaller details without dramatically changing larger areas of the image. It’s especially useful for landscapes, architecture, wildlife, clothing, and other subjects with lots of fine detail.
Clarity increases contrast around larger edges and midtones, giving the image more definition and “bite.”
Try starting around:
Then zoom out and look at the entire image.
You may be surprised by how much sharper the photograph suddenly appears.
There’s another simple adjustment that can help.
Try lowering the Blacks slider slightly.
A photo with weak blacks can look washed out and soft. Adding a little depth to the darkest tones creates more separation between details and can make the entire image feel crisper.
You don’t need much.
The goal isn’t to crush the shadows—it’s simply to give the photograph a stronger tonal foundation.
Once you’ve improved the local contrast, then evaluate whether the image needs additional sharpening.
In Lightroom, hold Alt/Option while adjusting the Masking slider in the Sharpening panel.
You’ll see a black-and-white preview.
White areas receive sharpening. Black areas are protected.
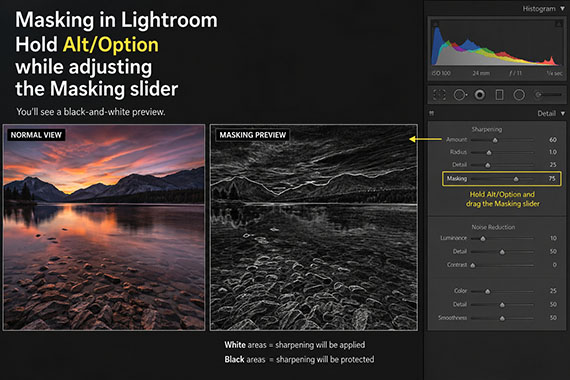
Increase Masking until you’re primarily sharpening important edges rather than smooth skies, skin, or out-of-focus backgrounds.
This often produces a much cleaner result than simply pushing the Amount slider higher.
Don’t try to rescue every soft-looking photograph with aggressive sharpening.
Too much sharpening creates halos, emphasizes noise, and can give fine details an unnatural, crunchy appearance.
Instead, think of perceived sharpness as a combination of:
Focus + Detail + Edge Contrast + Tonal Contrast + Appropriate Sharpening
Sometimes your camera captured plenty of detail.
Your editing software just hasn’t brought it out yet.
So the next time you open a photograph and immediately think, “I missed focus,” don’t delete it just yet.
Add a little Texture. Add a touch of Clarity. Deepen the Blacks slightly. Then apply carefully masked sharpening.
You may discover the photo was sharp all along.
If you’re ready to stop guessing why your photos aren’t sharp, our new Tack Sharp Photography Guide (currently 70% off today for a Summer Sale) will walk you through the complete system for capturing consistently crisp images.
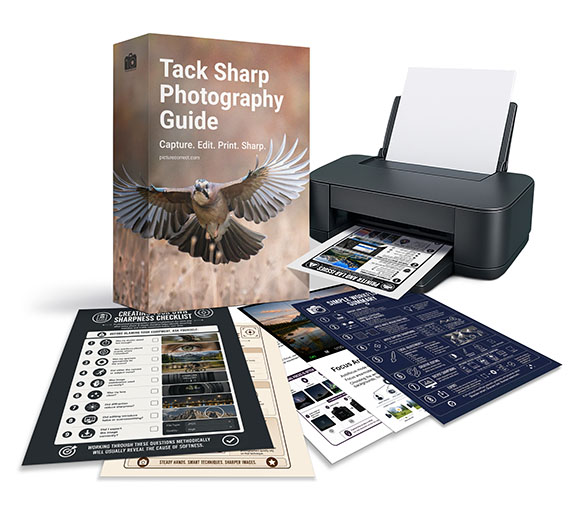
Inside, you’ll learn how to choose the right camera settings, master autofocus, eliminate camera shake, maximize lens sharpness, develop an efficient editing workflow, and prepare your photos for stunning prints. Whether you shoot landscapes, wildlife, travel, portraits, macro, or sports, the techniques apply to virtually every style of photography.
Only 2 days left: The Tack Sharp Photography Guide at 70% Off
You carefully compose the shot, focus, and take the photo.
Later, you discover something frustrating:
The camera focused perfectly—just not on what you wanted.
Maybe the background is sharp while your subject is soft. Or a branch is tack sharp instead of the bird sitting behind it.
Often, this isn’t an autofocus failure. Your camera simply chose a different target than you intended.
Reminder: only a few days left for the new Tack Sharp Photography Guide at 70% Off
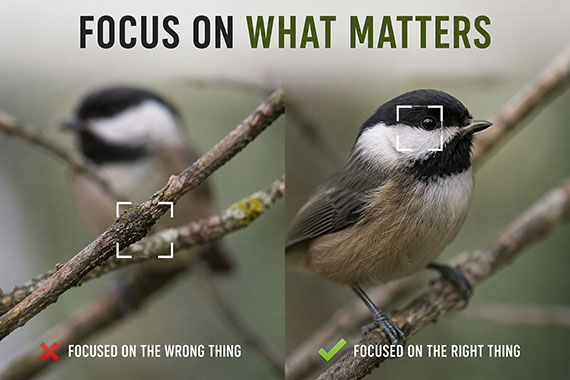
You see a person, bird, flower, or other obvious subject.
Your autofocus system sees something different: edges, contrast, detail, distance, faces, and potential subjects.
Imagine photographing someone wearing a plain shirt in front of a detailed brick wall. You immediately recognize the person as the subject, but the wall may contain much stronger contrast.
If you’re letting the camera choose the focus point, that background can become surprisingly attractive.
The same thing happens with birds behind branches, flowers surrounded by grass, or people in crowded environments.
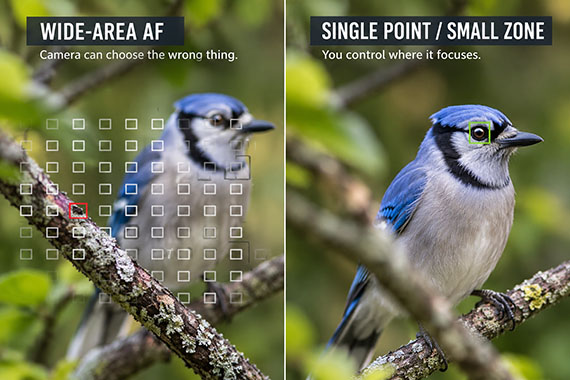
One of the easiest ways to accidentally focus on the wrong thing is using an autofocus area that’s larger than necessary.
Think of it this way:
Wide AF area: “Camera, find my subject.”
Single point or small zone: “Camera, focus right here.”
Wide-area autofocus can be excellent for moving subjects, especially with modern face, eye, and animal detection. But complicated scenes give the camera more opportunities to choose incorrectly.
If your camera keeps grabbing the background, try reducing the autofocus area.
Autofocus can also be attracted to objects between you and your subject.
This happens constantly in wildlife photography.
You’re photographing a bird through a tree, but a small branch crosses the autofocus area. The camera locks onto the branch because it’s closer and provides plenty of contrast.
Using a smaller AF point or zone can help you thread your autofocus through those distractions and place it directly on the subject.
Eye-detection autofocus is incredibly useful, but it isn’t infallible.
It can grab the wrong person, switch between eyes, lose the subject when they turn, or jump to another object entering the frame.
These small errors become especially obvious at wide apertures like f/1.4 or f/1.8, where depth of field can be extremely shallow.
Pay attention to where the eye-detection box actually appears rather than assuming it’s always on the correct eye.
Sometimes your camera did focus exactly where you told it to—and the problem happens afterward.
A classic example is focusing on someone’s eye with the center AF point and then rotating the camera to recompose.
At moderate apertures and distances, this often works fine. But at close distances with a wide aperture, that movement can shift the plane of focus enough to leave the eye slightly soft.
Instead, try positioning an AF point directly over the eye or using eye detection so you don’t need to recompose after focusing.
If your camera repeatedly focuses on the wrong thing:
If the camera suddenly focuses exactly where you wanted, you’ve discovered the problem.
It wasn’t that your camera couldn’t focus.
You were simply giving it too many places to choose from.
Modern autofocus systems are remarkably intelligent, but they still can’t read your mind. When a scene gets complicated, sometimes the fastest route to sharper photos is simple:
Give your camera less freedom—and tell it exactly what matters.
If you’re ready to stop guessing why your photos aren’t sharp, our new Tack Sharp Photography Guide (currently 70% off today for a Summer Sale) will walk you through the complete system for capturing consistently crisp images.
Inside, you’ll learn how to choose the right camera settings, master autofocus, eliminate camera shake, maximize lens sharpness, develop an efficient editing workflow, and prepare your photos for stunning prints. Whether you shoot landscapes, wildlife, travel, portraits, macro, or sports, the techniques apply to virtually every style of photography.
Deal ending soon: The Tack Sharp Photography Guide at 70% Off
Most photographers assume their most expensive lens is also their sharpest.
Or maybe it’s the newest lens. The prime lens. The one with the biggest front element and the impressive-looking red or gold ring.
But if you actually test the lenses in your camera bag, you might be surprised.
The lens that produces your sharpest photographs isn’t necessarily the lens with the best reputation—or even the highest price tag.
When lens manufacturers and review sites measure sharpness, they’re usually testing under carefully controlled conditions.
Real photography is different.
Your results depend on several factors working together:
A lens that looks spectacular on a test chart at f/5.6 might not be the lens that gives you the sharpest results in the field.
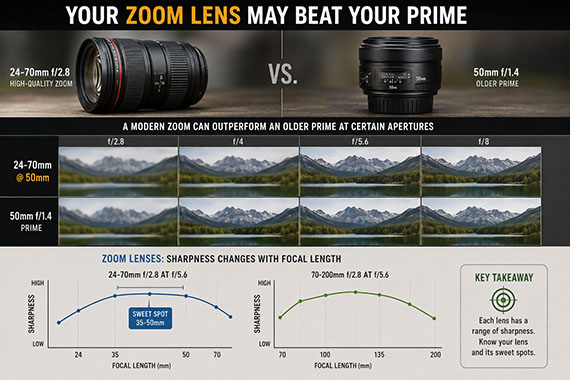
There’s a long-standing photography rule that prime lenses are sharper than zooms.
That was often true in the past, but modern lens design has made the difference much less predictable.
A high-quality 24–70mm or 70–200mm zoom can sometimes outperform an older prime lens—especially at certain apertures.
And zoom lenses have another wrinkle:
Sharpness can change depending on the focal length.
Your 24–70mm might be exceptionally sharp around 35–50mm but slightly softer at 24mm. Your 70–200mm might perform differently at 70mm than it does at 200mm.
In other words, you don’t really have one lens sharpness level.
You have a range of them.
Try photographing the same detailed subject with several of your lenses.
Use a tripod, keep ISO low, focus carefully, and compare the images at similar focal lengths and apertures when possible.
Pay particular attention to:
The center: Which lens resolves the finest details?
The corners: Does sharpness fall apart near the edges?
Wide open: How much does the lens improve when you stop down?
Mid-range apertures: Many lenses reach peak performance somewhere around f/4 to f/8, although there is no universal “sweet spot.”
You may discover that the inexpensive lens you’ve owned for ten years is remarkably sharp at f/5.6.
Meanwhile, your expensive fast lens might only become exceptionally crisp after stopping down a little.
Your individual copy of the lens matters too.
Manufacturing tolerances mean two examples of the exact same lens model aren’t necessarily perfectly identical. Small differences in optical alignment or autofocus performance can affect real-world results.

That’s why online sharpness rankings only tell you so much.
What really matters is:
Which lens produces the best results on your camera?
And there’s only one reliable way to find out.
Test it.
Pick a detailed, stationary subject—a brick wall, newspaper, bookshelf, textured building, or landscape with plenty of fine detail.
Put your camera on a tripod and photograph it with each lens.
For each lens, shoot several apertures:
Wide open → f/4 → f/5.6 → f/8 → f/11
Then inspect the files at 100%.
You’re not trying to conduct a laboratory test.
You’re simply learning where each lens performs best.
You might come away with useful notes like:
“My 50mm is slightly soft at f/1.8 but fantastic by f/2.8.”
Or:
“My 24–70mm is surprisingly sharp around 35mm at f/5.6.”
Those observations are far more useful in the field than knowing which lens scored highest on somebody else’s test chart.
Sharp photography isn’t about owning the lens with the highest price tag.
It’s about understanding where your equipment performs at its best.
Once you know the strongest focal lengths and apertures for the lenses you already own, you can deliberately use those combinations when maximum detail matters.
And you may discover something surprising:
Your sharpest lens might already be sitting in your camera bag—you just haven’t been using it at its best.
When photographers think about making money, the usual ideas come to mind: portraits, weddings, prints, and stock photography.
But some of the best opportunities don’t involve getting hired to take pictures at all.
Here are a few income streams photographers often overlook.
Related: deal ending soon for the Earn Money with Photography Summer Success Sale

Photo captured by Juls P
Your hard drives may contain more value than you realize.
Businesses, tourism organizations, magazines, and websites regularly need photography. Instead of selling an image outright, you can license an existing photograph for a specific use.
So where do you actually start?
One option is uploading your strongest images to established licensing marketplaces such as Adobe Stock, Alamy, or Shutterstock. But don’t overlook direct licensing, which can sometimes be more valuable.
If you have great photographs of your city or region, contact local tourism boards, hotels, magazines, chambers of commerce, real estate developers, and businesses that regularly promote the area.
You can also create a simple “Image Licensing” gallery on your own website. Include searchable captions describing the location and subject so businesses searching for a particular destination can discover your work.
Start with images that have obvious commercial usefulness: recognizable destinations, local landmarks, travel scenes, architecture, food, lifestyle imagery, and seasonal photographs.
You may already have dozens of licensable images sitting on your hard drive.
Years spent learning photography have given you something else valuable: experience.
That knowledge can become photography workshops, private lessons, photo walks, eBooks, presets, cheat sheets, online courses, or portfolio reviews.
You don’t need to know everything. You simply need to know something useful that another photographer wants to learn.
Your photographs can also become the foundation for products such as:
The advantage of digital products is simple: you create them once and can potentially sell them repeatedly.
Restaurants, hotels, gyms, real estate agents, contractors, and countless other businesses constantly need fresh visual content.
Instead of offering a single photo shoot, consider a monthly content package that provides new photographs for their website, advertising, email, and social media.

Photo captured by Tanya
A handful of recurring clients can create much more predictable income than constantly searching for one-time jobs.
Online education gets most of the attention, but local photography classes can be surprisingly profitable.
A beginner camera workshop, Lightroom class, landscape photo walk, or night photography outing might attract 10 photographers paying $75 each.
That’s $750 from one small event—while also introducing you to potential future students and clients.
The biggest mistake may be assuming photography income has to come from selling photographs.
You can sell your time through client work, your images through licensing, your knowledge through education, and your expertise through products and services.
The photographers who create sustainable income often combine several of these approaches.
Take another look at your photo archive, skills, knowledge, and local connections.
There may be an income stream hiding in your photography that you’ve never considered.
This in-depth eBook has helped thousands of photographers turn their passion into profit—and it’s currently 85% off for a Summer Success Sale

Packed with proven strategies in all types of photography and even printable contract templates you can use with clients right away, it’s your shortcut to making money with photography.
Deal ending soon: Earn Money with Photography Summer Success Sale
Auto ISO is one of the most useful features on a modern camera. It automatically adjusts ISO as lighting changes, helping you maintain a usable exposure without constantly changing settings.
But there’s a catch.
If Auto ISO isn’t configured correctly, it can quietly contribute to photos that look softer than they should.
And the problem usually isn’t ISO itself.
Reminder: only a little while left for the new Tack Sharp Photography Guide at 70% Off
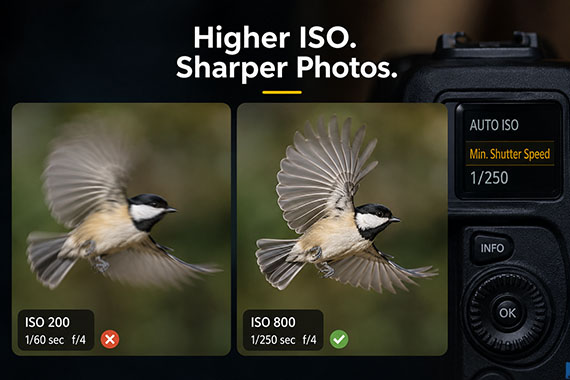
Higher ISO can introduce noise and reduce fine detail, but Auto ISO can cause another problem: your camera may allow the shutter speed to become too slow.
Imagine you’re shooting with a 200mm lens in Aperture Priority mode at f/5.6.
As the light fades, your camera might allow the shutter speed to drop to 1/100 second before significantly increasing ISO.
The photograph may look fine on the LCD. But zoom in later and you’ll notice slight softness from camera shake or subject movement.
The focus wasn’t necessarily wrong.
The shutter was simply open too long.
Consider these two exposures:
ISO 200 — 1/60 sec — f/4
versus:
ISO 800 — 1/250 sec — f/4
The first produces a cleaner file, but the second has a much better chance of being sharp.
Modern software can do an excellent job reducing noise. Motion blur is considerably harder to repair.
That’s why a slightly noisy sharp photograph is usually better than a clean blurry one.
Many cameras let you specify the slowest shutter speed Auto ISO should tolerate.
Look for a setting called something like Minimum Shutter Speed in your Auto ISO settings.
Instead of allowing the camera to drop to 1/60 second, you might tell it not to go below 1/250 second. Once it reaches that limit, the camera raises ISO instead.
For moving subjects, you might choose 1/250, 1/500, or faster. Stationary subjects may allow considerably slower speeds.
Remember that image stabilization only reduces camera shake. It can’t stop your subject from moving.
One particularly useful approach is Manual Mode with Auto ISO.
You choose the shutter speed needed for sharpness and the aperture needed for depth of field. The camera adjusts ISO as the light changes.
For example:
1/500 sec + f/4 + Auto ISO
Now you’re controlling the two settings that most directly determine how your subject looks, while letting the camera handle changing light.
Extremely high ISO can still reduce perceived sharpness. Noise—and aggressive noise reduction—can hide fine textures and detail.
So the goal isn’t to use unnecessarily high ISO.
But it also shouldn’t be to always use the lowest ISO possible.
Instead:
Use the lowest ISO that still gives you the shutter speed and aperture your photograph requires.
Take a minute to check your camera’s Auto ISO minimum shutter speed setting. If you’ve never adjusted it, your camera may be prioritizing low ISO over the shutter speed you actually need.
Your ISO numbers might become a little higher.
But your photographs might become noticeably sharper.
If you’re ready to stop guessing why your photos aren’t sharp, our new Tack Sharp Photography Guide (currently 70% off today for a Summer Sale) will walk you through the complete system for capturing consistently crisp images.
Inside, you’ll learn how to choose the right camera settings, master autofocus, eliminate camera shake, maximize lens sharpness, develop an efficient editing workflow, and prepare your photos for stunning prints. Whether you shoot landscapes, wildlife, travel, portraits, macro, or sports, the techniques apply to virtually every style of photography.
Deal ending soon: The Tack Sharp Photography Guide at 70% Off
Before our August Photo Editing Event ends tonight, here’s one Lightroom shortcut that’s incredibly useful—and surprisingly easy to overlook.
When you’re deep into editing, it’s easy to get so focused on individual adjustments that you lose perspective on the photograph as a whole. More on this below 
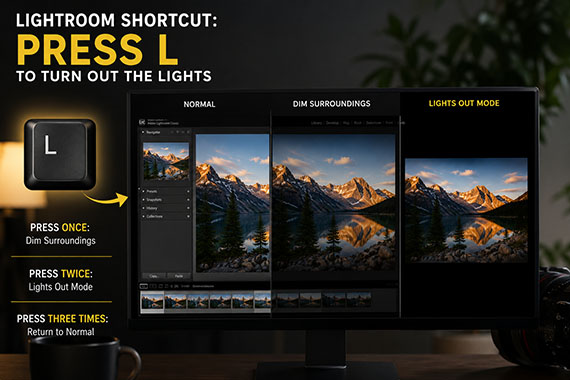
This simple shortcut gives you a quick way to see your image with fresh eyes—especially when you think your edit is finished.
 Press “L” to Turn Out the Lights
When you’re editing in Lightroom Classic, press:
L
once to dim everything surrounding your photograph.
Press it again and Lightroom darkens nearly the entire interface, leaving your photograph isolated on the screen.
Press L a third time to return to normal.
Why would you want to do this?
Because all those panels, sliders, thumbnails, buttons, and other photographs surrounding your image can actually influence the way you see your edit.
With Lights Out mode, all of that visual clutter disappears.
You’re left looking at the photograph itself.
I especially like this as a final check before exporting.
Take your hands off the sliders for a moment, press L, and ask yourself:
Sometimes you’ll immediately notice something you completely missed while concentrating on individual adjustments.
It’s a simple shortcut, but it’s a great reminder that sometimes the best way to improve an edit is to stop editing and simply look at the photograph.
 Last Chance: August Editing Event Ends Tonight
If you’d like more quick-reference editing tips like this, our Photo Editing Cheat Sheets are 85% off through tonight.
They’re designed to sit right beside you while you edit, giving you quick visual references for important settings, tools, shortcuts, and post-processing techniques.

Keep them on your computer, tablet, or phone—or print your favorites for your editing workspace.
Only hours left: The Photo Editing Cheat Sheets  at 85% Off
You set up your tripod in front of an incredible landscape. The light is perfect. You carefully focus, choose a small aperture, and press the shutter.
Everything should be sharp.
But when you inspect the photograph later, the foreground looks crisp while the distant mountains are slightly soft—or the mountains are sharp while the foreground isn’t.
Surprisingly, stopping your lens down to f/16 or f/22 isn’t always the solution.
Quick reminder: only a little while left for the new Tack Sharp Photography Guide at 70% Off
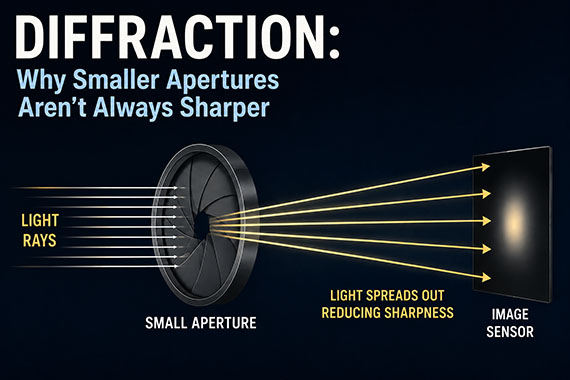
The real secret is understanding where to focus and how much depth of field you actually have.
Landscape photographers often choose extremely small apertures because they want everything sharp.
But at very small apertures, diffraction begins reducing fine detail across the image.
Many lenses produce excellent sharpness somewhere around f/5.6 to f/11, depending on the lens and camera. For landscapes, f/8 or f/11 is often a great starting point.
The trick is using that depth of field efficiently.
If you focus directly on distant mountains, you may waste a large portion of your available depth of field.
Instead, try focusing partway into the scene.
Depth of field extends both in front of and behind your focus point. By focusing closer than infinity, you can often keep both the foreground and distant background acceptably sharp.
This is the basic idea behind hyperfocal focusing.
You don’t necessarily need to calculate hyperfocal distance in the field. A simple approach works surprisingly well:
This can produce sharper results than simply choosing f/22 and focusing on the mountains.
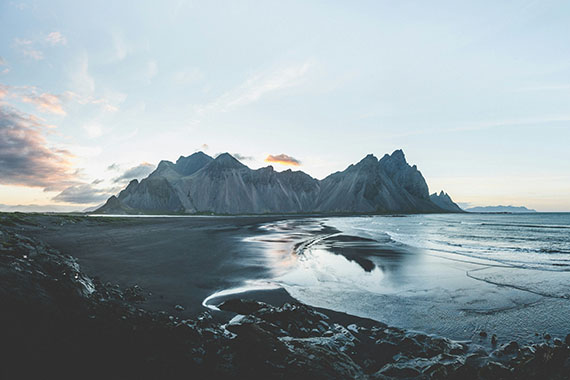
Captured by Norris Niman
Sometimes you simply can’t get everything perfectly sharp in one exposure.
Imagine wildflowers only a few feet from your camera with mountains stretching into the distance.
That’s when focus stacking becomes extremely useful.
Take several photographs without moving the camera, shifting focus progressively from the foreground toward the background. During editing, the sharpest portions of those images can be blended together.
This allows you to use a sharper aperture such as f/8 while still achieving incredible detail throughout the scene.
Razor-sharp landscape photography isn’t about discovering one magical camera setting.
It’s about combining the right aperture, focus point, shutter technique, tripod stability, and—when necessary—focus stacking.
Instead of simply trying to get everything in focus, think about exactly where you’re placing your available depth of field.
That small change in technique can make a surprisingly big difference in your landscape photographs.
Want to get consistently sharper photos—not just landscapes?
Our Tack Sharp Photography Guide walks you through the complete sharpness process, including camera settings, autofocus, lens performance, tripod technique, focus stacking, editing, sharpening, and more.
Today, you can save 70% during our Summer Focus Sale.
Stop guessing what’s causing your photos to look soft and learn the complete system for creating crisp, detailed images.
Deal ending soon: The Tack Sharp Photography Guide at 70% Off
Here’s a Lightroom trick that’s surprisingly useful—and one many photographers never discover. It’s hidden behind a simple keyboard shortcut, but once you know it’s there, it can completely change the way you sharpen your photos. Even better, it helps solve one of the most common sharpening mistakes: adding detail to parts of the image that shouldn’t be sharpened at all.
Related: only a little while left for the Photo Editing Cheat Sheets August Editing Event
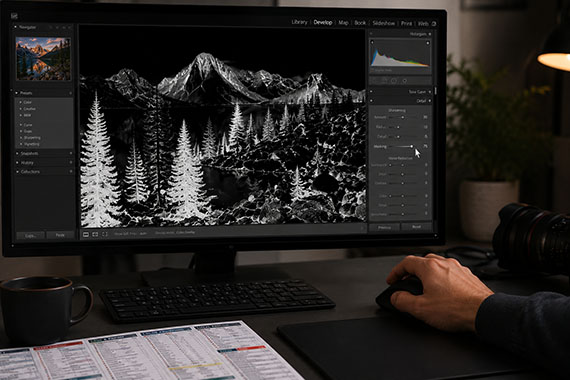
The Alt/Option Masking TrickWhen you’re sharpening a photo in Lightroom or Camera Raw, you usually don’t want to sharpen everything.
Sharpening smooth skies, blurred backgrounds, and out-of-focus areas can exaggerate noise and create an overly processed look.
Instead, go to Detail → Sharpening → Masking.
Now hold:
Alt on Windows
Option on Mac
…while dragging the Masking slider.
Your image temporarily turns black and white.
White areas = sharpening applied
Black areas = sharpening protected
For landscapes, try pushing Masking fairly high so sharpening concentrates on edges, rocks, buildings, trees, and fine details—while leaving smooth skies alone.
For portraits, this is especially useful for keeping sharpening away from skin while emphasizing eyes, eyelashes, hair, and clothing.
It’s one of those tiny editing techniques that can make your finished photographs look noticeably cleaner.
And that’s exactly the idea behind our Photo Editing Cheat Sheets: quick visual references that help you remember the settings, tools, and techniques that are easy to forget when you’re actually editing.
 August Photo Editing Event:
For this weekend, you can get the complete Photo Editing Cheat Sheets collection for 85% off.
Keep them on your computer, tablet, or phone—or print your favorites and keep them beside your editing workstation.
 Get the Photo Editing Cheat Sheets — 85% Off
Enjoy the weekend—and happy photo editing!
Motion blur isn’t always a mistake. Used intentionally, it can make a photograph feel faster, busier, and more alive.
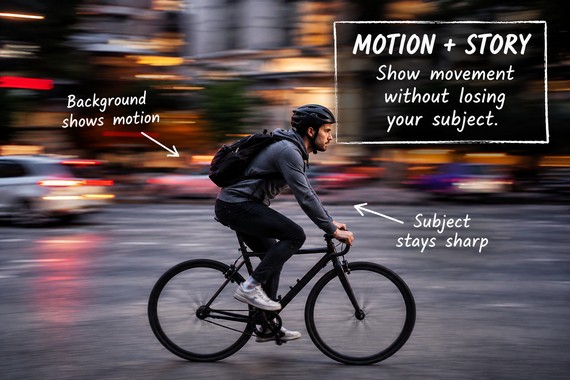
Your challenge is to show movement without losing your subject.
Relevant note: only a little while left for the Photography Exercises  Summer Skills Sale
The ExerciseFind a moving subject—someone walking, a cyclist, a passing car, a pet running, or even people moving through a busy street.
Start with:
Mode: Shutter Priority (S/Tv) or Manual
Shutter Speed: 1/15 to 1/30 sec
ISO: Auto or adjust as needed
Focus: Continuous AF / Servo AF
Drive Mode: Continuous
Now try two techniques.
Follow your subject with the camera as you press the shutter. This is called panning.
Move smoothly at roughly the same speed as your subject and continue moving even after you take the photo.
When it works, your subject stays relatively sharp while the background stretches into motion blur.
Now do the opposite.
Hold the camera steady and let your subject move through the frame. The surroundings remain sharp while the moving person, vehicle, or animal becomes blurred.
This works especially well when there’s something interesting and stationary in the scene to contrast with the movement.
 Your Goal
Take at least 10 photos using each technique.
Experiment with shutter speeds from 1/8 to 1/60 sec and notice how dramatically the feeling of movement changes.
Don’t judge the photograph only by whether it’s perfectly sharp.
Ask yourself:
Does the blur help tell the story?
A technically imperfect photograph that makes you feel the movement can be far more interesting than one where everything is frozen.
If you want to try more exercises like this—clearly structured, easy to follow, and designed to build real shooting instincts—the Summer Skills Sale on the Photography Exercises is wrapping up soon. It’s a practical way to keep improving, even when winter limits your time and motivation to shoot.

A practical way to build confidence for challenging shooting situations that often trip photographers up. Each exercise focuses on real-world scenarios—difficult light, motion, exposure decisions, and creative problem-solving—so you learn how to take control instead of relying on auto settings.
Deal ending soon: PictureCorrect Photography Exercises Summer Skills Sale
As a photographer, your artistic journey doesn’t end when you capture that perfect shot. Presenting your work in its best light is just as crucial, and this is where large-format printing comes into play. Large-format prints can transform your photographs into eye-catching pieces of art, making them an essential aspect of photography, especially for exhibitions, high-end client work, or personal satisfaction. This blog post aims to demystify large-format printing for photographers, helping you understand its benefits, considerations, and how to get started.
Related reminder: only a little while left for the Photo Editing Cheat Sheets Summer Sale
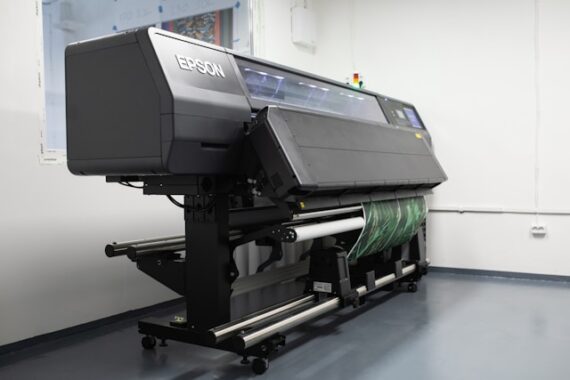
Large-format printing refers to print jobs that exceed the size of standard printers, usually wider than 24 inches. These prints can go up to several feet in both dimensions, offering incredible detail and a more immersive viewing experience. This type of printing is ideal for displaying landscape, wildlife, architectural photography, and more, at scales that capture every detail and color nuance.
Large-format printing opens up new horizons for photographers, allowing your work to be seen and appreciated like never before. By understanding the basics and diving into the world of large prints, you can add a powerful tool to your photographic arsenal. Whether for exhibition, sale, or personal enjoyment, large-format prints can bring your visions to life in a grand and impactful way.
If editing often feels scattered or uncertain, these cheat sheets provide a clear, repeatable process for tackling exposure, color, masking, retouching, and finishing touches in the right order.
Paired with time-saving keyboard shortcuts, they help you edit faster, stay consistent, and know when an image is truly finished.
Deal ending soon: The Photo Editing Cheat Sheets Summer Sale