maanantai 21. syyskuuta 2026

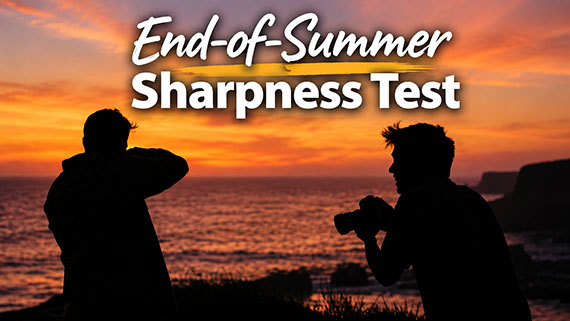
PictureCorrect.com: The End-of-Summer Photo Sharpness Test

Before summer officially comes to an end, here’s a quick photography challenge you can try today.

I call it the End-of-Summer Sharpness Test.

Find a stationary subject with plenty of fine detail—a tree, building, sign, fence, or anything else that will make sharpness easy to judge.

photo sharpness

Photo captured by Chris Leipelt

Now photograph it handheld using the same focal length at:

1/30 sec
1/60 sec
1/125 sec
1/250 sec

Adjust your ISO as necessary to keep the exposure roughly the same.

Then comes the important part:

Pull the photos up on a larger screen and view each one at 100%.

You might be surprised by what you see.

The 1/30-second shot may look perfectly fine on your camera’s LCD but show obvious camera shake when enlarged. At 1/60, things might improve. At 1/125 or 1/250, fine details may suddenly become noticeably crisper.

You’re essentially discovering your personal handheld shutter-speed limit.

And that limit won’t always match the old “1/focal length” rule. Your camera, lens, image stabilization, shooting technique, focal length—and even how steady you happen to be that day—all play a role.

Try the experiment again with a longer lens and you’ll probably see the difference even more dramatically.

📸 One Last Summer Sale

Since today marks the last day of summer, we’re also bringing back one of our most popular photography deals:

The Tack Sharp Photography Guide SALE is back for one final day.

👉 Get the Tack Sharp Photography Guide Here

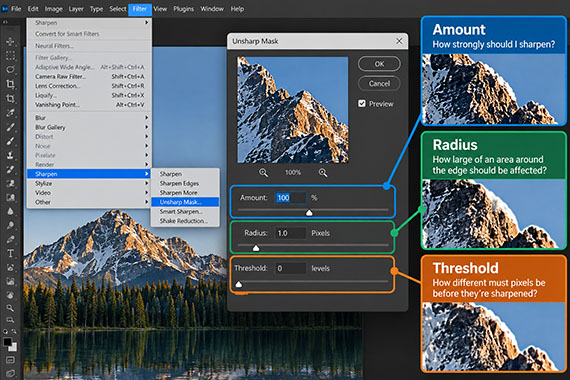
The guide dives much deeper into shutter speed, autofocus, critical focus, camera shake, lens sharpness, aperture, stabilization, sharpening and the other small details that separate a photo that looks sharp on your camera from one that’s genuinely tack sharp.

But we’re only bringing the sale back for the last day of summer.

sharp photography guide

So give the sharpness test a try—and if you’d like to take things further, you can grab the Tack Sharp Guide while the sale is back.

⌛ See the End-of-Summer Tack Sharp Sale


from PictureCorrect https://ift.tt/tr2ZozH
via IFTTT

sunnuntai 20. syyskuuta 2026

PictureCorrect.com: Lightroom’s Two Types of Noise Reduction Explained

If you’ve ever opened Lightroom’s Detail panel, you may have wondered why noise reduction isn’t just one slider.

Instead, Lightroom separates it into Luminance and Color.

That’s because digital noise actually comes in two different forms—and they look very different.

Related: only 1 day left for the Photo Editing Cheat Sheets ☀ Summer Finale Sale

lightroom noise

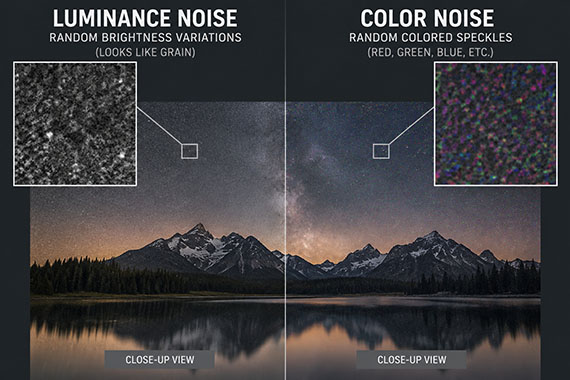
Luminance Noise Looks Like Grain

Luminance noise appears as random variations in brightness. Zoom into a high-ISO photo and you’ll see tiny light and dark speckles, almost like film grain.

It’s especially noticeable in:

  • Shadows
  • Dark skies
  • Smooth backgrounds
  • Underexposed areas brightened in editing

The Luminance slider smooths out this grain.

But be careful: fine photographic detail is also made from small variations in brightness. Push the slider too far and hair, skin, grass and other textures can start looking unnaturally smooth.

Color Noise Looks Like Colored Speckles

Color noise is different.

Instead of brightness variations, you’ll see tiny red, green, blue, purple or magenta speckles where those colors shouldn’t exist.

It’s particularly easy to spot in dark or neutral areas.

The Color slider removes these unwanted color variations while doing a better job of preserving the underlying detail.

That’s also why Lightroom can usually apply more color noise reduction without making a photograph look obviously soft.

The Easy Way to Remember It

Think of it this way:

Luminance noise = grain

Color noise = colored speckles

A high-ISO photograph will often contain both, which is why Lightroom gives you separate controls.

When editing, zoom to around 100%. Reduce the distracting color speckles first, then carefully increase Luminance until the grain becomes less noticeable.

The goal isn’t necessarily to eliminate every trace of noise.

It’s to find the best balance between cleaning up the image and preserving real detail.

For Further Training:

If editing often feels scattered or uncertain, these cheat sheets provide a clear, repeatable process for tackling exposure, color, masking, retouching, and finishing touches in the right order.

photo editing cheat sheets

Paired with time-saving keyboard shortcuts, they help you edit faster, stay consistent, and know when an image is truly finished.

Only 1 day left: The Photo Editing Cheat Sheets ☀ Summer Finale Sale


from PictureCorrect https://ift.tt/3bnrxBw
via IFTTT

perjantai 18. syyskuuta 2026

PictureCorrect.com: The Easiest Photography Niches to Monetize Without Being “The Best”

Many photographers assume they need an incredible portfolio, expensive equipment, and years of experience before anyone will pay them.

But plenty of clients aren’t looking for the best photographer in town. They’re looking for someone dependable who can solve a specific problem.

Here are some of the easiest places to start.

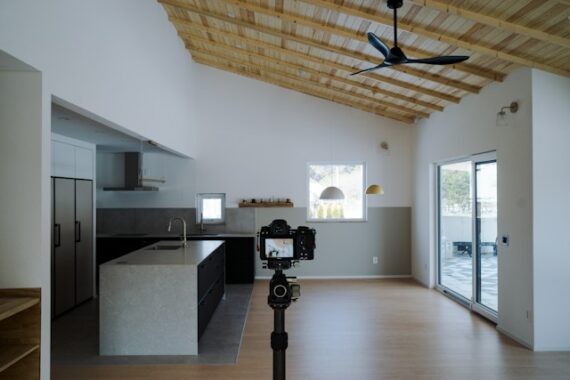
Related: deal ending soon for Earn Money with Photography ☀ Summer Closeout Sale

photo business ideas

Photo captured by rawkkim

1. Real Estate Photography

Most agents need clean, bright, sharp photographs that make a property look inviting. Learn to keep vertical lines straight, handle bright windows, and deliver consistent edits, and you can already provide something valuable.

Get your first client: Find a local listing with mediocre photos and contact the agent. Offer to photograph their next listing at a discounted introductory rate.

2. Airbnb & Vacation Rentals

Vacation-rental photography is about selling the experience: the inviting bedroom, balcony view, coffee setup, pool, fire pit, or cozy reading chair.

Get your first client: Browse nearby vacation rentals with weak photos. Contact the host and offer to reshoot the property, perhaps starting with a few sample images.

3. Local Businesses

Restaurants, gyms, salons, contractors, and shops constantly need photographs for websites, social media, and advertising.

You don’t need world-class images—you just need photographs noticeably better than what they’re currently using.

Get your first client: Pick a business you already visit and offer a small, inexpensive photo session. Ten great images can be enough to demonstrate your value.

4. Simple Product Photography

High-end commercial photography can be extremely technical, but small online sellers often just need attractive, consistent product images.

Basic lighting, a clean background, accurate colors, and solid editing can go a long way.

Get your first client: Find a small Etsy seller or local maker whose products are good but whose photography isn’t. Offer to photograph one product as a test.

5. Youth Sports

Parents aren’t necessarily looking for award-winning sports photography. They want a great photograph of their kid batting, scoring, running, or celebrating.

Master shutter speed, autofocus, positioning, and timing, and you can create images families genuinely value.

Get your first client: Photograph a game for a friend or relative’s child and give the family a few images. Other parents may quickly start asking where they came from.

6. Pet Photography

With pets, personality can matter more than technical perfection. A photograph that perfectly captures a familiar expression can become incredibly meaningful to an owner.

Get your first client: Offer a free mini-session to a friend with a photogenic dog or cat. Use the results to create a small portfolio you can share locally.

7. Everyday Professional Headshots

Millions of ordinary professionals need better photographs for LinkedIn, company websites, directories, speaking engagements, and other profiles.

A simple background, flattering light, sharp focus, and natural expression may be all that’s required.

Get your first client: Offer a few friends or coworkers inexpensive headshot sessions. One session can produce both portfolio images and referrals.

You Don’t Have to Be the Best

The easiest photography niches to monetize often reward something other than artistic brilliance:

Consistency. Reliability. Convenience.

Someone who answers messages, arrives on time, makes clients comfortable, and delivers good photographs when promised can be surprisingly valuable.

Instead of asking, “Am I good enough to charge for photography?” ask a better question:

“Who around me has a photography problem I already know how to solve?”

Your first paying client may be much closer than you think.

For Further Training:

This in-depth eBook has helped thousands of photographers turn their passion into profit—and it’s currently 85% off for a Summer Closeout Sale ☀

photography career

Packed with proven strategies in all types of photography and even printable contract templates you can use with clients right away, it’s your shortcut to making money with photography.

Deal ending soon: Earn Money with Photography Summer Closeout Sale


from PictureCorrect https://ift.tt/leNYmsE
via IFTTT

torstai 17. syyskuuta 2026

PictureCorrect.com: Why I Bracket Exposures While Traveling

When I’m photographing close to home, getting the exposure slightly wrong isn’t always a disaster. I can often return another day.

Travel photography is different.

You may have one sunset, one afternoon, or even one minute to capture a scene you’ll never see under the same conditions again.

That’s why I often bracket exposures while traveling.

Related: only a little while left for the Travel Cheat Sheets 🌤 End of Summer Sale

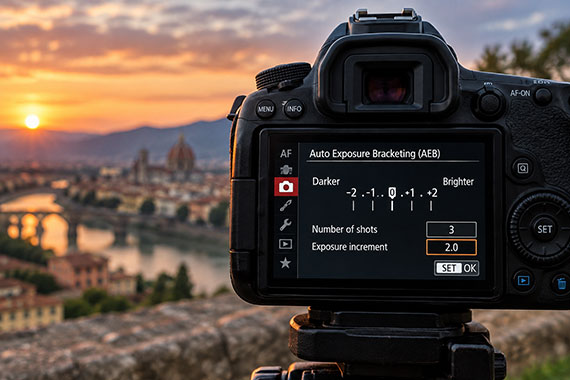
exposure bracketing

What Exposure Bracketing Does

Exposure bracketing means taking several versions of the same photograph at different exposures.

A simple bracket might be:

  • One normal exposure
  • One darker exposure
  • One brighter exposure

Most cameras can do this automatically using Auto Exposure Bracketing (AEB). A common starting point is -2, 0, +2 EV, although -1, 0, +1 EV may be enough for less extreme scenes.

It takes only a moment, but gives you considerably more flexibility later.

Travel Scenes Can Be Difficult to Expose

Travel photography frequently puts you in challenging light.

Imagine photographing inside an old cathedral with sunlight pouring through the windows. Or standing in a shaded alley while photographing a bright city beyond it.

Expose for the shadows and you may lose the highlights. Expose for the highlights and the shadows can become extremely dark.

Bracketing gives you options.

You might use the darker exposure to preserve a colorful sky, the brighter one for cleaner shadow detail, or blend multiple exposures later.

You Don’t Have to Create HDR

This is an important point.

Bracketing doesn’t mean you have to combine the photographs.

Often, I’ll simply choose the best individual exposure afterward.

Modern cameras shooting RAW have impressive dynamic range, so a single properly exposed frame may be all you need. But when the lighting is difficult, capturing two extra exposures is cheap insurance.

Instead of making a critical exposure decision while standing on a crowded street or racing to catch a train, you can make it later on a large monitor.

When Bracketing Is Most Useful

I consider bracketing when photographing sunsets, interiors with bright windows, landscapes with deep shadows, city skylines around twilight, backlit scenes, and viewpoints I probably won’t visit again.

There is one catch: bracketing works best when the scene isn’t changing rapidly.

Moving people, waves, blowing trees, or shooting from a moving vehicle can make exposure blending difficult. In those situations, one carefully exposed RAW file may be better.

Storage Is Cheap. Returning Isn’t.

Yes, bracketing creates extra files.

But memory cards are inexpensive compared with flights, hotels, rental cars, and returning to a location on the other side of the world.

You can always delete the extra RAW files later.

You can’t recreate the moment.

That’s the real reason I bracket exposures while traveling. Sometimes you only get one chance.

When the light is difficult and the photograph matters, a few extra exposures can be some of the cheapest photographic insurance you’ll ever buy.

For Further Training:

Some shots are just harder than others. Ever struggled with vacation photos, twilight exposures, or star trails and focus stacking while you’re on the move? The Travel Photography Cheat Sheets (currently 88% off today) are built exactly for moments like that:

Showing you step by step how to dial in settings, avoid common mistakes, and get the shot — even when you’re tired, rushed, or shooting in unfamiliar conditions. Travel-ready, no Wi-Fi required, and designed to be quick to reference so you can spend less time guessing and more time shooting.

Deal ending soon: Travel Cheat Sheets 🌤 End of Summer Sale


from PictureCorrect https://ift.tt/EtCmLkQ
via IFTTT

tiistai 15. syyskuuta 2026

PictureCorrect.com: The Travel Photography Mistake You Usually Notice Too Late

You get home from a great trip, unload your memory cards, and start scrolling through hundreds—or maybe thousands—of photos. You captured the famous landmark, the sweeping landscape, the hotel, the beach, the skyline and all the places you planned to photograph.

But as you look through everything, something feels strangely missing. You photographed the places you visited, but you didn’t really photograph the trip.

Unfortunately, this is one of those photography mistakes that’s much easier to recognize after you get home.

Related: offer ending soon for the Travel Cheat Sheets 🌤 End of Summer Sale

travel photo paris

Photo captured by Romain Terpreau

A Collection of Landmarks Isn’t a Story

When we’re traveling, it’s natural to concentrate on the obvious subjects. If you’re standing in front of the Eiffel Tower, you photograph the Eiffel Tower. If you’re visiting Yosemite, you photograph Half Dome. If you’re walking through Rome, you photograph the Colosseum.

There’s nothing wrong with those photographs. The problem comes when they’re all you photograph.

Years later, the images that mean the most may not be the perfect postcard shots. They’re often the little moments surrounding them: the coffee shop where you started the morning, your family walking down an unfamiliar street, the ridiculous rental car, the view through the train window, a handwritten menu, your luggage beside the hotel door, or rain falling outside a café.

These photographs can seem insignificant while you’re taking them, but later they may be the images that bring the entire trip back to life.

Think Like You’re Photographing a Story

One easy way to avoid this mistake is to imagine that you’re creating a small photo essay about your trip. Instead of asking, “What’s worth photographing here?” try asking, “What would I need to photograph to show someone what today felt like?”

That small change can completely alter what you notice. Suddenly you’re photographing more than destinations. You’re photographing transitions, details, people, weather, food, transportation and all the unexpected moments between the major attractions.

Some of the best storytelling photographs happen when you’re technically not “doing” anything. Waiting for the train, walking back to the hotel, stopping for lunch, watching everyone pile into the car or getting caught in the rain can all produce photographs that become surprisingly meaningful later.

These are exactly the moments when many photographers put their cameras away. Instead, when it feels like there’s nothing important to photograph, look a little harder.

food travel photo

30mm, f/2.8, 1/500s, ISO 400, Photo captured by Julian Dik

A Simple Travel Shot List

On your next trip, try capturing at least one photograph of the big scene, the people you’re traveling with, an interesting detail, the journey between locations, the environment around you, something unexpected and one quiet everyday moment.

You don’t need hundreds of photographs in each category. Sometimes a single image is enough to complete the story.

For example, imagine photographing a day in Paris. You might have a beautiful wide shot of the Eiffel Tower, but also photograph your morning croissant, the Metro entrance, your family studying a map, bicycles along the street, a waiter carrying coffee, rain on the café window and everyone exhausted on the train ride back to the hotel.

Put those photographs together and suddenly you don’t just have pictures of Paris. You have photographs of your day in Paris.

Don’t Forget the People You’re Traveling With

This may be the most important part. Photographers have a habit of returning from incredible trips with beautiful photographs—and almost no evidence that they were actually there.

Make sure the people you’re traveling with appear in the story. Photograph them walking through the scene, looking at something interesting, eating, laughing, waiting, exploring and simply experiencing the destination.

And occasionally, hand someone else the camera and get in the photograph yourself. Twenty years from now, that imperfect picture of everyone laughing at dinner may matter far more than your technically flawless photograph of the sunset.

street scene image

27mm, f/3.2, 1/125s, ISO 200, Photo captured by “refocus”

Photograph Something That Seems Unimportant

Here’s one simple habit to try on your next trip: at least once each day, deliberately photograph something that seems too ordinary to photograph.

It could be your breakfast, your shoes covered in dust, the view from your hotel window, someone studying a map, your camera sitting on the table or the pile of bags you’ve been dragging around all day.

You may delete some of these photographs later. But every once in a while, you’ll capture an image that seems completely unimportant today and becomes priceless years from now.

That’s because great travel photography isn’t only about showing where you went. It’s about remembering what it felt like to be there.

For Further Training:

Some shots are just harder than others. Ever struggled with vacation photos, twilight exposures, or star trails and focus stacking while you’re on the move? The Travel Photography Cheat Sheets (currently 88% off today) are built exactly for moments like that:

Showing you step by step how to dial in settings, avoid common mistakes, and get the shot — even when you’re tired, rushed, or shooting in unfamiliar conditions. Travel-ready, no Wi-Fi required, and designed to be quick to reference so you can spend less time guessing and more time shooting.

Deal ending soon: Travel Cheat Sheets 🌤 End of Summer Sale


from PictureCorrect https://ift.tt/AgnSaFx
via IFTTT

maanantai 14. syyskuuta 2026

PictureCorrect.com: The Better Way to Brighten a Photo

When a photo feels too dark, the obvious solution is to increase the Exposure slider.

But here’s something worth knowing:

Making a photo brighter and making it look brighter aren’t necessarily the same thing.

In fact, simply increasing exposure can sometimes make an image look washed out without actually improving it.

Related: only a little while left for the Photo Editing Cheat Sheets ☀ Summer Finale Sale

brighter settings

What the Exposure Slider Does

In Lightroom, Camera Raw, and similar editors, increasing Exposure broadly shifts the image toward brighter tonal values.

That’s useful when the entire photograph is genuinely underexposed.

But imagine a landscape where the sky is already bright while the foreground is dark. Increasing Exposure enough to fix the foreground might make the sky far too bright.

The image is technically brighter—but it may not look any better.

That’s where perceived brightness becomes important.

You Can Make a Photo Look Brighter Without Raising Exposure Much

Our eyes don’t judge brightness based only on the average amount of light in an image.

We also respond to contrast and relationships between different tones.

For example, instead of adding +0.7 Exposure, you might get a better result by:

  • Raising the Shadows slightly
  • Increasing the Whites
  • Adjusting the Tone Curve
  • Brightening the subject with a local mask
  • Slightly darkening surrounding areas

That last one sounds contradictory, but it’s particularly powerful.

If you darken the area surrounding your subject, the subject can appear brighter even though you haven’t brightened it at all.

You’re changing the relationship between the tones rather than simply adding brightness.

Whites Can Create “Light” Without Raising Everything

The Whites slider is another useful example.

Increasing Exposure affects a broad portion of the photograph. Increasing Whites primarily pushes the brightest tonal regions higher.

Used carefully, this can give an image more brilliance and make highlights feel luminous without dramatically brightening the midtones and shadows.

This is one reason two photos with similar overall exposure can have very different feelings of brightness.

One may look dull and heavy.

The other can look crisp, luminous, and full of light.

Local Brightness Is Often More Important

Modern masking tools make this even more useful.

Suppose you’re editing a portrait where the person’s face feels slightly dark, but the overall exposure is already correct.

Increasing global Exposure affects everything.

Instead, create a mask around the subject and brighten the face slightly. You could then subtly darken the background.

masking option

The difference might only be a fraction of a stop in either direction, yet the subject suddenly seems much brighter.

Landscape photographers can do the same thing with:

  • Sunlit mountains
  • Foreground objects
  • Paths and leading lines
  • Reflections
  • Clouds
  • Areas where sunlight naturally falls

You’re effectively sculpting the light that’s already in the photograph.

Try This Editing Experiment

Open a photograph that feels slightly too dark.

Before touching Exposure, try this:

  1. Raise the Shadows just enough to reveal important detail.
  2. Increase Whites slightly to give the brightest areas more life.
  3. Add a subtle S-curve if the image needs contrast.
  4. Use a mask to brighten the main subject.
  5. If appropriate, slightly darken less-important areas around it.

Now toggle the edits on and off.

You may find that the photograph feels significantly brighter even though you barely changed its overall exposure.

The Bigger Lesson

The Exposure slider is extremely useful—but it shouldn’t automatically be the first answer whenever an image feels dark.

Sometimes the photograph doesn’t need more brightness everywhere.

It needs brightness in the right places.

Once you start thinking about perceived brightness rather than simply moving the Exposure slider, editing becomes less about correcting the entire photograph and more about directing the viewer’s eye.

And that’s when brightness stops being just a technical adjustment—and becomes a creative tool.

For Further Training:

If editing often feels scattered or uncertain, these cheat sheets provide a clear, repeatable process for tackling exposure, color, masking, retouching, and finishing touches in the right order.

photo editing cheat sheets

Paired with time-saving keyboard shortcuts, they help you edit faster, stay consistent, and know when an image is truly finished.

Deal ending soon: The Photo Editing Cheat Sheets ☀ Summer Finale Sale


from PictureCorrect https://ift.tt/AGvfDSH
via IFTTT

sunnuntai 13. syyskuuta 2026

PictureCorrect.com: How to Photograph Zodiacal Light—the Strange “False Dawn”

If you’re willing to get up before sunrise this week, you may be able to photograph one of the night sky’s more unusual sights.

It’s called zodiacal light—sometimes nicknamed the “false dawn.”

Unlike the Milky Way, aurora, or a meteor shower, zodiacal light isn’t something happening far out in space. It’s sunlight reflecting from countless particles of interplanetary dust spread through the inner solar system.

From a truly dark location, that scattered sunlight can appear as a large, faint triangular column of light extending upward from the horizon.

Related reminder: offer ending soon for the Photo Adventure Cheat Sheets at 80% Off

zodiacal light

And mid-to-late September is a particularly good time to look for it before dawn from the Northern Hemisphere.

Why This Week Is Interesting

Around the September equinox, the angle of the ecliptic—the path followed by the Sun, Moon, and planets—is especially favorable in the pre-dawn eastern sky for Northern Hemisphere observers.

That causes the zodiacal light to extend more steeply upward from the horizon, making its distinctive cone shape easier to recognize.

The darker your sky, the better.

You’ll want to find a location far from city lights with a clear eastern horizon and start looking roughly 60–90 minutes before sunrise, before morning twilight becomes too strong.

How to Photograph It

Photographing zodiacal light is surprisingly similar to photographing the Milky Way.

Start with:

  • Wide-angle lens: roughly 14–24mm
  • Aperture: f/1.8–f/2.8 if possible
  • Shutter speed: around 10–20 seconds
  • ISO: approximately 1600–3200
  • Focus: manually focus on a bright star
  • Tripod: essential

Treat these as starting points rather than fixed settings.

Take a test shot and examine the histogram. Zodiacal light is relatively faint, so your camera may reveal considerably more of it than you can initially see with your eyes.

What Are You Looking For?

Don’t expect a bright beam.

Look east before dawn for a broad triangular glow that is brightest near the horizon and gradually becomes narrower and fainter as it reaches upward.

It can easily be mistaken for distant city glow.

The difference is its shape: light pollution generally hugs the horizon, while zodiacal light can stretch surprisingly high into the sky along the zodiac.

zodiacal diagram

For the best photograph, try placing something recognizable beneath it—a mountain ridge, desert landscape, lone tree, rock formation, or distant silhouette.

That gives the strange cone of light some scale.

One Important Tip

Give your eyes time to adjust.

Spend 15–20 minutes away from bright lights and your phone screen before deciding you can’t see anything. Zodiacal light can be subtle at first, but once you recognize its shape, it often becomes much easier to see.

And if you’ve photographed the Milky Way plenty of times already, this is a fun reason to point your camera somewhere different.

You might just capture a “false dawn” caused by sunlight reflecting from dust floating through our solar system.

For Further Training:

For help remembering the camera settings for difficult situations like this, a set of Photography Adventure Cheat Sheets are designed to help. They are currently 80% off for a Summer Adventures Sale ☀ which wraps up soon if you want to check them out.

photography cheat sheets

The perfect companion for any photographer. Print one out whenever you need it. Whether you’re going on vacation or seeking out a specific photography adventure, these cheat sheets can provide you with the knowledge and inspiration you need to create your best work yet.

Deal ending soon: Photography Cheat Sheets ☀ Summer Adventure Sale


from PictureCorrect https://ift.tt/xU2FvVJ
via IFTTT

torstai 10. syyskuuta 2026

PictureCorrect.com: The 1/10-Second Photography Challenge

Photographers spend a lot of time trying to eliminate camera shake and motion blur.

For this exercise, you’re going to do the opposite.

Set your shutter speed to around 1/10 of a second, leave the tripod at home, and photograph an entire session handheld.

The goal isn’t to make everything sharp. It’s to discover what happens when you deliberately allow movement into your photographs.

Reminder: only a little while left for the Photography Exercises 🔥 September Savings Sale

shutter speed

Why 1/10 Second?

At very fast shutter speeds, movement freezes. At several seconds, motion often becomes an obvious long-exposure effect.

But 1/10 second sits in an interesting middle ground.

It’s slow enough to show movement while still leaving recognizable shapes in the frame. Walking people develop blurred limbs, passing cars streak slightly, and moving water retains texture while gaining a sense of motion.

Three Ways to Try It

Set your camera to Shutter Priority (S or Tv) or Manual mode and choose approximately 1/10 sec.

First, try holding the camera as steadily as possible while your subject moves. Photograph pedestrians, cyclists, waves, traffic, pets, or trees blowing in the wind. The contrast between stationary and moving elements can be surprisingly effective.

Next, try panning. Follow a moving subject with your camera while taking the photograph. If your movement matches the subject, you may get a relatively sharp subject surrounded by a streaked background.

Finally, deliberately move the camera during the exposure. Sweep it vertically, horizontally, diagonally, or even rotate it slightly. This is known as intentional camera movement (ICM), and small changes in your movement can produce dramatically different results.

Don’t Look for Perfect Sharpness

When reviewing your photographs, resist automatically choosing the sharpest one.

Instead, ask:

Does the blur make the photograph more interesting?

A blurred hand can suggest action. Streaking scenery can communicate speed. Moving water can suddenly feel like it’s flowing.

Photography usually freezes a fraction of a second. This exercise asks you to show what happened during that fraction of a second instead.

Your Challenge

Take 30 photographs at roughly 1/10 second:

  • 10 holding the camera still
  • 10 while panning
  • 10 using intentional camera movement

Then choose the photograph where movement contributes the most to the image—not necessarily the one that’s sharpest.

You may discover that a shutter speed you’ve spent years trying to avoid can become a surprisingly creative tool.

If you want to try more exercises like this—clearly structured, easy to follow, and designed to build real shooting instincts—the September Savings Sale on the Photography Exercises is wrapping up soon. It’s a practical way to keep improving, even when winter limits your time and motivation to shoot.
photographer exercises

A practical way to build confidence for challenging shooting situations that often trip photographers up. Each exercise focuses on real-world scenarios—difficult light, motion, exposure decisions, and creative problem-solving—so you learn how to take control instead of relying on auto settings.

Deal ending soon: PictureCorrect Photography Exercises 🔥 September Savings Sale


from PictureCorrect https://ift.tt/hZPLwKk
via IFTTT

keskiviikko 9. syyskuuta 2026

PictureCorrect.com: How Much Does a New Moon Really Matter for Milky Way Photography?

If you’ve spent any time planning Milky Way photography, you’ve probably heard the same advice:

Shoot during a New Moon.

It’s good advice—but it’s also a little oversimplified.

September 10 New Moon Reminder: The darker skies around the new moon create one of the month’s best opportunities to photograph the Milky Way—and there’s only a little while left to save during the Milky Way Photo Guide 🌌 Summer Finale Sale.

milky way planner

A New Moon creates wonderfully dark skies, but you don’t necessarily need to wait for the exact night of the New Moon to photograph the Milky Way. In fact, understanding when the Moon is actually in the sky can be more useful than simply looking at its phase.

Why the New Moon Is So Good

During a New Moon, the Moon is positioned roughly between Earth and the Sun. The illuminated side faces away from us, making the Moon essentially invisible at night.

That means one major source of natural light pollution disappears.

Under a genuinely dark sky, this can make a dramatic difference. The Milky Way’s faint dust lanes become easier to see and photograph, contrast improves, and you can capture more subtle detail in the galactic core.

But here’s the important part:

The Moon can’t brighten your photograph if it isn’t above the horizon.

Moonrise and Moonset Can Matter More Than Phase

Imagine the Moon is 40% illuminated—but it sets at 10:30 p.m.

If the Milky Way is in a good position at midnight, you could still have hours of beautifully dark sky.

The opposite can happen too. A relatively small crescent Moon positioned near the Milky Way can introduce more unwanted light than you might expect.

That’s why experienced Milky Way photographers usually check several things:

  • Moon illumination
  • Moonrise time
  • Moonset time
  • Moon position
  • Milky Way core position
  • Astronomical darkness

The goal isn’t necessarily “New Moon.”

The real goal is a dark sky during the hours when the Milky Way is where you want it.

How Many Nights Around a New Moon Are Good?

Fortunately, you don’t get just one opportunity each month.

The nights immediately before and after a New Moon are usually excellent for Milky Way photography because the Moon is only a thin crescent and spends much of the night below the horizon.

Depending on your location and shooting time, you can often find several excellent nights on either side of the New Moon.

That gives photographers a much larger window to work with—particularly important when clouds, smoke, haze, or work schedules ruin the “perfect” night.

Can Moonlight Ever Be Useful?

Absolutely.

A small amount of moonlight can illuminate mountains, trees, buildings, or other foreground subjects while leaving enough darkness to photograph the stars.

Instead of needing artificial light painting, the Moon can become an enormous natural softbox.

The trick is balance.

Too much moonlight—especially when the Moon is high in the sky or near the Milky Way—can reduce contrast and wash out faint galactic detail. But carefully timed moonlight can produce a beautifully illuminated foreground beneath a star-filled sky.

This Week Is a Great Time to Experiment

The September New Moon arrives September 10, creating an excellent dark-sky window around this week’s moonless nights.

And for photographers in the Northern Hemisphere, the timing is particularly valuable. We’re approaching the end of the prime season for photographing the bright Milky Way core during convenient evening hours.

So if skies are clear where you live, the next few nights are worth watching.

Don’t just check the Moon phase, though.

Check when the Moon rises and sets, when astronomical darkness begins, and where the Milky Way will be during those hours.

You may discover that your best Milky Way photography night isn’t technically the New Moon at all.

The perfect night is simply when the Milky Way is up, the Moon isn’t causing problems, and the sky is clear.

Last Chance, Deal Ending Tonight:

If you want a simple, field-ready way to master night photography, the Milky Way Photography Field Guide breaks it down step-by-step.

Inside, you’ll learn when the Milky Way is visible, where to look, how the galactic core moves across the sky, which camera settings to use, and photo editing tricks.

milky way guide

Right now, it’s part of our Summer Finale Sale—timed perfectly for the months when most photographers start planning their Milky Way shoots.

Only hours left: Milky Way Photography Guide 🌌 Summer Finale Sale


from PictureCorrect https://ift.tt/rZd4ckx
via IFTTT

night at the gravel pit by thalerst (500px.com/thalerst)


The gravel pit was lit up by me .. about 15 minutes with a Led Lenser torch! via 500px https://ift.tt/gulSDbA

tiistai 8. syyskuuta 2026

PictureCorrect.com: The Forecast Milky Way Photographers Should Check

When planning a night of Milky Way photography, most photographers check the cloud forecast first. But some astronomy weather apps also display two less familiar measurements: seeing and transparency.

They may sound similar, but they describe very different atmospheric conditions—and one is usually much more important for photographing the Milky Way.

September 10 New Moon Reminder: The darker skies around the new moon create one of the month’s best opportunities to photograph the Milky Way—and there’s only a little while left to save during the Milky Way Photo Guide 🌌 Summer Finale Sale.

clear forecast

What Is Atmospheric Seeing?

“Seeing” describes the stability of the atmosphere.

As layers of air with different temperatures move above you, they bend light in slightly different directions. This turbulence can make stars appear to shimmer, wobble, or blur when viewed at high magnification.

Poor seeing is especially troublesome for:

  • Planetary photography
  • Lunar close-ups
  • Double-star observation
  • Long-focal-length astrophotography
  • Telescope imaging

That is why planetary photographers pay close attention to seeing forecasts. Even beneath a perfectly clear sky, turbulent air can make fine details on Jupiter or the Moon look soft.

For wide-angle Milky Way photography, however, seeing is usually much less important. Individual stars occupy only a tiny portion of the frame, and atmospheric turbulence is rarely the main factor limiting sharpness.

Your focus accuracy, shutter speed, lens quality, and tracking precision will generally matter far more.

What Is Transparency?

Transparency describes how clearly light can pass through the atmosphere.

A sky can be completely free of clouds yet still have poor transparency because of:

  • Humidity
  • Haze
  • Smoke
  • Dust
  • Air pollution
  • Thin, high-altitude clouds
  • Moisture suspended in the atmosphere

These particles scatter light and reduce contrast. They can also amplify the glow from nearby towns, making the sky look brighter and washing out the Milky Way’s faint structure.

Good transparency allows more starlight to reach your camera. The result is usually a darker background sky, stronger contrast, clearer dust lanes, and better definition in the galactic core.

For most Milky Way photographers, transparency is the more useful forecast.

atmosphere elements

Clear Skies Don’t Always Mean Transparent Skies

This is where many photographers get caught out.

A standard weather forecast may show clear skies all night, but “clear” generally means there will be little or no measurable cloud cover. It does not necessarily mean the atmosphere will be clean, dry, and transparent.

You might arrive at your location and find that the stars are visible, yet the Milky Way looks weak and muddy. The culprit may be high humidity, wildfire smoke, dust, or a thin layer of haze.

This is particularly noticeable near the horizon, where you are looking through much more atmosphere. If the galactic core is low in the sky, poor transparency can obscure it even when conditions overhead appear reasonably clear.

Which Forecast Should You Prioritize?

For wide-field Milky Way photography, check conditions in roughly this order:

  1. Cloud cover: Will the sky actually be open?
  2. Transparency: Will haze, smoke, or moisture reduce contrast?
  3. Moonlight: Will the Moon brighten the sky during your planned session?
  4. Humidity and dew point: Is condensation likely to form on your lens?
  5. Seeing: Mostly important if you are also using a telescope or long focal length.

A night with excellent transparency and mediocre seeing can still be wonderful for photographing the Milky Way.

A night with excellent seeing but poor transparency may produce disappointing wide-angle images.

When Does Seeing Matter to Milky Way Photographers?

Seeing becomes more relevant when you move beyond traditional wide-angle compositions.

You may want to check it more carefully if you are:

  • Photographing small deep-sky objects at long focal lengths
  • Using a telescope or telephoto lens
  • Capturing highly magnified Moon or planet images
  • Trying to resolve extremely fine star detail
  • Shooting detailed tracked panoramas with longer lenses

Even then, seeing is only one part of the equation. Wind, tracking accuracy, focus, equipment temperature, and optical quality can all affect the final result.

A Practical Forecasting Strategy

Don’t depend on a single “clear sky” icon. Compare several pieces of information before committing to a location.

Look at cloud cover at different altitudes, predicted transparency, humidity, dew point, wind, smoke maps, and the Moon’s position. It can also help to check nearby live cameras or recent satellite imagery shortly before leaving.

Remember that forecasts are estimates. Local valleys, marine layers, wildfire smoke, and changing winds can create conditions that broad regional forecasts miss.

The Simple Answer

If you photograph the Milky Way with a wide-angle lens, transparency matters more than seeing.

Seeing tells you how steady the atmosphere is. Transparency tells you how much faint galactic detail may actually reach your camera.

The ideal night offers clear skies, excellent transparency, low humidity, little moonlight, and manageable wind. But if you must choose between excellent seeing and excellent transparency, the more transparent sky will usually give you the stronger Milky Way photograph.

Don’t Miss the Last Milky Way Opportunity of the Season:

If photographing the Milky Way has been sitting on your summer photography list, September is giving you one more excellent opportunity.

The new moon arrives on September 10, 2026, creating several evenings with very little moonlight to interfere with the night sky. For photographers across much of the Northern Hemisphere, this is also one of the last really convenient opportunities of the summer to photograph the bright Galactic Core.

If you want a simple, field-ready way to master night photography, the Milky Way Photography Field Guide breaks it down step-by-step.

Inside, you’ll learn when the Milky Way is visible, where to look, how the galactic core moves across the sky, which camera settings to use, and photo editing tricks.

milky way guide

Right now, it’s part of our Summer Finale Sale—timed perfectly for the months when most photographers start planning their Milky Way shoots.

Deal ending soon: Milky Way Photography Guide 🌌 Summer Finale Sale


from PictureCorrect https://ift.tt/mOH2kpr
via IFTTT

maanantai 7. syyskuuta 2026

PictureCorrect.com: Why Infinity Focus Isn’t Really at Infinity

If you’ve ever photographed stars, the Milky Way, or a distant landscape, you’ve probably heard this advice:

“Just set your lens to infinity.”

It sounds simple. Turn the focus ring to the ∞ symbol and distant subjects should be perfectly sharp.

Except that’s often not what happens.

Reminder: only a little while left for the Milky Way Photo Guide 🌔 Summer Finale Sale

focus infinity

Many Lenses Focus Past Infinity

In photography, “infinity” doesn’t literally mean an infinitely distant object. It describes a distance where incoming light rays are effectively parallel enough that increasing the subject distance requires almost no change in focus.

A distant mountain, the Moon, and a star light-years away can therefore require essentially the same lens position.

But here’s the surprising part:

The end of your focus ring may actually be beyond infinity.

Manufacturers often allow extra focusing travel to accommodate things like temperature changes, manufacturing tolerances, and autofocus operation. Modern focus-by-wire lenses can make the relationship between the focus ring and actual lens position even less predictable.

So simply turning your focus ring all the way to the stop can actually make distant subjects slightly blurry.

Even the ∞ Mark Isn’t Always Exact

The infinity symbol itself shouldn’t necessarily be treated as a precision calibration.

Small differences in lens design, temperature, focal length, and calibration can change exactly where optimal infinity focus occurs.

This becomes especially noticeable in astrophotography.

A tiny focusing error that’s almost invisible in a daytime landscape can turn stars from sharp points into tiny blurry circles.

How to Find True Infinity Focus

Instead of trusting the focus ring, verify focus visually.

For Milky Way or star photography:

  1. Switch to manual focus.
  2. Open your aperture wide.
  3. Find a bright star using Live View or your camera’s display.
  4. Magnify the image as much as practical.
  5. Slowly rotate the focus ring.

Watch the star carefully.

As you approach correct focus, it should become smaller and sharper. Keep turning and you’ll often see it begin getting larger again.

finding focus

The point where the star appears smallest is your true infinity focus.

Interestingly, that position may be slightly before the ∞ mark—or before the end of the focus ring.

Infinity Focus Can Move

There’s one more complication.

Temperature changes can slightly alter the optical dimensions of a lens. During a long, cold astrophotography session, the perfect infinity position can therefore shift.

That’s why it’s worth checking focus occasionally throughout the night rather than assuming it will remain perfect.

Once you’ve nailed focus, you can also place a small piece of removable tape across the focus ring to prevent accidentally moving it.

The Bigger Lesson

The ∞ symbol doesn’t really mean:

“Everything distant will be perfectly sharp here.”

It’s better interpreted as:

“Infinity focus should be somewhere around here.”

For ordinary photography, the difference may be insignificant. But for stars, the Milky Way, and other subjects where precise focus matters, don’t blindly trust the symbol.

Magnify the image, fine-tune the lens, and trust what you see.

Because when it comes to lenses, infinity isn’t always where you think it is.

Don’t Miss the Last Milky Way Opportunity of the Season:

If photographing the Milky Way has been sitting on your summer photography list, September is giving you one more excellent opportunity.

The new moon arrives on September 10, 2026, creating several evenings with very little moonlight to interfere with the night sky. For photographers across much of the Northern Hemisphere, this is also one of the last really convenient opportunities of the summer to photograph the bright Galactic Core.

If you want a simple, field-ready way to master night photography, the Milky Way Photography Field Guide breaks it down step-by-step.

Inside, you’ll learn when the Milky Way is visible, where to look, how the galactic core moves across the sky, which camera settings to use, and photo editing tricks.

milky way guide

Right now, it’s part of our Summer Finale Sale—timed perfectly for the months when most photographers start planning their Milky Way shoots.

Deal ending soon: Milky Way Photography Guide Summer Finale Sale


from PictureCorrect https://ift.tt/vT0jGHY
via IFTTT