


If you’ve ever opened Lightroom’s Detail panel, you may have wondered why noise reduction isn’t just one slider.
Instead, Lightroom separates it into Luminance and Color.
That’s because digital noise actually comes in two different forms—and they look very different.
Related: only 1 day left for the Photo Editing Cheat Sheets  Summer Finale Sale
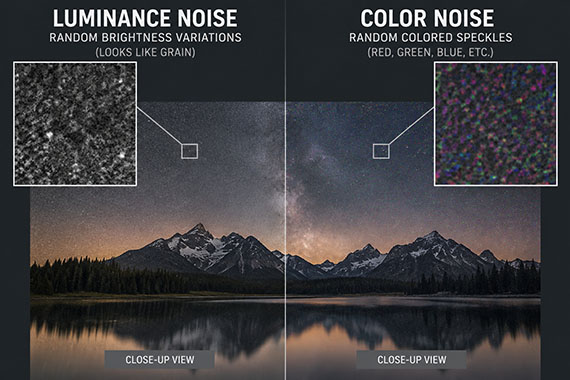
Luminance Noise Looks Like Grain
Luminance noise appears as random variations in brightness. Zoom into a high-ISO photo and you’ll see tiny light and dark speckles, almost like film grain.
It’s especially noticeable in:
- Shadows
- Dark skies
- Smooth backgrounds
- Underexposed areas brightened in editing
The Luminance slider smooths out this grain.
But be careful: fine photographic detail is also made from small variations in brightness. Push the slider too far and hair, skin, grass and other textures can start looking unnaturally smooth.
Color Noise Looks Like Colored Speckles
Color noise is different.
Instead of brightness variations, you’ll see tiny red, green, blue, purple or magenta speckles where those colors shouldn’t exist.
It’s particularly easy to spot in dark or neutral areas.
The Color slider removes these unwanted color variations while doing a better job of preserving the underlying detail.
That’s also why Lightroom can usually apply more color noise reduction without making a photograph look obviously soft.
The Easy Way to Remember It
Think of it this way:
Luminance noise = grain
Color noise = colored speckles
A high-ISO photograph will often contain both, which is why Lightroom gives you separate controls.
When editing, zoom to around 100%. Reduce the distracting color speckles first, then carefully increase Luminance until the grain becomes less noticeable.
The goal isn’t necessarily to eliminate every trace of noise.
It’s to find the best balance between cleaning up the image and preserving real detail.
For Further Training:
If editing often feels scattered or uncertain, these cheat sheets provide a clear, repeatable process for tackling exposure, color, masking, retouching, and finishing touches in the right order.

Paired with time-saving keyboard shortcuts, they help you edit faster, stay consistent, and know when an image is truly finished.
Only 1 day left: The Photo Editing Cheat Sheets Summer Finale Sale
from PictureCorrect https://ift.tt/3bnrxBw
via IFTTT


0 kommenttia:
Lähetä kommentti