


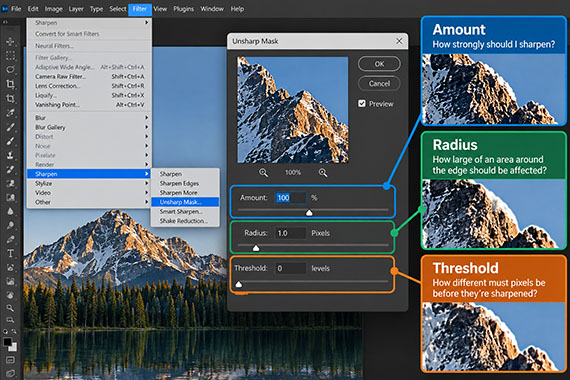
If you’ve ever used Unsharp Mask or a similar sharpening tool, you’ve probably seen three controls:
Amount. Radius. Threshold.
They can seem technical, but each has a specific job. Once you understand them, sharpening becomes much easier.
Sharpening doesn’t actually restore missing detail. Instead, it increases contrast along edges, making existing detail appear more defined.
Related: only a little while left for the Photo Editing Cheat Sheets  Autumn Editing Sale

Using Unsharp Mask to Sharpen Photos
Amount: How Strong Is the Sharpening?
Amount controls the strength of the sharpening effect.
Sharpening makes the bright side of an edge slightly brighter and the dark side slightly darker. Increasing Amount strengthens this contrast.
Too little may be barely noticeable. Too much can produce harsh textures and obvious halos.
Think of Amount simply as sharpening intensity.
Radius: How Wide Is the Effect?
Radius determines how far sharpening extends from an edge.
A small Radius emphasizes fine details such as hair, feathers, foliage, and textures. A larger Radius affects broader edges and larger structures.
That’s why the best Radius often depends on the type of detail in your photograph.
Push Radius too far and you may see bright or dark outlines around objects—one of the classic signs of oversharpening.
Threshold: What Gets Sharpened?
Threshold determines how different neighboring pixels must be before they’re considered an edge.
A low Threshold allows even subtle differences to be sharpened. A higher Threshold ignores small variations and concentrates on stronger edges.
This is especially useful with portraits or high-ISO photos. Raising Threshold can prevent sharpening from exaggerating skin texture or digital noise.
How They Work Together
An easy way to remember the three settings is:
Amount: How strongly should I sharpen?
Radius: How large of an area around the edge should be affected?
Threshold: How different must pixels be before they’re sharpened?
A detailed landscape might benefit from a smaller Radius and lower Threshold to emphasize fine detail. A portrait may benefit from a higher Threshold to avoid emphasizing every pore and subtle skin variation.
A Simple Sharpening Workflow
View your image at 100% magnification and temporarily increase Amount enough to clearly see what’s happening.
Adjust Radius until the right size details are being emphasized. Then adjust Threshold if noise, skin texture, or other unwanted details are being sharpened.
Finally, reduce Amount until the result looks natural.
Pay particular attention to high-contrast edges. If you see obvious bright or dark halos, you’ve probably gone too far.
The goal isn’t to sharpen every pixel.
It’s to make the right details look sharper.
For Further Training:
If editing often feels scattered or uncertain, these cheat sheets provide a clear, repeatable process for tackling exposure, color, masking, retouching, and finishing touches in the right order.

Paired with time-saving keyboard shortcuts, they help you edit faster, stay consistent, and know when an image is truly finished.
Deal ending soon: The Photo Editing Cheat Sheets Autumn Editing Sale
from PictureCorrect https://ift.tt/dq6TFt5
via IFTTT


0 kommenttia:
Lähetä kommentti