maanantai 2. marraskuuta 2026

PictureCorrect.com: Masking: The Secret to Perfect Photos

I think we can all agree that our goal is to make our photos as perfect as possible.

Some of that process occurs within the camera. However, in the era of digital photography, we are given far greater tools to work with than our previous brethren had with just film.

The key to perfection is post-processing.

And the key to perfection in post-processing comes with masking.

Relevant note: deal ending soon for the In-depth Masking Guide at 68% Off
example of masking in adobe photoshop

Photo by Kent DuFault

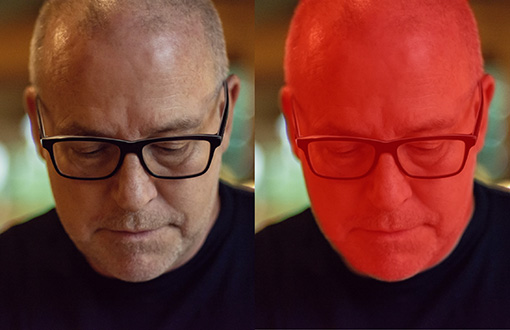
In this example photo above, the version on the left has no mask. The version on the right has the head masked from the rest of the picture.

All the possibilities for masking are too great to cover in a simple quick tip.
masking photoshop tutorial

Photo by Kent DuFault

Today, I want to give you a firm foundation on what masking is and how you can learn to make it work for you in your photography.

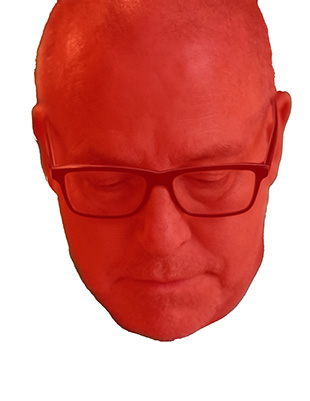
With masking, you can take different parts of different photos and combine them into a new picture. This would be an advanced masking technique.
example of mask transparency photoshop

Photo by Free-Photos, editing by Kent DuFault

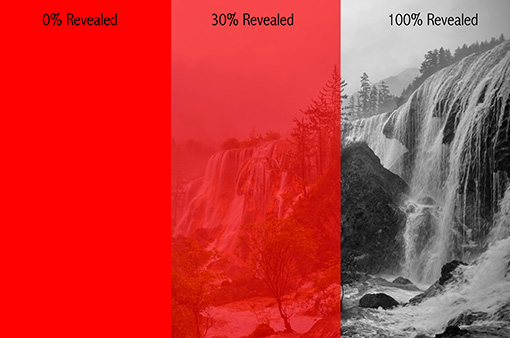
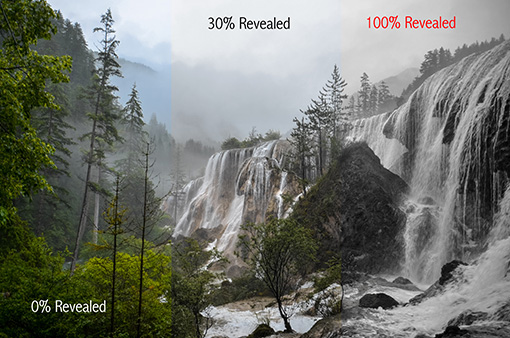
Most post-processing editing programs will allow a varying degree of transparency for a mask. This means that a mask can be applied at 100%, 0%, or anything in-between.
photoshop lightroom mask explained

Transparency Percentage

Above is the example with a black-and-white preset applied:

  • A 100% revealed mask is a black and white photo
  • A 30% revealed mask has a subdued color effect
  • A 0% revealed remains a full-color photograph

Quick Tip: You can vary the transparency of a mask from zero-to-100% in certain programs and with certain tools.

Masks are an essential tool to change a part of your photo while leaving the rest of the image alone.

Remember These Terms:

A global edit is one that affects the entire picture. A localized edit is one that affects only a portion of a photograph. The part of a photograph that a localized edit changes is determined by a mask.
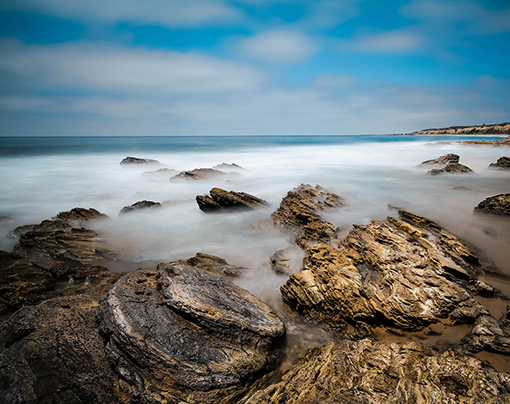
example photo for masking in photoshop

Photo by Jung Ho Park via Unsplash

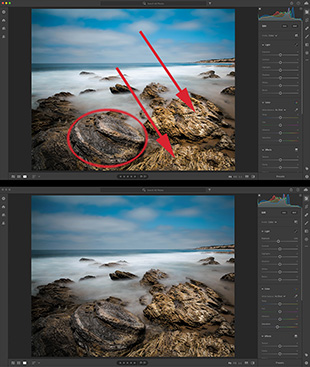
For example, in the above photo, I want to slightly darken the lighter rocks in the foreground on the right, so that the circular stones in the center-left are more prominent within the composition.
masking lightroom walkthrough

Masking a seascape

I want to darken the rocks at the red arrows while preserving the rest of the picture so that the stones in the red oval become more dominant.

On the bottom of the example photo above, I did a global adjustment using the Exposure slider in Lightroom CC.

It didn’t work out very well, as the entire picture became darker (global edit), and the round rocks don’t stand out at all.
masking lightroom tutorial

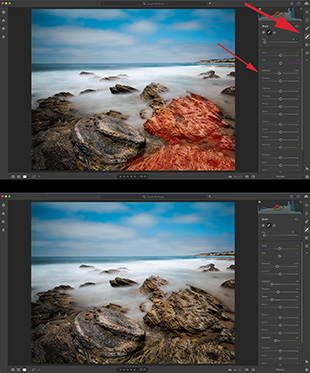
Masking tools

In the top half of the example photo above, I am using Lightroom CC to complete a localized edit.

I chose the Adjustment Brush, and I painted a mask over the rocks that I wish to change.

The larger red arrow points to the Adjustment Brush tool in Lightroom CC. The smaller red arrow points out my Exposure adjustment to the mask.

Quick Tip: In Lightroom, you can cycle the view of a mask on and off using the O key.

At the bottom half of the example photo above, you can see how my mask has darkened the rocks to the right, making the circular stones more visually prominent in the foreground.

Quick Tip: A mask can be created and applied in a distinct manner, such as by using the Adjustment Brush. However, at other times, masks are operating in the background, and you may not even realize they are there.
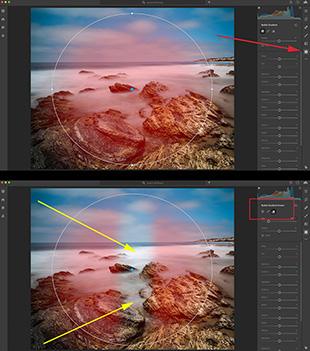
masking lightroom walkthrough

Masking brushes

Some tools, like the Linear Gradient Tool and the Radial Tool, automatically create a mask in the background.

You may not realize that it’s there unless you press the O key to turn it on. Any mask, even an auto-generated one, can be edited—and this is the real power behind masking!

Quick Tip: Cycle the mask view on while you create the mask. Then cycle the mask view off while you make your adjustments with the sliders. If the modification you’re making isn’t affecting a part of the picture, you can add to the mask with the Brush tool. If the mask is changing a part of the image you don’t want it to, erase part of the mask with the Eraser tool. You can see these tools in the red box in my image above. The yellow arrows indicate how I’ve changed the mask using the tools mentioned earlier.

Masking opens up your photography to limitless possibilities!

About the Author:
Kent DuFault is an author and photographer with over 35 years of experience. He’s currently the director of content at the online photography school, Photzy.com.

For Further Training:

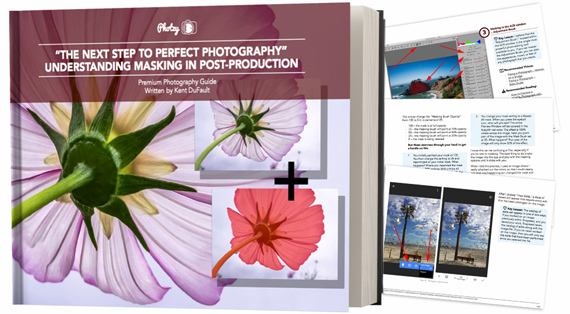
Achieving perfect photography requires more than just in-camera skills in today’s environment. Yes, even the professionals now rely on post-production skills to PERFECT their images. One of the most important photo editing skills to learn is called “Masking” and an in-depth guide is now available to help photographers master it. It is currently 68% off today if you want to check it out.
understanding masking

Masking: A Critical Skill for Photo Editing

After you read this new masking guide you’ll realize that you are no longer tied to what you find. You can clean up the bugs in your shots. Fix those less than perfect rose petals. Take out that pesky truck that parked right in the middle of your landscape shot.

Deal ending soon: Understanding Masking for Photographers at 68% Off


from PictureCorrect https://ift.tt/OcMf9qi
via IFTTT

sunnuntai 1. marraskuuta 2026

PictureCorrect.com: The Exact Point Where a Photo Edit Becomes Destructive

Most photographers have heard the advice to edit non-destructively. But what does that actually mean? And at what point does an adjustment permanently damage the information in your photograph?

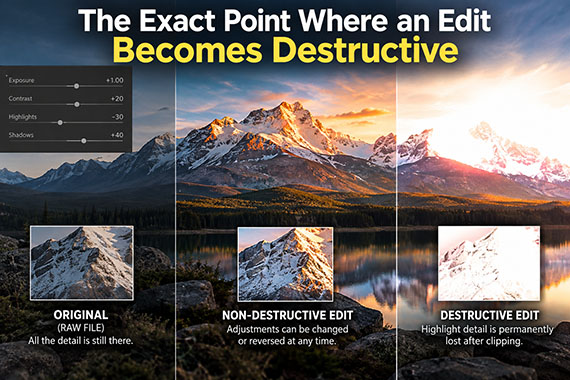
The answer is more specific than you might think. An edit becomes destructive when it permanently replaces or discards original image information that you can no longer recover from the saved file.

Understanding where that happens can change the way you approach photo editing.

Related: only a little while left for the Photo Editing Cheat Sheets 🍂 Autumn Editing Sale

destructive edit

Adjusting Pixels vs. Replacing Pixels

Imagine opening a photograph and increasing its contrast. The shadows become darker, the highlights become brighter, and the image looks more dramatic.

In a non-destructive workflow, your editing software simply remembers the contrast adjustment. The original image data remains untouched, and you can reverse the change whenever you want.

But if you apply that adjustment directly to the image pixels and save over the only original copy, you’ve crossed into destructive editing.

The distinction isn’t how dramatic the adjustment looks. It’s whether the original information is still available.

The Hidden Danger of Clipping

One of the clearest examples of destructive editing involves clipping.

Suppose you brighten a photograph until the brightest areas become pure white. Several different highlight values might now be mapped to the same maximum value of 255 in an 8-bit image.

Before the adjustment, those pixels contained subtle differences in brightness. After clipping, they may all contain exactly the same value.

If you permanently apply that change, lowering the exposure afterward won’t restore those differences. The information has already been discarded.

The same problem occurs when shadows are crushed to pure black.

However, there’s an important distinction: clipping visible in a Lightroom preview isn’t necessarily permanent. If you’re editing a RAW file with reversible adjustments, you can often pull those highlights or shadows back.

Why Layers and RAW Files Matter

Programs like Lightroom and Adobe Camera Raw typically store adjustments as instructions rather than rewriting the original RAW data.

Photoshop can also preserve information through adjustment layers, Smart Objects, and masks.

Consider these two approaches:

  • Destructive: Apply a Levels adjustment directly to a pixel layer, flatten the image, and save over the original.
  • Non-destructive: Add a Levels adjustment layer that can be modified or removed without changing the underlying pixels.

Both approaches might produce identical-looking photographs. But only the second preserves the flexibility to revisit the adjustment.

This is especially important when editing high-contrast scenes, recovering shadows, or making significant color corrections.

Is Exporting a JPEG Destructive?

Technically, yes. Standard JPEG compression is lossy, meaning some image information is discarded during encoding.

Additionally, exporting an edited photograph to JPEG generally bakes your adjustments into the output pixels.

But that doesn’t mean exporting JPEGs is a bad practice.

If your original RAW file and editable adjustments are preserved, the JPEG is simply a finished version. You can always return to your source image and produce another export.

The real danger comes when the compressed, flattened JPEG becomes your only remaining copy.

A Simple Rule for Every Edit

Before making a major adjustment, ask yourself:

Could I completely undo this change tomorrow, after closing and reopening the file?

If the answer is yes, you’re probably working non-destructively.

If the answer is no, you may be permanently changing or discarding image information.

Keep in mind that even non-destructive software cannot recover detail that the camera never captured in the first place. Completely blown highlights or severely underexposed shadows may contain little usable information regardless of your editing workflow.

Final Thoughts

Destructive editing isn’t defined by how far you push a slider. You can make extreme exposure, contrast, or color adjustments without permanently damaging the original photograph.

The exact turning point comes when the original pixel information is overwritten or discarded without a recoverable copy.

Preserve your RAW files, use adjustment layers when possible, and avoid overwriting your originals. These simple habits give you the freedom to experiment aggressively while keeping your photographs safe for future editing.

For Further Training:

If editing often feels scattered or uncertain, these cheat sheets provide a clear, repeatable process for tackling exposure, color, masking, retouching, and finishing touches in the right order.

photo editing cheat sheets

Paired with time-saving keyboard shortcuts, they help you edit faster, stay consistent, and know when an image is truly finished.

Deal ending soon: The Photo Editing Cheat Sheets 🍂 Autumn Editing Sale


from PictureCorrect https://ift.tt/CgDQLOA
via IFTTT