


Modern-day cameras have excellent autofocus systems. This means most of the time you’ll get images that are in focus. But, there are many circumstances where the autofocus system can fail. Photographer Mark Hemmings shows you how to correctly set focus so you’ll never take a blurry photo again:
Single Shot Autofocus Mode
In this mode, the camera focuses on the subject only once. It’s perfect for subjects like landscapes, architecture, and portraiture where the subjects do not move around much.

To use this mode, set the focus mode to S or AF-S depending on your camera model. When you let the camera decide where to focus at, it usually focuses on the subject that is at the center of the frame. Half press the shutter button to focus on the subject, and then press it fully to take the image.
However, if you want to compose with your subject off to the side, you can use a technique called focus and recompose or move your focus point to tell the camera where to focus.
Follow these steps to use the focus and recompose technique:
- Compose with the subject at the center of the frame.
- Half press the shutter button to lock focus on the subject.
- Without releasing the half-pressed shutter button, move your camera to place the subject off to the side. The focus will remain locked to the subject, as the camera does not try to refocus in this mode.
- When happy with the composition, press the shutter button fully to take the photo.
When using the focus and recompose technique, make sure not to change the distance between the camera and the subject. If the camera or the subject moves forward or backward, the image will turn out blurry.
If you’re not sure that you’ll be able to maintain focus with the focus and recompose technique, you can move the focus point instead. This will tell the camera where exactly to focus. To control the focus point, do the following:
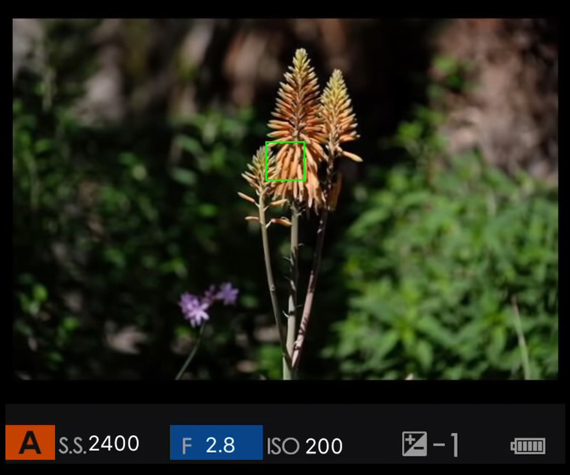
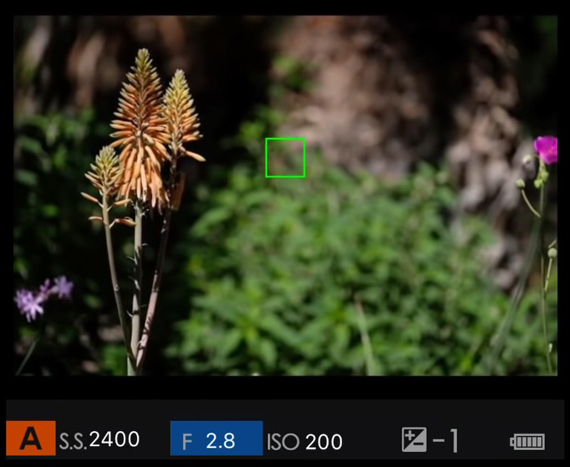
- Make sure that you select the focus area as a single point, spot, or flexible spot (depending on the camera model).
- Then, compose with your subject placed in any of the sides and using the camera’s joystick or dial, move the focus point over the subject.
- Half press the shutter button to focus on the subject and press fully to take the image.

Image taken with autofocus point on the plants

Image taken with autofocus point on the mannequin at the back
Continuous Autofocus Mode
Single-shot autofocus works great as long as the subject is static. But as soon as the subjects start moving, it will be of no use. This is when continuous autofocus mode comes in handy.

To use this mode, switch the focus mode to C, AF-C, or AI Servo. Keep in mind that you can still choose if you want to pick where the camera should focus or let the camera decide this on its own.
If you want to take multiple images of a moving subject, you can set the camera to shoot in a continuous mode. This way, the camera will keep on taking images until you keep pressing the shutter button or until the camera’s buffer fills up.
Using continuous autofocus mode sounds convenient, as it always keeps track of your subjects. However, there are two main drawbacks of this mode:
- It uses more battery as the demand for processing power is significantly greater than other focusing modes.
- For static subjects, the camera will still try to guess the subject’s movement. This can cause the camera to miss focus. It’s a good idea to stick with single autofocus mode for subjects that don’t move.
Manual Focus Mode
Autofocus modes depend on contrast to work. If there’s not much contrast in a scene, their performance will be greatly hindered. Also, when taking macro photos at 1:1 ratio, the camera will struggle to autofocus at such a close distance and with such narrow depth of field. Using manual focus mode is the only way out in such cases. Similarly, in dimly lit situations, the camera will again keep on hunting to lock focus. Focusing manually is the best option in such a case as well.
In order to use the manual focus mode, switch the camera over to MF via the system menu or by flipping the switch on the lens. Then, while viewing through the viewfinder or the LCD screen, rotate the manual focus ring until the subject appears sharp. Then, take the image by pressing the shutter release button.
So remember, use single autofocus mode for stationary subjects, continuous autofocus mode for moving subjects, and manual focus mode when the camera struggles to autofocus. With this in mind, you can start taking more images that are in focus.
Go to full article: Understanding Camera Focus Modes
What are your thoughts on this article? Join the discussion on Facebook
PictureCorrect subscribers can also learn more today with our #1 bestseller: The Photography Tutorial eBook
The post Understanding Camera Focus Modes appeared first on PictureCorrect.


from PictureCorrect https://ift.tt/2o464gY
via IFTTT


0 kommenttia:
Lähetä kommentti