tiistai 28. huhtikuuta 2020

PictureCorrect.com: Creative Photography: Technique Without Purpose

Technique without purpose is like a race without a finish line. Sure you can run as fast as you can and continuously improve—to what end?

creative photography lessons

photo by Tucker Sherman

Creativity and artistic expression are hard to define. What is artistic and creative for one person is just a pile of trash to the next. This is the main reason that a lot of people look upon creativity as some sort of gift that is bestowed upon the lucky few. Nothing could be further from the truth.

Creativity can be taught. I have done so for many people from all sorts of professions. Creative techniques can easily be taught but knowing the techniques by themselves will not bring out the creative talent that lies within most of us.

unique photography perspective

photo by Frank Meffert

Each and every one of us has a different view of the world. This view has been influenced and is made up from the sum of our previous experiences in life. Every single one of us has learned from these experiences in slightly different ways, therefore your creative genius and talent comes from being able to express your unique way of seeing the same things as others. It’s like you’re looking at life through your own unique set of glasses—a set that no one else can actually reproduce.

So next time you pick up the camera ask yourself, “What unique vision do I bring to the scene?” Creativity is not about finding new things constantly but rather seeing the same things from a different view—your view!

low angle of view

photo by Jack Wallsten

For myself, I’ve just embarked on a new series titled “Through The Rabbit Hole – Melbourne.” Yep, I’ve lived in this city for over four decades and have decided that I need to take a re-look at the world’s most livable city, through new eyes or more accurately, eyes which have four decades worth of history with this city.

I’m not even worrying about the technical side of things. I’m experimenting, toying with settings, different times of the day, and just trying to capture the emotional pull of this city of mine. I’ve given myself permission to just fly with it and have fun.

looking for unique views in photography

photo by Carlos ZGZ

This is creativity at its most fundamental. The joy of spontaneity and letting the images come to me rather than being in control of the entire situation, including the lighting, models, approach, and all the rest.

So if you’re truly stuck in a rut or looking to get your creative genie out of the bottle, start having fun with your photography. There is no right or wrong. There’s only your view and how you present it to the world.

The series mentioned in this article is still a work in progress. You can keep up with each image as it gets uploaded via my social links or my website below!

About the Author
My crazy world has included successfully combining all the skills of a artist, photographer, designer, programmer, and marketer into one crazy life. I’m available for guest blogging, article writing, and speaking events. Follow me in my crazy world via my site or Instagram!


Go to full article: Creative Photography: Technique Without Purpose

What are your thoughts on this article? Join the discussion on Facebook

PictureCorrect subscribers can also learn more today with our #1 bestseller: The Photography Tutorial eBook

The post Creative Photography: Technique Without Purpose appeared first on PictureCorrect.


from PictureCorrect https://ift.tt/2wElav6
via IFTTT

PictureCorrect.com: Interesting Photo of the Day: Rainy London

Believe it or not, rainy day conditions are a great time to be walking around a city taking photographs. Of course, the flexibility will be limited but this limitation is what will force you to think creatively. Then, there’s also the advantage of being able to photograph the moody side of the city. Everything about a city looks so different when it rains. The freshness, the lights reflecting all around, and the people hustling about, all give a different vibe to the city. Photographer Karthik Ramanathan was on a bus in London, when he captured this beautiful rainy side of the city:

“A Rainy Day in London” by Karthik Ramanathan (Via Reddit. Click image to see full size.)

The water trickling down the window pane almost makes it feel as if the image is an impressionist painting. One may even argue that it looks like an oil painting, but in any case the rain adds a beautiful mood to the image.

And the fact that Ramanathan took this image from a bus is a reminder that you can take photos anywhere. Just because he was on a bus on a rainy day didn’t stop him from taking his camera out. It’s quite obvious that he came across a beautiful opportunity and he took it. This again reiterates the fact that if you truly love photography, have a camera with you anywhere you go. Opportunities can present themselves in the most unexpected ways, so be prepared to capture them.


Go to full article: Interesting Photo of the Day: Rainy London

What are your thoughts on this article? Join the discussion on Facebook

PictureCorrect subscribers can also learn more today with our #1 bestseller: The Photography Tutorial eBook

The post Interesting Photo of the Day: Rainy London appeared first on PictureCorrect.


from PictureCorrect https://ift.tt/2SgCyjQ
via IFTTT

PictureCorrect.com: How to Take a Soft Light Portrait Using Speedlights

Speedlights are quite handy light sources that fit into many photographers’ budgets. Being a small light source, it creates hard light and can produce harsh looking results. But, when used with different light modifiers, it has the potential to create beautiful and dramatic results. Photographer Mark Wallace from Adorama shows you how you can use speedlights with some of the light-shaping tools to create soft light for beautiful portraits:

Wallace demonstrates how you can create a soft light portrait that packs a punch to it using three speedlights. Start by using a shoot through umbrella as a key light. It creates a soft light that beautifully wraps the subject. While you can easily get a soft look this way, it’s not all that exciting.

“We need to be able to shape our light, and add and subtract some things to make sure that we have beautiful light, not just blah soft light.”

You can then use a second speedlight with a reflector and a grid to work as a kicker light to highlight the cheek, shoulder, and hair. Finally, set up another speedlight with a grid and snoot to focus the light just on the subject’s hair. These three speedlights work great together to create a soft look portrait with highlights just at the right place.

To add a final touch, you can restrict light coming from the shoot-through umbrella from reaching the background. Simply place a subtraction panel between the shoot-through umbrella and the background. And if the side of the model’s face that’s away from the key light is too dark, use a reflector to fill the shadows.

You don’t always need expensive flashes and modifiers to create brilliant portraits. Try this technique to start off, and build on it to improve your portrait photography.


Go to full article: How to Take a Soft Light Portrait Using Speedlights

What are your thoughts on this article? Join the discussion on Facebook

PictureCorrect subscribers can also learn more today with our #1 bestseller: The Photography Tutorial eBook

The post How to Take a Soft Light Portrait Using Speedlights appeared first on PictureCorrect.


from PictureCorrect https://ift.tt/2KGMRtF
via IFTTT

maanantai 27. huhtikuuta 2020

PictureCorrect.com: Composite: Photoshop Basic Guide for Real Estate Photographers

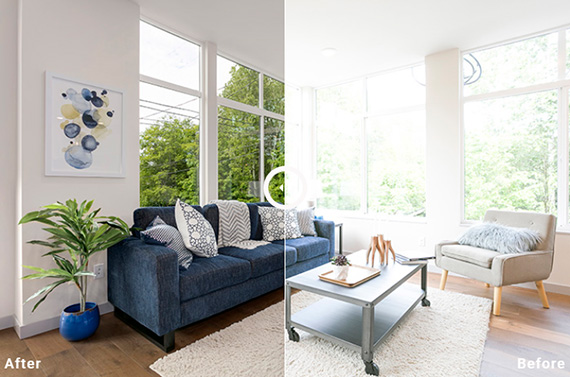
A composite image, or simply a composite, is an image created from multiple photos that are blended together. This technique can be used for different types of photography. In real estate and architectural photography, doing composites can be a handy trick.

before after composite

Before/After Composite

Composites in Real Estate Photography

Composites for real estate and architectural photography are usually used for interior shots. Others use this strategy to composite flash and ambient shots into a single photo.

What professional real estate photographers would do is to take varying flash shots of a room or exterior. This works best for areas that are too dark, like interiors. If you’re shooting the exterior during a darker time of day, this trick will also work for you.

How to Shoot for a Composite

When you’re taking photos of a project, whether it’s interior or exterior, make sure that you have taken an ample amount of different images to make your composite. Make sure that you’ve lit the different areas enough with a flash. Figure out the areas and places that need to be lit up and highlighted. Having an ambient light shot will also be a great base for your composite. For an interior, having three to five frames can be enough for a composite. Larger spaces might require even more frames.

Creating a Composite in Photoshop

Once you have the necessary shots, it’s time to do the work in Photoshop. Doing composites in Photoshop is one of the basic tricks that you have to learn as a real estate photographer.

Here are the steps that you can take to make a composite in Photoshop for real estate images:

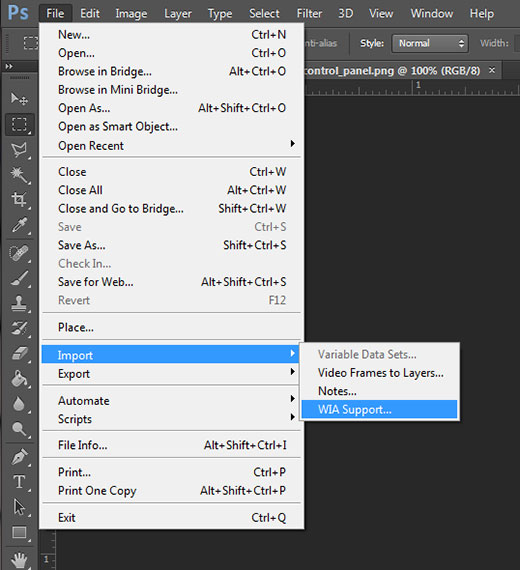
1. Import photos in Photoshop.

Get your images ready for Photoshop. Go to File menu, choose Scripts, and click on Load Files into Stack. Choose the frames that will make up your composite. This will put your images into different layers.

import photos

Import

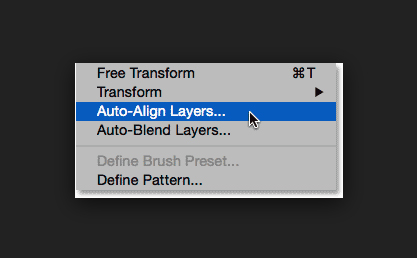
2. Auto-align the layers.

Shift-click on the layers. Go to the Edit menu and click on Auto-Align Layers. Choose Auto and let Photoshop align the images for you.

align layers

Auto-Align

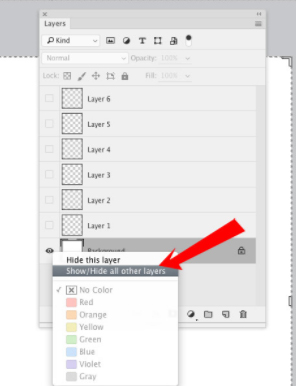
3. Hide the other layers.

Put on a layer mask and hide the other layers except for your base ambient light layer. To do so, click on the specific layer then hold down the Alt or Option key and click the layer mask button. This will put a mask on the respective layers.

hide layers photoshop

Hide All Other Layers

4. Start compositing one layer.

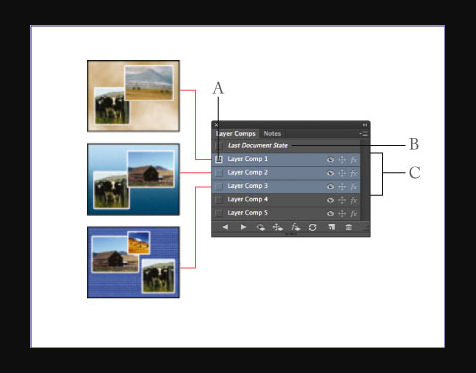
To add in the lighting of one layer to the base photo, click on the Brush tool and soften the flow to around five or ten percent. Paint white on the layer mask of the specific layer that you want to show on the base layer. The light will start to change as part of the top layer merges with the base. Make sure that you exclude those parts of the layer that shouldn’t be on the output. Once you’re happy with the first layer, move to the next layer and repeat the same process of painting white over the layer mask.

layers in photoshop

Composite Layers

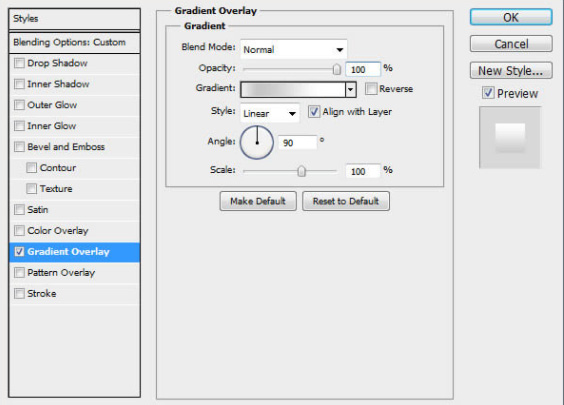
5. Gradient a layer.

This is an optional step that adds depth and dimension to the photo. Just click the Gradient tool and drag it across the photo in the direction that you want the light to show up. Make the necessary adjustments to make the gradient as realistic as possible.

layer gradient

Gradient a Layer

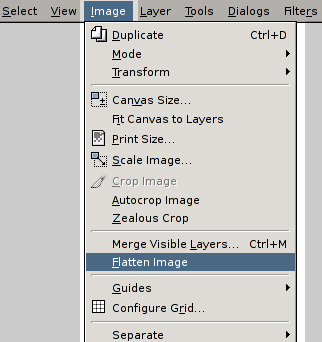
6. Flatten image.

Once you have the ideal output that you want, merge the layers. Go to the Layer menu and click on Merge Visible. Now you have your final composite photo.

photoshop flatten

Flatten Image

7. Lens correction.

This step is optional. Go to the Filter menu, click on the Lens Correction filter, and make the proper adjustment to align the image. You may want to check the lines of the image, like the tiles, corners of the cabinets or furniture, or the edges of the walls for alignment.

8. Final touches.

Make sure that the colors and tones of the image are correct before finishing up. If you’re already happy with the image, then it’s ready to be sent to the client.

About the Author
Rachelle Moore of Phixer is a technology enthusiast who writes articles about photography, photo editing, and videography.


Go to full article: Composite: Photoshop Basic Guide for Real Estate Photographers

What are your thoughts on this article? Join the discussion on Facebook

PictureCorrect subscribers can also learn more today with our #1 bestseller: The Photography Tutorial eBook

The post Composite: Photoshop Basic Guide for Real Estate Photographers appeared first on PictureCorrect.


from PictureCorrect https://ift.tt/2ruBj5R
via IFTTT

PictureCorrect.com: Small Perching Bird Photography Tips

Bird photography in itself is quite a challenging genre of photography. You need to be very patient with your subjects. Even locating those tiny little fellows demands quite a bit of attention and presence of mind. And even after you do so, getting them in the frame to snap a photo is a challenge.  Professional bird photographer Paul Miguel demonstrates in this video how you can get perfectly sharp images of perching birds:

Miguel shares some interesting insights on what it takes to be a professional bird photographer. It’s not only about what camera and lens you use, but how you use it. He shares how you must be able to maneuver your system effortlessly so that you don’t miss out on any shot. Also, you need to be very wary of any kind of noise level. If your camera is making a lot of noise, muffle it.

Then there are the basic yet vital factors that determine how the images come out – camera settings. Be picky about what shutter speed and aperture you’re using. Little birds are very quick, choose a shutter speed based on their movement. And don’t forget to pay attention to the kind of perch they’re on when choosing your shutter speed. When choosing your aperture, also consider your distance from the bird. The closer you are, the lesser the depth of field. You will need to set your aperture size accordingly.

He then goes about discussing the autofocus points, the drive move, and the autofocus mode that’s useful when taking bird photos. All of these camera settings and techniques aside, you also need to be quite attentive. Keep your eyes and ears open and learn to anticipate. Always be ready to shoot. Who knows when you’ll be presented with a beautiful bird moment to photograph.


Go to full article: Small Perching Bird Photography Tips

What are your thoughts on this article? Join the discussion on Facebook

PictureCorrect subscribers can also learn more today with our #1 bestseller: The Photography Tutorial eBook

The post Small Perching Bird Photography Tips appeared first on PictureCorrect.


from PictureCorrect https://ift.tt/3f2AbLF
via IFTTT

PictureCorrect.com: Photography Laws for Developing Yourself

Imagine what would happen if there was no system of law and governance. In the absence of a body to govern the people, almost everybody and everything would go haywire. Laws keep everyone within a defined track by differentiating the rights from the wrongs. If you want to seriously grow as a professional photographer, it’s essential that you have some sort of value system of your own. It will guide you and help you to develop into a better photographer professionally and personally. Photographer William Hall talks about his 5 personal laws of photography that he picked up over the years:

Hall talks about the laws that he has set up to develop himself. The laws don’t only cover topics related to gear, but also refer to psychological and conceptual topics.

The world of photography is quite distracting these days. There are thousands of photographers who tell you to follow certain composition rules, use certain gear, and apply certain presets. Who do you listen to? The answer is simple: no-one. Develop your own personal vision, and shoot to capture your ideas. And realize that you don’t need all of that fancy gear they’re promoting. Choose one that works best for you and stick to it. It’s better to learn to master what you already have than wishing for all the unnecessary gear out there.

“The less options you are presented with, the more creativity is going to arise.”

Also, make an effort to  be around creative people. Follow the works of proven geniuses. Go through photography books. Creative ideas can be transferred through various channels that ultimately leads to better results.

“Our outer world inspires our inner world.”

Have you ever tried setting up such guiding principles for yourself? If not, it’s still not too late.


Go to full article: Photography Laws for Developing Yourself

What are your thoughts on this article? Join the discussion on Facebook

PictureCorrect subscribers can also learn more today with our #1 bestseller: The Photography Tutorial eBook

The post Photography Laws for Developing Yourself appeared first on PictureCorrect.


from PictureCorrect https://ift.tt/2y7lNki
via IFTTT

sunnuntai 26. huhtikuuta 2020

PictureCorrect.com: Pet Pictures

Today’s photo tip is to help you in shooting better pet photos. Pet portraits can be the most fun you’ve ever had with your camera, you’ll meet a bunch of really nice people and it’s one of the easiest ways I know to go “pro” if that is a goal of yours.

This tip concerns the tongue…

pet picture

Photo captured by PictureSocial member Zefeng Chen

When I was specializing in pet photos, at first I used to work very hard at shooting the dog with its tongue in its mouth!

This is always a good strategy because it gives you an elegant, classic portrait.

But, my customers would look at my photos and frequently I heard comments like, “But he doesn’t look happy!” They could never explain why the dog didn’t look happy, just that it was true.

This stumped me for a long time. The ears were up, the dog looked alert, and I clearly remembered the dog as being very happy that day. The portraits were gorgeous.

Finally, I tried shooting a series of shots with the tongue out – AND I NEVER HEARD THAT COMPLAINT AGAIN!

When the tongue is out, the dog looks happier and more playful. You lose a bit of the elegant look, but gain a lot of personality.

When you are shooting, do some of each. Tongue in for a more classic and elegant pet portrait. Tongue out for a happier more playful, exuberant one.

happy dog photo

“Happy Dog” captured by PictureSocial member John Read

But, the tongue has to be in front of the mouth; not hanging out the side… no one likes those. It’s amazing how long some of those tongues can be! Whether to the front or the side, you don’t want it hanging halfway to the ground.

How to get the tongue in?

Get a dog’s toy that squeaks. They have them in almost all grocery stores. I like to get the “newspaper” one. They are flat and don’t roll away when it hits the ground. Get ready to shoot and then gently squeak the toy.

The ears will pop up, and the tongue will go in – for about half a second. So, you have that half a second to get your contest winning shot.

Eventually, the dog will get tired of the squeak and it won’t work any more. When that happens, gently flick the squeaker into the air. (Near the lens.) Shoot fast, the dog is going to go for the toy. See why I don’t want it rolling away? I want to get it first!

You will only get a second or two for the shot, but with a bit of practice, that is plenty of time. While I always recommend taking your camera off its automatic settings, with animal photos, auto focus is almost a MUST!

pet photography

“Mini on Guard” captured by PictureSocial member Mike Milton

Shooting better pet photos is easily with reach of all of us. Give it a try! Pet portraits are very rewarding and the pet owners will love you forever!

About the Author:
Dan Eitreim writes for ontargetphototraining.com. He has been a professional photographer in Southern California for over 20 years. His philosophy is that learning photography is easy if you know a few tried and true strategies.


Go to full article: Pet Pictures

What are your thoughts on this article? Join the discussion on Facebook

PictureCorrect subscribers can also learn more today with our #1 bestseller: The Photography Tutorial eBook

The post Pet Pictures appeared first on PictureCorrect.


from PictureCorrect https://ift.tt/2VDtyrl
via IFTTT