sunnuntai 7. marraskuuta 2021

PictureCorrect.com: Geyser Eruption Photography Tips

Geysir in Haukurdalur, Iceland is the home of the original geyser. The large geyser doesn’t erupt any more due to a history of soap powder and earthquakes. However, its little brother, Stokkur, does erupt regularly at intervals of around 5 to 7 minutes, so a typical visit to Geysir should allow any photographer to capture 5 to 10 eruptions. A visit to Geysir is an important part of any trip to Iceland and can be seen on the popular Golden Circle tour, which almost every Iceland tour operator runs.
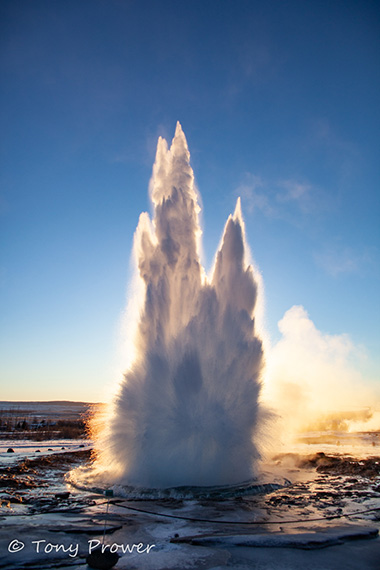
backlit geyser

Contre Jour

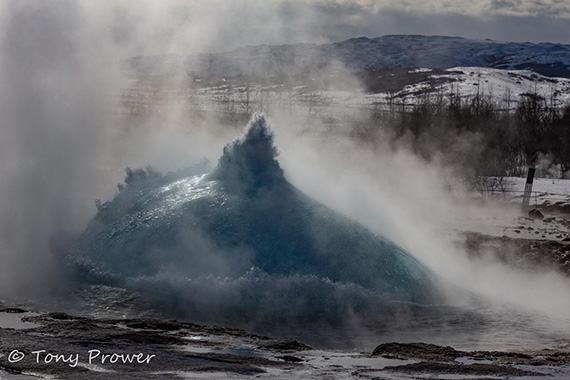
This photograph was taken in December. In Iceland in mid-winter, the sun doesn’t get very high. Using the sun as a strong back-light really brought out a long of textures and details that would otherwise be missing. The strong back-light shows various layers of water within the boiling spout. In the early days of photography, it was believed that shooting Contre Jour (into the light) was not possible. It was thought that you had to shoot with the light or at an obtuse angle.

Camera

I’m using a Canon 5D Mark II in shutter priority mode with a 1/2000 second shutter speed. The fast shutter captured tiny water droplets as they escape the explosion. The fast shutter also allows the continuous burst mode to run smoother. On a compact camera, the “sports” (or action) mode would be a suitable choice of shooting mode. I adjusted the iso to 400 which gave me an aperture of f/4. On a 24mm prime, that aperture easily gave me a depth of field to cover the surface of the erupting geyser. On a wide angle lens, it’s difficult to get a shallow depth of field, but I didn’t want to shoot this scene at f/2.8; f/4 is a better choice to ensure sharpness on the subject. If you’re shooting compact or iPhone, this sort of wide angle shot with a limited depth subject will rarely suffer from DOF issues. It is far better to prioritize the shutter speed by using sports/action mode or shooting in good lighting.
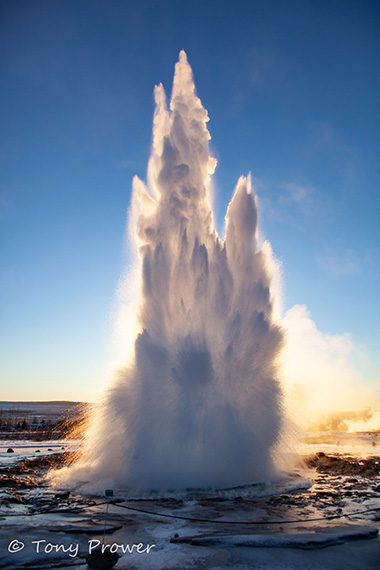
geyser full height

Eruption

Composition

I’m composing vertically with the geyser vent at the bottom of the frame. My lens was the Canon 24mm f/1.4 and the full height of the eruption just fit into the frame. Today, the rope circle has been extended to cope with larger crowds. The same type of composition can be achieved with a 50mm now because you have to stand much farther away. If you’re unsure of your focal length, it may take a few practice attempts before the geyser fits nicely in your frame. Eruptions do vary and you have to see 3 or 4 before you see a full height eruption.

Steady

It’s important to use a tripod at the geyser. Although this is a fast shutter, the tripod is so useful for holding your camera between eruptions. For this shot, I had my manual focus set so that when I press the shutter, the camera will respond faster. An erupting geyser has no hard edges so your camera would have great difficulty auto-focusing in this situation. Continuous burst is a highly recommended way to capture the various stages of the eruption.

Compensation

You can see how the sun is directly in the lens before the eruption, so I used a +1 stop exposure compensation to account for the change in brightness as the Geyser erupts.
geyser photography

Blue Bubble

geyser eruption

Blue Bubble

iceland geyser eruption

Blue Bubble

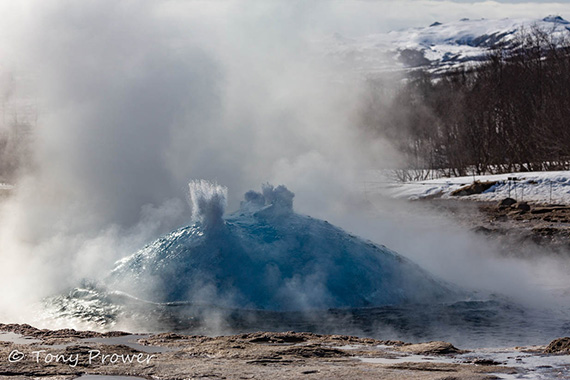
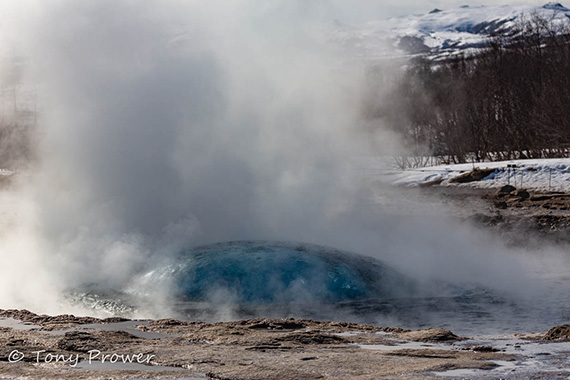
Just before an eruption, the surface of the water stretches and forms a blue convex (bubble). Capturing the blue bubble is a bigger challenge than photographing the full-length geyser eruption. This series of photos was taken in April, and you can see the snowy landscape in the background. The setup is the same as for the erupting geyser regarding the tripod, fast-shutter (1/3200 second), manual focus, and continuous bursts, but there was no compensation. The lens was a 135mm prime lens. I adjusted the ISO to 200 to allow a f/7.1 aperture. This gave me just enough DOF to cover the surface of the bubble and give me sharp details.

About the Author
Tony Prower is an Iceland landscape photographer.


Go to full article: Geyser Eruption Photography Tips

What are your thoughts on this article? Join the discussion on Facebook

PictureCorrect subscribers can also learn more today with our #1 bestseller: The Photography Tutorial eBook

The post Geyser Eruption Photography Tips appeared first on PictureCorrect.


from PictureCorrect https://ift.tt/2Yo0lVq
via IFTTT
lauantai 6. marraskuuta 2021

PictureCorrect.com: Long Exposure Photography Calculation Trick

Long Exposures look great but can be a little tricky to get the correct exposure. Sure there are Apps and charts to help out, but, what if there was an easier way?

A way that doesn’t require an App, doesn’t require a chart and most importantly doesn’t require taking your filters off to calculate the exposure length.

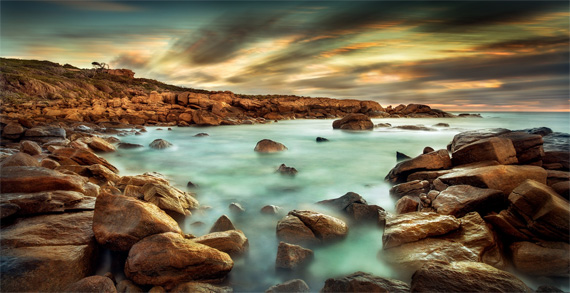
coast long exposure

The easy way to perfectly calculate the exposure time for your long exposures every time!

Let’s get into it.

  1. Frame up your shot
  2. Place the filters you wish to use into your filter holder and onto the camera, ready to shoot
  3. Set your ISO to 6400
  4. Test shoot at ISO 6400 until you have the perfect Histogram
  5. Once you have the perfect histogram, take note of the exposure length.
  6. Set your camera back to ISO 100
  7. And now how many seconds exposure at ISO 6400 now equal minutes at ISO 100

Basically, with all your filters in place and your camera set to ISO 6400, if the perfect exposure was 1 second, once you switch back to ISO 100 your perfect Exposure will be 1 minute.

2.5 secs = 2.5 minutes
10 secs = 10 minutes

Once you have the perfect exposure at ISO 6400, you have the perfect exposure at ISO 100.

ISO 6400 Seconds = ISO 100 Minutes

Why? Basically, it comes down to ratios.

60 seconds in 1 minute = 64 ISO 100s in ISO 6400 – roughly the same ratio’s.

I guarantee this technique works perfectly in constant light. Go out at midday with your 10 stop filter and try out the ISO 6400 technique. I bet it works every time!

Just make sure you remember to switch back to ISO 100 before taking the Long Exposure!

Oh and remember to calculate the ISO 6400 seconds with your filters in place.

long exposure rocks

Long Exposure Tips

  • Make sure when you are shooting LE’s that you cover up your rear viewfinder, a little light can sneak in there and ruin your Long Exposures.
  • LE’s can be really tricky when the light is rapidly changing, like Sunset/Sunrise. My rule of thumb here is if you are shooting LE’s as the light is changing, you need to 1/2 your exposure time as the light is increasing at Sunrise and Double it as the light fades at Sunset.
  • Use Bulb Mode to shoot LE’s longer than 30 seconds

Below is a video on the same technique.

The most likely time to damage or break your neutral density filters is taking them on and off your camera. Rather than take your filters off to calculate your exposure time, leave them on and use this simple super fast technique.

For Help with Photo Editing, Offer Ending Soon:

If you are working on photo editing these days you may want to delve into the full in-depth course. It is currently 84% off which ends soon. Learn the Photoshop art of alchemy, the skills to transform the most ordinary of photos into extraordinary photographic masterpieces.

photoshop workflow bundle

Ultimate Photoshop Workflow Bundle

Not only will this workflow bring out and enhance the breathtaking natural beauty of your photos, it will also give you the freedom to take your photos in any creative direction you choose.

Deal found here: The Ultimate Photoshop Workflow Bundle at 84% Off


Go to full article: Long Exposure Photography Calculation Trick

What are your thoughts on this article? Join the discussion on Facebook

PictureCorrect subscribers can also learn more today with our #1 bestseller: The Photography Tutorial eBook

The post Long Exposure Photography Calculation Trick appeared first on PictureCorrect.


from PictureCorrect https://ift.tt/3qinLqO
via IFTTT

perjantai 5. marraskuuta 2021

PictureCorrect.com: 5 Photography Tips for Viewers to Connect With Your Photos

One of the best photography tips I can share is to think less about the technical aspects and more about the impact your photo has on the people who view it. While it’s important to understand the elements of exposure, those techniques won’t guarantee an emotional connection with your subject. Here are five ways to help you capture the moment that connects with your viewers.

photography connect

Photo by Andreas Dress; ISO 500, f/7.1, 1/500s, 37mm.

1. Patience

What makes a photograph art instead of a snapshot? Patience! Just because you want a photograph right now doesn’t mean the subject is ready for your right now. You may have to wait for a sunrise or sunset. You may have to wait for a bird to land on a post in the water. You may have to wait for the perfect wave to crash. Maybe—just maybe—you have to wait for all of these elements to coincide to get a shot that no other photographer will get because they weren’t patient enough to let things happen. Maybe they weren’t patient enough to see what happened next. The world will unfold on its own schedule, so pick a good spot, be patient, and be ready to capture the moment.

2. Timing

Some photographers enjoy shooting rapid-fire to get an action shot—spray and pray—and hope they have something good when the action is over. That isn’t control, though. It’s trusting your fate to luck.

It doesn’t matter if you’re shooting wildlife, sports, or a model in a studio. There’s a concept known as the peak of action, and that’s the shot you want to capture. You may get it with spray and pray, or you may not. Rather than firing off a blast of shots, think about your subject. Put yourself in the subject’s position. Look for patterns, rhythms, or any clues that will help you predict when and where your subject will be at the optimum moment to capture the peak of action.

A big part of timing is knowing your subject. You need to know the optimum time for that subject to arrive in just the right place.

animal photography

Photo by Aftab Uzzaman; ISO 160, f/5, 1/2000 exposure.

3. Intimacy

Your photos need to show a connection. Sometimes that means creating a connection between the subject and the view. In other cases, it means showing a connection with your subject and something important. That connection could be between people, such as a husband and wife or a mother and child. The connection could also be with a pet or a possession.

Imagine a body builder working with weights. You see that she’s strong. She’s intent. She’s focused. The story is about her, but the weights show a relationship that helps define her as the subject. She has a relationship with the weights she’s lifting. She needs them in order to be the woman she wants to be. Intimacy helps the viewer understand her story.

4. Light

Photographers know that light is both your enemy and your friend. Without it, there’s no photo. If you have too much light, there’s still no photo. That’s because an evenly lit photo is little more than a dull snapshot. Nothing stands out. Nothing is special because you see everything. There’s no mystery.

Shadows are crucial because they provide a sense of depth and dimension. Their sense of darkness give shape, form and a sense of importance to the part of the photo in the light.

There’s an old adage, “If you want to make something more interesting, don’t light all of it.”

black and white travel

Photo by Björn Bechstein; ISO 100, f/2, 1/160 exposure.

5. Story

If you want to improve your photos, then they need to tell a story. A photo needs to say something to the viewer. It needs to draw them in and make them wonder. It needs to pique their interest. People look at images that are interesting. What makes them interesting? The photo communicates something to them.

Does your photo make you wonder about something in it?

Why is the girl in the water? Where is this relaxing scene? What is the surfer thinking before he enters the water? I wish I had her dedication. Why does this dangerous beast look so content?

There are stories for any emotion. If you can feel an emotion, then there’s a story to go with it. That’s what you need to capture and share with your viewers.

About the Author:
William Beem is a photographer and author living in Central Florida. He manages a blog offering photography tips and travel photos. Occasionally, he also provides training along with the folks at Harmon Photo’s School of Photography.


Go to full article: 5 Photography Tips for Viewers to Connect With Your Photos

What are your thoughts on this article? Join the discussion on Facebook

PictureCorrect subscribers can also learn more today with our #1 bestseller: The Photography Tutorial eBook

The post 5 Photography Tips for Viewers to Connect With Your Photos appeared first on PictureCorrect.


from PictureCorrect https://ift.tt/3qaIYmp
via IFTTT

torstai 4. marraskuuta 2021

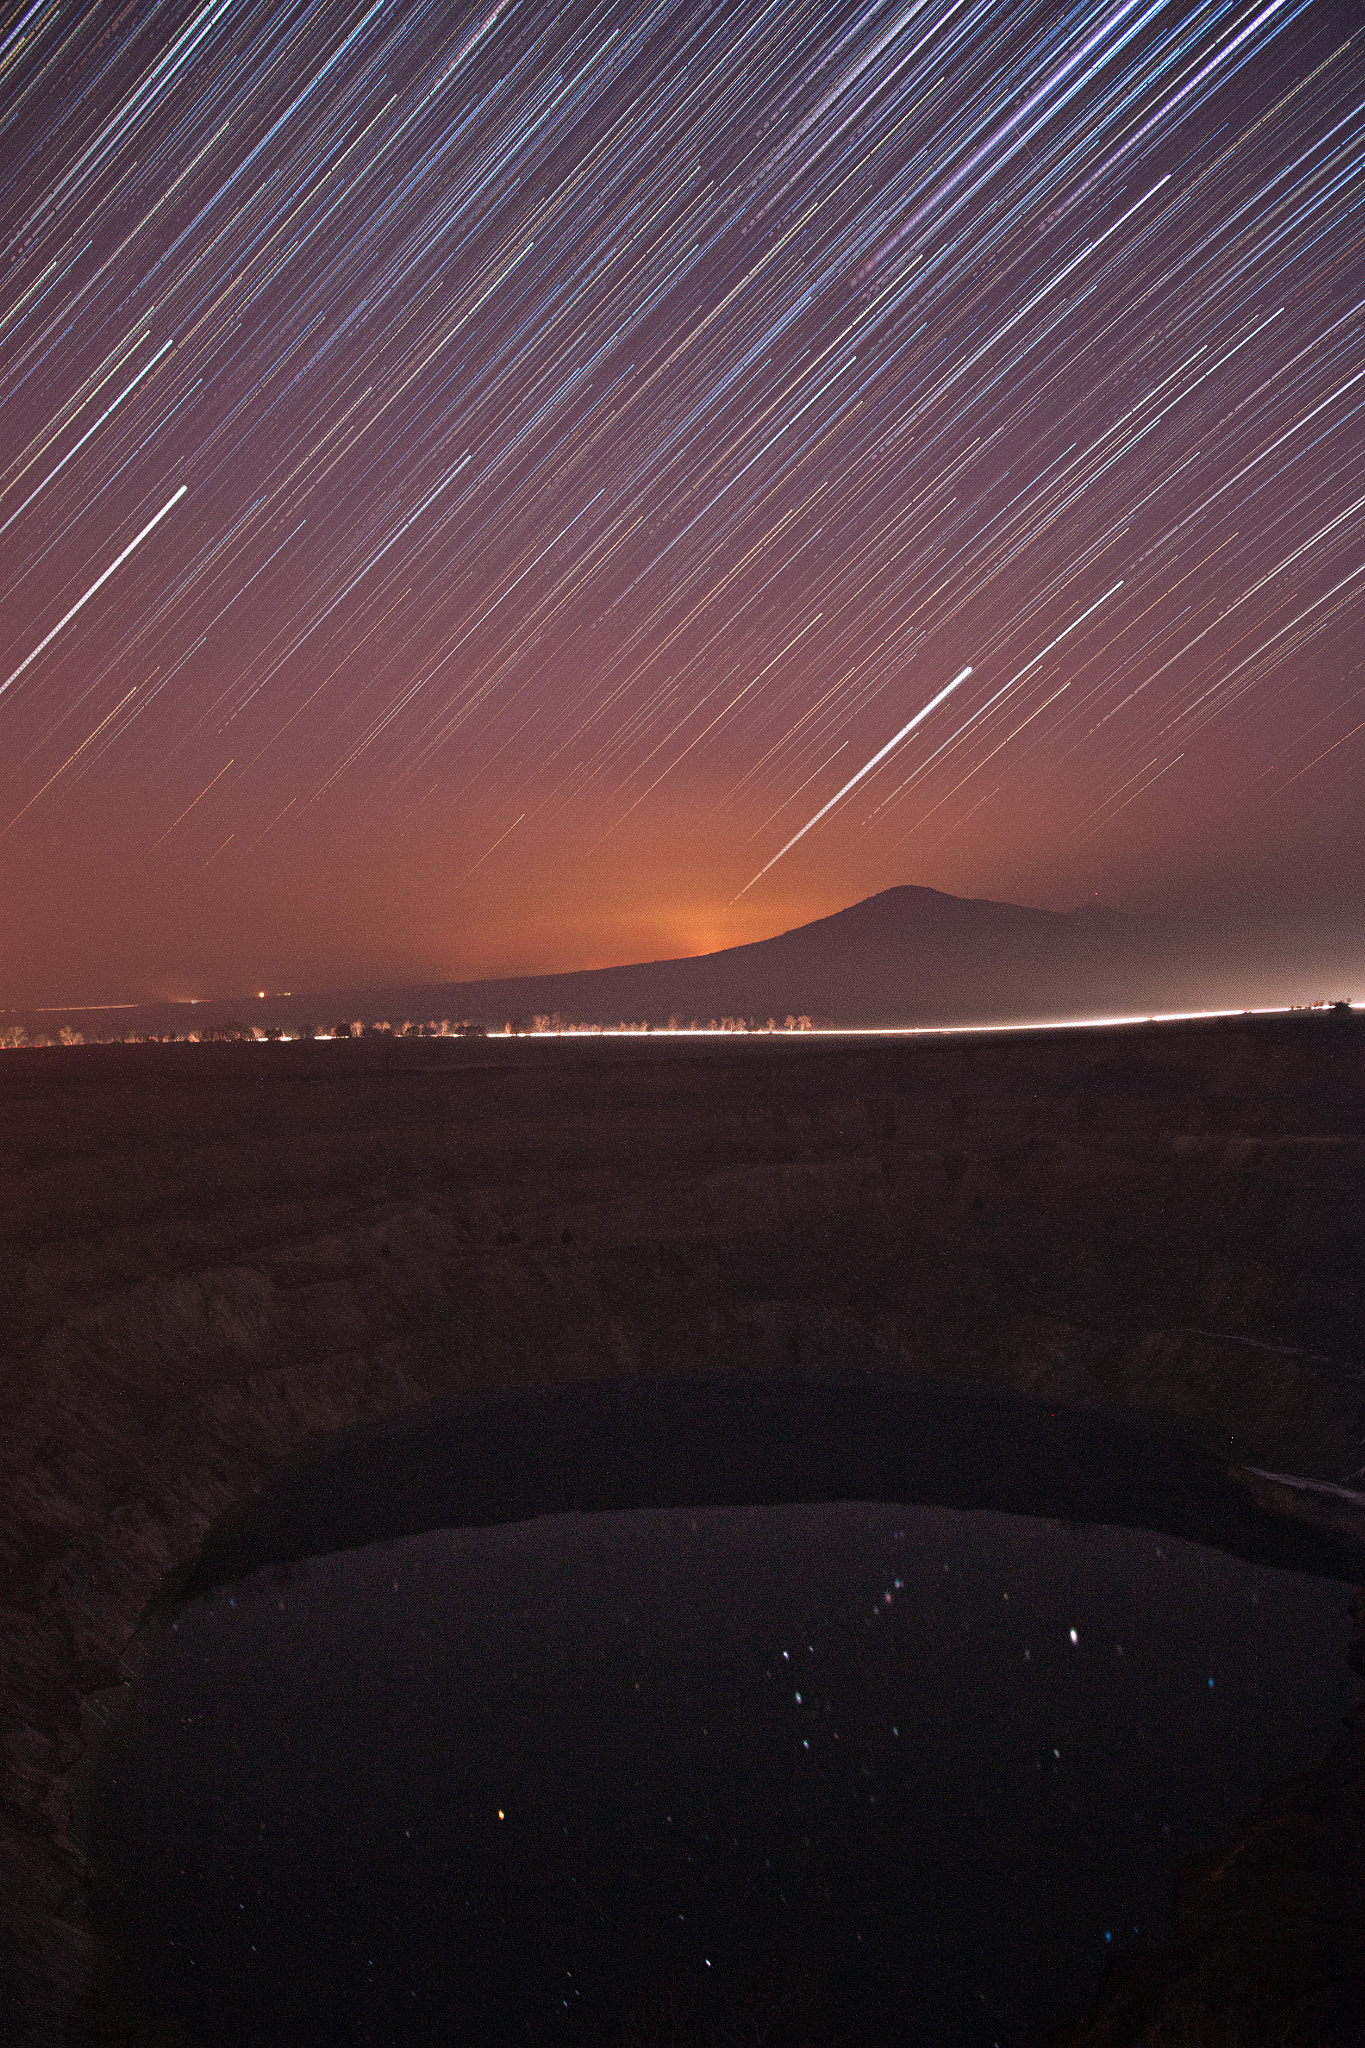
Startrails 2 by extremalen (500px.com/extremalen)


Startrails above abandoned mine. Different edit without the star spikes plug-in. via 500px https://ift.tt/2UGkP5X

keskiviikko 3. marraskuuta 2021

PictureCorrect.com: Top 10 Most Famous Photographers of All Time

If you want to take truly memorable and moving photographs, you can learn something by studying the pictures of famous photographers. Some of the most beloved artists are deceased, but some are still delighting us with their photographs. The list below includes some of the more famous photographers that still impact our lives today.

top 10 photographers

1. Ansel Adams is probably the most easily recognized name of any photographer. His landscapes are stunning; he achieved an unparalleled level of contrast using creative darkroom work. You can improve your own photos by reading Adams’ own thoughts as he grew older, when he wished that he had kept himself strong enough physically to continue his work.

2. Yousuf Karsh has taken photographs that tell a story, and that are more easily understood than many others. Each of his portraits tells you all about the subject. He felt as though there was a secret hidden behind each woman and man. Whether he captures a gleaming eye or a gesture done totally unconsciously, these are times when humans temporarily lose their masks. Karsh’s portraits communicate with people.

3. Robert Capa has taken many famous war-time photographs. He has covered five wars, even though the name “Robert Capa” was only the name placed to the photos that Endre Friedman took and that were marketed under the “Robert Capa” name. Friedman felt that if you were not close enough to the subject, then you wouldn’t get a good photograph. He was often in the trenches with soldiers when he took photographs, while most other war photographers took photos from a safe distance.

4. Henri Cartier-Bresson has a style that makes him a natural on any top ten photographer list. His style has undoubtedly influenced photography as much as anyone else’s. He was among the first to use 35mm film, and he usually shot in black and white. We are not graced by more of his work, since he gave up the craft about 30 years before he passed away. It’s sad that there are fewer photographs by Cartier-Bresson to enjoy.

5. Dorothea Lange took photographs during the Great Depression. She took the famous photo of a migrant mother, which is said to be one of the best-known photographs in history. In the 1940s, she also photographed the Japanese internment camps, and these photographs show sad moments in American history.

6. Jerry Uelsman created unique images with composite photographs. Being very talented in the darkroom, he used this skill in his composites. He never used digital cameras, since he felt that his creative process was more suited to the darkroom.

7. Annie Leibovitz does fine photographic portraits and is most well known for her work with Vanity Fair and Rolling Stone magazine. Her photographs are intimate, and describe the subject. She’s unafraid of falling in love with the people she photographed.

8. Brassaï is the pseudonym for Gyula Halasz, and he was well known for his photographs of ordinary people. He was proof that you don’t have to travel far to find interesting subjects. He used ordinary people for his subjects, and his photos are still captivating.

9. Brian Duffy was a British photographer who shot fashion in the 1960s and 70s. He lost his photographic interest at one time and burned many negatives, but then he began taking photos again a year before he died.

10. Jay Maisel is a famous modern photographer. His photos are simple; he doesn’t use complex lighting or fancy cameras. He often only takes one lens on photo outings, and he enjoys taking photos of shapes and lights that he finds interesting.

Of course there are other famous photographers that may be a part of your top 10 list. There is much to be learned in the art and craft of photography and from those who inspire us most.

About the Author:
Morris Pawtucket (FamousPhotographers125) writes about the famous photographers throughout history who have changed the way we see.


Go to full article: Top 10 Most Famous Photographers of All Time

What are your thoughts on this article? Join the discussion on Facebook

PictureCorrect subscribers can also learn more today with our #1 bestseller: The Photography Tutorial eBook

The post Top 10 Most Famous Photographers of All Time appeared first on PictureCorrect.


from PictureCorrect https://ift.tt/3CXNfxr
via IFTTT

tiistai 2. marraskuuta 2021

PictureCorrect.com: This is Why RAW is the Best Choice for Your Photography

This article is based on concepts from the DSLR Crash Course Guide if you want to dig deeper for further training.

I want give you the rock-solid reasons why RAW is your best choice for a camera file format.

Don’t get me wrong: there is a time and place for the trusted and long-used JPEG format as well. I’ll touch on that too.

The “glass of water” metaphor

why shoot in raw

Original image by Nolan Simmons

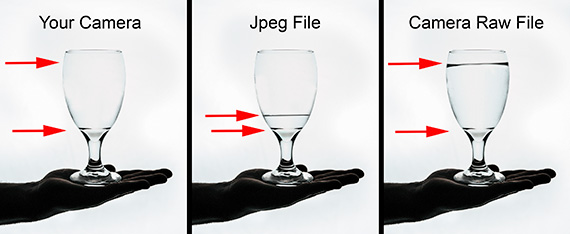
On the left, we have a water glass that represents your camera’s digital sensor. The red arrows illustrate the fantastic capabilities of your camera’s imaging sensor. It is capable of recording a lot of information.

In the center, the glass has water in it. But it’s only about a quarter full. This picture represents what a JPEG file records and transmits to your memory card. It’s quite limited in its abilities, which we will discuss further in a minute.

On the right, we see a full glass that represents what a RAW camera file is capable of recording—virtually everything your camera sensor has to offer.

Think of it this way

  • RAW is a digital negative. In the old days of film, you would take your negative into the darkroom and carefully craft your finished picture. Today, your digital negative is brought into your post-processing software—but you still carefully craft your final image.
  • A JPEG file is summarily processed. It would be the same as if you dropped your film off at the drugstore, and you receive whatever they deliver to you.

The strange world of bits

  • A JPEG is an 8-bit picture file. It displays a maximum of 256 colors.
  • A RAW file is anywhere from 12 bits to 16 bits, depending upon the age and complexity of the camera. It displays anywhere from 68 billion to a whopping 281 trillion colors.

All those extra bits mean more information captured and transferred to the memory card via the RAW digital negative file.

Why do we call a RAW file a digital negative?

First, let’s examine the JPEG file. When you apply settings within your camera menus, those settings are recorded to the JPEG file. After the picture is taken, they cannot be removed.

Those same settings won’t affect the RAW file, which ignores those settings, because it knows you are going to process the negative yourself!

What about TIFF, you ask?

A JPEG is not only just an 8-bit file, it also is compressed in what is known as a “lossy” compression algorithm. This means that over time, a JPEG file slowly deteriorates every time it is opened, altered, and saved.

A TIFF file can be anywhere from 8 to 16 bits, depending on the camera. However, the biggest difference is that a TIFF file is uncompressed. So, there is no loss of quality over time. However, a TIFF file created in-camera also is biased by the presets and these presets cannot be removed after exposure. Plus, TIFF files take up a lot of storage space—more than RAW files.

What you need to know

why shoot in raw

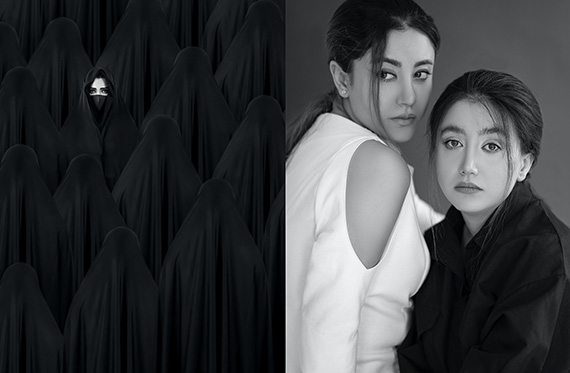
Photos by Shahin Khalaji

Only the RAW format will give all the information that you need to capture every level of tone that your camera is capable of producing in a file size that is manageable.

In a RAW processor (such as Adobe ACR, Lightroom, Luminar or Aurora), you can methodically and precisely set:

  • Exposure
  • Noise levels
  • Shadow details
  • Highlight details
  • Mid-tone details
  • Sharpness
  • White balance
  • Many other options

Let’s talk about white balance for a second

why shoot in raw

Original image by Claudio Schwarz

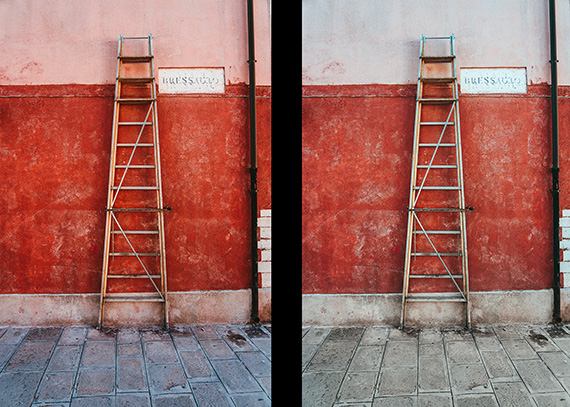
Some scenes are guaranteed to skew the white balance of a JPEG or a TIFF camera file. Only RAW gives you firsthand non-destructive control over the white balance of your pictures using post-production software—after the picture is taken.

Should you ever shoot in JPEG?

The JPEG format has three things going for it that can be helpful to a photographer—if you can overlook the detriments.

  • It’s the smallest file size. You can fit many more JPEG pictures on a memory card than either RAW or TIFF files.
  • It has the fastest transfer speed from the camera to the memory card. This can be helpful if you’re photographing sports or wildlife. If your camera stops to catch up to the transfer rate—well, consider just shooting JPEG images.
  • A JPEG camera picture file emerges from the camera as a finished product. So, you don’t have to wait on post-processing before uploading it online or passing it along to a client. The JPEG file is a great way to give your client a sneak peek while they wait on your post-processing of the RAW files.

Important: The RAW file provides maximum benefit for photo image quality. However, all RAW files need some post-processing to look their best, because the file was designed to work that way.

why shoot in raw

Photo by Shahin Khalaji

Final thought

If your camera allows it, set it to shoot both RAW and JPEG files at the same time. This provides you with the best of both worlds.

For Further Training:

This in-depth eBook takes you by the hand and leads you step-by-step in discovering photography skills using your DSLR. This eBook is filled with practical exercises that show you exactly what to do AFTER changing your camera settings. A powerful guide produced by TWO master photography teachers. It is currently 65% off if you want to check it out.

dslr crash course

New: The DSLR Crash Course (Click to Learn More)

It was adapted from an in-person photography workshop. Unlike a regular book, it’s designed to quickly get you up to speed with basic photography principles, and provides a platform for you to experiment and refine your techniques. P.S. try the discount coupon picturecorrect at checkout for even more savings.

Deal ending soon: The DSLR Crash Course at 65% Off


Go to full article: This is Why RAW is the Best Choice for Your Photography

What are your thoughts on this article? Join the discussion on Facebook

PictureCorrect subscribers can also learn more today with our #1 bestseller: The Photography Tutorial eBook

The post This is Why RAW is the Best Choice for Your Photography appeared first on PictureCorrect.


from PictureCorrect https://ift.tt/3nT2q4l
via IFTTT

maanantai 1. marraskuuta 2021

PictureCorrect.com: Why a Standard Lens is Perfect for Street and Travel Photography

Standard lenses (also called normal lenses) have a kind of mystique amongst photographers. Perhaps it’s because Henri Cartier-Bresson was famous for using one, maybe it has something to do with nostalgia for the times when most cameras came with a 50mm kit lens rather than the zooms that are common today. Regardless, if you are looking for a versatile prime lens for street or travel photography then a standard lens is an excellent choice. My 35mm prime (a standard lens on an APS-C camera) has become my favorite lens for street and travel photography.

prime lens

f/1.4

Let’s start with some definitions.

A standard lens for a full-frame or 35mm film camera is a 50mm prime (one exception – Pentax makes a 43mm f/1.9 lens).

For an APS-C system a 35mm prime lens (such as the excellent 35mm f/1.4 lens made by Fujifilm) is a standard lens. Some photographers also consider a 28mm lens to be a standard.

For a Micro four-thirds camera you need a 25mm prime.

Last year I took a wide-angle lens, a standard lens and a short telephoto lens with me on a five week trip to China. I used them all for street photography, but when I analyzed the photos afterwards I realized that over 90% of them were taken with the standard lens (a 35mm f/1.4 prime). That trend continued during a later trip to Spain.

Here are some of the reasons that I used the standard lens so much more than the others, combined with some tips for making the most from them yourself.

1. Standard lenses have wide maximum apertures

Standard lenses typically have a maximum aperture somewhere between f/1.2 and f/2. This helps you take photos in low light, or use the wide aperture settings for selective focus, or both. This is really useful if you take photos in a street market or some other lively location at night, or inside a dimly lit building.

The photo above, taken in a historical building in Hangzhou, is a good example. The light was so low that I had to set the aperture to f/1.4 and ISO to 6400 to take the photo.

2. Standard lenses let you take photos in the street without getting too close to people

Standard lenses let you take candid photos of people in the street without getting too close. In China, I found that most people ignored me as I took photos with my 35mm lens. It may have helped that the Fuijfilm camera I used (an X-T1) is much smaller than a digital SLR and less intimidating. It may also have helped that the Chinese are such keen photographers that another person with a camera doesn’t draw much attention.

From a practical point of view, the standard lens lets you take photos of people without getting so close to them that you invade their personal space.

I spotted this man by the entrance of a restaurant in Hangzhou. His clothing and thoughtful pose caught my eye – I believe he was there to encourage people to come into the restaurant. It was only afterwards that I realized there was an interesting juxtaposition between him and the statue to his left.

You can take environmental portraits like this very easily with a standard lens.

travel photography with a prime lens

Street Photography

3. You can use a standard lens to simplify the background

Street scenes are naturally chaotic, and it’s the photographer’s job to make some kind of visual order from this. The narrower field of view of standard lenses (compared to wide-angle lenses) means that you naturally include less background in your images. You can also throw the background at least slightly out of focus by selecting an aperture of f2.8 or wider. This is much harder to do with wide-angle lenses.

An image like this, taken in a street market in Xi’an, has a much tighter background than you would be able to get with a wide-angle lens. That helped me exclude other people from the scene and focus attention on the woman.

portrait with standard lens

Simplify the Background

4. You can use a standard lens to capture details

Standard lenses are good for capturing details. Street photography is not just about making portraits. You can build up a feeling for a place by photographing details that capture its character and spirit.

Most standard lenses can focus quite closely to the subject, making them a very versatile lens for travel photography.

This photo of fish taken in a market in Cadiz, Spain is a good example.

fish market prime lens

Details

5. Use a standard lens to make a portrait of somebody with permission.

Standard lenses are ideal for portraits. They work well if you stop people in the street and ask if you can take their photo. While you could argue that a longer focal length will help you take portraits with a more flattering perspective, the advantage of a standard lens is that it is smaller and less intimidating to the person that you have approached. You are much more likely to get a natural response.

Earlier this year I went to Carnival in Cadiz. There were lots of people in costume, but only a few with face paint. When I saw somebody with interesting face paint I asked if I could take a photo. Every time I asked, the person said yes, and I took a couple of photos.

Here is one of them.

mime portrait

Portraits with Permission

6. You can capture scenes including people for scale or context

Standard lenses are good for capturing scenes which include people to give scale or context. The angle of view is wide enough that the people in your photo, if you are far away, are not bothered about being in it. They will probably think you are taking a photo of the scene behind them, especially if it is picturesque and worthy of a snapshot. If the person is positioned on a third, or at the edge of the frame, then the camera won’t be pointing directly at them. Even if they notice you they don’t feel threatened by it.

portrait prime lens

People for Scale or Context

This photo, taken in Beijing, shows a local woman amongst some of the beautiful architecture by Beihei Lake.

About the Author:
Andrew S Gibson is a professional photographer based in New Zealand. He has taken photographs in 60 countries now as a Technical Editor for EOS magazine. He produced a Mastering Lenses guide for photographers.


Go to full article: Why a Standard Lens is Perfect for Street and Travel Photography

What are your thoughts on this article? Join the discussion on Facebook

PictureCorrect subscribers can also learn more today with our #1 bestseller: The Photography Tutorial eBook

The post Why a Standard Lens is Perfect for Street and Travel Photography appeared first on PictureCorrect.


from PictureCorrect https://ift.tt/2sMib0J
via IFTTT