


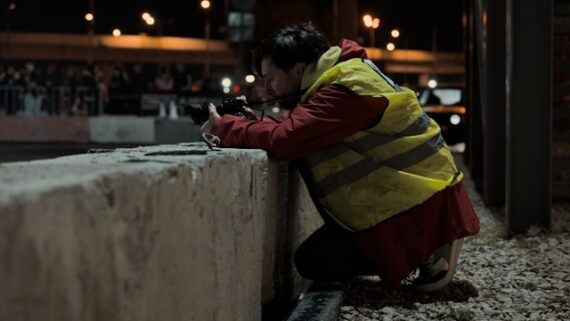
Push ISO higher than you normally would and learn where your camera actually breaks down.
Most photographers are far more conservative with ISO than they need to be.
We’re taught early on that low ISO = good and high ISO = bad, so many people avoid pushing ISO unless they feel completely desperate. The result? Missed shots, unnecessary blur, and a lot of anxiety when the light drops.
This exercise is designed to flip that thinking.
Related reminder: only 1 day left for the Photography Exercises  February Flash Sale
Instead of guessing where your camera’s limits are, you’re going to deliberately cross them—so you can see, with your own eyes, what actually happens and where your personal comfort line really is.
The Goal of This Exercise
The goal isn’t to get “clean” images.
The goal is to understand:
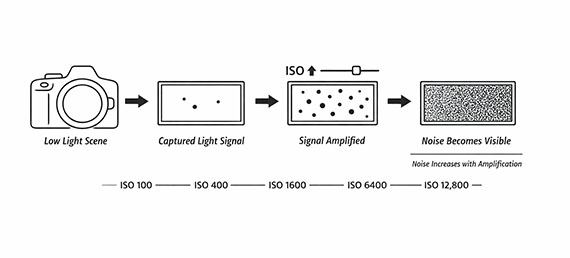
- How noise actually appears on your camera
- At what ISO noise becomes noticeable vs. distracting
- How much noise is easily fixable in post
- How far you can safely push ISO before image quality truly breaks down
Once you know this, ISO stops being scary—and becomes a practical tool instead of a last resort.
What You’ll Need
- Any camera that allows manual ISO control
- A scene with somewhat low, consistent lighting (indoors works well)
- A subject with texture and detail (fabric, books, wood, plants, skin tones)
- A tripod (optional, but helpful for consistency)
Choose a scene where the lighting won’t change during the test. Consistency matters more than the subject itself.
Step 1: Lock Everything Except ISO
Set your camera to Manual mode.
- Choose an aperture you commonly use (for example, f/4 or f/5.6)
- Choose a shutter speed that gives a correct exposure at a low ISO
- Turn off Auto ISO
- Keep white balance consistent
From this point on, only ISO should change.
This isolates ISO as the single variable so you can clearly see its impact.
Step 2: Start Low and Work Up (On Purpose)
Begin at your camera’s base ISO (often ISO 100).
Take a photo.
Then increase ISO in full-stop increments:
- ISO 200
- ISO 400
- ISO 800
- ISO 1600
- ISO 3200
- ISO 6400
- ISO 12,800 (and beyond if your camera allows it)
Take a photo at each setting without changing anything else.
Yes—some of these images will look “bad.” That’s the point.
Step 3: Review the Images Properly
Don’t judge these images on the camera’s rear screen.
Load them onto a computer and view them:
- At 100%
- At normal viewing size
- Side by side if possible
Pay attention to:
- When noise first becomes visible
- When color noise appears
- When fine detail starts to fall apart
- When noise becomes emotionally distracting—not just technically present
You’ll often discover that the ISO you “never use” is actually completely fine.
Step 4: Test Noise Reduction (Without Overthinking It)
Apply light noise reduction in your usual editing software.
Don’t aim for perfection—just apply what you’d realistically use on a real photo.
Notice:
- Which ISO levels clean up easily
- Which ones retain detail after noise reduction
- Where noise reduction starts to destroy texture
This step is huge. Many photographers fear ISO levels that are trivially fixable in post.
Step 5: Define Your ISO Comfort Zones
Now write this down:
- Safe ISO – No hesitation, no cleanup needed
- Usable ISO – Some noise, easily fixed, totally acceptable
- Emergency ISO – Quality drops, but the shot is still worth getting
- No-Go ISO – You personally hate the result
These zones are different for every camera and every photographer.
Once defined, ISO becomes a confident choice instead of a panicked one.
Why This Exercise Works
Reading about ISO doesn’t change behavior.
Seeing exactly how far your camera can go—and realizing it goes farther than you thought—does.
After doing this exercise:
- You’ll raise ISO faster instead of risking motion blur
- You’ll stop missing shots in low light
- You’ll trust your gear instead of fighting it
Most importantly, you’ll stop letting fear make technical decisions for you.
If you want more exercises like this—clearly structured, easy to follow, and designed to build real shooting instincts—the February Flash Sale on the Photography Exercises is wrapping up soon. It’s a practical way to keep improving, even when weather limits your time and motivation to shoot.
A practical way to build confidence for challenging shooting situations that often trip photographers up. Each exercise focuses on real-world scenarios—difficult light, motion, exposure decisions, and creative problem-solving—so you learn how to take control instead of relying on auto settings.
Only 1 day left: Photography Exercises February Flash Sale
from PictureCorrect https://ift.tt/og1zLu3
via IFTTT


0 kommenttia:
Lähetä kommentti