


Most cameras limit shutter speeds to a maximum of about 30 seconds. For many situations, that’s more than enough. But when you want to keep the shutter open longer—long enough to capture extended light trails, star movement, fireworks, or extremely smooth water—Bulb mode is the tool that makes it possible. Bulb mode allows the shutter to remain open for as long as you choose, giving you full control over exposure time.
Related: Want to master advanced techniques faster? PictureCorrect Premium is designed to be an accelerator with lessons, exercises, and more — and it’s only $1 to try today
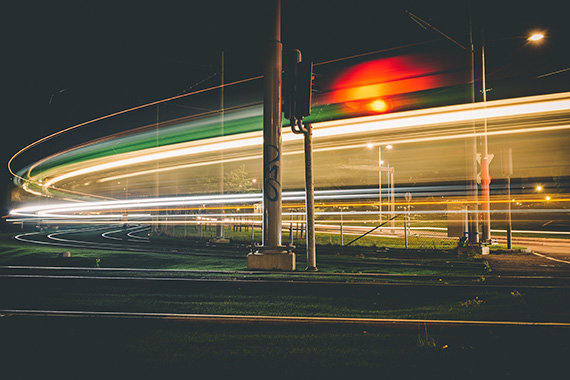
Photo by Mattias Diesel
Unlike standard shutter speeds, Bulb mode does not use a preset duration. The shutter opens when you press the shutter button and closes when you release it, or when you end the exposure using a remote shutter release. This manual timing is what makes Bulb mode useful in low-light or long-duration scenes where motion unfolds slowly and unpredictably.
Because Bulb exposures often last minutes instead of seconds, stability becomes critical. A solid tripod is essential, and using a remote shutter release or interval timer helps prevent vibration when starting and ending the exposure. Even small movements can soften an image during long exposures, so it’s important to eliminate any unnecessary contact with the camera while the shutter is open.
To access Bulb mode, switch your camera to Manual mode and scroll past the longest shutter speed until Bulb appears. Start with a low ISO to reduce digital noise, then choose an aperture that balances light intake and depth of field. Since exposure time is entirely manual, it helps to take a test shot at 20–30 seconds first. If the image is still too dark or the motion effect feels incomplete, switch to Bulb mode and extend the exposure.
Light control becomes increasingly important with very long exposures. In dark environments, Bulb mode can reveal subtle detail and motion the eye can’t easily see. In brighter conditions, however, exposures can quickly become too bright. Neutral density filters are often used to limit incoming light, allowing longer shutter times without overexposing the scene. Reviewing the histogram after each shot helps ensure highlights are not being clipped.
Learning Bulb mode encourages a slower, more intentional approach to photography. Instead of reacting quickly, you plan the exposure, observe how light and movement change over time, and decide precisely when the exposure should begin and end. That mindset translates well to many other areas of photography, even when working with shorter shutter speeds.
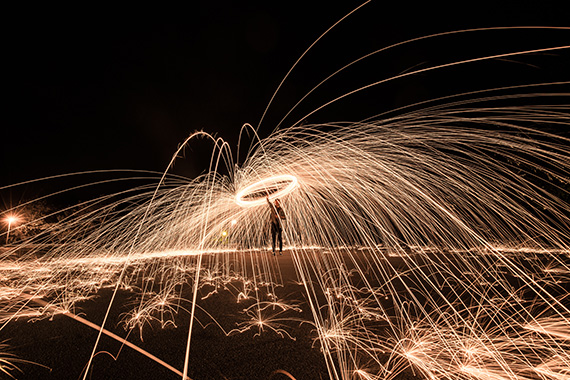
Photo by Cody Board
Mini Exercise: Your First Bulb Mode Exposure
Find a scene with steady movement, such as passing cars, flowing water, or drifting clouds. Set your camera on a tripod, switch to Manual mode, and select Bulb. Start at ISO 100 and choose an aperture around f/8. Take a test shot at 30 seconds, then switch to Bulb mode and extend the exposure to one or two minutes using a remote or timer. Compare the results and note how extended time changes the feel of motion and light in the image.
Premium Subscribers Are Already Ahead:
Every week, more photographers are joining PictureCorrect Premium to level up their craft — and you could be next. Subscribers receive expert-led tutorials, creative challenges, and printable exercises that make each lesson stick.
Whether you’re working to master manual control, or advanced techniques, Premium gives you the structure to make steady progress. The special $1 intro offer is wrapping up this evening, and once it’s gone, so is your chance to lock in early access.
Deal ending soon: Premium Newsletter Enrollment Special Today
from PictureCorrect https://ift.tt/i5zbvdq
via IFTTT


Really clear and practical explanation of how to use bulb mode — this is super helpful for anyone wanting better control in low-light photography! As someone working with real estate imaging at PhePhotos, I know how valuable mastering exposure techniques like this can be for capturing stunning property shots at dusk or night. Thanks for sharing these tips! https://phephotos.com/
VastaaPoista