perjantai 21. lokakuuta 2022

PictureCorrect.com: How to Photograph Bathrooms for a Real Estate Gig

Ever shared or been privy to more detail than you should when viewing or posting real estate photographs? Unwanted reflections on glass and mirrors can be both embarrassing and unattractive. Joe Gustafson has some clever tips to share on how to remove the glare in your shower and bathroom photography.

Step 1: Shoot With Artificial Light

When taking photographs of real estate, you can use artificial lighting to improve your results. A handheld strobe or flashlight is particularly useful for showers. Take multiple photos, including naturally-lit base images and others with your artificial light.

Ideally, hold the light inside and above the shower to give the best results. You can then layer or stack these images using photo editing software like Photoshop. Remember to shoot with a tripod and not move it or your camera, so your images line up perfectly.

Step 2: Choose The Best Images

Before you start stacking your images in Photoshop or your editing software, go through them. Choose the best shots as far as clarity, sharpness, and lighting are concerned. You’ll need an ambient layer free from artificial light as your base.

Plus, at least one artificially lit-up image to stack it with to create a composite image. Once you have selected your images in Lightroom, you can export them to Photoshop or similar editing software.

Step 3: Create Your Composite Image

It’s time to stack your images to create them into a reflection-free composite image:

  • To start, your ambient or base layer should be at the top of your stack.
  • Switch it off and create a layer mask on the other artificially lit images.
  • Use command I to invert each layer mask.
  • Then, select the white color for your brush.
  • You also want to set your flow to lower (around 5) for a gentler, subtler, slower, more controllable edit.
  • Use it to paint yourself or any artificial lighting equipment out, including on mirrors and reflective surfaces.
  • Next, select your ambient or base layer, add a mask to it, and invert it, too.
  • Paint any sections with the same brush settings to improve the overall lighting and brightness balance.
  • Then, flatten the image.

Step 4: Edit Out Any Final Reflections

At this point, there may be some smaller, more subtle reflections you wish to edit out. To do so, first duplicate the composite image. You can use the patch tool to highlight and slide any darker reflections out. Try to focus on the most obvious ones, as you may not need to eliminate them all. Joe also uses the dodge tool to brighten darker reflective patches afterward.

Step 5: Final Lightroom Edits

Once the reflective edits are done, you want to flatten them and move the composite image back into Lightroom. Here, you can add the final lighting edits. Adjust the brightness, exposure, tone, and more to create a real-estate-worthy snap. Though time-consuming, the results are well worth it!

…and that’s gonna separate you from the rest of the photographers out there… If you can provide images for them that look like this, that’s going to one-up yourself in the competition…

To Conclude:

Real estate photography really puts the pressure on photographers to capture properties in their best light. Sometimes, it’s necessary to bend the rules — and bring in a little artificial lighting and post-production editing into the mix — in order to get those results. Joe’s reflection and glare removal technique is a surefire way to level up your game!

- - - - - - - - - - - - - - - - - - - - - - - - - - - - - - - - - - - - - - - - - - - - - - - - - - - - - - - - - - - - - - - - - - - - - - - - - -

Did you appreciate this newsletter? Please help us keep it going by Joining Our Patreon Supporters

What are your thoughts on this article? Join the discussion on our Facebook Page

PictureCorrect subscribers can also learn more today with our #1 bestseller: The Photography Tutorial eBook

- - - - - - - - - - - - - - - - - - - - - - - - - - - - - - - - - - - - - - - - - - - - - - - - - - - - - - - - - - - - - - - - - - - - - - - - - -

The post How to Photograph Bathrooms for a Real Estate Gig appeared first in the Photography Tips category on PictureCorrect.


from PictureCorrect https://ift.tt/8vCeY75
via IFTTT
torstai 20. lokakuuta 2022

PictureCorrect.com: 3 Tips for Editing Crazy Colors in Photoshop

Most of the time we are trying to squeeze more out of our RAW files to make them pop.

But occasionally, a sunrise or sunset explodes and our job in editing somehow becomes harder.

Here’s an example of one of my OLD edits, where in hindsight, I got a lot wrong!

sunset old

Every adjustment teeters on the edge of sending the colors overboard like some kind of garish kaleidoscope.

When it comes to editing images with such crazy colors, the first editing mistake we make is approaching it the same as a “normal” photo.

Taking the image above, here are some special considerations I made to arrive at my best version of the scene:

1: Try to make the image more about the light than the color.

2: Don’t be tempted to over-brighten to “bring out the detail” in non-important areas. This is generally good advice anyway, but when colors themselves are making an image busy, the last thing we want is even more distracting detail.

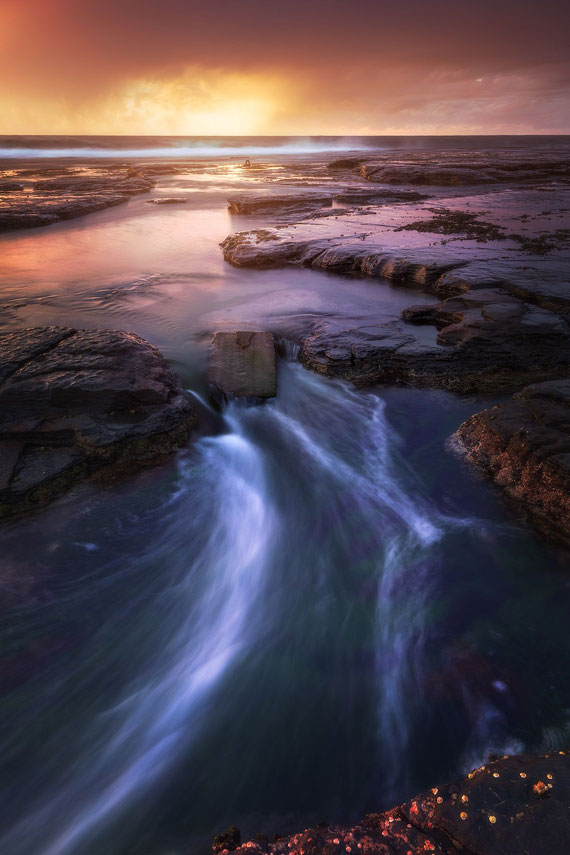
3: Try and harmonize the colors. In the RAW file (and my original old edit from years ago), the colors just didn’t look good together. Especially the naturally muddy colors on the rock shelf in the foreground.

In my new recent edit, I removed most of the green in the foreground and transformed the color pallet from a whacky mess, to a more harmonious warm-to-cool back-to-front transition.

These considerations can help create better versions of any “crazy color” sunrise/sunset images, so keep them in mind next time you’re faced with this kind of challenge.

Oh yeah – here’s the new and improved version of the above example based on the above considerations:

sunset improved

If you’d like to learn more about editing crazy colours like this in Photoshop, then great news :-)

For a limited time you can get my “How To Edit Crazy Colours” workshop recordings as a free bonus when you pick up a copy of my Photoshop 101 course, which includes a walkthrough of the editing process for the after-version of the above image.

There are over 6.5 hours of video tutorials included in this course covering all the most important aspects of Photoshop for editing a landscape.

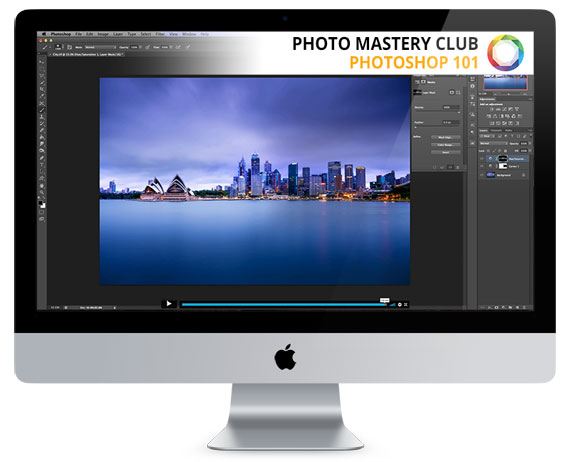
photoshop 101

Photoshop 101 for Landscape Photographers (Learn More)

Do you want to discover the most useful parts of Photoshop for landscapes? We were able to arrange an exclusive 50% discount for our readers which ends soon.

Found here: The Photoshop 101 Course at 50% Off

- - - - - - - - - - - - - - - - - - - - - - - - - - - - - - - - - - - - - - - - - - - - - - - - - - - - - - - - - - - - - - - - - - - - - - - - - -

Did you appreciate this newsletter? Please help us keep it going by Joining Our Patreon Supporters

What are your thoughts on this article? Join the discussion on our Facebook Page

PictureCorrect subscribers can also learn more today with our #1 bestseller: The Photography Tutorial eBook

- - - - - - - - - - - - - - - - - - - - - - - - - - - - - - - - - - - - - - - - - - - - - - - - - - - - - - - - - - - - - - - - - - - - - - - - - -

The post 3 Tips for Editing Crazy Colors in Photoshop appeared first in the Photography Tips category on PictureCorrect.


from PictureCorrect https://ift.tt/IRhxavC
via IFTTT

PictureCorrect.com: Interesting Photo of the Day: Abandoned Spaceship

Photographing abandoned homes and other spaces has a separate fan following of its own. There’s something about abandoned objects that’s so satisfying to photograph. If you think deeply about it, by photographing the spaces or objects left behind, you can reflect on its past and the emotional attachment associated with it. And while abandoned homes, workplaces, and other spaces are quite common, an abandoned orbiter definitely isn’t. It must have been an adventure for the photographer who goes by the name of Rxspawn when he took the following image:

“Abandoned Buran Orbiter at the Baikonur Cosmo, Kazakhstan” by Rxspawn (Via Reddit. Click image to see full size.)

While the place looks pretty much abandoned, the photographer shot this image in Baikonur Cosmo in Kazakhstan which is in fact a very active Russian spaceport. And interestingly, there is no legal way you can get in there. So, how do you think the photographer got this photograph?

“It was a perfect sneaky mission. My teammates and I are all safe.”

At first, it appears as if the photographer shot the image with a drone. But interestingly, he shot it using his Sony A7RII camera. He climbed up the ladder to the ceiling to get this fantastic angle of the Buran orbiter.

While the subject itself is definitely one of the most interesting aspects of this image, there’re so many other things to it as well. If you look closely, the symmetry, the lighting, and the combination of the colors in this image are all superb. It’s understandable that the photographer had pretty much no control over any variables in the scene. Still, he’s definitely done an excellent job composing the image right – that too under intense pressure.

Moreover, the dust collected on the orbiter’s body gives a clear indication of how it’s been left abandoned. At some level, it’s actually disheartening to see a machine with great potential left in such a condition. Anyways, let’s appreciate the artistic side of this image. That’s what matters more to us, right?

- - - - - - - - - - - - - - - - - - - - - - - - - - - - - - - - - - - - - - - - - - - - - - - - - - - - - - - - - - - - - - - - - - - - - - - - - -

Did you appreciate this newsletter? Please help us keep it going by Joining Our Patreon Supporters

What are your thoughts on this article? Join the discussion on our Facebook Page

PictureCorrect subscribers can also learn more today with our #1 bestseller: The Photography Tutorial eBook

- - - - - - - - - - - - - - - - - - - - - - - - - - - - - - - - - - - - - - - - - - - - - - - - - - - - - - - - - - - - - - - - - - - - - - - - - -

The post Interesting Photo of the Day: Abandoned Spaceship appeared first in the Photography Tips category on PictureCorrect.


from PictureCorrect https://ift.tt/iDy9YQB
via IFTTT

PictureCorrect.com: Seascape Long Exposure Tutorial

As captivating rivers, seas, and precipitation are to watch; they can be rather elusive to photograph. A master of the five elements, Mike Perea, knows a thing or two about capturing water. In this seascape long exposure tutorial, he shares his top tips on how to capture this unique and ever-changing landscape.

Pack The Right Equipment

For his seascape long exposure shoots, Mike brings along:

  • A tripod to stabilize and balance images.
  • Round ND filters to reduce exposure during long-exposure shots.
  • A shutter release; either a plug-in device or an app
  • His Nikon Z7 II camera, which features 30-second< long-exposure shutter speed options.

Stay Alert

It’s easy to get distracted when photographing just about anything, never mind the ocean. As soon your eye hits the viewfinder, you might as well be in another world. That’s why Mike warns photographers to keep another eye out for their gear and stay alert.

…first, never turn your back on the ocean. That’s how you get hurt, and that’s how you get your gear confiscated by the waves…

He keeps his backpack on his back or an elevated surface further away. That said, tides are something to be aware of, too — particularly when shooting on outcropped rocks. Mike uses the Magic Seaweed app to plot the rhythms of the tides — and avoid getting dashed on the rocks!

Take Lots of Photos

When dealing with such rough conditions — including biting winds, shifting sands, and unpredictable waves — camera shake is inevitable. Mike cheats by setting his camera to Continuos Hi. So it takes multiple shots, upping his chances of a sharp one.

A shutter release app or trigger device comes in handy here, too. Simply pre-set your camera and stand further away or stabilize your tripod. Mike also pushes his tripod as far into the sand as possible. That way, it will be less likely to sink when or if oncoming waves lap at the legs.

Blend Images

Remember all those burst photos you took? Well, they’ll come in handy for this next step! You see, Mike loves to blend more than one image to create unique compositions. He simply chooses whichever shots he likes most and thinks will work best together.

Then, combines them using photo editing software like Lightroom and Photoshop. Stacking various exposures to create a single composite image can yield awesome results. Sometimes, even better than the real thing.

Utilize Bulb Mode

Many cameras don’t offer shutter speeds longer than 30 seconds. As such, extended long exposures may be difficult to achieve. Most cameras do feature bulb mode, though, which you can use to set up those extra-long shutter speeds.

That said, if you do use this mode, your camera may not reflect simulated exposure values beyond 30 seconds. To solve this issue, Mike suggests using an app like Photopills to calculate your exposure values. You can input your test image ISO, f-stop, timer, filter, and shutter speed settings to get your estimated values.

Consider Your Lighting

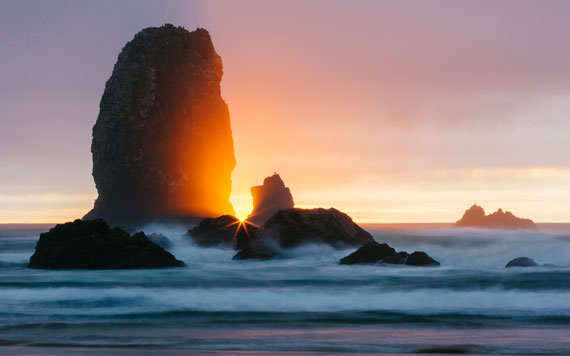
Typically, golden hour and other well-lit (but not-too-bright) times of the day are ideal for photography. However, when shooting long exposures, you can leverage various types of natural lighting to get the best results.

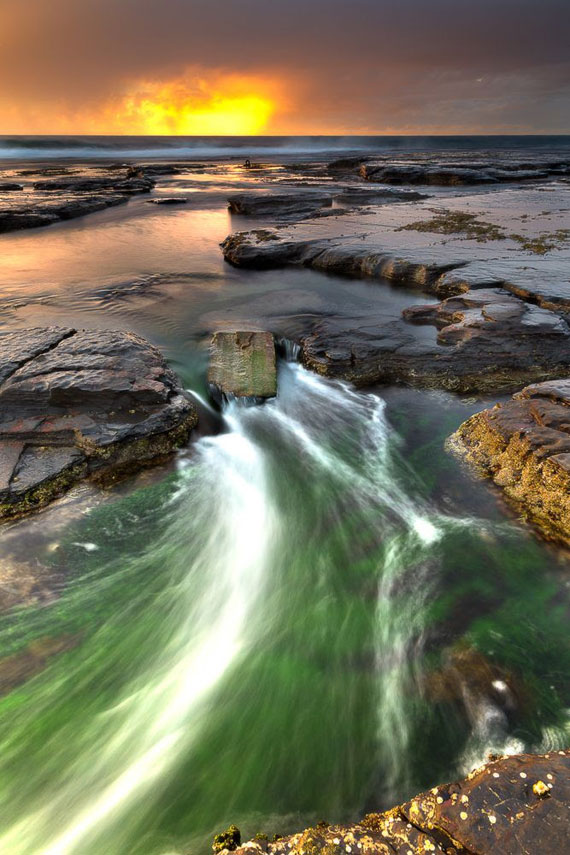
seascape long exposure

Photo captured by Dave Hoefler; ISO 100, f/32.0, 1.3s.

Flat, even light — including those slightly overcast days — are ideal for extended (1-minute< shutter speeds) long exposure shots. Black and white photography, especially, benefits from already semi-grayscale overcast lighting. Alternatively, when shooting typical seaside sunsets and sunrises, use shorter (>1 second) shutter speeds to compensate for the light.

To Conclude

Long exposure is an interesting photography technique that aims to capture movement in a single still image. Playing around with shutter speed and various other camera settings, as well as post-production editing, can yield stunning results. Follow Mike’s helpful tutorial and see what works for you.

- - - - - - - - - - - - - - - - - - - - - - - - - - - - - - - - - - - - - - - - - - - - - - - - - - - - - - - - - - - - - - - - - - - - - - - - - -

Did you appreciate this newsletter? Please help us keep it going by Joining Our Patreon Supporters

What are your thoughts on this article? Join the discussion on our Facebook Page

PictureCorrect subscribers can also learn more today with our #1 bestseller: The Photography Tutorial eBook

- - - - - - - - - - - - - - - - - - - - - - - - - - - - - - - - - - - - - - - - - - - - - - - - - - - - - - - - - - - - - - - - - - - - - - - - - -

The post Seascape Long Exposure Tutorial appeared first in the Photography Tips category on PictureCorrect.


from PictureCorrect https://ift.tt/f6vDoc8
via IFTTT

keskiviikko 19. lokakuuta 2022

PictureCorrect.com: Photoshop 101 for Landscape Photographers 🖼️

Found another resource for all the landscape photographers out there. Do you want to discover the most useful parts of Photoshop for landscapes? There are over 6.5 hours of video tutorials included in this course covering all the most important aspects of Photoshop for editing a landscape. We were able to arrange an exclusive 50% discount for our readers today for anyone interested. Deal ending soon: Photoshop 101 Course at 50% Off

photoshop 101

Photoshop 101 for Landscape Photographers (Learn More)

Here are some of the many topics covered.

Chapter 1:

  • Master Photoshops most important “blend modes” which open up a whole new way of blending layers and adjustment layers for creative effects
  • Get the lowdown on Photoshops main image adjustments and how each one affects your photos in different ways so that you can pick the right tool for the job
  • Find out how “filters” work in photoshop and how to use them properly in a non-destructive workflow.
  • The pros and cons of the various image file formats so that you retain as much “data” in your image files as possible when importing AND saving your photos in and out of Photoshop for the highest quality image every time.
  • What a “colour space” is and why choosing the right one in Photoshop’s settings is critical if you want to avoid the colours looking wrong when you put your photos online or print them.

Chapter 2:

  • How to use the various selection tools Photoshop has to offer so that you can copy, cut, paste and mask parts of your image accurately
  • Understand the basics of the sampling, brush, paint bucket and gradient tools
  • How to use the clone stamp tool to remove objects from your photos
  • Save time with the spot healing brush tool for a quick and easy alternative to the clone tool for small tasks
  • The difference between the healing brush tool and the clone tool – and when to use each one for the best results when cloning
  • How to seamlessly copy and blend objects from one part of your image to another easily with the Patch tool so that you don’t have to spend time “fixing the edges” of a regular clone tool job
  • How to use (and fine tune) the “content aware move” tool and tap into some of Photoshops cleverest functionality
  • How to use the dodge and burn tools to effectively alter how people view your shot and where they look first.

Chapter 3:

  • How to use the levels and curves adjustment layers to fine tune and tweak the colour and contrast in your images to make them pop
  • How to use the vibrance, hue/saturation and colour balance adjustment layers for realistic or creative effects
  • How to use the black and white adjustment layer to create great-looking black and white conversions PLUS a cool way to use the black-and-white layer to adjust your colour images
  • Find out which of the adjustment layers you DON’T need to waste your time on

Chapter 4:

  • How to use the levels and curves adjustment layers to fine tune and tweak the colour and contrast in your images to make them pop
  • Learn how to use the filters in Photoshop’s “blur gallery” so that you can create all kinds of different effects, from realistic depth of field style blurring, to pseudo-tilt-shift effects and more
  • Find out which of the sharpening filters I recommend using for your finished images to give the best and most eye-popping results.
  • Learn how to use the High Pass filter to increase detail in selective parts of your photos without affecting the rest.
  • How to retain ultimate control when fixing lens distortion in your photos using the “adaptive wide angle” filter (great also for fixing badly distorted stitched panoramic images)
  • Learn his favourite way of applying noise reduction to photos for smoothest results

Updated For Photoshop CC 2021:

  • Make the most of Photoshop’s brand new Super Resolution feature that promises to DOUBLE your RAW files resolution whilst IMPROVING image quality! It’s a big claim by Adobe, but Steve thinks they have delivered on it!
  • How to use Photoshop’s automatic sky replacement tool.
  • What are “quick actions” in Photoshop and how do they speed up your workflow?
  • Learn about Photoshops incredibly powerful “Neural Filters” and how to use them for one-click effects that were never previously possible
  • Photoshop’s “Content Aware Fill” functionality has changed! Find out how to use it now.
  • Previous PS version updates are also covered in the Extras chapter, where we dive into the “Select And Mask” work area, Select Subject, PS’s new Upscaling algorithm, HEIC file format compatibility (amazingly awesome for those of us with dual-camera cell-phones!), and more!

Chapter Zero

There’s also “Chapter Zero”, which is what sparked the idea for this whole course in the first place.

You can watch this entire chapter zero video here to get a great idea of the kind of pace and level at which the rest of the videos are going.

Steve’s Promise to His Students:

“After you’ve been through and watched all of his Photoshop 101 videos, and at the end of the day if you’re not feeling 10x more confident in your abilities to put Photoshop to work and create better-looking photos than ever before (which is all we really want, right?) – then just let him know within 2 months time and he will personally rush you a full refund for everything you’ve invested in this course… AND of course you get to keep all the videos as his gift to you for trusting him with your Photoshop education.”

Deal ending soon: The Photoshop 101 Course at 50% Off

- - - - - - - - - - - - - - - - - - - - - - - - - - - - - - - - - - - - - - - - - - - - - - - - - - - - - - - - - - - - - - - - - - - - - - - - - -

Did you appreciate this newsletter? Please help us keep it going by Joining Our Patreon Supporters

What are your thoughts on this article? Join the discussion on our Facebook Page

PictureCorrect subscribers can also learn more today with our #1 bestseller: The Photography Tutorial eBook

- - - - - - - - - - - - - - - - - - - - - - - - - - - - - - - - - - - - - - - - - - - - - - - - - - - - - - - - - - - - - - - - - - - - - - - - - -

The post Photoshop 101 for Landscape Photographers 🖼️ appeared first in the Photography Tips category on PictureCorrect.


from PictureCorrect https://ift.tt/4YTUuLj
via IFTTT

PictureCorrect.com: Interesting Photo of the Day: Pillars of Creation

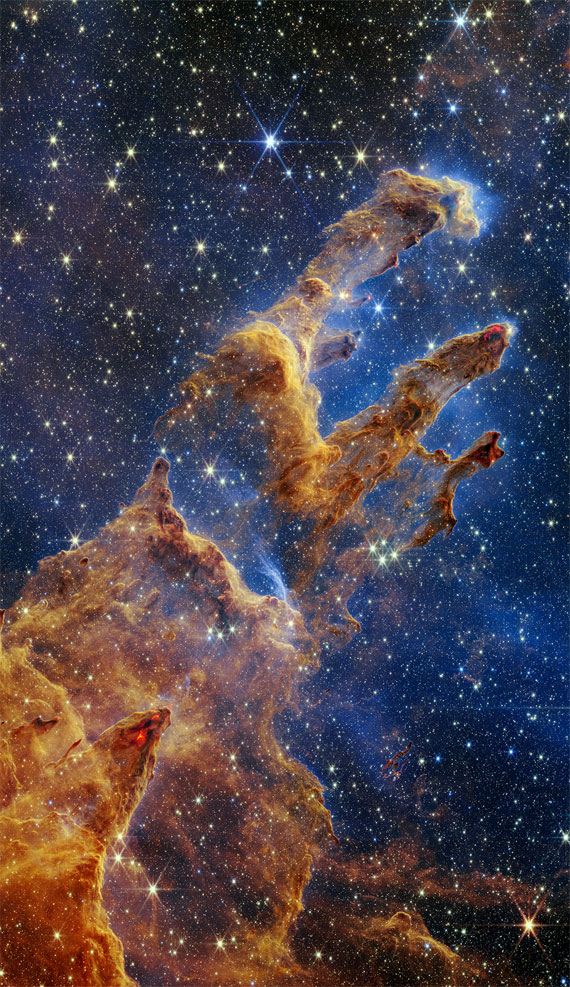
NASA’s James Webb Space Telescope has captured a lush, highly detailed landscape – the iconic Pillars of Creation – where new stars are forming within dense clouds of gas and dust. The three-dimensional pillars look like majestic rock formations, but are far more permeable. These columns are made up of cool interstellar gas and dust that appear – at times – semi-transparent in near-infrared light.

pillars of creation

Zoom in and grab the full size image here

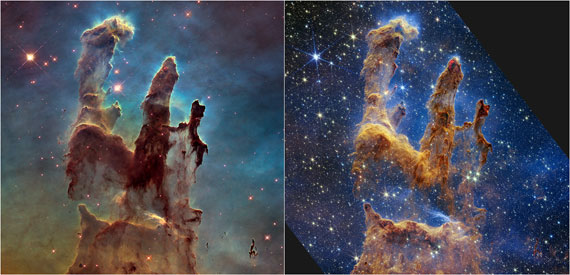
Webb’s new view of the Pillars of Creation, which were first made famous when imaged by NASA’s Hubble Space Telescope in 1995, will help researchers revamp their models of star formation by identifying far more precise counts of newly formed stars, along with the quantities of gas and dust in the region. Over time, they will begin to build a clearer understanding of how stars form and burst out of these dusty clouds over millions of years.

hubble vs webb

NASA’s Hubble Space Telescope made the Pillars of Creation famous with its first image in 1995, but revisited the scene in 2014 to reveal a sharper, wider view in visible light, shown above at left.

Newly formed stars are the scene-stealers in this image from Webb’s Near-Infrared Camera (NIRCam). These are the bright red orbs that typically have diffraction spikes and lie outside one of the dusty pillars. When knots with sufficient mass form within the pillars of gas and dust, they begin to collapse under their own gravity, slowly heat up, and eventually form new stars.

What about those wavy lines that look like lava at the edges of some pillars? These are ejections from stars that are still forming within the gas and dust. Young stars periodically shoot out supersonic jets that collide with clouds of material, like these thick pillars. This sometimes also results in bow shocks, which can form wavy patterns like a boat does as it moves through water. The crimson glow comes from the energetic hydrogen molecules that result from jets and shocks. This is evident in the second and third pillars from the top – the NIRCam image is practically pulsing with their activity. These young stars are estimated to be only a few hundred thousand years old.

Although it may appear that near-infrared light has allowed Webb to “pierce through” the clouds to reveal great cosmic distances beyond the pillars, there are no galaxies in this view. Instead, a mix of translucent gas and dust known as the interstellar medium in the densest part of our Milky Way galaxy’s disk blocks our view of the deeper universe.

Image Credit: NASA, ESA, CSA, STScI

- - - - - - - - - - - - - - - - - - - - - - - - - - - - - - - - - - - - - - - - - - - - - - - - - - - - - - - - - - - - - - - - - - - - - - - - - -

Did you appreciate this newsletter? Please help us keep it going by Joining Our Patreon Supporters

What are your thoughts on this article? Join the discussion on our Facebook Page

PictureCorrect subscribers can also learn more today with our #1 bestseller: The Photography Tutorial eBook

- - - - - - - - - - - - - - - - - - - - - - - - - - - - - - - - - - - - - - - - - - - - - - - - - - - - - - - - - - - - - - - - - - - - - - - - - -

The post Interesting Photo of the Day: Pillars of Creation appeared first in the Photography Tips category on PictureCorrect.


from PictureCorrect https://ift.tt/e56xRuT
via IFTTT

PictureCorrect.com: Brenizer Method Photo Tutorial

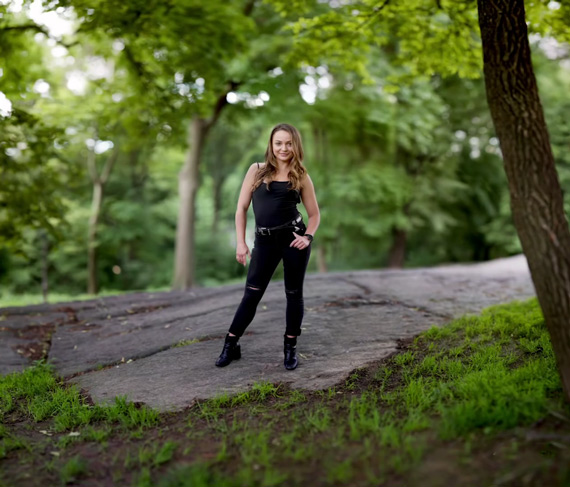
Wedding photographer Ryan Brenizer popularized a method wherein he was able to take very high resolution images of his clients with a very shallow depth of field. The Brenizer method involves taking and stitching multiple frames to get a result with incredible bokeh. It feels as if the image with taken with a lens with an f-stop less than one. In this video, photographer David Bergman with Adorama guides you through the Brenizer method to get a wide-angle image with shallow depth of field:

Using a longer lens at a wide open aperture setting is already a convenient way to blow out the background and draw attention to the subject. Why would you need the Brenizer method? Consider this: you want to shoot wider to show the environment the subject is in while still maintaining focus on the subject. For this, you can back up a little and shoot at a wider aperture or use a fast wide angle prime lens. But both of these methods will have the subject, the foreground, and the background in focus; the subject will not be isolated.

The Brenizer method is the perfect solution. It can give you with a shallow depth of field while still providing a wide angle field of view just like a medium format camera would do. You can follow these steps to take photos with the Brenizer method using your conventional lens wide open:

  1. Set your focus and exposure to manual to ensure that no settings change throughout the process.
  2. Lock your focus on the subject and take the first photo with a shallow depth of field.
  3. Ask the subject to stay as still as possible until you’re done taking photos.
  4. Move the camera in all directions and take multiple overlapping photos. The aim is to cover a much wider area than you would be able to see from the lens’s perspective.
  5. Make sure that you are quick while taking shots with the subject in the frame. This is to avoid any movement of the subject that can get problematic while stitching.
  6. Load all the images to your computer and use a tool like Photoshop’s Photomerge (File > Automate > Photomerge…) to stitch all the photos together.

portrait with brenizer method

Once done with the process, you will get an image that has a wide angle and medium format look. So what are you waiting for? Head out and give this artistic method a try.

- - - - - - - - - - - - - - - - - - - - - - - - - - - - - - - - - - - - - - - - - - - - - - - - - - - - - - - - - - - - - - - - - - - - - - - - - -

Did you appreciate this newsletter? Please help us keep it going by Joining Our Patreon Supporters

What are your thoughts on this article? Join the discussion on our Facebook Page

PictureCorrect subscribers can also learn more today with our #1 bestseller: The Photography Tutorial eBook

- - - - - - - - - - - - - - - - - - - - - - - - - - - - - - - - - - - - - - - - - - - - - - - - - - - - - - - - - - - - - - - - - - - - - - - - - -

The post Brenizer Method Photo Tutorial appeared first in the Photography Tips category on PictureCorrect.


from PictureCorrect https://ift.tt/Mw6BSz3
via IFTTT