maanantai 14. elokuuta 2023

PictureCorrect.com: Summer Storm Photography Tips

Summer storms can be nature’s way of putting on a show, offering photographers an excellent opportunity to capture powerful, dramatic, and beautiful images. With clouds, lightning, rainbows, and dramatic lighting, there’s plenty to photograph. However, photographing storms also presents some unique challenges. Here’s a guide to help you capture the beauty of summer storms safely and effectively.
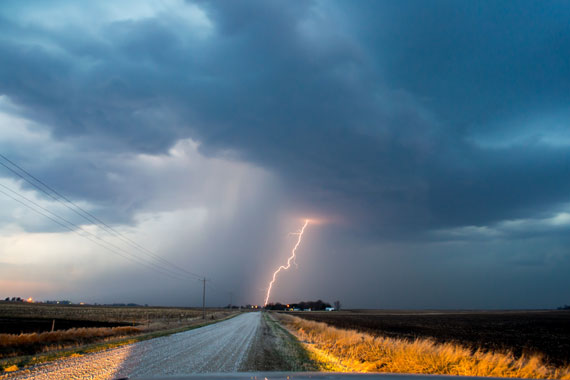
summer storm

Photo captured by NOAA; 18mm, f/8, 10 seconds, ISO 400

Safety First

  • Distance: Never prioritize a photo over your safety. Ensure you’re at a safe distance from the storm, especially lightning.
  • High Ground: Avoid being the tallest object in an open area, and don’t stand near tall trees or metal structures.
  • Weather Updates: Keep an eye on weather updates and storm movement. Apps like RadarScope or AccuWeather can be invaluable.

Optimal Settings

  • Shutter Speed: For lightning, longer exposures (several seconds) can be effective. However, if you want to capture the individual raindrops, a fast shutter speed (1/500 or faster) is required.
  • ISO: Start with a lower ISO (100 or 200) to reduce noise. You can increase it if the scene is too dark.
  • Aperture: Depending on your desired depth of field, an aperture of f/4.0 to f/11 is a good starting point.

Gear Protection

  • Rain Covers: Use rain covers to protect your camera and lens. Plastic bags with rubber bands can also work in a pinch.
  • Lens Cloth: Keep one handy to wipe off raindrops.
  • Backup Equipment: If possible, have backup gear in case something gets wet or damaged.
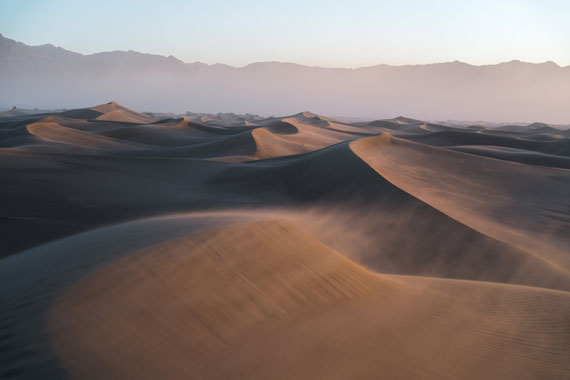
summer sand wind

Photo captured by Jeremy Bishop; f/4, 1/1000s, ISO 160

Composition Tips

  • Foreground Interest: Including objects in the foreground can give the viewer a sense of scale.
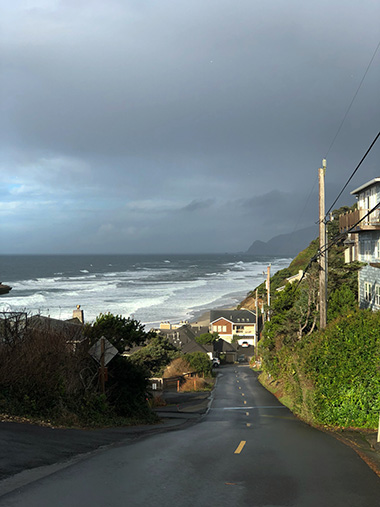
  • Leading Lines: Use roads, paths, or natural lines to lead the viewer’s eye into the storm.
  • Rule of Thirds: Position the horizon on the top or bottom third of the frame, depending on whether the sky or ground is more interesting.

Use a Tripod

Especially in lower light conditions or when capturing lightning with longer exposures, a tripod is essential to reduce camera shake and ensure sharp images.

Focus on Details

While vast stormy skies are captivating, don’t forget to focus on smaller details like raindrops on leaves, puddles reflecting the stormy sky, or the patterns of streaming water.

Chase the Light

The period just before or after a storm can have incredibly dramatic lighting. Golden hues, intense contrasts, and rainbows can emerge, offering unique photographic opportunities.
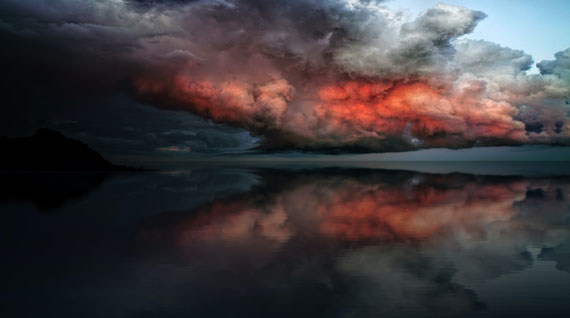
storm light

Photo captured by Johannes Plenio; 16mm, f/4.0, 1/30s, ISO 200

Post-Processing

Enhance the drama using editing tools. Increase contrast, sharpen details, and bring out the colors to give your storm photos an edge. However, avoid over-editing to the point of making the image unrealistic.

Practice and Patience

Nature is unpredictable. You may not get the perfect shot on your first outing. Keep practicing, understanding the nuances of your equipment and the weather patterns of your location.

Learn and Share

Join storm photography communities online or in person. Sharing experiences, tips, and photos can be beneficial and inspiring.

In conclusion, photographing summer storms is as much about understanding and respecting nature as it is about technical prowess. With safety at the forefront, embrace the challenge, and you’ll find yourself capturing some of nature’s most awe-inspiring moments.

For Further Training:

This #1 bestseller is the most in-depth eBook on how to capture amazing photography anywhere. Over 250 pages of photography tips & tricks from industry insiders. Currently 83% off which ends soon for a Summer Sale if you want to check it out.
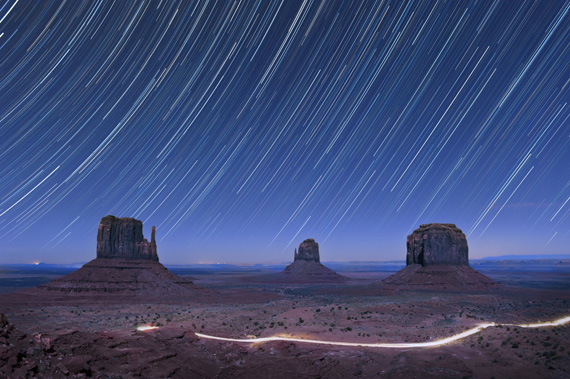
It is the product of over a DECADE of research as an insider in the photography industry, assembled to help you learn quickly and avoid the mistakes that I made along the way.

Deal ending soon: The Photography Tutorial eBook Summer Sale

- - - - - - - - - - - - - - - - - - - - - - - - - - - - - - - - - - - - - - - - - - - - - - - - - - - - - - - - - - - - - - - - - - - - - - - - - -

Did you appreciate this newsletter? Please help us keep it going by Joining Our Patreon Supporters

What are your thoughts on this article? Join the discussion on our Facebook Page

PictureCorrect subscribers can also learn more today with our #1 bestseller: The Photography Tutorial eBook

- - - - - - - - - - - - - - - - - - - - - - - - - - - - - - - - - - - - - - - - - - - - - - - - - - - - - - - - - - - - - - - - - - - - - - - - - -

The post Summer Storm Photography Tips appeared first on PictureCorrect.


from PictureCorrect https://ift.tt/r1tXbh6
via IFTTT
sunnuntai 13. elokuuta 2023

PictureCorrect.com: How to Use Topaz Photo AI Within Photoshop

Editing photographs can be a game-changer for both professional photographers and hobbyists alike. With the myriad of tools available, knowing the right one to use can be a daunting task. In this recent video tutorial, we got a detailed walkthrough on how to edit photos using Topaz Photo AI through Adobe Photoshop. Here’s a breakdown of the key points:

The tutorial begins with a Canon raw file. If you’re unfamiliar with raw files, they are digital negatives that preserve the most amount of information from your camera, providing more flexibility in post-processing.

You have two options to begin the process:

  1. Launch Photoshop and open the file.
  2. Drag the file from its location directly onto the Photoshop icon.

Adobe Camera Raw will open by default when working with a raw file, giving you an initial opportunity to make adjustments. But for the tutorial’s purpose, the file was directly opened without any changes.

Noise Reduction First

Zooming into the image, it was evident that it suffered from significant noise. Before any edits, the first task was to get rid of this noise. Here’s how it was approached:

  1. Create a dedicated layer for Topaz Photo AI by right-clicking on the original layer and selecting ‘Duplicate Layer’.
  2. Rename this new layer to ‘Topaz Photo AI’.

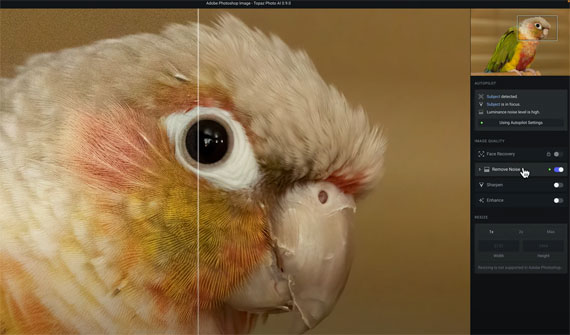
remove noise

Accessing Topaz Photo AI

  1. From the main menu, go to ‘Filter’.
  2. Navigate to ‘Topaz Labs’ and select ‘Topaz PhotoAI’.

Autopilot: The Core Feature

Once in PhotoAI, you are introduced to the ‘Autopilot’ feature. It’s a hallmark of PhotoAI, showcasing everything the software has detected with your image. This includes:

  • Existing issues in the image.
  • Detection of a subject.
  • In portraits, the number of faces detected and their quality.

Hovering over the word ‘subject’ in Autopilot, a mask is automatically applied, revealing any other identified issues.

The beauty of Autopilot is that once it identifies issues, it also applies the best model and strength to rectify them. The split view in the software showcases this effectively. By swiping right, you can see the noisy image, while swiping left demonstrates the noise reduction in action, preserving all essential image details.

Customizing Autopilot Settings

While Autopilot does an impressive job, you can still make manual changes to the settings. This includes:

  • Enabling and adjusting sharpening.
  • Specifying if the sharpening should apply to the detected subject or the entire image.

Should you wish to revert to the original Autopilot settings, there’s a handy ‘Reset to Autopilot Settings’ button.

It’s worth noting that when using PhotoAI with Photoshop, resizing is unsupported within PhotoAI. Resizing would have to be conducted in Photoshop or through an external platform.

Once satisfied with the edits, you can save and return to Photoshop.

Benefits of a Layer-Based Workflow

A significant advantage of this process is the layer-based workflow in Photoshop. You can effectively compare the edited image with the original. If desired, you can also add layer masks or make further adjustments using Photoshop’s suite of tools.

How to Get Topaz Photo AI for a Discount Today:

Topaz Labs has currently marked it on sale at $40 off to celebrate the most recent update.

Deal found here: Topaz Photo AI at $40 Off

- - - - - - - - - - - - - - - - - - - - - - - - - - - - - - - - - - - - - - - - - - - - - - - - - - - - - - - - - - - - - - - - - - - - - - - - - -

Did you appreciate this newsletter? Please help us keep it going by Joining Our Patreon Supporters

What are your thoughts on this article? Join the discussion on our Facebook Page

PictureCorrect subscribers can also learn more today with our #1 bestseller: The Photography Tutorial eBook

- - - - - - - - - - - - - - - - - - - - - - - - - - - - - - - - - - - - - - - - - - - - - - - - - - - - - - - - - - - - - - - - - - - - - - - - - -

The post How to Use Topaz Photo AI Within Photoshop appeared first on PictureCorrect.


from PictureCorrect https://ift.tt/ms56dwC
via IFTTT

lauantai 12. elokuuta 2023

PictureCorrect.com: Finding Fresh Angles in Photography

How on earth do you find a fresh angle to shoot from when they’ve all been taken? That’s not what I mean. I do not mean discovering a new angle but using new angles you don’t usually shoot from. By changing your angles you’ll add a whole new dimension to your photography.

fresh angles for better photos

Photo by Sathish J; ISO 400, f/14.0, 1/100-second exposure.

The question I get asked as a photography teacher is how do the pros do it? Why are their images so different from mine? Simple, one of the techniques they use is angles or viewpoints. Implement them in your images and you are one step nearer to a great image. The key here is varying the angles and trying to think outside the box.

1. Don’t stand in front of your subject

Everyone shoots an image from directly in front of their subjects or objects. They line everyone up, tell them to say cheese, and push the shutter button. Then they wonder later why their images all look the same. The reason they all look the same is because most people shoot from eye level, which, on average, is about 1.5 meters or 5 feet above the ground. Boring because everyone does it. So think before you shoot, and use your feet to move around.

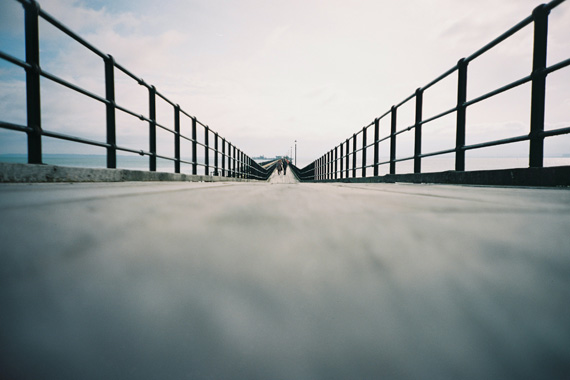
2. Use your stomach not your head

How low can you go is the chant when attempting to belly dance under a balancing pole. Get down low on the ground and shoot from that angle looking up at the subject. Immediately the perspective has changed and the image is dramatically different.

low angle bridge

Photo by Nick Page

How many people do you ever see in a tourist spot lying on their stomachs getting a shot. No need to answer. I have never seen one. If you are prepared to forgo embarrassment, then you are the one who will get the unique shot. Logical, isn’t it? But how many people do it?

3. Vary your height

This is just a little less embarrassing than point two. Using your knees, sitting down, or resting on your haunches all help you to vary your height. More people do this, so it’s not as unique as using your stomach. But, you will still get great images. Do this exercise: Choose a subject and then shoot it from 3 meters on your stomach, sitting on your bum, kneeling, crouching, and standing straight up. Then move in a few feet or a meter and do it all again. Do this until your are as near as you can get. Then view all of your images and see how many of them are better than a normal standing image.

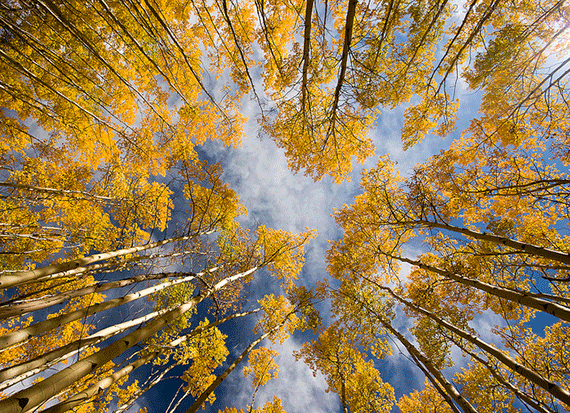
4. Out cold

This is a variation of point two. Try lying flat on your back. Try it. It will give you a totally new perspective on life and your photography. Again you never see photographers lying on their backs in public places. Why? Same old reasons: embarrassment and shyness. But, the one who tries this gets the better shot. Ever seen those shots looking up into tall trees? How do you think they were taken? Right! Use this angle more often, and you’ll find that more than half your shots will improve dramatically. You can even try this for family shots to get that unique extra photo that nobody else has.

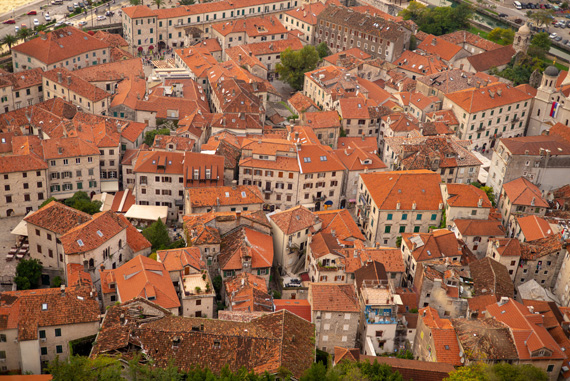
5. Bird’s eye view

Now don’t get all dangerous and attempt to climb too high and damage yourself and your gear. Just get a vantage point that is above the normal eye level images that everyone shoots. Get a different perspective. It may be great to get the odd high shot but really all you want to do is get a higher, different viewpoint. Again, something that is unique and not the norm.

birds eye view

Photo by Geng Sittipong; ISO 200, f/2.5, 1/60-sec.

6. On the move

One of the best pieces of advice I can give you is to use your feet. Forget about zooms and move around. Walk around your subject or the object you’re shooting and find a different viewpoint or angle. Vary your height, lie on your back, get higher or even lower but find something that is different. At the same time though, use your head to visualize the final image and work toward that.

These are just a few tips for shooting more creative images from different angles. I think that this is one the best tips you can use as you learn  photography. Don’t be afraid to experiment or get embarrassed. Keep practicing, and before you know it you will be shooting like a pro.

About the Author:
Wayne Turner has been teaching photography for 25 years and has written three books on photography. He has produced 21 Steps to Perfect Photos, a program of learner-based training using outcome-based education.

- - - - - - - - - - - - - - - - - - - - - - - - - - - - - - - - - - - - - - - - - - - - - - - - - - - - - - - - - - - - - - - - - - - - - - - - - -

Did you appreciate this newsletter? Please help us keep it going by Joining Our Patreon Supporters

What are your thoughts on this article? Join the discussion on our Facebook Page

PictureCorrect subscribers can also learn more today with our #1 bestseller: The Photography Tutorial eBook

- - - - - - - - - - - - - - - - - - - - - - - - - - - - - - - - - - - - - - - - - - - - - - - - - - - - - - - - - - - - - - - - - - - - - - - - - -

The post Finding Fresh Angles in Photography appeared first on PictureCorrect.


from PictureCorrect https://ift.tt/fjcNnDv
via IFTTT

perjantai 11. elokuuta 2023

PictureCorrect.com: Black and White Photography on Rainy Days

This article is based on concepts from the Bad Weather Photography Guide and also the Better B&W Photography Guide if you want to dig deeper for further training.

One of my favorite locations in the entire world to take pictures is coastal Oregon.

And as sure as the sunrise and taxes, most of the time I’m there, it’s going to be raining.

Rainy days are typically not a photographer’s friend, especially when you’re out creating landscape photography.

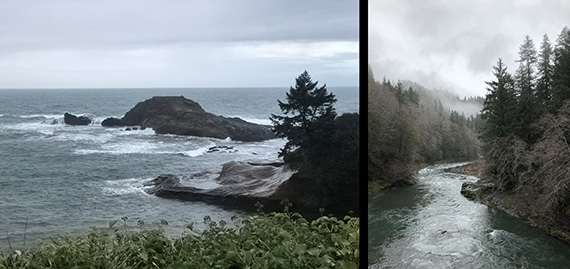
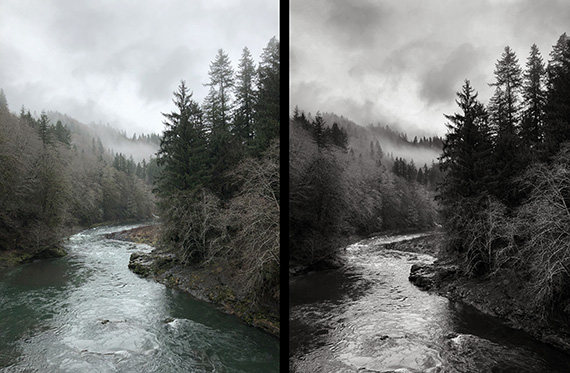
black and white landscape photography weather

Photos by Kent DuFault

Rainy days in Oregon produce photos that look like the above two examples. They not horrible, but they’re also not very exciting.

Color landscape photography needs some lighting to make it shine—literally.

This news can be disappointing if you’ve waited six months, or a year, to photograph a location that you love.

The sunshine brings color to photography. Without the sun, colors tend to go flat as a pancake.

Here is my quick tip for photography in bad weather conditions.

black and white landscape photography weather

Conversion in tonality using the Kodak 400 HC film preset by Topaz Labs. (Photo by Kent DuFault)

Consider going black and white. This can be done in post-processing or at the moment of taking pictures.

Why does black and white photography work better in inclement weather?

  • It relies on varying tones instead of color.
  • Black and white relies heavily on the use of shapes for interest. You don’t necessarily need sunshine to highlight shapes.
  • Black and white photography relies on texture, which can be easily accentuated in post-production—even when there was no directional lighting in the scene.
  • Manipulating tone in a realistic manner is far easier and faster than trying to manipulate color.

Using these principles, you can create a more exciting composition when color is lacking.

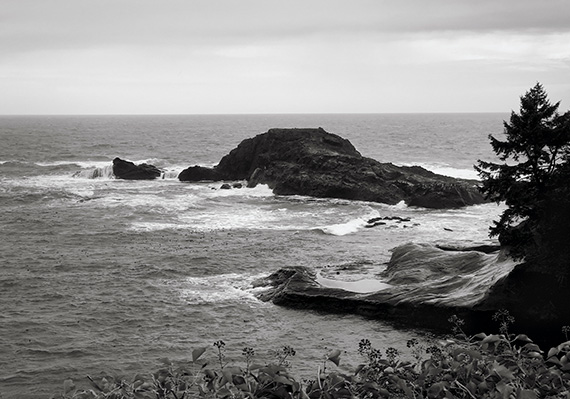
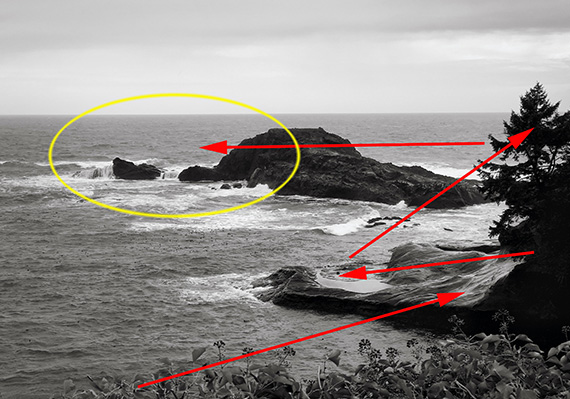
black and white landscape photography weather

I quickly created this compositional path using the elements of black and white photography described above.

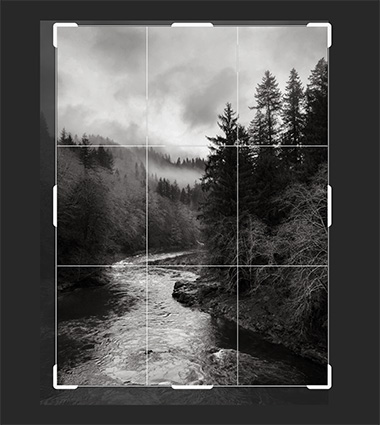
When converting to black and white in post-production, you’ll want to take a look at your frame.

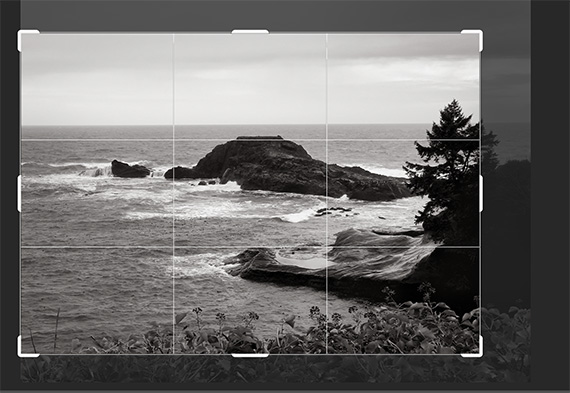
black and white landscape photography weather

Slight crop

I often end up cropping slightly to enhance my chosen black and white path through the photo versus how I composed it in color.

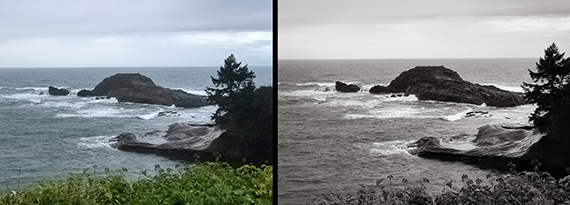
black and white landscape photography weather

Comparison of color to b&w crop

The black and white version most assuredly provides an increased level of visual interest.

Here is another comparison:

black and white landscape photography weather

Photo by Kent DuFault

It’s easier to manipulate tone in post-production than color, especially when striving for realism.

Using an Adjustment Brush feature, I raise and lower tonal values to create my composition path within the landscape. The software that I use to accomplish this is usually Photoshop, Lightroom or Snapseed.

black and white landscape photography weather

Another slight crop

Once again, a crop helps to solidify my black and white landscape composition.

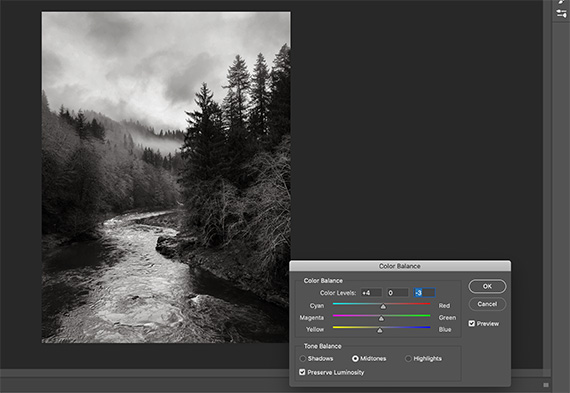
black and white landscape photography weather

Slight warm tone

I often give my black and white landscape photos a slightly warm tone as a final step.

I’m very proud of the final shot—despite the lousy weather!

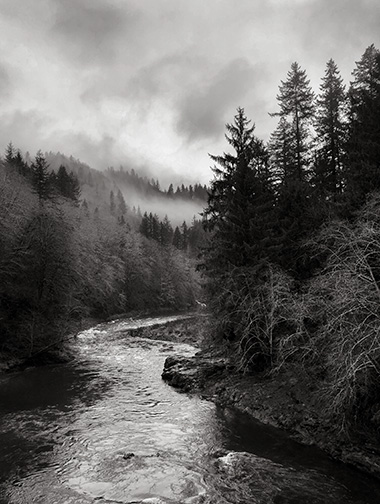
black and white landscape photography weather

Final result despite the weather

This is a black and white conversion of the Wilson River near Tillamook, Oregon, edited first in Snapseed and then in Photoshop.

black and white landscape photography weather

Photo by Kent DuFault

Occasionally the sun pops out in Oregon. This time it was for about 10 minutes! No need for black and white when you’ve got the sun on your side.

About the Author:
Kent DuFault is an author and photographer with over 35 years of experience. He’s currently the director of content at the online photography school, Photzy.com.

For Further Training:

Have you ever quickly converted your shots to black & white, hoping to make them “Better”? And the result was bland to say the least? This is a very common occurrence. Knowing how to convert color to B&W with a working understanding of tone and contrast in post-processing is a very different story. This in-depth eBook is designed to cover EVERYTHING you need to know about producing your own powerful and professional B&W images.

black and white photo guide

Better Black & White Photography Guide (See What’s Inside)

Every step is detailed in all three programs: Photoshop, Lightroom, & Elements. But even if you don’t have these applications, there’s enough information in here to help you achieve the same results with the software you already have. It is currently 76% off if you want to check it out.

Deal ending soon: The Better Black & White Photography Guide at 76% Off

- - - - - - - - - - - - - - - - - - - - - - - - - - - - - - - - - - - - - - - - - - - - - - - - - - - - - - - - - - - - - - - - - - - - - - - - - -

Did you appreciate this newsletter? Please help us keep it going by Joining Our Patreon Supporters

What are your thoughts on this article? Join the discussion on our Facebook Page

PictureCorrect subscribers can also learn more today with our #1 bestseller: The Photography Tutorial eBook

- - - - - - - - - - - - - - - - - - - - - - - - - - - - - - - - - - - - - - - - - - - - - - - - - - - - - - - - - - - - - - - - - - - - - - - - - -

The post Black and White Photography on Rainy Days appeared first on PictureCorrect.


from PictureCorrect https://ift.tt/MBGJe2N
via IFTTT

torstai 10. elokuuta 2023

PictureCorrect.com: How Much Photo Editing is Too Much?

Photography is an ever-evolving blend of art and technology. As the craft has progressed, photo editing has become an intrinsic part of the process. Tools like Adobe Photoshop, Lightroom, and a slew of mobile apps have brought sophisticated editing capabilities to the fingertips of photographers worldwide. However, with this power comes a question: how much photo editing is too much?

photo editing

Photo captured by Tianyi Ma

1. The Intent of the Photograph

Before diving into the mechanics of editing, let’s consider why we’re editing in the first place. Is the intent to depict a realistic, journalistic representation of an event? Or is it an abstract piece intended to evoke emotion, regardless of its adherence to reality?

For instance, a photojournalist might make minor adjustments to exposure, contrast, or color balance to ensure the photo accurately represents the scene. Conversely, a fine-art photographer might lean heavily into editing to manifest a particular vision or mood.

2. The Power of Subtlety

Over-editing is a common pitfall, especially with the multitude of sliders and filters available. Often, less is more. A slight tweak in brightness, a small nudge in saturation, or a touch of sharpening can make your photo stand out without making it scream “overprocessed!”

3. The Tell-Tale Signs of Over-Editing

Here are some signals that you might have gone a bit too far:

  • Over-saturated Colors: If your colors look neon-bright or unnatural, it’s a sign you might have pushed your saturation sliders too far.
  • Haloing: Pushing the clarity or sharpness sliders too much can result in halos around objects, particularly against high-contrast backgrounds.
  • Over-smoothing: While removing blemishes or imperfections is standard in portrait photography, making a subject’s skin too smooth can render them plastic-like and unreal.
  • Loss of Detail: Overexposing highlights or underexposing shadows can result in a loss of detail in those areas.

4. Be True to Your Vision

It’s essential to recognize that every photographer’s vision is unique. What might be “too much” editing for one person could be “just right” for another. The crucial part is to be consistent with your style. If heavy edits and surreal colors are your trademarks, embrace them! If you lean more towards natural and minimalistic edits, that’s perfect too.

5. Seek Feedback

Often, another set of eyes can provide a fresh perspective. Share your edited photos with peers or photography groups. Listen to their feedback but remember to prioritize your creative vision.

6. Educate Yourself

Editing, just like shooting, requires practice and education. Understand the tools at your disposal, and you’re less likely to misuse or overuse them. There are countless tutorials, courses, and workshops out there to help hone your editing skills.

Balance:

Photo editing is a powerful extension of the photography process. When done with care and intent, it can elevate a good shot into a masterpiece. The key lies in finding a balance between portraying your vision and maintaining the essence of the photograph. Remember, the best edits often enhance the story the photograph tells, not overshadow it.

For Further Training:

Those of you working on photo editing may also be interested in the just released Synthetic Photography Masterclass, designed by Phil Steele, a veteran in the field of photography education. With over 13 years of experience in teaching online photography and a deep-seated passion for technology, Phil is ideally placed to guide students into the new era of synthetic photography.

synthetic image

The Synthetic Photography Masterclass introduces you to the concept of synthetic photography, helps you gain a firm understanding of the underlying technology, and provides you with the skills required to create synthetic images. This knowledge and the skills acquired will, in turn, keep you at the forefront of this exciting new art form.

Launch sale ending soon: The Synthetic Photography Masterclass at 40% Off

- - - - - - - - - - - - - - - - - - - - - - - - - - - - - - - - - - - - - - - - - - - - - - - - - - - - - - - - - - - - - - - - - - - - - - - - - -

Did you appreciate this newsletter? Please help us keep it going by Joining Our Patreon Supporters

What are your thoughts on this article? Join the discussion on our Facebook Page

PictureCorrect subscribers can also learn more today with our #1 bestseller: The Photography Tutorial eBook

- - - - - - - - - - - - - - - - - - - - - - - - - - - - - - - - - - - - - - - - - - - - - - - - - - - - - - - - - - - - - - - - - - - - - - - - - -

The post How Much Photo Editing is Too Much? appeared first on PictureCorrect.


from PictureCorrect https://ift.tt/O3RqLFv
via IFTTT

keskiviikko 9. elokuuta 2023

PictureCorrect.com: Removing Image Noise and Recovering Original Detail

The photography world is a dynamic field with constant updates and upgrades, ensuring that professionals and hobbyists alike get the best experience possible. Topaz Photo AI has been at the forefront, offering intuitive photo-editing solutions that cater to a wide array of needs. Their recent updates have ushered in a series of exciting features and improvements, marking a promising journey for image enhancement. Here’s an in-depth look:

1. Enhanced Noise Reduction with Recover Original Detail

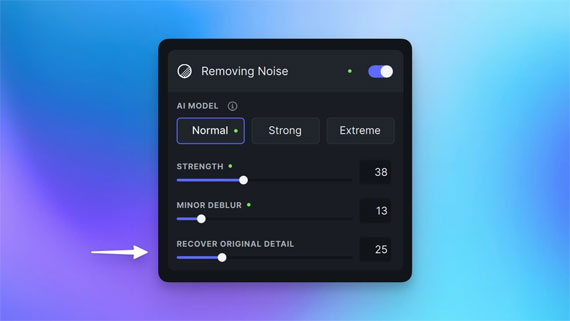
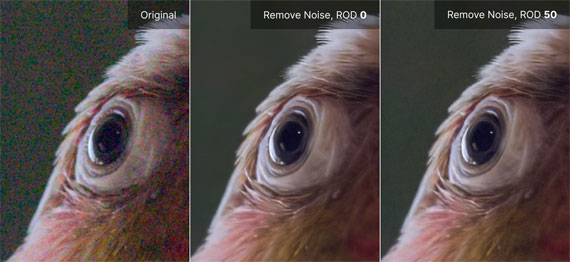
Noise reduction is crucial in enhancing clarity in images. However, too much noise removal can make an image appear eerily smooth, which takes away its natural look. Topaz’s innovative solution? The Recover Original Detail feature.

removing noise

Instead of relying on artificial grain to add texture, this feature intelligently reintroduces luminance details from the original image, eliminating color noise. The outcome is a natural, sharp image without any color noise interference. As of now, this feature is available for non-raw images, but raw image support is coming soon.

noise example

2. True-to-Life Face Recovery

Ensuring the authenticity of portraits, Topaz Photo AI now ensures that eye colors are not altered during face enhancement. Especially in black and white or sepia images, this update maintains the genuineness of the subject. There’s also a provision to control the areas of face recovery, allowing users to avoid any jarring transitions between enhanced and untouched parts of an image.

3. Swift Navigation with Keyboard Shortcuts

For those who love efficiency, this update is a treat. Topaz Photo AI has introduced a slew of keyboard shortcuts for quick access to popular features. Whether it’s zooming, changing modes, or quick saving, these shortcuts make the user experience snappy and intuitive.

4. User Experience Improvements

Topaz has always been keen on user feedback, and it shows. They’ve made a myriad of improvements:

  • Visibility: Moving the processing status indicator for better clarity.
  • Integration: Improving compatibility with tools like Photoshop and Lightroom.
  • Functionality: Enhancements like tooltip addition, re-organization of menu items, and improved resize display make for a more refined experience.
  • Bug Fixes: From addressing saving issues in Photoshop to refining the upscaling feature, the team has been diligent in making the software more robust.

5. A Glimpse into the Future

The journey doesn’t stop here. Topaz has lined up a series of fascinating features based on user feedback. From a high-quality removal brush and an ML exposure tool to improvements in raw noise removal and sharpening models, there’s a lot to look forward to.

Moreover, for those who have integration preferences, a new Automate plugin will soon allow upscaling within Photoshop. There’s also a focus on refining batch processing and addressing specific technical issues.

Topaz Photo AI continues to be a beacon of innovation in the photo-editing sphere. With its commitment to user feedback and a passion for enhancing the photography experience, we can only anticipate even more groundbreaking features in the future. Keep an eye out for more updates, and in the meantime, make the most of these fantastic new features!

How to Get Topaz Photo AI for a Discount Today:

It is currently $40 off for their update sale which ends soon. Already own a Topaz product? You may be able to get a special price. Topaz Labs also has a 30 day, no-questions-asked refund policy. That means that if you aren’t happy with the results, you are eligible for a full refund on any of their products within 30 days after purchasing. No risk in trying it.

Deal ending soon: Topaz Photo AI at $40 Off

- - - - - - - - - - - - - - - - - - - - - - - - - - - - - - - - - - - - - - - - - - - - - - - - - - - - - - - - - - - - - - - - - - - - - - - - - -

Did you appreciate this newsletter? Please help us keep it going by Joining Our Patreon Supporters

What are your thoughts on this article? Join the discussion on our Facebook Page

PictureCorrect subscribers can also learn more today with our #1 bestseller: The Photography Tutorial eBook

- - - - - - - - - - - - - - - - - - - - - - - - - - - - - - - - - - - - - - - - - - - - - - - - - - - - - - - - - - - - - - - - - - - - - - - - - -

The post Removing Image Noise and Recovering Original Detail appeared first on PictureCorrect.


from PictureCorrect https://ift.tt/darGtVX
via IFTTT

tiistai 8. elokuuta 2023

PictureCorrect.com: 8 of the Most Important Photoshop Tools for Photographers

Photoshop is one of the most well known and most commonly used image editing software programs in the world. It’s used worldwide both personally and professionally. When people see a picture they believe too good to be true, the reply is often the same: “That’s Photoshopped.” What many people don’t realize is that many of the images you think are just perfect shots are touched up using Photoshop, whether that be adding a little brightness or totally removing an undesirable person or section. When Photoshop is used correctly and not over done, it can make amazing imagery even better!

most important photoshop tools

photo by AMINE KAYTONI

While every tool in Photoshop has its use, and, when you know what you’re doing should definitely not be overlooked! One thing you need to remember is that Photoshop isn’t there to “fix” a photograph, a bad photograph is always going to be a bad photograph. Of course the tools you find useful are going to differ to those someone else finds useful, so it’s all a matter of opinion, but if you have a great photograph and it just needs that little touch up, then here are our eight of the most important Photoshop tools for photographers:

1. Hue and Saturation

The Hue and Saturation tool enables you to control the colors in your images based on, well, their hue and saturation. To open the Hue/Saturation tool you can go to Image > Adjustments > Hue/Saturation.

Hue refers to the color in your image. Changing this will change the colors in your photograph and so this setting is usually best left untouched.

The tool you’re more likely to use here is saturation; this is the intensity and richness of the colors in the image. When saturating an image you can use the Master box found at the top of the Hue/Saturation toolbox to choose which colors you’d like to saturate. The colors you’re going to want to saturate most are the reds and yellows in your image rather than the blues. Adjusting the saturation allows you to make it look more natural and dramatic while not changing the colors or image too drastically.

2. Cropping

This is one of the more simple tools you’ll find yourself using, but that doesn’t make it any less valuable. Cropping is a valuable tool for photographers as it allows them to prep an image for posting online or printing: taking an image and changing its size and/or removing unnecessary empty areas. You can save presets for various sizes and resolutions, enabling you to crop images specifically for various reasons.

square crop

photo by Thomas Leuthard

3. Layers

Layers are another simple tool that any Photoshop user knows how to use. But while simple, this tool is actually one of the most useful. Layers allow you to work on parts of an image without changing others. There really isn’t much more to say about layers than that, they allow you to layer various edits and section each, remaining its own separate section and having no impact on any other.

4. Levels

The levels tool allows you to correct the tonal range and color balance of an image by adjusting the intensity levels of images shadows, highlights and midtones. When editing the levels of an image you are shown a histogram, which is essentially just a visual guide for adjusting the image tones. You can find the levels tool by going to Image > Adjustments > Levels.

The histogram represents the dark and light tones within the image. If your histogram is mainly pushed to the left hand side it represents darker tones in your image, whereas the right hand side shows brighter tones. This is a tool you’ll likely find hard to use, but with slow adjustments you’ll notice how it can influence your images.

5. Sharpening

Sharpening is a hard tool to use; it requires a lot of practice and a very steady hand with a mouse. Sharpening an image is basically touching up all the lines and increasing their contrast, this will cause smaller features of an image stand out more. Sharpening your image is usually one of the last edits you’ll find yourself doing. The sharpen tool also has an “Auto Sharpen” command which may save you the time. When sharpening an image you should remember there is a fine line between sharpened and over-sharpened; over-sharpening an image will cause it to look unrealistic.

6. Healing Brush

The healing brush is used to replace scratches and small specs you might have noticed in your image. It works like a paintbrush tool but allows you to take a “perfect” part of your image (let’s say you focus on the blue of the sky) and copy that part of your image over the top of the spec or scratch you’ve found within your image. This tool will attempt to blend the section you’re copying with the area you’re covering; this means nothing looks out of place.

7. Exposure

Exposure adjustment corrects the tonal values or lightness of HDR (High Dynamic Range) images. You can find the exposure tool in Images > Adjustments > Exposure. This allows you to edit three settings: Exposure (this adjusts the highlights of your image while ignoring the darker areas of your image), Offset (this darkens the shadows and midtones of your image while ignoring the lighter areas), and Gamma (this adjusts the image’s gamma or midtone values).

8. Vibrance

The vibrance tool saturates the colors in your image, focusing mainly on increasing the intensity of colors in your image. Vibrance works much like saturation except it avoids skin tones (mainly oranges and yellows), so it’s perfect for images that contain people; it saturates their skin tone without making it seem unrealistic but adds to every other color in your image. A simple rule to follow is to use saturation when removing color from an image as it removes color from all colors, and vibrance when adding color. Vibrance essentially acts as a smart saturation, as it will only add color to the dull colors already in the image and not every color while avoiding skin tones.

About the Author:
Antonio has been an active photographer for more than three decades. An artist, coach, and teacher, he has developed a unique educational philosophy centered on the creative process and the transformational learning experience. He taught photography and digital imaging at The School of Media of LCC (The University of The Arts London) for more than ten years. Antonio has trained and coached people from all over the world to the highly professional standards of National Geographic and he is currently developing new educational projects on photography and creative development. He is now the owner of London School of Photography, where he runs classes and courses for novice photographers.

- - - - - - - - - - - - - - - - - - - - - - - - - - - - - - - - - - - - - - - - - - - - - - - - - - - - - - - - - - - - - - - - - - - - - - - - - -

Did you appreciate this newsletter? Please help us keep it going by Joining Our Patreon Supporters

What are your thoughts on this article? Join the discussion on our Facebook Page

PictureCorrect subscribers can also learn more today with our #1 bestseller: The Photography Tutorial eBook

- - - - - - - - - - - - - - - - - - - - - - - - - - - - - - - - - - - - - - - - - - - - - - - - - - - - - - - - - - - - - - - - - - - - - - - - - -

The post 8 of the Most Important Photoshop Tools for Photographers appeared first on PictureCorrect.


from PictureCorrect https://ift.tt/8iC0kH9
via IFTTT