


Editing photographs can be a game-changer for both professional photographers and hobbyists alike. With the myriad of tools available, knowing the right one to use can be a daunting task. In this recent video tutorial, we got a detailed walkthrough on how to edit photos using Topaz Photo AI through Adobe Photoshop. Here’s a breakdown of the key points:
The tutorial begins with a Canon raw file. If you’re unfamiliar with raw files, they are digital negatives that preserve the most amount of information from your camera, providing more flexibility in post-processing.
You have two options to begin the process:
- Launch Photoshop and open the file.
- Drag the file from its location directly onto the Photoshop icon.
Adobe Camera Raw will open by default when working with a raw file, giving you an initial opportunity to make adjustments. But for the tutorial’s purpose, the file was directly opened without any changes.
Noise Reduction First
Zooming into the image, it was evident that it suffered from significant noise. Before any edits, the first task was to get rid of this noise. Here’s how it was approached:
- Create a dedicated layer for Topaz Photo AI by right-clicking on the original layer and selecting ‘Duplicate Layer’.
- Rename this new layer to ‘Topaz Photo AI’.
Accessing Topaz Photo AI
- From the main menu, go to ‘Filter’.
- Navigate to ‘Topaz Labs’ and select ‘Topaz PhotoAI’.
Autopilot: The Core Feature
Once in PhotoAI, you are introduced to the ‘Autopilot’ feature. It’s a hallmark of PhotoAI, showcasing everything the software has detected with your image. This includes:
- Existing issues in the image.
- Detection of a subject.
- In portraits, the number of faces detected and their quality.
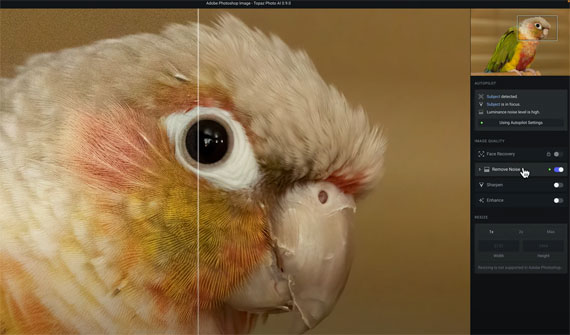
Hovering over the word ‘subject’ in Autopilot, a mask is automatically applied, revealing any other identified issues.
The beauty of Autopilot is that once it identifies issues, it also applies the best model and strength to rectify them. The split view in the software showcases this effectively. By swiping right, you can see the noisy image, while swiping left demonstrates the noise reduction in action, preserving all essential image details.
Customizing Autopilot Settings
While Autopilot does an impressive job, you can still make manual changes to the settings. This includes:
- Enabling and adjusting sharpening.
- Specifying if the sharpening should apply to the detected subject or the entire image.
Should you wish to revert to the original Autopilot settings, there’s a handy ‘Reset to Autopilot Settings’ button.
It’s worth noting that when using PhotoAI with Photoshop, resizing is unsupported within PhotoAI. Resizing would have to be conducted in Photoshop or through an external platform.
Once satisfied with the edits, you can save and return to Photoshop.
Benefits of a Layer-Based Workflow
A significant advantage of this process is the layer-based workflow in Photoshop. You can effectively compare the edited image with the original. If desired, you can also add layer masks or make further adjustments using Photoshop’s suite of tools.
How to Get Topaz Photo AI for a Discount Today:
Topaz Labs has currently marked it on sale at $40 off to celebrate the most recent update.
Deal found here: Topaz Photo AI at $40 Off
- - - - - - - - - - - - - - - - - - - - - - - - - - - - - - - - - - - - - - - - - - - - - - - - - - - - - - - - - - - - - - - - - - - - - - - - - -
Did you appreciate this newsletter? Please help us keep it going by Joining Our Patreon Supporters
What are your thoughts on this article? Join the discussion on our Facebook Page
PictureCorrect subscribers can also learn more today with our #1 bestseller: The Photography Tutorial eBook
- - - - - - - - - - - - - - - - - - - - - - - - - - - - - - - - - - - - - - - - - - - - - - - - - - - - - - - - - - - - - - - - - - - - - - - - - -
The post How to Use Topaz Photo AI Within Photoshop appeared first on PictureCorrect.
from PictureCorrect https://ift.tt/ms56dwC
via IFTTT


0 kommenttia:
Lähetä kommentti