


In the age of digital photography, noise can often sneak its way into our photos. Whether it’s the grainy specks in low-light shots or the colored pixels in certain textures, noise can be distracting and degrade the quality of an image. Thankfully, we have the tools and software to address this issue. But when should you incorporate noise reduction into your photo editing workflow? Let’s dive in.
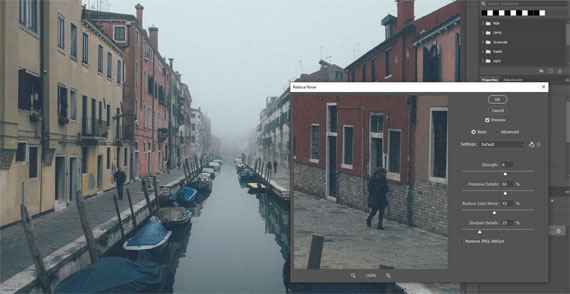
Photo captured by Darwin Vegher
1. Understanding Noise
Before we address when to tackle noise, it’s crucial to understand its types:
- Luminance Noise: These are the grainy, black and white specks that appear in photos, especially in shadows or under low-light conditions.
- Chroma (Color) Noise: These are the colored specks that can appear anywhere in the photo, often in uniform areas like the sky or skin tones.
2. The Ideal Time for Noise Reduction
Typically, noise reduction should be one of the earlier steps in your editing process, especially if it’s a significant concern in the image. Here’s why:
- Before Detailed Edits: Reducing noise before making detailed edits ensures that you don’t accidentally enhance the noise when adjusting sharpness, clarity, or contrast.
- After Raw Conversion: If you’re shooting in RAW (which is recommended for the most editing flexibility), apply noise reduction after converting the file. Some RAW converters even have built-in noise reduction tools.
- Before Color Adjustments: Chroma noise can impact how colors appear, so it’s wise to reduce this noise before making color corrections.
3. Things to Remember
- Don’t Overdo It: While it’s tempting to completely eliminate noise, over-processing can result in a plasticky look, void of details. Balance is the key.
- High ISO Isn’t Always Bad: Yes, higher ISO settings can introduce noise. But don’t be afraid of it. Sometimes, a bit of grain adds character to a photograph.
- Noise Reduction Tools Matter: Not all noise reduction tools are made equal. Some software focuses on luminance noise while ignoring chroma noise, and vice versa. Research and invest in one that suits your needs.
Incorporating noise reduction at the right time in your photo editing workflow ensures that you maintain image quality without sacrificing essential details. Remember, while the aim is to reduce distractions, retaining the natural feel and texture of the photograph is just as important. Happy editing!
For Help Sharpening Blurry Photos:
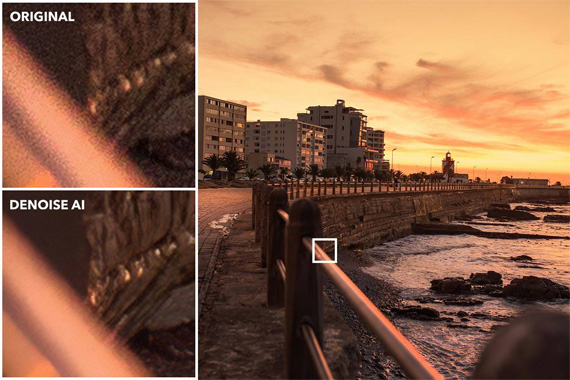
In photo editing news, Topaz Photo AI was recently updated to version 1.5. The company has marked it down $40 off for a short time to celebrate the update if you want to try it out.
Updated: Reducing Noise in a Cityscape Results (see how it works)
Sharpen, remove noise, and increase the resolution of your photos with tomorrow’s technology. Topaz Photo AI supercharges your image quality so you can focus on the creative part of photography.
Deal ending soon: Topaz Photo AI at $40 Off
- - - - - - - - - - - - - - - - - - - - - - - - - - - - - - - - - - - - - - - - - - - - - - - - - - - - - - - - - - - - - - - - - - - - - - - - - -
Did you appreciate this newsletter? Please help us keep it going by Joining Our Patreon Supporters
What are your thoughts on this article? Join the discussion on our Facebook Page
PictureCorrect subscribers can also learn more today with our #1 bestseller: The Photography Tutorial eBook
- - - - - - - - - - - - - - - - - - - - - - - - - - - - - - - - - - - - - - - - - - - - - - - - - - - - - - - - - - - - - - - - - - - - - - - - - -
The post When to do Noise Reduction in a Photo Editing Workflow appeared first on PictureCorrect.
from PictureCorrect https://ift.tt/psOP4xo
via IFTTT


0 kommenttia:
Lähetä kommentti