tiistai 6. huhtikuuta 2021

PictureCorrect.com: How to Use Aperture Priority Mode on Your DSLR

People who invest in a digital single lens reflex (DSLR) camera make their purchase for many reasons, but most want more control over their shots. People may envision themselves selecting the appropriate lens, taking light measurements, setting the controls, and snapping the perfect photograph on the first try. Unfortunately, most people want to have more control over their camera rarely venture beyond the automatic or program modes, essentially using their DSLR as a heavy point-and-shoot camera. I believe people simply don’t know where to start. This article will cover how to manually adjust the aperture under the Aperture Priority setting.

dslr photographer

“Find the differences…” captured by Enrique Céspedes

What is Aperture?

Before we look at making adjustments to the Aperture Priority, let’s take a moment to review what the aperture does. The term aperture refers to the amount of light that is allowed to pass through the lens. To illustrate how an aperture works, think of how the iris works in your eye. When it’s dark out, your iris relaxes to allow more light to enter the eye through the pupil. As the amount of light is increased, the iris constricts the amount of light entering the eye. The aperture, like your eye, can be closed incrementally as the light requirements change for each shot.

camera aperture

“Aperture” captured by Brian Y.

How Do You Set Your Camera to Aperture Priority Mode?

The Aperture Priority mode on most DSLR cameras is indicated by either an “A” or an “Av” mark on the selection dial.

aperture priority mode

“The Mode Dial D80” captured by Andrew Xu

Once the dial is placed in the Av setting, you’ll have the opportunity to change the aperture settings. Although the aperture settings are adjusted on the camera body, the adjustment tolerances are dictated by the lens manufacturer. Each increment of change made to the aperture is indicated by what is called an f-stop. When referring to f stops it is key to understand the lower the number, the wider the aperture. Likewise, the higher numbers indicate there is less light entering the camera.

How Does Aperture Priority Mode Work?

When you adjust the aperture in Aperture Priority mode you are able to specify the f-stop, but the camera continues to adjust for the shutter speed. Let’s say you want to take a photograph outside using available, natural light, but you want to set the aperture at a low setting in order to invoke a strong bokeh (selective blur) effect.

bokeh portrait

“Untitled” captured by Vic Xia

shallow depth of field

“More Than Spring” captured by Jose Maria Cuellar

With the camera in Aperture Priority mode, set the aperture to a low setting (increased light), let’s say about f/4. The camera will calculate the amount of time the shutter needs to stay open at f/4 in order to properly expose the frame. Since the camera selects the shutter speed, it is recommended that you use a tripod (or watch the shutter speed closely) when setting the camera to the Aperture Priority mode to avoid inducing camera shake.

The Aperture Priority mode can also be used when you want to increase the amount of depth of field (DoF). This can best be utilized when taking landscape shots. The higher the f-stop is set, the less light is allowed into the camera. Although it may seem counter intuitive at first, less light generally leads to increased clarity, or DoF. By selecting a high aperture setting, let’s say about f/16, you will be able to capture more detail when shooting to infinity.

landscape photography

“Magical Beautiful World” captured by Christos Tsoumplekas

As we discussed earlier, we now understand that when we set the aperture setting in Aperture Priority mode, the camera compensates by setting the shutter speed. As we decrease the amount of light, the camera must compensate by increasing the amount of time the shutter remains open, so using a tripod is highly recommended.

Shooting in Aperture Priority mode is the first step to leaving the fully automatic comfort zone behind. Think of Aperture Priority as going into semi-automatic mode while learning how the camera functions in various configurations. As you review your shots, take a moment to review the shutter speed the camera selects for each shot. Once you’re comfortable with Aperture Priority, come back to this site and read about setting your camera to Shutter Priority.

About the Author:
Peter Timko writes on behalf of Proud Photography, which offers online photography courses on a variety of subjects.


Go to full article: How to Use Aperture Priority Mode on Your DSLR

What are your thoughts on this article? Join the discussion on Facebook

PictureCorrect subscribers can also learn more today with our #1 bestseller: The Photography Tutorial eBook

The post How to Use Aperture Priority Mode on Your DSLR appeared first on PictureCorrect.


from PictureCorrect https://ift.tt/2JY25K1
via IFTTT

PictureCorrect.com: Interesting Photo of the Day: A Bird’s-Eye Wedding Portrait

It’s what every couple wants from a wedding photographer: someone dedicated and passionate, who goes above and beyond expectations. Here’s one that takes that philosophy dangerously literally:

wedding photography from a tree

(Via Imgur. Click for larger image.)

The shot was snapped by South Dakotan wedding photographer Wes Eisenhaur, whose style of rustic simplicity feels at once classic and strikingly contemporary. He’s clearly got an eye for odd angles:

“They thought I was crazy when I climbed the tree….I’m always climbing on things, or getting really low and laying on the ground in some compromising position to get a shot. It’s an easy way to get an interesting perspective. Ultimately, I want to go above and beyond for anyone I work with.”


Go to full article: Interesting Photo of the Day: A Bird’s-Eye Wedding Portrait

What are your thoughts on this article? Join the discussion on Facebook

PictureCorrect subscribers can also learn more today with our #1 bestseller: The Photography Tutorial eBook

The post Interesting Photo of the Day: A Bird’s-Eye Wedding Portrait appeared first on PictureCorrect.


from PictureCorrect https://ift.tt/2EdpnqL
via IFTTT

PictureCorrect.com: Tips for Easy Macro Photography (Video Tutorial)

Macro photography is a specialized genre of photography wherein you take life-size or more magnified images of your subjects. It usually requires a specialized lens, a bit of technical know-how, and quite a lot of patience. For beginners, in the absence of proper guidance, the experience of learning macro photography can be daunting. So, if you’re looking forward to getting started with macro photography, we have the video just for you. Photographer and trainer Andrew Boey shares some quick tips to make learning macro photography easier:

The beauty of macro photography is that you have your potential subject everywhere. And when you look at anything up close, you’ll be even more surprised to see how interesting it appears.

“If you look at things close up they are really going to be interesting and unique because in real life you never look at things that close up that much.”

To help you get started with macro photography, Boey talks about the equipment that you’ll need. When shooting very close to a subject, you’ll realize that things will get pretty shaky. Even a minor camera shake gets amplified drastically. This is why a tripod is preferred. For greater depth of field, you’ll need to work with narrow aperture values which means less light. So, have a light source handy.

While macro photography requires that you use specially designed macro lenses, Boey shows you how you can achieve similar results on a budget using close-up filters. You can screw the filters on your regular lens like any other filter. They help you by effectively reducing the focusing distance and letting you get closer to your subject. These are cost-effective solutions if you’re on a budget. Boey also shows how you can set up your lights and background to make your macro photos look more aesthetically pleasing.

If you’ve been wanting to try macro photography, be sure to watch the complete video. It’ll definitely help you to get a head start.


Go to full article: Tips for Easy Macro Photography (Video Tutorial)

What are your thoughts on this article? Join the discussion on Facebook

PictureCorrect subscribers can also learn more today with our #1 bestseller: The Photography Tutorial eBook

The post Tips for Easy Macro Photography (Video Tutorial) appeared first on PictureCorrect.


from PictureCorrect https://ift.tt/2Q2xwJw
via IFTTT

PictureCorrect.com: How to Capture Really Sharp Photos

One of the most frustrating experiences for a photographer is to get home from a photo trip with some great images only to find that some of the images are not sharp. To help solve this problem, this article covers seven things that a photographer can do to create really sharp images.

taking sharp photos

Photo by Matus Kalisky

Tripod

When it comes to getting sharp images, the first place to start is with a tripod. A tripod provides a stable platform that holds the camera rigid — dramatically increasing the sharpness of the image.

Weighting the tripod

A tripod is a good start. However, a tripod can be made even more stable by using some object to weigh down the tripod. This produces even sharper images. This is so important that many tripods have some type of mechanism at the bottom of the center post that was designed for hanging objects to add weight to the tripod.

A simple way to take advantage of this feature is to carry a small net bag with your photo equipment. The bag can be filled with rocks, or other materials, and attached to the tripod. Even if a tripod doesn’t have such a mechanism, other methods can be used such as hanging a camera bag from the center column of the tripod.

Shutter release

Just because a camera is on a tripod doesn’t mean that the camera will be steady. The simple act of pressing the shutter can cause vibrations that will cause a loss of sharpness. The solution is simple. A remote switch can be used to release the shutter. A remote switch is a device that attaches to the camera through a cable, or wirelessly, and allows the photographer to release the shutter without touching the camera.

Mirror lock up

Even if the camera is set up on a tripod, the tripod is weighted down, and a remote switch is used, image quality can still be degraded due to vibration from the movement of the camera’s mirror when the shutter is released. This vibration is primarily a problem with shutter speeds between about 1/30s and 1s.

how to take sharp photo

Photo by sandeepachetan.com travel; ISO 100, f/7.1, 1/1250-second exposure.

This is easily solved by enabling the mirror lockup function on the camera. Once enabled, pressing the shutter button once swings the mirror out of the way. Pressing the shutter button a second time releases the shutter. This way, the mirror vibration dies out before the shutter is released.

Aperture

The middle apertures (around f/8 for most lenses) produce the sharpest images. The larger apertures produce softer images due to various aberrations while the smaller apertures produce softer images due to diffraction.

Shutter Speed

While a tripod eliminates camera movement, the subject that is being photographed may be moving. Thus, a shutter speed that is high enough to freeze the subject movement should be used. This may require that a larger aperture be used in order to get the proper exposure

ISO

Increasing the ISO will allow a higher shutter speed to be used in order to stop the movement of the subject.

tips for taking sharp photography

Photo by Don Harder; ISO 3200, f/5.0, 1/1250-second exposure.

Following these techniques will put you on your way to creating some really sharp photos.

About the Author:
Ron Bigelow (www.ronbigelow.com) has created an extensive resource of articles to help develop photography skills.

For Further Help Achieving Crisp, Sharp Photos:

In photo editing news, Topaz Sharpen AI v3.0 was just released, and it’s on sale now! With a new, faster AI Engine and model improvements for large blur, the latest version of Sharpen AI will impress more photographers than ever.

sharpen ai photo

Results with Sharpen AI (Click to See More Examples)

It is currently 25% off which ends soon, plus our readers can save even more by using the coupon code picturecorrect at checkout.

See how it works here: Topaz Sharpen A.I. at 25% Off


Go to full article: How to Capture Really Sharp Photos

What are your thoughts on this article? Join the discussion on Facebook

PictureCorrect subscribers can also learn more today with our #1 bestseller: The Photography Tutorial eBook

The post How to Capture Really Sharp Photos appeared first on PictureCorrect.


from PictureCorrect https://ift.tt/2v4An9G
via IFTTT

PictureCorrect.com: Interesting Photo of the Day: Mountain Road Long Exposure

This amazing photograph is actually a cropped version of the Lacets de Montvernier Aerial View photo captured by photographer Sandro Bisaro. The photo was taken with a Canon 5D Mark III camera. Bisaro created the road’s light trails using a long exposure:

lacets, montvernier

Mountain Road in France (Via Imgur. Click image to see full size.)

The Lacets de Montvernier (aka the shoelaces of Montvernier) is a 3.4 kilometer road commonly used in the Tour de France. This Alpine climb offers 18 hairpin curves, with a 180 degree switchback about every 150 meters. The road was built over a period of six years (1928-1934), with the intention of reaching the small village at the top of Montvernier.


Go to full article: Interesting Photo of the Day: Mountain Road Long Exposure

What are your thoughts on this article? Join the discussion on Facebook

PictureCorrect subscribers can also learn more today with our #1 bestseller: The Photography Tutorial eBook

The post Interesting Photo of the Day: Mountain Road Long Exposure appeared first on PictureCorrect.


from PictureCorrect https://ift.tt/2YWPs7l
via IFTTT

PictureCorrect.com: 10 Nature Photography Tips for Beginners (Video)

One of the many beautiful aspects of nature is that it’s ever-changing. The color of the surroundings changes with the seasons, and this allows nature photographers to capture the various moods of nature. Photographer Gary Reed shares some great beginner tips for nature photography:

During the entire shoot, Reed uses his Sony A7RIII with the Tamron 300mm f/2.8 lens coupled with the Kenko Pro 300 3X adapter. Because of the nature of his setup, Reed uses manual focusing along with focus magnification and focus peaking to nail his focus.

Use a tripod and 10-second timer

When you use lenses with long focal lengths, be aware that things will get very shaky. At the longer end of telephoto lenses, even a slight shake of the camera gets multiplied. Failing to manage such shakes can render your shots useless. A tripod is thus essential whenever using long lenses.

Also, Reed suggests that you use a 10-second timer and press the shutter release button very gently when taking photos.

Balance the tripod

If you opt to use a gimbal with your tripod setup and you find yourself on uneven ground, either lower or raise one of the legs of the tripod. Since gimbals don’t have a mechanism to adjust the horizontal balance, this is the easiest way to achieve overall balance.

balance tripod

Don’t delete in the bush

When you’re out in the field taking photos, do not delete photos. It’s always great to have many options to choose from when you get home. Who knows if the image that you deleted was better than the one you opted to keep? You cannot trust the small screen on the back of your camera. Besides, your memory card can hold tons of images anyways.

Take lots of shots

Don’t shy away from taking multiple photos of the same subject. Change your distance, shoot from different angles, change your perspective, and do whatever you can to create multiple options for yourself.

Take images in both landscape and portrait orientation

Imagine how bad you would feel if you wished that you had taken a particular image in another orientation. Take every shot in both landscape and portrait orientation.

nature photo in portrait orientation

nature photo in landscape orientation

Prepare yourself for the weather

On cold days, wear warm clothes and carry a hot drink. And don’t forget your gloves, as the metal tripod can be freezing to touch.

Prevent condensation

Water vapor can condense on photography gear in extreme weather conditions. To prevent condensation when moving in from the cold weather, leave your gear in the car or unheated garage for about half an hour. Then, bring it into your warm house but don’t wipe it for another half an hour or so; wait for the gear to dry up before cleaning it.

Be sure to put these nature photography tips into practice and share your experience!


Go to full article: 10 Nature Photography Tips for Beginners (Video)

What are your thoughts on this article? Join the discussion on Facebook

PictureCorrect subscribers can also learn more today with our #1 bestseller: The Photography Tutorial eBook

The post 10 Nature Photography Tips for Beginners (Video) appeared first on PictureCorrect.


from PictureCorrect https://ift.tt/3dxobS4
via IFTTT

sunnuntai 4. huhtikuuta 2021

PictureCorrect.com: Focal Points: The Smallest Important Elements in a Photo

This article is based on concepts from The Advanced Composition Guide if you want to dig deeper for further training.

One of the challenges that we face as photographers is the ability to create a meaningful composition path through our photographs. The effort needs to be recognizable to many different minds to reach a broad and accepting audience.

A focal point attracts attention via one or more of these attributes: shape, color, tonal contrast, color contrast, relationship between sizes, juxtaposition and, on occasion, the texture of an object.

Close your eyes, and then open them while viewing the beautiful sunset landscape photo above.

When you open your eyes, what is the first thing you see?

It’s the two people standing in the distance.

They are a focal point due to their shape, size relationship and tonal contrast.

Critical Thought: A well-placed human being, within a composition, will almost always create an energetic and practical focal point.

Are those two individuals the subject of the image? Good question! Perhaps not.

Remember This: A focal point can support the subject of a photo composition, and it can also be the subject of the composition.

In the landscape shot, the individuals are in support of the subject—which is the landscape.

focal point guide in photography

The sun setting behind the boat is a focal point that is supporting the subject, which is the schooner. (Photo by Kent DuFault)

The sun setting behind the boat above is a focal point that is supporting the subject, which is the schooner.

Try This!

Step outside your home. Take up a position where you can see your street, your neighbors or whatever else is around your home. Close your eyes. Count to 10. When you open your eyes, make a mental note of the first five things that you notice.

The above exercise is the basis of finding focal points.

Human vision doesn’t sit still. It scans continuously, then it stops at points of interest. This scanning is called a scanpath. The stopping points are fixations—our eyes dart between these fixations in movements known as saccades.

But enough anatomy.

Critical Point: The essential takeaway from this is that the human traits of scanning and fixations provide the photographer with a potent visual tool—the focal point. The focal point is a fixation.

I think it is relatively easy to grasp the concept of what is a focal point.

The learning curve comes with how to execute a focal point within a photographic composition properly. That becomes even trickier when you include multiple focal points!

Idea: A scene can contain more than one focal point. The trick is to ensure that the multiple focal points have varying levels of visual interest, or visual weight. Think of your focal points as signs along a path. The first sign says, “Go here.” You follow it. A second sign—the focal point—says, “Now go here.” The viewer of the photo follows the second sign along the path. Now imagine a third sign on the trail. It says, “You’re here!”

This example demonstrates three focal points, each acting as a signpost through the composition of the photo.

focal point guide in photography

Photo via Pixabay

This bridge photo is an excellent example of multiple focal points. We have the boat wake on the lower right. We have the two pylons under the bridge. Finally, we have the repeating triangular pattern of bridge construction.

What is the subject of the photograph discussed above? It’s the bridge. The bridge and the landscape surrounding it are the subject.

Do you see how the focal points are helping to guide viewers’ eyes through the picture?

Key Point: Effective focal points don’t have to be ostentatious. Put this picture of the bridge in front of you and close your eyes. When you open your eyes, they go immediately to the right side of the bridge. The bright yellow highlights on the bridge and the boat wake, as well as the shape and contrast of the two protective piers and bridge uprights, create focal points. This photograph is an example of multiple focal points in use.

What is the most common photographer-related mistake concerning focal points?

focal point guide in photography

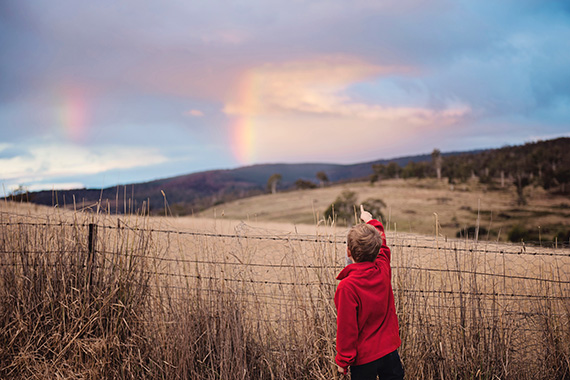
Photo by Kat Jayne

The boy and his finger create a focal point. However, this is an excellent example of a mistakenly placed focal point!

Critical Point: The most common problem with focal points is that they are misplaced and don’t serve the subject very well. That is the problem with the boy pointing. If a focal point does not support the subject, then it becomes a composition problem known as an eye snag. It snags the viewer’s eyes away from the subject.

The subject of this photo is the rainbow. It’s quite clear that the photographer set this up to show the boy as a focal point pushing the viewer’s eyes toward the rainbow. The raised hand and pointing finger also emphasize that function.

Except he isn’t pointing at the rainbow. He’s pointing to the right of it. As a viewer, you tend to think, “What is the boy pointing at?” You scan the landscape looking for something else of interest.

The focal point is misplaced. It isn’t correctly supporting (pointing toward) the subject.

Let’s talk about the second biggest composition mistake involving focal points.

focal point guide in photography

Photos by Kasper Rasmussen

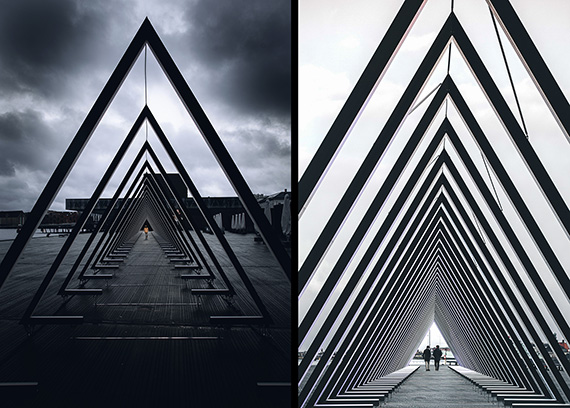
Here we have two different photos taken at the same location and utilizing the similar techniques of a focal point and repetition.

One of these example images is successful—the other one is less so.

For the photo on the left, poor choices have left the focal point (the man) almost invisible. The version on the right is much better and quite effective.

The difference? Visibility!

Remember: A focal point must stand out from the surrounding scene. It should be the first or second most prominent spot within the composition. Why do I say first or second? If the focal point is also the subject, it should be the most prominent. If the focal point is a supporting element for the subject, then it should be the second-most prominent.

The example image on the right is a classic focal point photograph. The walking couple creates a focal point due to their size, shape, contrast, and positioning within the composition. In this case, the focal point is also the subject. What is the triangular sculpture? It’s a frame. It is framing the subject!

A focal point operates within the confines of the space of the image frame. This fact of composition has to be taken into consideration when composing a photo.

focal point guide in photography

Original photo by Tembela Bohle

Do you see this shot as having a focal point? What is the subject—the girl or the landscape?

The visual weight between the girl and the background is too evenly balanced in this composition.

The photographer’s intent was for the “shape” of the rock to be a focal point, which then establishes the girl as the subject. However, it’s not visually strong enough to accomplish this.

Now, consider this:
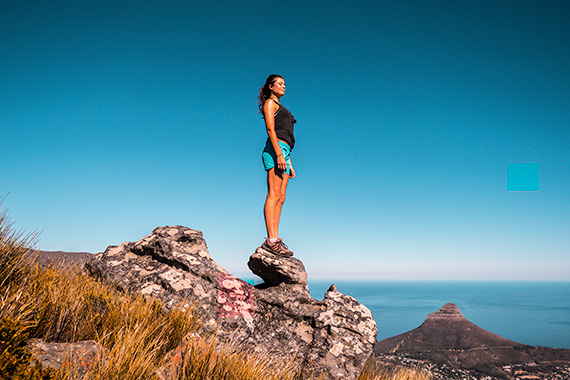
focal point guide in photography

Change of frame

A different arrangement of the focal point within the space of the frame creates a more robust composition.
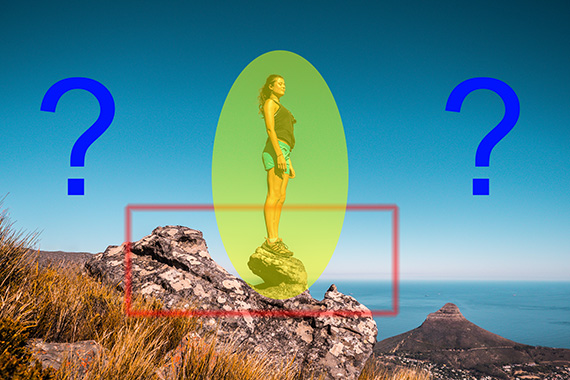
focal point guide in photography

Focal point change

By changing the frame, we have now accomplished several things:

  1. The woman is now clearly the subject.
  2. The interesting shapes in the rocks are now working very well as a focal point to the woman as the subject.
  3. The rest of the picture area provides background and storytelling details.

Critical Thought: When contemplating a focal point in your photo, consider its placement relative to the subject and also its location within the entire frame.

focal point guide in photography

Photo by Erwan Hesry

A focal point can also be created by something that isn’t present in the frame!

Remember: A focal point can be created by what’s not there. The abstract photo above relies on a pattern. The break in the design makes a focal point! An object that seems like it should be in the picture but isn’t—this can also create a fixation for the eyes.

The best focal points relate to the overall theme, subject and story of the final photograph.

focal point guide in photography

Photo by Ben Pham

The speaker in the building above meets much of the criteria for a focal point. However, in this case, it’s a weak element. The speaker doesn’t relate or provide an interesting point of view for the rest of the frame.

So, although it attracts immediate attention, that attention dies right there.
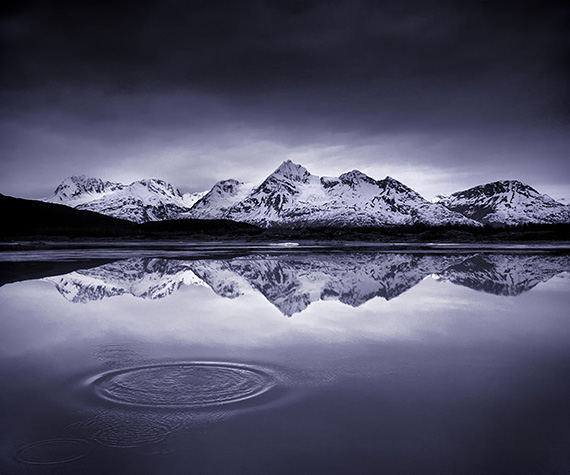
focal point guide in photography

This circular focal point relates to the theme and subject of the entire frame. (Photo by Kent DuFault)

Focal Points Are Fun!

Since we are programmed internally to see focal points (eye fixations), they are one of the most straightforward composition solutions to grasp and learn.

They are so much fun because they can be used in so many different ways.

focal point guide in photography

Photo by Geran de Klerk

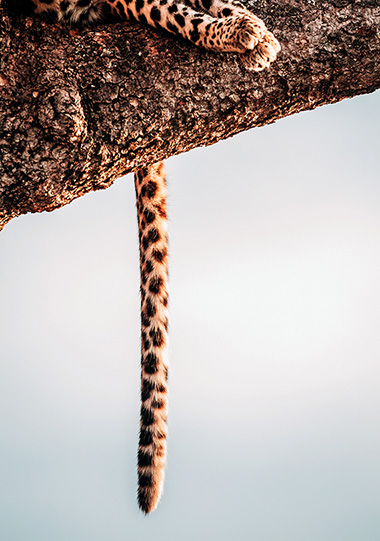
What is the subject of the photograph above? It’s a big cat. The dangling tail is a strong focal point.
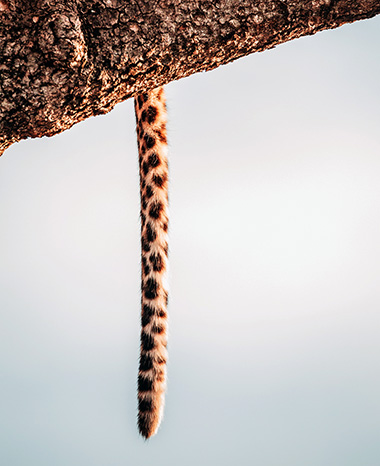
focal point guide in photography

Cropped out paws

What if the paws are removed? Is the subject still the big cat? Or, have we made the focal point the subject by changing the frame?

In Conclusion

Keep these learning points in mind when using focal points in your photo compositions:

  • A focal point attracts attention through size relationships, shape, color, tonal contrast, color contrast, juxtaposition and occasionally texture.
  • A well-placed human being in a photograph will almost always provide the potential for a strong focal point.
  • A focal point can support the subject in a composition—or it can also be the subject.
  • Focal points are natural composition tools because of the human trait known as saccades or fixations.
  • The human mind continually scans with the eyes. This eye movement is known as a “scanpath”.
  • A picture can have one focal point or multiple focal points. The key to success is to compose images so that each point has varying levels of visual weight that lead a viewer’s eyes in the correct direction within the frame.
  • If a focal point doesn’t direct viewer attention toward the subject area, then it becomes a problem known as an eye snag.
  • A focal point must be obvious to work. Don’t get clever and hide your focal points!
  • The placement of the focal point within the overall frame is vital.
  • When something is missing from a picture, and our mind feels that it should be there, that missing element creates a focal point!
  • The best focal points relate well to the subject, theme and story of the final photo.

Now it’s your turn.

Spend an afternoon shooting photos and hunting for focal points. Landscapes, cityscapes and architecture lend themselves well to photographers looking to hone their focal point skills.

How did you do?

  • Did you find different types of focal points: size, shape, color, tone/color contrast or position?
  • Do your focal points work well within the overall composition?
  • When doing the eye-closure test, do your eyes immediately go to your intended focal points and subject?

About the Author:
Kent DuFault is an author and photographer with over 35 years of experience. He’s currently the director of content at the online photography school, Photzy.

For Further Training:

This recently updated & expanded in-depth guide rolls years and years of practical knowledge, condensed into 239 pages packed with training, illustrations, and assignments. Advanced Composition goes far beyond knowing what composition is… (or, even knowing what the tools of composition are). Develop the SKILLS of anticipation, pre-visualization, and timing that are core to capturing great photography. It is currently 77% off today if you want to check it out.

advanced composition

Updated: The Advanced Composition Guide at 79% Off (Learn More)

Broken into 84 key lessons, 38 assignments, & 117 self-check questions – it delves DEEP into the artistic and technical aspects of photographic composition. With this guide you will learn to SEE light, shadow, lines, curves, space, repetition, and focal points.

Deal ending soon: The Advanced Composition Guide at 79% Off


Go to full article: Focal Points: The Smallest Important Elements in a Photo

What are your thoughts on this article? Join the discussion on Facebook

PictureCorrect subscribers can also learn more today with our #1 bestseller: The Photography Tutorial eBook

The post Focal Points: The Smallest Important Elements in a Photo appeared first on PictureCorrect.


from PictureCorrect https://ift.tt/39KIIl4
via IFTTT