keskiviikko 14. helmikuuta 2024

PictureCorrect.com: How to Make a Panorama in Lightroom

Panoramas can be difficult to shoot without knowing the process behind their creation. Here is a step-by-step guide to help you create beautiful panorama images using Adobe Lightroom. This guide will help you both shoot the individual panorama photographs themselves and merge them afterwards in post-production.

Step 1: Photograph the Panorama in Individual Frames

The first step is to photograph multiple sets of frames that will comprise the final panorama. I recommend starting with at least three frames; however, you can photograph more if you wish.

Mount your camera and lens on a secure tripod. A tripod is extremely helpful for perfect panoramas, as it’s the best way to line up the frames exactly. If you cannot use a tripod or monopod, make sure to hold your camera as steady as possible.

Once you’re set up, the next step is composition. Panoramas do not have to include everything before your eyes—you should only include elements that work with your composition. Exclude any elements that seem distracting, just as you would in any other photograph.

Next, adjust your desired exposure. You can use a live view for this. Make sure you have consistent exposure across all the frames by panning the camera left and right to ensure the same exposure works consistently, regardless of where your light source is.

In the example image below, I decided to include a hut as the main element. The primary focus is on the small hut. The mountains in the background give grandness to the landscape.

panorama adobe lightroom guide

Once you’re all set, start photographing the image from the lefthand side. Then move your camera horizontally to the right and photograph the second frame.

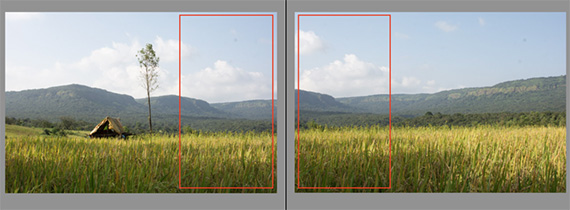
It’s very important that some of the elements from the first and second frames overlap with each other. Refer to the below image: I tried to overlap the right part of the first frame and the second frame. If you are using a tripod, it is easy and convenient.
panorama lightroom tutorial

After snapping the second frame, move your camera to the right again and photograph the third frame.

Below are my three example frames. In the first, you can see the hut and the tree. In the second and third images, I’ve included mountains and grasslands. I captured all three with a Nikon D7100, a Nikon 35 f/1.8 lens and a tripod.


panorama adobe lightroom guide

panorama lightroom tutorial

panorama lightroom tutorial

Now that we have three frames ready, it’s time to merge the images in Adobe Lightroom.

How to Merge Images in Adobe Lightroom

Open an Adobe Lightroom and import your selected frames.

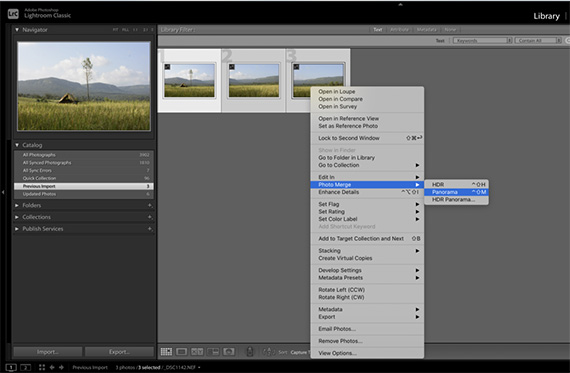
Select all the frames and right click. Select Photo > Photo Merge > Panorama.
panorama lightroom tutorial

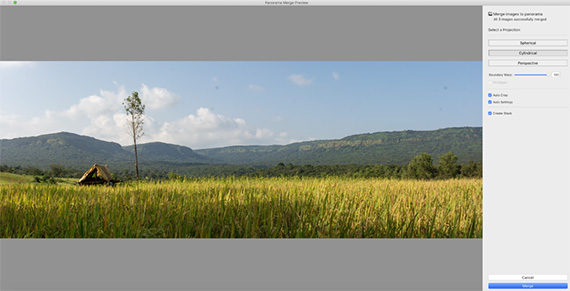
After that, a preview of your merge will open, as seen here:
panorama lightroom tutorial

Start by selecting a projection. I have selected a cylindrical projection. You can preview how spherical and perspective change your result as well. For landscape images, I find cylindrical works best.

Next, select the Auto Crop option and Create Stack box. With the Create Stack option enabled, you can have a merged image along with individual frames.

Use the slider Boundary Warp and see the effect of Boundary Warp. I have selected 100% for this image. Boundary Warp will help preserve the details in the merged image at the corners.

Finally, click the Merge button.

Lightroom will take a few seconds to merge your images and create a panorama.

panorama lightroom tutorial

Lightroom will eventually merge the frames, like so:

Now you can edit your merged panorama in Adobe Lightroom or Photoshop. I used Adobe Lightroom to post-process my image.

Mainly I focused on spot removal, black and white points, vibrance, distortion correction, curves and targeted adjustments for the sky, farm and hut.

panorama lightroom tutorial

Here is my final image. Notice how the color is much stronger, and the three frames have merged intoa single, beautiful panorama image:

panorama lightroom tutorial

The Panorama option in Adobe Lightroom is a simple, effective way to create beautiful panoramic images. You will find this technique especially helpful for landscape images when you lack a wide-angle lens.

Final Note

The steps I’ve outlined above will help you get started with standard panorama images. However, I encourage you to explore different kinds of images in different settings, as well as vertical panoramas. Also, you can photograph panorama images with multiple exposures (HDR panoramas). But I’ll cover those techniques in another article!

About the Author:
Shreyas S. Yadav is an engineer and photographer of wildlife and nature. He is also a writer and lifelong adventure explorer. Through his writings, he teaches about digital post-processing and nature photography. Shreyas shares field techniques about nature photography, post-processing and wildlife photo stories on his website.

- - - - - - - - - - - - - - - - - - - - - - - - - - - - - - - - - - - - - - - - - - - - - - - - - - - - - - - - - - - - - - - - - - - - - - - - - -

This post How to Make a Panorama in Lightroom appeared on PictureCorrect.


from PictureCorrect https://ift.tt/0ybAGqO
via IFTTT
tiistai 13. helmikuuta 2024

PictureCorrect.com: 10 Ways to Build Confidence as a Photographer

Final day: only hours left for The Confident Photographer at 52% Off

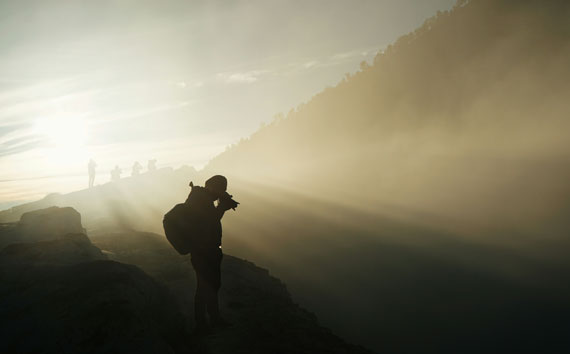
Creating confidence as a photographer is a journey that combines mastering your craft, understanding your unique style, and building a supportive network. Here’s a comprehensive guide to help you grow your confidence behind the lens:

photography confidence

Photo captured by Suganth

1. Master the Basics

Before you can confidently express yourself through photography, you need a solid understanding of the basics. This includes exposure, composition, lighting, and the rule of thirds. Enroll in photography courses, watch tutorials, and read books. Practice regularly to understand how different settings affect your images. Remember, the goal isn’t just to take pictures, but to make them with intention.

2. Experiment with Different Styles and Techniques

Photography is an art form with endless possibilities. Experiment with different styles (landscape, portrait, street, etc.) and techniques (long exposure, macro, black and white). This exploration not only helps you find what you love but also builds your versatility and skill set. Don’t be afraid to step out of your comfort zone; this is where growth happens.

3. Build a Portfolio

Your portfolio is a reflection of your best work and your journey as a photographer. Start by selecting your best photos that showcase your unique style and the diversity of your skills. An online portfolio can help you reach a wider audience, while a physical one may be useful for local engagements. Update it regularly as you improve and explore new areas of photography.

4. Seek Constructive Feedback

Feedback is crucial for growth. Share your work with peers, join photography forums, or participate in social media photography groups. Be open to constructive criticism and use it to improve. Remember, every photographer has room for improvement, and feedback is a way to learn from different perspectives.

5. Collaborate with Others

Collaborating with other photographers, models, or artists can boost your confidence and expose you to new ideas and techniques. It’s also a great way to network and build relationships within the industry. Collaboration can lead to new opportunities and help you see your work from different angles.

6. Challenge Yourself with Projects or Assignments

Give yourself assignments or embark on long-term projects. This could be a 365-day photo challenge, a thematic series, or documenting a particular event or journey. Projects keep you motivated, help develop your skills, and can lead to a sense of accomplishment that boosts your confidence.

7. Share Your Work

Sharing your work can be daunting, but it’s a vital step in building confidence. Use social media, photography websites, or local exhibitions to showcase your work. Receiving appreciation from others can be a significant confidence booster. Moreover, the more you share, the more comfortable you’ll become with putting your work out there.

8. Learn from the Masters

Study the work of renowned photographers. Understand what makes their work stand out, their techniques, and how they convey their vision through photography. This can inspire you and give you a benchmark to strive towards. Remember, even the masters started somewhere, and they too faced challenges and moments of doubt.

9. Embrace Failure

Not every shot will be perfect, and that’s okay. Failure is a part of the learning process. Each mistake is an opportunity to learn and improve. Embrace your failures, analyze what went wrong, and how you can avoid similar mistakes in the future.

10. Practice Mindfulness and Patience

Photography is as much about seeing as it is about looking. Practice mindfulness to be present in the moment and truly observe your surroundings. Patience is key in waiting for the right moment to capture a shot. Sometimes, the difference between a good photo and a great one is just a matter of seconds.

Building confidence as a photographer is a continuous process that involves learning, experimenting, and pushing your boundaries. Celebrate your progress, stay curious, and keep shooting. With time and perseverance, you’ll find your unique voice and gain the confidence to express it through your photography.

For Further Training, Deal Ending Soon:

These online courses, ebooks, and cheat sheets cover every possible topic for beginner photographers. Currently 52% off until midnight tonight. The content is vast and complete while still being easy to navigate and understand.

confident photographer

The Confident Photographer

It’s the most complete education available for a beginner photographer, brought to you by the most trusted names in photography.

Only hours left: The Confident Photographer at 52% Off

- - - - - - - - - - - - - - - - - - - - - - - - - - - - - - - - - - - - - - - - - - - - - - - - - - - - - - - - - - - - - - - - - - - - - - - - - -

This post 10 Ways to Build Confidence as a Photographer appeared on PictureCorrect.


from PictureCorrect https://ift.tt/5xAVtSY
via IFTTT

maanantai 12. helmikuuta 2024

PictureCorrect.com: Understanding Lens Distortion and Tools to Fix It

Lens distortion is a common issue in photography that affects the shape, size, and sharpness of images. This optical aberration occurs due to the imperfections in camera lenses. There are primarily two types of lens distortions: barrel distortion and pincushion distortion.

lens correction

Barrel Distortion occurs when the edges of an image appear to bulge outward, giving the photo a rounded, barrel-like appearance. This type of distortion is most commonly seen in wide-angle lenses and can give an unnaturally curved look to straight lines near the edges of the frame.

Pincushion Distortion, on the other hand, is the opposite effect, where the edges of an image seem to pinch inwards, making the middle part of the image appear to puff out. This distortion is more common in telephoto lenses and results in straight lines bending inward towards the center of the image.

Both types of distortions can detract from the aesthetic appeal of a photograph, making architectural lines appear curved when they should be straight, or creating unnatural proportions in subjects.

How Does Lightroom Fix It?

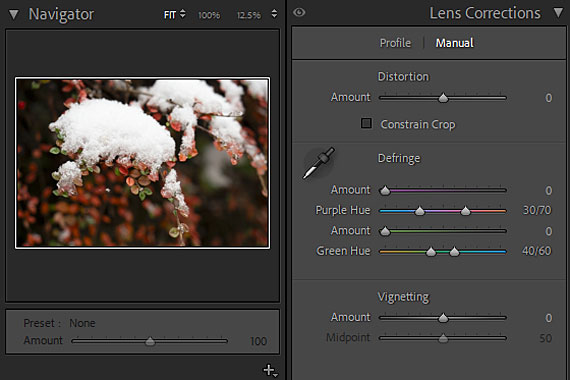
Adobe Lightroom includes tools specifically designed to correct lens distortion. The process Lightroom uses can be broken down into a few steps:

  • Profile Corrections: Lightroom has a database of lens profiles that contain information on how different lenses distort images. By selecting the make and model of the lens used to take the photo, Lightroom can automatically apply a correction that counteracts the known distortion characteristics of that lens. This feature significantly simplifies the correction process, making it accessible to photographers of all skill levels.
  • Manual Corrections: For lenses not included in Lightroom’s database, or for fine-tuning corrections, Lightroom provides manual distortion correction sliders. The manual controls allow photographers to adjust the amount of barrel or pincushion correction applied to the image. By adjusting these sliders, photographers can straighten curved lines and restore natural proportions to their subjects.
  • Guided Upright Tool: For complex distortion issues or when straight lines are essential (such as in architectural photography), Lightroom’s Guided Upright tool allows users to draw lines directly on the image to indicate where straight lines should be. Lightroom then automatically adjusts the image to align with these guides, correcting perspective and distortion simultaneously.
  • Edge Refinement: After correcting for distortion, Lightroom offers tools to crop the image to remove any unwanted empty spaces or distorted edges that result from the correction process. Additionally, the software can perform edge stretching to fill in these spaces, preserving the original dimensions and composition of the photo.

In summary, lens distortion is a challenge that photographers face, but tools like Adobe Lightroom provide effective solutions to correct these imperfections. Through automatic lens profiles, manual adjustments, guided corrections, and edge refinement, Lightroom helps photographers achieve more accurate and visually pleasing images. Whether you’re dealing with wide-angle barrel distortion or the pincushion effect of a telephoto lens, Lightroom’s comprehensive toolkit can restore the natural appearance of your photographs.

For Further Training:

In the digital age, capturing a photo is only half the battle; the true magic happens in post-processing. This is where Lightroom Editing Mastery, an online course meticulously designed for both budding and seasoned photographers, steps in to transform the way we enhance our photographs.

lightroom mastery

Lightroom Editing Mastery (see what’s included)

For a limited time, “Lightroom Editing Mastery” is available at a significantly discounted rate, making professional-grade photo editing skills more accessible than ever.

Deal ending soon: Lightroom Editing Mastery at 80% Off

- - - - - - - - - - - - - - - - - - - - - - - - - - - - - - - - - - - - - - - - - - - - - - - - - - - - - - - - - - - - - - - - - - - - - - - - - -

This post Understanding Lens Distortion and Tools to Fix It appeared on PictureCorrect.


from PictureCorrect https://ift.tt/TROyKvM
via IFTTT

sunnuntai 11. helmikuuta 2024

PictureCorrect.com: Topaz Labs Photo Editor Development Roadmap

Eric Yang, CEO of Topaz Labs, recently shared an insightful update on the future of the company’s photo editing and video products, marking what he describes as the most significant evolution since their first AI product was introduced six years ago. Here’s an overview of what users can expect from Topaz Labs in the near future, focusing on their commitment to generative AI technology.

topaz labs photos

Topaz Labs Development Roadmap

Core Development Principles

Topaz Labs’ product development for 2024 and beyond is grounded in three key principles:

  1. Enhancement vs. Replacement: The goal is to improve existing work without changing its fundamental essence. This principle ensures that the original intent and authenticity of the user’s work are preserved, aligning with professional needs for authentic enhancements.
  2. Natural and Photorealistic Results: In contrast to the trend of creating fantastical AI-generated imagery, Topaz Labs focuses on maintaining the realism of photos and videos. This approach is particularly important for applications where the true-to-life representation of images is crucial.
  3. On-device Processing: Moving away from cloud-based processing, Topaz Labs is emphasizing on-device processing to enhance privacy, reduce processing times, and expand editing capabilities directly on the user’s device.

Upcoming Enhancements to Core Products

The announcement detailed upcoming improvements across Topaz Labs’ suite of products:

  • Photo AI: This tool is designed to address common photography challenges such as noise reduction and sharpening more effectively. With the integration of generative AI, Photo AI aims to significantly enhance the photo editing experience in various aspects beyond these issues.
  • Video AI: This product focuses on delivering higher quality video footage that is sharp, stable, and smooth. The 2024 updates are expected to improve the AI models further, enhance the application experience, and introduce more integrations for a seamless professional editing workflow.
  • Gigapixel: Known for its image upscaling capabilities, Gigapixel is set to receive updates that promise to improve model quality and usability. Later in the year, Topaz Labs plans to expand Gigapixel’s availability beyond desktop platforms, aiming to set a new standard in image upscaling quality.

Topaz Labs’ announcement signals a significant shift towards more natural, photorealistic, and user-friendly photo and video enhancement tools. By focusing on generative AI to improve work rather than replace it, and on-device processing, the company aims to meet the evolving needs of professionals and enthusiasts alike. As these updates roll out, Topaz Labs encourages user feedback to further refine and tailor their offerings to the community’s needs.

Try it free: The Photo AI Editor

- - - - - - - - - - - - - - - - - - - - - - - - - - - - - - - - - - - - - - - - - - - - - - - - - - - - - - - - - - - - - - - - - - - - - - - - - -

This post Topaz Labs Photo Editor Development Roadmap appeared on PictureCorrect.


from PictureCorrect https://ift.tt/Vq6yzg5
via IFTTT

lauantai 10. helmikuuta 2024

PictureCorrect.com: Football Photography Tips and Techniques

American football photography offers challenges which are very different than those of traditional photography. In this article, I will introduce you to helpful techniques to get you up to speed with gear and technique, so you can catch the winning touchdown this fall!

football photography

Photo captured by Riley McCullough; ISO 640, f/5.6, 1/640s, 55mm.

Equipment

A fast DSLR camera and lens are an absolute must. The camera and lens should each be able to auto focus very quickly. My camera of choice for the last several years has been Canon 1D, with the Canon 70-200 Image Stabilized f/2.8 lens attached.

The Canon 1D series is noted for its ultra fast focusing, especially when using the center point. The 1D series also represents the finest in Canon technology, producing low noise even at high ISO settings. Colors are pleasingly warm and vibrant, and images very sharp.

A monopod can been helpful at times, but if you have a steady hand you are better off hand holding the camera.

Settings

I prefer to shoot in Manual Mode at all times, with AI Servo Auto Focus. Setting exposure can be tricky on sunny days because many areas of the field will be a few stops higher or lower based on where the sun is landing.

There are no hard and fast rules, but I do have a few helpful tricks.

  • Set your exposure by pointing at the grass in the general area of the field you expect the play to occur. Adjust your aperture and shutter speed until you get the exposure to “0” or “-1/3”.
  • Try exposing for white on the uniforms. You can use the white stripes of the referee’s uniform, or any player’s uniform or helmet. Adjust your exposure and take a test shot until the camera displays the whites just beginning to “blink” in the viewfinder as over exposed. This is particularly effective if you are shooting back lit and want to ensure the players’ faces are not too dark inside their helmets.
  • If you are shooting during the day, consider setting your white balance to “Cloudy” instead of “Sunny” or “Auto (AWB)”. The “Cloudy” white balance setting gives a warmer and more saturated look to subjects under a sunny sky.
football image

Photo captured by John Torcasio; ISO 125, f/3.5, 1/1600s, 400mm.

Technique

There is no substitute for real experience. You will get better with repeated shoots. But there are some tips to help you get better, faster.

  • Learn about the game of American football. Part of the “trick” to getting great shots is to know ahead of time where the play will unfold on the field. Understanding football strategy and recognizing who the key players are on the field will help you get the best shots. Look for mismatches, where one player is superior to another.
  • Use the light. I shoot mainly daytime football games, and constantly keep aware of the sun’s position to maximize my image contrast. Back lighting can be very effective, but I prefer the colors and contrasts from side lighting and angled lighting where the sun is behind the camera and slightly to the side.
  • Don’t use too much shutter speed. If you are attempting to freeze the action, 1/500 to 1/1000 of a second is usually plenty fast enough for American football. Going up to 1/2000 even in very bright conditions is overkill and will cause you to sacrifice depth of field. You can still get a great out of focus background and bokeh using an aperture of f/4.0 to 5.6, and you will get more of your subject in sharp focus.
  • Keep your subject in the center of the screen and follow him with center point auto focus. When you anticipate the action is about to occur, shoot in burst mode until the action comes to an end. You will end up with a lot of pictures to go through, but this greatly increases the odds that you will catch a few beauties.

About the Author:
Article written by Daniel Padavona from Warmpicture Sports Stock Photos.

- - - - - - - - - - - - - - - - - - - - - - - - - - - - - - - - - - - - - - - - - - - - - - - - - - - - - - - - - - - - - - - - - - - - - - - - - -

This post Football Photography Tips and Techniques appeared on PictureCorrect.


from PictureCorrect https://ift.tt/7Xekhns
via IFTTT

perjantai 9. helmikuuta 2024

PictureCorrect.com: Lightroom Culling Mastery: Tips for Choosing Your Best Photos

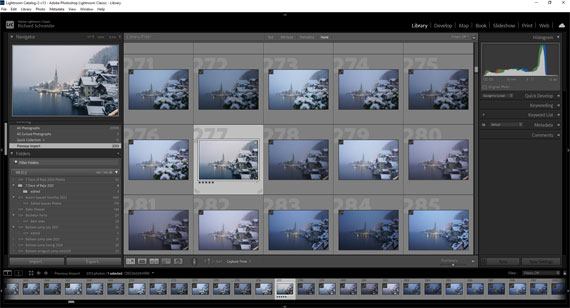
Culling photos in Adobe Lightroom is an essential step in a photographer’s workflow, allowing you to select the best images from a shoot for editing and presentation. Here are some effective strategies to streamline the culling process:

lightroom culling

  1. Use Flags and Ratings Efficiently:
    Flags: Quickly flag your photos as “Picks” (P key) for those you like, “Rejects” (X key) for those you don’t, and unflagged for those you’re unsure about. Later, you can filter to show only picked or rejected photos to review your selections.
    Ratings: Assign star ratings (1-5) to differentiate levels of quality or potential within your selections. This can help when you need to narrow down picks further.
  2. Use Color Labels: Assign color labels to categorize your photos further. This can be used to indicate different stages of editing, types of photos (e.g., portraits, landscapes), or priority for editing.
  3. Take Advantage of Smart Previews: If you’re working with a large batch of high-resolution images, consider using Smart Previews in Lightroom to speed up the loading and reviewing process. Smart Previews are smaller, lightweight versions of your photos that are much faster to work with. You can always switch back to the full-resolution files for detailed editing.
  4. Compare View: Use the Compare View (C key) to look at two photos side by side. This is particularly useful for choosing between similar shots.
  5. Survey View: When you have several candidates for a specific need, use the Survey View (N key) to see them all at once without distractions. It makes it easier to eliminate outliers until you find the best one.
  6. Use Auto Advance: Enable Auto Advance in the Photo menu to automatically move to the next photo after you rate or flag the current one. This can significantly speed up the culling process.
  7. Keyboard Shortcuts: Learn and use Lightroom’s keyboard shortcuts to speed up your workflow. Key shortcuts for flagging, rating, and moving between photos can save a lot of time.
  8. Initial Fast Pass: Do a quick first pass through your photos to flag obvious rejects. This can quickly reduce the number of photos you need to consider more carefully.
  9. Focus on Elimination, Not Selection: Sometimes it’s easier to eliminate the weakest photos first rather than trying to pick the best ones right away. This reduces the pool of candidates and makes final selections clearer.
  10. Take Breaks: Especially for large batches, take breaks to avoid fatigue and maintain a fresh perspective. What might look like a reject at first could be a hidden gem upon a second look.
  11. Use Collections: After culling, create collections in Lightroom for your selected photos. This helps organize your workflow and keeps your picks easily accessible for the next steps in your editing process.

These strategies can be adapted based on personal workflow preferences and the specific needs of a project. The goal is to make the culling process as efficient and accurate as possible, ensuring that you spend your editing time on the photos that best capture your vision.

For Further Training:

In the digital age, capturing a photo is only half the battle; the true magic happens in post-processing. This is where Lightroom Editing Mastery, an online course meticulously designed for both budding and seasoned photographers, steps in to transform the way we enhance our photographs.

lightroom mastery

Lightroom Editing Mastery (see what’s included)

For a limited time, “Lightroom Editing Mastery” is available at a significantly discounted rate, making professional-grade photo editing skills more accessible than ever.

Deal ending soon: Lightroom Editing Mastery at 80% Off

- - - - - - - - - - - - - - - - - - - - - - - - - - - - - - - - - - - - - - - - - - - - - - - - - - - - - - - - - - - - - - - - - - - - - - - - - -

This post Lightroom Culling Mastery: Tips for Choosing Your Best Photos appeared on PictureCorrect.


from PictureCorrect https://ift.tt/aF3juBE
via IFTTT

torstai 8. helmikuuta 2024

PictureCorrect.com: Mastering Lightroom Photo Editing

In the digital age, capturing a photo is only half the battle; the true magic happens in post-processing. This is where Lightroom Editing Mastery, an online course meticulously designed for both budding and seasoned photographers, steps in to transform the way we enhance our photographs. Unlike the generic advice scattered across the internet, this course dives deep into the essentials of Adobe Lightroom, offering a comprehensive guide to mastering post-processing skills.

lightroom mastery

Lightroom Editing Mastery (see what’s included)

Why Lightroom Editing Mastery?

Adobe Lightroom has emerged as the quintessential tool for photo editing, favored by professionals for its efficiency and powerful features. However, its comprehensive capabilities can often seem daunting to newcomers. “Lightroom Editing Mastery” demystifies Lightroom, making it accessible and straightforward. Here’s what sets this course apart:

  • Step-by-Step Guidance: Tailored for those who may feel overwhelmed by technical jargon, the course breaks down Lightroom’s complex functionalities into digestible, easy-to-follow lessons.
  • Practical, Hands-on Learning: By providing actual photos for practice, the course ensures that learners can follow along with real examples, applying edits as they progress through the material.
  • Efficiency in Editing: Learn to fine-tune hundreds of photos within hours, a skill crucial for professionals under tight deadlines and amateurs eager to share their work.

Course Highlights

“Lightroom Editing Mastery” is not just about learning to edit; it’s about transforming your entire workflow to save time while elevating the quality of your images. Highlights include:

  • Rapid Editing Techniques: Discover how to turn ordinary shots into magazine-quality images in minutes, leveraging Lightroom’s batch processing features.
  • Comprehensive Skill Development: From basic adjustments for vibrant color and flawless exposure to advanced edits like noise reduction, perspective correction, and selective adjustments, this course covers it all.
  • Workflow Optimization: Learn to organize your photo library efficiently, ensuring you can find and edit your photos quickly, on any device.
  • Personalized Learning Experience: With lifetime access to 40 videos totaling 179 minutes of content, you can learn at your own pace, revisiting complex topics as needed.

photo editing in lightroom

Exclusive Bonuses and Satisfaction Guarantee

Enrolling in “Lightroom Editing Mastery” provides more than just educational content; it offers a toolkit for success:

  • One-Click Editing Presets: Receive a private collection of 20 Lightroom presets designed for various photography styles, enabling instant enhancements with a single click.
  • Workflow Blueprints: Gain access to bonus modules outlining common photo editing workflows, applying course techniques to real-world scenarios.

Moreover, with a 30-day money-back guarantee, the course invites you to embark on this learning journey risk-free, promising a transformative experience or a full refund.

How to Get the Course for a Discount Today:

For a limited time, “Lightroom Editing Mastery” is available at a significantly discounted rate, making professional-grade photo editing skills more accessible than ever.

Deal ending soon: Lightroom Editing Mastery at 80% Off

- - - - - - - - - - - - - - - - - - - - - - - - - - - - - - - - - - - - - - - - - - - - - - - - - - - - - - - - - - - - - - - - - - - - - - - - - -

This post Mastering Lightroom Photo Editing appeared on PictureCorrect.


from PictureCorrect https://ift.tt/Agl4vir
via IFTTT