maanantai 13. marraskuuta 2023

PictureCorrect.com: Slot Canyon Photography Tips & Techniques

Slot canyons represent one of the most fascinating corners of our planet: the American Southwest. Sandstone, over millions of years, has been eroded by the power of water, creating deep, winding corridors. For anyone of any age with an explorative spirit, slot canyons are a playground. The two most iconic, and likely the most photogenic canyons in the world, are within a two-hour drive of each other. They are the Zion Narrows and Antelope Canyon.
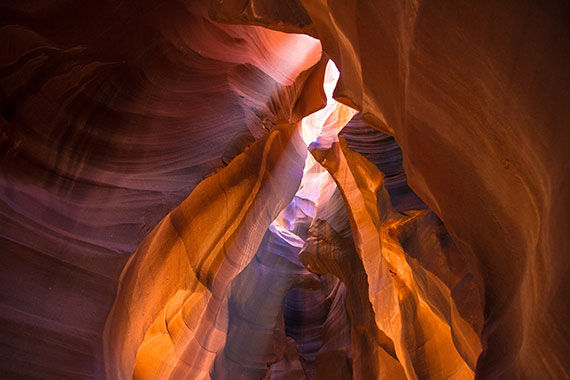
My name is Seth Hamel. I’m a professional landscape and adventure photographer working in the Zion National Park area. When I go into the Narrows by myself or with clients, the start time isn’t until 10 am or so, depending on the time of year. Many of the clients that I guide through the Narrows ask, “Can we start earlier? I want to make sure I’m in there for the best light.” With typical landscape photography, we want to get that early, glowing light on the features of whatever we’re photographing.

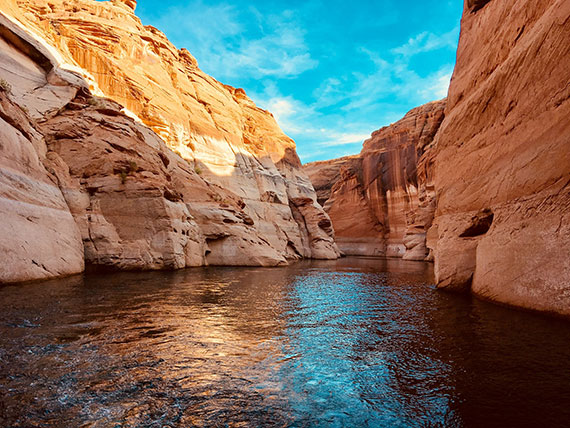
In slot canyons, however, the best light occurs mid-day on cloudless, sunny days. The best light is not direct sunlight hitting the walls of the canyon but rather reflected light. Reflected light occurs when bright, harsh, direct sunlight hits a canyon wall and reflects that light onto another wall. This is the type of light that produces rich, saturated, glowing colors in slot canyons. It’s important to keep even a peep of sky or direct sunlight out of your photos, as this produces blown out areas of your image and can produce a nasty haze near those areas. Naturally, there are exceptions to this rule, but they are uncommon.
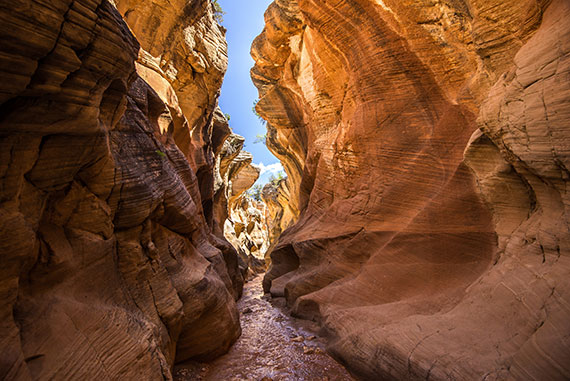
photographing slot canyons

Photo by Scott Osborn

The Zion Narrows and Antelope Canyon are significantly different canyons.

The Zion Narrows is the largest slot canyon in the world! Carved by the power of the Virgin River, the Narrows is a canyon where you hike in the river itself. Antelope Canyon is a dry canyon unless there has been recent rainfall. Due to the narrowness of this canyon and its large water gathering area during the monsoon season, this canyon has been carved by powerful raging flash floods. Because of the differences between these canyons, camera settings can vary with each.

To obtain professional quality images, a tripod is required. As a general rule, setting your ISO to 100 will give you crisp, printable images. In canyons, you typically want to have the entire scene in focus–no blurring of the foreground or background (again this is a general rule). In order to obtain such depth of field, set your aperture to a higher number. F/16, f/18 or f/22 is useful. From there, read your camera’s internal light meter and adjust your shutter speed in order to get the appropriate exposure. These settings are a safe bet for Antelope Canyon.
slot canyon photo methods

Photo by Dave Dollar

The Zion Narrows presents situations where controlling your shutter speed is the first priority. Due to the beautiful flowing water in this magnificent canyon, controlling what the flowing water looks like plays a major role in the artistic outcome of your image.

Good shutter speeds range from 1/2 of a second to 1/10 of a second. This requires some experimentation with different speeds of water flow and the effect you’re hoping to achieve. After setting the shutter speed, I would adjust my aperture and then the ISO. This can be a tricky balance. Having an experienced mentor in this situation is helpful.

Slot canyons are amazingly beautiful and awe-inspiring. They are candy lands for any level of photographer. Keep in mind that during rainy periods, slot canyons are very dangerous due to flash flooding. Be sure to do your research on flash flooding and weather conditions before you enter into these canyons. There have been numbers of fatalities in both of these canyons.

About the Author
Seth Hamel offers professional guiding and photography instruction in Zion National Park. Tracking the best light in the Zion Narrows throughout the year, you are guaranteed to have the opportunity to shoot some of the best scenes in the canyon. Learn more about available guided Zion photography opportunities at zion-photography.com. Along with artistic and technical instruction, you will be walking away with professional quality images that will be some of your favorite images from the desert Southwest.

- - - - - - - - - - - - - - - - - - - - - - - - - - - - - - - - - - - - - - - - - - - - - - - - - - - - - - - - - - - - - - - - - - - - - - - - - -

The post Slot Canyon Photography Tips & Techniques appeared first on PictureCorrect.


from PictureCorrect https://ift.tt/YX4vTsp
via IFTTT
sunnuntai 12. marraskuuta 2023

PictureCorrect.com: From Warmth to Winter: Pre-Cooling Tips for Your Camera

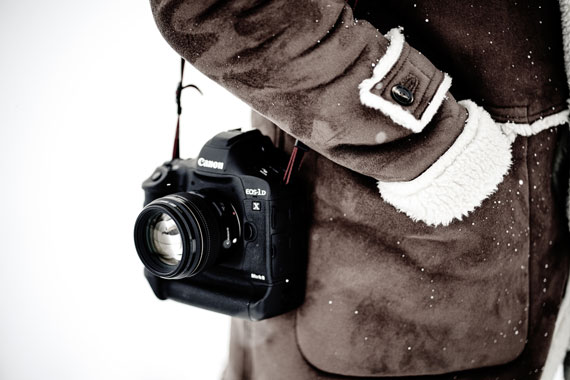
As photographers, we often find ourselves drawn to the stark beauty of cold weather environments. However, transitioning your camera from a warm indoor environment to the icy outdoors can be a challenge. The key to seamless cold weather photography lies in effectively pre-cooling your camera. Let’s dive into how you can prepare your gear for the chill and capture those winter wonderland shots flawlessly.

cold camera

Photo captured by Jonas Allert

The Risks of Rushing the Pre-Cooling Process:

It’s tempting to skip the gradual pre-cooling process, especially when you’re eager to capture a fleeting winter moment. However, rushing it can occasionally lead to some issues. The most common problem is condensation – when warm, moist air from inside the camera condenses on the cold camera sensor and internal components. This can result in foggy images and, in worse cases, damage to the camera’s electronics.

Additionally, rapid temperature changes can cause lens elements to contract unevenly, potentially affecting focus and optical quality. In extreme cases, it can even lead to cracking of the lens elements. Therefore, patience is more than a virtue in cold weather photography; it’s a necessity for safeguarding your precious gear.

Understanding Condensation

Condensation occurs when warm, moist air meets a cold surface, a common challenge in cold weather photography. Inside a warm environment, your camera and its internal components, including the sensor and electronic circuitry, are at a much higher temperature compared to the frigid outdoor air. When you take your camera from a warm room to a cold outdoor setting, the moisture in the air inside and around the camera quickly cools down.

Since cold air holds less moisture than warm air, this rapid cooling causes the moisture to condense into water droplets. These droplets can form on both the external and internal parts of your camera, including the lens and sensor. This not only affects image clarity but also risks damaging the sensitive electronics inside your camera. Understanding this phenomenon underscores the importance of gradually acclimating your camera to colder temperatures to prevent condensation and ensure optimal performance. Here are some tips to prevent it:

1. Gradual Temperature Adjustment:

Start by gradually exposing your camera to colder temperatures. Moving your camera directly from a warm room to freezing temperatures can cause condensation, which might damage your camera’s internal components. An effective way to do this is by placing your camera in a cooler area of your house, like a garage or near a window, before taking it outside.

2. Use a Ziploc Bag:

Before stepping out, place your camera in a large Ziploc bag. This will trap the warmer air around the camera and prevent condensation when you move outdoors. Once outside, allow the camera to acclimate to the external temperature while still in the bag. This usually takes about 30 minutes.

3. Pre-Cool Your Lenses:

Lenses are just as susceptible to temperature shock as your camera body. Apply the same gradual temperature adjustment to your lenses. Remember, changing lenses in cold conditions can introduce moisture, so try to decide on a lens before heading out.

4. Keep Spare Batteries Warm:

Battery performance can drastically drop in cold conditions. Keep spare batteries in a warm pocket close to your body. This will ensure they retain their charge longer when you need to swap them out.

5. Avoid Breathing on Your Equipment:

It might be tempting to use your breath to clean the viewfinder or lens, but in cold weather, this can cause immediate frosting. Use a lens cloth or blower instead.

6. Use Silica Gel Packets:

Placing silica gel packets in your camera bag can help absorb any moisture that might accumulate, offering an extra layer of protection against condensation.

By pre-cooling your camera properly, you can make the transition to cold environments much smoother and protect your equipment from ruined images or potential damage. Remember, the beauty of winter photography is unmatched, and with these tips, you’re all set to capture it in all its glory.

For Further Training:

For help remembering these concepts, and more cheat sheets on the Most Difficult Photography Situations, this popular set of Photography Adventure Cheat Sheets have you covered. They are currently 80% off for a Pre-Black Friday sale which ends soon if you want to check them out.

photography adventure

New! Cheat Sheets for Your Photography Adventures (see how they work)

The perfect companion for any photographer. Print one out whenever you need it. Whether you’re going on vacation or seeking out a specific photography adventure, these cheat sheets can provide you with the knowledge and inspiration you need to create your best work yet.

Deal ending soon: The Photography Adventure Cheat Sheets at 80% Off

- - - - - - - - - - - - - - - - - - - - - - - - - - - - - - - - - - - - - - - - - - - - - - - - - - - - - - - - - - - - - - - - - - - - - - - - - -

The post From Warmth to Winter: Pre-Cooling Tips for Your Camera appeared first on PictureCorrect.


from PictureCorrect https://ift.tt/PVAdHwk
via IFTTT

lauantai 11. marraskuuta 2023

PictureCorrect.com: How to Open RAW Image Files in Windows Photo Viewer

RAW image files are a photographer’s boon. They capture all the data from the camera’s sensor, offering unparalleled quality and flexibility in post-processing. However, their complexity often makes them tricky to handle, especially when it comes to viewing them on standard software like Windows Photo Viewer.

open raw images

Why Are RAW Files Difficult to Open?

  1. Unprocessed Data: RAW files are essentially unprocessed data. This means they need special software that can interpret this data and convert it into a viewable image.
  2. Variety of Formats: Each camera manufacturer has its own RAW format (like NEF for Nikon, CR2 for Canon). This diversity adds another layer of complexity in standardization for viewing.

What Are Codecs and How Do They Help?

A codec is a type of software that decodes or encodes a digital data stream or signal. In the context of RAW images, codecs are used to decode the RAW file format into a viewable image.

  1. Decoding Data: The codec takes the RAW data and translates it into an image that can be displayed on your screen.
  2. Manufacturer-Specific: Since different manufacturers have different RAW formats, you often need specific codecs for each format.

How to Open RAW Files in Windows Photo Viewer

Check for Native Support: Some newer versions of Windows may have built-in support for popular RAW formats. Try opening your RAW file in Windows Photo Viewer to see if it works.

Install the Right Codec:

  • Microsoft Camera Codec Pack: Microsoft offers a Camera Codec Pack that adds support for many RAW formats.
  • Manufacturer Codec: Visit your camera manufacturer’s website and look for their specific RAW codec. For example, Nikon and Canon provide their own codec packs.
  • Third-Party Codecs: There are third-party options available that add support for multiple RAW formats.

Using Windows Photo Viewer: After installing the necessary codec, simply right-click your RAW file and choose to open with Windows Photo Viewer. The codec will do its job, and you should be able to view your image.

While RAW files offer the best in terms of image quality and post-processing flexibility, they do require a bit more effort to view on standard software like Windows Photo Viewer. By understanding the nature of these files and installing the right codecs, you can easily overcome this hurdle.

- - - - - - - - - - - - - - - - - - - - - - - - - - - - - - - - - - - - - - - - - - - - - - - - - - - - - - - - - - - - - - - - - - - - - - - - - -

The post How to Open RAW Image Files in Windows Photo Viewer appeared first on PictureCorrect.


from PictureCorrect https://ift.tt/rctzaR1
via IFTTT

perjantai 10. marraskuuta 2023

PictureCorrect.com: Wedding Photography Gear List

Being asked to be a wedding photographer is a huge responsibility! Someone has trusted you with capturing the memories of what could be the biggest day of their lives!

Have you got the right gear to get the job done?

Gear can be a bit of a sensitive topic, and every photographer is different. Some prefer Canon, others prefer Nikon. Some prefer zoom lenses, others prefer prime lenses. And some photographers are just starting out and don’t know what they need. So, I’ve created this article to give an outline of the gear I take with me to every wedding that I feel is crucial and could not live without!

Firstly, I use Canon gear and only use zoom lenses. A lot of my friends like to use prime lenses, and we often have fun battling about the pros and cons of both options —  but for me, I’m a zoom lens kind of guy.

Zoom Lens vs. Prime Lens

Here are six super-important reasons why I prefer to use zoom lenses over prime lenses:

  1. I can shoot 95 percent of the wedding on just two lenses.
  2. It saves me from having to shoot using two cameras.
  3. I feel more prepared with a zoom lens to get “the shot” when it appears in a split second.
  4. It gives the look of my images more variety. For example, I can shoot the same subject while quickly zooming in and out, and the two images will look completely different.
  5. It’s also just way quicker to use; instead of running in and out, I can simply just zoom in and out (within reason).
  6. And my last reason is simply that this is the way I learned to shoot weddings, and I just feel way more comfortable using zoom lenses. Again, everyone is different and everyone has their own style, so it’s simply just my preferred way of shooting a wedding.

Checklist: 13 Must-Have Gear for Every Wedding

OK, so this bag (LowPro Pro Roller x300 AW) comes with me on every shoot. Check out what’s inside:

1. Canon 5D Mark IV (with battery grip)

My trusty workhorse! An absolutely fantastic camera that does everything I need it to do to shoot weddings. There are definitely better cameras out there, but for what I need it for — and at this price range — it’s the best!

2. Canon 5D Mark III (backup camera body just in case)

This was my old camera before I upgraded to the Canon 5D Mark III. The perfect backup camera, which hopefully I will never need to use!

3. Canon 24mm–70mm f/2.8 (series 2)

The lens I absolutely could not live without and most used in my whole kit. The series 2 is also a big improvement on the series 1, providing noticeably sharper images.

4. Canon 70mm–200mm f/2.8 IS (series 2)

The second-most-used lens in my kit and another that I could not live without! This lens comes in two versions, with image stabilizer and a cheaper version without. If I could give one point of advice, it’s definitely worth forking out for the IS.

5. Canon 100mm Macro f/2.8

I mainly use this lens for all my detail shots, as the macro lets me get up close and personal with the item and also gives the images a super-nice, soft drop off. Just be careful to check your images on the back of the camera to make sure the thing that you want to have in focus is actually in focus. If you miss by a millimeter, your whole shot will be ruined!

wedding rings, macro photo

“Wedding Rings” captured by Frank Tasche

6. Canon 17mm–40mm f/4

This is a great lens that I use to get a lot of my “epic'” shots. The wide angle is amazing and can give you some really dramatic shots. Also great when you’re shooting in a crowd after the ceremony and on the dance floor in the reception. Personally, I couldn’t justify the additional $1500 for the 16mm–35mm f/2.8

wide-angle shot of wedding dance

“E gira tutto intorno alla stanza mentre si danza” captured by Stròlic Furlàn

7. Canon Speedlite 600EX-RT Flash

I just upgraded from the 580ex and basically can’t tell the difference. I’m sure there are more and better features, but I just use it on ETTL and bounce the light around. Works perfectly, as did the 580EX.

8. Spare Camera Batteries

Always bring spare batteries with you to every wedding! Luckily, I have never needed to use them yet, as I always charge my batteries the night before — but still, for the peace of mind, it’s worth having.

9. Canon Battery Charger

Also have never needed to use this on a wedding yet, as everything is already charged, but it’s nice to have just in case you need to do some emergency charging. Remember, with the battery grip, you can charge one battery while still being able to shoot with the other in your grip.

10. Spare AA Batteries and Charger for Speedlite Flash

Now, these are probably more important than the spare camera batteries. I find I’m way more likely to run out of flash power, especially on some of the longer days, so a spare set of fully charged AAs is a must!

11. Card Folder with 5 Sandisk Memory Cards

To be honest, I should actually have one more card in my kit. I find it is best to have one card for every different section of the day: groom coverage, bride coverage, ceremony, locations, and reception. That way in a worst-case scenario (you end up with a corrupt card), you have only lost a section of the day, not the whole day!

12. Little Baggie with Lens Cloth and Elinchrom Flash Trigger

I find it just nice to have a little bag to put random little stuff in.

13. Business cards!

Always be thinking about marketing — give out your business cards!

Gear to Get That Extra Punch

So apart from everything that is in my camera bag, a few extra bits and pieces make it on the list as well! These things are not crucial, but I still like to take them to every wedding so I can use them if I want to.

1. Elinchrom Quadra

An amazing 400-watt portable studio flash unit that’s totally easy to use and transport. This flash has helped me define my style as a wedding photographer, and I use it at almost every wedding. Remember, I don’t use assistants or second shooters at a wedding, but it’s still easily manage use this flash without any headaches.

2. Dido Video Light

A super awesome warm light that I use almost at every wedding to create really moody shots. I use the light generally during the morning coverage at the groom’s house and bride’s house, sometimes at receptions to get a bit of flare during the dancing, and if we go to any bars or clubs on locations. Works a treat!

portrait of bride

“Julie & Allen | The Parlor” captured by Sean Molin

3. My Trusty Little Step Ladder

I use this 95 percent of the time for the group photo of all the guests after the wedding ceremony. A bit of a hassle to carry and travel with, as it takes up a decent amount of room in the car, but a must-have piece of equipment if you’re doing group photos. Without it, you might be stuck standing on a chair (which doesn’t give you the height you need) or looking for a tree to climb.

4. Lastly, not exactly something you need to bring with you, but something worth preparing — always have enough petrol in the car to get you through the day.

Thanks so much for reading!

Thanks so much for reading my post about wedding photography gear, a detailed must-have checklist of everything you need to take to every wedding!

About the Author:
Chris Garbacz has 10 years of experience as a Melbourne wedding photographer with Epic Photography PTY LTD. He’s photographed just shy of 400 weddings, says he has seen it all and experienced almost every scenario imaginable. The best part is that he still loves photographing weddings and jumps out of bed feeling excited to see each couple’s wedding day unfold.

- - - - - - - - - - - - - - - - - - - - - - - - - - - - - - - - - - - - - - - - - - - - - - - - - - - - - - - - - - - - - - - - - - - - - - - - - -

The post Wedding Photography Gear List appeared first on PictureCorrect.


from PictureCorrect https://ift.tt/Ye76MGd
via IFTTT

torstai 9. marraskuuta 2023

PictureCorrect.com: Advanced Masking Techniques in Lightroom and Camera Raw

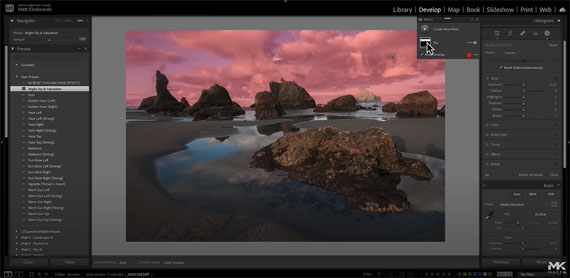
As photographers increasingly rely on Adobe’s raw editors, it’s crucial to master the multitude of features available within these powerful tools. Matt Kloskowski’s latest video tutorial sheds light on five lesser-known tips that can streamline your photo editing workflow in Lightroom and Camera Raw. Here are the key takeaways:

Solo Mode for Masking Panels: The updated Lightroom Classic separates different sections within the masking tool, which can become cluttered. Right-clicking and selecting ‘Solo Mode’ within the masking panels allows you to focus on one panel at a time, reducing screen clutter and improving efficiency.

Global Amount Adjustment: This feature is a game-changer for revisiting edits. With an ‘Amount’ adjustment at the top of your masks, you can collectively increase or decrease the intensity of all adjustments made to a particular area, such as the sky, without tweaking each setting individually.

Reset Adjustment Panels: If you find yourself needing to reset adjustments made within a specific panel, hold down the Option (Mac) or Alt (PC) key and click ‘Reset’ at the top of the panel. This resets all adjustments within that panel to their default states, saving time and clicks.

Subtractive Masking with AI: When brushing adjustments onto an image, you can now subtract the effect from certain areas with precision. For instance, if you enhance the rocks in a landscape but inadvertently affect the sky, simply use the ‘Subtract’ feature and select ‘Sky’ to remove the adjustments from the unwanted area.

advanced masking

Presettable AI Masks: AI masks, such as ‘Select Sky’ or ‘Select Subject’, can be saved as presets. When applied to a new image, the AI adapts the mask to the new photo’s specific conditions, allowing for quick and consistent adjustments across different images.

Incorporating these tips into your editing process can dramatically improve your workflow, giving you more time to focus on the creative aspects of photography. Whether you’re fine-tuning a previous edit or applying complex adjustments to multiple photos, these tricks ensure your Lightroom and Camera Raw experience is more efficient and intuitive.

For further training: The Photoshop System

- - - - - - - - - - - - - - - - - - - - - - - - - - - - - - - - - - - - - - - - - - - - - - - - - - - - - - - - - - - - - - - - - - - - - - - - - -

The post Advanced Masking Techniques in Lightroom and Camera Raw appeared first on PictureCorrect.


from PictureCorrect https://ift.tt/sOXYg7A
via IFTTT

keskiviikko 8. marraskuuta 2023

PictureCorrect.com: Rolling Shutter Issues and Sony’s Innovative Solution

The rolling shutter effect is a well-known challenge in the world of photography and videography. This post will delve into what causes rolling shutter artifacts, how they can negatively impact your work, and discuss an exciting development from Sony that promises to address this issue.

What is Rolling Shutter?

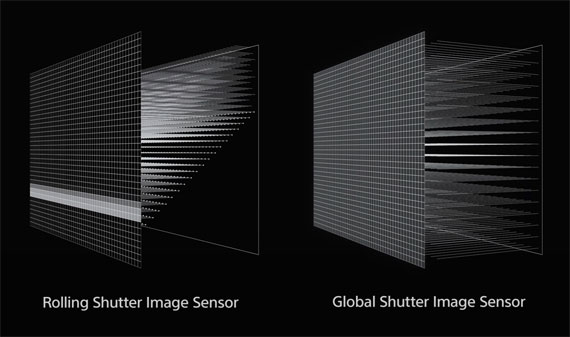
Rolling shutter occurs because the camera’s sensor scans the scene line by line rather than capturing it all at once. This sequential recording method can cause distortions, such as slanted vertical lines, shape warping, or a ‘jello effect’ in videos, which is especially problematic for photographers who capture fast action or use rapid camera movements.

Problems Caused by Rolling Shutter in Photography

  • Skewed Lines: When panning quickly, straight lines can appear tilted or curved.
  • Partial Exposure: Flash photography can suffer as the flash may only illuminate part of the scene.
  • Wobbling Video: Fast-moving objects or quick camera pans can create a wobble in video footage, reducing quality.

Sony’s Sensor Technology to the Rescue

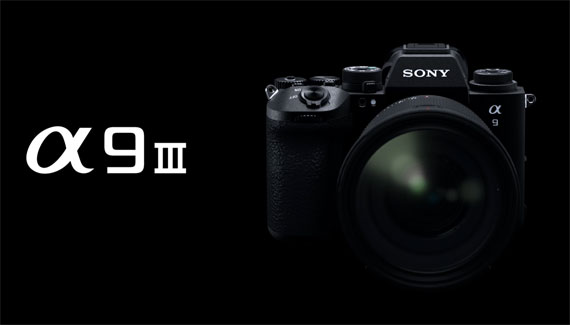
Sony has recently introduced a new sensor technology that significantly reduces the rolling shutter effect. Recently they unveiled the latest addition to their lineup, the a9 III Mirrorless Camera, which boasts the distinction of being the inaugural mirrorless model equipped with a global shutter sensor.

sony a9 iii

The cutting-edge a9III is engineered with a 24.6MP full-frame global shutter stacked BSI CMOS sensor, offering a leap in performance over traditional rolling shutters. This innovation eliminates motion distortions, enables extraordinary continuous shooting at speeds of up to 120 fps, and delivers shutter speeds reaching 1/80,000 sec. Additionally, it allows for flash synchronization at every speed.

global shutter

This ground-breaking technology is poised to be a game-changer for professionals in sports, wildlife, and news photography, as well as for commercial and editorial photographers seeking to capture fast-moving subjects or manage challenging lighting scenarios with a creative edge.

Learn more: Sony a9 III Mirrorless Camera

- - - - - - - - - - - - - - - - - - - - - - - - - - - - - - - - - - - - - - - - - - - - - - - - - - - - - - - - - - - - - - - - - - - - - - - - - -

The post Rolling Shutter Issues and Sony’s Innovative Solution appeared first on PictureCorrect.


from PictureCorrect https://ift.tt/DmcwRJC
via IFTTT

tiistai 7. marraskuuta 2023

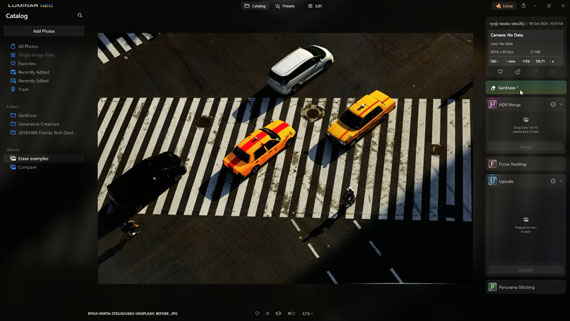
PictureCorrect.com: How to Use GenErase in Luminar Neo

Representing the next generation of image editing, GenErase is an advanced tool that elevates the standard for erasing and refining visual elements in photographs. It not only removes undesirable visual distractions from your images but also applies content-aware AI techniques to replace these elements intelligently. This process results in a composition that is both focused and devoid of distractions.

GenErase’s unique capability is to uphold the integrity of your photos by automatically filling in the erased areas with textures and elements that seamlessly match the surrounding context, all thanks to the power of AI. GenErase excels at effortlessly eliminating objects like litter, street signs, utility poles, vehicles, graffiti, crowds, and more, preserving the inherent beauty of your composition.

Preview Icon: To observe the outcomes before and after, click the preview icon, represented by an eye symbol.

Zoom Feature: Adjust your view using the zoom slider or the left and right bracket keys to magnify or shrink the view of the image.

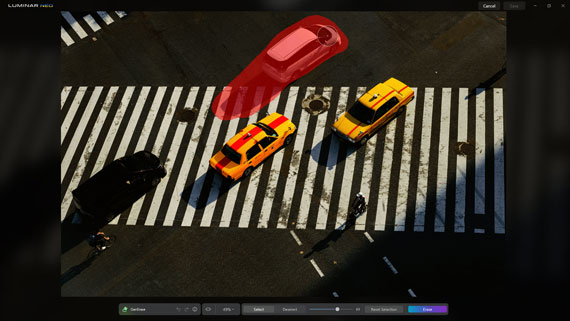
Select: When you need to replace an object, activate the “select” option, fine-tune the brush size, and paint over the region you wish to substitute. It’s advisable to be generous with your selection, providing the tool with more intricate details to enhance accuracy.

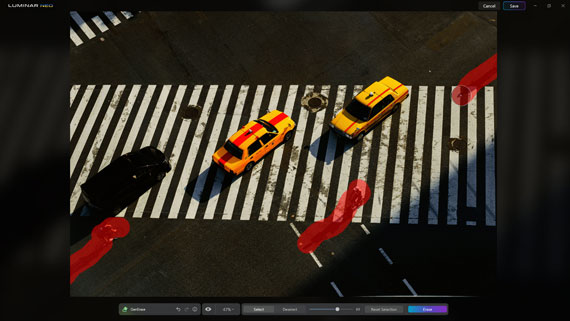
Deselect: Once an object is selected, enable the “deselect” option, refine the brush size, and paint over the area you want to exclude from the selection.

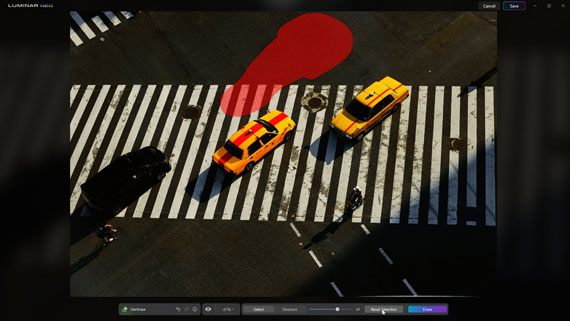
Reset Selection: Following the application of GenErase, the object remains selected. If the desired outcome isn’t achieved, you can reapply the erase tool by selecting it again. If you wish to erase a different object, reset the current selection and create a new one.

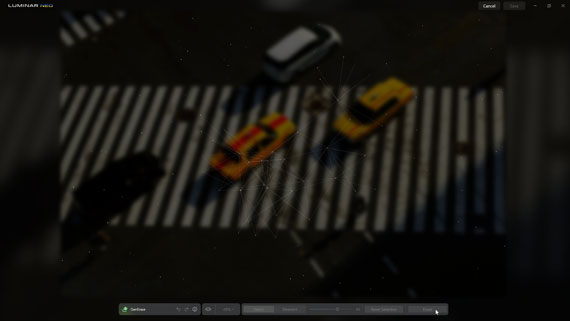
Erase button: To utilize GenErase and eliminate the selected object while also intelligently replacing unwanted visual distractions in your images, simply click the erase button. This innovative tool goes beyond essential removal, harnessing content-aware AI techniques for a refined result. You can continue to select the erase button to cycle through different outcomes, fine-tuning your edits until you achieve the desired result.

Cancel Button: If you opt not to implement the alterations, simply click the cancel button.

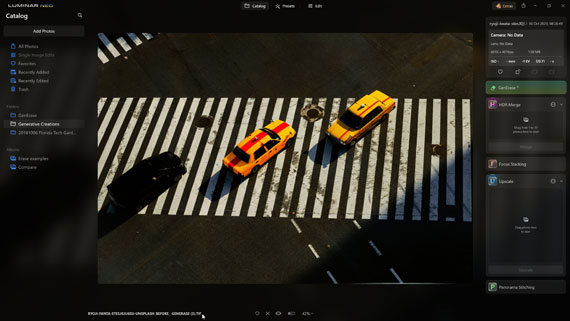
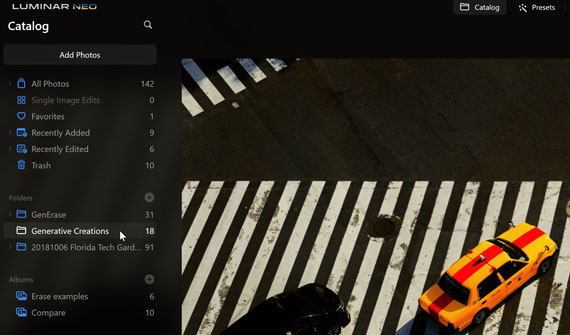
Save Button: When content with the GenErase outcomes, click the save button to confirm the changes. This will generate a new image saved in TIF format, renamed with the GENERASE extension, and added to the Genitive Creations folder.

Applying GenErase

Below is a detailed, step-by-step guide for replacing undesired objects in an image with GenErase.

1. Begin in the Catalog view and choose an image with objects you want to replace.

choose an object

2. Adjust the brush size and select the unwanted object generously. Precision is not required. You can deselect a selection by clicking the Deselect button.

brush

3. Click the Erase Button to initiate the object replacement. You can repeatedly select the erase button to explore different outcomes, fine-tuning your edits until you achieve the desired result.

erase and object replacement

4. To switch to a different object, select the Reset Button and pick the desired object. For optimal results, handle individual objects separately.

reset button

5. Confirm your changes by clicking the save button.

confirm changes

6. The new image will be saved in the Genitive Creations folder.

creations folder

generative creations

Before and After

In essence, GenErase revolutionizes the way photographers curate their images, offering an AI-powered tool that seamlessly excises distractions and reinstates the intended focus of their work. Its user-friendly interface and intelligent replacement technology ensure that your images retain their natural essence, uninterrupted by visual noise. Embrace the art of clean, focused photography with GenErase—where your vision meets the pristine reality of image editing.

Deal ending soon: GenErase in Luminar Neo Photo Editor

- - - - - - - - - - - - - - - - - - - - - - - - - - - - - - - - - - - - - - - - - - - - - - - - - - - - - - - - - - - - - - - - - - - - - - - - - -

The post How to Use GenErase in Luminar Neo appeared first on PictureCorrect.


from PictureCorrect https://ift.tt/zY3spu0
via IFTTT