keskiviikko 29. toukokuuta 2019

PictureCorrect.com: Newborn Photography Tips

Did you know that a newborn is probably the easiest subject to photograph? That you don’t have to be Anne Geddes to take truly beautiful photos of your child during the first 30 days of his or her life?

newborn twins yawning

photo by love_K_photo

Consider this. During the first month, your child sleeps up to 16 hours a day. Imagine, the most adorable and beautiful subject on earth will stay put for you – for up to 16 hours a day for 30 days – until you get a perfect portrait of him or her. I think even the highest paid model will have a hard time doing that and would, in all probability, throw a tantrum after a day.

But not your child, no. Your newborn will give you all the time to set up your camera, to focus, to shoot. He will be patient with your mistakes until you get it right. He will even give you that angelic smile when you fumble with your camera’s controls. And you know what? His only requirement is you keep him comfy and dry and well-fed all the time. So take advantage of this stage. Your newborn will not stay as cooperative and well-behaved in front of the camera. You only have up to 30 days.

Don’t worry if you have the most basic point-and-shoot camera or only a smartphone camera. Some of the best images in the world have been taken with a basic camera. Your camera, whatever brand you’re holding, will definitely do. Just try to remember the tips below and you’ll be on your way to creating beautiful pictures of your newborn. These tips assume that you have the basic knowledge to operate your camera. If not, read the camera’s manual again.

1. After feeding your newborn and you’re sure that he is comfortable, take him out of his crib and lay him down on a table with a soft, plain-colored blanket. White would be perfect. But if you cannot find a white cloth, any pastel color would be a good alternative. Laying your child on a table, instead of inside a crib, allows you to move around and give you different vantage points to photograph. It’s also easier on your back.

2. Place this table beside a big window so you don’t need to use the built-in flash of your camera. What I’m saying is don’t use the built-in flash of your camera if you want beautiful light.

3. If you have a big woven basket or huge bowl lying around the house, you can also place your newborn there. Just make sure it’s safe and stable.

4. You want to focus on your child, so don’t place any object or toy beside your child that would divert the viewer’s attention from him.

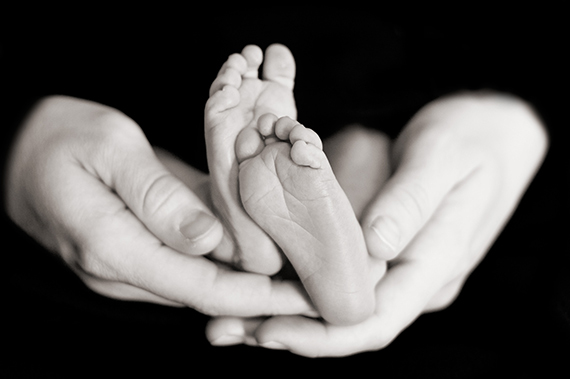
newborn studio photography

“Feet” captured by PictureSocial member Dani

5. Get close to your newborn—as much as your lens will allow.

6. If your camera has a close-up or macro option (usually represented by a flower icon), use it to take close ups of his face, eyes, ears, lips, nose, feet, hands, and fingers, even belly button.

7. You or your spouse can take turns holding the baby and photographing.

Remember, you have only 30 days to take advantage of this stage before you and your baby enter another milestone in his life. And I tell you, it’s not going to be easy as this one. So get going.

About the Author:
Tony Oquias is a professional photographer and writer based in the Philippines. He specializes in executives, factory workers, equipment, products, food, drinks, processes, corporate events, and weddings.


Go to full article: Newborn Photography Tips

What are your thoughts on this article? Join the discussion on Facebook

PictureCorrect subscribers can also learn more today with our #1 bestseller: The Photography Tutorial eBook

The post Newborn Photography Tips appeared first on PictureCorrect.


from PictureCorrect http://bit.ly/2YWJUKw
via IFTTT

PictureCorrect.com: Interesting Photo of the Day: Milky Way Over Longs Peak

Patience is key when it comes to photography. Especially in the case of landscape photography. Photographer Justin Baltz is thankful that he waited because when an opportunity was presented to him, he captured this absolute beauty of an image:

milky way rising over Longs Peak

“Milky Way Rising Over Longs Peak, Colorado” by Justing Baltz (Via Reddit. Click image to see full size.)

Baltz took the image with his Nikon camera, 20mm f/1.8 lens, and a Sky-Watcher Star Adventurer. He obtained the panorama of the sky by stitching 6 shots, exposing each shot for 120 seconds at ISO 800 and f/1.8. The foreground is a panorama that he got by stitching 6 shots, each exposed for 216 seconds at ISO 800 and f/1.8.

“I hiked out to one of my favorite overlooks of Longs Peak. I quickly set up shop but the core did not rise like it was suppose to at 3:30am. I started to freak out thinking I was wasting my time and missed it. But through the light pollution at 4:00am the Milky Way began to appear.”


Go to full article: Interesting Photo of the Day: Milky Way Over Longs Peak

What are your thoughts on this article? Join the discussion on Facebook

PictureCorrect subscribers can also learn more today with our #1 bestseller: The Photography Tutorial eBook

The post Interesting Photo of the Day: Milky Way Over Longs Peak appeared first on PictureCorrect.


from PictureCorrect http://bit.ly/2I2Tuog
via IFTTT

PictureCorrect.com: How to Get Your White Balance Right

With the flexibility of adjusting white balance during post-processing, is it really that important to get it correct in-camera? While some may argue that white balance can only be changed for RAW files, what about JPEG files? Gerald Undone discusses the common misconceptions about white balance and shares his thoughts:

Adjusting White Balance in RAW Files

While Undone tests how RAW files perform when changing white balance for stills, the same results can be expected for RAW videos. In his test, Undone takes three images with a grey card in the frame, shot at different color temperatures:

  • manual white balance setting (5500K)
  • very warm white balance setting (10,000K)
  • very cool white balance setting (2,500K)

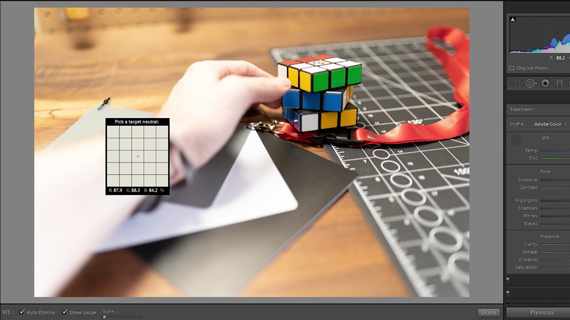
Then, with the white balance dropper tool, he sets the white balance using the same portion of the grey card. After adjustment, the final colors in all the three images look identical.

using grey card to correct white balance

“This test confirms that RAW images are able to have their white balance changed drastically in post with no discernible losses.”

Using a Neutral Object to Adjust White Balance

“When it comes to making videos, shooting the b-roll or even my product product photography, my hands are often in the scene. I don’t always remember to put out a color checker or a grey card. But if I have something consistent from scene to scene, like the neutral shoelace, I can get a consistent look throughout my shots.”

It really is a neat trick. By taking the shoelace as a reference, Undone can ensure that the white balance is being set consistently in any type of lighting conditions. He uses the white balance dropper tool on the shoelace around his wrist to get consistent results in images shot with varying white balance settings. The results are very close to the ones where the grey card was used to adjust white balance.

using a neutral shoelace to adjust white balance

“Having something with you at all times that is a neutral grey can be quite beneficial to keep a consistent look throughout your shots. Just make sure it doesn’t have its own color, though, or that defeats the purpose.”

Adjusting White Balance in JPEG Files

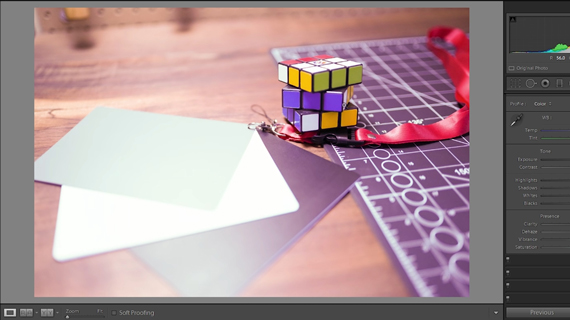
Next, Undone goes on to see if the white balance can be fixed as conveniently when working with JPEG files. Following the same process of using the white balance dropper tool on the grey card, here’s the results:

  • The image with the manual white balance setting undergoes unnoticeable changes.
  • The colors in the image with a very warm white balance setting lose intensity.
  • The colors in the image with a very cool white balance setting appear totally off, and the overall image appears overexposed.
white balance adjustment in JPEG

Colors in the image look totally off when a JPEG is subject to extreme white balance adjustment

We can conclude from this test that while minor white balance adjustments have no drastic effect on the image, extreme adjustments are not good for JPEGs.

It doesn’t matter whether you’re overexposing or underexposing. In any case, the image will face issues when you’re warming or cooling the image. But if you’re confident that you’ll be warming the images up later, then it is a good idea to underexpose a bit.

Setting a Correct White Balance

Use custom white balance in-camera before shooting. Either take a photo and scan it, or hold a grey card in a target to set the white balance.

Use a neutral grey object in the scene. This option is the second best in case you don’t have a grey card with you. Having something neutral in the scene like Undone’s shoelace or a piece of paper with 18% grey printed on it can later help you to correct white balance in post.

Eyeball it or set white balance to lights. This is a simple trial and error technique. You need to continuously check if what you see in the screen appears close to the actual scene and adjust the white balance in-camera. Try to set your camera’s white balance close to the Kelvin temperature of the lights being used.

Set your white balance to a neutral value. If you don’t have the time to adjust the white balance continuously, simply choose a neutral setting between 4500K and 6000K and forget about it. Since you’ll be somewhere in the middle, the adjustments won’t be too extreme. You can make the corrections without any adverse effects. Another advantage of using this technique is that you will have consistency throughout your shots.

Auto white balance. Auto white balance does a decent job most of the time. But the problem is its inconsistency. This may not be an issue if your images are not going to be juxtaposed. However, the inconsistency will be noticeable if the images are in a sequence or a collection.

In conclusion, you can make white balance adjustments in RAW files quite easily in post without any side effects. Anything else will suffer if extreme white balance adjustments are to be made.


Go to full article: How to Get Your White Balance Right

What are your thoughts on this article? Join the discussion on Facebook

PictureCorrect subscribers can also learn more today with our #1 bestseller: The Photography Tutorial eBook

The post How to Get Your White Balance Right appeared first on PictureCorrect.


from PictureCorrect http://bit.ly/2Qyz762
via IFTTT

tiistai 28. toukokuuta 2019

PictureCorrect.com: Interesting Photo of the Day: On the Nose of a Dog

If you’re procrastinating on the Internet right now, you probably want to see something cute. Something like, I don’t know, a butterfly sitting on a bulldog’s nose, for example:

butterfly on bulldog's nose

(Via Imgur. Click image to see full size.)

Austria-based photographer Anne Geier captured this adorable image with a Nikon D750 using a 50mm lens at f/2 to create the soft focus surrounding the pup, then balanced out the light by using a quick 1/1000 shutter speed and ISO of 320. If you like this photo, you should check out her website—she specializes in animal photography, and a lot of her work has the same magical quality as this one.

If you want to improve your own doggie snapshots, you should also read these tips from the world’s most famous dog photographer.


Go to full article: Interesting Photo of the Day: On the Nose of a Dog

What are your thoughts on this article? Join the discussion on Facebook

PictureCorrect subscribers can also learn more today with our #1 bestseller: The Photography Tutorial eBook

The post Interesting Photo of the Day: On the Nose of a Dog appeared first on PictureCorrect.


from PictureCorrect http://bit.ly/2toVRJb
via IFTTT

PictureCorrect.com: Elements That Make a Striking Photograph

What does it take to create a really stunning image? There are six basic elements and certain factors that influence composition and make a really great image. If you can understand these and learn to apply them successfully, then you’re on your way to top photos.

Now although there are all of these elements to consider, you still need to understand that a really stunning image is composed in the simplest way. So with these factors in mind, use your photographic eye to create images that have them present. Let’s take a look at the elements.

1. Shape

Shape is fundamental to your images. Without shape you cannot identify your subjects. If you are unable to identify the shape of a lion under a tree when hiking through a reserve then you are in trouble. Shape is what the viewer sees first and allows them to relate all of the elements in the image.

2. Line

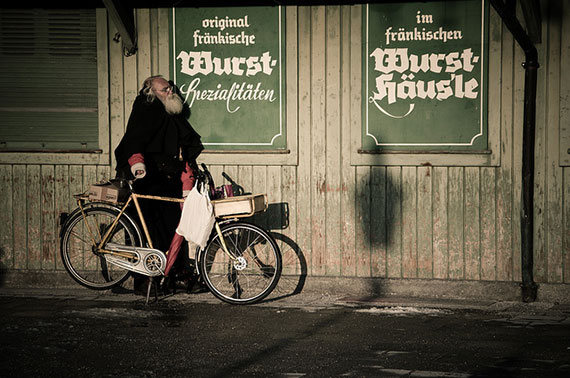
This is the strongest of all the elements and comes into play very often. If you can use strong lines in your images they will be striking. Learning to use lines is essential if you are to progress in your photography. As you learn digital photography use them often. From horizontals to diagonals and from verticals to converging, all of these will strengthen your images.

using lines in photography composition

photo by Tuncay

3. Form

Now shape is two dimensional but when we get to form we add a third dimension, depth. Form is very dependent on light. How the light hits the form creates the feeling of depth which is essential in a stunning image. Squares, circles and triangles reveal their form when strong side lighting hits them. The contrast between shadows and light turns shape into form.

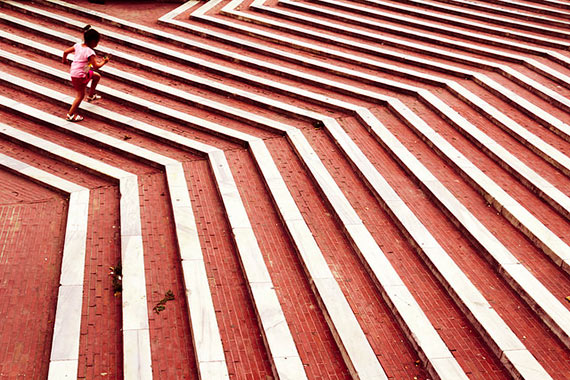
4. Patterns

Patterns to me are exciting. Finding patterns where you least expect them adds a new dimension to your images. Repeated patterns and broken patterns both reveal interesting aspects in a photo. Patterns can be used as the subject or as a background to an image. The careful use of these patterns will always help in creating a really great image. Patterns can be found everywhere and by identifying them will add interest to the overall image. Use them to your advantage.

pattern

photo by Simon Schlegl

5. Color

Use color to your advantage as well. Color is the most striking of the elements when used correctly. Contrasting and complementary colors will create an amazing image but used incorrectly will wash out an otherwise great photo. Color evokes deep emotion. We think in color and feel in color and use color to describe those feelings. Red gives a feeling of passion while orange shows warmth. Black denotes anger and fear while green represents growth and peace. If you can add color to an image that already has elements that evoke the emotion, the final image will be exceptional.

6. Texture

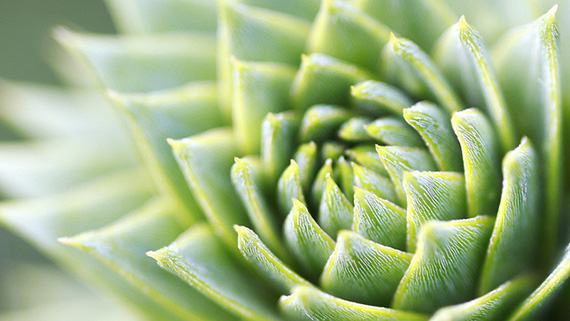
Out of all the elements I think that texture evokes the biggest emotional response by a viewer. The challenge here is to photograph it in such a way that the light causes the texture to reveal itself in a way as to create a feeling. Side lighting is important as it lifts the texture out of the image so as to almost create the actual texture for you to feel. More than any other element, it is important to get in close so that the fibers, cracks, or rough stone are clearly visible.

texture

photo by eiji ienaga

These elements of design can all make that outstanding image when used by themselves or when combined. By regularly looking for them and applying them in your images you will learn just how much they help to create great photos. Happy shooting!

About the Author:
Wayne Turner has been teaching photography for 25 years. Passionate about photography, radio and video. He is a Radio CCFm producer and presenter in Cape Town.


Go to full article: Elements That Make a Striking Photograph

What are your thoughts on this article? Join the discussion on Facebook

PictureCorrect subscribers can also learn more today with our #1 bestseller: The Photography Tutorial eBook

The post Elements That Make a Striking Photograph appeared first on PictureCorrect.


from PictureCorrect http://bit.ly/2tW3ytI
via IFTTT

PictureCorrect.com: Simple Tips for Better Food Photography

A number of elements go into making delicious food photos. Nisha from RainbowPlantLife shares her lighting secrets for great food photography:

Understand Directional Light

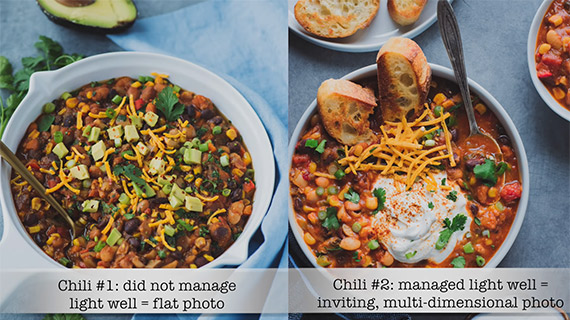
Directional light produces much better quality photos than light that comes from all different directions.

Food photography tips to improve your game

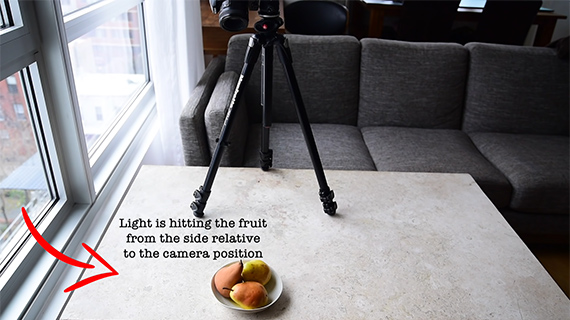
Directional lighting can be of many different types. First, there is side lighting, where the food is being illuminated from one side, be it right or left.

Food photography tips to improve your game

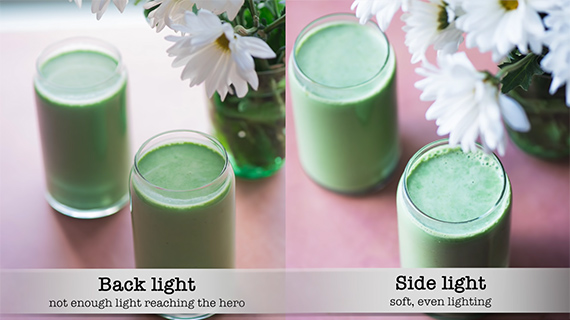
Then there is backlighting where the subject is illuminated from the back.

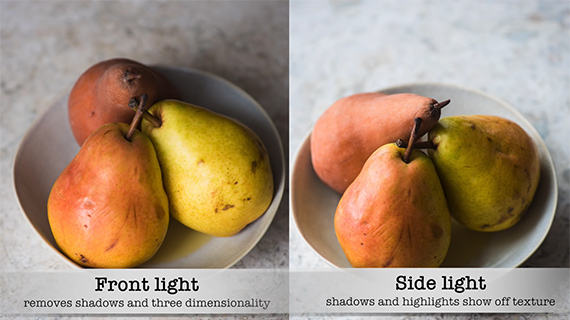
Finally, there is front lighting, with the subject illuminated from the front.

Food photography tips to improve your game

Front lighting is probably the most boring, as it tends to produce flat images.

Food photography tips to improve your game

That said, both side lighting and backlighting have their own specific uses.

Manage Your Light Source

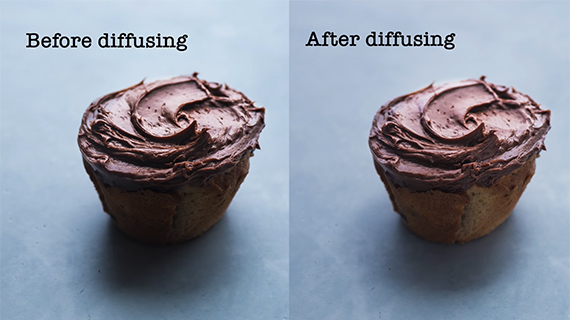
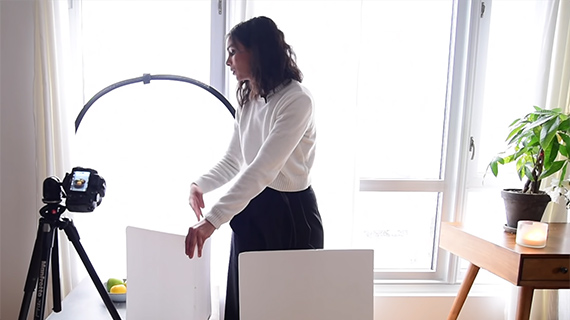
Backlighting is a lot more difficult to manage than side lighting because of contrast. The trick to managing backlighting is to diffuse the light.

Food photography tips to improve your game

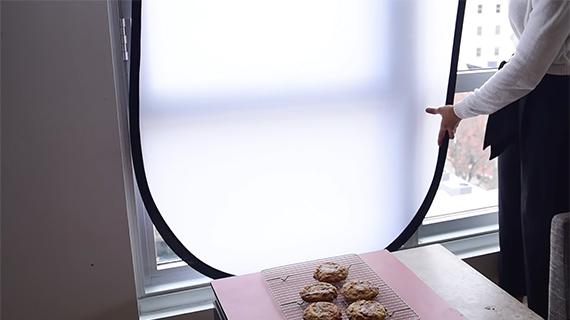
All you need is a large diffuser.

Food photography tips to improve your game

With a diffuser, hopefully, you will have sorted out the problem of high contrast imagery. If your images still have deep, dark shadows, now is a good time to bring in some fill light via a reflector.

Food photography tips to improve your game

Master Exposure

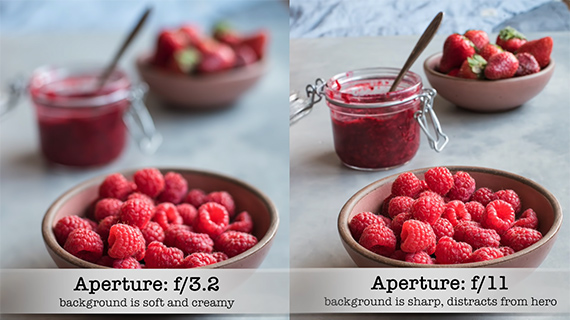
One of the things that all photographers have to master is exposure. Exposure consists of three aspects: shutter speed, ISO, and aperture. Aperture controls not only the amount of light that gets into your camera but also the depth of field in your images. The choice of aperture will depend on your choice of how much of the background you wish to project tack sharp in your composition.

Food photography tips to improve your game

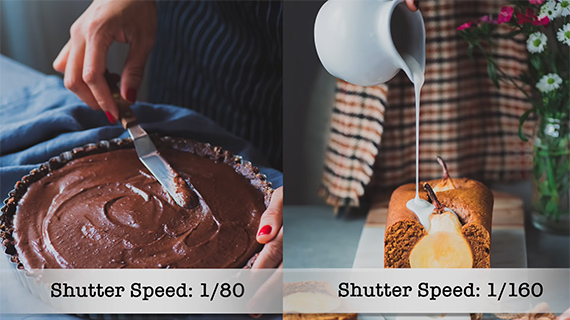
Shutter speed controls the length of time for which the shutter remains open and collects light.

Food photography tips to improve your game

ISO controls the sensitivity of the sensor. It acts as the balance between shutter speed and aperture.

Experiment with Color Theory

Food photography tips to improve your game

A surprisingly effective tip which very few people actually pay attention to is understanding color theory.

Explore Composition Techniques

Food photography tips to improve your game

Simple photography rules, such as the rule of thirds, are what is important here. They’ll help you produce more compelling compositions.

What other tips do you have for improving food photography?


Go to full article: Simple Tips for Better Food Photography

What are your thoughts on this article? Join the discussion on Facebook

PictureCorrect subscribers can also learn more today with our #1 bestseller: The Photography Tutorial eBook

The post Simple Tips for Better Food Photography appeared first on PictureCorrect.


from PictureCorrect http://bit.ly/2Kba9sz
via IFTTT

maanantai 27. toukokuuta 2019

PictureCorrect.com: The Amateur’s Guide to Photography

Don’t Read the Manual

OK, I’m assuming you all know how to take a photo with your camera and have fully read the manual…

…nope, nor did I!

You got your camera out of its box and charged it up and started snapping on auto ASAP.

dslr camera

“Canon EOS 60D DSLR” captured by Jung-nam Nam

I’m the same with anything new, to be honest. It’s only when I really can’t figure it out that I’ll actually start reading the manual.

Anyway, after wandering around and trying the zoom and snapping at anything that moved—mostly ducks!—I finally consulted the manual. If you’ve ever done the same thing as an amateur photographer with a new camera, I’m sure, like me, you eventually wanted to know what the dials do and what all the numbers mean, as the photos you intend to take had better be superior to what a mobile phone produces—even if they are only photos of ducks (I’m guessing you also took photos of ducks! Why is that? Why do new photographers always take lots of photos of ducks? It’s like we’re hoarding them for some special duck event one day!)
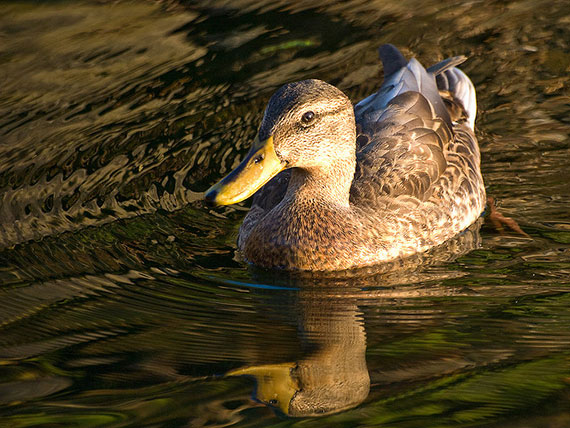
guide for amateur photographers

Photo by Michael B.; f/5.6, 1/250-second exposure.

Forget the Numbers

I’m going to keep this simple for you so we can move on and actually start doing the cool stuff and not worry about the complete science of everything. Skip this, by the way, if you’re already using your camera on Tv, Av, or Manual mode.

To alter your settings on your camera, you’re going to have to turn the dial on top so that it reads (for Canon) M, Av, or Tv. If you’re using the little pictures on top or the green square, your camera is still on auto mode and will not let you change much. If you have your camera right now, set it to M. Don’t be scared; we’re just playing with settings, not taking a master class.

Stop! F-Stop?

So what’s f/16? or f/5.6?

This number is a control for your lens (light is measured in stops—the same as how on a ruler, distance is organized into centimeters. I’m not going into the history and science of these numbers here), and it does two things.

Assuming you have a standard, cheap kit lens (the lens they gave you with the camera) it will be capable of giving you f/3.5 to f/22. Now, it’s cheap, and due to technical issues, it can’t hold these numbers if you set them and then zoom in or out. I’ll go into more detail later on and compare between a cheap lens and a pro lens. Just know for the moment we are going to work with f/5.6 to f/22.

So clear your head and forget these odd numbers like f/3.5 or f/4.0. Just know that each time you raise or lower this number, you are making two changes at once.

We’ll start with f/5.6 to f/8. Setting a low f-stop number opens a doorway inside your lens, allowing light to come in. And once you have focused onto something, it creates a more blurred background. This is one of the most popular settings to use for portraits.
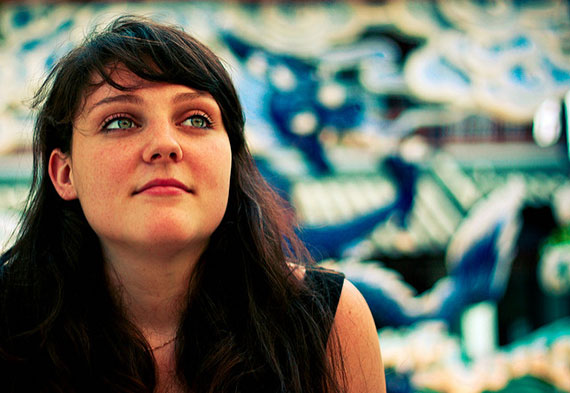
guide for amateurs in photography

Photo by Lina Hayes; ISO 200, f/2.0, /12000-second exposure.

To increase this blurring, zoom in closer your subject and take a shot (stand back and zoom in if you have to) and see the result. Although you will get some background blur without zooming in, when you zoom in with a low f-stop number, the background magnifies even more. In another article, I will go into the differences between a bokeh/prime lens and a zoom lens.

So guess what the high number does…

Yes, from f/8 to f/22, you start to increase the depth of field, the photo gets sharper front to back, and you are also limiting the amount of light coming into the camera. Again, if you want front-to-back sharpness, don’t zoom in too much!
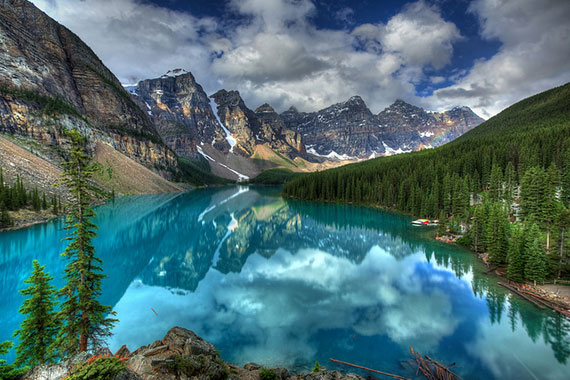
amateur photographer guide

Photo by edwademd; ISO 100, f/8.0, 1/125-second exposure.

So forget the numbers. Just know that a low number is good for low-light photos with blurring, and a high number is good for front-to-back sharpness and limited incoming light.

The next trick is balancing the light to control your photo.

The Next Trick

You might be taking a photo on a very bright day, and you want to use f/2, but your shots are coming out very bright or white (over-exposed). You need a way of controlling the light without changing the f-stop. This is where your shutter comes into play, and the shutter also controls two things.

It can be slowed down to allow more light to come in, which helps with your exposure, but the drawback here is that anything moving in front of the camera could potentially be blurred. In this case, we are talking about more light in the scene, so if you’re shooting at f/2, push the shutter speed higher and freeze-frame the scene.
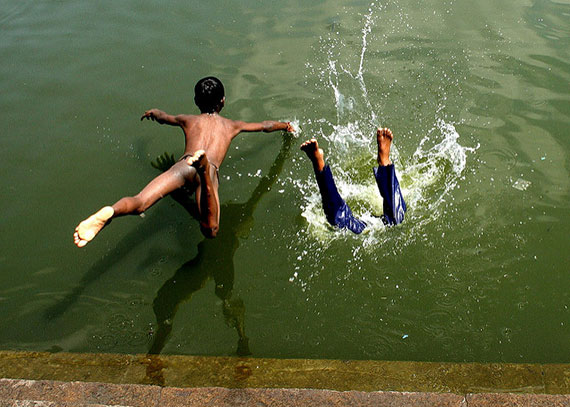
amateur photography guide tips

Photo by Simply CVR; ISO 400, f/8.0, 1/400-second exposure.

One way to experiment with this is to set your camera to Tv mode (shutter priority) and try some shots on a slow speed and some on a high speed. Compare your photos, and you will see that the camera made adjustments for you to affect the photo because of the shutter speed changes you made—fast or slow.

Shutter Play

When you press that button to take your photo, you hear a “click-click.” That is the little door (or shutter) inside your camera moving out of the way so the light coming into your lens passes through to your camera sensor (the device that records light, which is converted into information that ends up on your SD card in the form of a photo).

You can control how slow or fast this shutter opens and closes. The longer you leave it open, the more light hits the sensor until you get the desired exposure.

The camera is sensitive to light, which is why your photos may sometimes come out too bright or dark if you’re not in control.

Let’s say that the photo you want to take was at the end of a sunset and the light was not very plentiful, but you wanted to shoot it at f/16. As you should now know, this number limits the light coming into the camera, but gives the scene front-to-back sharpness.

guide to photography for amateurs

Photo by Maurizio Fecchio; ISO 400, f/8.0, 1/10-second exposure.

By slowing down the shutter, you give the camera more time to compensate for the lack of daylight (ambient light) and the controlled light coming into the lens and enough time to create a balanced photo exposure.

The average, normal speed of your shutter is considered to be 1/125 of a second. This speed is reasonably fast enough to hold your camera steady and take a clear photo. I can hold my camera and take a photo with a shutter speed as slow as 1/60 of a second—but anything slower, and I will likely have a blurred photo from my own movement. But if you’re taking a photo in low-light conditions (like during a sunset) or with a slower shutter speed, your camera should on a tripod so you can have more shutter control at your disposal when you need it.

This is where it starts to come together. Let’s suppose I took the same photo with an f-stop of f/2.8. I can’t leave the shutter at 1/4 of a second, since so much light would come into the camera that the photo would be overexposed—bright and washed out.

You’re a juggler with intent.

So to compensate, I would have to increase the shutter speed so that it opens and closes more quickly. To get the photo the way we want it, we have to learn to balance light. If you make a change to your f-stop, you will need to make an adjustment of another sort elsewhere to compensate. As we go on, you’ll hopefully understand this better.

Know that your camera is your tool; it may have lots of fancy processors and metering systems, but you’re in the hot seat (I would not want it any other way!), and your camera does not know what you’re trying to do or what it is looking at. So as a juggler of light, you will eventually know when to press that shutter button and make that photo.

The other control your shutter offers is a sense of movement—or the opposite: complete motion freeze. Now, if you need your f-stop number to stay where it is, Tv mode is not for you, because in this mode it’s going to keep your shutter speed fixed at whatever you tell it to, but the auto ISO and f-stop are going to be constantly changing.

Something to Try

Now for this quick experiment, we want to control the speed of the shutter, and you can’t do this in Av (or aperture priority) mode. Instead, M for manual is what we will need here, but we are going to leave the ISO to the camera (as we are not talking about the ISO right now, make sure it is set to auto and not a number, and we will come to this eventually).

  • In manual mode, set your f-stop to f/5.6.
  • Adjust your shutter dial to a slow number, say 1/20 of a second.
  • Take a shot (and don’t worry about what you shoot), and then set it to 1/200 of a second and take another shot.

Assuming you have set it correctly, your camera has kept the same photo exposure (by changing the ISO setting in the background), but you managed to keep the f-stop the same whilst making adjustments to the shutter.

You can do the same process to the shutter by repeating the same experiment, but changing the f-stop number instead:

Set the shutter to 1/80 of a second for the moment, but change the f-number to f/5.6 and take a shot. Then set to f/22 and shoot again. So, this gives us different exposures with the same shutter speed, and let’s not forget the lessons of blurring (or bokeh, as it is sometimes called). So what did we just learn? Here is a breakdown:

  • Photo at shutter 1/20 = too blurry for handheld, but quality of shot is good (ISO)
  • Photo at shutter 1/200 = Sharp, frozen photo with some bokeh
  • Photo at f/5.6 = Generally sharp for handheld, and background begins to blur from focus point
  • Photo at f/22 = Sharp front to back, but picture quality may have been sacrificed (ISO — don’t panic; ISO is almost next!)

The Big Freeze

So here’s a little bit more about shutter speeds.

The faster your shutter speed is, the quicker it opens and closes inside your camera, which limits the light coming into the camera. On a bright summer day, you can happily take photos at a speed of 1/200 of a second and get good handheld photos. And if its really, really sunny, you can push this up higher as you see fit. The more you push this number, the quicker the photo, and the more “frozen” the scene is. Not because it’s cold, of course, but because movement is frozen in that time.

For example, pick up any sports magazine, and you will see footballers in mid-air, sweat drops and footballs in a solid state. The photographer who took these shots would have used a fast shutter speed like 1/800 of a second—fast enough to catch a Formula One car!

tips amateur photo guide

Photo by www.twin-loc.fr; ISO 100, f/13.0, 1/100-second exposure.

Find a fountain and shoot at 1/4000 of a second!

If you shoot at this speed on a bright day, you can see the water is choppy and frozen in motion.

ISO

ISO 50 on my Canon 6D is the highest quality recording it offers. It is also the lowest light sensitivity setting.

So let’s recap for a second. Are you seeing a pattern forming yet? Three controls: each does two changes at once, and all three affect light either up or down in volume. Or do they?

The ISO, when set to its lowest number, simply records faster digitally and so requires more light. If pushed to its higher numbers, like say ISO 12,800, it’s very sensitive to light and is a lot brighter, so your camera needs less light to record a photo for you.

The ISO settings cannot stop light coming into the camera once it travels through the lens and passes through the shutter, so technically speaking, it’s not a control of light. But just keep in mind that playing with these settings does make a change in the camera’s behavior if you happen to set an ISO at a particular number in Av or Tv modes.

Let’s suppose I’m indoors on a bright day, and my camera is set to Av mode. If I changed my ISO to 400 or even 800, this would be sensitive enough with the available light for the camera to auto increase the shutter speed and get you a reasonable handheld exposure. The downside to increasing this ISO number is that it creates more noise in the photo, which means it decreases the overall quality. Remember the fountain photo? I shot mine at 1/4000 of a second in Tv mode, and its ISO only went to 640, as it was a bright day on the coast—plus it was a white fountain reflecting more light.

ISO quality varies per camera or mobile phone. You can shoot a pretty good photo up to 3200 ISO, and noise reduction software can make it look very good.

More about quality in a sec; I want you to understand a little of the impact that your camera setting changes are making. As as I said earlier, you are a juggler of light. So here is a little exercise:

  • Like before, set your camera dial to Av, set your ISO to 100, and take a photo of something.
  • Next, set your ISO to 800 and take a shot, and then to 3200 and take another.

Which of the photos worked out better for you? Have a look on the back, and zoom in using your display screen onto the object you focused on; see if the photos look any different.

Your camera records settings known as Exif data that are attached to each photo file. Getting to this data varies by camera, so look this up. If you get to this data, you’ll see that the camera made adjustments to the f-stop and the shutter speed as you changed the ISO.

High ISO is Bad… and Good

I’m hoping that you’re not feeling too overwhelmed with all this. If you get your head round these three main camera settings, everything else is easier, as all the other settings in your camera usually only need to be set just once depending on what you’re doing. But exposure is very important.

Usually it’s good practice to shoot in the best quality possible, especially if there is enough light. It’s our job to get the best capture possible, right?

Now, it seems like a terrible thing to shoot in any ISO higher than 800 (I will go into quality on high ISOs later and how to manage them), but there are situations when a high ISO can actually give a photo an improvement in-camera without having to muck about in Photoshop.

It’s a judgement call! When Canon released the 24mm to 70mm Mark II lens in 2011 (a fast lens), I was lucky enough to be one of the first few to get hold of one and try it out shortly after buying it. I fired a shot in Av mode (Aperture Priority) at f/2.8 and zoomed in at 70mm (the widest and tightest it can go) to see how it looked. The Canon 550D came back with a photo setting: shutter speed of 1/40 of a second and ISO 6400. In color, the photo was noisy, and even with noise reduction it did not look good—but I knew this would happen. I knew that, in the low light, the camera would have to choose these settings, even with a wide aperture (or low f-stop number).

I was looking to make a black-and-white photo, and I wanted to have natural grain in the photo as close to those old, black-and-white film photos we used to see from the pros.

amateurs of photography guide and tips

Photo by Konrad Lembcke; ISO 3200, f/2.0, 1/60-second exposure.

I believe Sir David Bailey shoots digital now, but when he does create B&W shots, he still shoots with film. So when I processed this photo, I made sure no noise reduction was applied, and once I added a black-and-white layer (and there are many to choose from in Photoshop and other filter software), the noise was now an advantage toward the look I wanted.

Sometimes in photos, we want grain. It depends what you’re doing. Some photographers choose to shoot the photo perfectly and add grain afterward in Photoshop. As an example, it may be a wedding, and the color photo does not work well, so you change it to B&W—and if it was shot in a good ISO, you may decide to add the grain if you feel it improves the shot (your call). But as I said earlier, your camera is a tool just like Photoshop is a tool; you have paid a lot of money for your camera, so your first task is to do as much as possible in-camera before having to tweak it afterwards (get your money’s worth!). Besides, if you get it right in camera first, then there’s no need to spend time later fixing it, right?

As I said earlier, it’s a judgement call. With practice, you will start to exercise this more often.

Give it a go. Set your camera to P mode or Av mode, and ISO to its auto setting, and just take some snaps and see what you come up with!

I hope this tutorial has been helpful. Maybe it’s time to take some photos of ducks in case there is a duck competition?

About the Author:
Jamie McConnachie is a professional wedding photographer specializing in natural light photography and mobile studio flash photography such as corporate headshots in Essex, Hertfordshire and London.


Go to full article: The Amateur’s Guide to Photography

What are your thoughts on this article? Join the discussion on Facebook

PictureCorrect subscribers can also learn more today with our #1 bestseller: The Photography Tutorial eBook

The post The Amateur’s Guide to Photography appeared first on PictureCorrect.


from PictureCorrect http://bit.ly/2rP7WXP
via IFTTT