perjantai 28. joulukuuta 2018

PictureCorrect.com: Aurora HDR Real Estate Photo Editing Tutorial

Related reminder: only a little while left for the Aurora HDR Holiday Offer

If you work in real estate, you know how important great imagery is in getting people interested in a property. First impressions last, and too many real estate shots don’t do justice to the building itself. A lot of the interior shots are distorted or too shadowy in some areas and too bright in others. How do you fix that?

Skylum’s revamped HDR editing program includes the next generation of AI-powered software that saves you time and makes creating the perfect HDR image easy. You can use either bracketed exposure images or single-images for tone-mapping, and the Quantum HDR Engine will do all the heavy lifting for you in optimizing each image individually.

Aurora HDR 2019 also minimizes common problems like over-saturation and contrast loss, as well as controlling noise and reducing issues such as halos and ghosting. Other new features are the HDR Smart Structure, LUT Mapping, and the rejuvenated Aurora HDR Looks, which replaces the Presets feature. There are even Looks created especially for enhancing real estate images.

Let’s have a quick look at what Aurora HDR can do for you.

There are five bracketed images here, from under to over-exposed. I load them into Aurora HDR 2019:
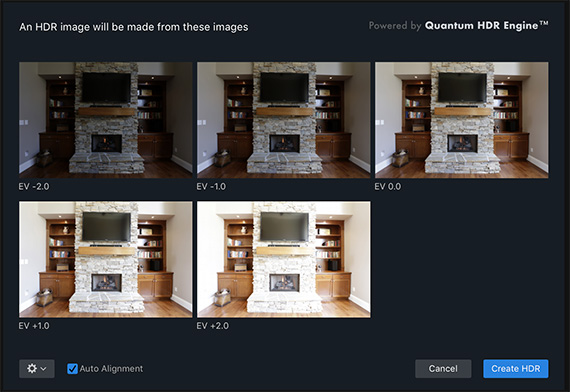
bracketed images

© Chad Sucher

Aurora HDR 2019 merges them, and the Quantum AI engine uses its intelligence to see how the image can be improved. Here’s the result:
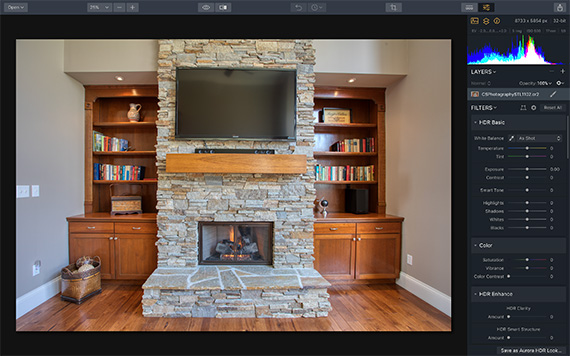
quantum-ai-merge

© Chad Sucher

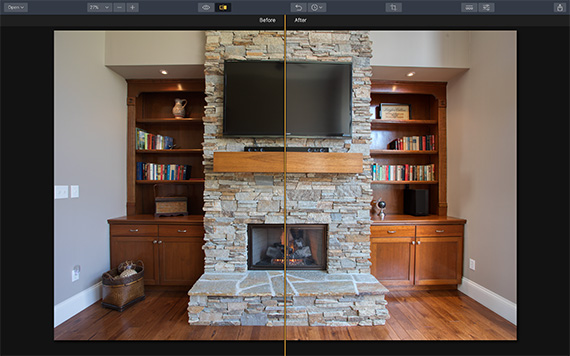
This looks great already, but to add the finishing touches we shall add one of the Looks—in this case, one of Randy Van Duinen’s signature real estate collection, a tungsten/daylight mix.
aurora hdr looks

© Chad Sucher

The split screen shows the ‘before’ image on the left and the ‘after’ one on the right. As you can see, the Look applied has given the image on the right a warmer tone, and more of the shadows are brightened.

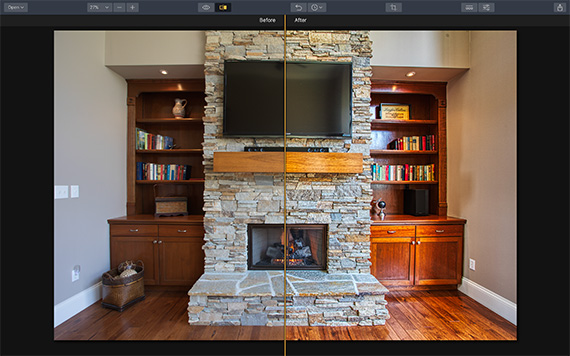
There are many different Looks to choose from, including many that are suitable for architecture and real estate. The before/after below is from the Architecture looks and is called ‘detailed interior’:
architecture looks

© Chad Sucher

This Look has really made the details pop and the colors warmer—you can see the beautiful grain of the floorboards and the intricate detail of the stonework. All of Aurora HDR 2019’s Looks are fully customizable, and the slider allows you to adjust the strength of the effect.

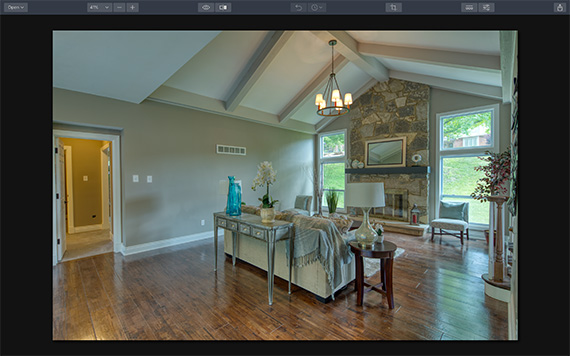
Let’s look at a different set of merged images and see what we can do. The image below is merged but unedited apart from Quantum HDR’s adjustments. As you can see, the result is pretty mind-blowing already!
quantum hdr

© Chad Sucher

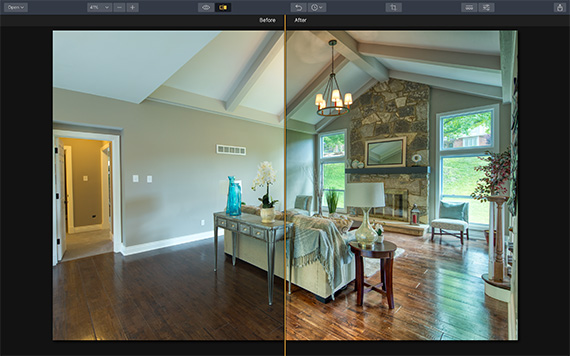
Mixing the exposure between interior and exterior is always a challenge with traditional photography, and here you can see why HDR is such a key part of real estate imagery. Aurora HDR has mixed the different lighting sources to produce a well-balanced image. Let’s look at how this image will change when we add a Look to it.

This is another Architecture look, called ‘bright interior’. The before/after split shows what a difference this Look has made:
bright interior look

© Chad Sucher

Yet again, the detail has been brought out beautifully. Here is the full image with the Look applied:
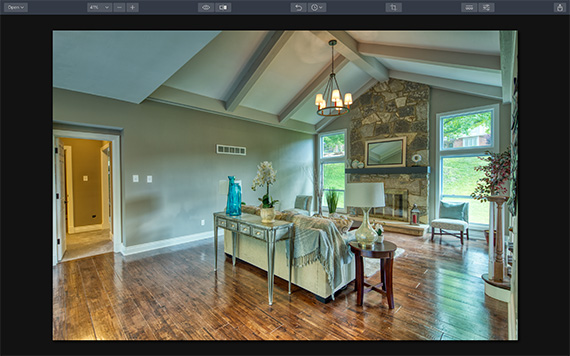
hdr after real estate interior

© Chad Sucher

If you wish to tweak the image after applying the Look of choice, that’s simple too.

On the right-hand side of the screen, you will find the HDR develop panel, with all the tools you could possibly need to add the finishing touches to your images, from vibrance/saturation to contrast and structure.

Final Thoughts

The Looks were added in just one click, and I’m sure you’ll agree that getting professional results in such a short time can free you up to do the other important tasks that you have to be getting on with.

How to Get Aurora HDR for a Discount Today:

During this Holiday Offer customers can purchase Aurora HDR 2019 for only US$89 and get a bonus of 1 year SmugMug Portfolio plan which ends soon.

aurora holiday

Aurora HDR Holiday Offer (Click to Learn More)

At the core is Skylum’s revolutionary Quantum HDR Engine, an AI-powered tone mapping technology that’s been three years in the making within Skylum’s AI lab.

Deal found here: The Aurora HDR 2019 Holiday Sale


Go to full article: Aurora HDR Real Estate Photo Editing Tutorial

What are your thoughts on this article? Join the discussion on Facebook

PictureCorrect subscribers can also learn more today with our #1 bestseller: The Photography Tutorial eBook

The post Aurora HDR Real Estate Photo Editing Tutorial appeared first on PictureCorrect.


from PictureCorrect http://bit.ly/2LE8BWD
via IFTTT

PictureCorrect.com: Interesting Photo of the Day: A Majestically Snowy Cat

Welcome to winter, where the weather’s so cold that the only thing to warm you up is photos of cats you find while browsing the Internet because it’s too frigid to go outside. Happy holidays:

cat in snow

(Via Imgur. Click image to see full size.)

This cozy cat comes from Alina Shevelina, who specializes in hyper-colorful, hyper-detailed portraits of humans and nature. We especially dig the top corner lens flare illuminating the flakes of snow, adding a bit of depth and a slight halo to this angelic feline.


Go to full article: Interesting Photo of the Day: A Majestically Snowy Cat

What are your thoughts on this article? Join the discussion on Facebook

PictureCorrect subscribers can also learn more today with our #1 bestseller: The Photography Tutorial eBook

The post Interesting Photo of the Day: A Majestically Snowy Cat appeared first on PictureCorrect.


from PictureCorrect http://bit.ly/2AGXXZB
via IFTTT

PictureCorrect.com: Photography Project Brings Awareness to Ocean Plastic

As useful as plastics are, they have always been a pain to handle. They don’t decompose, and the enormous volume of plastic being dumped in the ocean is a serious matter of concern. Every 60 seconds, the equivalent of a truckload of plastic enters the ocean. In order to create awareness around the issue, photographer Benjamin Von Wong took up an ambitious project:

With the help of volunteers, Von Wong and his team were able to “dump” plastic into the ocean in a controlled manner. They transformed a pristine piece of nature into a symbol of environmental tragedy.

“Statistics alone are hard to visualize so we decided to show it instead.”

First, they had to find a way to keep all the plastic from floating away. This proved challenging, but the crew scavenged for old fishing line and nets to create a containment system.

photographing plastic in the ocean

Next, they sought volunteers to assemble and manage the huge amount of plastic—and to help reel it back in.

setting up ocean plastic photo shoot

They gathered and displayed a truckload of plastic and worked together to create a visual representation of this environmental crisis.

plastic dumped in ocean

“We began this project with the goal of raising more awareness. But after an entire week of struggling to keep up with the endless flow of plastics that were being donated to us, my counterpart Katarina and I realized that the problem wasn’t awareness. The problem was that there is just too much plastic, and regardless of how much effort and hard work we put into collecting, recycling, and reusing, it would never be enough unless we stopped producing so much of it in the first place.”


Go to full article: Photography Project Brings Awareness to Ocean Plastic

What are your thoughts on this article? Join the discussion on Facebook

PictureCorrect subscribers can also learn more today with our #1 bestseller: The Photography Tutorial eBook

The post Photography Project Brings Awareness to Ocean Plastic appeared first on PictureCorrect.


from PictureCorrect http://bit.ly/2LCsUDL
via IFTTT

torstai 27. joulukuuta 2018

PictureCorrect.com: Interesting Photo of the Day: Twilight Snowstorm on the Streets of Boston

Because it’s one of the oldest cities in the United States, walking through the streets of Boston can sometimes feel like taking a step into the past. Even with neon signs and streetlights illuminating the streets, it’s easy to lose yourself among the brownstones while reminiscing about the area’s storied past. While doing just that in the midst of a recent winter storm, photographer Andrea Fanelli snagged a truly breathtaking moment:

boston snow scene

“Snowstorm in Downtown Boston” by Andrea Fanelli. (Via Reddit. Click image to see full size.)

Outside of the Bell in Hand Tavern—the oldest bar in America—the city streets cleared out as a blizzard blanketed everything in sight with snow. This shot shows the severity of the weather in the fat flakes wildly flailing through the frigid, blustering wind. Nevertheless, the lack of people in this scene creates a sense of quiet calm that’s rarely seen in the center of a bustling metropolis.

Though Fanelli had to brave some bone-chilling conditions in order to create this image, it certainly seems that stumbling onto this simultaneously serene and chaotic scene was well worth the effort it took to get out of the house and start exploring.


Go to full article: Interesting Photo of the Day: Twilight Snowstorm on the Streets of Boston

What are your thoughts on this article? Join the discussion on Facebook

PictureCorrect subscribers can also learn more today with our #1 bestseller: The Photography Tutorial eBook

The post Interesting Photo of the Day: Twilight Snowstorm on the Streets of Boston appeared first on PictureCorrect.


from PictureCorrect http://bit.ly/2EOgFCS
via IFTTT

PictureCorrect.com: How to Photograph Smoke

At some point in your life, you’ve probably seen an amazing photograph featuring smoke. The smoke might be flawlessly lit against a solid background or feature breathtaking colors, leaving you wondering just how on earth you could possibly duplicate it. While photographing smoke can be difficult due to its unpredictable nature, thankfully, it doesn’t take a lot of special equipment. In fact, once you study a little more about how to light and shape smoke, it’s all about trial and error.

smoke on dark background

photo by Paul Hansen

Supplies and Setup for Smoke Photography

As with any photo shoot, the first thing you need to do is to prepare. Make a list of all the supplies you will need, and get everything set up in advance. Typically, you will want to use the following supplies when working with smoke photography:

  • Black Background / Backdrop. Compared to other colors, a pure black backdrop helps to blend the smoke into your images easier. (You can also minimize the size of backdrop required by using a telephoto lens.)
  • Your Camera. If possible, use a telephoto zoom lens. This will help minimize the required backdrop, and make it easier to control your composition.
  • Extra Memory Card. When photographing smoke, you will typically capture a lot of frames.
  • Flash or Lamp. This needs to be an external source and does not count your camera flash.
  • Incense (including incense holder). While you can use other options, incense not only provides a long-burning smoke source, but it also will not set off a smoke detector or sprinkler system.
  • Reflector (optional)
  • Snoot. If you don’t have one, try using pieces of cardboard. The point is to help direct your flash toward the smoke and away from the backdrop.
  • Tripod. Although it is possible to shoot without one, a tripod helps to ensure stability and keeps your camera steady if you need to walk away to make changes.

After you have gathered all your supplies, you will want to set up in a nice dark and draft-free location. If necessary, wait until it is dark out, and avoid working near open windows. Remember, smoke is easily directed. Even with the slightest puff of air, smoke can move, so always make sure to turn off any fans, and cover up any vents that could cause issues during your shoot. If at all possible, use a cool room with a high ceiling to allow somewhere for the smoke to go.

Although you don’t need a lot of room for your setup, you typically will require around five feet between the camera and backdrop. Your light source should never be placed directly in front of the backdrop; it should always be placed to the left or right to avoid light from hitting it. A great starting point for your light source is between 30 and 45 degrees away with the snoot directing the flash toward the smoke; the incense (or other smoke source) should be in the middle with your camera pointed directly at the backdrop.

purple smoke on black background

photo by charel.irrthum

Photographing Smoke

During your shoot, you should always shoot in RAW format. This will make your post-processing much easier, and provides you with as much information as possible. However, if you do not plan on editing your images, you can consider JPEG.

Like most shoots, your camera settings can vary depending upon your location. However, there are a few specifications you can keep in mind. Your ISO setting should be placed at the lowest possible option, and your shutter speed lower than your normal settings, with 1/250 of a second as a good starting point.

Like sports photography, auto focus is not an option. Smoke is continuously moving, so you will need to ensure your focus is in manual mode. Start by focusing on the tip of the incense, using a dim lighting setup. Be prepared to experiment, because what works for some photographers doesn’t necessarily always work for others. Keep experimenting until you fine tune your camera settings, position, flash, and reflector to where your images consistently have a pure black backdrop, as well as a good tonal range and highlights for your smoke.

When working with smoke, make sure to keep safety in mind, not just for you, but for your equipment as well. Smoke has the ability to create a film over your lens, destroy plastic (as well as other parts)—and more. You paid good money for your equipment, so don’t damage it because of small oversight.

It may just be incense, but you still will never want to set up in a location where chemicals or other flammable materials are stored. A good rule of thumb is it is better to be safe than sorry; so while you may not think you need to, always take breaks throughout your photo shoot. Ideally this should be around every 20 to 30 minutes. This will allow you time to open any doors or windows to let out any extra smoke within the room.

colorful smoke

photo by butch

Post Processing Photos of Smoke

For most photographers, the fun begins during the post-processing stage. You can remove unwanted smoke areas, change the contrast, levels, curves, and/or other aspects until your highlights and shadows reflect the look you’re trying to achieve. Looking for something different than the same old black background or white smoke? Then try inverting the image (Image > Adjustments > Invert) or using layer masks to change the colors of your smoke. The possibilities are endless, and the only thing that can limit your creativity is you, so play around with the image.

Despite the difficulty, photographing smoke can be lots of fun. Often times, it is hit or miss to capture an amazing shot; but it has the potential to be a big hit. So while you may experience some bumps along the way, the positives far outweigh any of the troubles you had to achieve it.


Go to full article: How to Photograph Smoke

What are your thoughts on this article? Join the discussion on Facebook

PictureCorrect subscribers can also learn more today with our #1 bestseller: The Photography Tutorial eBook

The post How to Photograph Smoke appeared first on PictureCorrect.


from PictureCorrect http://bit.ly/2AiM8tP
via IFTTT

PictureCorrect.com: Composition Mistakes to Avoid as a Photographer

Leave out all the technicalities involved in taking a photograph, and it’s composition that makes or breaks an image. No matter how technically complex your photo may be, if the composition isn’t good, the photo is a failure. Photographer Sheldon Evans sheds light on some mistakes that photographers should avoid when composing an image:

Evans makes it clear that these aren’t rules that must be followed hard and fast; they’re merely some guidelines that will help you in getting better results. He even advises you take his guidelines with a grain of salt. Let’s dive right in.

Not Doing Background Checks

Doing a background check on the model for any criminal records might be a good idea, but that’s not what we’re concerned about here. During photo shoots, be wary of the elements that are behind the model or in the model’s surroundings that can intersect with the model’s face and body. These are some things to look out for:

  • lines going through the subject that appear to be splitting the subject
  • branches, wires, or poles coming out of the subject’s head
  • horizon going through the subject’s neck or head

composing frame within a frame

To avoid background issues, you can either reposition yourself or the model, or widen the aperture to blow the background away. You can even step the game up and try to use the lines to your advantage. See if you can form a frame out of the intersecting lines, and try to place the subject within that frame to make the photograph even more appealing.

Lack of Breathing Room

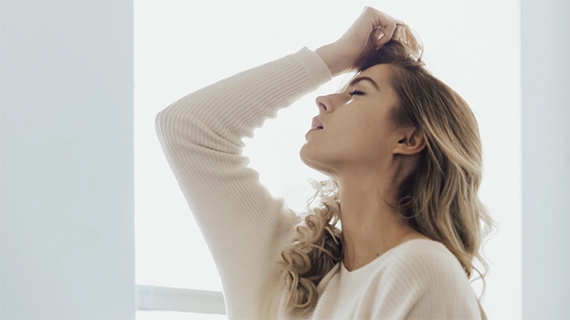
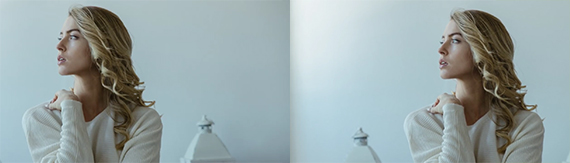
If the subject is facing in a direction without much space in the frame, the image seems out of balance; it might feel suffocating and uneasy. The edge of the frame can act as a barrier between the wall and the surrounding of the image.

Fix this issue by asking the model to turn the other way or recompose so the model is facing the edge of the frame with more space.

breathing space in a photo

The image on our right seems much more comforting due to the breathing space that the model has in the direction she is looking.

Photographers tend to leave way more head room than necessary. Don’t leave too much space above the model’s head. Either compose the shot by moving in a little closer or crop in by using the rule of thirds.

Amputations

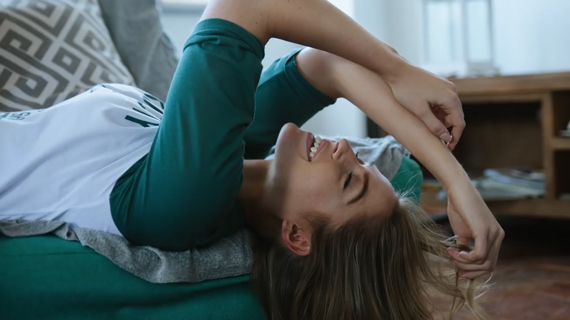
Amputation occurs in photography when you compose or crop the image in such a way that the subject ends up having some part of his/her body cut off. Most of the time you can solve this issue by using a shorter focal length or stepping back a bit to accommodate all of the subject.  But if there are constraints that prevent using these fixes, you can crop the subject in safe zones, like the areas between joints or mid-abdomen. Cropping the subject at joints like the elbows, neck, wrists, knees is strictly a no go.

properly cropping the subject

An example of a good crop

Cropping can be done in a variety of ways, and each crop can make the photograph look a little different. So experiment.

“Remember that these are just guidelines. While there are some rules in photography, often the photographs that break those rules are the ones that are most effective. First understand and then break them.”

Just going through these guidelines, articles, and videos won’t instantly improve your photographs unless you put your findings into practice. Be sure to get out there and try out these techniques!


Go to full article: Composition Mistakes to Avoid as a Photographer

What are your thoughts on this article? Join the discussion on Facebook

PictureCorrect subscribers can also learn more today with our #1 bestseller: The Photography Tutorial eBook

The post Composition Mistakes to Avoid as a Photographer appeared first on PictureCorrect.


from PictureCorrect http://bit.ly/2ESHQNs
via IFTTT

PictureCorrect.com: What Makes a Great Photograph?

I’m sure this article will be controversial. I mean, after all, how do you objectively characterize what makes a good photograph? It’s not like marking a mathematics paper, where there is always a right or wrong answer. Photography, much like any other art form, is very subjective. That said, I do believe that there are certain elements that all great photographs share in common. Here’s my (subjective) attempt at defining them:

things that make a photo good

Photo by Giuseppe Milo; ISO 50, f/6.3, 25-second exposure.

1. Great use of Light – I’ve placed this in position 1, because photography is essentially all about light. As has been said many a time, photography literally means ‘painting with light’, and to become a true master of this discipline requires that you can read and understand light in the same way that you read and understand language- Metaphorically, it is one of the linguistic building blocks of photography. When taking a picture, great photographers will consider the direction as well as the quality of light. Is the subject side lit, or back lit? Is the light source hard or soft? Will I set up the picture so that it is low-key or high key? Depending on the answers to these questions the overall emotional feel and aesthetic of the image will change radically, thereby changing its meaning. To give you an example, look at some classic pictures taken of jazz clubs in low light. Typically these are low key in nature and they create a very definite ‘noir’ aesthetic. Play around with light so that it supports the meaning you are trying to convey in the image.

2. Great Composition – As in great art, great photographs generally have a sense of compositional form and balance that is pleasing to the eye. As a starting point it’s a great idea to understand the basic rules of composition, such as using the rules of thirds. Once you have learned them though, don’t be afraid to play around with them and break the rules. It’s a way of establishing your own unique style, and who wants to be limited by rules anyway?

taking a good picture

Photo by Martin Snicer Photography; ISO 100, f/5.0, 1/200-second exposure.

3. A Sense of Timing – Take a look at the work of Henri Cartier-Bresson, the undisputed master of street photography, and you will notice that, as well as having complete mastery of composition, he was also a master of timing. He knew how and when to anticipate what he called ‘The Decisive Moment’; that point in time when all of the elements of the image fall into place and when the emotional ‘pitch’ of the story is at its peak. Great timing is essential in photography. Practice being patient, and remember to try to anticipate the best moment at which to engage the shutter button.

4. A Clear Subject – Great photographs generally have a very clear idea of what the core subject of the photograph is. If you find that when you frame an image the subject is unclear then try taking out any unnecessary elements. Sometimes simplifying the image is the best way to improve it.

how to take a good photograph

Photo by Ed Suominen; ISO 80, f/2.8, 1/1000-second exposure.

Try experimenting with these different elements to see what works for you. Don’t forget you only get better with plenty of practice. Good luck!

About the Author:
Matt Foden Photography (mattfoden dot co dot uk) is a wedding and portrait photographer based in Croydon in London.


Go to full article: What Makes a Great Photograph?

What are your thoughts on this article? Join the discussion on Facebook

PictureCorrect subscribers can also learn more today with our #1 bestseller: The Photography Tutorial eBook

The post What Makes a Great Photograph? appeared first on PictureCorrect.


from PictureCorrect http://bit.ly/2u319LW
via IFTTT