keskiviikko 25. huhtikuuta 2018

PictureCorrect.com: 7 Ways to Improve Your Landscape Compositions

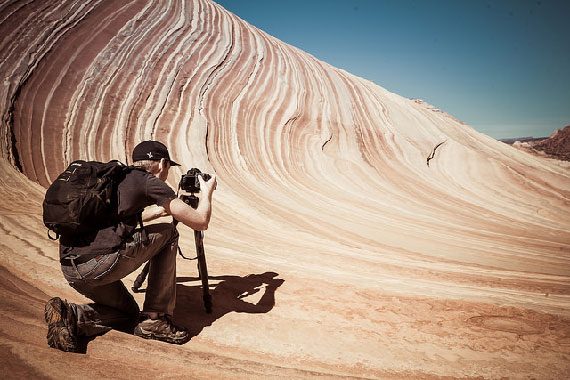
It’s one thing to admire a photographer’s work, but it’s entirely something else to replicate it. Oftentimes, you will hear people remark that a photographer has “the eye” for it. Yet, that makes it sound like a predetermined ability instead of acknowledging that amateur photographers can study and experiment composition to improve their landscape work. Photographer Nigel Danson shows his tips to improve your landscape compositions:

1. Look First, Photograph Later

Leave yourself time to explore an area that you intend to photograph. Although the light might be changing or receding, the best photos come from knowing your angles and how the light will affect the scene. Danson suggests composing through a smartphone before you even get your camera and tripod out.

Search for a point of interest in your composition. A sunrise or sunset can always be beautiful, but will likely look generic if there isn’t a creative element included. Danson’s first example shows a colorful orange sunset over a herd of sheep enclosed between the walls.

After that, find a way to direct the viewer’s eye to your point of interest. You don’t want to have distracting elements on the sides or corners of your image that will drive the attention away from that point.

Danson’s keys to look for in the initial composition before you actually start taking photos are focus, light, interest, corners, and simplicity.
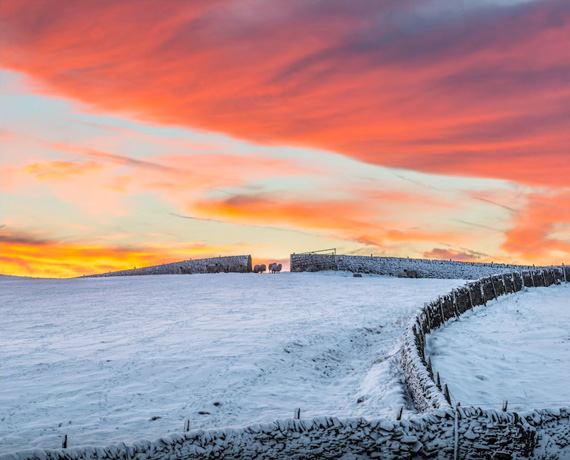
tips to improve landscape composition photography

2. Find Patterns

Scour the landscape for repetition and simplicity. These two push the viewer’s eyes to the striking point of interest.

3. Use Lines and Shapes

Most images have “visual weight,” which indicates where your eye lands when first looking at a picture. By using lines and shapes in your composition, you can direct the viewer’s attention through the details on to your point of interest. The goal is to move their gaze around your image to absorb more than just the focal point.

4. Move from 3D to 2D

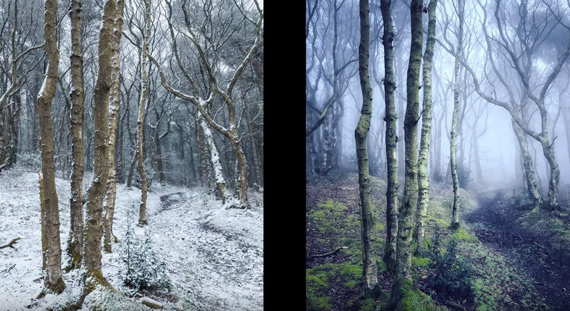
When you’re scouting the landscape, your eyes obviously view your surroundings as three dimensional. However, images on your camera and computer screen are two dimensional and need depth and detail to convey what you originally saw. For example, Danson suggests finding texture or using fog to create this effect in your work.
photography composition tips

5. Tell a Story

Try using color to convey a feeling throughout your landscape. Danson’s example shows cool colors in the snowy foreground, but then warm, orange sunlight creeping in on the mountain peaks in the background.

6. Use Negative Space

Negative space can be used to your advantage to push more attention to interesting details in your composition. For example, negative space around a mountain peak shows the grandeur of the size and height.

7. Remove Distractions

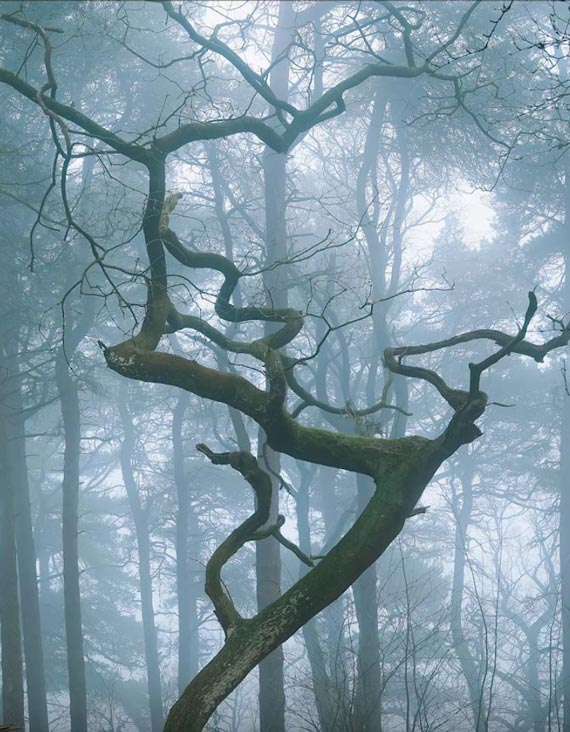
Unnecessary details or elements in your composition can create distractions from the point of interest or overall movement. In Danson’s example, there is a striking tree in the foreground overwhelmed by the vertical lines of the trees directly behind it. When fog is added, the background trees change exposure and lose detail, essentially pushing the foreground tree further into view. You can also try cropping your image to see if there are distractions to remove from the sides or corners.
landscape composition

There you have it—seven tips for improving your landscape compositions. Like always, practice makes perfect, so the best thing for you to do is get out there and put these tricks to use!


Go to full article: 7 Ways to Improve Your Landscape Compositions

What are your thoughts on this article? Join the discussion on Facebook

PictureCorrect subscribers can also learn more today with our #1 bestseller: The Photography Tutorial eBook

The post 7 Ways to Improve Your Landscape Compositions appeared first on PictureCorrect.


from PictureCorrect https://ift.tt/2HsZGIE
via IFTTT

tiistai 24. huhtikuuta 2018

PictureCorrect.com: Topaz Photo Editing Software Spring Sale 2018

Topaz Labs, maker of leading professional photo editing tools, just announced their Spring 2018 sale! Today they are offering 40% off of the full Topaz Photography Collection (that’s an additional $200 discount). Bring your photos to life. Topaz plugs into your image editing software and gives you photo editing superpowers. Deal found here: Topaz Photography Software 2018 Spring Sale

topaz plugins

Topaz Photography Software

You can also try a free trial. Software made by photographers for photographers.

Photo Editing Products for Various Specialties:

Adjust – Magical contrast, detail, and color adjustments.

B&W Effects -Develop stunning black and white photography.

Clarity – Flawless image definition through intelligent contrast.

topaz clarity

Topaz Clarity Example (Click to See More)

Clean – Creative smoothing effects with edge and texture control.

DeJPEG – Increase the image quality of your JPEG photos.

DeNoise – Excels at removing noise while preserving image detail.

Detail – Creative detail enhancement with no halos or artifacts.

topaz detail screenshot

Topaz Detail Example (Click to See More)

Glow – Create vibrant and beautiful images with energetic sparks of neon light.

Impression – Turn your photos into art with real brushstrokes.

InFocus – Sharpen your image by removing shake and motion blur.

Lens Effects – Creative effects derived from real-world lens and filters.

ReMask – The quickest and easiest way to mask your photo.

ReStyle – Over 1000 unique photographic effects.

topaz restyle after

Topaz ReStyle Example (Click to Learn More)

Simplify – Create art by selectively removing image details.

Star Effects – Add realistic star and lighting effects to your photos.

Texture Effects – Quickly achieve a variety of textured, toned, and lighting effects.

photoFXlab – Standalone image editor specializing in image effects.

What is the Collection?

With the recent addition of Topaz Texture Effects 2, Impression 2, and Glow 2, the Complete Collection includes all 17 products, which individually would cost over $1000. They normally offer the Complete Collection at 50% off. However, today you can take an additional 40% off for the collection and collection upgrades.

What is a Collection upgrade?

If you’ve already purchased an individual product (or several products) from Topaz in the past, our system already discounts the collection upgrade price. As long as you’re signed into your account, you can get an additional 40% off your custom collection upgrade pricing through the end of the Spring sale. Whether you’re just starting or looking to expand your collection, there is never a better time.

How to Get the Spring Sale Discount:

Topaz plugs into your image editing software and gives you photo editing superpowers. The collection now includes 17 amazing products. The products also include a satisfaction guarantee, if you are not completely satisfied with their products for any reason simply let them know for a full refund.

Deal found here: Topaz Photography Software 2018 Spring Sale


Go to full article: Topaz Photo Editing Software Spring Sale 2018

What are your thoughts on this article? Join the discussion on Facebook

PictureCorrect subscribers can also learn more today with our #1 bestseller: The Photography Tutorial eBook

The post Topaz Photo Editing Software Spring Sale 2018 appeared first on PictureCorrect.


from PictureCorrect https://ift.tt/2JjzAEv
via IFTTT

PictureCorrect.com: 5 Mistakes Beginner Photographers Make and How to Avoid Them

Photography is one of the most creatively rewarding hobbies you can pick up, but when you’re first starting out it can be all too easy to become overwhelmed. Endless possibilities mean endless possible mistakes. However, in reading this, we hope you’ll know how to avoid the five most common mistakes that beginner photographers make when starting out.

how to avoid beginning photography mistakes

1. Overexposing Highlights

One of the most common issues facing a new photographer is the ‘clipping’ of highlights. This means that your highlights are so overexposed that the camera sensor can’t record any information in that part of the image. Once your highlights are blown, no amount of post-processing can bring them back; the data is just not there.

Let’s say you have a high contrast situation; maybe it’s a sunny day… What can you do? This is where we ‘expose for the highlights.’ Simply put, this means that when taking a photograph, you make sure the exposure is correct for the highlights in the image. This will naturally mean that the rest of the image will be a lot darker than you want it, so isn’t this just as bad as clipping the highlights? Well actually, no!

Camera sensors tend to be able to record much more information in the shadows than they can in the highlights. So when you take the image into your post-processing software, you can simply adjust the exposure and bring back all the detail in the shadows. That is if you are shooting in RAW, which brings us to our next point…

2. Shooting in JPEG

Now, contrary to popular belief amongst the photography community, sometimes it actually is OK to shoot in JPEG as opposed to RAW. The files sizes are smaller, cameras usually allow for a faster burst mode in JPEG, the whole process is quicker, and sometimes all you need is to take a few quick snapshots and be done.

So why not just shoot in JPEG? Well because some photographers don’t like the automatic processing done by the camera and prefer to take the RAW file into their post-processing software of choice and finish the image themselves. If you’re looking to process the images yourself, though, it’s always advisable to shoot in RAW as the files are much more malleable.

What is RAW? Well, when your camera is shooting in JPEG, between you taking the image and seeing it on the screen the camera does the processing and voila! Your photo is ‘finished’. Shooting in RAW, on the other hand, gives you many more tools for a much wider range of creativity and often this is key in developing your own signature style.

3. The ‘I’ll Fix it Later’ Mentality

But be warned, shooting in RAW comes with its own set of pitfalls! Maybe you’ve begun using photo editing software and have started to feel comfortable. There’s a risk that you can become lazy when shooting in RAW. What’s the point in getting the exposure right when you can adjust exposure by up to five stops either way in post processing? Why get the white balance correct in-camera when you can just fix it later?

With such incredible tools as Photoshop available, it’s become all too familiar to hear, “You can fix that in Photoshop, right?” Sure, you probably can fix the problem in Photoshop later, but should you? Once you start taking shortcuts with one area of your photography, other areas are sure to suffer, too.

I admit that when I first discovered the power of Photoshop, I had this very same mentality. But I realized that because I was becoming less methodical in my approach, my composition had started to suffer. Because the other factors were on autopilot in my brain, I began giving less and less thought to the remaining aspects of photography. Always remember that post-processing is intended to finish and enhance your images. Don’t rely on it to rescue a bad picture!

4. Overshooting

When people talk about perfecting anything in life, they say that you should do it as much as possible; practice makes perfect. It’s also often said that your first 10,000 photos are going to be terrible. While I agree that you should be shooting every day, I also think that you can improve your photography by shooting less! Back in the analogue days, you were locked into either 12, 24, or 36 exposures per roll of film. And film was expensive! This meant that you really had to think each time you pressed the shutter.

Now, digital photography is a much cheaper process and you can take many more shots even with even the smallest of memory cards. However, with this comes the problem of overshooting. When you can take as many photos as you like, how much are you really thinking about each shot? It turns into a ‘spray and pray’ situation!

One creative exercise I recommend is to go out for the day and challenge yourself to take no more than 12 photos. With this limitation, you might just find that you end up putting much more thought into what you are capturing and develop your skills much quicker.

5. Heavy-Handed Editing

When you first start editing your photos the array of options on offer can be dizzying! Exposure, contrast, shadows, highlights, blacks, vibrance, saturation, vignettes—the list goes on and on. It’s so easy to move the sliders and lose track of where you started out, often ending up with a hot mess! Across all areas of editing, moderation is key, and you should never really notice the post-processing on an image, so it’s essential to just make small adjustments at first. It may even help to have the original image side by side with your edit so that you can see how far you’ve come. If your image starts to look very different from the scene you saw when capturing the image that’s a sure sign that you may have gone too far.

So there you have it. The five top tips I wish somebody had told me when I was starting out! I hope this list will help you to further your talent in the photography world. Let us know in the comments of any mistakes you wish somebody had warned you about and how you overcame them.

About the Author
Bradley Allen is a freelance photographer and writer for Fat Lama.


Go to full article: 5 Mistakes Beginner Photographers Make and How to Avoid Them

What are your thoughts on this article? Join the discussion on Facebook

PictureCorrect subscribers can also learn more today with our #1 bestseller: The Photography Tutorial eBook

The post 5 Mistakes Beginner Photographers Make and How to Avoid Them appeared first on PictureCorrect.


from PictureCorrect https://ift.tt/2HObi8C
via IFTTT

PictureCorrect.com: 5 Creative Photography Hacks in Under 60 Seconds

We’ve shared a healthy dose of tips aimed at stuck at home photographers struggling for ideas. Some of these tips are simple to implement, while others require a bit more effort to pull off. Here are a few more tips from Dan and Sally. Thankfully, these are on the easier side:

1. Smoke Emitter

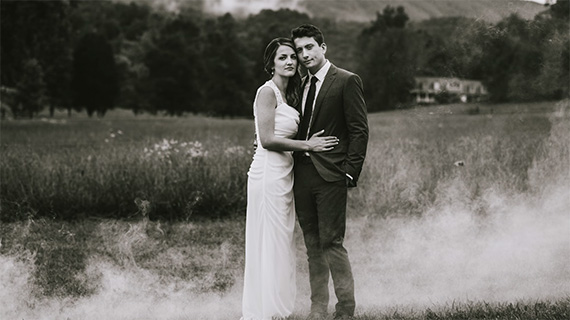
Adding smoke to a scene gives your images an instant pop of interest.

5 cool photography hacks

2. Crystal Ball

A crystal ball is an inexpensive tool and yet it can produce some pretty stunning images with a flipped effect.

5 easy photography tricks

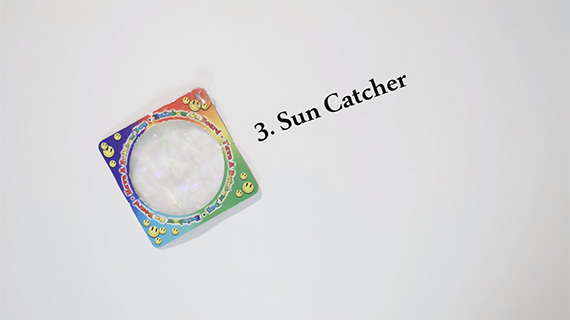
3. Sun Catcher

5 cool photography hacks

A sun catcher breaks up light rays much like a prism.

5 cool photography hacks

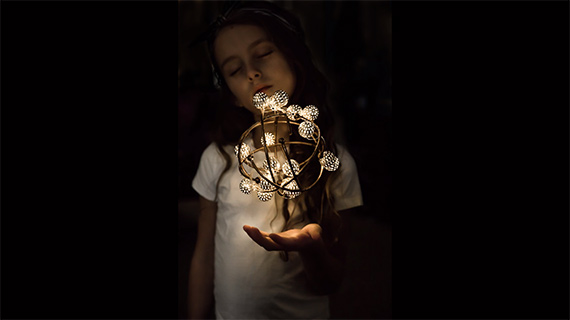
4. LED Lights

LED lights used as a main light source are pretty v

5 cool photography hacks

5. Triangular Prism

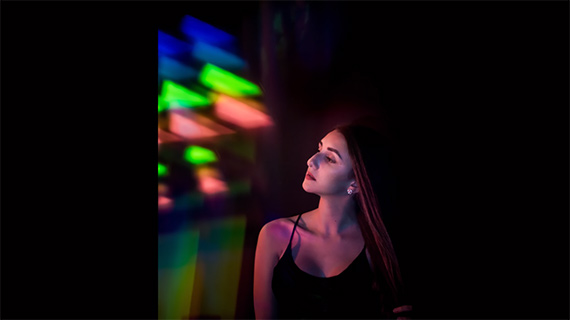
Hold a triangular prism in front of your lens to add a rainbow to your image.

5 cool photography hacks

Which one did you like the best? Do you have a cool trick of your own? Do share with us.

For further techniques: The Photography Tricks Chapters


Go to full article: 5 Creative Photography Hacks in Under 60 Seconds

What are your thoughts on this article? Join the discussion on Facebook

PictureCorrect subscribers can also learn more today with our #1 bestseller: The Photography Tutorial eBook

The post 5 Creative Photography Hacks in Under 60 Seconds appeared first on PictureCorrect.


from PictureCorrect https://ift.tt/2qXisN7
via IFTTT

maanantai 23. huhtikuuta 2018

PictureCorrect.com: Photoshop Tutorial for How to Color Correct Quickly

Color correction is an important aspect of post-processing. This process renders the right color tones and tint for your photos, making them appear the way your naked eye saw the scene in the first place. In this video, Unmesh Dinda from PiXimperfect explains some easy steps to color correct your photos in Photoshop:

Image with a Well-Defined Grey Area

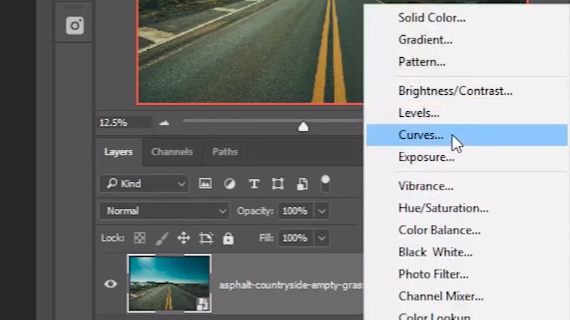
First, create a Curves Adjustment layer in Photoshop. Click on the Circle Adjustment layer icon, and then select Curves from the ensuing pop-up window.

one click color correction

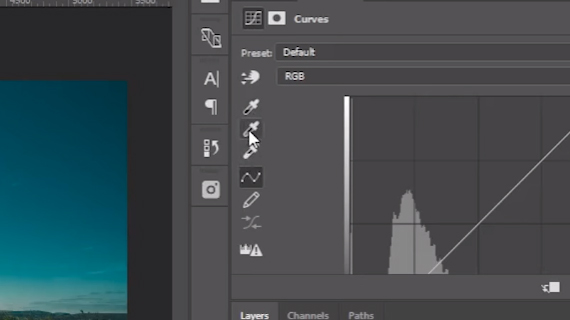
Choose the middle eye-dropper tool.

eye dropper tool

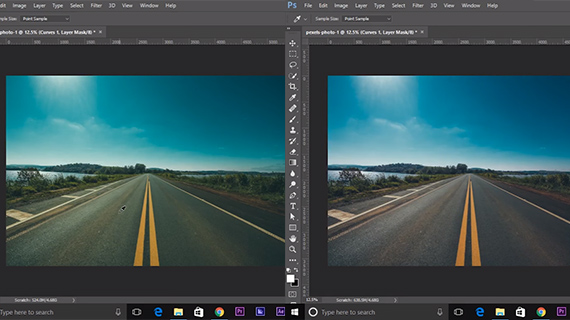
Now click on anything on the photo that should have been grey in the final image. In this image, the road has ample amount of grey. Click on anywhere on the road. Voila! The image will now be color corrected.

color correcting your images in photoshop

Now you can move to make subtle adjustments to the white and black levels of the image or other adjustments as you deem fit.

Image without a Grey Area

It’s all too well when your image has a well-defined grey area and you click on that with the eye-dropper tool to color correct it. Things in real life, unfortunately, are not that simple. You may have an image with no grey area. Or an image which is so complex that you can’t find a grey area to use. What do you do in such situations?

The solution is to look for an area which is closest to grey.

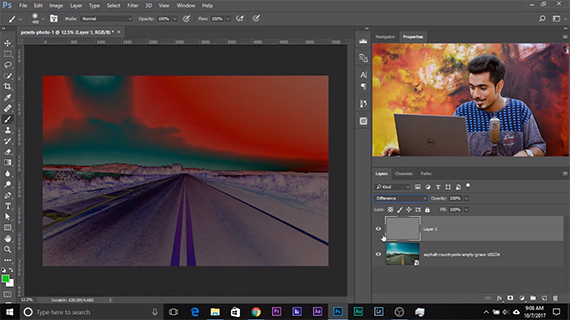
First, create a solid color adjustment layer. Click the layer icon, and then click on Solid Color (the first option in the pop-up window).

Now fill the layer with 50 percent grey.

The easiest way to find 50 percent grey is to type 808080 in the # box. Alternatively you can type 128 for R, G, B boxes. Alternatively, you can choose Control + Shift + N (Command + Shift + N) to bring up the New Layer dialogue box and then from there on you can choose Overlay as the mode and choose 50 percent grey color. Then change the blend mode to normal.

Once you have the 50 percent grey adjustment layer, change the Blend mode to Difference.

how to color correct

Once you do that, the areas which become dark will be closer to grey. Or in other words, precisely 50 percent grey. This is because when you subtract two colors using the Difference blending option the result becomes black and highlights the areas where the color is present. In this case the color is 50 percent grey.

Make a new layer and mark this area out using the Brush tool.

The final step is to delete the Solid Color Adjustment layer as you don’t need that anymore.

Now, create a Curves Adjustment Layer, select the middle eyedropper tool and try clicking on the area that you’ve marked away.

Have you used these methods for color correction? Did they work as expected?


Go to full article: Photoshop Tutorial for How to Color Correct Quickly

What are your thoughts on this article? Join the discussion on Facebook

PictureCorrect subscribers can also learn more today with our #1 bestseller: The Photography Tutorial eBook

The post Photoshop Tutorial for How to Color Correct Quickly appeared first on PictureCorrect.


from PictureCorrect https://ift.tt/2HnOYTV
via IFTTT

sunnuntai 22. huhtikuuta 2018

PictureCorrect.com: 4 Basic Steps to Take a Star Photograph

Knowing how to take a good picture of the stars is not as complicated as it may seem. Now, there are things that would obviously make it easier to take the pictures, for instance having a telephoto or zoom lens would be very beneficial. But in the following steps you will learn the basics for photographing the night sky.

photographing stars tips

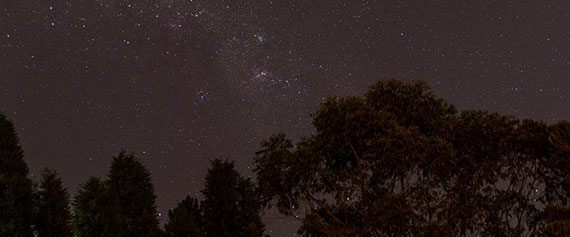
Photo by Ulrich Peters; ISO 800, f/1.8, 15-second exposure.

There are 4 steps that you should take for star photography:

  1. Mount your camera and set your ISO.
  2. Turn off Auto Focus.
  3. Set your shutter speed.
  4. Position yourself and your camera.

Mount Your Camera and Set Your Speed

It is absolutely necessary to use a tripod for nighttime photography because of the long exposure times that are required. Tripods give you the stability required for a clear and crisp picture. You will want to set your camera’s ISO between 200 and 800. This again allows for the cleanest and most crisp photograph you can get. It is also on this step that if you have a telescope or telephoto lens you should connect it.

Turn Off Auto Focus

The reason you turn off auto focus is that your camera may find it difficult to focus on anything in the night sky. So, instead of confusing your equipment, it’s better to just focus in on the sky yourself. I know this may seem odd but if you want to know how to take a good picture of the stars, then trust me—this will work.

Set Your Shutter Speed

You want to set your shutter speed to keep the lens open for as long as possible. The reason we do this is to allow as much light in as possible. Cameras differ on the length of time they allow. The times ranges anywhere between 2 and 40 seconds.

Position Yourself and Your Camera

The last step in learning how to take a good picture of the stars is to position yourself in a prime location for a beautiful shot. You want to find a place clear of light pollution and also an area that gives you a clear view of the entire sky. Then find your beauty shot and aim the camera. It’s a good idea to use a timer for the shot or a cable release to avoid vibration with the shot. It’s also a great idea to take more than one shot. Take multiple pictures to guarantee a great photo.

tips how to photograph stars

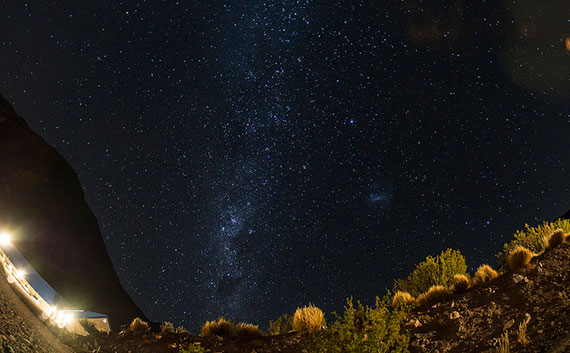
Photo by Rafael Edwards; ISO 200, f/11.0, 60-second exposure.

When learning how to take a good picture of the stars, it’s important follow at least these above steps. However, the best advice I could give would be to take a course on the fundamentals of photography. These types of courses cover everything from exposure, aperture, and even composition and color.

About the Author:
Article written by Damian Ray, abstractdigitalphotography dot com.


Go to full article: 4 Basic Steps to Take a Star Photograph

What are your thoughts on this article? Join the discussion on Facebook

PictureCorrect subscribers can also learn more today with our #1 bestseller: The Photography Tutorial eBook

The post 4 Basic Steps to Take a Star Photograph appeared first on PictureCorrect.


from PictureCorrect https://ift.tt/2HKFhyl
via IFTTT

PictureCorrect.com: Interesting Photo of the Day: Milky Way Island

The Pacific Northwest is renowned globally for its incredible beauty and striking landscapes. Photographer Kevin Shearer has trekked out to some of the most remote coasts of the region in order to fully grasp all that the nature has to offer. Based on the results Shearer managed to capture in just a few exposures, it’s easy to come to the conclusion that the hike was well worth the effort:

Oregon Milky Way Nightscape

Samuel H. Boardman State Park, OR (Via Imgur. Click image to see full size.)

More reminiscent of a colorful fantasy than anything we’re able to see with the naked eye, this image was made with a simple Nikon D810 equipped with a 12-24mm lens. Using a long exposure paired with corrective software, Shearer captured the fine details of the night sky without any light pollution interference.

Regardless of whether this image underwent heavy digital manipulation or advanced HDR processing, one thing is for sure – today’s inspiring picture is all the motivation any person needs to get out of town and explore what sort of small treasures the planet has to offer.


Go to full article: Interesting Photo of the Day: Milky Way Island

What are your thoughts on this article? Join the discussion on Facebook

PictureCorrect subscribers can also learn more today with our #1 bestseller: The Photography Tutorial eBook

The post Interesting Photo of the Day: Milky Way Island appeared first on PictureCorrect.


from PictureCorrect https://ift.tt/2F5Dezb
via IFTTT