lauantai 3. kesäkuuta 2023

PictureCorrect.com: Flash Photography: Taking Photos With vs. Without Flash

Without flash: When taking photos without flash, you’re relying on the image sensor being sensitive enough to capture as much information about the scene as possible, based upon the available light—whether that’s ambient light from the sun, whether the sun is shining directly or being diffused through cloud cover.

no flash portrait

Without flash, ISO 250, 1/125 sec, photo by Ansel Edwards

The larger the sensor, the more data can be recorded, and this helps, to a degree, when taking photos in low light conditions, particularly indoors. However, with the more sophisticated, modern DSLR cameras, there are a few settings adjustments you can make to help improve both the amount and the quality of light that go into making a nice looking photo.

Adjusting the ISO Setting = Adjusting the Sensor’s Light Sensitivity

One of the things you can do to improve the light recording capability of your DSLR is to adjust the light sensitivity of the sensor. This is done by adjusting what is known as the ISO (pronounced “EYE-so”) setting. This is a numerical value and the higher the ISO number, the better your camera’s sensor will deal with low light conditions—to a point! You see, there is a trade-off for this wizardry; the higher you push the ISO setting, the grainier your photos will turn out. This graininess is referred to as “noise” and it lowers the overall quality of the image.

high iso noise

ISO 3200, photo by suman roy choudhury

A general principle is to keep the ISO setting as low as possible for the best possible quality in your images. Get to know your camera’s lowest “native” ISO setting. What I mean by this is that on some of the more sophisticated DSLRs, you get the option to select Extended ISO from the camera’s menu and this allows you to digitally take it below the manufacturer’s natural or “native” ISO setting, which is where the camera’s sensor performs at its best. For instance, on the Panasonic GH4, you can turn on the Extended ISO feature and this will allow you to take the ISO down to either 100 or 80. Turn off the Extended ISO and the lowest you can get to is ISO 200—this is the Panasonic GH4’s lowest native ISO setting.

Adjusting the Aperture Lets More Light in Through the Lens

Another thing you can try to adjust is the aperture of the lens. This works like the iris of a human eye: the wider it opens, the more light can enter, so the scene looks lighter and brighter; with a narrower aperture, less light can enter the lens, so the image will be darker.

If your images are looking too dark when you review them on the LCD screen of your camera, you can try and open up the aperture. This will require dialing down to a lower f-stop number. For instance, f/2.8 is a wider aperture than, say, f/8. If, on the other hand, your images are too bright and detail is being lost because of the brightness, you can try to dial a higher f-stop number, to close the aperture down and make the image darker.

shallow depth of field

photo by Joel Olives

However, notice that in both instances I said “you can try”? This is because adjusting the aperture impacts on the overall image by adjusting how much of the scene is in clear focus and how much will be blurred. Basically, lowering the f-stop number (widening the aperture of the lens), increases how much of the background will be blurred (focus on a subject in the foreground and stuff in the background will become defocused/blurred), and you might not want this; you might want everything in the image in clear, sharp focus. The way to do this is to increase the f-stop number (narrowing the aperture of the lens). But, in doing so, you’re going to reduce the amount of light that can come through the lens, so you’ll once more encounter darker images.

Adjusting the aperture, to employ what’s called “selective focus”—where you deliberately blur out background subjects in order to make foreground subjects stand out more clearly, helping direct the eyes of those looking at your photos to precisely your chosen subject—is a key part of helping your photos tell a story, so you may not want to adjust your aperture in order to brighten up your image. It depends. If your image doesn’t suffer from the wider aperture, then do so to help aid the image sensor in grabbing as much of the available light as possible.

Adjusting the Shutter Speed Allows More or Less Light to Be Recorded by the Sensor

If you’ve decided you’ve got the right aperture for your photo and don’t want to alter it any further, then adjusting the shutter speed is another way to increase or reduce the amount of light that can be recorded onto your digital image.

Basically, when you select a faster shutter speed, you’re reducing the time that the shutter stays open and, as a result, less light can reach the sensor, so this will make images darker. Conversely, when you select a slower shutter speed, you’re keeping that shutter window open for longer, exposing the image sensor to more and more light. For all the time the shutter is open, the sensor will record every scrap of light it detects. Keep it open for long enough and you will end up with an overexposed image, to the point where you just have a totally white photo, which has lost all of its detail because you allowed the shutter to stay open too long—light rays get recorded on top of light rays, and you end up with a washed-out image. So, you play about with the shutter speed, increasing and decreasing it until you have the shutter staying open just long enough to capture the perfect amount of light detail, resulting in a nicely exposed photograph.

However, there may be times when you don’t want to adjust your Shutter Speed any further. For instance, you may deliberately want a slower Shutter Speed, because you’re trying to capture movement of, say, a car as it passes with its lights on, and you want to add a sense of motion to your still image, by capturing the light trails as the vehicle whizzes by.

Taking Photos With Flash

What do you do when you’ve adjusted your ISO and don’t want to risk introducing any noise into your images; and when you’ve adjusted your aperture to get the right amount of depth of field; and when you’ve adjusted your shutter speed as fast or slow as you want it and you’re still not getting enough light onto your sensor to expose your photo(s) properly? Well, that’s when you need to add some flash into the mix, preferably from an external flash (as you can control direction, as well as the power of the light, to get that perfect balance of light hitting your subject when you take the shot).

camera flash

photo by Tom Pumford

The pop-up flash on your camera is better when you’re able to turn down the power, so you’re just “kissing” subtle light onto your subject to fill in what would otherwise be lost to shadows. But because it’s facing your subject directly, it tends not to give the most flattering look, especially when taking photos of people. If you can get hold of an external flash unit, you will improve the look by taking the flash off to the side (at an approximate 45-degree angle from your subject).

Depending on the external flash unit you get, you will be able to change certain settings on the flash, to add sufficient light when you don’t want to make any further changes to your camera settings.

Settings that top of the range flash units allow you to adjust, include:

  • Flash Power. This will be a feature of virtually all external flash units, allowing you to keep the ISO on your camera low, by increasing the power of the flash output.
  • Flash Zoom. If this is an option on your flash, you’ll be able to select a wide angle setting, to spread the light wider in the foreground; or you can zoom the flash to get it to spread deeper into the scene (but at the expense of how wide the light will spread – the further out you zoom the flash, the narrower the beam).

And Don’t Forget to Experiment With Bounce

When I first got my external flash for my Panasonic FZ1000, I was a bit disappointed with the results. No matter how much I changed the flash power and zoom settings—higher or lower—it made no difference; the photos just didn’t look very good. And then, just pratting about out of sheer frustration, I turned the flash head so it was pointing up toward the ceiling, and with that one change, I got instant improvement with my photos. As the light from the flash hits the ceiling, especially if it’s a light colored ceiling, it spreads out and is then redirected back down. As it comes back down, it spreads out. The force of the direct flash is softened and this helps to give a much nicer spread of light down onto your subject. Direct flash (when the flash is pointed “directly” at your subject) tends to be a bit too hard, but when you bounce the light off a surface (it can be a side wall; it doesn’t just have to be the ceiling, so experiment!), the softer light just has a nicer look to it against your subject.
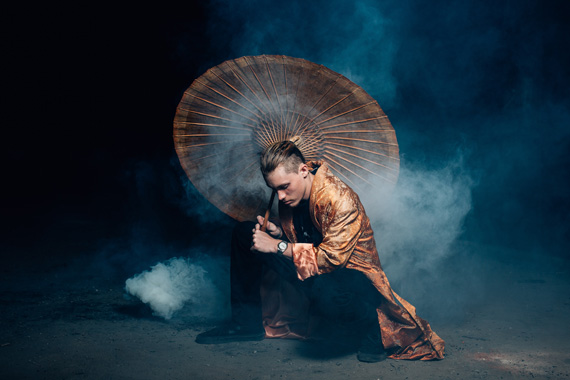
photo by Kyle Cleveland

One thing you’ll need—particularly with the ceiling bounce—is to find a way to project some of the light forward. If  it all goes straight up to the ceiling, this is when you’ll likely get unpleasant shadows, particularly under people’s eyes, nose, chin (basically, anything that protrudes that will block the fall of the light as it comes down off the ceiling). The flash unit I bought came with a white strip of plastic that you pull out and this helps to project some of the light forward. It’s okay, but I found the white diffuser cap, which also came with my Panasonic flash and fits over the flash head, helps to soften the light coming out of the flash, as well as projecting slightly more light forward, even when doing a ceiling bounce. Other products that seek to enhance this forward spread of light, are Gary Fong’s Half Cloud, and Rogue’s Flash Bender, both of which increase the area the direct flash light hits as it leaves the flash head, thus throwing even more light toward your subject than a basic diffuser cap, helping to fill in more of the shadows. So far, I’m happy with the results I’ve been getting with a simple diffuser, but I am considering experimenting with those other two flash attachments, and that’s possibly something you’ll want to consider, too.

About the Author:
Graham Wadden created and maintains the Creative Commons photography website, WaddenCCPhotography, specializing in creating stock photography primarily for home educators and those in education.

- - - - - - - - - - - - - - - - - - - - - - - - - - - - - - - - - - - - - - - - - - - - - - - - - - - - - - - - - - - - - - - - - - - - - - - - - -

Did you appreciate this newsletter? Please help us keep it going by Joining Our Patreon Supporters

What are your thoughts on this article? Join the discussion on our Facebook Page

PictureCorrect subscribers can also learn more today with our #1 bestseller: The Photography Tutorial eBook

- - - - - - - - - - - - - - - - - - - - - - - - - - - - - - - - - - - - - - - - - - - - - - - - - - - - - - - - - - - - - - - - - - - - - - - - - -

The post Flash Photography: Taking Photos With vs. Without Flash appeared first on PictureCorrect.


from PictureCorrect https://ift.tt/R9aeDzq
via IFTTT
perjantai 2. kesäkuuta 2023

PictureCorrect.com: How to Use Auto Exposure Lock on a DSLR Camera

The auto exposure lock (AE-L) function on a digital camera lets you physically lock the exposure reading from anywhere in the scene. You can use it on its own or at the point where you focus the image.

Just about all DSLR or Mirrorless cameras have an auto exposure lock button. When you press the AE-L button, the current exposure settings are fixed (locked) so that they can’t change as you recompose the shot—even if the level of light alters as you aim the camera elsewhere.

exposure lock

Photo captured by Aziz Acharki; ISO 100, f/4.5, 1/800s.

When the shutter is pressed halfway down, the autofocus mechanism is engaged. As it does so, the camera takes a meter reading and sets the exposure. But what if you want to focus and meter from different parts of the scene?

This is where the auto exposure lock function comes in handy. It lets you take an exposure reading independently of where you want to focus.

The AE-L function is best used with spot or partial metering in order to fix the meter reading from a small area in the scene. This is very useful in lighting conditions that may fool the metering system.

For example, if you shoot a scene that has a bright source in part of the image, an evaluative, matrix, or multizone meter can easily force underexposure. To get the right exposure, you need to take a reading away from the bright region.

This can be easily be done by taking a spot or partial meter reading from a mid-tone area of the scene and then locking that reading by pressing the AE-L button and keeping it pressed until you’ve recomposed and taken the shot. On some cameras you don’t need to keep the AE-L button depressed, on others you do.

The AE-L button can be used if the subject or subjects are positioned off-center in the scene. It is also useful when you’re shooting a sequence of images that you want to be stitched together in order to produce a panoramic photograph. The AE-L function makes sure that every shot taken in the sequence has exactly the same exposure settings.

About the Author:
Chris Smith is a writer for an online photography magazine Photography-Expert.

- - - - - - - - - - - - - - - - - - - - - - - - - - - - - - - - - - - - - - - - - - - - - - - - - - - - - - - - - - - - - - - - - - - - - - - - - -

Did you appreciate this newsletter? Please help us keep it going by Joining Our Patreon Supporters

What are your thoughts on this article? Join the discussion on our Facebook Page

PictureCorrect subscribers can also learn more today with our #1 bestseller: The Photography Tutorial eBook

- - - - - - - - - - - - - - - - - - - - - - - - - - - - - - - - - - - - - - - - - - - - - - - - - - - - - - - - - - - - - - - - - - - - - - - - - -

The post How to Use Auto Exposure Lock on a DSLR Camera appeared first on PictureCorrect.


from PictureCorrect https://ift.tt/8LZplIA
via IFTTT

PictureCorrect.com: Interesting Photo of the Day: Taxi Panning in Hong Kong

Panning is a technique wherein the photographer tracks a moving subject while using a slower shutter speed. The concept of moving the camera while using slower shutter speed may sound surprising to beginners, and that’s exactly what makes this technique a challenge. The following image of a taxi in Hong Kong by photographer Nathan Ackley is an excellent example of a well-executed panning shot:

panning shot of a taxi in hong kong

“Panning Shot of a Taxi in Hong Kong” by Nathan Ackley (Via Reddit. Click image to see full size.)

One surprising thing about the photo is how the photographer managed to take it when the road was so clear. While the photographer believes that it was luck, I believe it was his persistence that paid off. He waited around one and a half hours to take this shot.

The photographer took this image handheld at a 16mm focal length and later did a tight crop. There is a little Photoshop involved, too. He smoothed out the lines of the lights and straightened them in post. He also exaggerated the blur to fill the frame.

- - - - - - - - - - - - - - - - - - - - - - - - - - - - - - - - - - - - - - - - - - - - - - - - - - - - - - - - - - - - - - - - - - - - - - - - - -

Did you appreciate this newsletter? Please help us keep it going by Joining Our Patreon Supporters

What are your thoughts on this article? Join the discussion on our Facebook Page

PictureCorrect subscribers can also learn more today with our #1 bestseller: The Photography Tutorial eBook

- - - - - - - - - - - - - - - - - - - - - - - - - - - - - - - - - - - - - - - - - - - - - - - - - - - - - - - - - - - - - - - - - - - - - - - - - -

The post Interesting Photo of the Day: Taxi Panning in Hong Kong appeared first on PictureCorrect.


from PictureCorrect https://ift.tt/1BepDYi
via IFTTT

PictureCorrect.com: How to Turn Any Background Black

Black backgrounds work great when you want to create high contrast and moody images. They work great for almost any type of portrait photography. And the good thing is that you can create a black background with almost any type of background that you have. You just need to be careful with where and how you place your lights. In this video, photographer Mark Wallace from Adorama talks about how you can create a black background from a white wall. You can apply the same principle to any wall with any color and get the exact result:

If you take a regular approach and place the lighting in front of the model, some lighting will naturally fall on the background. This will result in the background being visible and not appearing black. So, how do you go about making the background disappear?

“The answer is simple; we just need to not illuminate it.”

To go about it, first start by turning your flash off and then adjust your camera settings in a way that you get a black frame. This ensures that all the ambient lighting is cut out, and that the final image will only be affected by the light that you add in. Next, position the model and the lighting in a way that no light strikes the wall while the model is still illuminated. Using a grid on the softbox is a good way to prevent any light spill.

This is quite a convenient and an economical way to create a black background for your image. Give it a try, and you’ll realize how easy this is.

- - - - - - - - - - - - - - - - - - - - - - - - - - - - - - - - - - - - - - - - - - - - - - - - - - - - - - - - - - - - - - - - - - - - - - - - - -

Did you appreciate this newsletter? Please help us keep it going by Joining Our Patreon Supporters

What are your thoughts on this article? Join the discussion on our Facebook Page

PictureCorrect subscribers can also learn more today with our #1 bestseller: The Photography Tutorial eBook

- - - - - - - - - - - - - - - - - - - - - - - - - - - - - - - - - - - - - - - - - - - - - - - - - - - - - - - - - - - - - - - - - - - - - - - - - -

The post How to Turn Any Background Black appeared first on PictureCorrect.


from PictureCorrect https://ift.tt/nvFAmLM
via IFTTT

PictureCorrect.com: Updated: Luminar Neo Photo Editor Version 1.10

In photo editing news, there’s a new Luminar Neo 1.10 Update out now with Upscale AI and other Extension improvements, new cameras support, and more. They also have a Summer sale going on which is ending soon.

luminar neo summer

Luminar Neo Update and Summer Sale

In Extensions, you’ll get significant quality improvements with Upscale AI. You will now be able to collapse individual Extensions panels in the Catalog view—such as HDR Merge, Focus Stacking, and Upscale AI—providing a more customized and cleaner user experience. There are also several interface changes for Noiseless AI, Supersharp AI and Magic Light AI.

They’ve also added support for the new cameras Sony ZV-E1 and Sony FX30. On top of that, you can learn more about every tool by clicking on the “i button” located beside each one. You’ll also receive explanations about all the five tabs inside Luminar Neo (Catalog, Presets, Edit, Extensions, and Export) during the onboarding process.

Additionally, you can easily purchase new creative assets including Skies and Presets from the Luminar Marketplace directly in Luminar Neo’s Extras tab.

While editing you’ll notice performance and stability improvements in Face AI, Mask AI, and Sky AI.

Luminar Neo 1.10.0 is also faster and more stable, as they’ve caught and fixed a number of bugs. Update now and enjoy using the latest version of Luminar Neo!

MacOS Bug fixes:

  • Collapse the Background Removal AI tool before the end of processing without seeing the galaxy animation still in action.
  • Access the add custom skies button inside the custom skies category.
  • Use the Develop Raw tool and preview DCP on hover without Luminar Neo saving it as a step for Undo/Redo.
  • Reset Presets while preserving the Crop settings.
  • Reset a Preset on an image, then open another image, and immediately get Preset previews, without the previews getting stuck in generation mode.
  • Undo two separate duplicate edits of Clone, Erase, Portrait Bokeh AI or Dodge and Burn, without irrelevant edits appearing on your image.
  • Apply Portrait Bokeh AI, Undo and Redo the edit, then open the Develop Raw tool in the Edits tab, and still see the Undo/Redo functionality as available.

Windows Bug fixes:

  • Undo two separate duplicate edits of Clone, Erase, Portrait Bokeh AI or Dodge and Burn, then apply Redo, expand the Clone tool and see the results as expected.
  • Use the Undo/Redo feature as expected in masking mode in the Edits tab.
  • Undo an edit without the Edits tab opening unprompted.
  • Click on any tool with a previously opened “Share to” pop-up without disabling all the other tools.
  • Clicking the remove dust spots or remove powerlines buttons and move to another image without the process of removal continuing on the new image.

How to update Luminar Neo?

On macOS, select Luminar Neo in the top menu bar and choose Check for updates.

On Windows, select Luminar Neo in the top left-hand corner and choose Help > Check for updates.

Summer sale ending soon: Luminar Neo Photo Editor Version 1.10

- - - - - - - - - - - - - - - - - - - - - - - - - - - - - - - - - - - - - - - - - - - - - - - - - - - - - - - - - - - - - - - - - - - - - - - - - -

Did you appreciate this newsletter? Please help us keep it going by Joining Our Patreon Supporters

What are your thoughts on this article? Join the discussion on our Facebook Page

PictureCorrect subscribers can also learn more today with our #1 bestseller: The Photography Tutorial eBook

- - - - - - - - - - - - - - - - - - - - - - - - - - - - - - - - - - - - - - - - - - - - - - - - - - - - - - - - - - - - - - - - - - - - - - - - - -

The post Updated: Luminar Neo Photo Editor Version 1.10 appeared first on PictureCorrect.


from PictureCorrect https://ift.tt/Z8POvc6
via IFTTT

torstai 1. kesäkuuta 2023

PictureCorrect.com: How to Handle Bad Lighting in Landscape Photography

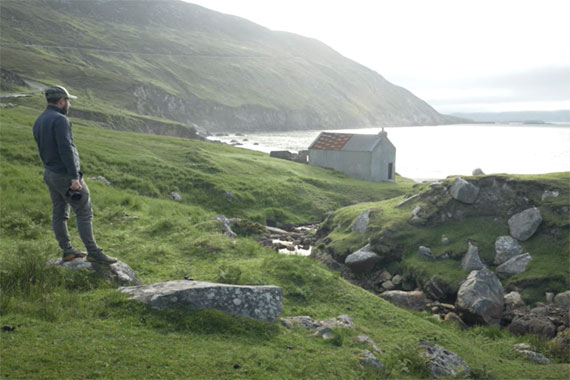
In a recent video, landscape photographer James Popsys took us on an enchanting journey to Keem Bay, a serene spot on the west coast of Ireland. Popsys’ work has always been about the harmony between natural and man-made elements, and his latest adventure provided a stage for this balance to play out in full:

Keem Bay has long been on Popsys’ list of places to photograph. Interestingly, this stunning location was also the backdrop for a hit movie – with a house that plays an integral role in the story (and which is digitally burned down!). Undeterred by the less-than-ideal light on his visit, Popsys had a clear plan – he would visit the spot multiple times to try to capture its full glory.

Popsys, along with his fellow photographer friend Rich, was visiting Ireland on an assignment for the tourism board. They had a week to explore the west coast of Ireland – a trip Popsys had been meaning to take in winter, hoping for the atmospheric mood, massive waves, and storms that the season brings.

The Tools of the Trade

Popsys brought along both his Leica and Sony a7r for this journey. Despite his recent enjoyment of shooting with the Leica, he found himself gravitating towards his Sony camera upon arrival. He reflected on this choice, suggesting that his years of experience with the Sony might have influenced his trust in it to help him achieve the shot he desired.

Discovering New Shots

Popsys wasn’t just after the obvious shots at Keem Bay. Believing that any good photographer should be able to create more than one composition in such a beautiful location, he searched for other perspectives. This included a shot that required a bit of Photoshop manipulation, including the cloning of a lifeguard and a tent. He suggests that using these techniques in a place like this is justified, adding a playful note that if it’s considered “cheating,” then he is fine with it.

bad light landscape

The Power of Patience

Popsys’ video not only explored the beauty of Keem Bay but also served as a lesson in patience for photographers. Despite his long-held desire to photograph the area, Popsys found himself facing conditions that didn’t align with his vision. However, rather than viewing this as a disappointment, he saw it as an opportunity for multiple visits and a deeper connection with the place.

He explains that if he achieves a portfolio-quality photo from a place right away, his interest in the location fades almost instantly. This realization has transformed his perception of what it means to connect with a location, teaching him the value of revisiting the same spot multiple times to develop a deeper understanding and relationship with it.

Popsys ended his journey with a philosophical reflection: the pursuit of the perfect photo isn’t meant to be easy, and the challenge is part of what makes photography so rewarding. He views his lack of the ‘perfect shot’ from Keem Bay as the beginning of a long-term relationship with this place, a chance to return and keep exploring the location through his lens.

- - - - - - - - - - - - - - - - - - - - - - - - - - - - - - - - - - - - - - - - - - - - - - - - - - - - - - - - - - - - - - - - - - - - - - - - - -

Did you appreciate this newsletter? Please help us keep it going by Joining Our Patreon Supporters

What are your thoughts on this article? Join the discussion on our Facebook Page

PictureCorrect subscribers can also learn more today with our #1 bestseller: The Photography Tutorial eBook

- - - - - - - - - - - - - - - - - - - - - - - - - - - - - - - - - - - - - - - - - - - - - - - - - - - - - - - - - - - - - - - - - - - - - - - - - -

The post How to Handle Bad Lighting in Landscape Photography appeared first on PictureCorrect.


from PictureCorrect https://ift.tt/zh3WedP
via IFTTT