sunnuntai 4. huhtikuuta 2021

PictureCorrect.com: Focal Points: The Smallest Important Elements in a Photo

This article is based on concepts from The Advanced Composition Guide if you want to dig deeper for further training.

One of the challenges that we face as photographers is the ability to create a meaningful composition path through our photographs. The effort needs to be recognizable to many different minds to reach a broad and accepting audience.
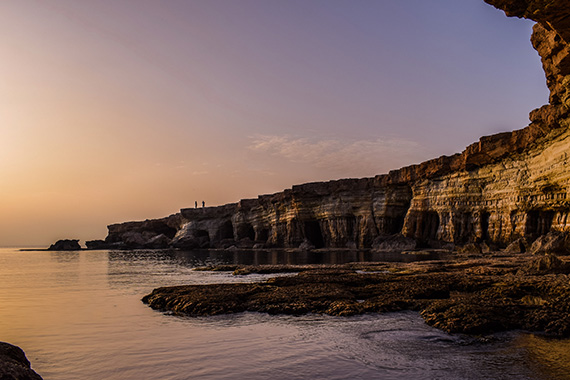
A focal point attracts attention via one or more of these attributes: shape, color, tonal contrast, color contrast, relationship between sizes, juxtaposition and, on occasion, the texture of an object.

Close your eyes, and then open them while viewing the beautiful sunset landscape photo above.

When you open your eyes, what is the first thing you see?

It’s the two people standing in the distance.

They are a focal point due to their shape, size relationship and tonal contrast.

Critical Thought: A well-placed human being, within a composition, will almost always create an energetic and practical focal point.

Are those two individuals the subject of the image? Good question! Perhaps not.

Remember This: A focal point can support the subject of a photo composition, and it can also be the subject of the composition.

In the landscape shot, the individuals are in support of the subject—which is the landscape.

focal point guide in photography

The sun setting behind the boat is a focal point that is supporting the subject, which is the schooner. (Photo by Kent DuFault)

The sun setting behind the boat above is a focal point that is supporting the subject, which is the schooner.

Try This!

Step outside your home. Take up a position where you can see your street, your neighbors or whatever else is around your home. Close your eyes. Count to 10. When you open your eyes, make a mental note of the first five things that you notice.

The above exercise is the basis of finding focal points.

Human vision doesn’t sit still. It scans continuously, then it stops at points of interest. This scanning is called a scanpath. The stopping points are fixations—our eyes dart between these fixations in movements known as saccades.

But enough anatomy.

Critical Point: The essential takeaway from this is that the human traits of scanning and fixations provide the photographer with a potent visual tool—the focal point. The focal point is a fixation.

I think it is relatively easy to grasp the concept of what is a focal point.

The learning curve comes with how to execute a focal point within a photographic composition properly. That becomes even trickier when you include multiple focal points!

Idea: A scene can contain more than one focal point. The trick is to ensure that the multiple focal points have varying levels of visual interest, or visual weight. Think of your focal points as signs along a path. The first sign says, “Go here.” You follow it. A second sign—the focal point—says, “Now go here.” The viewer of the photo follows the second sign along the path. Now imagine a third sign on the trail. It says, “You’re here!”

This example demonstrates three focal points, each acting as a signpost through the composition of the photo.

focal point guide in photography

Photo via Pixabay

This bridge photo is an excellent example of multiple focal points. We have the boat wake on the lower right. We have the two pylons under the bridge. Finally, we have the repeating triangular pattern of bridge construction.

What is the subject of the photograph discussed above? It’s the bridge. The bridge and the landscape surrounding it are the subject.

Do you see how the focal points are helping to guide viewers’ eyes through the picture?

Key Point: Effective focal points don’t have to be ostentatious. Put this picture of the bridge in front of you and close your eyes. When you open your eyes, they go immediately to the right side of the bridge. The bright yellow highlights on the bridge and the boat wake, as well as the shape and contrast of the two protective piers and bridge uprights, create focal points. This photograph is an example of multiple focal points in use.

What is the most common photographer-related mistake concerning focal points?
focal point guide in photography

Photo by Kat Jayne

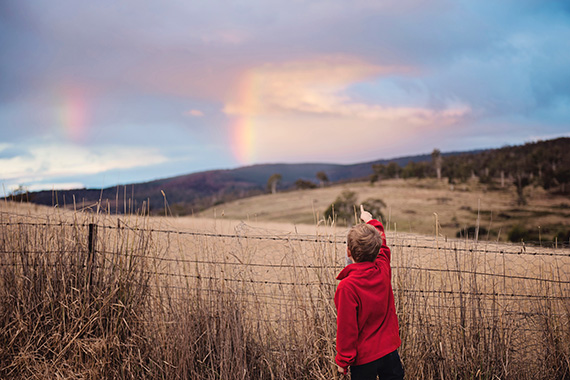
The boy and his finger create a focal point. However, this is an excellent example of a mistakenly placed focal point!

Critical Point: The most common problem with focal points is that they are misplaced and don’t serve the subject very well. That is the problem with the boy pointing. If a focal point does not support the subject, then it becomes a composition problem known as an eye snag. It snags the viewer’s eyes away from the subject.

The subject of this photo is the rainbow. It’s quite clear that the photographer set this up to show the boy as a focal point pushing the viewer’s eyes toward the rainbow. The raised hand and pointing finger also emphasize that function.

Except he isn’t pointing at the rainbow. He’s pointing to the right of it. As a viewer, you tend to think, “What is the boy pointing at?” You scan the landscape looking for something else of interest.

The focal point is misplaced. It isn’t correctly supporting (pointing toward) the subject.

Let’s talk about the second biggest composition mistake involving focal points.
focal point guide in photography

Photos by Kasper Rasmussen

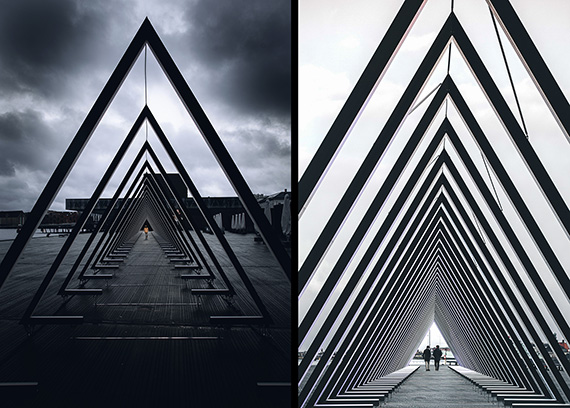
Here we have two different photos taken at the same location and utilizing the similar techniques of a focal point and repetition.

One of these example images is successful—the other one is less so.

For the photo on the left, poor choices have left the focal point (the man) almost invisible. The version on the right is much better and quite effective.

The difference? Visibility!

Remember: A focal point must stand out from the surrounding scene. It should be the first or second most prominent spot within the composition. Why do I say first or second? If the focal point is also the subject, it should be the most prominent. If the focal point is a supporting element for the subject, then it should be the second-most prominent.

The example image on the right is a classic focal point photograph. The walking couple creates a focal point due to their size, shape, contrast, and positioning within the composition. In this case, the focal point is also the subject. What is the triangular sculpture? It’s a frame. It is framing the subject!

A focal point operates within the confines of the space of the image frame. This fact of composition has to be taken into consideration when composing a photo.
focal point guide in photography

Original photo by Tembela Bohle

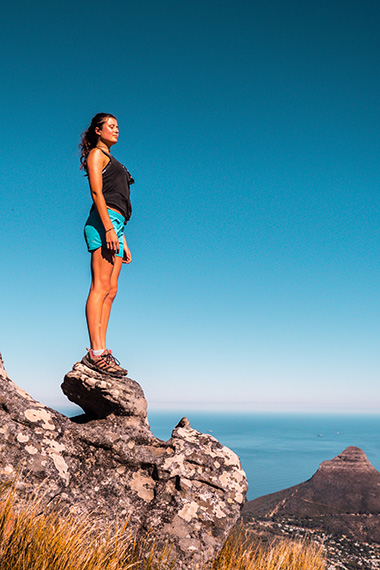
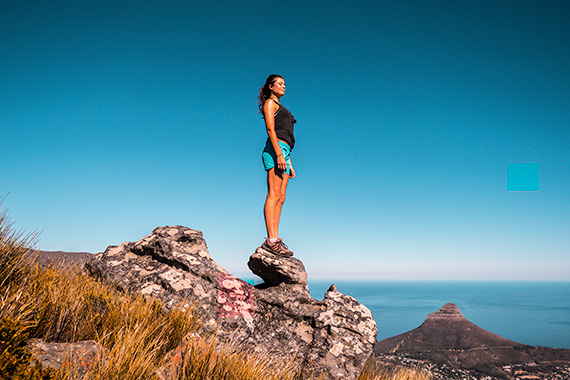
Do you see this shot as having a focal point? What is the subject—the girl or the landscape?

The visual weight between the girl and the background is too evenly balanced in this composition.

The photographer’s intent was for the “shape” of the rock to be a focal point, which then establishes the girl as the subject. However, it’s not visually strong enough to accomplish this.

Now, consider this:
focal point guide in photography

Change of frame

A different arrangement of the focal point within the space of the frame creates a more robust composition.
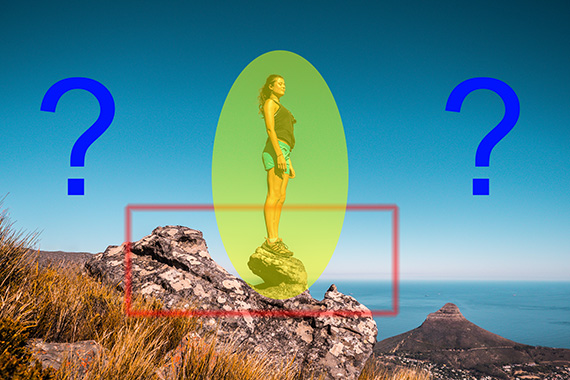
focal point guide in photography

Focal point change

By changing the frame, we have now accomplished several things:

  1. The woman is now clearly the subject.
  2. The interesting shapes in the rocks are now working very well as a focal point to the woman as the subject.
  3. The rest of the picture area provides background and storytelling details.

Critical Thought: When contemplating a focal point in your photo, consider its placement relative to the subject and also its location within the entire frame.
focal point guide in photography

Photo by Erwan Hesry

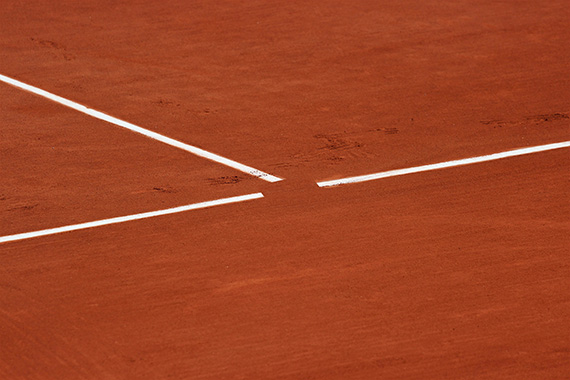
A focal point can also be created by something that isn’t present in the frame!

Remember: A focal point can be created by what’s not there. The abstract photo above relies on a pattern. The break in the design makes a focal point! An object that seems like it should be in the picture but isn’t—this can also create a fixation for the eyes.

The best focal points relate to the overall theme, subject and story of the final photograph.

focal point guide in photography

Photo by Ben Pham

The speaker in the building above meets much of the criteria for a focal point. However, in this case, it’s a weak element. The speaker doesn’t relate or provide an interesting point of view for the rest of the frame.

So, although it attracts immediate attention, that attention dies right there.
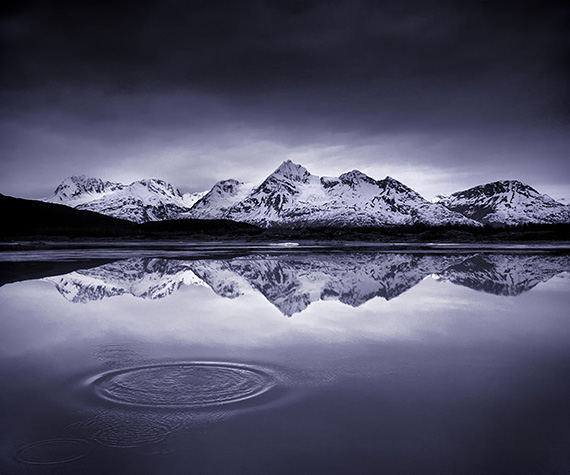
focal point guide in photography

This circular focal point relates to the theme and subject of the entire frame. (Photo by Kent DuFault)

Focal Points Are Fun!

Since we are programmed internally to see focal points (eye fixations), they are one of the most straightforward composition solutions to grasp and learn.

They are so much fun because they can be used in so many different ways.
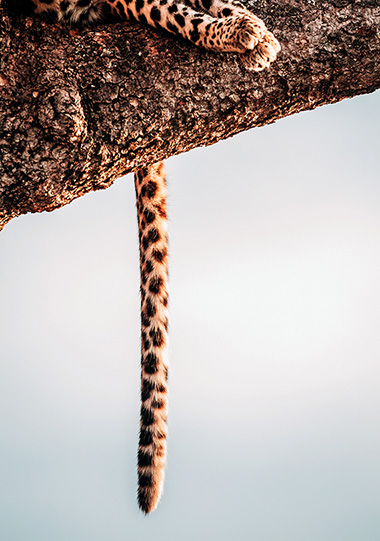
focal point guide in photography

Photo by Geran de Klerk

What is the subject of the photograph above? It’s a big cat. The dangling tail is a strong focal point.
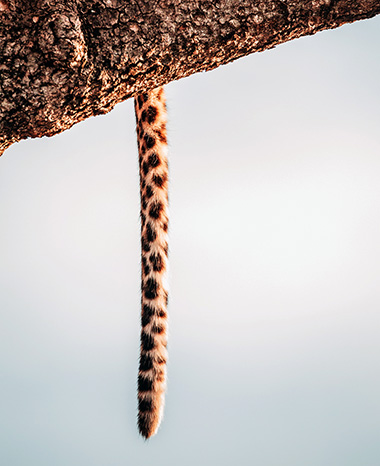
focal point guide in photography

Cropped out paws

What if the paws are removed? Is the subject still the big cat? Or, have we made the focal point the subject by changing the frame?

In Conclusion

Keep these learning points in mind when using focal points in your photo compositions:

  • A focal point attracts attention through size relationships, shape, color, tonal contrast, color contrast, juxtaposition and occasionally texture.
  • A well-placed human being in a photograph will almost always provide the potential for a strong focal point.
  • A focal point can support the subject in a composition—or it can also be the subject.
  • Focal points are natural composition tools because of the human trait known as saccades or fixations.
  • The human mind continually scans with the eyes. This eye movement is known as a “scanpath”.
  • A picture can have one focal point or multiple focal points. The key to success is to compose images so that each point has varying levels of visual weight that lead a viewer’s eyes in the correct direction within the frame.
  • If a focal point doesn’t direct viewer attention toward the subject area, then it becomes a problem known as an eye snag.
  • A focal point must be obvious to work. Don’t get clever and hide your focal points!
  • The placement of the focal point within the overall frame is vital.
  • When something is missing from a picture, and our mind feels that it should be there, that missing element creates a focal point!
  • The best focal points relate well to the subject, theme and story of the final photo.

Now it’s your turn.

Spend an afternoon shooting photos and hunting for focal points. Landscapes, cityscapes and architecture lend themselves well to photographers looking to hone their focal point skills.

How did you do?

  • Did you find different types of focal points: size, shape, color, tone/color contrast or position?
  • Do your focal points work well within the overall composition?
  • When doing the eye-closure test, do your eyes immediately go to your intended focal points and subject?

About the Author:
Kent DuFault is an author and photographer with over 35 years of experience. He’s currently the director of content at the online photography school, Photzy.

For Further Training:

This recently updated & expanded in-depth guide rolls years and years of practical knowledge, condensed into 239 pages packed with training, illustrations, and assignments. Advanced Composition goes far beyond knowing what composition is… (or, even knowing what the tools of composition are). Develop the SKILLS of anticipation, pre-visualization, and timing that are core to capturing great photography. It is currently 77% off today if you want to check it out.
advanced composition

Updated: The Advanced Composition Guide at 79% Off (Learn More)

Broken into 84 key lessons, 38 assignments, & 117 self-check questions – it delves DEEP into the artistic and technical aspects of photographic composition. With this guide you will learn to SEE light, shadow, lines, curves, space, repetition, and focal points.

Deal ending soon: The Advanced Composition Guide at 79% Off


Go to full article: Focal Points: The Smallest Important Elements in a Photo

What are your thoughts on this article? Join the discussion on Facebook

PictureCorrect subscribers can also learn more today with our #1 bestseller: The Photography Tutorial eBook

The post Focal Points: The Smallest Important Elements in a Photo appeared first on PictureCorrect.


from PictureCorrect https://ift.tt/39KIIl4
via IFTTT

perjantai 2. huhtikuuta 2021

PictureCorrect.com: Tripods and Tripod Alternatives for Photographers

When you’re new to photography, whether you’re using an old film camera or a modern digital SLR, for a time, you may be content just to roam about with camera in hand. Many modern DSLR camera lenses have built-in optical image stabilization, which helps counteract the movement you may inadvertently introduce, despite trying your best to keep your movements under control while taking your photos.

tripod sillhouette

photo by Zach Dischner

For some situations, you can often get away without using a tripod and, in fact, having your camera mounted on a tripod can inhibit how creatively you use the camera to create your photographic masterpieces.

However, there are situations when a tripod is invaluable. I will cover some typical example situations, and then discuss your options when it comes to buying a tripod—whether it be a more traditional aluminium or carbon fiber tripod, or one of the alternative tripods, such as a Gorilla Pod, an Ultra Pod II, or a camera beanbag.

Why You Might Want to Buy a Tripod

For every situation where a tripod is needed, it is required in order to avoid introducing unwanted vibration into your camera, particularly during long exposure photographs, where the camera’s shutter will be open for a second or more, during which time any vibration will be picked up and, most likely, be represented as blurring of your subject(s) in your final image. Landscape photography is one such sub niche that always benefits from having a good quality tripod.

Another area of photography where you will want a tripod is if you’re exploring light painting. This time, not only are you going to be using longer exposure times, you’re also going to need to rest your camera on a stable platform, while you either stand off to one side with a flashlight, or go into the frame, painting light into your scene. Once again, a tripod is your friend for this task.

drawing with light

photo by Brian Tomlinson

Anytime you need to keep your camera at a specific angle, whether it be absolutely horizontal (such as for landscape photos) or vertical (such as for portrait photographs of people) or any other angle in between, a tripod is the best tool for the job. Being human, there’s only so long you can hold your camera in a totally still position before you start to fatigue. And that’s when you’ll wish you’d had a tripod to take the strain. Providing you have a solid tripod that can comfortably hold the weight of your DSLR camera (and possibly and external flash on top), then it will keep your equipment at the angle you want it for as long as you need it.

It’s good to have a tripod when doing product photography. Many times, I will take the photos without using a tripod. However, it can quickly become a chore to hold a bulky DSLR, and that’s when I’m glad I’ve got the option to stick the camera on the tripod, so I can just focus on arranging the products to get the best shot.

Types of Camera Tripod

Okay, so now that you’re hopefully coming around to the benefits of having a tripod, the next issue is which type of tripod to get.

Nowadays, the way I see it, there are really two types of tripod:

Traditional Tripods

These have three legs (hence the term “tri”pod) stacked in sections that collapse down on top of one another, to keep the tripods compact when storing them or when travelling with them. When you are using these tripods, the legs can be eased out to a required length and then locked in place, for the specific height you need. Locking the legs is either done via a spin-lock system, where you rotate rings to lock the legs so your tripod won’t collapse unceremoniously to the floor, while others have quick-release locks with flaps that can be flicked open or securely closed.

One of the key decisions you’ll need to make is whether to get an aluminium tripod, or one constructed from carbon fiber. Aluminium tripods will be cheaper to buy than carbon fiber versions, but the carbon fiber tripods will weigh less, making them the better option for those who like to go trekking with their camera gear and want to take a tripod along as well.

low tripod in tunnel

photo by darkday

Just remember, because carbon fiber tripods are so lightweight, you’re likely to need something to weigh it down, so that the wind won’t introduce unwanted vibrations. Good carbon fiber tripods, such as the 3LT “Brian”, which I own, have a hook underneath the central column, onto which you can sling your camera bag, for added ballast.

Alternative Tripods

There are three different types of alternative tripod that may interest you; they have their pros and cons, compared with a traditional tripod, and I have one of each.

The first offering is the Gorilla Pod. The benefit of this style of tripod, over a more traditional tripod, is that, due to the unique construction of the legs, the Gorilla Pod is better suited to placing on all sorts of awkward and uneven surfaces, such as, rocks, grassy hillsides, etc. You can also wrap the three legs around tree branches, posts, railings and the like to place your Gorilla Pod at all sorts of different heights, providing there are suitable objects available to do this. That’s one of the advantages of a standard tripod: you’ll generally have enough height variations (by expanding or contracting the legs), to set up your camera at a fairly decent height. One thing you should be aware of are the subtle variations of Gorilla Pods, as one type will only fit the mounting bracket of larger DSLR cameras. I have both a Panasonic FZ1000 (bridge camera) and a Panasonic GH4 (DSLR, but a micro four thirds camera, so smaller than larger, full frame DSLR, such as Canon’s 1DX) and neither of them will fit on the original Gorilla Pod. I had to purchase a Gorilla Pod Zoom, which fit both cameras.

gorillapod

photo by Nan Palmero

The next option is the Ultra Pod II. This is the smallest tripod I’ve ever owned. It has three solid plastic legs, which are not height adjustable. However, what it lacks in height, it makes up for in both portability and versatility. This thing is super lightweight, so it’s great for hiking about with. But, its party-piece trick is the integrated Velcro strap, which allows you to secure the tripod to tree branches, gates, sign posts, and the like. The one slight downside is the Velcro strap isn’t all that long, so you’re limited to attaching it to things not much larger than the size of a thick man’s wrist. However, it’s so compact, lightweight, and brilliantly versatile that it has a permanent place in my camera backpack; it comes with me wherever I go with my camera gear and, if I think I can get away with it, I will prefer just this one Ultra Pod II—and maybe my Gorilla Pod, which is also similarly compact, but is superior to the Ultra Pod II on uneven and awkward surfaces—than lugging about a bulkier, more traditional tripod.

The final tripod alternative is not actually a tripod, at all: it’s a camera beanbag. I have a 1kg variety (though different weights and sizes are available) and it’s great that you don’t have to fiddle about screwing in your camera; just plonk down the beanbag, mush your camera down on top of it so that you get it level (okay, so there is still a little bit of fiddling), and then you’re ready to start snapping. You can also put it on top of your car, for instance, and not have to worry about scratching the paintwork.

So, if you had to buy just one tripod, which would it be? I’m tempted to say the Ultra Pod II, because you don’t have to fiddle about with adjusting multiple leg sections before you’re ready to start photographing stuff. However, as much as I really like that lightweight tripod alternative, you can’t beat the height adjustability of a traditional tripod. If you find yourself wanting to take it out and about, and if your budget can stretch to it, a quality carbon fiber tripod is probably the one to go for. However, if you have extra cash going spare, I do find it great to be able to choose between using my Gorilla Pod Zoom, Ultra Pod II, and my more traditional carbon fiber 3LT Brian tripod – if I need the height, I will use the 3LT; if I think I can get away without this larger tripod, when going out with my camera gear, I do prefer to travel light and take both the Ultra Pod II and Gorilla Pod Zoom, which give me enough options to find a suitable solution for where to place my camera to get some interesting shots.

About the Author:
Graham Wadden created and maintains the Creative Commons photography website, WaddenCCPhotography, specializing in creating stock photography primarily for home educators and those in education.

For Further Help Achieving Crisp, Sharp Photos:

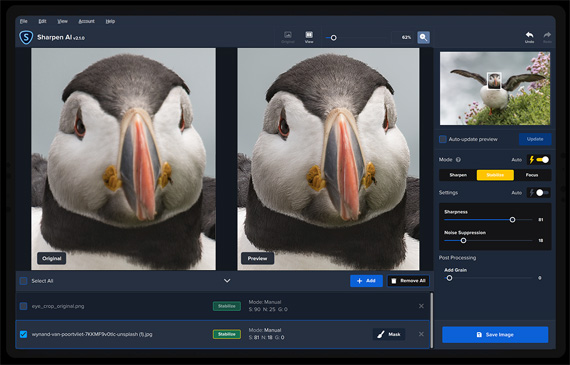
Currently on sale to celebrate a recent update, Topaz Sharpen A.I. takes some of the tedious work out of post-processing. With a new, faster AI Engine and model improvements for large blur, the latest version of Sharpen AI will impress more photographers than ever.

results with sharpen ai

Results with Sharpen AI (See more examples)

It is currently 25% off which ends soon, plus our readers can save even more by using the coupon code picturecorrect at checkout.

See how it works here: Topaz Sharpen A.I. at 25% Off


Go to full article: Tripods and Tripod Alternatives for Photographers

What are your thoughts on this article? Join the discussion on Facebook

PictureCorrect subscribers can also learn more today with our #1 bestseller: The Photography Tutorial eBook

The post Tripods and Tripod Alternatives for Photographers appeared first on PictureCorrect.


from PictureCorrect https://ift.tt/2HqLnTI
via IFTTT

PictureCorrect.com: Interesting Photo of the Day: Moonlit Waterfall

Technology in photography has come a long way. The developments have allowed photographers to capture images that were once nearly impossible to take. Whether it be the focusing system, the speed, or even sensitivity, cameras have matured very well. It’s now up to photographers to decide how to use such capable systems to capture their visions. Photographer Matt MacPherson captured the following image of Palouse Falls lit only by the moon:

“Palouse Falls by Moonlight” by Matt MacPherson (Via Reddit. Click image to see full size.)

MacPherson shot this incredible image with his Nikon D810 and 16mm lens. The center of attraction definitely has to be the silky smooth water of the falls. The low light conditions allowed him to take the image using a long exposure. To capture the shape of the water body, and the surrounding landscape, he took the photograph from a higher vantage point. Doing so also allowed him to get the moon in the shot, which is the only source lighting the scene.


Go to full article: Interesting Photo of the Day: Moonlit Waterfall

What are your thoughts on this article? Join the discussion on Facebook

PictureCorrect subscribers can also learn more today with our #1 bestseller: The Photography Tutorial eBook

The post Interesting Photo of the Day: Moonlit Waterfall appeared first on PictureCorrect.


from PictureCorrect https://ift.tt/2zBf6Ei
via IFTTT

PictureCorrect.com: The Five Levels of Becoming a Better Photographer

Once you pick up a camera and start taking photos, the journey to becoming a better photographer is not a simple one. It is a roller coaster ride and you’re sure to face a lot of hurdles along the way. If you want to take photos that provoke feelings and emotions—photos that really make your viewers pause and think—that’s where the process gets challenging. In today’s video, photographer Adam Karnacz describes his philosophy about getting better at photography. Whether you just want to take good snapshots or photographs that inspire, you’ll find his ideas quite useful:

In the video, Karnacz explains in detail his five levels of photography. You can use his philosophy as a reference to determine where you fall at present and what you can do further to improve yourself.

In the beginning, it is quite natural to get overwhelmed by the different camera settings. And while many make an attempt to understand and move past the auto mode, they may find themselves stuck there. In the early stage, you may even feel that your gear is limiting you. You may develop the notion that your photos will improve if you improve your gear. However, keep in mind that the key is in learning to take the best photos using the least amount of gear. As time goes on, you’ll soon realize when it’s time to upgrade.

To get the best results from what you’re currently using, it is essential to master the technicalities. Make an active effort to get acquainted with the manual mode, learn how exposure works and expand your knowledge base. You’ll need to spend years shooting at least semi-frequently in order to graduate from this level.

As for the next level, Karnacz suggests trying to imitate a photo that you like. Copying others takes some pressure off you—you don’t need to try and be original. You can think more about the lighting, settings and composition that the original photographer might have used. This might sound easy, but unless you have a good understanding of these behind-the-lens settings, the process can actually be quite challenging. That said, don’t be afraid to mix in your own ideas and improvise.

Remember, there is no shortcut to being a good photographer. How good you get all boils down to the effort you put into the art form. Patience and persistence are key. You must be willing to do things over and over again. Keep yourself open to learning from every shot you take. Hard work is the absolute difference-maker and will definitely pay off.

You’ll know you’ve mastered the art of photography when you start innovating. You’ll constantly come up with different ideas that you want to try out. A good idea is to keep yourself with different photography projects—not necessarily big ones. Of course, at this level, it makes sense that you print your work too. This gives you better insight into your own work and motivates you in the process.

The beauty of these levels that Karnacz discusses is that they’re not linear. In fact, they are cycles, and we can go around them as long as we want. What level do you think you’re at?


Go to full article: The Five Levels of Becoming a Better Photographer

What are your thoughts on this article? Join the discussion on Facebook

PictureCorrect subscribers can also learn more today with our #1 bestseller: The Photography Tutorial eBook

The post The Five Levels of Becoming a Better Photographer appeared first on PictureCorrect.


from PictureCorrect https://ift.tt/3fG703w
via IFTTT

torstai 1. huhtikuuta 2021

PictureCorrect.com: Interesting Photo of the Day: Milky Way Over Lindis Pass

New Zealand has been blessed with beautiful landscapes. Pair that with the amazing view of the Milky Way, and what better combo could you ask for? Astro photographer Paul Wilson captured the following image of the Milky Way over Lindas Pass in New Zealand:

lindis pass milky way

Lindis Pass, New Zealand by Paul Wilson (Via Reddit. Click image to see full size.)

Wilson took multiple images with his Canon 5D Mark IV and stitched them together to create this magnificent photo. The foreground is a panorama that he got by stitching 80 shots, which he shot using his 200mm lens. The sky, on the other hand, is a result of stitching 35 shots that he took with his 50mm lens, each shot being a 60-second exposure at f/2.8, and ISO 1600. Since each sky photo was exposed for 60 seconds, he used an astro tracker to avoid any star trails.

Considering the way Wilson has taken the images, it is clear that he has put in a lot of effort. And his effort has clearly paid off. The brighter portion of the foreground beautifully leads the viewers to the bright spot on the mountains. And the gigantic and beautiful Milky Way makes for a beautiful backdrop for this brilliant image.


Go to full article: Interesting Photo of the Day: Milky Way Over Lindis Pass

What are your thoughts on this article? Join the discussion on Facebook

PictureCorrect subscribers can also learn more today with our #1 bestseller: The Photography Tutorial eBook

The post Interesting Photo of the Day: Milky Way Over Lindis Pass appeared first on PictureCorrect.


from PictureCorrect https://ift.tt/2OHUymz
via IFTTT

PictureCorrect.com: Lens Hoods: How to Make Your Own Tutorial (Video)

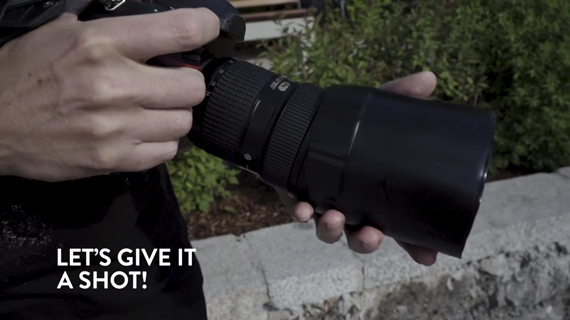
A lens hood is a simple tool that does some important work. Its primary purpose is to block direct light from striking the front element of the lens. This reduces unwanted flares and ghosting, thereby boosting contrast. It also helps in protecting the front element of the lens. In this video, COOPH presents a hack to make your own DIY lens hood using a bottle and black paint:

Here’s what you will  need to make your own DIY lens hood:

  • a soda bottle
  • a knife
  • black spray paint
  • rubber gloves

Start by cutting off the neck and base of the soda bottle carefully with the knife, leaving just the cylindrical portion. Then, clean it using a soft, dry towel.

Move to a well-ventilated area and paint the plastic bottle black. Wear rubber gloves for your safety.

Once done, leave the painted bottle to dry.

how to make your own lens hood

When it comes to using the lens hood, pop it over the lens so as to block off any direct light. You will instantly notice a difference in contrast.

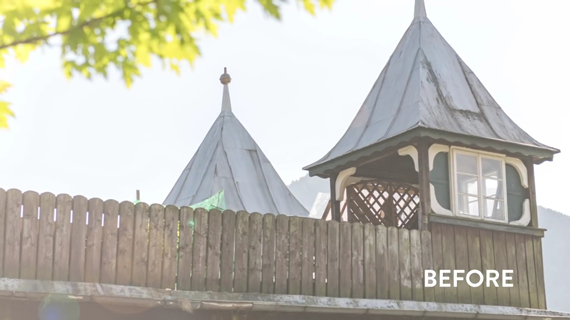
glare without lens hood

lens hood higher contrast

While this is not a long-term or convenient solution, it still works!


Go to full article: Lens Hoods: How to Make Your Own Tutorial (Video)

What are your thoughts on this article? Join the discussion on Facebook

PictureCorrect subscribers can also learn more today with our #1 bestseller: The Photography Tutorial eBook

The post Lens Hoods: How to Make Your Own Tutorial (Video) appeared first on PictureCorrect.


from PictureCorrect https://ift.tt/2QKxfLb
via IFTTT

PictureCorrect.com: How to Hold a Camera for Sharp Photos

Blur or lack of sharpness due to camera shake is a common problem for many photographers. It’s caused by the movement of the hand(s) holding camera itself. It can cause you to take a completely useless photo from a good opportunity.

Luckily, holding a camera correctly is not that hard. You can find many guides all over the internet showing you how you should hold your camera. Since I’m a big fan of simplicity, I will try to tackle this with just one principle that you can apply to every single situation.

get sharper images by holding your camera like this

Photo by Vaidotas Mišeikis; ISO 200, f/1.4, 1/2500-second exposure.

Let’s start with the worst case, what I will call the fingertip approach. You hold the camera in front of you with your fingertips. Your arm is extended, your fingers are extended, and the camera is shaking.

The basic and important thing to remember is the heavier your camera is, the less likely it is to shake.

Now, before you say, “I don’t want to carry a heavy camera!” well, neither do I. Fortunately, there are ways to make your camera “heavier” without carrying a single gram more.

How? In the fingertip approach, the “weight” of the camera is just itself, say 200 grams for a small compact digital camera. Now try to think of something to combine it with so it gets heavier.

Hmmm…

Found it yet?

For starters, your whole hand! Let’s apply the principle, one step at a time.

sharp photography by holding your camera

Photo by greg Robinson; ISO 100, f/4.0, 1/800-second exposure.

Hold the camera with the palm of your right hand, instead of just with the fingertips. Now, your arm is extended, but you have “integrated” your hand with the camera; they move together. The “weight” of the camera is now the camera plus your hand, say 0.5kg. You have about doubled the “weight,” and this will be a little steadier than the fingertip approach.

One more step. Instead of holding the camera with just your right hand, hold it with both hands. Now, you have a much more balanced platform for your camera; the “weight” of the camera is around 1kg. Be careful not to block the flash or lens with your left hand.

OK, now it’s time to minimize arm movement. Instead of having your elbows at the sides, have them rest on your chest in front of you. Now, you have essentially cut out the movement of the upper arm and fastened the camera a little better to a heavy object—yourself. If you do this, you will want to control your breathing when shooting. It’s surprising how much your lungs move up and down when breathing.

Now the motion of the camera is much more closely tied to your body, and the apparent “weight” of the camera is increased.

The next step is to cut out your motion. If you’re standing up, you will inevitability move a little bit. What you have to do is increase your apparent weight by “integrating” yourself to some heavier object. The technique that I use most often is to find a column or a wall and brace myself against it. You can sit somewhere, lie down on the ground—whatever stops your motion. You can also try to brace just your main shooting hand on a still object.

Obviously, there are different styles for different cameras. SLRs or other cameras with viewfinders, for example, are inherently less prone to camera shake, because in putting your eye to the viewfinder, you often “integrate” them with your head, which is obviously heavier than your hand(s).

For an SLR, I find it best to hold the camera normally with my right hand and place the left side of the camera in my palm so that I am holding the lens with my left hand fingers. (Thumb to the left, fingers to the right of the lens.) When shooting in portrait orientation, I keep the same grip and always tilt the camera to the left (counter clockwise). I find that my right hand is always steadier when tilting to the left. This is what works best for me; you can probably use this as a good starting point to find out exactly how you feel comfortable.

For any camera, and any hand holding situation, just remember the basic principle: make your camera heavier.

About the Author:
Can San writes for notesonphotography.

For Further Help Achieving Crisp, Sharp Photos:

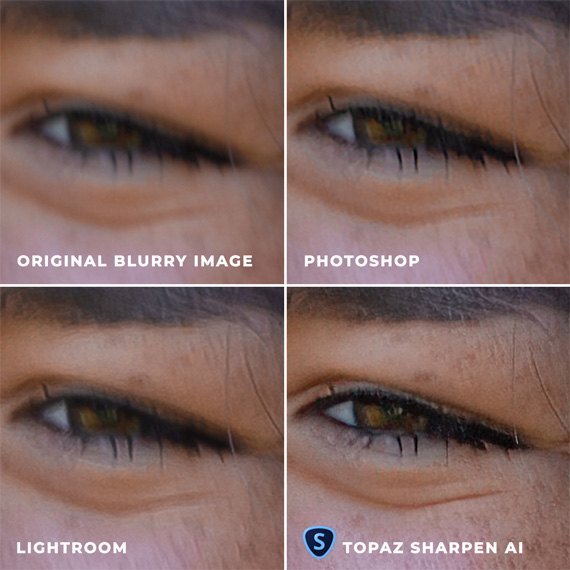
Currently on sale to celebrate a recent update, Topaz Sharpen A.I. takes some of the tedious work out of post-processing. With the new auto-detect feature in the Masking tool, Sharpen AI will automatically detect the subjects in your image for sharpening. It can detect 20 different types of subjects including people, cars, planes, various animals, and more.

sharpen comparison

Results Comparison (see more)

It is currently 25% off which ends soon, plus our readers can save even more by using the coupon code picturecorrect at checkout.

See how it works here: Topaz Sharpen A.I. at 25% Off


Go to full article: How to Hold a Camera for Sharp Photos

What are your thoughts on this article? Join the discussion on Facebook

PictureCorrect subscribers can also learn more today with our #1 bestseller: The Photography Tutorial eBook

The post How to Hold a Camera for Sharp Photos appeared first on PictureCorrect.


from PictureCorrect https://ift.tt/2UcCbpD
via IFTTT