tiistai 30. maaliskuuta 2021

PictureCorrect.com: Wide-Angle Lens Tips in Landscape Photography

Final reminder: only hours left for the Complete Landscape Guide at 58% Off

On a full-frame camera, focal lengths of 35mm or wider are considered wide angle lenses. These are great for landscape photography.

Settings for best results:

A) Aperture Priority Mode

Whenever I conduct landscape photography, I always shoot in Aperture Priority mode. Reason being I am able to shoot with more choices of appropriate f-stops and depth of field. I normally use the optimal aperture of my lens, and that is between f/8 to f/14.
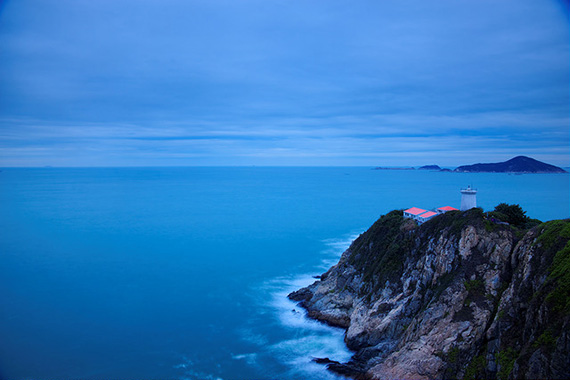
tips for landscape photos with wide angle lens

Photo by gato-gato-gato; ISO 100, f/8.0, 1/180-second exposure.

B) Hyperfocal Point

When you are photographing landscapes with a wide angle lens, try this; include foreground interest and focus onto the hyperfocal point. The hyperfocal point is the closest distance a lens can be focused while keeping objects at infinity acceptably sharp. This maximizes the depth-of-field.

Why not just focus on infinity with the smallest aperture available? Well, using the hyperfocal point enables the photographer to access a wider aperture. Other than that, a majority of lenses work better with the aperture opened up by one or two stops.

Tip #1: Try a Polarizing Filter

Polarizing filters can bring about different effects towards your landscape photography attempts. The type of effect produced differs in accordance to the angle of the sun towards the filter.

Polarizing filters can help to increase the intensity of the blue skies. It can also help reduce the reflections on water. Even if you were to use your image-editing software, there’s no way you can reproduce the effects or results a polarizing filter can give, at least not as convincing.

This fact makes the polarizing filter a must-have lens gear for landscape photographers.

Tip #2: Bug Eye View

Place your camera on the ground to photograph landscapes. Doing this creates a bug’s eye view of a landscape. The result will turn out pretty unusual, yet dramatic composition. Reason being that a photograph of a landscape taken from an angle of ground level is not something we are used to viewing from.

It will be great if you have a tripod that can go all the way to ground level to photograph a bug’s eye view of a landscape. However, when you use an ultra-wide angle lens, you will have to be extra careful as to ensure that the tripod’s legs are not shot and will not appear in the bottom of the shot.
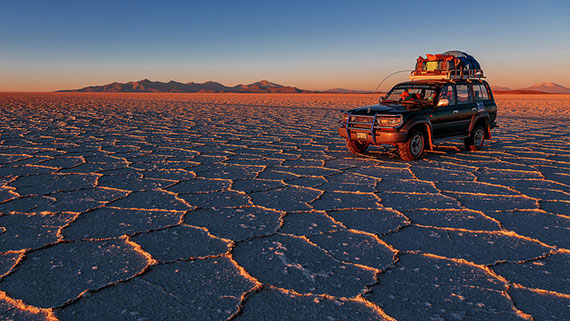
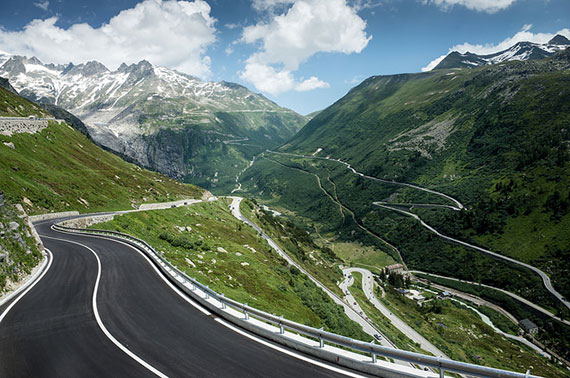
wide angle lens tips for landscapes

Photo by roman korzh; ISO 200, f/8.0, 1/125-second exposure.

Tip #3: Avoid Camera Shake

You can avoid the risk of producing blurry photographs caused by camera shake when you set your camera’s self-timer on a tripod or other stationary object. You can also opt to use a remote release that functions to trigger the shutter.

If you have no access to utilizing a tripod, as long as your camera has Live View, you can set your camera low to the ground and keep close to your subject.

About the Author:
This article was written by Michelle Lee Fui Jinn from tipsforphotographers. It takes time to practice and improve your photography skills.

For Further Training, Deal Ending Tonight:

If you are looking for more help with your landscape photography, you may want to check out this in-depth guide while it is currently 58% off until the end of the month, March 31. It contains 237 pages jam-packed with training, illustrations, and assignments for photographers seeking to take better landscapes.
landscape photography guide

New: The Complete Landscape Photography Guide

It covers everything you need to know to take consistently great landscape shots – lens and gear help, developing your own style, post-processing guides, composition tips, how to get unique images, and much more. P.S. also try the coupon code picturecorrect at checkout.

Only hours left: The Complete Landscape Photo Guide at 58% Off


Go to full article: Wide-Angle Lens Tips in Landscape Photography

What are your thoughts on this article? Join the discussion on Facebook

PictureCorrect subscribers can also learn more today with our #1 bestseller: The Photography Tutorial eBook

The post Wide-Angle Lens Tips in Landscape Photography appeared first on PictureCorrect.


from PictureCorrect https://ift.tt/2rUXOAe
via IFTTT

maanantai 29. maaliskuuta 2021

PictureCorrect.com: Interesting Photo of the Day: Russian Red Fox

Wildlife and nature photographer Ivan Kislov has assembled quite an impressive portfolio over the past few years, including this gorgeous shot of a red fox that looks more like a painting than a photograph:

russian red fox ivan kislov

“Chukotka 2013” (Via Imgur. Click image to see full size.)

Kislov lives in Magadan, a port town in a remote area of Russia. He shoots with a Nikon D800.


Go to full article: Interesting Photo of the Day: Russian Red Fox

What are your thoughts on this article? Join the discussion on Facebook

PictureCorrect subscribers can also learn more today with our #1 bestseller: The Photography Tutorial eBook

The post Interesting Photo of the Day: Russian Red Fox appeared first on PictureCorrect.


from PictureCorrect https://ift.tt/30afndh
via IFTTT

PictureCorrect.com: Photo Editing: Sharpen A.I. Version 3.0 Released

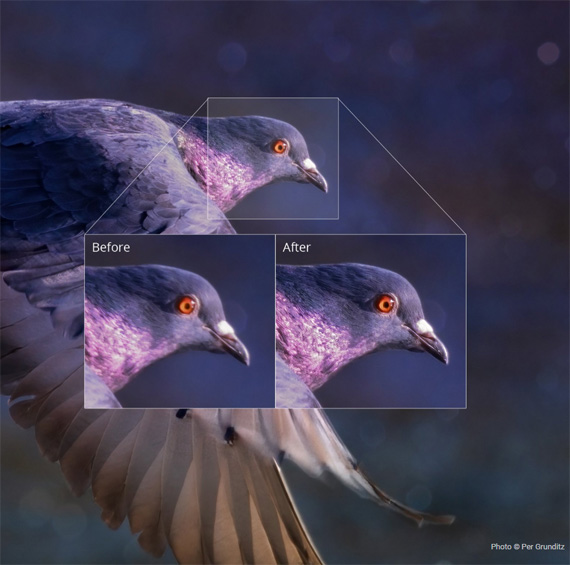
In photo editing news, Topaz Sharpen AI v3.0 was just released, and it’s on sale now! With a new, faster AI Engine and model improvements for large blur, the latest version of Sharpen AI will impress more photographers than ever. It is currently on sale for 25% off if you want to check it out. See how it works: Topaz Sharpen A.I.

sharpen ai photo

Results with Sharpen AI (Click to See More Examples)

Sharpen AI is the first sharpening and shake reduction software that can tell difference between real detail and noise. It was trained with millions of images so it could learn the characteristics of detail vs. noise – and then enhance just the detail. In some cases, it can even recover image detail.

More intelligent image sharpening.

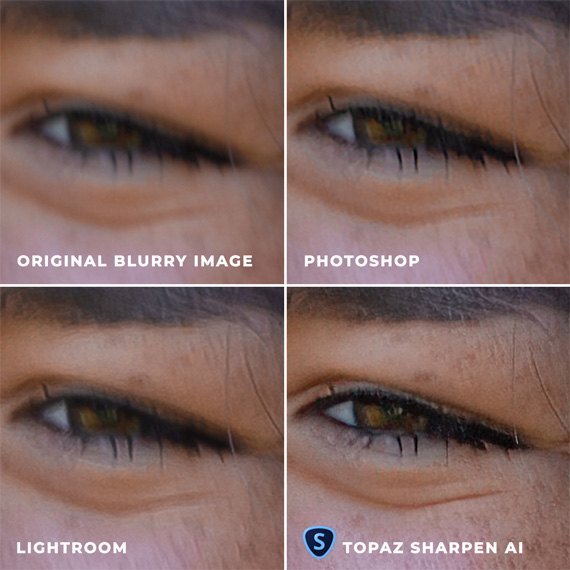
True sharpness is the lack of softness and blur. Traditional sharpening tools try to simulate this by just making edges brighter, but they don’t correct the actual source of the problem. Sharpen AI works differently by targeting and reversing three specific types of blur to create much more natural results:

The Motion model was trained to reduce motion blur caused by a shaky camera or moving subject. Often, you won’t even think there’s motion blur in your image… until you see the before/after from this model.

The Focus model reduces lens blur caused by missed focus. This is the toughest use case and won’t recover 100% of your photos. When it works, though, it works really well and can completely recover a throwaway image.

The Softness model works best to give already-good images that extra “pop” while making sure it stays natural. Use instead of traditional sharpening on finely detailed features like eyes, feathers, leaves, and stars.

Integrated into your workflow

Sharpen AI seamlessly plugs directly into your existing workflow as a plugin for Lightroom or Photoshop (or anything that supports these plugins). You can also use it as a standalone with batch processing.

sharpen comparison

Results Comparison (see more)

Batch process hundreds of images

Import multiple images quickly and easily for batch processing. You can apply the same settings to all images for rapid processing. You can also single out an image, or a handful of images, and apply different settings before completing your batch process.

How to Get Sharpen A.I. for a Discount Today:

To celebrate the release of version 3.0, the company is offering it at 25% off today if you want to check it out, plus our readers can save even more by using the coupon code picturecorrect at checkout.

It also includes a generous 30-day refund guarantee. If you don’t like Sharpen AI or if it doesn’t work for any reason, simply contact them within 30 days for a no-questions-asked refund. So there is no risk in trying it.

Deal ending soon: Topaz Sharpen A.I. at 25% Off


Go to full article: Photo Editing: Sharpen A.I. Version 3.0 Released

What are your thoughts on this article? Join the discussion on Facebook

PictureCorrect subscribers can also learn more today with our #1 bestseller: The Photography Tutorial eBook

The post Photo Editing: Sharpen A.I. Version 3.0 Released appeared first on PictureCorrect.


from PictureCorrect https://ift.tt/2tKVXgo
via IFTTT

PictureCorrect.com: Photographer Shares Tips from First Real Estate Shoot

Real estate photography is a very lucrative genre of photography. However, as profitable as it may be, it demands a lot of effort as well. After all, your images will need to produce results—they should generate leads, pique interest and honestly convey the reality of the building. If you’re looking forward to establishing your career as a real estate photographer, we have the right video for you today. Photographer Gene Nagata shares his experience of photographing real estate and offers some useful tips for real estate photography in the process:

As you can see in the video, there are a lot of things you need to consider. The job is not as simple as just showing up onsite and immediately taking photos.

To start, you should pay attention to verticals. Make sure that all pillars, walls, doors, windows and anything else that’s straight appears straight. Depending on what focal length you are using and how you hold the camera, those may appear slanted. While you can straighten them in post, getting them straight right in-camera is best.

And don’t make the mistake of getting stuck with one focal length and one perspective. Shorter focal lengths in the range of 15-35mm usually work best with real estate photography. Play around in that range and see how you can get the best images. Also, depending on whether you’re photographing the driveway, a bedroom or the kitchen, you’ll need to change the angle you’re shooting from. You can see in the video how Nagata works with that.

Like with any other genre of photography, lighting is the key. With real estate photography, you want your images to appear as bright as possible. It makes the images look aesthetically pleasing and more inviting. And when photographing the exterior, golden hour light—renowned for landscape photographers—can be harsh for real estate photography. See how Nagata waits for twilight, turns up all the lighting in the house and takes an absolutely beautiful image of the building.

For further training: Picture Perfect Properties at 80% Off


Go to full article: Photographer Shares Tips from First Real Estate Shoot

What are your thoughts on this article? Join the discussion on Facebook

PictureCorrect subscribers can also learn more today with our #1 bestseller: The Photography Tutorial eBook

The post Photographer Shares Tips from First Real Estate Shoot appeared first on PictureCorrect.


from PictureCorrect https://ift.tt/2PJ0TjS
via IFTTT

sunnuntai 28. maaliskuuta 2021

PictureCorrect.com: 5 Tips to Add Flavor to Landscape Photography

Landscapes can have a magical impact on people. Depending on the location, a landscape may instill a feeling of serenity or natural turmoil; it might imply lush development or continuous erosion; green with life or dim, gray, and lifeless. A talented photographer can leverage these features to create pictures that are simultaneously captivating, poignant, and beautiful.

sunrise landscape

photo by john mcsporran

However, this seldom occurs by chance.

In this post, we’ll provide five tips that can bring essence to your landscape photography. Several of the following suggestions may appear instinctive while some might be unexpected. In the long run, you’ll have the ability to utilize these tips to create landscape pictures that seize the curiosity of your audience.

1. Use A Tripod to Eliminate Camera Tremble

In order to catch a broad, deep portion of the landscape, you’ll want to employ a smaller aperture to improve your depth of field. A smaller aperture generally requires a longer shutter speed to make up for a reduction in light. But a lengthier shutter speed can make camera shake more probable, which leads to blurring. Use a tripod to eliminate the issue.

2. Use the Foreground as an Intro to the Photo

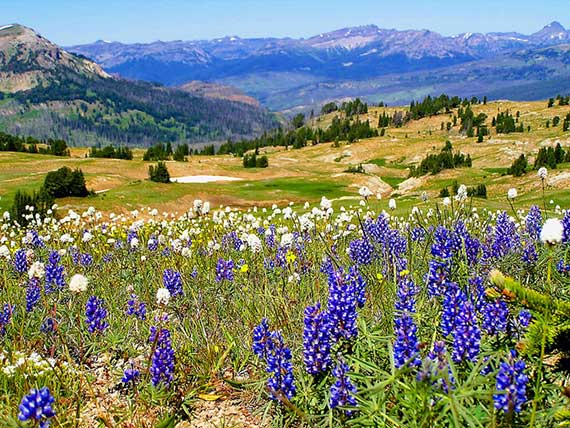
Suppose your shot comprises of a field of gaily-hued blossoms in the front with snow-capped hills etched into the backdrop. One approach to bring your audience into your photo is to use the foreground as an intro.

For example, place your camera lower so the flowers are shot up close at eye level. The field will stretch into the distance toward the mountains in the background to generate a graphic experience that makes it simpler for your audience to work with your scenery.

3. Use Depth of Field

If you’re an experienced shooter, you might need to play with a much more shallow depth of field to generate unique effects. That said, amateur photographers should select as deep a depth of field as possible when shooting landscapes to permit objects at varying distances from your camera to enter into focus.

As pointed out previously, think about utilizing a tripod since a smaller aperture normally needs a lengthier shutter speed.

4. Show Action

Landscape photography is typically thought of as capturing stillness. However, you can bring a unique result to your pictures by capturing particular kinds of surroundings in a way that implies movement. For instance, water lapping a close-by shore, trees swaying in a soft wind, a group of gulls slicing lazily through the air. These components animate your pictures. They attract the individual seeing the picture to the scenery’s action.

action in landscape photography

photo by tommy@chau

5. Integrate the Sky, Clouds, and Sun

The atmosphere may make your pictures sparkle. In fact, if you allow additional components of your landscapes to command the top part of your photo, the end result may be less than fulfilling to your viewers. The key is to make sure there are contrasting features that draw the eye.

For instance, strips or teams of clouds may split an otherwise clear blue sky. The clouds add flavor.

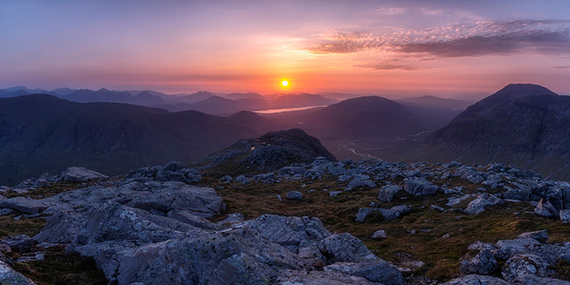
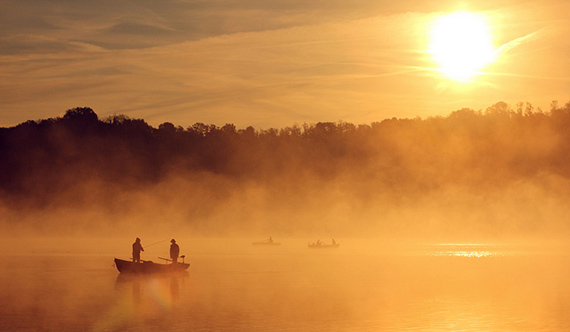
If you’re photographing near dusk, a setting sun can splash colored light. Splotches of red and yellow thrown through a light cloud cover can generate startlingly beautiful photos.

foggy sunset photography

photo by Paolo Terraneo

Photographing landscapes is an opportunity to present the environment in a manner that draws your audience into your arrangement. Many photographers—both beginners and pros—squander the occasion.

Employ the tips above to introduce elements into your photos that show nature at its most exciting and stunning.

About the Author
PosterBrain’s only passion is printing posters (and, for some reason, hair). They have searched the world for the finest paper, printers, and inks to give you an incredible artwork experience.


Go to full article: 5 Tips to Add Flavor to Landscape Photography

What are your thoughts on this article? Join the discussion on Facebook

PictureCorrect subscribers can also learn more today with our #1 bestseller: The Photography Tutorial eBook

The post 5 Tips to Add Flavor to Landscape Photography appeared first on PictureCorrect.


from PictureCorrect https://ift.tt/2HYzscN
via IFTTT

lauantai 27. maaliskuuta 2021

PictureCorrect.com: Diagonal Lines in Landscape Photography

Today’s landscape photo tip involves diagonal lines. In a landscape photo, portrait photo, still life or any other kind of photo, the first major task of the photographer is to draw the viewer’s eye to the most important aspects of the shot and keep it there!

rule of thirds

Photo by Jeff Wallace; ISO 160, f/8, 1/60-second exposure.

We want our photo to send some sort of message. If not, we shouldn’t be taking the shot. So we want to be certain that our viewer’s attention is focused in the right area. By the way, the message we’re sending could be as simple as wanting them to see an attractive cloud formation or some pretty colors in a rainbow—whatever.

We’re taking the shot because something in that scene attracted us and we want the viewer to see it, too.

This is actually the whole point to the photo composition rules. To make sure the viewer sees what we want them to see in the scene.

First, let’s consider how a person looks at a photo. Obviously it’s not a hard and fast rule. After all, people are individuals. But eye tracking studies have shown that people tend to start off in the lower left of the frame and let their eye travel up toward the upper right. Add to that the tendency of a viewer’s eye to follow natural lines in a photo and you have the genesis of a pretty powerful compositional tool.

In photography, diagonal lines starting at the lower left and traveling toward the upper right are very powerful.

photography diagonals

Photo by Giuseppe Milo; ISO 100, f/9, 1/50-second exposure.

Why does the viewer’s eye typically go from left to right? For many of us, it’s because we’re accustomed to reading from left to right. We tend to look at all text and photos in that way.

Keep this in mind… I haven’t seen any studies to support this, but I suspect that in countries where people read from right to left, the viewer’s eye will travel from right to left. In that case, design your diagonals to lead them into the photo from right to left.

Keep your potential viewers in mind when you’re designing your photography composition.

When you’re trying to determine where to place your diagonals, try not to start or end right in the corner. Photography diagonal lines that split the composition in half are no more interesting than placing the main subject in the bulls eye position.

Your diagonal lines don’t have to be an actual line. It could be a fence drawing a viewer’s eye, the horizon (if you’re shooting at some funky angle)—anything!

Try this: have diagonal lines coming from both right and left and converging at the subect of your photo.

While vertical and horizontal leading lines are nice compositional elements, diagonal lines are more dynamic and will impart more strength and verve to your shot.

photography lines

Photo by Flickr user Dimit®i; ISO 200, f/5, 1/1600-second exposure.

Your assignment for today is to get out there with your camera and find ten different ways to add diagonal lines to your photos. This landscape photo tip—while it seems simple—is one of the big photo composition rules. Master it!

About the Author:
Dan Eitreim writes for ontargetphototraining.com. He has been a professional photographer in Southern California for over 20 years. His philosophy is that learning photography is easy if you know a few tried and true strategies.


Go to full article: Diagonal Lines in Landscape Photography

What are your thoughts on this article? Join the discussion on Facebook

PictureCorrect subscribers can also learn more today with our #1 bestseller: The Photography Tutorial eBook

The post Diagonal Lines in Landscape Photography appeared first on PictureCorrect.


from PictureCorrect https://ift.tt/31Zb068
via IFTTT

PictureCorrect.com: Interesting Photo of the Day: Grand Canyon Stormy Sunset

Nature is unpredictable, which makes landscape photography challenging. A scene that looks flat one moment can turn into a magical one in the blink of an eye. And if you fail to make the most of what’s in front of you, chances are that you’ll have to wait a long time for another chance. Photographer Morgan Tuohy took the following image at just the right moment on the south rim of the Grand Canyon:

storm in the Grand Canyon

“Evening Storm in the Grand Canyon” by Morgan Tuohy (Via Reddit. Click image to see full size.)

Tuohy took the image on his Sony A7III with the 16-35 GM lens. The image is a 1-second exposure that he took at 30mm, f/11, and ISO 100.

“The clouds across the sky had us thinking sunset was going to be a dud, so we didn’t pay much mind to the sky and started making dinner at our cars. Eventually, I looked back towards the canyon and saw this massive column of water begin to fall on the sourth rim of Grand Canyon National Park, just a few miles away. Needless to say, dinner became an after thought, we grabbed our camera gear, and headed back towards the cliff that we’d visited earlier that evening.”

Scenes like this make you pinch yourself to make sure what you’re seeing is actually real. The rain cloud being illuminated by the setting sun against the storm clouds makes it an incredible moment to witness. It seems like, besides the photographer, even nature has put in some effort to make this image look and feel so beautiful.


Go to full article: Interesting Photo of the Day: Grand Canyon Stormy Sunset

What are your thoughts on this article? Join the discussion on Facebook

PictureCorrect subscribers can also learn more today with our #1 bestseller: The Photography Tutorial eBook

The post Interesting Photo of the Day: Grand Canyon Stormy Sunset appeared first on PictureCorrect.


from PictureCorrect https://ift.tt/2Z74ZWU
via IFTTT