tiistai 4. kesäkuuta 2019

PictureCorrect.com: Photo Sharpening Tutorial in Lightroom Classic CC

Sharpening is a key piece of post-processing, especially if you shoot in Raw. Luckily Lightroom has everything you need, from capture sharpening to selective sharpening to output sharpening. In the video below, Adobe expert Terry White demonstrates all you never knew you ever needed to know about sharpening in Lightroom Classic CC. I bet even expert Lightroom users will learn something new:

If Lightroom is your primary editing software, you’ll be happy to learn that it has plenty of little tricks for sharpening, some that even advanced users might not know about.

If you shoot raw, there’s always going to be some sharpening you need to do during post-processing. This is true to a lesser extent with JPEGs, but it’s especially true for raw. When you tell your camera to shoot in raw, it essentially turns off all the camera’s editing capacities. So where it will always sharpen a JPEG, it leaves raw images completely alone.

As a result, no matter how good your camera is there will always be some sharpness lost during the process of loading your images into any software, Lightroom included.

“There’s an inherent amount of sharpness that is lost from the process of transferring the image from the camera to the computer…especially if you’re shooting in raw.”
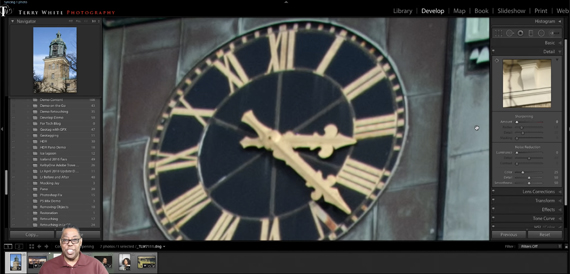
Raw image with no sharpening added

White’s raw image straight out of the camera

Lightroom, and other raw editing programs, will sharpen upon import as part of their raw file interpretation. They’re trying to make your photo look more or less as you would expect it to. (It’s worth noting that each raw editor is different in how it interprets raw files, which makes for quite a few differences in both color and sharpness.)

This version of Lightroom Classic automatically sets the slider to 45 when you import a raw file. (Older versions used to start them out at 25.) But even with some sharpness already added, you’re probably going to want to add a bit more. That’s where White’s first type of sharpening, capture sharpening, comes in.
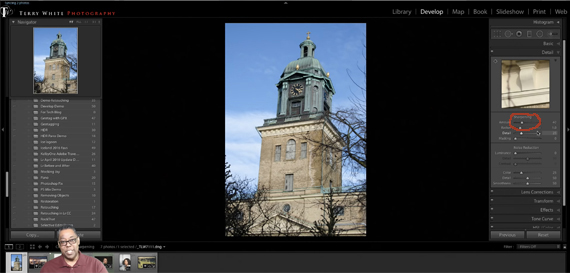
Sharpening added by Lightroom

Capture Sharpening

Capture sharpening ideally adjusts an in-focus image to the point of being “tack-sharp.” If you have a camera or lens that takes sharp photos and your shot is in focus, this is simply the step of returning the image to what it’s supposed to look like. To do this we either need to use the sharpening sliders under the Details panel or the presets to the left.

While the sliders are pretty self-explanatory, it turns out that Lightroom has a number of presets—both old and new—that can be particularly helpful. The newer ones should already be loaded into the presets. White, however, prefers using some of the older presets. You can get to them by going to “Manage Presets” and then clicking on “Classic – General.”
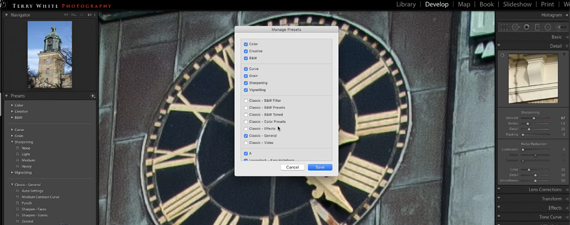
Lightroom's classic presets

One of White’s favorite older presets is “Sharpen – Faces.” It automatically turns up the masking, which in turn, intelligently chooses to sharpen key elements in a face like eyes, lips, and hair, all while leaving the skin alone—something extremely important when shooting feminine subjects.

One cool little trick to see how Lightroom is applying the mask is to hold down the option/alt key and then click on the slider. The areas being sharpened will come out in white. Here you can see the eyes, eyebrows, nostrils, lips, hair, and jewelry are affected by the slider, while the face and clothes are masked out.
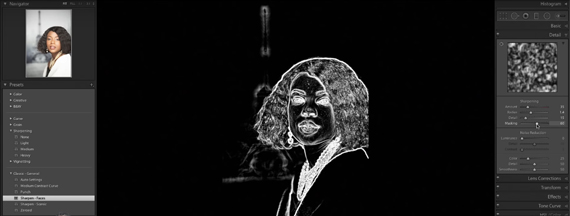
Hit opt/alt to see LR's sharpening mask

Here’s what it looks like practically speaking, where the eye’s been sharpened but the skin is still soft and glowing.
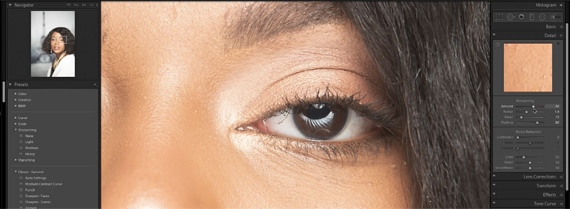
Sharpening the eye but not the face

Selective Sharpening

Once you’ve got your overall image looking as sharp as you’d like it, it’s time to consider creative sharpening. Elements like jewelry, for example, can usually benefit from a little extra sharpening. For this, Lightroom’s handy adjustment brush with the sharpening preset selected will do the trick.
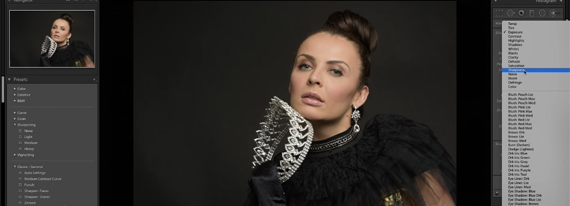
selective sharpening with the adjustment brush

Once your preset’s selected, bump up the sharpness slider under the adjustment panel and paint away. Here, White’s chosen to selectively sharpen the earrings:
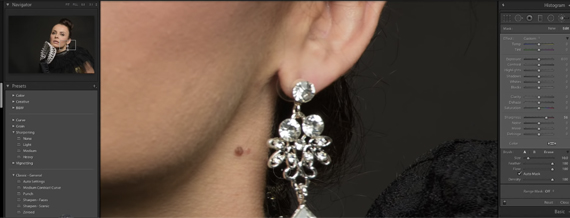
Using the adjustment brush to selectively sharpen

Output Sharpening

As it turns out, both exporting and sending an image to print will cause the image to lose a little of its sharpness. That’s why it’s important, if Lightroom is your image’s last stop, to make sure some type of output sharpening is selected. Just be aware, this step should be done only when you’re finished with the image, so if you’re sending the image to another program for finalizing, sharpen there instead.

Both Export and Print have a number of sharpening options. It’ll probably take a bit of trial and error see which ones work best for your needs, though. I tend to start out low and go from there. (Though, honestly, I prefer to do my final sharpening in Photoshop.)
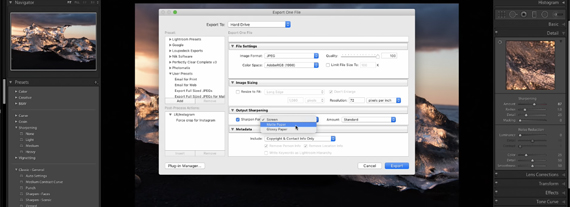
Lightroom has an output sharpening menu

Keep in mind, sharpening won’t make an out-of-focus photo look sharp. It may improve it somewhat, but to really get tack-sharp photos, you need to shoot them fully in focus in-camera. Also, be careful of over-sharpening. If you start to see artifacts, halos, or grains, it’s time to back the slider off.

So there you have it! Learn anything new? I did! Using the option button to see the sharpening mask was a big aha moment for me. How about you?


Go to full article: Photo Sharpening Tutorial in Lightroom Classic CC

What are your thoughts on this article? Join the discussion on Facebook

PictureCorrect subscribers can also learn more today with our #1 bestseller: The Photography Tutorial eBook

The post Photo Sharpening Tutorial in Lightroom Classic CC appeared first on PictureCorrect.


from PictureCorrect http://bit.ly/2WNYLcw
via IFTTT
PictureCorrect.com: Photo Lab Film Scanning Tips for Photographers

If you’re an analog photographer, scanning your film allows you to get your photos in digital form, too. However, the type of scanner used can really affect the quality. Jay P. Morgan from The Slanted Lens shares six tips to get great film scans at your photo lab:

1. Choose the Scanner That’s Right for You

Depending on what make of scanners are being used, the operator can either preview individual or multiple images at a time. While working with a single image allows the operator to pay special attention to each image, working with multiple images at once makes the work faster and more consistent.

When choosing a scanner, go with the look that you love. If you like a style that a particular photographer uses, try to find out which scanner they’re using and go for it.

2. Communicate with the Lab

Once you identify the look that you want to go with, it’s important that you communicate the same to the lab. If you have a photographer whose look you admire, share the online portfolio or some sample images with the lab. Or, if you have your own preference for color tones, exposure, tonality, or anything else, make sure that you let the lab know.

“Whatever lab you’re using, communication with the lab is key so they know what it is you’re after, and they are going to get the image that you want.”

3. Get Exposure Right for Film

“A good negative will render a terrific scan, and it’s really hard to work with a bad negative.”

Film doesn’t play very well when it’s underexposed. This is why many film photographers tend to meter for the shadows and overexpose by a stop or two to make sure shadows aren’t crushed. It doesn’t matter much if the highlights are slightly overexposed as the scanner can work to recover the highlight details.

4. Be Consistent

Not being able to preview the images right away can freak you out when starting out. But don’t worry too much about changing your settings frequently with the aim of getting a correct exposure. Instead, shoot a consistent exposure to ensure a consistent scan.

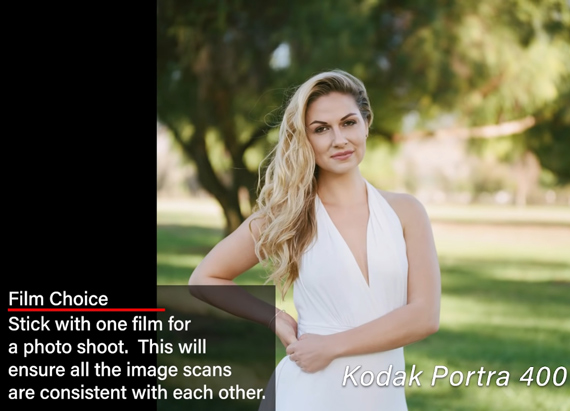
5. Stick with One Type of Film for a Shoot

Don’t switch film halfway through a shoot. The results will be inconsistent. Film differences are more apparent than scanner differences.

film choice

6. Test, Test, Test

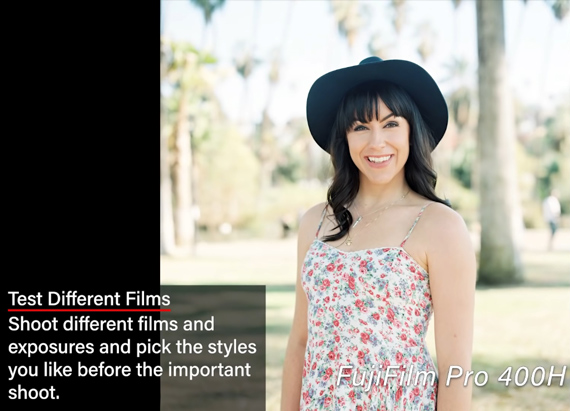
Before you settle on a particular film, test the results you get with different film types and see what you like. Also, try out different exposures. Some films work great when they’re metered correctly, while others deliver better results when over or under-exposed.

“Find where your sweet spot is and then you can repeat those results over and over again.”

test diferent films

If you’re not satisfied with the scans you’ve been getting from your lab, you now know what to look out for. Keep these tips in mind and they’ll help you get consistent scans of your film.


Go to full article: Photo Lab Film Scanning Tips for Photographers

What are your thoughts on this article? Join the discussion on Facebook

PictureCorrect subscribers can also learn more today with our #1 bestseller: The Photography Tutorial eBook

The post Photo Lab Film Scanning Tips for Photographers appeared first on PictureCorrect.


from PictureCorrect http://bit.ly/2IhCdYH
via IFTTT

maanantai 3. kesäkuuta 2019

PictureCorrect.com: Interesting Photo of the Day: Boston Street in a Mirror

Magic mirror? Vampire photographer? These are some of the far-fetched theories (jokes) behind this mysterious photo of Boston’s iconic Acorn Street. Capturing a reflection of the street, with an apparently invisible camera, the image looks like a thing of magic, until you look closer. Photographer Andrea Fanelli is behind the creative image, but just how did he do it? This is a clever photography trick that allows the viewer to see what’s in front of the camera and what’s behind the camera at the same time:

magic mirror reflection photo

Boston Street in a Mirror by Andrea Fanelli (Via Imgur. Click image to see full size.)

Fanelli has openly said he used Photoshop to create the image, so that automatically eliminates some of the mystery. But, it doesn’t make the effect any less impressive. The concept behind the image—where the reflection in the mirror matches up with the surroundings to create an almost seamless composition, all while eliminating any sign of a camera—is a creative one, and one that takes some skill to pull off.

But, as you can see, it’s not a reflection. The mirror image should be flipped to really give it that believable quality. The image that appears in the mirror was captured with the camera facing down the street. The mirror itself was then photographed while looking up the street. Then, the first shot was Photoshopped into the mirror in the second shot. A bit more believable? What do you think of the photo?


Go to full article: Interesting Photo of the Day: Boston Street in a Mirror

What are your thoughts on this article? Join the discussion on Facebook

PictureCorrect subscribers can also learn more today with our #1 bestseller: The Photography Tutorial eBook

The post Interesting Photo of the Day: Boston Street in a Mirror appeared first on PictureCorrect.


from PictureCorrect http://bit.ly/319Mi2z
via IFTTT

PictureCorrect.com: Snap Cards for Photographers at 80% Off

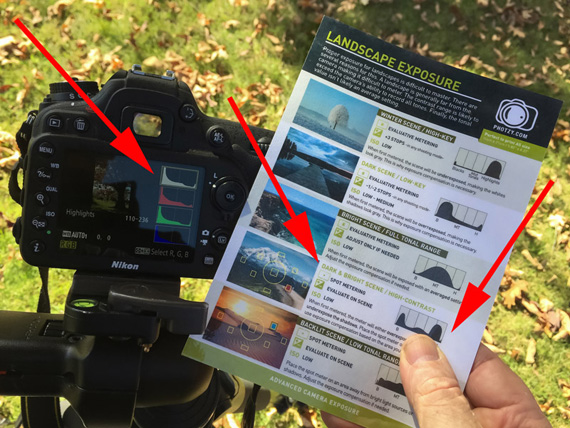
This product has been so hugely popular that we wanted negotiate a discount for PictureCorrect readers to start the summer. What are these “Photographer SNAP! Cards”? They are a training boot camp and reference companion in your camera bag… A common problem photographers run into is questions/issues arising while on an actual photo shoot out in the field. And there is a card to cover virtually every type of photographer situation imaginable. We were able to negotiate an 80% discount for our readers today which ends soon. Deal found here: The Photography Snap Cards at 80% Off

photography snap cards

New! Snap Cards for Photographers (Click to See How They Work)

They polled ‘thousands’ of photographers and asked them:

“What’s your biggest deterrent when trying to learn new photographic techniques and concepts.”

The answer that we heard over and over again, (by a huge margin), was this:

“When I’m out shooting photographs the training materials are sitting at home…I don’t have an easy method to reference back to what I studied, so that I can apply it to the photographs that I’m currently creating!”

Here’s the difficulty.

You invest in good quality photographic training. Maybe it’s a video, eBook, or even a workshop. You study these excellent tools while you’re in the comforts of your home.

But, what happens when you leave to go out on a photo shoot? What happens when you’re out in the middle of the woods, and you can’t quite recall that one concept that seemed so valuable when you read it last Saturday night?

landscape snap card

Just one of the many landscape guidance snap cards (click to see more)

Some Positives of Trying the Snap Cards:

  • Completely portable training, so you can study when and where (anywhere) that you have time.
  • Easy to understand graphics. Bright, colorful, and easily understood.
  • Huge range of themes and lessons – organized, and color coded, for easy retrieval.
  • A professional photographer and educator scrutinized all of the topics and the training concepts for maximum effectiveness.
  • The concepts are explained with beautiful examples.
  • Each card can be studied in electronic form, and even more importantly, they can be easily printed and taken with you on your photo shoots!
  • They can be printed in a smaller A5 size to fit into your camera bag with ease. Or, if you prefer, you can also print them at the larger A4 size with no loss of readability.
  • They are easy to laminate for increased durability. You could actually pour water onto them after lamination!
  • Lost one of your cards? No problem! Just print out another one…
  • Covers a wide range of topics from beginner to intermediate levels of photography.
  • Move from key lesson- to key lesson- quickly and easily.
  • Pick and choose your lessons at will.
  • It’s like having a photographic mentor at your side (while you’re out shooting).
  • Not 1 – not 10 – not even 20 – but 44 fantastic and pertinent “SNAP! Card” lessons that will kick your photographic training into high gear- why? Because you will have them with you when you need them the most- when you’re actually out shooting pictures!
  • They cover all the intricate aspects of photography (those aspects that are so difficult to grasp).
  • And the lessons go on and on…
snap cards for photographers

More of the snap cards featured all over (Click to Learn More)

An Example Situation Where the Cards Can Be Useful:

  • Yes. You’re holding the camera correctly for a steady (sharp) picture.
  • You’re following all of the tips listed on the “Getting Sharp Pictures” SNAP! Card. Your photo will be critically sharp.
  • You notice something in the scene that could improve your shot. Why? Because you just referred to Your “Landscape Creative Concepts” card as well as your “Landscape Checklist” card. You adjust your camera position for a better composition.
  • The Sun is setting. You know that the proper exposure is going to be tricky.
  • You refer to Your “Photographing Sunsets” and the “Exposure Triangle” SNAP! Cards. They help you to make the best exposure choices.
  • Finally, you take a test shot. You pull out the “Histogram” SNAP! Card and triple check your results against the histogram shown on the camera.
  • All looks good! And, you learned a lot- right there and on the spot- while you created the photograph.
  • Just one of the thousands of different scenarios the cards can be helpful…

How to Get the Snap Cards for a Discount Today (With Bonuses):

We were able to negotiate a 80% discount (normally $220, today just $29). They also come with an unbeatable 90-day, double-your-money-back guarantee so there’s no risk in trying them. Plus, you’ll get two bonus video tutorials to get you started – all of which ends soon.

Deal found here: The Photography Snap Cards at 80% Off


Go to full article: Snap Cards for Photographers at 80% Off

What are your thoughts on this article? Join the discussion on Facebook

PictureCorrect subscribers can also learn more today with our #1 bestseller: The Photography Tutorial eBook

The post Snap Cards for Photographers at 80% Off appeared first on PictureCorrect.


from PictureCorrect http://bit.ly/2itqDRa
via IFTTT

PictureCorrect.com: Where to Position a Softbox for Portrait Photography

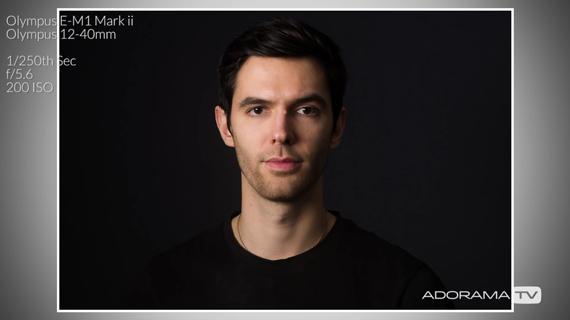
Where you place a softbox greatly determines how a subject looks in an image. A softbox also sets a photo’s mood. While a softbox is usually placed in front of a subject, photographer Gavin Hoey from Adorama demonstrates what happens when it is moved to different positions:

Softbox in Front of Model

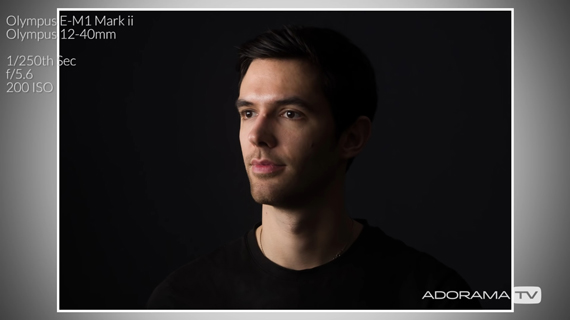
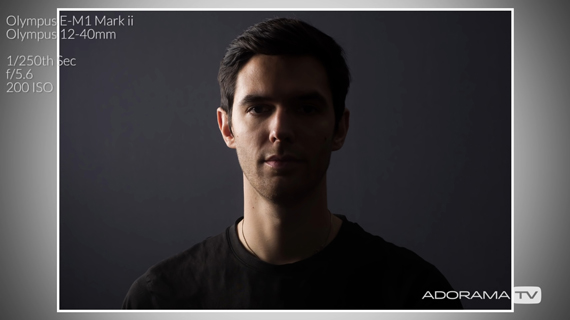
Hoey starts out with a standard lighting setup. He places the softbox in front of the model for a classic look. The side of the face closer to the softbox is well lit while the other side has a soft shadow.

portrait with softbox in front of model

And when the model turns slightly toward the light, the image looks more or less the same.

softbox position

Portrait with softbox in front of the model

Portrait with softbox in front of the model.

Softbox Slightly Behind Model

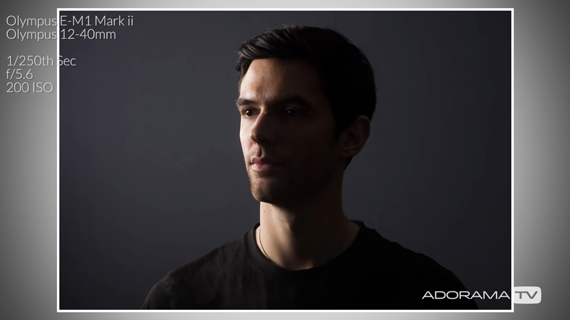
Next, Hoey moves the softbox so that the back of the softbox is in alignment with the back of the model’s head. This creates greater contrast, as half of the model’s face is illuminated properly while the other half remains in shadow. However, we can still make out some details in the shadows.

portrait with softbox slightly behind the model

When the model turns slightly toward the light the shadow shapes the face, giving it a three-dimensional look.

portrait with softbox slightly behind the model

Split Lighting

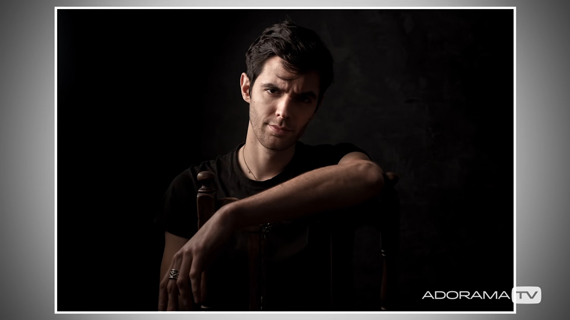
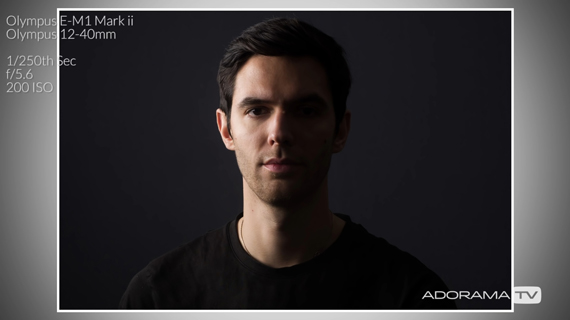
Moving on, Hoey shifts the light farther back so that it’s central to the model. The softbox fires an equal amount of light behind and in front of the model. This creates a split effect in which the side of the face away from the light is in dark shadows while the side facing the light is properly illuminated. As expected, there’s very little detail on the shadow side.

softbox split lighting

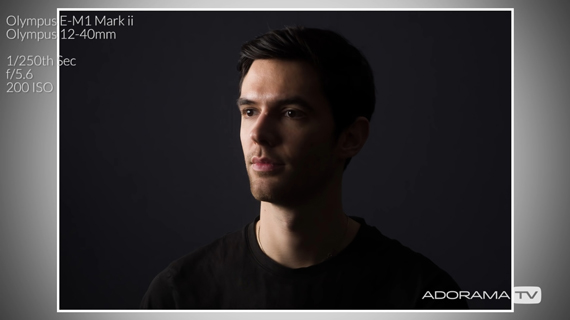
But when the model turns toward the light, the result is astounding. Hoey gets an image that works brilliantly for a portrait.

portrait with split lighting

Portrait with split lighting

Portrait with split lighting.

Softbox Behind Model

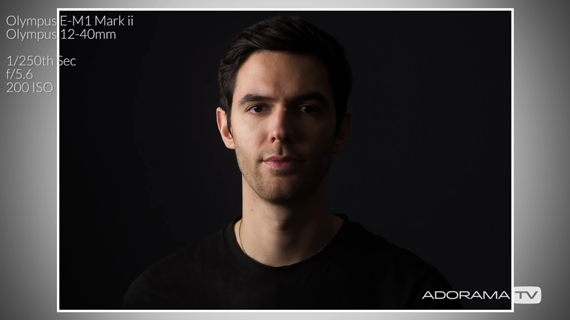
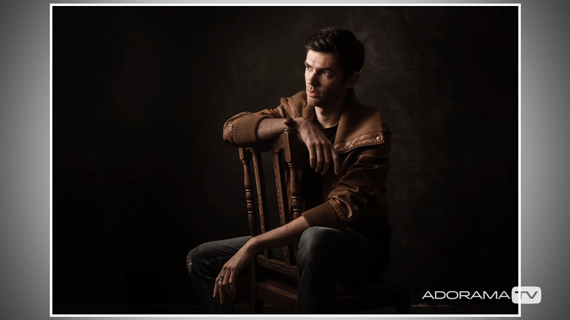
Finally, Hoey sets up the light so that almost all of the softbox is behind the model. This setup sheds more light on the background, making it brighter.

position of softbox behind subject

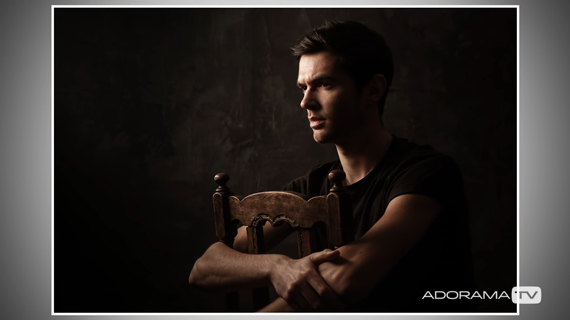
This time, when the model turns toward the light, we can make out some of the details on the shadow region of his face.

portrait with softbox behind model

Portrait with softbox behind the model

Portrait with softbox behind the model.

There’s no concrete answer to where you should place your softbox. Every position creates its own signature look. You need to understand for yourself what kind of look and mood you want and adjust the position of the softbox accordingly.

“The more you move your light, the more you’ll learn, and the more variety you’ll be able to create in your portraits.”


Go to full article: Where to Position a Softbox for Portrait Photography

What are your thoughts on this article? Join the discussion on Facebook

PictureCorrect subscribers can also learn more today with our #1 bestseller: The Photography Tutorial eBook

The post Where to Position a Softbox for Portrait Photography appeared first on PictureCorrect.


from PictureCorrect http://bit.ly/2EP1CYI
via IFTTT

PictureCorrect.com: Hats in Portrait Photography?

Today I have a photo tip that actually breaks the rules. I’m going to talk about including hats in portrait photography.

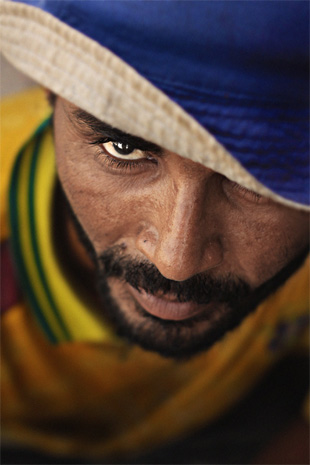
portrait with hat

Photo captured by PictureSocial member Lysander Jugo

Hats can say a lot about a person’s personality and are a good prop to use – if they actually DO fit the subject’s personality.

But, be careful of the lighting. You don’t want the eyes to be shadowed so you need to lower the light. But if you lower it too far, you can get “horror movie” lighting and shadows. Be careful.

If you are doing a quick snapshot just for fun let your model goof off and wear whatever they want. If they want to wear a funny looking clown hat or a jester’s hat with the jingling bells – or even a deerstalker for the Sherlock Holmes fans… go for it! (I’ve done them all.)

In this article, I’m not talking about funny snapshots. I’m talking about portrait photography that tells the story of who this person is – and will stand the test of time.

If you are trying to create something special that will be on the wall (and liked) 20 years from now, you need to be careful and plan every detail. You DO want to show the model’s personality and who they are – so sometimes hats come into play. Just be sure you NEED it to tell the story.

BTW – in case you aren’t aware, the reason for caution is that a hat has the capacity to draw the viewer’s eye away from the face and that is the ultimate bad thing.

If you are shooting a professional baseball player – can you imagine telling their story without a baseball cap?

How about a rodeo cowboy? Can you really tell the story of who they are without a cowboy hat? They wear a hat ALL the time.

Aside from the hats’ ability to disguise the radical difference between their tanned cheeks and fish belly white forehead – it is a natural part of this subject. They would look like something is missing if you shot them without their hat.

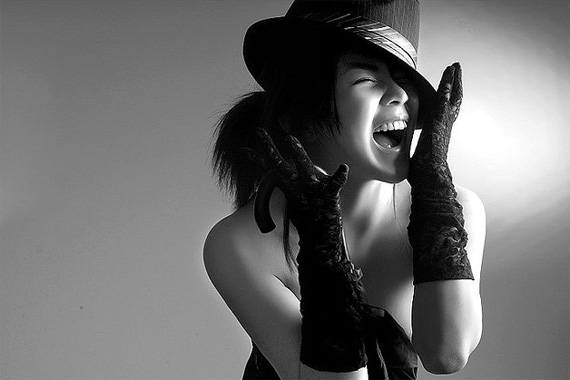
portrait subject wearing hat

“Scream” captured by PictureSocial member Ji Yeon So

Now that I think of it that could be our rule. Would they look like something is missing without the hat?

I’ve written quite a few articles where I continuously harp on the fact that you should never include something that will draw the viewer’s eye off the face… but hats can be an exception to that rule.

What about the young girl who NEVER wears a hat, but is having a bad hair day! You guessed it – no hat. Find a way to fix her hair or even postpone the shoot. No matter how “cute” she looks, that portrait is not going to make it to the wall. It’s just not her.

There IS one time when you SHOULD shoot the model in a hat, even if that’s the only hat they have ever put on!

It’s the mortarboard that graduating seniors wear. THAT one is a must! (And it will make it to the wall – no question.) As I write this it is graduation time – that’s why I thought of what may be the only exception to the hat problem.

By the way, do you know how wearing the mortarboard originated? It’s kind of a fascinating story.

Back in the day – (the renaissance era), the only two ways for an artist to make any money was to be commissioned by the church or a very wealthy patron.

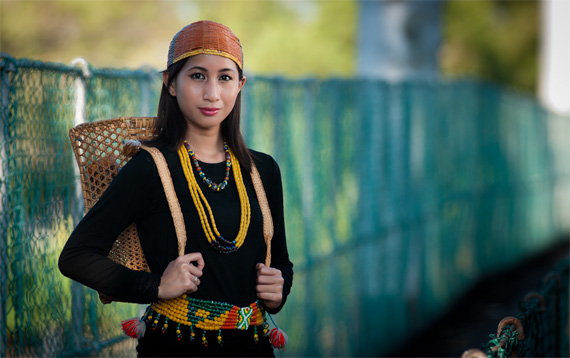
portrait photo

“Phoebe in Kelabit’s Costume” captured by PictureSocial member Joshua Aquinas Ding

If they were doing a religious painting for the church, the most important and most holy person in the photo was emphasized by putting them in the center and putting a gold, circular shape behind their head – indicating a halo. It was a solid shape, not the ring shape we now associate with a halo.

This immediately separated them from the crowd and defined them as a very important person.

When the rich dudes came along and wanted a portrait. They wanted a halo too! Egos of wealthy people were every bit as over the top then (or even more so) as they are now. They wanted to be the center of attention and “important” too!

Unfortunately, putting a halo on a non-holy subject was considered sacrilegious. The rich folks had the cash and power to avoid problems, but the starving artists had a way of getting burned at the stake. (Or tortured and killed in some other gruesome fashion.)

What to do?

The problem was resolved by using a solid circular shape for holy figures and a solid square shape for the rich and famous. If you look at one of the paintings, it appears that they are wearing a gold colored mortarboard!

And that is how it came about. The mortarboard is a symbol indicating the importance of the day and the graduate!

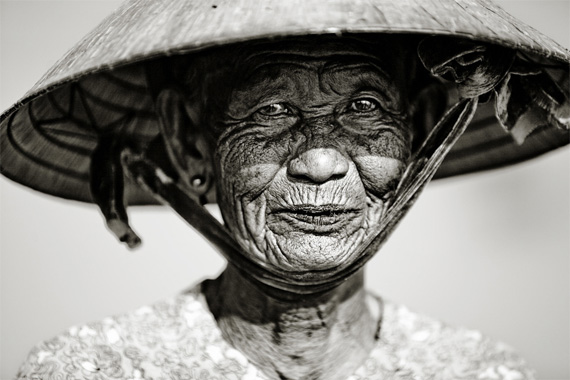
hats

“A tiny early morning smile” captured by PictureSocial member Thomas Jeppesen

In portrait photography, avoid a hat unless it is truly needed to “tell the story.” But if it is part of their personality – put it in there even though it may technically be against the rules. Take care when setting up your lighting and you are good to go. Photo tips are guidelines and should be broken from time to time.

About the Author:
Dan Eitreim writes for ontargetphototraining.com. He has been a professional photographer in Southern California for over 20 years. His philosophy is that learning photography is easy if you know a few tried and true strategies.


Go to full article: Hats in Portrait Photography?

What are your thoughts on this article? Join the discussion on Facebook

PictureCorrect subscribers can also learn more today with our #1 bestseller: The Photography Tutorial eBook

The post Hats in Portrait Photography? appeared first on PictureCorrect.


from PictureCorrect http://bit.ly/2HRpblm
via IFTTT

lauantai 1. kesäkuuta 2019

PictureCorrect.com: Beginner Tips for Shooting Action Photography

Digital camera owners who are not that experienced in taking photos often find it hard to capture the action scenes they so desire. With their subjects being mobile, they may not be aware of what to do with their camera to take the best action shots.

photographing a rodeo

photo by Emil Kepko

Indeed, it can be quite a challenge to engage in sports and action photography. Movements are fast and unpredictable, so you need to be quick in clicking your shutter. Whatever type of digital camera you have, you really need to take the extra effort to take clear pictures of people and animals in motion. It’s also best to learn the right techniques so you won’t get frustrated with your photos.

In action and sports photography, the most important factors to keep in mind are pre-focusing and timing, especially for very fast moving or far away subjects. It pays to be alert and ready with your camera so that anytime you see an action worth capturing, you can do it instantly.

Pre-Focusing

Pre-focusing means locking the focus of your camera to the scene where you want to take your shots (consider using AF to lock onto the spot, then simply switch to manual focus so you say focused on that spot). This technique will lower the lag time between the pressing of your shutter release button and the actual taking of the image. This step will also help you plan your shots well.

jumping dancer

photo by torbakhopper

Shutter Lag

In terms of timing, you will need to learn the shutter-lag delay of your own camera. Shutter-lag delay remains a fact despite the advancement in digital camera technology. Some DSLRs still have an issue with this.

To determine your camera’s shutter-lag delay, first take a test shot and observe the lag. Take note of how long it is so that you can pre-shoot to compensate for that lag. Normally, it’s only a matter of seconds but then in action photography, keep in mind that time is gold if you want to take the best shots possible.

Panning

Panning is another way of capturing great action scenes. Think if it as following your subject, such as a football player, a cyclist, or race car, with your camera as you snap the photograph. Some of you may be surprised to know that panning actually helps in taking clearer photos of a subject in motion than when photographing it while you’re holding still, because it helps capture subjects in which you are matching the speed of their movement. Having an optical viewfinder will be very helpful for this purpose.

car race panning

photo by darren price

Flash

Using your camera’s flash is also a great tactic to capture unique action shots. It’s best to use the flash when you’re closer to the subject and when the scene is dark. This technique helps to freeze the action and highlight your subject more. As the light is focused on the subject, the background will usually become blurry resulting in a beautiful effect. Just remember to always plan your shot, pre-focus, and pan to capture wonderful photos with your subject standing out from the scene.

skateboard flash photography

photo by Luiz Oliveiraa

About the Author:
Kalyan Kumar writes for http://www.42photo.com, a camera store in business for 40 years.

Now that we have the basics figured out, let’s head out to the motocross track and see some real world examples in this video. Keep the action alive in your photographs; it’s not always just about freezing the action, it’s about expressing it:

Panning is very simple. Just set shutter speed and aperture, hold your camera and pan along with moving subject (tracking motion with your camera). Guess what you’ll get? Bingo! A sharp subject with blurred background. Of course, you might think this is easy, but it can be a little tricky. For further training head over to our next article: Panning Photography Tips


Go to full article: Beginner Tips for Shooting Action Photography

What are your thoughts on this article? Join the discussion on Facebook

PictureCorrect subscribers can also learn more today with our #1 bestseller: The Photography Tutorial eBook

The post Beginner Tips for Shooting Action Photography appeared first on PictureCorrect.


from PictureCorrect http://bit.ly/2WEejj5
via IFTTT