lauantai 8. marraskuuta 2025

PictureCorrect.com: Anticipation in Photography

This article is based on concepts from Effective Storytelling with Photography if you want to dig deeper for further training.

Remember the lyrics from the famous Carly Simon song: “Anticipation. It’s making me wait.”

Remember: Anticipation is a skill common among experienced photographers and generally lacking in newer photographers. Let’s discuss the photographic expertise of anticipation and what it can mean to your photography.

anticipation in sports photography

Photo by Nik Shuliahin

Sports photographers use the tool of anticipation all the time. They do so because they need to capture the peak moment of action.

They use their knowledge of the game to anticipate where the peak action will occur and then place themselves in a position to creatively capture it.

For the rest of us photographers, anticipation can be a bit more challenging to sort out.

For this quick tip, let’s discuss some techniques to help you hone your anticipation skills.
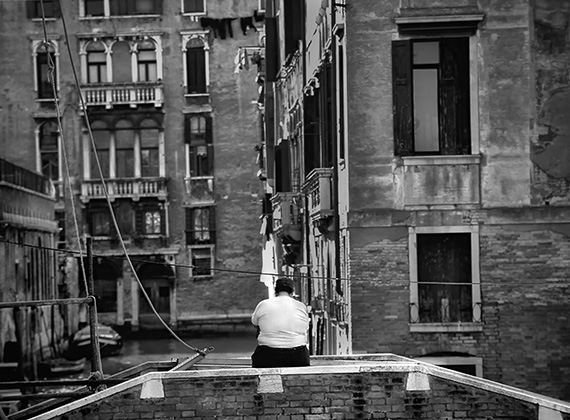
waiting for the right photo moment

Photo by Kent DuFault

In the above image, I was visiting Venice, Italy. I was standing on one canal bridge while looking at the one next to me. I was attracted to the scene, but it was missing something. So, I practiced anticipation and waited.

A few minutes later, a man walked up onto the bridge and sat down. I was ready, because I had anticipated this moment!

First Tip: Find a scene that attracts you visually, and then wait for something to happen. This is a common technique with experienced street photographers.
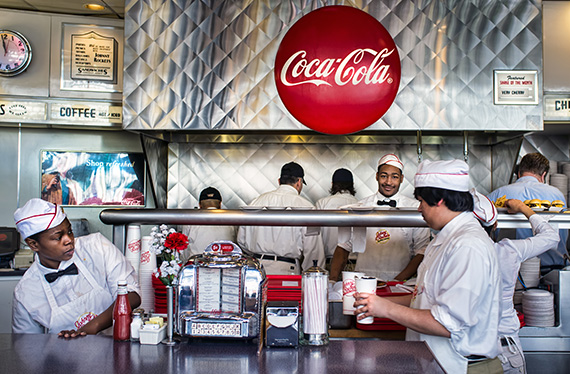
anticipating the scene

Photo by Kent DuFault

At this moment, I saw the scene and walked toward the order counter with my camera ready. I waited in anticipation for something special to happen—and it finally did, when one of the employees looked up at me and smiled.

Second Tip: When a scene catches your eye, get your camera ready. This is where automation will really help you—no manual mode is necessary. I tend to use shutter priority mode with auto ISO. I like to set my shutter speed because I don’t want my picture ruined by camera shake. Preset the focus or use all your focal points in autofocus. Hold the camera just below your eyes. You are not actually looking through the viewfinder but over the top of the camera. This technique allows you to anticipate what might happen by opening up your peripheral vision. It works best with a wide-angle lens.
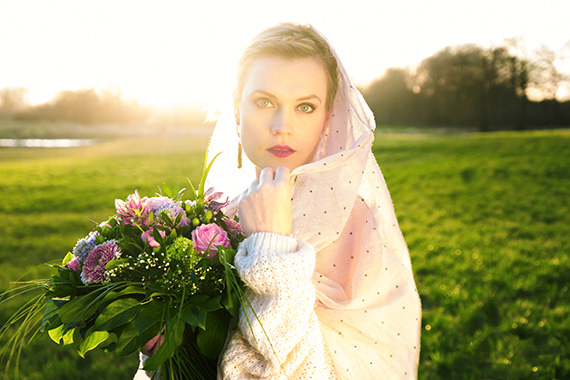
anticipating wedding photo

Photo by Max Poschau

Be ready when the subject doesn’t think you’re ready. This will allow you to capture candid moments.

Third Tip: When you are actively setting up a picture, get yourself ready before you announce that you’re ready. In this way, you can anticipate a true moment of expression that you may not get once the subject realizes you’re shooting.
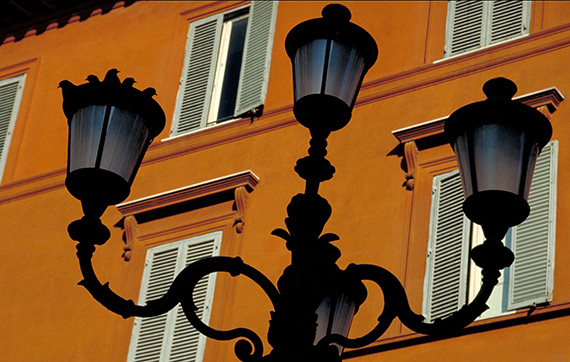
anticipating street photos

Photo by Kent DuFault

In the photo above, I was walking the streets of Paris. I noticed a couple of birds on top of a light post. They were in silhouette against a brightly colored wall.

I took a picture, and then in anticipation that the situation might improve, I waited and watched.

Within a minute or so, several more birds swooped down onto the light and began looking at me. I think they thought I was going to throw down some food.

My anticipation created a photo with more impact—by having more birds in silhouette.

Fourth Tip: When you take a live-action picture, don’t be satisfied with your first shot. Anticipate that the scene might improve. It often will—with a little bit of anticipation and patience.

About the Author:
Kent DuFault is an author and photographer with over 35 years of experience. He’s currently the director of content at the online photography school, Photzy.com

For Further Training:

Storytelling is the single biggest photographic skill, that you can learn, that will make your work stand out from everyone else. This in-depth guide by Kent DuFault is 133-pages of deep training, giving you a simple and practical understanding of using storytelling to make your photographs stand out. It is still 76% off which ends soon if you want to check it out.
storytelling photo

Effective Storytelling with Photography Guide

You’ll get 7 complete chapters of training, illustrations, case-studies and self-check quizzes. It will teach you every aspect of the storytelling process, and also, (even more importantly), how you can implement that knowledge into your photographic efforts.

Deal ending soon: Effective Storytelling with Photography at 76% Off

The post Anticipation in Photography first appeared on PictureCorrect.


from PictureCorrect https://ift.tt/CRS3QXN
via IFTTT

torstai 6. marraskuuta 2025

PictureCorrect.com: The Photo Editor Everyone’s Revisiting This Fall

Skylum has released its annual fall update for Luminar Neo, introducing new tools and workflow improvements aimed at photographers who want more flexibility in editing and sharing their work. The update coincides with the company’s Black Friday pricing period, which includes additional savings for a limited time:

luminar neo fall update

Key Features in the Fall Update

The Fall 2025 release adds several noteworthy capabilities:

  • Restoration Tool – A new feature for repairing aged or damaged photos. It can automatically remove scratches, rebuild missing areas, and restore faded colors in scanned images.
  • Light Depth – An evolution of Luminar’s Relight tool, providing more granular control of lighting across depth layers. Users can adjust exposure and warmth in foreground and background areas independently.
  • Cross-Device Workflow – Edits, masks, and adjustments now sync between desktop and mobile versions, allowing work to continue seamlessly across devices.
  • Spaces (Web Galleries) – A built-in sharing option that lets photographers publish curated galleries online without using an external platform.
  • Performance Updates – The interface has been refined with faster export speeds, broader camera support, and stability improvements.
    Collectively, these updates strengthen Luminar Neo’s role as a connected ecosystem for photographers who edit on multiple devices and want more natural control over light and restoration.

Black Friday Sale and Extra Savings

Skylum’s Black Friday event brings substantial discounts on Luminar Neo licenses:

  • Perpetual Desktop License – Reduced from the standard price for one-time purchase users.
  • Cross-Device and Max Licenses – Discounted bundles for those who use Luminar on multiple devices.
  • Upgrade Options – Reduced rates for current Luminar users upgrading from earlier versions.

During the sale, readers can use the promotional code “picturecorrect” at checkout to receive an additional 10% off the already discounted Black Friday pricing.

The Fall 2025 Luminar Neo update focuses on three main areas: restoring older photos, improving lighting control, and enhancing cross-device workflow. While the changes are evolutionary rather than dramatic, they continue to refine the platform’s balance between simplicity and advanced editing. With seasonal discounts and the extra savings code available for a limited period, this update marks a practical moment for photographers to review what’s new in Luminar Neo. It’s their best price of the year!

Deal ending soon: Luminar Neo Black Friday Sale

The post The Photo Editor Everyone’s Revisiting This Fall first appeared on PictureCorrect.


from PictureCorrect https://ift.tt/UVXfWYn
via IFTTT

keskiviikko 5. marraskuuta 2025

PictureCorrect.com: Demystifying the Plane of Focus in Photography

In the world of photography, achieving sharp, well-defined images is often the holy grail. One crucial concept that can significantly impact the sharpness of your photographs is the “plane of focus.” Whether you’re a seasoned photographer or just starting, understanding this concept can elevate your photography skills. So, let’s dive in!

Related: Want to level up your photography fast? PictureCorrect Premium is designed to be an accelerator with lessons, exercises, and more — and it’s only $1 to try today

plane of focus

Photo captured by Timothy Dykes

What is the Plane of Focus?

The plane of focus refers to the specific area within your shot that is in sharp focus. Imagine it as an invisible, flat surface running parallel to your camera’s sensor. When you focus your camera on a subject, you are aligning the plane of focus with your subject, ensuring that it appears sharp in your image.

Depth of Field and Plane of Focus

The plane of focus is intrinsically linked to the concept of depth of field (DoF). DoF defines how much of your image, from front to back, appears sharp. A shallow depth of field means that only a thin slice of your image (the plane of focus) will be sharp, with areas in front of and behind it appearing blurry. Conversely, a deep depth of field expands this sharpness to a larger portion of your scene.

Controlling the Plane of Focus

  1. Aperture: The aperture of your lens controls the depth of field. A wide aperture (small f-number) yields a shallow depth of field, while a narrow aperture (large f-number) increases the DoF, making more of your image appear in focus.
  2. Lens Focal Length: Telephoto lenses have a shallower depth of field compared to wide-angle lenses. Hence, the plane of focus appears narrower with longer lenses.
  3. Focusing Distance: The closer you are to your subject, the shallower the depth of field becomes, narrowing the plane of focus.
focus techniques

Photo captured by Breno Machado

Practical Tips for Mastering Plane of Focus

  • Manual Focusing: Sometimes, your camera’s autofocus might not align the plane of focus precisely where you want it. Using manual focus gives you complete control over the focus point.
  • Focus Peaking: Many modern cameras have a focus peaking feature that highlights the edges of the plane of focus, aiding in manual focusing.
  • Tilt-Shift Lenses: These specialized lenses allow you to tilt the plane of focus, enabling it to be non-parallel to the image sensor. This technique can produce striking effects, particularly in architectural and product photography.

The Creative Power of the Plane of Focus

Understanding and controlling the plane of focus not only improves the sharpness of your images but also unleashes creative potential. By deliberately placing your plane of focus, you can direct the viewer’s attention, isolate your subject, or create dreamy, ethereal backgrounds.

Summary:

The plane of focus is a fundamental concept in photography that, when mastered, can significantly enhance the technical and artistic quality of your images. By understanding how to control it through aperture, focal length, and focusing distance, you can take your photography to new heights of clarity and creativity.

Whether you’re capturing the delicate details of a flower or framing a stunning landscape, remember that where you place your plane of focus can transform an ordinary shot into a compelling visual story.

Early Members Are Already Ahead:

Every week, more photographers are joining PictureCorrect Premium to level up their craft — and you could be next. Inside, you’ll find expert-led tutorials, creative challenges, and printable exercises that make each lesson stick.

premium newsletter

Whether you’re working to improve composition, lighting, or manual control, Premium gives you the structure to make steady progress. The special $1 intro offer is ending soon, and once it’s gone, so is your chance to lock in early access.

⌛ Join now for only $1 before discount enrollment closes

The post Demystifying the Plane of Focus in Photography first appeared on PictureCorrect.


from PictureCorrect https://ift.tt/P03QZew
via IFTTT

tiistai 4. marraskuuta 2025

PictureCorrect.com: Photographing the Brocken Spectre

The Brocken Spectre, a mesmerizing atmospheric phenomenon, has long captivated the imaginations of those fortunate enough to witness it. Occurring in specific meteorological conditions, this spectre presents a unique opportunity for photographers to capture a blend of natural wonder and optical illusion. This guide delves into understanding the Brocken Spectre and offers practical tips for photographers aiming to immortalize this fleeting marvel.

Related note: offer ending soon for the Photo Adventure Cheat Sheets 🍂 Autumn Sale

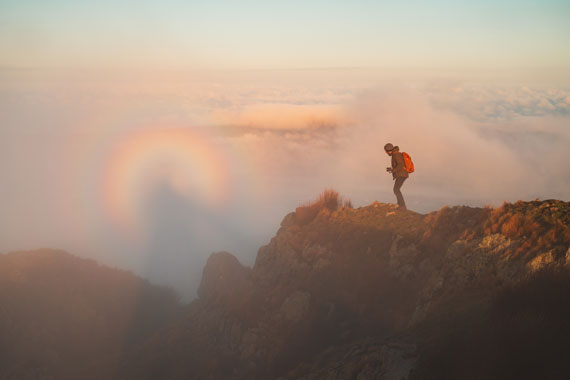
brocken spectre

Understanding the Brocken Spectre:

The Brocken Spectre appears when a person stands above the upper surface of a cloud – on a mountain or high ground – with the sun shining from behind them. When they look down into the mist, they see a magnified shadow of themselves. This shadow is often surrounded by colorful halos due to the diffraction of sunlight in the water droplets in the cloud. Named after the Brocken, a peak in the Harz Mountains in Germany where it is frequently observed, this phenomenon can actually occur in any mountainous area under the right conditions.

Photographic Challenges and Opportunities:

Capturing the Brocken Spectre requires not just the right conditions but also a keen photographic eye. The phenomenon’s transient nature, combined with the challenging light conditions, can test a photographer’s skills.

  • Timing and Location: Since the spectacle requires specific atmospheric conditions, planning is crucial. Early mornings, with clearer skies and the right amount of mist, are often ideal. Familiarize yourself with the terrain and predict where the spectre might appear.
  • Equipment: A good quality camera with manual settings is essential. Using a tripod can help stabilize your shot, especially in the tricky lighting conditions of a Brocken Spectre. A telephoto lens can also be beneficial, allowing you to zoom in on the spectre without changing your position.
  • Camera Settings: To capture the vibrant halos, a lower ISO can help reduce noise, while a higher aperture (around f/8 to f/16) can sharpen the focus on the spectre and the surrounding landscape. Experiment with shutter speed to find the right balance between light and motion, especially if the mist or your shadow is moving.
  • Composition: The Brocken Spectre offers a unique opportunity to juxtapose the human figure against the vastness of nature. Experiment with positioning the shadow in different parts of the frame to create compelling compositions. The surrounding landscape can also add context and contrast to the ethereal figure at the center.

Focusing on the Brocken Spectre:

Achieving sharp focus in the fluctuating visibility and contrast of the Brocken Spectre can be challenging, particularly when using autofocus systems that may struggle in these conditions. Manual focus becomes an invaluable tool in this context. When the spectre appears, switch your camera to manual focus and adjust carefully to ensure the edges of the shadow and the halo are as sharp as possible. Live view mode can be beneficial here, allowing you to zoom in on the screen and fine-tune the focus. If your camera has focus peaking, enable it to highlight areas of high contrast, making it easier to discern when the spectre is in sharp focus.

cloud brocken spectre

Remember, the spectre and its halo can appear and shift quickly, so being adept with your manual focus controls can make the difference between a good shot and a spectacular one. Additionally, practicing manual focusing under various conditions can enhance your readiness to capture the Brocken Spectre, ensuring that when the moment arrives, you’re fully equipped to immortalize this ephemeral marvel with clarity and precision.

Summary:

The Brocken Spectre remains one of nature’s most splendid visual treats, offering photographers a chance to explore the interplay of light, shadow, and landscape. By understanding the phenomenon, being prepared with the right equipment and settings, and approaching the subject with creativity and respect, photographers can capture stunning images of this elusive spectacle.

For Further Training:

For help remembering the camera settings for difficult situations like this, a set of Photography Adventure Cheat Sheets are designed to help. They are currently 80% off for an Autumn Sale 🍂 which ends soon if you want to check them out.

photography adventure

New! Cheat Sheets for Your Photography Adventures (see how they work)

The perfect companion for any photographer. Print one out whenever you need it. Whether you’re going on vacation or seeking out a specific photography adventure, these cheat sheets can provide you with the knowledge and inspiration you need to create your best work yet.

Deal ending soon: Photo Adventure Cheat Sheets 🍂 Autumn Sale

The post Photographing the Brocken Spectre first appeared on PictureCorrect.


from PictureCorrect https://ift.tt/06aIC1c
via IFTTT

maanantai 3. marraskuuta 2025

PictureCorrect.com: Best Spots for Street Photography in a City

Street photography is an art form that thrives on spontaneity, capturing candid moments of urban life that tell a story or evoke a particular feeling. While every city is unique, offering its own rhythm and character, there are common types of locations within any urban environment where street photographers can find compelling subjects and scenes. Here are some of the best spots in a city for street photography, each offering a window into the heartbeat of urban life.

street photo spots

Photo captured by Cory Schadt

1. Busy Marketplaces

Marketplaces are bustling hubs of activity, color, and culture, making them perfect for street photography. They offer a variety of subjects in a single frame, from vendors and shoppers to a myriad of goods and the vibrant chaos of commerce. The interactions, expressions, and energy in marketplaces provide endless opportunities for dynamic shots.

2. Historic Neighborhoods

Every city has its historic quarters, streets that tell the story of its past. These neighborhoods often feature unique architectural details, old signs, and a sense of timelessness. Capturing life as it unfolds in these areas can create a fascinating contrast between the old and the new, offering a rich context for storytelling through photography.

3. Public Squares and Parks

Public squares and parks are gathering places for people from all walks of life. They serve as stages for a range of human activities — kids playing, couples relaxing, individuals lost in thought, or public performances. The variety of backdrops, from manicured gardens to grand architectural features, can enhance the visual appeal of your photographs.

4. Transit Hubs

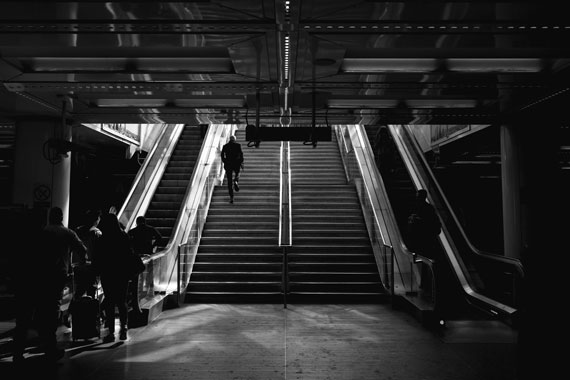
Stations, bus terminals, and airports are transit hubs where people are often seen in transition, offering a glimpse into the journey aspect of urban life. These locations provide dynamic environments for capturing people in motion, varied interactions, and a mix of emotions, from the joy of greetings to the sadness of farewells.

transit hubs

Photo captured by Ed Robertson

5. Street Corners and Crosswalks

The intersections of busy streets are prime spots for capturing the flow of city life. Pedestrians, cyclists, cars, and street vendors converge at these points, creating opportunities for photographers to capture movement, interactions, and the organized chaos of urban living.

6. Cafés and Restaurants

Outdoor seating areas of cafés and restaurants offer a more relaxed atmosphere for street photography. They allow you to capture people in a range of activities — dining, conversing, or simply enjoying the street scene. These spots provide a more intimate glimpse into the everyday life and culture of the city.

7. Cultural Institutions and Events

Museums, galleries, theaters, and venues for cultural events are not only architectural landmarks but also gathering spots for diverse crowds. During events, these places offer a mix of excitement, interaction, and the convergence of different cultures, ideal for vibrant and expressive photography.

Respecting Privacy and Ensuring Safety

While street photography is about capturing authentic urban life, it’s paramount to do so with respect for individuals’ privacy and dignity. Always be mindful of people’s comfort levels and avoid taking intrusive photos that could invade their personal space or cause distress. It’s about observing and documenting life, not violating privacy or exploiting moments. Additionally, prioritize your safety and be aware of your surroundings, especially in crowded or less familiar areas. Respect local laws and customs, and if someone indicates they do not wish to be photographed, honor their request without hesitation. By fostering an approach rooted in respect and ethical considerations, you can create compelling imagery that truly honors the essence of street life.

Conclusion

The best spots for street photography in a city are those where life unfolds in its most authentic and vibrant forms. While the locations mentioned above are typical hotspots, the true essence of street photography lies in the unexpected moments that you stumble upon. Always be ready with your camera, for the streets are alive with stories waiting to be captured. Whether you’re a seasoned photographer or new to the field, exploring these urban canvases can be a deeply rewarding experience, full of surprises and profound insights into the human experience.

For Help with Photo Editing:

To help with a street photo editing workflow, these presets are designed to help photographers instantly bring out the best attributes of their street photography with exposure adjustments, clarity, vibrance, saturation, split toning, highlights, shadows, sharpening, noise reduction, vignetting, graduated filter adjustments and much more. They are currently 67% off today if you want to check them out.

street presets

Amazing street photo edits in seconds (see how they work)

As street photographers, it’s our job to catch the emotional essence of a city and show it to others through street portraits, documenting moments, and more. In many cases it’s about being in the right place at the right time. How can you do that if you are always stuck at your computer editing photos?

Deal ending tonight: The Street Photographer’s Presets at 67% Off

The post Best Spots for Street Photography in a City first appeared on PictureCorrect.


from PictureCorrect https://ift.tt/16l8rUI
via IFTTT

sunnuntai 2. marraskuuta 2025

PictureCorrect.com: Life in Slow Shutter: Mastering Pedestrian Motion in Long Exposure Photography

The intricate dance of urban life, with its ceaseless ebb and flow of people, presents a unique tableau for photographers. It’s in these pedestrian tides where the essence of a city truly lies. This blog post will explore the art of long exposure photography with a specific focus on capturing pedestrian motion. From embracing unpredictability to seeking contrast and defining the right location, this post will guide you through this fascinating technique that breathes life into still images.

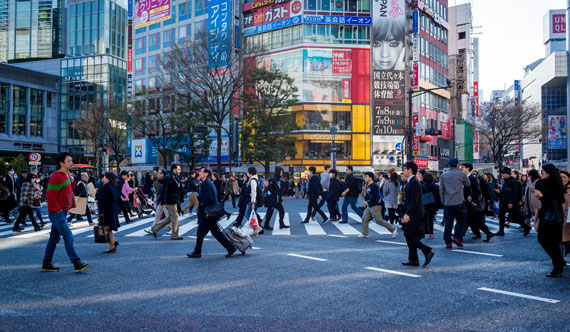
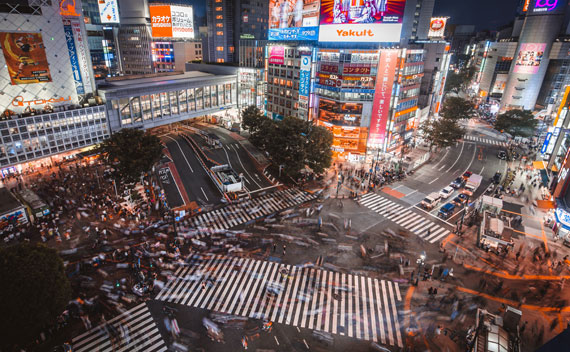
pedestrian crossing photo

Photo of Shibuya Crossing captured by Denys Nevozhai

1. Variety is the Spice of Long Exposure

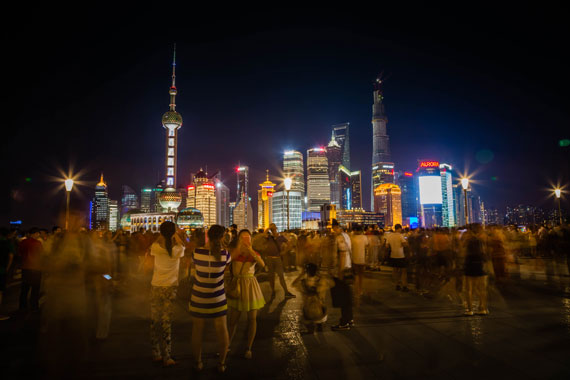
Navigating the unpredictable nature of human motion is a captivating challenge. To deal with this, cultivate a habit of diversity – experiment with various angles and shutter speeds. If you’re concerned about discomforting a person or a group, simply adjust your position and try a different perspective on the same scene. Pay attention to the different patterns that emerge from long exposures of human movement. To accurately depict motion from crowds, shutter speeds between 1-5 seconds usually work well. However, be cautious – shutter speeds longer than this could render people into a blurry, indistinguishable mass.

2. Embrace the Unexpected

In certain situations, you may desire people to move in front of your camera, adding dynamism to the scene. However, they may pause, unsure of your intention. In such scenarios, it’s perfectly acceptable to let them know that it’s okay to continue walking. Remember, this can happen especially in foreign locations due to cultural differences. Use this to your advantage and turn it into a unique photo opportunity.

pedestrian cityscape

f/11, 3.2 seconds, ISO 500, 24mm

3. Pick Your Spot

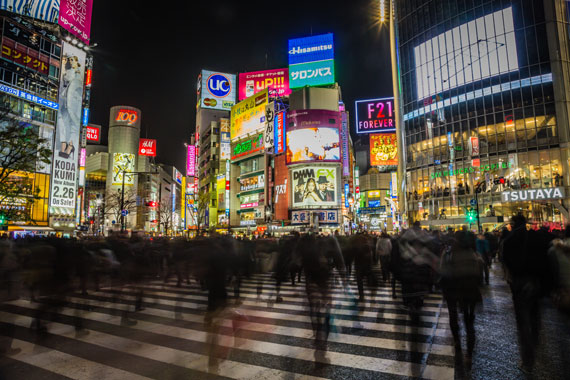
Location is a key element in shaping the outcome of your long exposure shot. Aim for places that naturally attract large gatherings. Public squares, major intersections, city lookouts, building observatories, landmarks, street festivals, markets, and protests are all excellent choices. In major cities such as New York, Tokyo, or Toronto, four-way crosswalks can provide exciting opportunities to capture chaotic scenes of people against a backdrop of headlights and city lights.

pedestrian motion

f/16, 1.3 seconds, ISO 250, 24mm

Here’s a list of places that can serve as excellent locations for capturing long exposure pedestrian photographs:

  • Public Squares: Places like Times Square in New York, Piazza San Marco in Venice, or Trafalgar Square in London see a high footfall of people day and night.
  • Major Intersections: The scramble crossing at Shibuya, Tokyo, or the intersection at Oxford Circus, London offer an abundance of dynamic movement.
  • City Lookouts: Views from spots like the Griffith Observatory in Los Angeles or Mont Royal in Montreal can provide a great overview of pedestrian movement in the city.
  • Building Observatories: Locations such as the Skydeck at Willis Tower, Chicago or the viewing platform at the Shard, London, provide bird’s-eye views of pedestrian traffic.
  • Landmarks: The areas around popular landmarks like the Eiffel Tower in Paris or the Colosseum in Rome are bustling with locals and tourists, perfect for long exposure photography.
  • Street Festivals: Events like the Mardi Gras in New Orleans or the Carnival in Rio De Janeiro can offer vibrant and colorful crowd movement.
  • Markets: Bustling markets like the Grand Bazaar in Istanbul or the Camden Market in London are brimming with movement and activity.
  • Train Stations: Major stations like Grand Central Terminal in New York or King’s Cross Station in London, with their constant stream of commuters, are excellent for capturing motion.
  • Protests or Parades: Events like these often involve large crowds and can result in powerful imagery.
  • Pedestrianized Streets: Areas like La Rambla in Barcelona or The Strip in Las Vegas that are specifically designed for foot traffic.
  • Parks and Recreation Areas: Places like Central Park in New York or Hyde Park in London offer a mix of stationary and moving subjects.
  • Beaches and Boardwalks: Locations like Venice Beach in California or Bondi Beach in Sydney present opportunities to capture a mix of static and dynamic elements.

4. Standing Still in a World of Motion

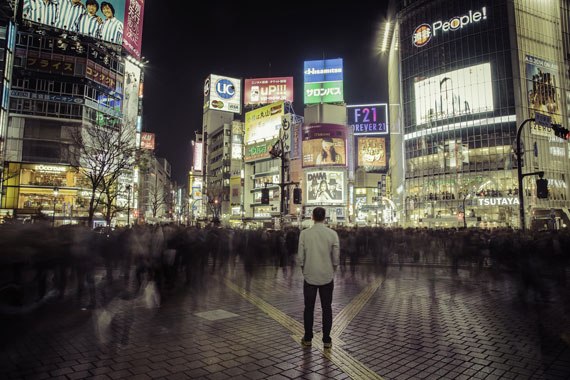
Combining motion and stillness creates powerful, evocative imagery. Landmarks and observation decks are perfect for this technique, providing opportunities to contrast an ever-moving crowd with a few static individuals. Try to find people who will remain relatively stationary – a busker, a person sitting on a park bench, or someone waiting for a bus. The result can be a poignant “world passing them by” effect, where they remain still and in focus while the world continues in blurred motion around them.

standing still

f/14, 6 seconds, ISO 160, 24mm

5. Composing the Perfect Shot

Composition plays a crucial role in long exposure photography. Always strive for a balanced shot. Position your static subject in a manner that complements the moving elements. Ensure they aren’t obscured by the motion blur but instead stand out in sharp relief. Remember, it’s not just about capturing motion but also about telling a story – use your composition to create a narrative that draws the viewer in. With practice, you’ll find a style that’s uniquely yours and be able to bring your vision to life.

In summary, long exposure photography is about capturing more than just a moment – it’s about capturing an experience, a slice of life. With the right techniques, you can transform the mundane into the extraordinary and truly capture the heartbeat of the city.

The post Life in Slow Shutter: Mastering Pedestrian Motion in Long Exposure Photography first appeared on PictureCorrect.


from PictureCorrect https://ift.tt/DsoEde3
via IFTTT

lauantai 1. marraskuuta 2025

PictureCorrect.com: Understanding Metadata for Photographers

In the digital age of photography, understanding metadata is crucial for photographers who want to manage, organize, and utilize their photos effectively. Metadata is the hidden data embedded within your digital images, providing essential information about the photo. Let’s delve into what metadata is, why it’s important, and how you can leverage it to enhance your photography workflow.

Related note: 🍂 Autumn sale going on now for the Fundamental Camera Cheat Sheets

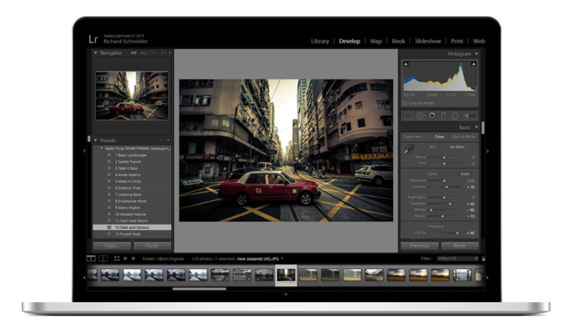
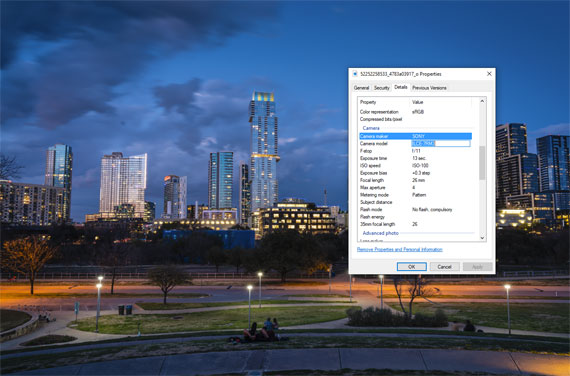
photo metadata

What is Metadata?

Metadata is essentially data about data. In the context of photography, it refers to the information embedded within your digital images that describe various aspects of the photo. This data includes details about the camera settings, the date and time the photo was taken, and even the GPS coordinates of the location where the photo was shot. Metadata is automatically generated by your camera when you take a photo and can be further edited and extended using various software tools.

Types of Metadata

EXIF (Exchangeable Image File Format):

  • Camera Settings: Includes details such as shutter speed, aperture, ISO, focal length, and white balance.
  • Date and Time: Records when the photo was taken.
  • Camera and Lens Information: Brand and model of the camera and lens used.

IPTC (International Press Telecommunications Council):

  • Descriptive Information: Captions, keywords, and titles that describe the content of the photo.
  • Author Information: Photographer’s name and contact details.
  • Copyright Information: Usage rights and licensing details.

XMP (Extensible Metadata Platform):

  • Custom Data: Allows for the creation of custom metadata fields to suit specific needs.
  • Compatibility: Ensures metadata compatibility across different software applications.

Why is Metadata Important?

  • Organization and Searchability: Metadata helps you organize your photos systematically, making it easier to search and retrieve specific images. By adding keywords, captions, and ratings, you can quickly find photos based on various criteria.
  • Workflow Efficiency: Effective use of metadata can streamline your workflow. Software like Adobe Lightroom and Capture One allows you to sort, filter, and edit images based on their metadata, saving you time and effort.
  • Copyright and Ownership: Embedding your copyright information within the metadata ensures that your ownership is recognized and helps protect your intellectual property rights.
  • Geotagging: For travel and landscape photographers, GPS metadata is invaluable. It allows you to map out your photo locations and revisit them in the future or share them with others.
  • Client Communication: For professional photographers, metadata can include client details, project information, and specific requirements, making it easier to manage client shoots and deliverables.

How to View and Edit Metadata

In-Camera:

Some cameras allow you to view basic metadata information on the camera’s LCD screen. However, for detailed metadata editing, you will need to use software tools.

Using Software:

  • Adobe Lightroom: Provides extensive metadata editing capabilities, allowing you to add, edit, and search metadata fields.
  • Adobe Photoshop: Offers metadata viewing and basic editing options.
  • Capture One: Another powerful tool for managing metadata.
  • Free Tools: Software like XnView and PhotoME provide free options for viewing and editing metadata.

Batch Editing:

Most professional software tools offer batch editing features, enabling you to apply metadata changes to multiple photos simultaneously. This is particularly useful for large photo shoots or when organizing your photo library.

Best Practices for Using Metadata

  • Be Consistent: Develop a consistent method for adding and editing metadata. Use a standard set of keywords, captions, and ratings to ensure uniformity across your photo library.
  • Automate When Possible: Use metadata presets and templates to automate the process of adding common metadata fields. This can save you a significant amount of time.
  • Backup Metadata: Always ensure that your metadata is backed up along with your photos. Some software allows you to export metadata separately, providing an additional layer of protection.
  • Update Regularly: As your photo library grows, periodically update your metadata to ensure it remains relevant and accurate.

Summary:

Understanding and utilizing metadata is a powerful way to enhance your photography workflow. By effectively managing your metadata, you can organize your photos better, protect your work, and streamline your editing process. Whether you’re a hobbyist or a professional, mastering metadata is an essential skill that will serve you well throughout your photography journey.

For Help with Tricky Lighting & Camera Settings:

Have you ever wanted to photograph an amazing moment but missed the shot because you didn’t know the right camera settings to use? That’s where these fundamental Camera Cheat Sheets come in. They are currently 75% off for an Autumn sale if you want to check them out.

fundamental photography sheets

New: Fundamental Photography Cheat Sheets

Whether you’re a seasoned professional or just starting out, photography cheat sheets can be a valuable resource for improving your skills and taking your photography to the next level. The perfect companion for any photographer. Print one out whenever you need it.

Autumn sale ending soon: The Camera Cheat Sheets at 75% Off

The post Understanding Metadata for Photographers first appeared on PictureCorrect.


from PictureCorrect https://ift.tt/gSxHey7
via IFTTT