tiistai 17. kesäkuuta 2025

PictureCorrect.com: New! Pro Tripod by Peak Design

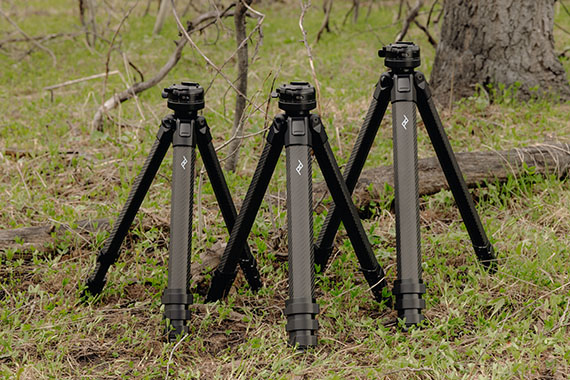
Peak Design has launched a brand-new lineup of professional-grade tripods—Pro Lite, Pro, and Pro Tall—via Kickstarter, building on the success of its award-winning Travel Tripod. Co-developed with renowned adventure photographer Jimmy Chin, this new series is aimed squarely at pros and serious enthusiasts seeking portability without compromise.
pro-tripods

What Makes the Pro Series Stand Out

  • Carbon Fiber Construction for Serious Load Capacity – All models use robust carbon-fiber legs and a CNC-machined hub, supporting up to 40 pounds of camera gear—double the weight capacity of the original Travel Tripod.
  • Three Models Tailored for Unique Needs – Peak Design’s lineup includes the lightweight Pro Lite, the standard Pro, and the towering Pro Tall. Each model maintains a compact diameter of just 3.66 inches, while offering varying maximum heights and weight capacities to fit different shooting needs.
  • Redesigned Ball Head with Fluid Panning – The updated ball head features an enhanced Arca-type quick-lock system with a secure safety toggle. A built-in fluid pan feature offers smoother movement for video work, and an optional Tilt Mod adds full pan-tilt head functionality.
  • Portability Meets Functionality – Despite their robust build, all models pack down small enough to fit into a backpack side pocket. Clever features like a stowable phone mount and hidden hex tool inside the center column remain from the original Travel Tripod.

Pro-Level Upgrades You’ll Appreciate

The Pro series introduces fast-deploy cam locks and flush angle adjusters, making setup and breakdown quicker than ever. Ergonomic CNC hardware ensures smoother handling and long-term durability. Peak Design has also developed optional accessories like spike feet, the Tilt Mod, and a Pro leveling base to further expand professional use.

photographer using tripod

Pricing & Kickstarter Details

Through the Kickstarter campaign, early backers can access significant discounts compared to the eventual retail pricing. Early-bird backers can expect to receive their units starting in late 2025, with general availability following afterward.

Why Professionals Will Be Intrigued

This new lineup doubles the load capacity compared to Peak Design’s original Travel Tripod, making it suitable for heavier cinema and photography setups. The Pro Tall reaches nearly two meters in height, ideal for taller users or for slider use with minimal center-column extension. Integrated panning and the optional Tilt Mod also make it a highly capable hybrid solution for both photo and video work.

Final Take

Early reviewers are already praising the stiffer build, improved ball head, and refined design. The Pro Lite stands out for travel and photography use, while the Pro and Pro Tall models offer serious stability for heavy-duty video and cinema applications. The carefully engineered design allows for professional-grade performance without sacrificing portability.

pro tripod

Should You Back the Kickstarter?

A strong yes if you:

  • Shoot heavy gear for photography or video.
  • Want a rugged tripod that’s still travel-compatible.
  • Like the idea of fluid panning and tilt options integrated into a ball head.

A possible wait if you:

  • Already own a high-end professional tripod.
  • Prefer detachable video heads with leveling bases.
  • Are willing to wait for full reviews after the Kickstarter campaign.

With Kickstarter savings and Peak Design’s reputation for quality, this is one campaign well worth watching.

Deal ending soon: Peak Design Pro Tripod Pre-Order Rewards


from PictureCorrect https://ift.tt/btS4B2Q
via IFTTT

maanantai 16. kesäkuuta 2025

PictureCorrect.com: The #1 Lightroom Alternative Is On Sale Today

Summer is here — and so is one of the best Luminar Neo sales we’ve seen in a while. For a limited time, Skylum is offering deep discounts on Luminar Neo as part of their summer promotion. But what makes Luminar Neo different from other photo editors? Let’s take a look at why so many photographers — from hobbyists to professionals — are adding it to their workflow.

luminar summer

AI-Powered Tools Mostly Unique to Luminar:

While many editing programs are starting to add AI, Luminar Neo has taken it much further by integrating tools that handle complex tasks with a simple, intuitive interface. A few of the standouts include:

1️⃣ Sky AI

Swapping out dull skies is notoriously difficult in most editors. Luminar Neo’s Sky AI can automatically detect the sky, replace it with a variety of built-in or custom skies, and handle the tricky edge blending and lighting adjustments automatically — no tedious masking required.

2️⃣ Relight AI

Adjusting lighting in portraits and landscapes can often mean hours of dodging and burning. Relight AI analyzes depth within your image and allows you to adjust foreground and background lighting independently. This depth-aware lighting tool is still rare even among advanced editors.

3️⃣ GenErase and GenSwap

While many apps offer object removal, Luminar Neo’s GenErase uses AI to intelligently fill in backgrounds when removing distractions, delivering cleaner results with fewer artifacts. GenSwap goes even further by allowing you to replace parts of an image with AI-generated alternatives — an emerging capability that’s still missing in most mainstream editors.

4️⃣ Portrait Tools (Skin AI, Face AI, Body AI)

For portrait shooters, Luminar Neo simplifies skin smoothing, eye enhancement, face contouring, and body shaping. These tools analyze facial features automatically and give you full control without the “over-edited” look that many portrait editors struggle to avoid.

Cross-Platform Flexibility

Unlike some competitors that are tied to one system or another, Luminar Neo works across Windows and macOS, and also integrates as a plugin inside Adobe Photoshop, Lightroom, and Apple Photos. That makes it easy to blend Luminar Neo’s unique tools into your existing workflow.

Continuous Innovation

Skylum continues to release new extensions for Luminar Neo — such as Upscale AI, Noiseless AI, HDR Merge, and Focus Stacking — many of which expand its capabilities far beyond typical one-time-purchase editors. With these add-ons, photographers get professional-level results without having to jump between multiple programs.

Why This Sale is Worth a Look

Skylum’s summer sale gives you a chance to lock in Luminar Neo at a significant discount. Whether you’re looking for a subscription or a one-time perpetual license, the current pricing makes it one of the most affordable ways to add true AI power to your editing setup.

But more importantly: you’re not just buying software — you’re getting a set of AI tools that can save you hours per edit, tackle the most time-consuming parts of post-processing, and let you focus on creativity.

The sale runs for a limited time — once it’s over, pricing returns to normal.

Found here: Luminar Neo Summer Sale


from PictureCorrect https://ift.tt/4jrdsx8
via IFTTT

sunnuntai 15. kesäkuuta 2025

PictureCorrect.com: How to Capture Motion and Blur in Photography

The fans are screaming; the Bulls have the ball, and you are following number 23 as he approaches the basket. He jumps, he shoots … you score! You did get that picture just as the ball left his fingertips, didn’t you? If you got that Sports Illustrated cover shot, the ball would be frozen just past the tip of his fingers.

This is the type of fast paced action shot that most photographers think about when they are trying to show motion in their photos; but it is not the only way to show motion. Think about it for a moment. If you were watching a wind mill on a windy day, how would those blades look? If they were frozen in mid air like the basketball, you wouldn’t be able to tell if there was actually any wind that day or not.

Related note: only a little while left for the Infinite Exposures Course at 67% Off

If you were shooting a NASCAR race and got a single car high up on the edge of a curve, do you really want it 100% stop motion, razor sharp? I would say no. Why? Because if you took the picture the way it was just described, it could just be parked on the track for all anyone knows.

Obviously, stopping motion is not the only way to show motion. If you want to freeze things in mid air, think fast shutter speed or electronic flash. If you want some blur in the image, think slower shutter speed and a tripod.

capturing motion in photos

Photo by Tuncay; ISO 200, f/22.0, .8-second exposure.

When we say slow, we mean slow compared to the speed of the subject. For example, if we are talking about a NASCAR car that goes 200 miles per hour, even 1/250 of a second might be slow enough to catch some blur. To be on the safe side, I would bracket your exposures to include: 1/500, 1/250, 1/125, 1/60, and 1/30 of a second. The first two or three shots you should be able to hand hold without much problem, but once speeds start getting at 1/60 of a second or slower, it is always safer to use a tripod.

The wind mill may only be blowing at 25mph or slower, so you might still freeze the image at only 1/125 of a second. In this case, you definitely want to use a tripod and shoot at even slower speeds. The reason you use a tripod is so that the rest of the image (other than moving parts) will photograph sharp and crisp.

So far we have only mentioned two basic choices:

A) the subject is frozen in mid air (commonly referred to as Stop Action)

B) the subject deliberately shows some blur to indicate movement.

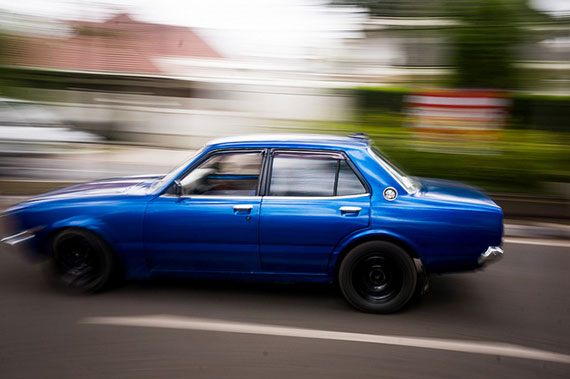
There is a third choice which is not so basic. This choice is called panning. Panning involves using a slower shutter speed, but moving with (or panning with) the subject as it goes by. This makes the subject clear but the background blurry. It is very effective in showing motion, but it does take a lot of practice. Panning can be done with or without a tripod. But the cleanest pan shots I have ever seen were taken with a tripod.

You can also combine effects. For example, I once shot a dance where there were several photographers using flash. I was trying a timed exposure of a young lady coming down a circular stair case. Right at the end of my exposure, a flash went off. The end result was really quite amazing. The ghost image of the girl walking slowly down the stairs became crystal clear when she paused at the bottom step and the flash went off.

how to capture motion in photography

Photo by Sophia Purbasari; ISO 100, f/18.0, 1/15-second exposure.

There is no one way that is right or wrong to capture motion. Sometimes we see motion using stop action; sometimes we do it with a deliberate blur. Blur can be fractions of a second, or it can be several minutes long. If you have ever seen waterfall shots with the white dreamy flowing water, it was exposed for several seconds or minutes with a tripod. The choice of how you shoot movement determines how you view movement. Next time you automatically think “stop action” try a few blur shots as well; you might be surprised at the results.

About the Author:
Award winning writer / photographer Tedric Garrison has 30 years experience in photography (better-photo-tips.blogspot.com). As a Graphic Art Major, he has a unique perspective. His photo eBook “Your Creative Edge” proves creativity can be taught. Today, he shares his wealth of knowledge with the world through his website.

For Further Training on Long Exposures:

If there was an easy way to capture long exposure photos that amaze viewers would that interest you? What if all you need is a selection of go-to settings and some low-cost accessories? So that you could capture perfectly timed long exposures every time you shoot? This in-depth course is currently 67% off if you want to check it out.

infinite exposures

Infinite Exposure Tutorials

This 5-hour course walks you through the entire process of taking stunning long exposure photos. Including camera settings, gear and setup, daytime shooting, and night-time shooting. With and without filters.

Deal ending soon: Infinite Exposures at 67% Off


from PictureCorrect https://ift.tt/IROQ7cm
via IFTTT

lauantai 14. kesäkuuta 2025

PictureCorrect.com: Pick and Choose Tips for Photography Composition

Everything today is about getting things done fast.

For the most part, we consider that a good thing.

However, in photography, slowing down for one second to complete this simple task will significantly improve your photos immediately!

For today’s lesson, I’m going to share with you this seemingly insignificant step that many photographers tend to overlook. Still, many a Pro shooter will confirm it’s an absolute necessity.

This article is based on concepts from Understanding Composition if you want to dig deeper for further training.

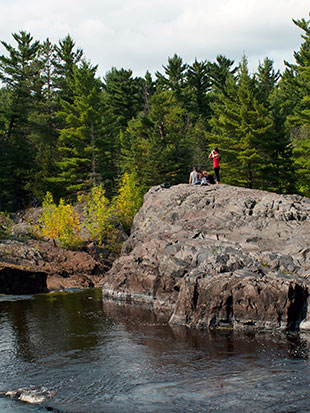
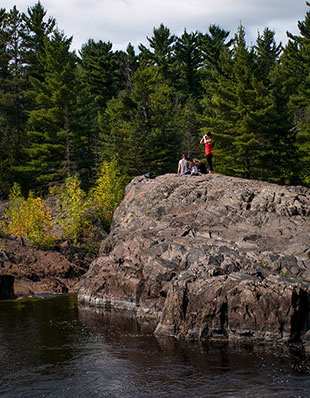
example of not being selective with composition

Photograph #1 by Kent DuFault

Photo #1 is an excellent example of myself not practicing what I’m about to preach. (You have to love how photography is a constant learning experience!)

Here’s your Quick Tip:

When confronted with a scene that catches your eye, and you wish to photograph it, stop and practice the Pick and Choose mindset.

how to visualize photo parts of composition

Photograph #2 by Kent DuFault

When I created this picture, I saw the woman standing next to her friends, and I simply raised the camera and clicked the shutter because I found it a fascinating mix of color and texture with a human element.

If I ‘d been practicing the Pick and Choose mindset, I could’ve really improved my end result!

I would’ve:

• Evaluated what should be included in the frame.
• Decided what shouldn’t be included in the frame!
• And identify composition elements to help me tell my story.

I should’ve seen something similar to Photograph #2 in my mind!

example of better composition by cropping

Photograph #3 by Kent DuFault

The Pick and Choose mindset would’ve told me that Photograph #3 was a better picture than the one that I actually created.

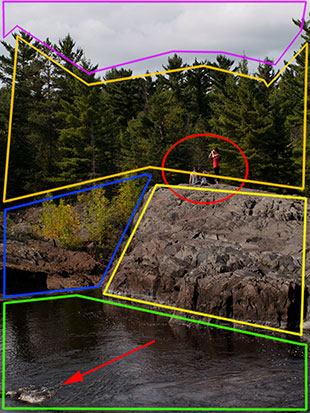
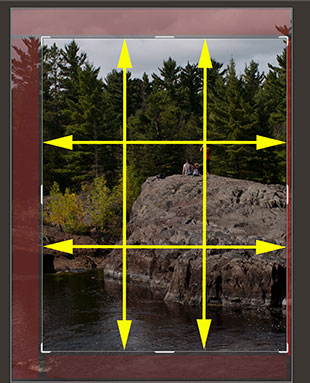
rule of thirds outlined on photo

Photograph #4 by Kent DuFault

As digital photographers, we do have the luxury of ‘fixing’ some things in post-production.

However, there’s always a trade-off. Look at how much of my image area I’ve lost when cropping to fix my picture!

Taking a couple of seconds to “Pick and Choose” my frame elements could’ve saved the day.

When raising your camera to click the shutter, think Pick and Choose.

  • Scan the entire frame within your viewfinder.
  • Can your composition be tighter to the subject?
  • Have you truly identified your subject?
  • Do you have unwanted elements that you could exclude from the frame?
  • Could a change in camera position eliminate distracting background elements?
  • Is your subject located in the best position within the space of the frame?

The Pick and Choose mindset is a skill that you can begin today. Once you start actively practicing this pro technique, it’ll become second nature!

About the Author:
Kent DuFault is an author and photographer with over 35 years of experience. He’s currently the director of content at the online photography school, Photzy.com

For Further Training:

So many new photographers think the key to great images is going to beautiful places and pressing the shutter button. But how you compose a shot is actually one of the most important parts of the equation. This in-depth guide is designed to give you a complete understanding of composition fundamentals, taught through 120 easy-to-follow pages of training, illustrations, and assignments.

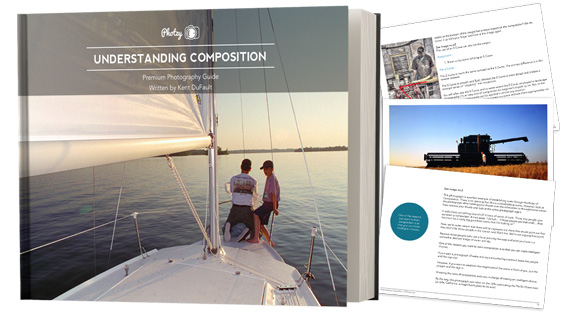
understanding composition

Pages from Understanding Composition

“Your photography is no different than Beethoven composing his “5th Symphony”, or Van Gogh sketching the layout for ‘Starry Night’. It all starts with GREAT composition!”

Take a peek inside: The Understanding Composition Guide at 62% Off


from PictureCorrect https://ift.tt/tq6xXsG
via IFTTT

perjantai 13. kesäkuuta 2025

PictureCorrect.com: Capturing Motion with Slow Shutter Speeds

A camera with manual controls gives you the power to capture some amazing effects, once you know how to use it. You can develop all the skills of a professional once you understand your manual settings.

Related reminder: only a little while left for the Infinite Exposures Course at 67% Off

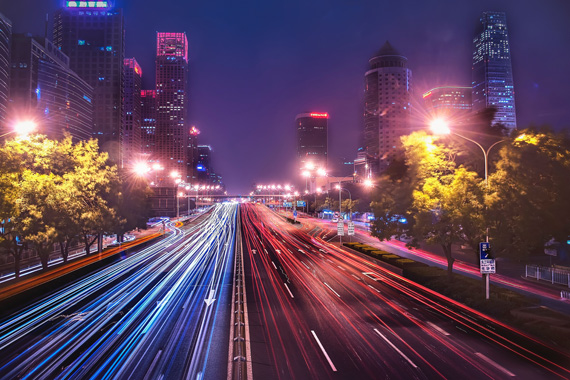
traffic long exposure

Photo captured by zhang kaiyv

If you’ve grown up with a ‘point and shoot’ camera and have just taken the plunge with a new digital SLR or mirrorless camera, don’t just leave it on auto. That is a waste of good technology; it means you’re still using your equipment as a point and shoot camera. The key to improving your photography is to learn to use your manual settings.

One of these settings is shutter speed. It’s fun to experiment with and easy to see the results in your photos. Although we usually try to freeze our subject with the fastest shutter speed possible, you can get some great effects by using a slower shutter speed to capture movement.

To try this out, you can set your camera to Shutter Priority mode, in which case you set the shutter speed and the camera takes care of the aperture for you. Or, you can go to fully manual mode and adjust both settings yourself. Just remember to keep your exposure balanced by compensating each movement in the shutter speed setting with a corresponding movement of the aperture setting.

Remember to always use a tripod for slow shutter speed photos.

5 Ideas for Long Exposure Photography

Here are five ideas for great capturing great motion effects, simply by slowing down your shutter speed to capture the movement of the subject. If you haven’t tried this before, you’ll have some fun and be thrilled with the results.

1. Waterfalls

This is the obvious first choice. You have certainly seen the silky effects of flowing water in photos, but perhaps you have wondered how it’s done. Just set your camera to a very slow shutter speed—about one second or a half-second—and see the results. The silky slow movement effect is not always your best option. For each waterfall you should try a few shutter speeds to see which one works best for that particular subject.

2. Cars at Night

When doing night photography, you usually need fairly slow shutter speeds anyway. If you try shutter speeds of one second, two seconds, ten seconds, and even longer, you will see some amazing results.

street cars

Photo by Ben; ISO 400, f/6.3, 4-second exposure.

In color photos, the lights of the vehicles will create streams of bright color, stretching away into the distance. The more traffic you see, the more remarkable the effect becomes.

3. Lightning

People often ask me how I take my lightning photos. Some people imagine it takes superhuman reflexes to snap the picture at just the right moment. The truth is, my approach is exactly the opposite.

slow shutter speed lightning

“Windmill and Lightning” captured by Jeremy Weber

First, I wait for a storm (at night) with lots of lightning; in particular, fork lightning that will appear well defined in a photo. I set the shutter to the ‘B’ setting, which lets me open the shutter for any length of time I choose. Then I wait for the lightning to flash. I can capture just one flash of lightning, or several flashes, just by leaving the shutter open for longer.

4. Waves

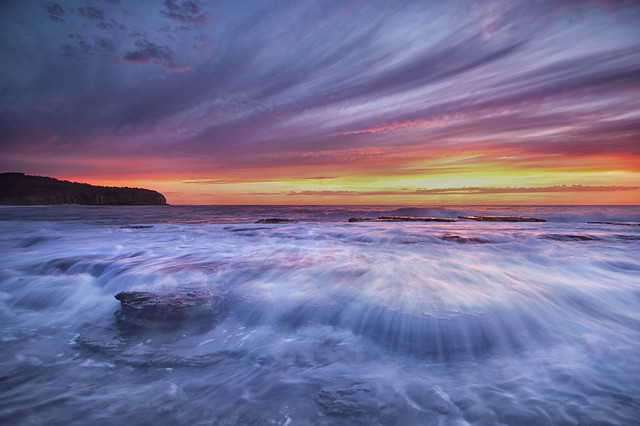
The movement effect of water in a waterfall can also be applied at the beach, although you don’t see it so often in photography. When you visit the beach, experiment with different shutter speeds.

long exposure ocean waves

“Narrabeen Sunrise” captured by Nigel Howe

Sometimes you will find that soft movement effects are just as satisfying as freezing everything with a fast shutter speed.

The misty appearance of fast moving water captured with slow shutter speeds can be most effective where waves are crashing over, or swirling around rocks.

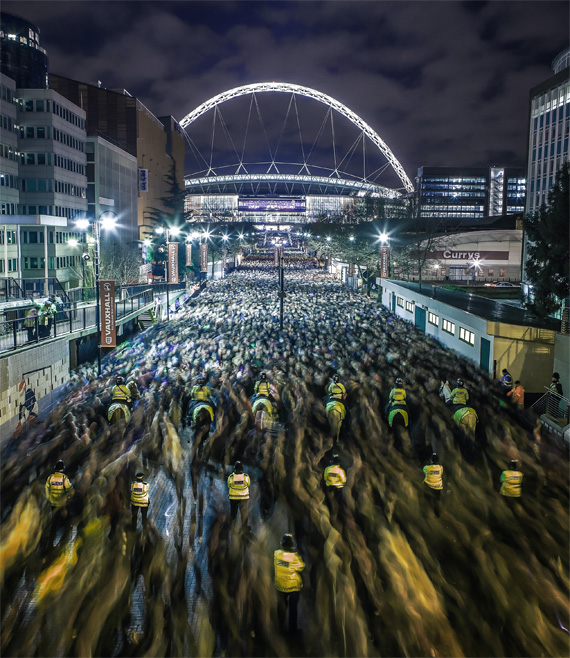
5. Crowds Of People

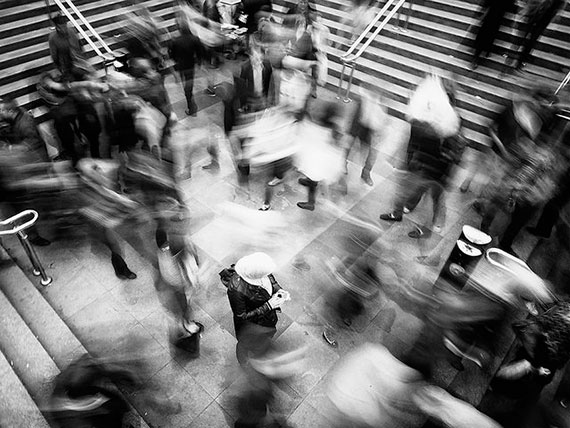
A crowd of people moving in different directions can create a fascinating motion effect in a photo. You don’t need extremely slow shutter speeds to capture some nice results. Photos taken around 1/4 of a second will show substantial blurring, but of course you can exaggerate the effect by going even slower.

For a really impressive image, have a friend stand very still, while everyone around them is moving. Your subject will appear frozen in a sea of moving humanity. Very striking!

crowd long exposure

Photo captured by Jaanus Jagomagi

So there you have some experiments to go out and try yourself. If you haven’t done it before, you are bound to have fun and be excited by the results. And of course it will force you to get to know your camera a little better, which is guaranteed to make you a better photographer.

About the Author:
Andrew Goodall writes for https://naturesimage.com.au/ and is a nature photographer based in Australia. He manages a gallery in Montville full of landscape photography from throughout Australia.

For Further Training on Long Exposures:

If there was an easy way to capture long exposure photos that amaze viewers would that interest you? What if all you need is a selection of go-to settings and some low-cost accessories? So that you could capture perfectly timed long exposures every time you shoot? This in-depth course is currently 67% off if you want to check it out.

infinite exposures

Infinite Exposure Tutorials

This 5-hour course walks you through the entire process of taking stunning long exposure photos. Including camera settings, gear and setup, daytime shooting, and night-time shooting. With and without filters.

Deal ending soon: Infinite Exposures at 67% Off


from PictureCorrect https://ift.tt/VYaGJsN
via IFTTT

keskiviikko 11. kesäkuuta 2025

PictureCorrect.com: Where to Put Hands in Photos

There are three modes of non-verbal communication in humans.

The first and most apparent is facial expression, including using our eyes and mouths.

The second is body language—how we position ourselves.

The third is our hands.

This article is based on concepts from The Art of Portrait Photography if you want to dig deeper for further training.

Immanuel Kant, the 18th-century German philosopher, has an excellent quote about hands. “The hand is the visible part of the brain,” he said. This phrase should be on the mind of every photographer who takes pictures of people.

Pay Attention to the Hands

Photographers tend to pay a lot of attention to the face, but sometimes pay little attention to body language, and even less toward their subject’s hands.

Here are some photography tips for shooting people in such a way that incorporates their hands, including do’s and don’ts.

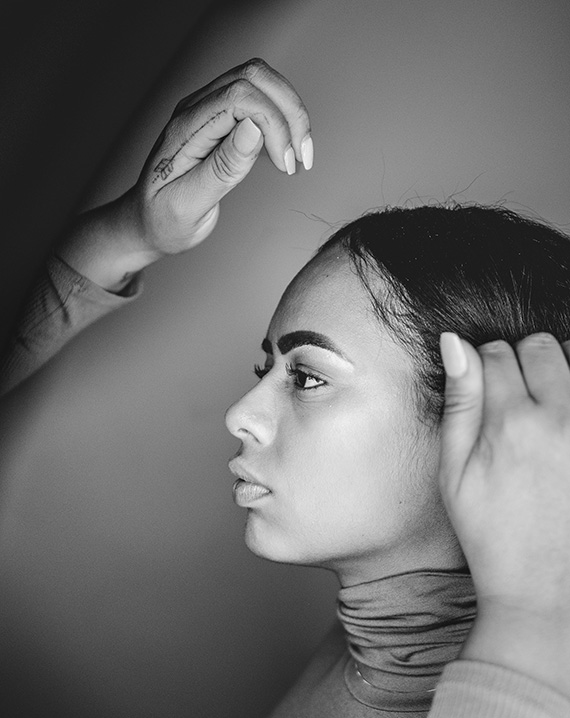
Don’t place a subject’s hand close to the face, unless it frames the face or provides context to the expression.

In the example photo above, the subject’s hand attracts as much visual attention as the face itself, if not more. This may have been a jewelry shoot to showcase her rings, but if the prominence of her hands was not intentional, then the effect is often distracting.

how to place hands in photos

Photo by David Alvarado

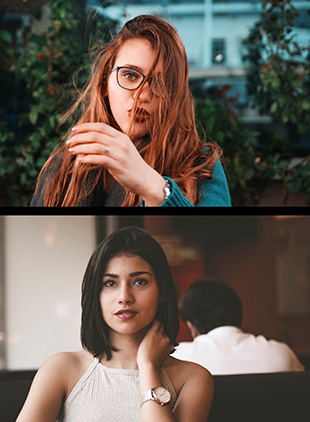
When appropriately positioned, and with good lighting, hands can accentuate a face. They can provide an eye-catching frame that forces a viewer’s eyes right toward the subject of the portrait.

hand in photos examples

From top: Photos by Hichem Dahmani and Allef Vinicius

Keep the hands close to, or parallel to, the body. Placing one or both hands closer to the camera than the rest of the body rarely works out—unless you’re going for a unique effect.

hands in pockets photos good or bad

Photo by Michael Afonso

It is equally important not to let your subject push their hands all the way into their pockets—they will simply disappear.

An old trick used by wedding photographers is to have a subject hook just their thumbs into their pockets, while leaving the rest of their hands hanging on the outside of their pants. Another option is to have the subject slide the last three fingers into the pocket while keeping the thumb and forefinger exposed.

You may be wondering, why place their hands in their pockets at all?

The reason is simple and mostly psychological: when photographing subjects who are uneasy or not used to being in front of the camera, giving them something to do with their hands will often relax them.

how to pose subjects hands in photos

Photo by Nick Karvounis

When posing the hands, you must also take into account the framing of your picture. Is it a headshot? Is it a half body shot? Maybe it is a full-figure shot? The placement of the hands will change based upon the amount of body you include in your picture.

This last example photo is a perfect use of hands in a portrait. Here’s why:

  1. They don’t distract from the subject’s face.
  2. The hand placement provides a balance to the composition by giving some shape and contrast against the dark coat in the lower part of the frame.
  3. The body language of the arms and hands matches the expression of the subject’s face.
  4. Her ring becomes a small focal point, helping to tell a story about the subject’s sense of style and perhaps her personality.

About the Author:
Kent DuFault is an author and photographer with over 35 years of experience. He’s currently the director of content at the online photography school, Photzy.com

For Further Training:

Do you know what subject generally scares the daylights out of new photographers? Photographing people! This eBook is designed to help you become a master of portraits with insider secrets used by professionals and more. It contains 214 pages of in-depth easy learning packed with illustrations, case-studies and assignments to verify your knowledge. It is currently 82% off which ends soon if you want to check it out.

portrait photography

The Art of Portrait Photography at 80% Off (Learn more)

Do you have lots of photographs of barns, fences, plates of food, and landscapes? But portraits – not so much? Don’t worry. We’ve all been in that same boat. Author, and professional photographer, Kent DuFault, has put over three decades of experience into this eBook. If it’s happened in a portrait session, it’s happened to him. His pain is your gain.

Deal found here: The Art of Portrait Photography at 82% Off


from PictureCorrect https://ift.tt/xnE7Pum
via IFTTT

tiistai 10. kesäkuuta 2025

PictureCorrect.com: Update: Synthetic Photography Masterclass

Steeletraining just added some updates to their popular Synthetic Photography MasterClass (currently 40% off!) along with the updates that have come to Midjourney.

AI image generation is more accessible than ever. Tools like ChatGPT, DALL·E, and others now let anyone create visuals with just a few words. But while access is growing, quality remains another story entirely.

That’s why more and more photographers—not replacing their cameras, but evolving their workflows—are starting to blend AI-generated imagery with their own photos, especially for commercial projects that demand speed, flexibility, and allow creative range.

And in that space, MidJourney still leads the way.

What’s New in MidJourney?

The most notable update is the Image Editor, which allows users to upload their own images and modify them directly within MidJourney’s interface.

Here’s what that unlocks:

  • Upload real photographs and selectively edit or enhance them
  • Use inpainting and outpainting tools to creatively remix parts of an image
  • Combine photography and AI art in a seamless, high-fidelity workflow
  • Make targeted edits with MidJourney’s unique artistic flair

This feature brings a Photoshop-like level of control—but with the magic of MidJourney’s rendering engine.

New Lessons Added to the Synthetic Photography Masterclass

To keep pace with these breakthroughs, professional photographer Phil Steele has updated his popular Synthetic Photography Masterclass.

The newest lessons walk you through:

  • How to use the MidJourney Image Editor step by step
  • Uploading your own photos and enhancing them with AI
  • Creating hybrid imagery that blends DSLR shots with synthetic elements
  • Advanced prompting for lighting, detail, and composition control

Phil’s course has always focused on helping photographers creatively explore the power of AI—without abandoning their craft. These new modules are perfect for photographers and visual artists looking to extend their creative reach.

Why MidJourney Still Stands Apart

It’s tempting to assume all AI image generators are more or less the same. But spend five minutes comparing MidJourney to its competitors, and the difference becomes obvious.

While other tools may offer convenience, MidJourney offers quality—with unmatched detail, color harmony, and stylistic consistency. That’s why it remains the top choice for creators who care about the final image as much as the process behind it.

Check Out the Updated Course

Whether you’re brand new to MidJourney or already experimenting with AI in your photography workflow, Phil Steele’s updated course is packed with practical instruction and inspiring examples.

AI photography isn’t about replacing your camera. It’s about expanding your vision. And this is one of the best places to start.

The course is currently 40% to celebrate the updates if you want to check it out.

Deal ending soon: The Synthetic Photography Masterclass at 40% Off


from PictureCorrect https://ift.tt/pUBjKOo
via IFTTT