maanantai 22. toukokuuta 2023

PictureCorrect.com: How a Fisheye Lens Works

A fisheye lens is a type of ultra wide-angle lens that produces strong visual distortion to create a wide panoramic or hemispherical image. Named for the visual effect they create, which is similar to how the world might look through a fish’s eye, these lenses achieve an extremely wide field of view by bending incoming light rays in a way that is radically different from a typical camera lens.

fisheye lens image

Photo captured by Stewart Munro

Here’s a more technical explanation of how this works:

  1. Light collection: Fisheye lenses have a much wider field of view than normal lenses. This means that they collect light from a larger area.
  2. Lens shape: The front element of the lens is bulged in a way that resembles a hemisphere rather than being flat or mildly curved. This unusual shape is crucial to the lens’s ability to capture such a wide field of view.
  3. Light bending: The convex shape of the lens causes incoming light rays to bend more toward the edges. This bending of light, also known as refraction, allows the lens to capture light from a wider field of view than would be possible with a lens that does not cause as much bending.
  4. Image projection: The lens projects the light onto the camera’s sensor or film plane in a different way than normal lenses. Normal lenses aim to project light in such a way that straight lines in the real world are reproduced as straight lines in the image. Fisheye lenses, however, project light so that straight lines are reproduced as curves if they do not pass through the center of the image.

The outcome of all this is an image that has a unique aesthetic: an extremely wide field of view, significant distortion towards the edges of the frame, and a certain kind of perspective “warping” that can make the image feel more immersive or dramatic.

It’s worth noting that there are two main types of fisheye lenses: circular fisheye lenses, which produce a round image with a 180-degree field of view in all directions, and full-frame fisheye lenses, which produce a rectangular image with a 180-degree field of view only in the diagonal direction. The type of fisheye lens used can have a significant impact on the look of the final image.

For Further Training:

This #1 bestseller is the most in-depth eBook on how to capture amazing photography anywhere. Over 250 pages of photography tips & tricks from industry insiders. Currently 83% off for a Spring Sale that’s wrapping up if you want to check it out.
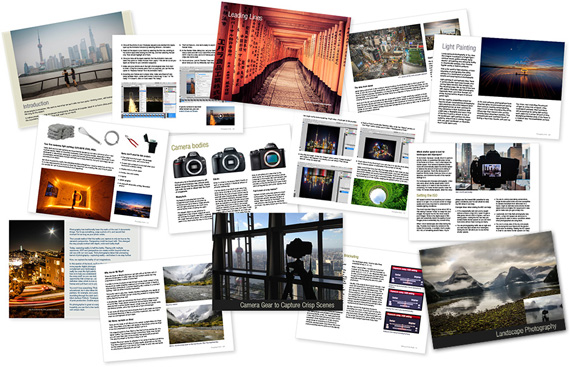
ebook pages

Pages from The Photography Tutorial eBook

It is the product of over a DECADE of research as an insider in the photography industry, assembled to help you learn quickly and avoid the mistakes that I made along the way.

Deal ending soon: The Photography Tutorial eBook Spring Sale

- - - - - - - - - - - - - - - - - - - - - - - - - - - - - - - - - - - - - - - - - - - - - - - - - - - - - - - - - - - - - - - - - - - - - - - - - -

Did you appreciate this newsletter? Please help us keep it going by Joining Our Patreon Supporters

What are your thoughts on this article? Join the discussion on our Facebook Page

PictureCorrect subscribers can also learn more today with our #1 bestseller: The Photography Tutorial eBook

- - - - - - - - - - - - - - - - - - - - - - - - - - - - - - - - - - - - - - - - - - - - - - - - - - - - - - - - - - - - - - - - - - - - - - - - - -

The post How a Fisheye Lens Works appeared first on PictureCorrect.


from PictureCorrect https://ift.tt/LJVTNAa
via IFTTT
PictureCorrect.com: Exploring Landscape Photography with a Single Prime Lens

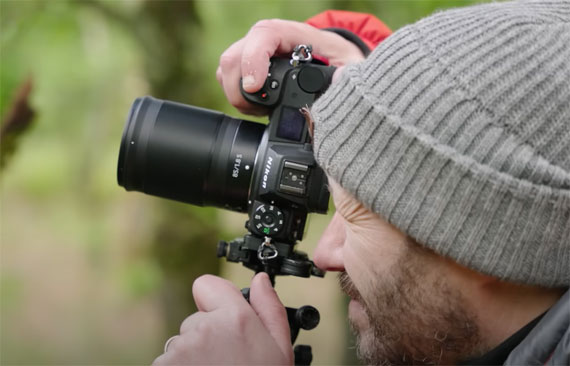
Recently landscape photographer Nigel Danson shared his experiences venturing into the Lake District, armed with nothing more than an 85mm lens. The challenge? Capture the beauty of this serene location through the confines of a fixed focal length lens. The result was a visual exploration that revealed new layers of creativity and spontaneity in his work. Let’s unpack some of the lessons learned from his adventure:

Nigel Danson began the expedition with an objective in mind – a self-imposed challenge to use a single focal length throughout his journey. Using an 85mm lens forced him to take fewer shots, thus compelling him to explore more and be more thoughtful about each composition.

Challenge Yourself: The Power of One Focal Length

His constraint led to creative solutions and pushed him to find novel ways to capture the essence of the landscape. By working within these constraints, Danson effectively stretched his creativity and produced extraordinary results that emphasized the aesthetic power of simplicity.

The Importance of Physical Movement in Photography

One crucial takeaway from Danson’s video is the importance of movement in photography. Without the flexibility of a zoom lens, he needed to physically move around to find the perfect shot. This approach encouraged him to be more aware of his surroundings and look for new perspectives that may not have been evident from his initial vantage point.

The Impact of Timing and Light on Landscape Photography

Another lesson from Danson’s experience involves the timing and light in landscape photography. He demonstrated the importance of waiting for the perfect light to illuminate a scene, showing how it could transform an ordinary image into something exceptional.

The right light conditions can create depth, accentuate textures, and provide an image with an appealing, almost magical glow. However, it requires a great deal of patience and the ability to seize the moment when it arises.

Spotting the Extraordinary in the Ordinary

Danson’s exploration brought forth the idea of spotting extraordinary details in ordinary scenes. By capturing close-ups of ferns or silhouettes of isolated trees against a mountain backdrop, he reminded us of the beauty inherent in everyday sights that we often overlook.

Danson also demonstrated the power of an 85mm lens in creating compelling images that rely on the lens’s natural bokeh effect to separate the subject from the background. This allowed him to draw attention to intricate details and create a sense of depth and three-dimensionality in his images.

single lens

Appreciating the Value of Simplicity in Composition

Above all, Danson underscored the value of simplicity in composition. By using the green patches as leading lines into his scenes, he drew the viewer’s attention to the focal points of his images. This was particularly effective in the dense woodland, where he managed to distill complex scenes into simpler, more digestible compositions.

Conclusion: Embrace the Challenge

Throughout his journey, Nigel Danson repeatedly showed that constraints could be a photographer’s best friend, acting as catalysts for creativity. The adventure wasn’t just about capturing images with an 85mm lens; it was a lesson in embracing challenges, understanding the landscape, and refining the art of seeing. It was a testament to the power of patience, the magic of the right light, and the potential hidden in everyday scenes.

Finally, Danson’s experience emphasized the importance of physical movement in photography – a reminder that the best zoom function we have is our own two feet. By stepping out of our comfort zones and embracing new ways of capturing the world around us, we can unlock new dimensions of creativity in our work.

- - - - - - - - - - - - - - - - - - - - - - - - - - - - - - - - - - - - - - - - - - - - - - - - - - - - - - - - - - - - - - - - - - - - - - - - - -

Did you appreciate this newsletter? Please help us keep it going by Joining Our Patreon Supporters

What are your thoughts on this article? Join the discussion on our Facebook Page

PictureCorrect subscribers can also learn more today with our #1 bestseller: The Photography Tutorial eBook

- - - - - - - - - - - - - - - - - - - - - - - - - - - - - - - - - - - - - - - - - - - - - - - - - - - - - - - - - - - - - - - - - - - - - - - - - -

The post Exploring Landscape Photography with a Single Prime Lens appeared first on PictureCorrect.


from PictureCorrect https://ift.tt/wZF6dxs
via IFTTT

sunnuntai 21. toukokuuta 2023

PictureCorrect.com: How to Photograph Waterfalls

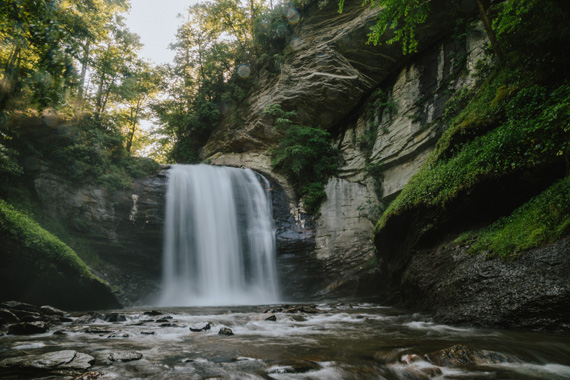
I love water. Coming from Ontario where lakes and rivers abound, I’d spend entire summers at our cottage as a kid either in or on the water. I’m still drawn to it like steel to a magnet, so it’s not surprising that after learning the technique to create the beautiful pictures like in this article, I was shooting every waterfall I could find!

waterfall photography

Photo by Wes Hicks; ISO 100, f/22.0, 0.6 sec, 24mm.

If you have waterfalls in your area, or are planning a trip where you will have access to waterfalls, rapids, etc, keep the following few tips in mind for some beautiful and dramatic captures.

As mentioned in my article How to Shoot Fireworks, a tripod is at the top of the list for equipment, including a remote cable release. Mirror lock-up is good if your camera has it. The reason for all this is that we’re aiming for that silky, surreal effect, which requires the shutter to be open one second or more.

Some important factors are film speed, or ISO setting if you’re shooting digital. Because we want a nice long exposure, ISO 100 or lower is ideal. An overcast sky is best, as it provides diffused light, as opposed to the harsh shadows and highlights of direct sunlight. Filters are important here too: see the list just below.

In the end, all these elements work nicely together to get the ideal shutter speed of two to five seconds, possibly more.

For equipment, you’ll need a…

  • good SLR that you can put into either manual or aperture priority mode.
  • tripod.
  • neutral density filter, and filter holding system such as Lee or Cokin.
  • polarizing filter.
  • remote cable release for the camera.

So the setup goes as follows: find a nice composition of your water subject, which doesn’t have to be a full-frame of the entire waterfall, as sometimes just a small portion of it is all you need for an effective and beautiful shot. And, it doesn’t have to be an actual full-blown waterfall – any water moving over rocks and such still come out beautiful with this technique. Set your tripod at its lowest possible height for stability, and if it’s windy, hang your camera bag off it to add weight.

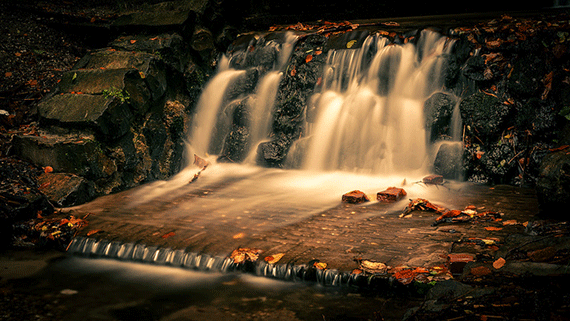
best tips for photographing waterfalls

Photo by Dennis Burger; ISO 100, f/11.0, 30-second exposure.

The f-stop should be set for maximum depth of field, not only to maintain focus across the entire image, but also to minimize the amount of light entering your camera – remember, we’re looking for a long exposure. A setting of f-22 may cause a slight bit of blurriness due to light fringing. Photons actually bend a slight bit around sharp edges (i.e. your camera’s aperture blades), so you’ll need to experiment. Perhaps f-13 or f-19 will best suit your lens.

Adjust the polarizing filter to eliminate as much reflection as possible, then take a reading of the subject with your camera in aperture priority, noting the shutter speed. If it’s too fast, then you will want to either stop down the aperture, and/or add a neutral density filter or two. I carry a one-stop as well as a two-stop, so not only do I have the choice of a one or two stop reduction in light, but if I stack them, I can get three stops of light reduction which is great for those really long exposures.

So, you’ve composed your image, and found the right combination of f-stop and filters to achieve the ideal shutter speed. There are two techniques for firing the shutter. If you keep the camera in aperture priority, and move your face away from the camera to trip the shutter with your remote cable, your exposure will be incorrect. Light entering the eyepiece affects the in-camera metering, so either keep your eye in the eyepiece, or cover it with your hand when firing the shutter.

The other method it to note the shutter speed when composing, put the camera into manual mode, and set the shutter to that metered value. You can then back off from the camera and trip the shutter with no worries about the camera changing any settings on you. If you happen to have forgotten your remote cable at home (which I’ve done more than once), just use the camera’s timer feature. That way, you’re not jiggling the camera when the shutter fires.

A quick word about image stabilizing technology: whether it’s in the camera or in your lens, turn it off unless the manufacturer says it’s designed to be activated while on a tripod. Some even sense when they’re on a tripod, and dampen mirror slap, such as Canon’s 70-200 f2.8L IS USM lens. Otherwise, leaving it on actually will blur your image.

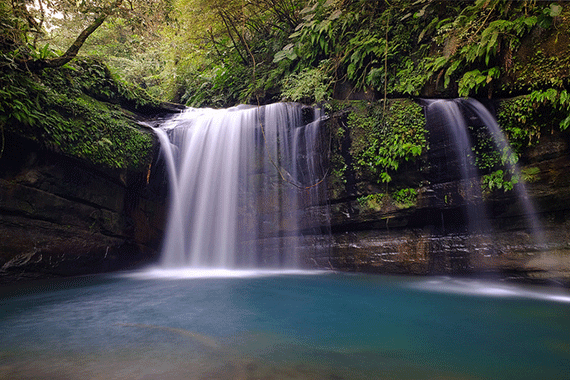
waterfall photography methods

Photo by jack.chih; ISO 200, f/11.0, 20-second exposure.

So, experiment with your settings. Play with longer and shorter shutter speeds, under and over exposing, etc. You will then get a good feel for your camera’s capabilities, which leads to more beautiful pictures to add to your collection. Although this is a technique used to create many images you see in coffee table books, etc, it’s still a satisfying experience creating your very own!

Enjoy!

About the Author:
James Hutchison is a graduate of the New York Institute of Photography, and a member of the National Association of Photoshop Professionals.

- - - - - - - - - - - - - - - - - - - - - - - - - - - - - - - - - - - - - - - - - - - - - - - - - - - - - - - - - - - - - - - - - - - - - - - - - -

Did you appreciate this newsletter? Please help us keep it going by Joining Our Patreon Supporters

What are your thoughts on this article? Join the discussion on our Facebook Page

PictureCorrect subscribers can also learn more today with our #1 bestseller: The Photography Tutorial eBook

- - - - - - - - - - - - - - - - - - - - - - - - - - - - - - - - - - - - - - - - - - - - - - - - - - - - - - - - - - - - - - - - - - - - - - - - - -

The post How to Photograph Waterfalls appeared first on PictureCorrect.


from PictureCorrect https://ift.tt/Q3uEvXs
via IFTTT

PictureCorrect.com: Interesting Photo of the Day: Antelope Canyon Colors

Photo tours around Antelope Canyon in Arizona are quite the experience. While not everyone seems to enjoy it, the same cannot be said about the photos that you end up getting. The natural beauty of the canyon is so mesmerizing that the images come out terrific and surreal. When photographer Giorgio Suighi was there, he was able to capture this brilliant image:

“Oozing Colors in Antelope Canyon” by Giorgio Suighi (Via Reddit. Click image to see full size.)

The textures, patterns, and the interesting shapes of the walls of the canyons are what make this place every photographer’s dream. Who wouldn’t love to be here to photograph the beauty of it? On top of that, what also stands out in the image are the colors.

Maybe it’s the way Suighi has processed the image, or his white balance setting, but the stark contrast in colors between the shadows and the highlights is quite interesting. The dominance of blue tint on the shadows with the bright area outside appearing golden yellow definitely adds a wow factor to the image.

- - - - - - - - - - - - - - - - - - - - - - - - - - - - - - - - - - - - - - - - - - - - - - - - - - - - - - - - - - - - - - - - - - - - - - - - - -

Did you appreciate this newsletter? Please help us keep it going by Joining Our Patreon Supporters

What are your thoughts on this article? Join the discussion on our Facebook Page

PictureCorrect subscribers can also learn more today with our #1 bestseller: The Photography Tutorial eBook

- - - - - - - - - - - - - - - - - - - - - - - - - - - - - - - - - - - - - - - - - - - - - - - - - - - - - - - - - - - - - - - - - - - - - - - - - -

The post Interesting Photo of the Day: Antelope Canyon Colors appeared first on PictureCorrect.


from PictureCorrect https://ift.tt/ksgnizB
via IFTTT

PictureCorrect.com: Wedding Photography in the Rain Tutorial

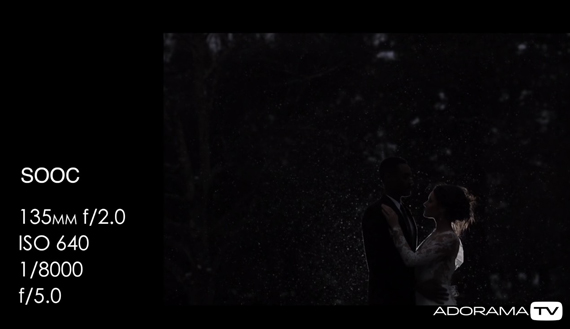
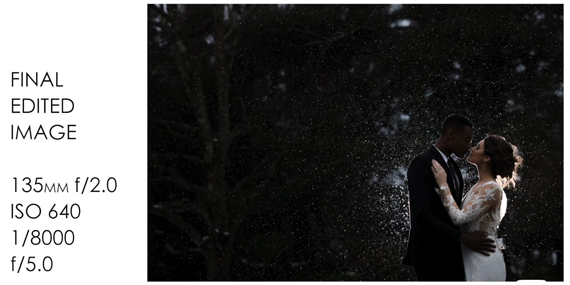
There you are on wedding day, all set to take the couple’s photos, when it starts to rain. What do you do? Well, you can’t postpone the wedding! Wedding photographer Vanessa Joy with Adorama shares some tips to help you shoot wedding photos in the rain:

Background

Photographs in the rain look best when it’s dark. If it’s not dark, place the couple in front of a dark background to accentuate the raindrops.

Using a longer lens compresses the background and makes it appear closer to the subject, making the raindrops more prominent. If it’s still not dark enough, increase the shutter speed as high as possible, while maintaining a low ISO.

Lighting

Place a light directly behind the couple and turn it slightly more toward the groom. This is important as the highlights in the bride’s white dress can easily blow out due to the light. Don’t place any sort of modifier or grid on the light. Let it spread as much as possible.

Set the power on the light depending on the ambient light. If it’s bright outside, you will need to set the flash output at a higher power setting to overpower the ambient light.

wedding photoshoot on rainy day

In order to have some light on the couple’s faces, you can also place another light at the front. But, be sure to keep it at a low power setting. If silhouettes aren’t your thing, you can raise the exposure later in post to bring up some more details on the bride and the groom. But, doing so will introduce loads of noise in the image. It may not be an issue if the images are to be used for social media, but they’ll appear muddy when printed.

rainy day wedding photoshoot

Are you a fan of shooting out in the rain?

- - - - - - - - - - - - - - - - - - - - - - - - - - - - - - - - - - - - - - - - - - - - - - - - - - - - - - - - - - - - - - - - - - - - - - - - - -

Did you appreciate this newsletter? Please help us keep it going by Joining Our Patreon Supporters

What are your thoughts on this article? Join the discussion on our Facebook Page

PictureCorrect subscribers can also learn more today with our #1 bestseller: The Photography Tutorial eBook

- - - - - - - - - - - - - - - - - - - - - - - - - - - - - - - - - - - - - - - - - - - - - - - - - - - - - - - - - - - - - - - - - - - - - - - - - -

The post Wedding Photography in the Rain Tutorial appeared first on PictureCorrect.


from PictureCorrect https://ift.tt/PBGabcD
via IFTTT

lauantai 20. toukokuuta 2023

PictureCorrect.com: 10 Common Problems Photographers Fix with Photo Editing

Final day: only hours left for the Luminar Photo Editing Course at $30 Off

Photo editing is an essential part of the photography process, often used to correct or enhance images. Here are some of the most common problems that photographers usually fix in photo editing:

photo editing image

Photo captured by Onur Binay

Exposure Issues: Overexposed photos are too bright, with details lost in white areas, while underexposed photos are too dark, losing details in shadows. Editors adjust exposure levels to balance the image.

White Balance: Sometimes the colors in a photo may appear too blue (cool) or too orange (warm) based on the lighting when the photo was taken. Editors adjust the white balance to make the colors appear more natural.

Contrast: Photos can sometimes look flat without enough difference between light and dark areas. Adjusting the contrast can make the image pop more.

Color Saturation: This refers to the intensity of the colors. Sometimes colors can appear too vibrant or not vibrant enough. Adjusting the saturation can help to achieve a more balanced look.

Noise: High ISO settings, low light, or long exposures can cause noise, which appears as random specks of color. Noise reduction tools can be used to minimize this.

Sharpness: If a photo isn’t perfectly in focus, it might appear a little blurred. Editors can increase sharpness to a degree, but it’s better to get the focus right when taking the photo as there are limits to how much you can correct this.

Composition: While ideally, this should be fixed when taking the photo, sometimes it’s necessary to crop or straighten a photo during editing to improve its composition.

Blemish Removal: This is especially common in portrait photography. Photographers use editing software to remove blemishes, wrinkles, and spots from a subject’s skin or to remove unwanted elements from the image.

Distortion: There can be different types of distortions in photographs like barrel distortion, pincushion distortion, or perspective distortion which can make straight lines appear curved or objects appear closer or further than they are. This is particularly noticeable in architectural photography, where straight lines and symmetry are important. Using photo editing software, these distortions can be corrected.

Chromatic Aberration: This is a common optical problem that occurs when a lens is either unable to bring all wavelengths of color to the same focal plane, and/or when wavelengths of color are focused at different positions in the focal plane. It appears as a fringe of color along boundaries that separate dark and bright parts of the image. Photo editing software can be used to reduce or eliminate the appearance of chromatic aberration.

These are some of the most common problems that photographers fix in editing, but there are many other potential issues and creative choices that can be made during the editing process.

For Further Training on Photo Editing:

Whether you’re brand new to photo editing,  or want to add Luminar Neo into your workflow – this new Luminar Neo Masterclass may help. Designed to help you gain confidence in your photo editing abilities, speed up your workflow and create stunning images. It is currently 30% off until Sunday, May 21.

luminar neo image

You’ll learn the best approach to photo editing starting with the basics before moving on to adding creative touches. Clean up spots, powerlines, do portrait edits, replace the sky, remove the background, control the light in 3D and more.

Only hours left: The Luminar Neo Photo Editing Course at 30% Off

- - - - - - - - - - - - - - - - - - - - - - - - - - - - - - - - - - - - - - - - - - - - - - - - - - - - - - - - - - - - - - - - - - - - - - - - - -

Did you appreciate this newsletter? Please help us keep it going by Joining Our Patreon Supporters

What are your thoughts on this article? Join the discussion on our Facebook Page

PictureCorrect subscribers can also learn more today with our #1 bestseller: The Photography Tutorial eBook

- - - - - - - - - - - - - - - - - - - - - - - - - - - - - - - - - - - - - - - - - - - - - - - - - - - - - - - - - - - - - - - - - - - - - - - - - -

The post 10 Common Problems Photographers Fix with Photo Editing appeared first on PictureCorrect.


from PictureCorrect https://ift.tt/vaMC6uE
via IFTTT