maanantai 25. heinäkuuta 2022

PictureCorrect.com: Large Moon Photos with a Long Focal Length

This article is based on concepts from The Photography Tutorial eBook which is currently 83% off for a Summer Sale if you want to dig deeper.

Have you ever come across images where the moon looks big, like really really big? Looks fascinating right? But, when you point your smartphone towards the sky, it’s nothing more than mere disappointment. And the situation doesn’t improve much even when you use your camera with an everyday lens. So how can you take such pictures? You actually don’t have to wait for the supermoon to take such images really. All you need is some planning and the right equipment.

large moon

Captured by Ganapathy Kumar, Nikon D7000, 600mm lens

Use a lens with a long focal length

If you want the moon to appear big, you’ll need to use a big chunk of glass yourself. And for this purpose, even something like a 200mm will fall short. Go for something in the range of 400mm and above. Longer the focal length, narrower will be your field of view, making the moon appear bigger and closer. These types of lenses can be quite expensive so renting one for a short time to try it out might be a good option.

Get a teleconverter

If you feel that your lens is not long enough, and if getting another one is not an option, consider using a teleconverter. They come at a fraction of the price and yet increase your reach drastically. For instance, by using a 2x teleconverter, your 400mm lens will act as an 800mm lens.

Consider crop sensors

Crop sensor cameras can also be an option for increasing your reach. For instance, if you use a 400mm lens on an APS-C Canon body, the crop factor of 1.6 means that the crop sensor will be able to form an image that’s the equivalent of a 400×1.6 = 640mm lens. And that’s without using any teleconverters.

The rule of 100

Consider that you want to take an image with an interesting subject superimposed over the moon, while the moon appears roughly the same size of the subject. This is where the ‘rule of 100’ comes into play. In the aforementioned case, if the subject is of size D, you must shoot from a distance of 100D. This will cause the moon to appear as the same size as the subject.

For instance, if you have a subject that’s 5m wide, for the moon to appear 5m wide, you’d have to shoot from a distance of 100×5 = 500m from the subject.

Shoot when the moon is low

You’ll be able to get an interesting perspective when photographing the moon while it is low in the sky. This gives you an opportunity to compose with interesting landscapes and cityscapes in the foreground. Doing so will also give viewers a sense of scale and make them realize how big the moon is appearing in your image.

Use a tripod

Things get shaky with longer focal length. Even the slightest movement will get amplified and make it difficult for you to even compose the shot. It is thus a good idea to use a good tripod when working with long lenses. When using a tripod, be sure to switch off the stabilization in your camera and lens.

Camera settings

As the moon itself is bright, consider using low ISO values. Use a narrow aperture like f/8 for a good mix of depth and sharpness. And since the moon isn’t running away anywhere that fast, adjust your shutter speed based on the ISO and aperture you’re using. Be aware that the difference in luminosity can cause the foreground to appear dark. Either use it to your benefit to take images with silhouette, or take multiple exposures and work in post to bring a balance in brightness between the moon and the foreground.

For further training on camera settings, equipment, and photographing the moon and other night sky objects, you may want to check out the chapters on Night Sky Photography while The Photography Tutorial eBook is on sale!

For Further Training, Summer Sale Ending Soon:

This #1 bestseller is the most in-depth eBook on how to capture amazing photography anywhere. Over 250 pages of photography tips & tricks from industry insiders. Currently 83% off today for a Summer Sale if you want to check it out.
ebook pages

Pages from The Photography Tutorial eBook

It is the product of over a DECADE of research as an insider in the photography industry, assembled to help you learn quickly and avoid the mistakes that I made along the way.

Deal ending soon: The Photography Tutorial eBook Summer Sale

- - - - - - - - - - - - - - - - - - - - - - - - - - - - - - - - - - - - - - - - - - - - - - - - - - - - - - - - - - - - - - - - - - - - - - - - - -

Did you appreciate this newsletter? Please help us keep it going by Joining Our Patreon Supporters

What are your thoughts on this article? Join the discussion on our Facebook Page

PictureCorrect subscribers can also learn more today with our #1 bestseller: The Photography Tutorial eBook

- - - - - - - - - - - - - - - - - - - - - - - - - - - - - - - - - - - - - - - - - - - - - - - - - - - - - - - - - - - - - - - - - - - - - - - - - -

The post Large Moon Photos with a Long Focal Length appeared first in the Photography Tips category on PictureCorrect.


from PictureCorrect https://ift.tt/RSidGEU
via IFTTT
PictureCorrect.com: Interesting Photo of the Day: Dog Walker’s Reflection

By now, you probably know that some of the best natural lighting comes during sunrise and sunset. Warm tones during a sunrise can create a red or orange glow in your image that is hard to beat! On a beach, you can capture the clouds overhead, the waves in the middle, and the sand in the foreground. And if there’s water in the foreground, you can align your shot to display the scene’s reflection:

landscape photographer captures reflection water beach clouds sunrise

“Dog Walker During Sunrise” by Eugene Olkhov (Via Reddit. Click image to see full size.)

Photographer Eugene Olkhov ventured out to capture pictures of a beach sunrise in North Wildwood, New Jersey. He managed to incorporate a lone dog walker and their dog into the image, as seen in the stunning reflection. He used a Nikon D750 camera with a 24mm f/1.8 lens on a tripod. His settings included a 1/25 second shutter speed, f/10 aperture, and ISO 100. The day before, Olkhov noticed this location and wanted to portray it in warm sunlight during the following morning’s sunrise. The dog walker strolling through his shot happened by chance but certainly added appeal to the image.

- - - - - - - - - - - - - - - - - - - - - - - - - - - - - - - - - - - - - - - - - - - - - - - - - - - - - - - - - - - - - - - - - - - - - - - - - -

Did you appreciate this newsletter? Please help us keep it going by Joining Our Patreon Supporters

What are your thoughts on this article? Join the discussion on our Facebook Page

PictureCorrect subscribers can also learn more today with our #1 bestseller: The Photography Tutorial eBook

- - - - - - - - - - - - - - - - - - - - - - - - - - - - - - - - - - - - - - - - - - - - - - - - - - - - - - - - - - - - - - - - - - - - - - - - - -

The post Interesting Photo of the Day: Dog Walker’s Reflection appeared first in the Photography Tips category on PictureCorrect.


from PictureCorrect https://ift.tt/bZKJBDl
via IFTTT

PictureCorrect.com: Blinkies in Photography

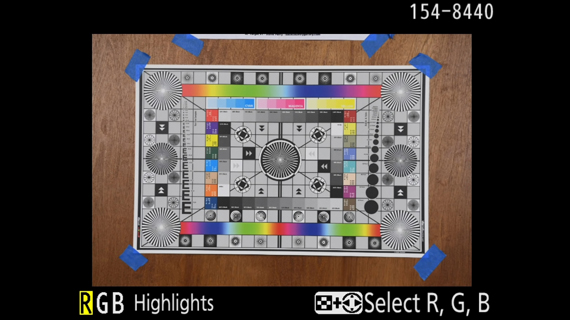
Technically known as overexposure highlight warnings or highlight alerts, blinkies perform a basic function. They indicate the areas in an image where the highlights have been clipped. Steve Perry explains how your understanding of blinkies can improve your photography:

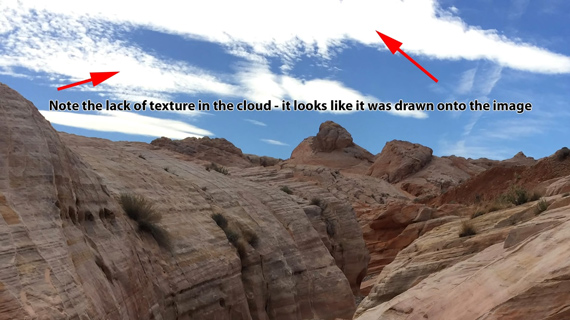
Most modern day cameras do very well at recovering underexposed images. You can easily recover shadow details in post using the exposure slider even if the image is underexposed by a stop or two. In fact, many photographers deliberately underexpose their images. However, the case is different when it comes to overexposed images. If the highlights are blown, you lose the details. You simply cannot recover them no matter how hard you try.

loss of detail in clouds due to over exposure

“The biggest exposure sin a photographer can commit is to blow highlights that should contain detail.”

By enabling blinkies in your camera settings, you let the camera show you when you’re losing details. That way, you can instantly make the necessary exposure adjustments to protect the highlights.

Why Not Use Histograms?

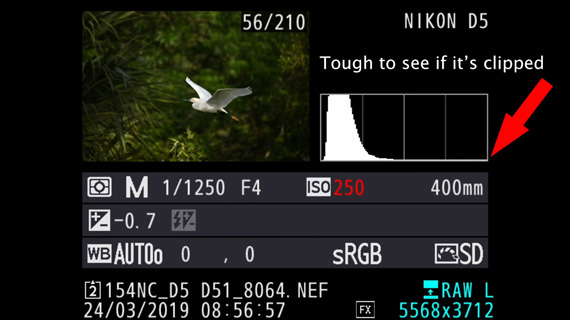
Histograms, too, can let you know if you the highlights have been clipped or not. So, why not use them instead? If you’re working in a fast-moving situation, blinkies will be much easier to work with. Blinkies instantly tell you if you’re clipping the highlights and also point out where the clipping is occurring.

histogram vs blinkies

Effect of Picture Profile on Blinkies

“The blinkies are based off of the embedded jpeg in the raw file and not the raw file itself. In addition, that embedded jpeg is based on your currently selected picture profile.”

What this means is that if you use vivid picture profiles, they will show blinkies much quicker than the flat picture profiles. In such cases, blinkies aren’t totally reliable. Using flat or neutral picture profiles will show blinkies that are a much closer representation of the raw files. However, if you’re a jpeg shooter, it’s certain that data is lost in any area where blinkies appear.

Setting Up Blinkies

If you’re a Canon user, look for the “Highlight Alert” feature in the playback menu and turn it on.

Nikon users, follow these steps:

  • Go to the “Playback menu” and select “Playback display options.”
  • Scroll down to “Highlights” and check it by pressing the multi selector to the right.
  • Also, select the “RGB histogram.”
  • Hit “OK” and you’re done.

Using Blinkies

After taking an image, simply press the playback button to preview it. Then, by pressing the up or down button of the multi-selector, scroll until you come across the one that says “Highlights.” This will show you the blinkies if the image has some clipping. But, if the image has no clipping, there won’t be any blinkies.

Blinkies and Color Channel

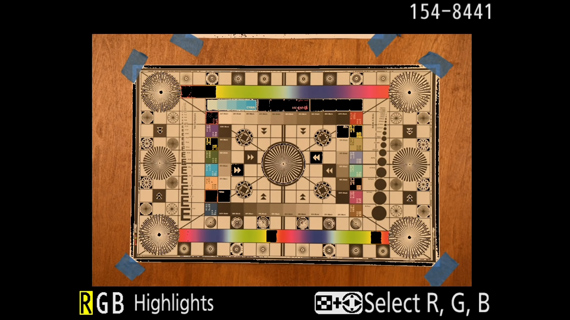
Basically, blinkies are based on the luminance histogram, which is the combination of the Red, Blue, and Green color channel. But there’s a catch:

“The camera will typically only flash you a blinkie if two of the three channels are clipped.”

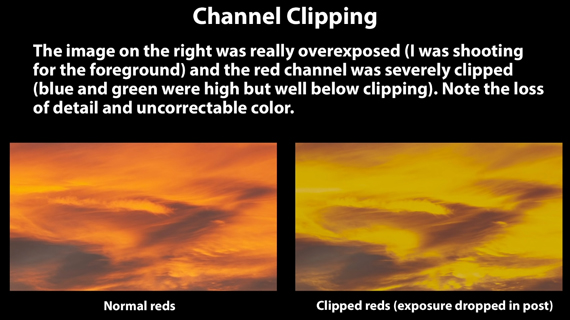
This isn’t a problem most of the time. However, if your image is dominated by a single color, you’ll need to be aware of this. Otherwise, the image will have a severe loss of detail and color that cannot be corrected. This is where checking individual color channels for blinkies comes in handy.

single channel clipping

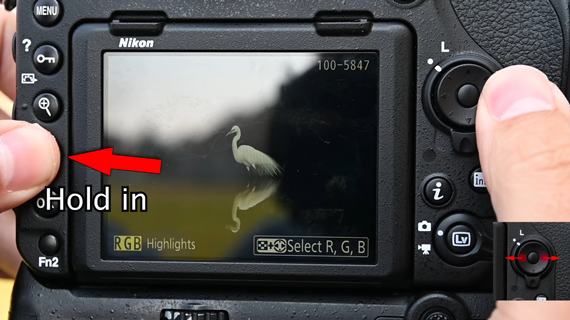
In order to scroll through blinkies based on individual color channel, simply hold the image grid button when reviewing an image and press the multi-select button left or right.

enabling color channel blinkies

“When you do this, you’re looking at the clipping on just the selected channel.”

But again, even the color channel information is based on the embedded jpeg from the raw file. So, if you’re using a picture profile or using an incorrect white balance, the information will be misleading.

no clipping when white balance is correct

clipping when incorrect white balance is used

“If you want to use the color channels to check exposure information, then make sure the color balance you see on the back of the camera matches what you see in front of you.”

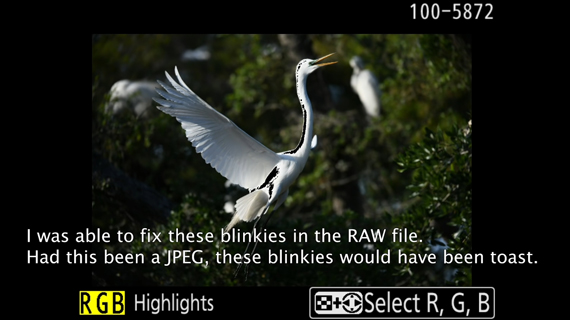
And don’t worry too much if the camera shows you a tiny bit of clipping. Remember, that information is based on the embedded jpeg image. With the actual raw file, you’ll be able to recover the details in minor clipping. Just keep your eyes out for massive clipping.

exposure warning

Are you a fan of blinkies?

- - - - - - - - - - - - - - - - - - - - - - - - - - - - - - - - - - - - - - - - - - - - - - - - - - - - - - - - - - - - - - - - - - - - - - - - - -

Did you appreciate this newsletter? Please help us keep it going by Joining Our Patreon Supporters

What are your thoughts on this article? Join the discussion on our Facebook Page

PictureCorrect subscribers can also learn more today with our #1 bestseller: The Photography Tutorial eBook

- - - - - - - - - - - - - - - - - - - - - - - - - - - - - - - - - - - - - - - - - - - - - - - - - - - - - - - - - - - - - - - - - - - - - - - - - -

The post Blinkies in Photography appeared first in the Photography Tips category on PictureCorrect.


from PictureCorrect https://ift.tt/m6JbhnR
via IFTTT

PictureCorrect.com: HDR Photography: RAW or JPEG Format?

If I had a nickel for every time I heard someone say, “I only shoot RAW” (you could substitute JPEG for RAW here) I would be rich. Truth be told, if one limits one’s self to a single format then, I suggest, that one has established limits that are simply stifling one’s creative choices.

Many people argue that RAW is superior to JPEG in that it captures a significantly wider dynamic range, a fact quite true for single image photography. When it comes to creating hdr images, however, JPEG is the virtual equal of RAW.

hdr format

Photo captured by Venti Views

The dynamic range of an hdr image is captured through exposure control across 3 to 5 bracketed exposures (some folks use up to 7 bracketed exposures but I think this is overkill) exposing for extremes at either end of the dynamic range.

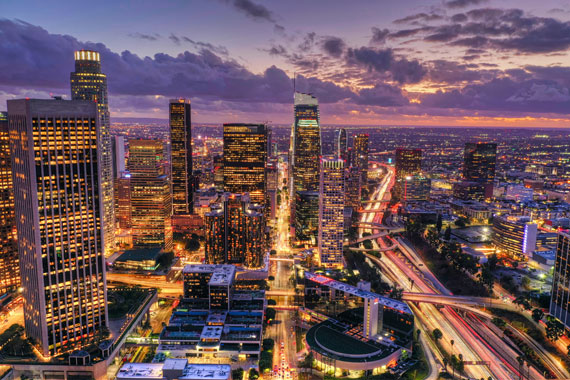
By relying on multiple exposures and merging them into an hdr format one extends their ability to capture the dynamic range of a scene so that the final image created extends across the entire dynamic range of the scene being photographed. If your camera only shoots in JPEG you shouldn’t run to the photo shop and buy one that adds RAW to your gadget bag unless, of course, you have other reasons to shoot in RAW.

In HDR photography, RAW does provide one with a possible advantage. RAW exposures create a digital file (not an image) that captures all that the camera’s sensor is capable of capturing. The RAW image displayed is prioritized to the camera settings but all of the other image data is present in the file as well. In single image shooting, RAW offers one a wide range of fixes for shots that simply got away, that are over or under exposed or the white balance is way off. Because all of the data is already there, poor RAW images can be salvaged. In HDR the RAW file allows one to create a faux HDR image in a number of conversion/merger software solutions. Photomatix Pro, the software I use allows one to create a passable HDR image from a single RAW formatted file.

Other post-processing software have presets that selectively adjust the highlights and shadows of a single image to produce something that appears to have the full dynamic range of a merged HDR image but don’t be fooled! Adjusting the shadows and highlights is something like putting 10 peaches in a small basket and then transferring them to a bigger basket. The fact still remains that one still only has 10 peaches. While these adjusting techniques produce interesting images, they are not what they pretend to be.

sunset photography

Photo by Lisa Elliott.

One more thing to keep in mind. RAW files are quite large and slow. Recall that they record simply everything that can be recorded and store that information in a digital file. To display the RAW file on your camera’s display or on your monitor the prioritized image is converted to a JPEG prior to display. JPEG captures are smaller and load much quicker in both the camera and monitor. Shooting JPEG will speed processing time. If this is important to you than JPEG may be the format of choice.

Making the choice between shooting HDR bracketed images in RAW or JPEG is a matter of choosing the best solution for the task at hand. Let me give you an example. When I am going out to capture an HDR landscape I normally lug my Canon 5D and a carbon fiber tripod (its both sturdy and lightweight but quite expensive). That way I can take my time, compose the image to my liking and manually control my bracketing.

When I am in full control I capture HDR brackets in high quality JPEG. But there are times when I am taken by surprise. I see a scene that would make a perfect HDR image but I don’t have an adequate tripod with me. I then take a single image shot in RAW and let Photomatix Pro create a faux HDR tone mapped image. While not perfect, it is a perfectly good solution in a pinch.

About the Author:
Roger Passman is an award winning professional photographer located in Northern Illinois (rogerpassmanphotography dot net). He often leads creative photo workshops designed for beginning through intermediate amateur photographers.

- - - - - - - - - - - - - - - - - - - - - - - - - - - - - - - - - - - - - - - - - - - - - - - - - - - - - - - - - - - - - - - - - - - - - - - - - -

Did you appreciate this newsletter? Please help us keep it going by Joining Our Patreon Supporters

What are your thoughts on this article? Join the discussion on our Facebook Page

PictureCorrect subscribers can also learn more today with our #1 bestseller: The Photography Tutorial eBook

- - - - - - - - - - - - - - - - - - - - - - - - - - - - - - - - - - - - - - - - - - - - - - - - - - - - - - - - - - - - - - - - - - - - - - - - - -

The post HDR Photography: RAW or JPEG Format? appeared first in the Photography Tips category on PictureCorrect.


from PictureCorrect https://ift.tt/uE9k4dl
via IFTTT

sunnuntai 24. heinäkuuta 2022

PictureCorrect.com: Interesting Photo of the Day: Glowing Ala-Archa Mountains

Landscape photographers are crazy about lighting, patiently waiting for the right moment to capture scenery in all its full glory. Award winning landscape photographer Albert Dros captured this amazing image of the mountains in Kyrgyzstan, where the lighting was just splendid:

Ala-Archa mountains in Kyrgyzstan

“Glowing Ala-Archa mountains in Kyrgyzstan” by Albert Dros (Via Reddit. Click image to see full size.)

While the lighting amidst the mountains and clouds is beautiful, the eagle circling the rugged peaks adds further interest to the photo. The giant bird of prey provides scale that demonstrates the majesty of the mountains.

- - - - - - - - - - - - - - - - - - - - - - - - - - - - - - - - - - - - - - - - - - - - - - - - - - - - - - - - - - - - - - - - - - - - - - - - - -

Did you appreciate this newsletter? Please help us keep it going by Joining Our Patreon Supporters

What are your thoughts on this article? Join the discussion on our Facebook Page

PictureCorrect subscribers can also learn more today with our #1 bestseller: The Photography Tutorial eBook

- - - - - - - - - - - - - - - - - - - - - - - - - - - - - - - - - - - - - - - - - - - - - - - - - - - - - - - - - - - - - - - - - - - - - - - - - -

The post Interesting Photo of the Day: Glowing Ala-Archa Mountains appeared first in the Photography Tips category on PictureCorrect.


from PictureCorrect https://ift.tt/wEmc1fb
via IFTTT

PictureCorrect.com: Headshot Photography: Quick Tips from a Pro

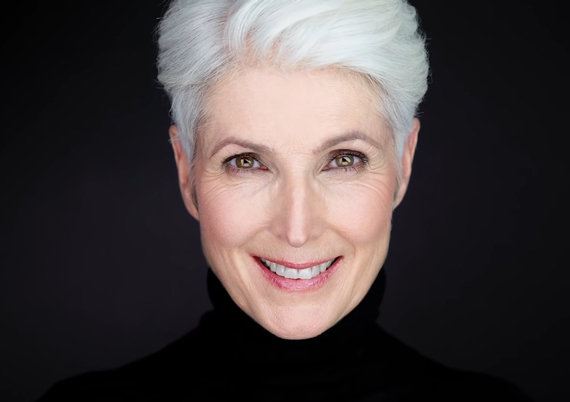
When taking headshots, it’s essential that your subjects look composed and confident. And as a photographer, it’s your duty to make sure that happens. In this video by B&H, portrait photographer Peter Hurley shares five pro tips to help you take better headshots:

1. Keep it Simple

When taking headshots, the key is to keep the image as simple as possible. There’s no need to overthink or overdo it.

“If you look at my work over the years, it just becomes simpler and simple.”

Keep your subjects simple and straight, and just photograph them.

simple headshot

2. Keep a Consistent Portfolio

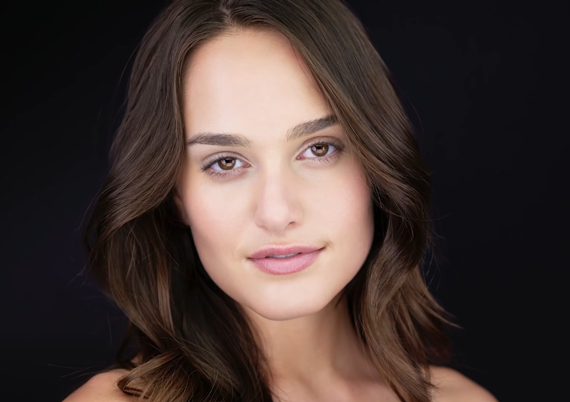
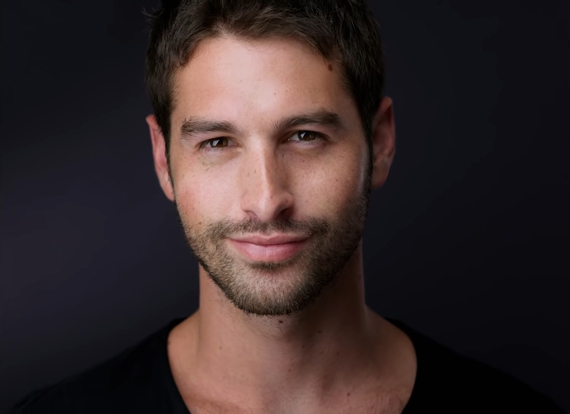
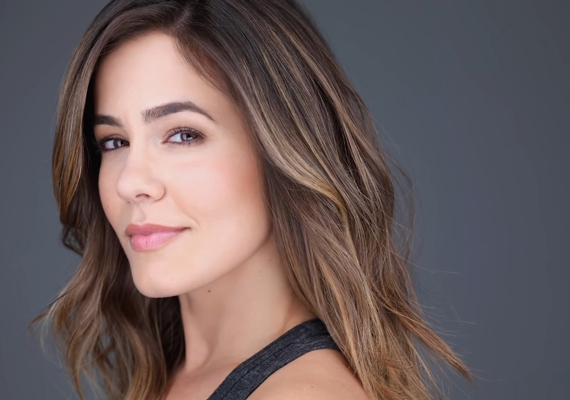
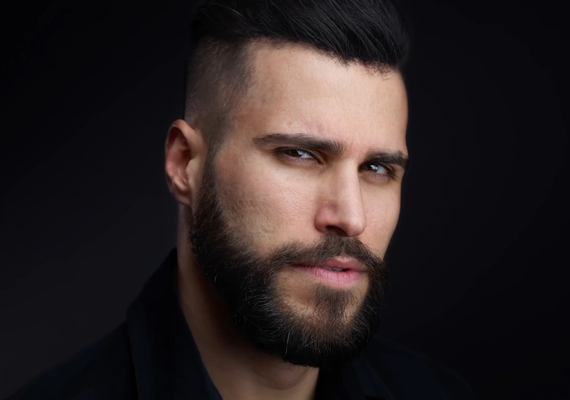
A portfolio showcases what kind of results can be expected from you. Your prospective customers need to know what to expect when they’re approaching you. So it’s important that your portfolio showcases work that’s consistent. To keep it consistent, make sure that your shots match each other.

headshot of a girl

headshot of a man

3. Get the Jawline Out

Getting the jawline out is the most crucial thing you can do to make a human look better in front of a camera. Keeping it in will cause a double-chin. Nobody wants to have a double-chin in their headshot!

jawline in headshot photography

4. It’s All About the Squinch

Your eyes are the windows to your personality. Confidence and fear are reflected in the eyes. It’s important that you pay attention to how the subject’s eyes are behaving in front of a camera.

“When humans aren’t certain when they get in front of a camera, their eyes open up. That’s not cool at all.”

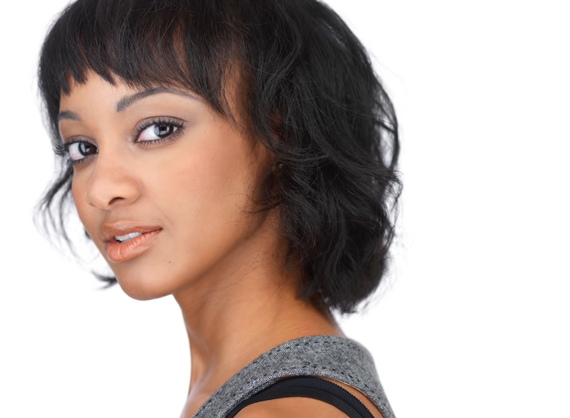
Ask your subjects to squinch their eyes a bit to convey confidence in front of the camera.

squinching for headshot

5. Confidence and Approachability

“As humans, we like to look at other humans that are approachable and that are confident.”

In order to get the winning shot, it’s your responsibility to couple confidence with approachability. The subject’s confidence is reflected from their eyes, and they appear more approachable when they smile. So ask your subjects to squinch and give a hint of a smile.

subject appearing confident and approachable

These are some really simple yet very effective tips that you can use to get some brilliant headshot images.

- - - - - - - - - - - - - - - - - - - - - - - - - - - - - - - - - - - - - - - - - - - - - - - - - - - - - - - - - - - - - - - - - - - - - - - - - -

Did you appreciate this newsletter? Please help us keep it going by Joining Our Patreon Supporters

What are your thoughts on this article? Join the discussion on our Facebook Page

PictureCorrect subscribers can also learn more today with our #1 bestseller: The Photography Tutorial eBook

- - - - - - - - - - - - - - - - - - - - - - - - - - - - - - - - - - - - - - - - - - - - - - - - - - - - - - - - - - - - - - - - - - - - - - - - - -

The post Headshot Photography: Quick Tips from a Pro appeared first in the Photography Tips category on PictureCorrect.


from PictureCorrect https://ift.tt/kxpZU89
via IFTTT

lauantai 23. heinäkuuta 2022

PictureCorrect.com: Beginner Light Painting Photography

Light painting is one of the lesser known techniques in photography and is usually only carried out by serious night owls… and some very keen photographers. Primarily performed at night and outdoors, such night captures can make scenes look more dramatic than they would under normal conditions.

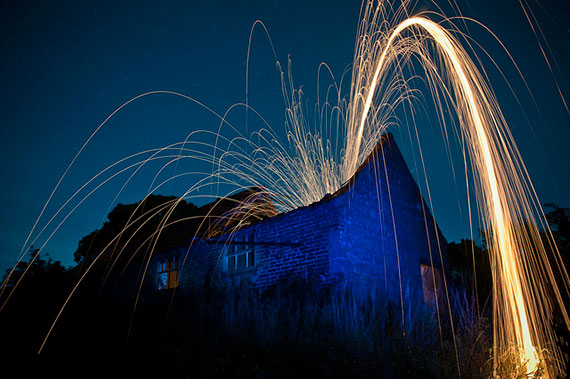
how to do light painting

Photo by darkday; ISO 100, f/9.0, 13-second exposure.

Light painting is not a new thing. It’s a technique that has been used for over 100 years. And contrary to modern belief, it’s not at all easy to get the optimal result. Accuracy in exposure settings, the right tools, the right atmospheric conditions, and patience are all key to a great night captures involving light painting.

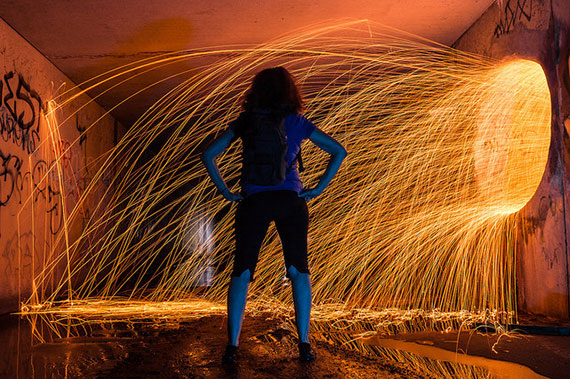
Light painting technique involves two methods: moving a light around in the frame during a long exposure, similar to writing with a sparkler, or using a controlled light source, such as a flashlight or speedlight, on or off camera, to light a particular part of a scene.

The latter is more of a contrived and creative technique that can yield spectacular results, especially in a commercial setting. LED torches are the tool of choice here. A few dollars at Kmart, will get you a small pocket sized, but extremely bright and useful LED torch, which is also daylight balanced, so you won’t get any undue yellow shift in colour to whatever you light up. I often use colored gels or filters that go with my Canon speedlight. They go over the light source to further increase the dynamic feel of the image.

light painting photo tips

Photo by Owen Signal; ISO 200, f/6.3, 326-second exposure.

A major part of light painting involves setting your composition. Often hard to do when you’re in the pitch of night with all the necessary evils at hand. No moon, no ambient light, and quite often in the middle of a quiet nowhere, all alone. If you’re well prepared, you’ll find that the tiniest amount of light in such a setting will have either a dramatic or devastating effect in your shot, so paint carefully.

I always test the setting, with sample shots of various areas, to measure the reflectiveness off anything shiny or wet, the time absorbed when lighting dark corners, and the relevant amount of exposure to suit each. From there, you’ll need to orchestrate which parts of the scene are to receive a “heavy brush” of light exposure with the torch or flash, and which are to receive a “sprinkle”. And you thought it was an easy technique! Using a torch, will provide you with so much more control, as a speedlight flash will never “choose its target.”

For this article, I thought I’d step you through how to create your own image using the light painting technique. Light painting does take a while to grasp, as there are many places you can make minor mistakes that ruin the shot. But with a little knowledge and advice, anyone can try this technique.

Equipment Required

  • Digital Camera
  • Tripod
  • Light Source
  • Flash, torch, or any other light source you can think of (I’ve used my iPhone before!)
  • An open mind!
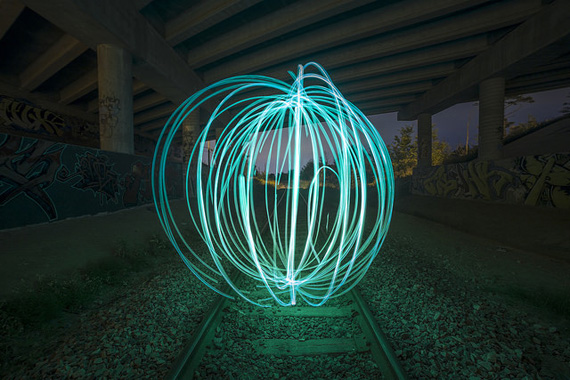
light painting orb

“light painting orbs” captured by jack.chih (Click image to see more from jack.chih)

Scope Out the Scene

OK, first, set your tripod up to a predetermined height and leave it to the side. Time to scout for a scene. There’s no point setting all your equipment up to find that you just have to move later because something is killing your shot or getting in the way. I take my camera and walk the scene, looking for interesting things, watching that my background is not too congested, and that I have a way of separating my subject from the “junk”.

Setting Up Your Shot

Switch your camera to manual, and auto-focus. Zoom in and find a light source or light area that is the same distance away as the subject you want in focus, an dpress the shutter halfway down. If need be, artificially light the subject with your new LED torch. Once focused, zoom back out to your desired length and, without touching the shutter or the focus ring, switch back to manual focus. Make sure you’re also not touching the focus ring when you compose.

This is something that no tutorial can tell you how to do, this is in the eye of the photographer. Be creative and show off your creative eye.

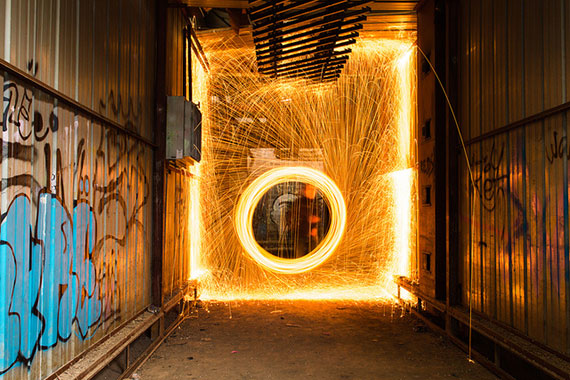
light painting techniques

Photo by Jean-Marc ALBERT; ISO 100, f/13.0, 13-second exposure.

Quick Tip: Wide angles make for much more interesting settings at night than longer focal lengths.

Setting the Correct Exposure

Nearly there, but getting the exposure right, is crucial. The best way to expose your shot manually is to use your camera’s built in light meter as a rough guide but not as a precise judge. When you first start you will need to follow it tightly, but as you gain more and more experience you won’t need the meter at all.

Set the camera mode to Av (aperture priority). Now, set the aperture anywhere in between f/4 and f/8 to achieve maximum sharpness. Deeper apertures of f/16, etc., will help your sharpness factor but will take much longer to expose–sometimes too long.

Two things you’ll need to be mindful of here. First, that such a shallow aperture setting of f/4 or f/8 will mean you will have to be accurate when focussing. And second, but just as important, the difference in exposure between these two apertures can greatly vary your result, depending on the conditions you’re in. Your in-camera light meter will tell you its suggested exposure time when you half depress the shutter. Let’s just say the camera suggests a shutter speed of 10 seconds. Remember 10 seconds. Now set the ISO to 100. Take your 10 seconds and multiply that number by 32. This gives us 320 seconds. Divide this by 60. This gives us about 5.5 minutes.

Getting the Shot

Now, drag out your light source and begin painting in sections of your scene, by shining your torch onto the scene during each test exposure. Check the results with each test image you capture. Look to achieve a nice ambient overall exposure without too much digital noise or excessive highlights. Using the results you measured in each of your test shots, you should now be able to see what parts of your scene require more light painting, and what parts only require a quick flash past.

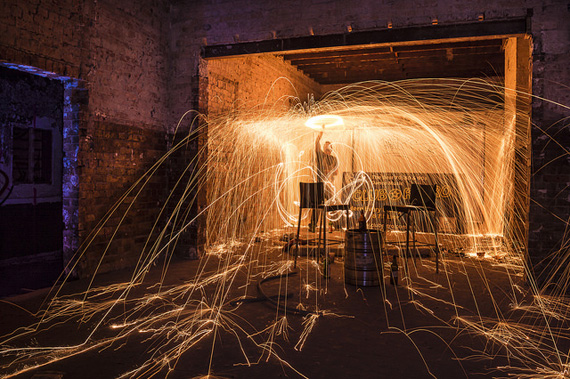
light painting techniques

“Wild Nights” captured by darkday (Click image to see more from darkday)

Now plug in a remote shutter release, and set the camera to Bulb mode (move the shutter down past 30 seconds). Get a timing device (phone, stop watch, or similar) and get ready to wait. Press the remote shutter release and lock it on. Start the timer. Wait the desired time, and check the results. Look for excessive highlights or shadows with no light (which will fill with digital noise), and adjust your torch technique to suit.

There are few things to remember here. The longer your torch shines or the more times you flash your speedlight, the light will accumulate and therefore increase the overall exposure. This is why you should run test shots and paint carefully. It’s not an exact science to start with, but after a few test shots, your accuracy can be high, especially if you take notes–whether mental or written–to help you orchestrate the final image.

What do we call this? Planning. The ideals of every good photographer should begin with good planning. In light painting, its essential.

About the Author:
Steve Rutherford is a photographer with a publication based in Australia.

- - - - - - - - - - - - - - - - - - - - - - - - - - - - - - - - - - - - - - - - - - - - - - - - - - - - - - - - - - - - - - - - - - - - - - - - - -

Did you appreciate this newsletter? Please help us keep it going by Joining Our Patreon Supporters

What are your thoughts on this article? Join the discussion on our Facebook Page

PictureCorrect subscribers can also learn more today with our #1 bestseller: The Photography Tutorial eBook

- - - - - - - - - - - - - - - - - - - - - - - - - - - - - - - - - - - - - - - - - - - - - - - - - - - - - - - - - - - - - - - - - - - - - - - - - -

The post Beginner Light Painting Photography appeared first in the Photography Tips category on PictureCorrect.


from PictureCorrect https://ift.tt/yhnzXIY
via IFTTT