keskiviikko 25. elokuuta 2021

PictureCorrect.com: Interesting Photo of the Day: Matterhorn Alpenglow in the Swiss Alps

At 14,690 feet (4,478 meters) in height and boasting four steep faces surrounded by glaciers, the Matterhorn is one of the tallest and most dangerous peaks in the Alps. It’s also one of the most sought after. Throughout history, the mountain’s fierce terrain has killed over 500 alpinists, but masses of undaunted mountaineers attempt to climb to the summit every year.

The Matterhorn is the most prominent peak in this photograph, covered in the red glow of morning:

matterhorn switzerland alps alpenglow sunrise mountains snow swiss

“Morning Fire of Matterhorn” by Karol Nienartowicz. (Via Imgur. Click to See Full Size.)

This natural phenomenon is called alpenglow, which occurs when the sun is still below the horizon line, but its light reflects off of moist air particles in the atmosphere. While the term can be loosely used to describe any sort of fiery sunrise or sunset light cast on mountains, true alpenglow happens just before sunrise or just after sunset.

The photo was created by Karol Nienartowicz, a mountain photographer based in Gdansk, Poland. Nienartowicz combines his passion for mountaineering with his photography skill to fund his travels.


Go to full article: Interesting Photo of the Day: Matterhorn Alpenglow in the Swiss Alps

What are your thoughts on this article? Join the discussion on Facebook

PictureCorrect subscribers can also learn more today with our #1 bestseller: The Photography Tutorial eBook

The post Interesting Photo of the Day: Matterhorn Alpenglow in the Swiss Alps appeared first on PictureCorrect.


from PictureCorrect https://ift.tt/3kiOcrS
via IFTTT

PictureCorrect.com: Daytime Long Shutter Speed Photography with a 10 Stop ND Filter

Long exposure photographs stand out from the rest as they have the potential to create dreamy and mesmerizing results. Subjects that are static remain sharp in the photograph while moving subjects turn out blurry which creates an artistic effect. It is quite natural for budding photographers to use this technique during low-light and night conditions. Photographer Gavin Hoey from Adorama explains how you can take a long exposure photograph during day time using a 10-stop neutral density (ND) filter:

If you aren’t familiar with an ND filter it, it’s essentially a shade for your lens. It darkens the scene by blocking light rays from entering the lens, and this allows you to set your exposure for a longer duration (10–15 seconds, for example) even during day time without overexposing your shot. Now that we know what an ND filter is, let’s see how we can use it to click a long exposure photograph during day time.

Steady Your Camera

Since we are aiming for a long exposure, it is essential to have the camera on a stable surface. You can use a tripod, a gorillapod or even place it on a stable surface. It is a good idea to turn off any kind of stabilization (i.e. the camera’s in-body stabilization function, and/or the lens’s stabilization function) whenever your camera is stabilized using a tripod or any other medium. Keep it on for handheld shots, though.

Compose the Shot

Now that your camera is stabilized, the next step is to compose your shot. Notice that we have not yet placed the ND filter on the lens. This is because once the ND filter is mounted on the lens, the viewfinder/LCD screen gets pretty dark making it difficult for you to compose.

Set the Exposure

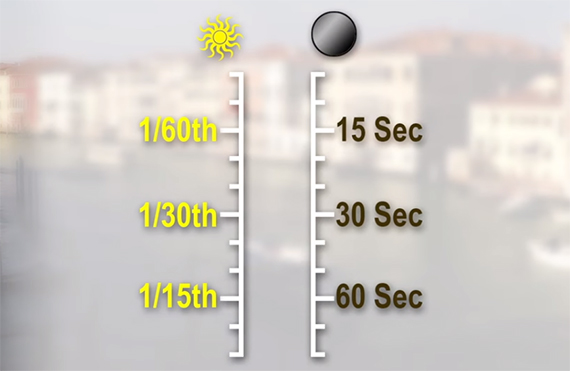
If you are not familiar with using a ND filter, setting your exposure can get a little tricky. Remember that you are yet to mount the ND filter on the lens. Hence, if you meter your shot correctly beforehand, the shot will be underexposed once you mount the ND filter. So there is a little math to be done. There are charts and apps that can help you with the calculations but if you use a 10-stop ND filter, it is fairly easy to remember the conversion. For instance, with a 10-stop ND filter, if you meter a scene correctly at 1/30 second before placing the ND filter, you will need to dial in a shutter speed of 30 seconds to get the exposure correct after the 10-stop ND filter is mounted. Similarly, a 1/60 second shutter speed will need to be a 15 second exposure, and so on.

10 stop nd filter exposure chart

Focus

Why can’t we just focus after the ND filter has been mounted on the lens? Remember that the loss in light caused by the ND filter can cause difficulty for some cameras to focus. It is thus a good idea to focus on your subject before the ND filter is mounted on the lens.

Mount the ND Filter on the Lens

Finally, you can now mount the ND filter onto your lens. However, be sure not to accidentally rotate the zoom ring or the focus ring. Otherwise you will need to recompose and refocus.

Cover the Viewfinder

If you are a DSLR user, cover the viewfinder of your camera with the cover that came with your camera or use some dark cloth. This is because light can leak from the viewfinder into the camera and mess with your exposure.

Release the Shutter

Now that you are all set, you must be pretty excited to press that shutter release button. Before you do that, you might want to consider a few things:

  • If you have a shutter release cable, use it. This will help in eliminating the camera shake caused while pressing the shutter button resulting in a sharper photo.
  • If you do not have a shutter release cable, use the self-timer mode on the camera to reduce camera shake.
  • If you are a DSLR user, use the mirror lock-up function to eliminate camera shake caused by mirror slap. Mirrorless camera users can use silent shutter mode.

Take Care of White Balance

You must have noticed how we struggle to precisely identify colors while wearing shades. Similar is the case for a camera when the lens has an ND filter attached. You will notice a color shift and incorrect color being rendered while using ND filters. If you shoot RAW (which you should be) this should not bother you, as it can be easily corrected in post. But if you want to get it correct in-camera, then you might have to guess and dial in the white balance manually until you get it right.

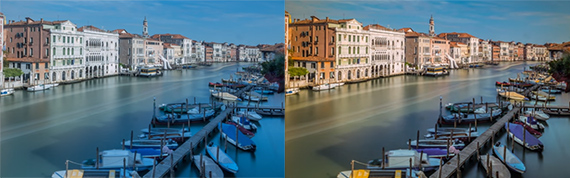
before and after white balance correction

The image on the left is before white balance is corrected while the one on the right is after the white balance is corrected in post production.

Retake the Shot

Why the redundancy? Because during long exposure photography, if the camera shakes even by a tiny bit while taking a photograph, then the photograph will turn out blurry. To be on the safer side, it’s always a good idea to take multiple photos of the same scene.

What are you waiting for? Get out there, find a scene with a primary stationary subject and other subjects with subtle movements to add drama to your photograph, and create magic with long exposure photography.


Go to full article: Daytime Long Shutter Speed Photography with a 10 Stop ND Filter

What are your thoughts on this article? Join the discussion on Facebook

PictureCorrect subscribers can also learn more today with our #1 bestseller: The Photography Tutorial eBook

The post Daytime Long Shutter Speed Photography with a 10 Stop ND Filter appeared first on PictureCorrect.


from PictureCorrect https://ift.tt/2yNTDL4
via IFTTT

tiistai 24. elokuuta 2021

PictureCorrect.com: Top 10 Tips on How to Take a Great Photo

1) Start with a clear view. This first tip might sound very obvious, but it is key to make sure your camera lens is clean and if you are using a digital SLR, you also need to make sure that the sensor is clean. This is easy to do and will avoid your images having any unwanted dots, smears or marks on them.

Use a lens cloth that is only going to be used on the lens. Firstly, breathe on the lens and then clean it with a circular motion.

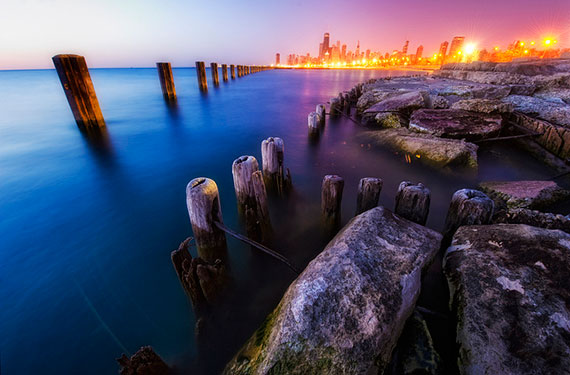
great photo tips to try

Photo by Justin Kern; ISO 100, f/8.0, 60-second exposure.

For the sensor, to reduce dirt getting onto it, always turn the camera off before changing the lens and try to do so in a ‘controlled’ environment like the back of a car. Essentially, try not to change the lens on a really windy beach or in the desert! Most DSLR cameras have automatic sensor cleaning when you turn the camera on and off so that helps a lot!

I know you can always Photoshop dirt out in stills, but if you are using the video function on your camera then removing specs and unwanted dirt is not an easy option – unless you have got months of spare time on your hands.

2) Read your camera’s manual. I know it sounds boring, but 1-2 hours with the manual and your camera in hand will guarantee that you will learn to understand it quickly. The sooner you can operate in full manual mode the better. It is the only way to start pushing your photographic skills.

3) Positioning. It is vital to get your subject in the right spot. If you are shooting a portrait or a group of people, position them where you want them. Make sure there is nothing growing out of their heads and if you want to feature your background then do so. Ask you subject(s) to move forwards or backwards and framing your shot with your subject framed hard left or right can work really well. Never be shy to move your subject(s) around, it is the best way to learn.

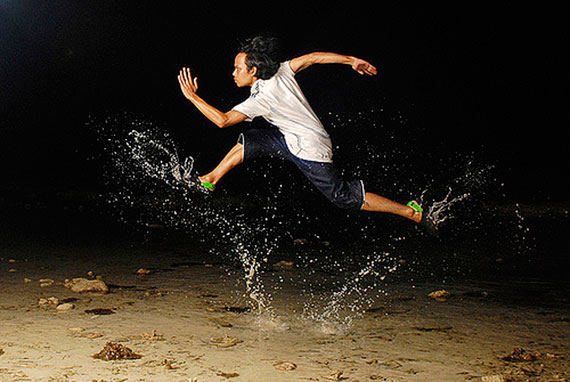
ways to take great photos

Photo by Anan Mohamad Amri Adanan; ISO 400, f/5.6, 1/160-second exposure.

Don’t be frightened to shoot vertical. Vertical can really suit certain shots, especially portraits. Try it out.

4) Framing, this is what 80% of photography is all about. Look at images in magazines, watch movies and see how they are framed. You need to allow enough headroom, but not too much other wise the image can look clumsy. Don’t crop half a hand or part of their head. Try not to place people directly in the centre of the frame. Soon your eye will get used to framing and you will know what looks good. The best thing I was ever taught was ‘If it looks good, it is good!’

5) Lighting is really important and helps set mood and atmosphere. While using additional flash units can be a little advanced, setting your internal flash to the correct level for your lighting environment makes a big difference. This is where we come back to reading the ‘dreaded’ manual. On most cameras accessing the flash control is only a few clicks away on the menu. Learning how to do this will definitely help. If you have a DSLR, get an external flash and experiment using it off the camera.

6) Being able to control the exposure and shutter speed manually will mean that you can expose what you want to expose for and not what the camera thinks you want to expose for. When the camera is in auto exposure mode it will expose whatever is largely in frame. For example, if you are taking a picture of your subject and a waterfall is in the background then the camera will close down the iris to expose for the white waterfall and as a result your subject will be under exposed/ dark.

list great photography tips

Photo by Niklas; ISO 100, f/8.0, 1/250-second exposure.

By knowing how to use exposure and shutter manually (which each directly affect each other) this will allow you to take control and make decisions on what part of your image you want to expose for.

7) Learning the basics of depth of field (DOF) and how exposure (F Stop) increases or decreases what is in focus will expand your creativity no end.

Shutter speed will directly affect your F Stop. Also learning about how slow and fast shutter speeds can affect your work will increase your creativity. Switching to manual focus for specific shots is also very helpful especially with macro (close up) work. This means you can set the focus to exactly where you want it to be.

8} Having your camera on hand. Again this might sound obvious, but Photography is all about catching a moment and moments only last a moment… So leaving your camera in your bedroom or buried deep in your bag is never a winner.

9) Direction and angles of light. If you are shooting in daylight and want the best picture possible, then use the sun to your advantage. Backlit photography can look fantastic, and is very helpful to separate your subject from its background and can give a much more 3D image. Just be aware of lens flare entering the lens and decide if you want that effect. You can flag the flare by using a lens hood or simply using your hand.

When possible use a piece of white card or a reflector to bounce light back onto your subjects face. You will be surprised how effective this method is and it will dramatically lift the shadows from your subjects face and improve your images.

10) Try to use your zoom lens like a prime lens. Set your zoom lens to about 50mm, which is approximately what our eyes see – this will give you the experience of what it is like to work with a prime lens. Then, rather than zoom the camera in and out, keep it fixed and physically move yourself around. Get close to your subjects and down on their level. Don’t always shoot from standing up, just because it is the most convenient.

great tips for photography

Photo by Racineur; ISO 158, f/6.3, 1/1000-second exposure.

About the Author:
Harvey Glen is a professional Director of Photography (DOP) with over 10 years experience shooting commercials, documentaries, music videos, channel idents, corporate videos and drama. Harvey uses his DSLR camera to combine his passion for both stills and high definition (HD) video filming (directorofphotographyblog), a resource for DOP’s, cameramen, photographers and people who just love to get behind the lens and shoot.


Go to full article: Top 10 Tips on How to Take a Great Photo

What are your thoughts on this article? Join the discussion on Facebook

PictureCorrect subscribers can also learn more today with our #1 bestseller: The Photography Tutorial eBook

The post Top 10 Tips on How to Take a Great Photo appeared first on PictureCorrect.


from PictureCorrect https://ift.tt/3B9CA1b
via IFTTT

PictureCorrect.com: Interesting Photo of the Day: Mount Bromo Temple

In Hindu mythology, gods and goddesses are believed to reside in the most uncommon places. They are portrayed as living atop of mountains, under the sea, up in the sky and in other godly places. This represented their divine power, their ability to survive in environments where mortals would find it impossible to settle down. This is also one of the reasons why you’ll see a lot of Hindu temples in remote places. Reaching the site itself is an adventure. Photographer Adrian Bateman took the following image of one such Hindu temple in Indonesia and the image beautifully gives a sense of this whole concept:

temple at the base of a volcano in Indonesia

“A Temple at the Base of an Active Volcano” by Adrian Bateman (Via Reddit. Click image to see full size.)

Bateman shot the image on a Pentax K50. That’s a digital camera—however, the analog aesthetic of the image might indicate otherwise. Bateman achieved this effect in post, as he didn’t quite like the “digital look”.

“I’ve been softening the images quite a bit to get rid of that digital, overly sharp look.”

One interesting thing about this location is that the temple is located right at the base of an active volcano. Imagine what an adventure it must be to visit this beautiful place. The interesting rocky landscape in the foreground also gives a sense of the trek it takes to reach. The photographer has also done an excellent job of portraying the barren background, which contrasts the green and uneven foreground. This really makes us wonder how the location must appear in reality.

Wouldn’t you love to visit this temple? We’re sure you would.


Go to full article: Interesting Photo of the Day: Mount Bromo Temple

What are your thoughts on this article? Join the discussion on Facebook

PictureCorrect subscribers can also learn more today with our #1 bestseller: The Photography Tutorial eBook

The post Interesting Photo of the Day: Mount Bromo Temple appeared first on PictureCorrect.


from PictureCorrect https://ift.tt/3DeybvJ
via IFTTT

PictureCorrect.com: Flash Photography: 7 Use Cases and Tips

A lot of beginner photographers make the mistake of assuming that a flash is used to add light when shooting in conditions where the light is insufficient. Well, this is only partially true. In fact, you can use flash even in situations where there’s enough natural light. Using a flash allows you to add a certain “pop” to your image that is not possible when only using natural light. In this context, today we have professional wedding and portrait photographer Vanessa Joy with Adorama who shares seven tips on how you can use flash to take better images:

“Flash is not just about adding more light to your photo. It’s about molding the light to your photo.”

A common mistake a lot of beginner photographers make is to turn the flash head directly towards the subject. This has a lot of undesired effects. It creates unflattering hotspots and harsh shadows, and makes the image appear unnatural. As Joy demonstrates in the video, there are a lot of ways you can overcome this.

The idea is to think of a way to make the light source as big as possible. Joy shares a ton of ways you can do that. Starting from the bare minimum, you can use the small diffusion cover that a speedlight comes with. Or, you can also use a small white card to bounce the light indirectly toward the subject. For better results, use a reflector to bounce the flash towards the subject. You’ll instantly see how much better the images come out.

In cases where you need to use flash indoors, the task is even easier. Just look for neutral-colored walls or ceilings and turn your flash head in that direction. The entire wall or ceiling acts as a huge light source and bounces off soft light, resulting in flattering images.

Joy also shares some interesting ways you can introduce colors to your images using flash and gels. And if you’re someone who loves to take portraits during golden hours, be sure to watch till the end. You’ll get to see how you can create your own golden sun using flash and gels.

How do you like to use flash for your portrait photography sessions?

For further training: The Electronic Flash Photography Guide


Go to full article: Flash Photography: 7 Use Cases and Tips

What are your thoughts on this article? Join the discussion on Facebook

PictureCorrect subscribers can also learn more today with our #1 bestseller: The Photography Tutorial eBook

The post Flash Photography: 7 Use Cases and Tips appeared first on PictureCorrect.


from PictureCorrect https://ift.tt/3kpep84
via IFTTT

maanantai 23. elokuuta 2021

PictureCorrect.com: Interesting Photo of the Day: NYC Lightning

During a typical summertime thunderstorm, photographer Dan Piech captured a gigantic lightning strike over lower Manhattan’s Battery Park City extending all the way to Jersey City, New Jersey:

New York City lightning storm

“The Hand of Zeus” by Dan Piech (Via Imgur. Click image to see full size.)

Having photographed boatloads of storms in the past, he grabbed his Canon 5DS and captured a substantial lightning strike that spanned the entire Hudson River. Using a single long exposure shot, Piech was able to snap one of the most amazing cloud-to-ground lightning strike photos to ever be caught on film. This awe-inspiring photo is aptly titled “The Hand of Zeus,” and it’s a testament to the beauty and power Mother Nature has over the earth.


Go to full article: Interesting Photo of the Day: NYC Lightning

What are your thoughts on this article? Join the discussion on Facebook

PictureCorrect subscribers can also learn more today with our #1 bestseller: The Photography Tutorial eBook

The post Interesting Photo of the Day: NYC Lightning appeared first on PictureCorrect.


from PictureCorrect https://ift.tt/2Jm7Cec
via IFTTT

PictureCorrect.com: Twilight Real Estate Photography Camera Settings

Relevant note: version 6.3 just released of the Photomatix HDR Photo Editor

Many people would nominate twilight as the best time of day for photography, and that definitely includes real estate photography.

The combination of deep blue skies and dazzling lights is perfect for show-stopping exterior shots and bright interiors. However, shooting at this time of day isn’t easy.

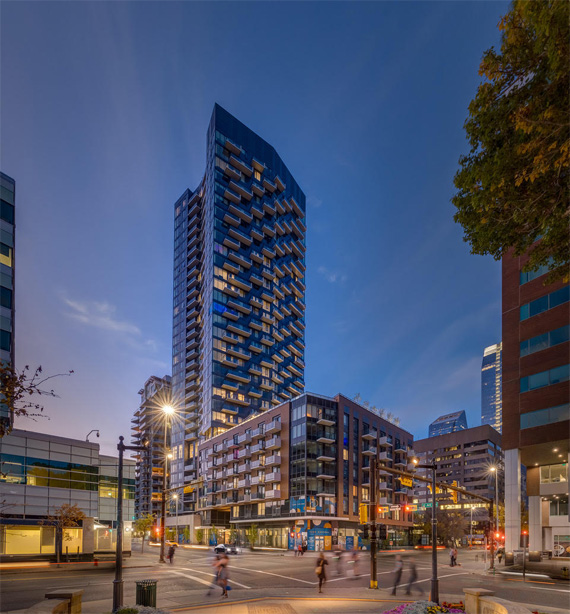
twilight camera settings

Photo by Rob Moroto

To help you nail your twilight shots time after time, here’s a look at the settings and techniques used by the top real estate photographers.

The challenge: shooting real estate during twilight

Twilight begins the moment the sun dips below the horizon, and it continues until dark. Depending on where you are in the world, this alluring light can last for as little as 20 minutes.

Assuming you want to capture a good selection of images, you will need to work fast. In addition, the light can change significantly even within this short amount of time.

What camera settings work best at twilight?

For the best possible image quality, set your aperture to f/8 and your sensitivity to ISO 100.

You can then select a shutter speed to match the light you encounter. At twilight, this could be up to four seconds. If possible, focus manually to ensure all the main parts of the scene are sharp.

However, you may need to adjust your technique if you want to complete your full shot list during the twilight period, especially if you have a lot of photos to take, and want to capture both interior and exterior twilight images.

When you are trying to squeeze dozens of images into 20 minutes, all with bracketing, every long exposure takes precious time. Four seconds might not sound like a lot, but take 100 shots of this length and you will spend nearly six minutes just waiting for your camera.

Choosing the right ISO and aperture

Raising the sensitivity of your camera to ISO 400-1600 will reduce your shutter speed, which means that each exposure will take less time. That said, you may introduce unwanted noise at a higher sensitivity — so consider what level of image quality you need.

Choosing a small aperture, such as f/13, will force you to use longer exposures or higher sensitivity, but the benefit is that you can ditch autofocus.

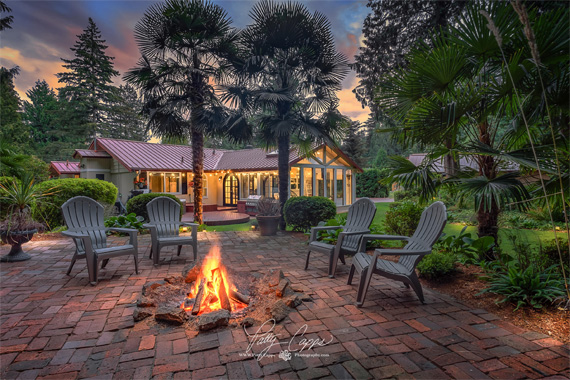
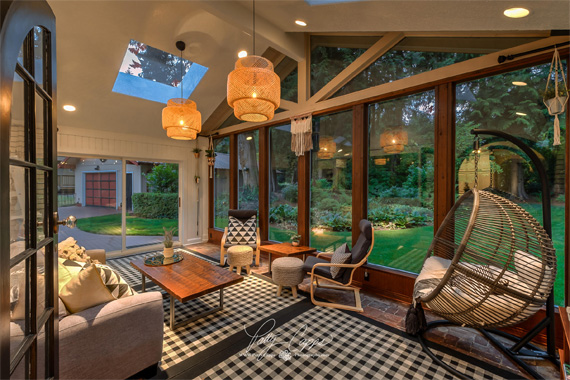
twilight real estate

Photo by Patty Capps

This means you can put your lens on manual focus and choose the hyperfocal distance — the focusing distance that offers the maximum depth of field for any given focal length.

Using this technique, you can simply place your camera down and hit the shutter without thinking about focus.

PhotoPills is a popular smartphone app that helps you calculate hyperfocal distance. In addition, it has a neat feature that shows you where the sun will be in relation to your subject at any given time.

Do you need to use exposure bracketing?

It’s a very good idea to take multiple exposures at different shutter speeds for each composition. This will give you the option to use HDR to brighten up dark corners and bring down highlights.

To save time, you might want to bracket your shots. If possible, set your bracketing range to one or two stops.

While it might be tempting to leave your settings untouched between shots, this isn’t advisable. Bracketing works best when the mid-point is correctly exposed. If the middle image is too dark or too bright, you can easily find yourself having to mount a post-capture salvage operation.

How many exposures will you need when bracketing at twilight?

During the twilight hours, contrast is relatively limited. As a consequence, three bracketed exposures for each composition should be enough for interior shots.

Depending on what natural light you are working with, you might need to take a couple more exposures for the exterior of a property. This is particularly likely if you shoot just after sunset, when the dynamic range of your camera is stretched.

Choosing the right aperture to enhance point lights

A pleasing side effect of using a smaller aperture is that point lights will take on the appearance of stars. This is a natural consequence of light bending around the blades that form the aperture within your lens.

The F-stop that causes this effect varies between lenses.

On wide-angle glass, you will probably see it appear between f/11 and f/14. The effect increases as you continue to reduce the aperture size, but this comes with the drawback of reduced sharpness.

Besides, you probably just want a little sparkle rather than the full Christmas tree look.

Do you need a tripod for twilight photography?

Yes. Any time you are shooting after sunset or under artificial lighting, you should be using a tripod.

twilight interior photo

Photo by Patty Capps

In these conditions, you won’t be able to use a fast shutter speed to counteract hand shake. This applies even if you are shooting with your phone.

Using a tripod is also important for interior shots when bracketing or taking multiple exposures with a flash.

Do you need a flash for real estate photography at twilight?

Flash isn’t strictly essential. Many real estate photographers use bracketed captures exclusively. But flash is a very useful tool to have.

One of the biggest challenges of real estate photography at twilight is color balance. Many homes have a variety of light sources, each giving out different hues. This can make it pretty tricky to correct white balance in the edit suite.

One solution is to use flash. This can be on-camera, but you have far greater control with a wireless flashgun.

In spaces with poor lighting, it’s possible to illuminate every corner by moving your flash around the room, and taking multiple exposures which you can blend together later. Using a remote trigger makes the process much faster.

If you are going to use on-camera flash, make sure to bounce it off a surface such as a wall, rather than pointing it directly at what you’re photographing.

This can result in a nice diffused glow, rather than harsh light and shadows. This is relatively easy in large spaces, but the effect is difficult to achieve in tight spaces.

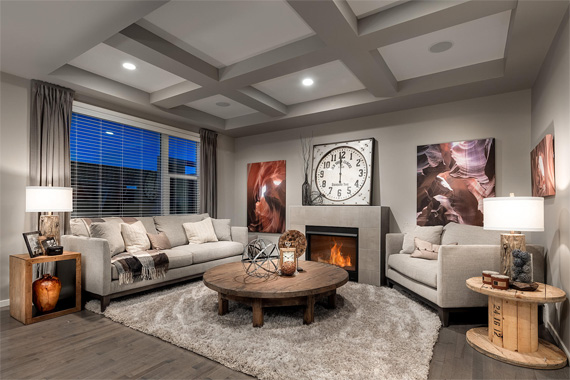
interior camera settings

Photo by Rob Moroto

What about flash in exterior shots?

An easy and popular method of capturing the dusk sky, as well as the dark exterior areas of the house and grounds, is to take bracketed shots and merge them to HDR in Photomatix or other HDR software.

By using exposure bracketing and HDR, you can eliminate over and underexposed areas, and you may not need a flash at all.

For exterior shots in certain situations, on-camera flash can provide subtle fill-lighting.

But this technique should be used with caution; you can easily add unwanted shadows and a bright patch in the foreground. It works best when you are relatively near to the property.

Some pro photographers, whether using bracketing or a single shot, prefer to take greater control using a flash.

A single ‘pop’ of the flash might be all that’s needed to highlight a certain area, but some may take 10 or even 20 exposures for a single exterior composition to achieve balance in the scene, or their style or vision.

When starting out using flash photography outside, focus on areas that you wish to appear more inviting such as a sheltered doorway, or a pathway for instance.

Making the Most of Twilight

It might seem like a lot of hassle, but most professional photographers agree that twilight is the best time to shoot real estate.

With all the lights on, you can peek into the property from outside. Once you walk inside, those lights make every room look bright and airy – yet there is still enough light coming through the windows to see the view.

To capture real estate in this amazing light, remember these tips:

  • Get there early and switch on the lights
  • Create a plan to accomplish your shoot in the short twilight period
  • Use bracketing and hyperfocal distance to save time
  • Don’t start shooting inside too early

For Help with Photo Editing:

Photomatix HDR software lets you create HDR images and adjust them with various settings or one-click presets to get the look you want. It can work as a standalone program or as a plug-in for Photoshop, Lightroom, or Apple’s Aperture. There is a free trial version users can try before purchasing a license.

They are kindly providing a discount to PictureCorrect readers on any version of their software. For 15% off, try the coupon code picturecorrect at checkout.

See how it works: Photomatix Pro HDR Photo Editor


Go to full article: Twilight Real Estate Photography Camera Settings

What are your thoughts on this article? Join the discussion on Facebook

PictureCorrect subscribers can also learn more today with our #1 bestseller: The Photography Tutorial eBook

The post Twilight Real Estate Photography Camera Settings appeared first on PictureCorrect.


from PictureCorrect https://ift.tt/3gnJVlB
via IFTTT