tiistai 28. tammikuuta 2020

PictureCorrect.com: Newborn Posing Tips: Side Pose to Belly Pose

When it comes to newborn photography, posing can be a real challenge. Your subjects can’t exactly communicate to you if they’re feeling any discomfort. It is thus up to you to determine what works best for the newborns while ensuring that the image comes out good. Photographer Fenna Holwerda demonstrates in this video how you can comfortably transition babies from a side pose to a belly pose:

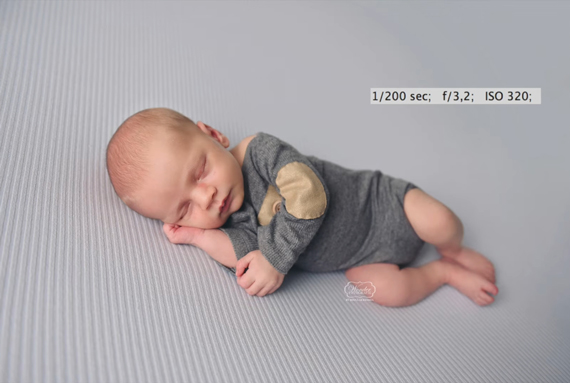
Babies can naturally lay flat on their back. It is not much of a challenge to photograph babies laid down on their backs. Posing them on the side is relatively easy as well. Gently roll them over to the side while ensuring that they do not press hard on their arms. Any disturbance to the blood flow will discomfort the child making it difficult for you to photograph them. To make your job easier, you can use soft pillows and bean bags.

newborn photography with side posing

Now, to transition from the side pose to the belly pose, here’s what you can do:

  • With the baby on his/her side, place your left hand across their chest. Be sure to warm your hands by placing them in front of a heater.
  • Then, with your right hand, gently roll the baby over. You can use your left thumb to direct the baby’s head in the process.
  • When the baby is on their belly, make sure that arm that’s away from the camera is not pressed against their body. Again, it is important to ensure proper blood circulation.
  • Pose the arm that’s facing the camera in a way the baby feels comfortable. You can either leave it beside their body, have a flat palm underneath their face, or even place it under their chin.
  • Gently press their legs forward so that the knees tuck in under their belly.
  • Once you feel that the baby is comfortable, you can even place their one foot over the other.

newborn photography belly posing

If you’d been struggling to pose a newborn this way, definitely try out Holwerda’s method. It’ll make your work so much easier.


Go to full article: Newborn Posing Tips: Side Pose to Belly Pose

What are your thoughts on this article? Join the discussion on Facebook

PictureCorrect subscribers can also learn more today with our #1 bestseller: The Photography Tutorial eBook

The post Newborn Posing Tips: Side Pose to Belly Pose appeared first on PictureCorrect.


from PictureCorrect https://ift.tt/2taUgw8
via IFTTT

maanantai 27. tammikuuta 2020

PictureCorrect.com: Composition Guidelines for Great Photography

It’s often been said that photography is one of the most difficult and demanding pastimes to master, but many people relate that to learning more about the technical aspects of photography and light. There is much more to photography than just getting the exposure right, and it’s about composing your shots to give the viewer a better visual experience. It’s about turning a simple photograph into an artistic statement or telling a story in pictures. It’s about grabbing the attention of the viewer and taking them on a journey through the frame.

guideline for photo composition

Photo by kennysarmy; ISO 200, f/8.0, 2-second exposure.

I used the word “guidelines” in the title, because the following suggestions are not concerned with applying hard and fast rules, but rather being aware of techniques that you can utilize to excite the viewer.

Awareness

This covers many things that we should all consider before releasing the shutter, but here are some obvious ones.

  • Clearly identify your subject and draw the viewer’s eyes to it.
  • Eliminate background clutter to maintain focus on the subject.
  • In the background is there something there that will balance the subject? Would moving the main subject one way or the other provide an interesting balance?
basics of composition in photography

Photo by Tambako The Jaguar; ISO 1600, f/4.5, 1/200-second exposure

There is nothing worse than looking at an image after the shoot and finding a street light protruding into the top right corner. Make sure everything you can see through the viewfinder is wanted in the shot.

Lines and Patterns

When you are composing your shot look for any interesting lines such as railway lines or roads taking the eye into the image. A favorite line is the S-shape that really takes the eye on a journey through the image. An example of this could be a creek tumbling over rocks forming a small waterfall.

composition and lines in photos

Photo by 白士 李; ISO 64, f/8.0, 1/160-second exposure

If you photograph buildings, look at how you can use lines to accentuate the architecture. Maybe change your viewpoint and camera level. Have the image make a bold statement.

Similarly with patterns. You might photograph a house with interesting windows. Do they make a pleasing pattern? How about a plowed field taken from a low angle, or the seats in an arena? If you look you will find patterns all around you and their creative use will deliver stunning images.

Framing and Space

Again this is concerned with balance in your composition. The frame obviously defines the limits of your image. Your subject should be situated within the image frame but not be crowded by it. Here’s where space comes in, and there are two types of space: positive and negative.

Positive space is that occupied by your subject, and a rough guide says that it should occupy about a third of the frame area.

Negative space is of course the remaining, supporting space that provides balance to the image. It should not compete with the subject but should serve to emphasize it. It can also give context and depth to a subject. For example, take two compositions: a beach photograph with a subject taken close up with a sea horizon behind and sand in the foreground; or, pull back on the shot to show a meandering path through sand dunes arriving at the subject posed in front of a sailing boat on the water in the background. Which composition gives more depth and context and delivers a better viewer experience?

photo composition guidelines

Photo by Marcus Zorbis; f/3.5, 1/50-second exposure

The power of threes is everywhere including photographic composition. It is believed by many photographers that an odd number of elements in a composition work better than an even number, and a special place is reserved for the number three. One reason for three being so popular is that the viewer can focus in on the center element and then easily drop away to visit the other two. More than three and you run the risk of chaos.

learn how to get good photo composition

Photo by Graeme Tozer; ISO 200, f/16.0, 125-second exposure

Diagonals and triangles are variations of the power of three. Triangles are pretty obvious. If you have three elements in your composition, they stand a fair chance of creating a triangle within the image frame. The tightness of the triangle is a marker to whether this formula works for you or not.

best guidelines for photo composition

Photo by Mandy Greer; ISO 1600, f/4.0, 1/125-second exposure

Diagonals work by drawing a line from one corner of the frame to the opposite corner and then drawing another line from one of the remaining corners to intersect the first diagonal at ninety degrees. This forms three triangular areas that can contain related elements of a composition.

compostion techniques

Photo by Michael Muraz; ISO 100, f/18.0, .3-second exposure

The Rule of Thirds is well known in the photographic world, and once you have tried it you will find it can add so much to what could have been a ho hum composition. Imagine dividing your image frame into three equal columns and three equal rows. Now try to place your main subject at one of the four row/column intersections. If that is not possible then at least try for one of the vertical or horizontal lines. Try this with an image. A classic one is a snapshot of a friend or relative taken smack in the center of the frame. Now try to crop the frame and move the subject to one side or the other to place it over one of the vertical lines.

This technique works so well that many current cameras provide a rule of thirds overlay grid to help with composition as you shoot. How many images have you seen with the horizon half way up the frame? Look at the foreground and sky; decide which is more important, then place the horizon along one of the two dividing lines of the rule of thirds grid.

understand photo composition

Photo by Michael Dawes; ISO 1600, f/4.0, 1/20-second exposure

Finally, remember that rules are made to be broken so don’t be afraid to do that now and then.

About the Author:
Terence Stanley from SLRJourney has been an avid amateur photographer for several years now and during that time experienced a somewhat testing but enjoyable journey into the field of digital SLR photography. To help others on a similar journey he decided to document his discoveries on all manner of topics in a clearly understandable form. The result is a website with lots of informative articles supported by example images relating to photography in general, post processing, and getting the most out of your DSLR camera.


Go to full article: Composition Guidelines for Great Photography

What are your thoughts on this article? Join the discussion on Facebook

PictureCorrect subscribers can also learn more today with our #1 bestseller: The Photography Tutorial eBook

The post Composition Guidelines for Great Photography appeared first on PictureCorrect.


from PictureCorrect https://ift.tt/2GccdLo
via IFTTT

PictureCorrect.com: Interesting Photo of the Day: Portrait with Light Painting

It’s usually when you think out of the box that you get some mind boggling images. For instance, it’s not everyday that you come across a portrait that was taken with a long exposure. Photographer Adrian Mechocki specializes in the art of light painting and took the following portrait using the technique:

long exposure portrait

“Portrait With Light Painting” by Adrian Mechocki (Via Reddit. Click image to see full size.)

This image is a long exposure of almost a minute that Mechocki took in a completely dark room. The model had to be perfectly still throughout the entire exposure as even the slightest movement would cause the image to be blurry. What’s really interesting is that the image is a sole result of light painting without any sort of post processing.

“I did the light trails by moving the LED lights in the air for a few minutes. The duration depends on what I want to achieve and it differs on every photo.”

The mix of colors along with the intense look on the face of the model gives a really moody look to the image. Also, if you look closely at the light trails, they appear as brush strokes. This further adds to the artistic feel of the image. And not to forget, it’s worth appreciating how still the model appears since there is hardly any noticeable motion blur.

Do you know someone who would be able to stay perfectly still for over a minute?


Go to full article: Interesting Photo of the Day: Portrait with Light Painting

What are your thoughts on this article? Join the discussion on Facebook

PictureCorrect subscribers can also learn more today with our #1 bestseller: The Photography Tutorial eBook

The post Interesting Photo of the Day: Portrait with Light Painting appeared first on PictureCorrect.


from PictureCorrect https://ift.tt/36A4x2q
via IFTTT

PictureCorrect.com: Improve Your Photography: 4 Quick Tips

No matter how versed you may be with the art of photography, there is always some space for improvement. There are some days when you feel stuck, and a creative push becomes essential to reignite your creativity. Keeping this in mind, digital artist James Tralie talks about 4 simple photography tips that will help you to improve your photography. These tips will come in handy whether you’re just starting out, or you’re already quite good at photography:

1. Put Your Camera Away

This sounds a little weird, right? But, when you’re out on the field for some photography, you’re very eager to take photos. Have you ever noticed that? It’s quite natural and can happen with anyone. However, when the motive is to just take photos, the creative process gets lost. It is thus quite important that you slow the process down a bit, keep the camera away, and observe what’s happening around you. Looking through your eyes is much more effective than looking through that tiny viewfinder.

For instance, the image below was taken by Traile after he noticed how the sky was being reflected in the window behind him.

2. Look For Frames In The Wild

“Look for ways that the world around you has essentially already done your job for you and found the perfect composition.”

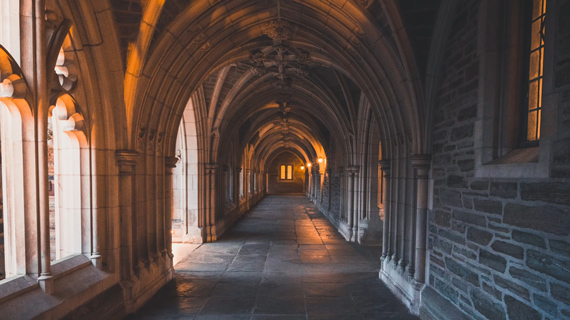
Observe how the elements around you fall in place. You will definitely come across certain scenarios where elements like trees, mountains, doors, windows, or just anything have shaped the scene for you. You just need to find them, and shoot to your taste.

frame made by arches

3. Nail Your Exposure In Camera

It’s always best to get things as right as possible in camera. This takes a huge burden away from post-processing. One of the critical aspects that you can get correct in the camera itself is the exposure. Every camera comes with a tool called the histogram that can assist you in getting the exposure correct.

A histogram shows the distribution of data across the shadows (left), mid-tones (middle), and the highlights (right). By referring to the histogram, work to get an image that has an evenly distributed histogram. You can do so by balancing your exposure triangle.

4. Do  Your Homework

This is essentially about planning any of your photography trips well ahead. There are many websites and mobile applications that tell you where the sun will rise and set in any part of the world. You can use them to analyze the direction of light as well. Also, don’t forget to keep an eye out for the weather. You don’t want to be disappointed with a cloudy sky, or rainfall once you reach the location.

Do you have any other simple tips to improve photography? Let us know.


Go to full article: Improve Your Photography: 4 Quick Tips

What are your thoughts on this article? Join the discussion on Facebook

PictureCorrect subscribers can also learn more today with our #1 bestseller: The Photography Tutorial eBook

The post Improve Your Photography: 4 Quick Tips appeared first on PictureCorrect.


from PictureCorrect https://ift.tt/2O4SHqK
via IFTTT

sunnuntai 26. tammikuuta 2020

PictureCorrect.com: Tips for Using ISO Settings in Photography

When you as a photographer—amateur or professional, analog or digital–practice your craft or hobby, you will at one time or another become acquainted with the three letters ISO. If the camera does not get enough light onto the sensor or film, the images will be too dark.

To correct this you can set a higher value on the ISO. All photographers are dependent on light and lighting conditions can be very variable at different locations or times of day. The ISO value is for that reason an important tool that allows the photographer to be able to work effectively in many different lighting conditions.

iso speed photography

photo by Howard Ignatius, ISO 6400

ISO value has influence on the shutter speed and aperture for any photo shoot. Deep in the rain forest, to a concert or a moonlight walk, where there is little light available, it will by using this tool will be possible to get excellent pictures without using a tripod. This is one of the reasons why the digital cameras has made it much easier to be a photographer.

ISO Indicates the Sensitivity of the Image Sensor

With ISO (International Standards Organization, previously known as ASA), we mean how quickly a film or digital sensor is capable of recording light. An image sensor set to ISO 100 requires twice as much light to achieve a normal exposure, as when the sensor is set to ISO 200.

In order to get twice the light the shutter speed must either be doubled (e.g., from 1/60 to 1/30 seconds) or the aperture must be opened up a whole f-stop (e.g., from f/5.6 to f/4).

That may not sound like a good idea to have to double the shutter speed so that we risk blurring the picture? Why doesn’t we always set the ISO speed as high as possible (e.g., ISO 1600) to obtain the fastest possible shutter speeds?

Higher ISO Values Produces More Noise

The downside of raising the ISO number is more noisy images – in the film world, this is a bit more romantically known as grain.

High ISO Entails Several Drawbacks

It is not just noise that increases with increased ISO settings. There are actually three “problems” that occur: increased noise, reduced sharpness and reduced contrast ratio.

digital photo with noise from high iso

High ISO = High Noise (Slightly exaggerated to show effect in this example)

The last two problems are usually marginal. The decrease in the sharpness of the increased noise that hides the details. Reduced contrast ratio refers to the ability to see details/nuances in the shadow areas as well as highlights.

Is Noise Always Negative?

People often tend to have a hard time telling the difference between images with low and high ISO speeds and very large prints. Therefore, it is difficult to choose which you prefer – a little “noise” doesn’t always disturb the picture. It may even bring a little feeling into the photo.

Different Cameras Provide Different Levels of Noise

Now you may think that you do not recognize this at all – when you test high ISO settings on your camera, the pictures may seem to be very noisy, much more noisy?

Yes, the noise is very different between different cameras and it has been an enormous development in recent years. If you have a compact camera, the risk that your images even at ISO 400 looks like ISO 3200 in other cameras. But if you use a modern digital SLR, you should be able to get great pictures even on ISO 800 and maybe even at higher ISO speeds if your camera allows it.

The problems we have these days when we assess the digital images is that we would look at them maximum zoomed in on the screen. However do not forget to relate to the possible noise you see to what size you actually use the image. Honestly, how many images to print larger than A5/A4?

How High ISO Should I Tolerate in My Camera?

Test your camera! Take a picture of the same motif with different ISO settings and print or send images to the photo lab. The most challenging is to shoot indoors in a low light setting. To try different ISO settings in daylight gives surprisingly comparable results, it is in low light conditions the major problems occur.

interior lighting

Photo by Flickr user barnyz; ISO 200, f/5.6, 5-second exposure.

This is What You Gain by Increasing the ISO Settings

Now I have spent the whole article to explain the potential problems of raising the ISO. Let us finally turn to the issue and look at the opportunities provided by changing the ISO value.

By Raising the ISO Setting, You Can:

– Speed Up the Shutter Speed.

It is common to have problems getting fast shutter speeds when taking pictures indoors at night (= reduced risk of image blur). Although you may have opened the aperture to the max, you may even have to raise the ISO as high you think the quality will allow.

– Reduce the Aperture Setting.

Instead of changing the shutter speed, you can choose to reduce the aperture (for example, from f/4 to f/5.6) if you need a greater depth of field.

– Try a Combination of Both.

For example, if you raise the ISO setting from 100 to 400, you have doubled the ISO value in two steps. This allows for faster shutter speeds combined with reduced aperture, like going from 1/30 to 1/60 sec. (= 1 step) and f/4 to f/5.6 (= 1 step).

Is it Possible to Lower the ISO Setting From Time to Time?

The most common is that you want to increase the ISO value, but if there is a lot of light in the scene it can be justified to go the other way. Here are three examples:

Example 1:

You want to shoot a stream and use a slow shutter speed around half a second to get good-looking motion blur in the water.

Answer:

Here you must set the camera at lowest ISO. If the minimum aperture is still not enough, you must use a gray filter that reduces the light inlet.

Example 2:

You want to shoot with wide aperture to get the short depth of field on a sunny day. You have chosen the A/Aperture Value setting (Auto Aperture Priority) to get to choose f/2.8 aperture while the camera determines the shutter speed for you. The problem is that your images are overexposed at all times.

Answer:

A large aperture (comparable with a large pupil) on a sunny day means fast shutter speeds. Most cameras cannot capture images faster than 1/4000 or 1/8000 seconds, which may be too slow for the ISO number you selected. If you can, try to reduce the ISO to 100 or 50. If it is not enough, the only choice left is to buy a gray filter for the lens, which removes some of the sunlight.

iso tutorial

Photo by Paul Saad; ISO 160, f/3.5, 1/35-second exposure.

Example 3:

You try to shoot indoors in a low light setting and has set the ISO at max, you have selected a large aperture and still think that the shutter speed is a bit too slow. You now turn on the flash and take the shot, however you notice that the picture becomes too bright. Despite the fact that you reduce the flash power all the images appear to be heavily overexposed.

Answer:

In extreme situations, the lowest effect of the flash can be too strong for the scene along with your choice of a high ISO number. The only opportunity to use flash in such a situation is to lower the ISO until you notice that the image becomes darker and then start to increase flash power again. From there, you will try to aim for a good balance between the ISO and the flash effect.

About the Author:
Morris Scjomin (dslrlensauctions) has been a professional photographer for over 10 years, practicing exclusively in the field of portraiture, still life, and documentary images.


Go to full article: Tips for Using ISO Settings in Photography

What are your thoughts on this article? Join the discussion on Facebook

PictureCorrect subscribers can also learn more today with our #1 bestseller: The Photography Tutorial eBook

The post Tips for Using ISO Settings in Photography appeared first on PictureCorrect.


from PictureCorrect https://ift.tt/2YH99R2
via IFTTT

PictureCorrect.com: Interesting Photo of the Day: The Land of Whispering Wind

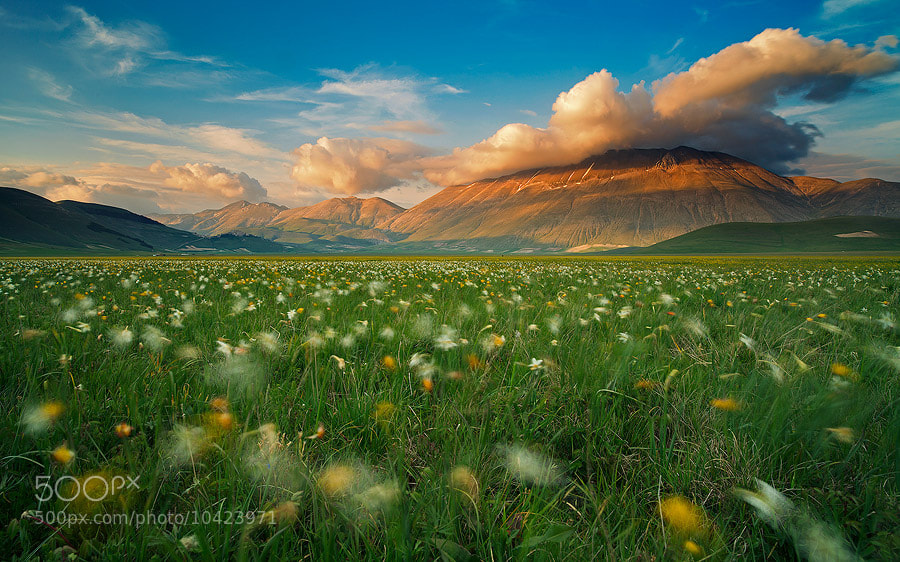
Flower-dotted meadows and cloud-topped mountains take center stage in today’s featured photo, which is set in Italy’s Sibillini National Park:

landscape photography

Italy’s Sibillini National Park, captured by Luca Giustozzi (Via 500px. Click for larger size.)

Photographer Luca Giustozzi, who dubbed the shot “Land of Whispering Wind,” captured the picturesque landscape outside of the village of Castelluccio di Norcia, which borders Monti Sibillini National Park. The park was established as a protected area in 1993.

Giustozzi used a Canon 5D Mark III camera and a Zeiss 21mm lens.


Go to full article: Interesting Photo of the Day: The Land of Whispering Wind

What are your thoughts on this article? Join the discussion on Facebook

PictureCorrect subscribers can also learn more today with our #1 bestseller: The Photography Tutorial eBook

The post Interesting Photo of the Day: The Land of Whispering Wind appeared first on PictureCorrect.


from PictureCorrect https://ift.tt/2DYctw5
via IFTTT

PictureCorrect.com: How to Clean a Tripod

Your tripod is the most trustworthy tool in your arsenal. Who else would you depend on with your expensive camera and lens while you stand several feet away? But sadly enough, that same trustworthy tool is overlooked when it comes to maintenance. We take care of our cameras and lenses. But what about the three legged thingy? This short tutorial by Troy Nikolic demonstrates how to clean your tripod and keep it in sparkling condition:

Over time, dirt and grime can get inside of your tripod—areas like the interlocked parts of the legs and inside the ball head. It’s imperative that your cleaning process take care of all the hidden dirt and grime.

What You Need

  • a soft toothbrush
  • water
  • silicone based lubricant

1. Break down every piece of your tripod

how to clean a tripod

Pull out each part of the legs, all of the screws, and even the leg tabs.

tips to clean your tripod

Lay all the components down in a methodical arrangement in front of you, preferably on a bed sheet or something similar. This is to ensure that everything is in front of you and nothing gets misplaced.

2. Start the cleaning process

tips on cleaning your tripod

Start the cleaning process by dipping your soft brush in water and rubbing off the dirt. Take extra care to clean the stubborn dirt in the screw threads and the inside of the hollow shafts.

3. Lubricate the tripod legs

silicone based lubricant for tripod cleaning

Spray each of the tripod leg parts with silicone lubricant—just a small dab, not too much.

cleaning your tripod

Then take a rag to give it a good swipe down to ensure that any remaining dirt is removed from the piece.

4. Put everything back together

Putting everything back together correctly is the critical part. Make sure every piece goes back to where it belongs. Take special care about the tabs; they create resistance in the legs. If they’re out of place you’ll have problems extending or collapsing the legs.

And there you have it! Keeping your tripod clean should keep it in good working order.


Go to full article: How to Clean a Tripod

What are your thoughts on this article? Join the discussion on Facebook

PictureCorrect subscribers can also learn more today with our #1 bestseller: The Photography Tutorial eBook

The post How to Clean a Tripod appeared first on PictureCorrect.


from PictureCorrect https://ift.tt/37vFxuA
via IFTTT