perjantai 29. maaliskuuta 2019

PictureCorrect.com: DIY Creative Still Life Photography Tips

Photographing inanimate objects is easier than photographing people, right? In reality, that’s not always the case; there are a lot of steps involved. Photographer Chrissie White with COOPH presents this tutorial on still life photography in which she explains her creative process:

Finding Props

For the purpose of this video, White looks for objects in COOPH’s old storeroom. If you happen to have a collection, look for objects that work well together, have an interesting texture, and great colors. White ends up finding a crystal ball, marbles, a mirror, and some gravel. With these objects, she plans to work on an outer space scene.

Draw the Scene First

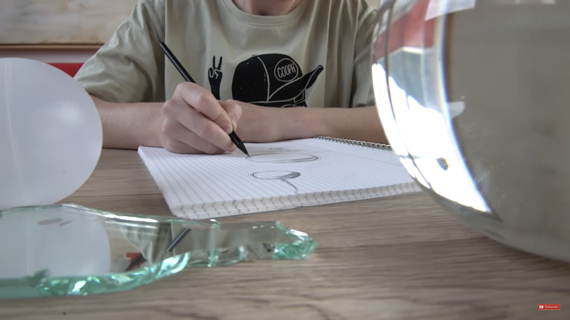
After choosing props, White suggests that you sketch out the scene before doing anything else. This will help you figure out how the objects will look in relation to each other to tell a story.

draw the scene first

Set Up a DIY Studio

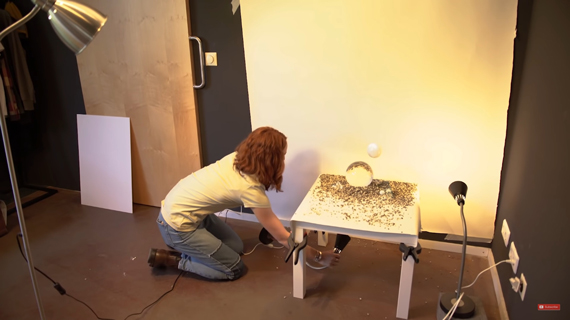
If you already have a studio to work with, that’s great. But for those of us on a tighter budget, you can easily set up a DIY studio. Get some white chart paper and tape it to the wall. Next, put a table in front of the wall and cover it with another piece of white paper.

Setting Up the Composition

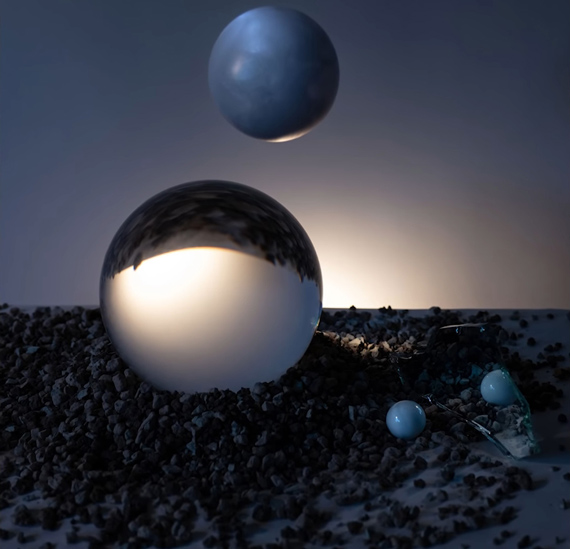
White suggests that you set up the scene by placing the largest object on the table first. Then, you can place all the smaller objects around it. White spreads the gravel on the table first and then places the large crystal ball on it. Using the crystal ball as a reference, she then places the smaller marbles around it.

The fun side to still life photography is that the photographer has complete control over the scene and can manipulate it as required. So, be sure to constantly monitor how your images are coming out and set the scene up as you go. Once you find a composition that you feel works the best, the next step is to set up the lights.

Light With Lamps

To work with still life, it’s not necessary that you have high-end lighting equipment. White demonstrates how you can use simple lamps. To light up the scene, she uses one lamp as a fill light to fill in any shadows. She then uses another lamp as a backlight to create a separation between the orb and the background. It also creates an illuminating effect on the orb. Finally, she uses a third lamp to fill in unwanted shadows.

lighting setup for still life photography

Check the White Balance

Lamps give out light that has a warm temperature. To neutralize the warm look, White uses the tungsten white balance setting. If you shoot in RAW, you can conveniently change white balance during post-processing.

Editing Still Life Images

To make the image stand out, White does some post-processing using Lightroom. You can do the same using Adobe Camera RAW.

  • Crop and straighten the image.
  • Adjust the exposure using the exposure slider.
  • Use a local adjustment tool like the brush tool to adjust exposure in selected areas of the image. Make sure that the local adjustments match the overall tone of the image.
  • Adjust the saturation of selected colors using the saturation tab of the Hue Saturation Luminance panel.
  • Add some clarity to make the image pop.

Once done with the basic adjustments, White opens the image in Photoshop for some minor tweaks in the details. She uses the patch tool to remove fingerprints and the fishing line she used to suspend the marble.

still life photography

Final Image

“When you’re working with still life, it’s all about the tiny details.”

So what are you waiting for? Have a look around your home for some interesting objects and put your creative mind to work.


Go to full article: DIY Creative Still Life Photography Tips

What are your thoughts on this article? Join the discussion on Facebook

PictureCorrect subscribers can also learn more today with our #1 bestseller: The Photography Tutorial eBook

The post DIY Creative Still Life Photography Tips appeared first on PictureCorrect.


from PictureCorrect https://ift.tt/2Uhr1TW
via IFTTT

PictureCorrect.com: Astro Photography Tips & Camera Settings

Astrophotography opens a window to another world. The results are so powerful that they make us feel our insignificance. Professional astrophotographer Stan Moniz shares camera settings, gear, and secret tricks to help you get started with photographing the stars:

Gear for Astrophotography

Moniz recommends that you have the following essential gear for astrophotography:

  • tripod
  • head lamp for your safety
  • a fast wide angle lens

The 500 Rule

Use the 500 rule to calculate the longest exposure you can take without introducing star trails into your images. The application is simple. Divide the number 500 by the focal length you’re using. For instance, if you use a 24mm lens, the longest exposure you can use is 500/24 = 20.833 seconds—or simply 20 seconds.

Camera Settings for Astrophotography

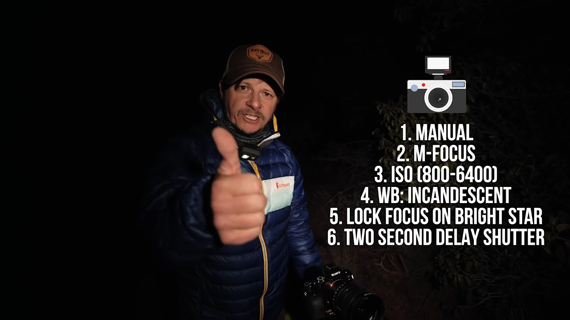
When photographing stars, be sure to have everything in manual mode, including focus mode.

To set your focus, turn the focus mode to manual, and focus manually on the brightest star. Once you’re happy with the sharpness, use tape on the focus ring to fix it there. This way you don’t have to worry about focusing for the entire night.

As the light is really low, Moniz suggests staying between ISO 800 and 6400.

If you shoot RAW (which you should), you can always change the white balance later. Otherwise, the cool look from incandescent white balance works great when shooting stars.

When pressing the shutter release button, there is a high chance of camera shake being introduced. To keep camera shake from ruining your shot, make sure to activate the two-second delay timer.

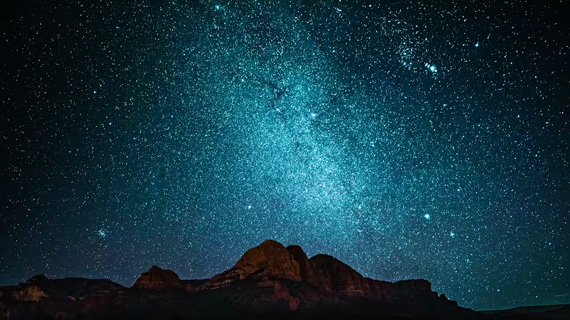
night sky photography tips

Post Processing Tips for Astrophotography

When it comes to processing his images in Lightroom, Moniz gets away with just using the Dehaze and Clarity tools.

Shooting in RAW gives you the flexibility to change the white balance and recover tons of shadow and highlight details if required.

milky way photography

Give these simple tips a try, and you’ll definitely start taking better night sky photos.


Go to full article: Astro Photography Tips & Camera Settings

What are your thoughts on this article? Join the discussion on Facebook

PictureCorrect subscribers can also learn more today with our #1 bestseller: The Photography Tutorial eBook

The post Astro Photography Tips & Camera Settings appeared first on PictureCorrect.


from PictureCorrect https://ift.tt/2JQ4FF7
via IFTTT

torstai 28. maaliskuuta 2019

PictureCorrect.com: Photography Histogram Explained

Today’s DSLR photo tip, the photo histogram explained, involves using the (gulp) histogram. This is another of those features found on most of the higher end cameras that you probably aren’t using. But you should!

What is the histogram?

The photo histogram is that graph that looks like a mountain range with spikes shooting up at seemingly random places. The scary thing is that when you see it, it looks really technical. Most of us immediately try for the land speed record in turning it off.

photo histogram

“Correct Histogram” by Bruce

It really isn’t that hard or confusing. Plus, it can go a long way to getting better exposure on our images.

All the histogram does is graphically display the tonal ranges in your photo from the darkest black areas to the lightest white areas. The left side is for black, the right side is for white.

Why should we use the histogram?

Why not just look at our LCD and make adjustments from there? Glad you asked…

I’ve written other articles (discussing picture controls) where I’ve said that the LCD is not accurate. What you’re seeing on the LCD screen is not necessarily what is going to show up on your computer. It is really easy to do a whole series of photos and get home only to discover that your masterpiece is under- or overexposed and not at all what you were expecting.

Sometimes exposure can be fixed (after hours and hours in Photoshop); sometimes it can’t. If the shadow or highlight details weren’t captured, they just aren’t there to be “fixed.”

Rule of thumb: Use your LCD to check for composition. Use your histogram to check for exposure.

The initial step to understanding how to use a histogram is to drag out your camera’s manual and figure out how to turn it on in playback mode so that you can see both the histogram and the picture. Reading your manual could easily be the most complex part of the operation. This is another of those times when reading the manual (ten minutes of sheer boredom) can dramatically improve your photography–forever.

Once you’ve learned how to turn on your histogram, take a few shots of something.

  1. For this test run, find a subject that is mostly neutral in tone and not mostly dark or light. Take a correctly exposed, “neutral” shot.
  2. Take your first test shot by underexposing your next photo. Check out the histogram. See how the spikes are more to the left hand side of the screen? That’s the side that shows the dark areas of a photo, and since this one is underexposed, it is darker than normal.
  3. Now take a photo of the same subject, but greatly overexpose it. See how the histogram spikes have shifted to the right side? That is the side dealing with the light areas in your photo.
  4. Now look at your original “correctly exposed” photo. The spikes are likely to be more in the middle area.

Spikes at either end of the spectrum, touching the edges of the histogram, tend to indicate a photo that is over- or underexposed, and you will want to make adjustments–but not always.

Caution: the temptation at this point is to automatically set every photo so that the histogram spikes are in the middle. This would NOT be correct. Each photo has its own right or wrong settings, determined by the subject matter and your artistic vision:

  • If you are making a photo showing a lot of snow, a histogram heavily skewed to the right is correct.
  • A scene of a coal bin would correctly produce a histogram heavily skewed to the left.
  • A sunset silhouette will give you spikes on both the left AND right, with a huge dip in the center.
  • A scene with a lot of neutral tones will give us a bell curve in the center.

Experiment with this for a few minutes, and you will quickly understand how histograms work.

histogram on camera

“Out and About Again” by Carl Jones

Then, when you are shooting, you will instantly see where your photos can be improved and make the adjustments to your settings before it’s too late. Remember, in Photoshop you can adjust the lightness and darkness of a photo, but you can’t add detail that was never captured.

Today’s challenge is to take this DSLR photo tip–the photo histogram explained–and practice with using your camera’s histogram. It will make a good weekend project for you, and if you want to start winning photo contests, it is worth the effort to get comfortable with using histograms.

About the Author
Dan Eitreim writes for ontargetphototraining.com. He has been a professional photographer in Southern California for over 20 years. His philosophy is that learning photography is easy if you know a few tried and true strategies.


Go to full article: Photography Histogram Explained

What are your thoughts on this article? Join the discussion on Facebook

PictureCorrect subscribers can also learn more today with our #1 bestseller: The Photography Tutorial eBook

The post Photography Histogram Explained appeared first on PictureCorrect.


from PictureCorrect https://ift.tt/2CHTjwA
via IFTTT

PictureCorrect.com: Interesting Photo of the Day: Stunning Shot of Stranded Ice

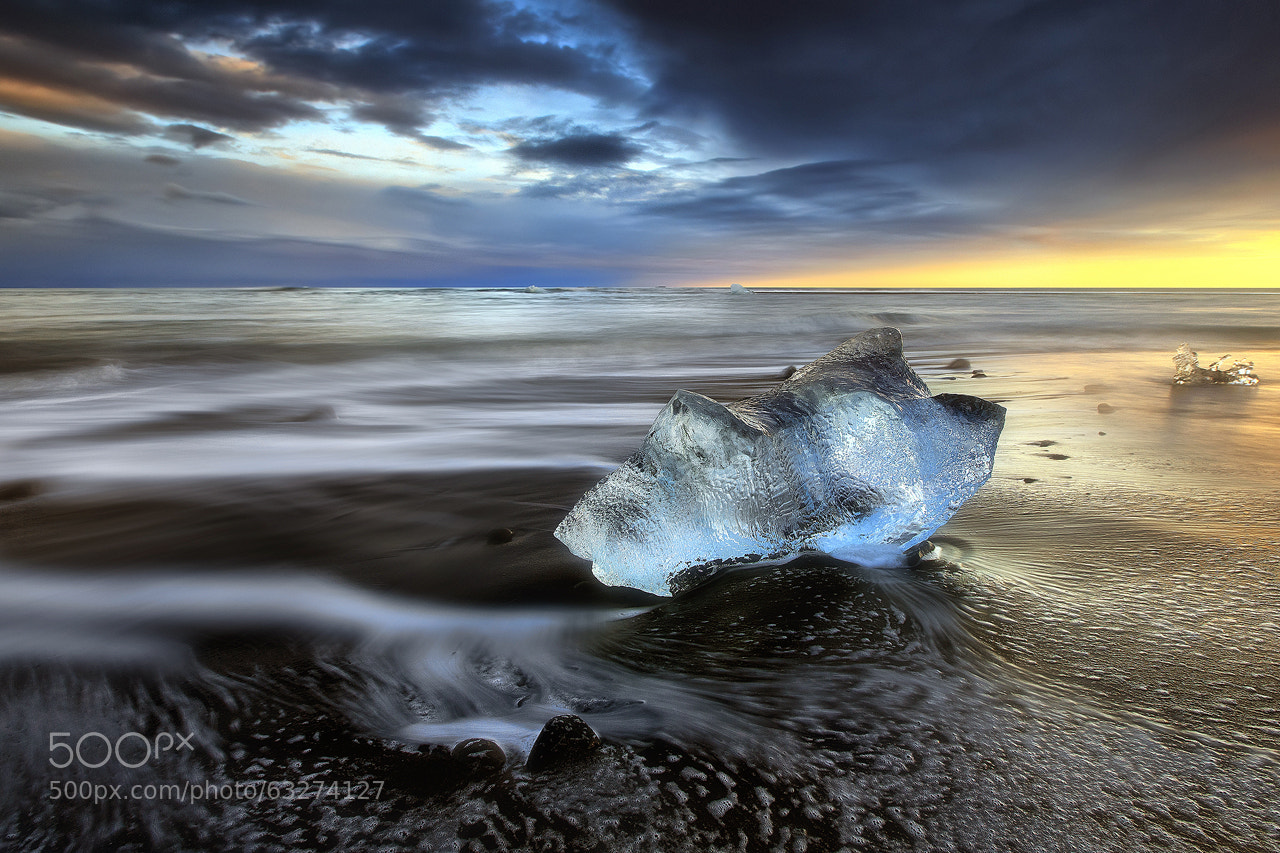
This amazing shot was taken by amateur photographer Christian Lim while waiting for “fine light in extreme cold weather.” It wasn’t until the last sunset of his nine day trip that he was able to catch the stunning photo below:

Lone Ice On Beach In Iceland

“Crash Into Me” (Via 500px.com. Click to see full size.)

The photo depicts glacier ice marooned on Jokulsarlon Beach in Iceland.

Lim shoots with a Canon 5D using a set of 5 lenses: 16-35mm, 17-40mm, 15mm FE, 20mm 2.8, and a 70-200mm.  He also uses LEE and Singh-Ray filters in his landscape photography.

Brilliant work!


Go to full article: Interesting Photo of the Day: Stunning Shot of Stranded Ice

What are your thoughts on this article? Join the discussion on Facebook

PictureCorrect subscribers can also learn more today with our #1 bestseller: The Photography Tutorial eBook

The post Interesting Photo of the Day: Stunning Shot of Stranded Ice appeared first on PictureCorrect.


from PictureCorrect https://ift.tt/2nIaPcT
via IFTTT

PictureCorrect.com: When Does Photo Editing & Photography Become a Lie?

Photography involves a mix of the skills of taking a photograph and the knowledge to edit it. But possibilities are infinite with post-processing. Photographers have the ability to manipulate images to their liking. Is there a limit at which an image becomes a lie? Or should editing be readily accepted without any questions asked? Photographer Jamie Windsor shares his views on this controversial topic:

The key takeaway from Windsor’s discussion is that post-processing is a part of the art. For genres of photography like fine art, the process is irrelevant. It is, in fact, somewhat expected.

What matters is the message that the image carries to the viewers.

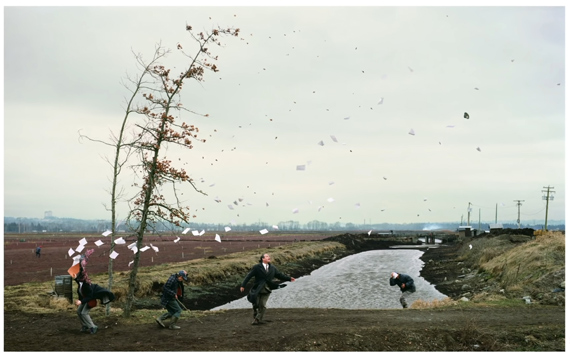
a sudden gust of wind

“A sudden gust of wind” is an example of a carefully planned composite image.

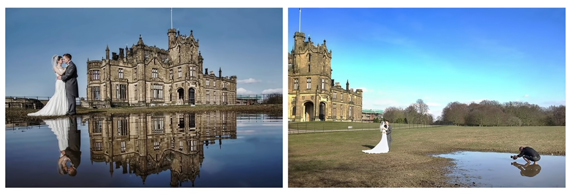
If we look at it from a general sense, all photography is a lie because it’s the photographer who chooses what to show and what to exclude.

“The act of choosing what to take and not to take is in itself subjective. What we see is what the photographer has chosen for us to see.”

we see what the photographer shows

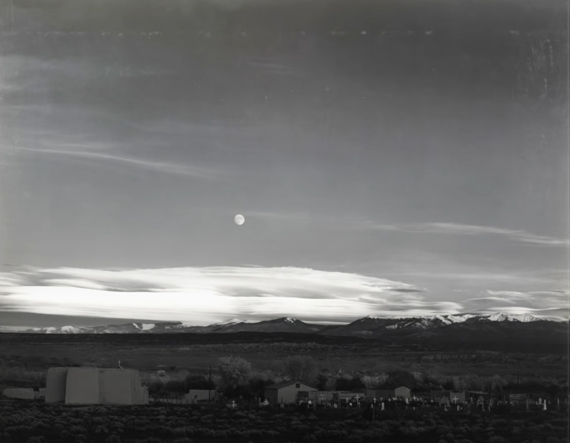
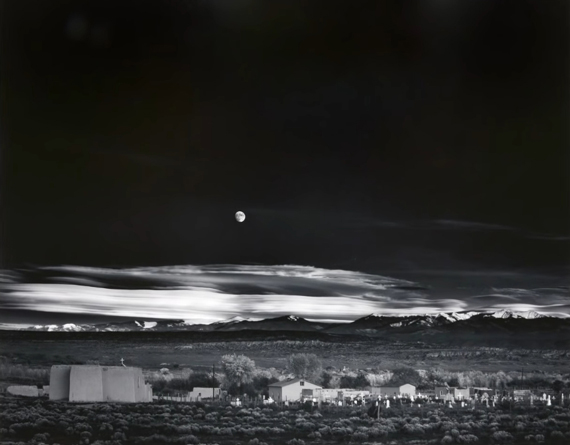
Even iconic photographer Ansel Adams was a master of manipulating his images. But did he ever alter the truth by editing his images? Or did he do it to represent his vision of the scene? That’s the question you should ask yourself.

Here’s the before and after images by Ansel Adams named Moonrise, Hernandez, New Mexico:

Moon rise by Ansel Adams before editing

Moon rise by Ansel Adams after editing

“Photography will never be absolute truth in itself but rather a communicative tool by which a representation of truth is conveyed. For me, truth in photography as with all art, is not told through the intent or the process by which something was created but by what the end result communicates to me as an observer.”


Go to full article: When Does Photo Editing & Photography Become a Lie?

What are your thoughts on this article? Join the discussion on Facebook

PictureCorrect subscribers can also learn more today with our #1 bestseller: The Photography Tutorial eBook

The post When Does Photo Editing & Photography Become a Lie? appeared first on PictureCorrect.


from PictureCorrect https://ift.tt/2FGT1YO
via IFTTT

keskiviikko 27. maaliskuuta 2019

PictureCorrect.com: Groom Preparations: Wedding Photography Tips

We already covered bride photography tips. Now it’s time to discuss the groom.

wedding photography

photo by John Hope

Photographing the groom seems to fall into two categories for me. Either I don’t get to be with the groom until he arrives at the church/ceremony room, or I’m flitting between the bride and the groom because they’re in the same location getting ready. So I’ll treat these as two separate approaches, although the principle is the same: what’s the story and how can I capture it in the best way?

At the Hotel/House

I always arrange a time when I’m going to find the groom and his party so they know when to expect me. This is very important because I want to get the story of getting ready as it happens and not have to re-stage it (which I wouldn’t do anyway). I almost certainly have been with the bride first, so I arrange a time that allows the groom’s party plenty of time to change and get to the venue/church, thus allowing me to get back to the bride for the getting into the dress shots.

The approach to shooting the guys is basically the same as the bride: be relaxed, let the story unfold, know where the best light is, and gently move people to it if necessary. There are certain moments I’m looking for that I know will tell the story visually, and it depends on what has had to occur before I get there as to how many I can capture. I can’t be in two places at once. (I’ll talk about second shooters in a separate article).

portrait of the groom

photo by Sergey Podtsepko

Ideally, this is what I’d like to see:

  • Shaving/post shower towelling (nothing naked, although some men have no inhibitions)
  • Other groomsmen arriving
  • Suits hanging up
  • Shoe polishing
  • Getting suited and booted
  • Cufflinks and watches (think of these as the male equivalent of tiaras and earrings)
  • Buttonholes (these may not arrive until the church)
  • Rings being handed over or checked
  • Any of the usual macho male bonding rituals—unlike with bride’s friends, the groomsmen see it as their job to undermine the confidence of the groom at very opportunity. (Please note that I am generalizing greatly, but as a man and a husband I might have the right.)

Generally men get changed very quickly, so you have to be on your toes. There is no taking your time and savoring the ritual that you find with the bride. Getting into the suit is the prerequisite for getting to the pub/church/venue as soon as possible so the day can begin. For me the same image rules apply but you might have to shoot fast. I’m looking for wide establishing shots to give us the context/setting, medium shots to show relationships and emotion, plus lots of detail shots to show us the rituals of the ‘uniform’ being donned (it might the best the groom ever looks and he will want images that reflect how smart/fashionable/individual and ‘hot’ he looks—it’s no different from the bride).

Once everyone is ready it’s nice, if time allows, to spend some time just melting into the background and capturing the interaction between the group of friends as they prepare to leave. They’re the smartest they’re going to be all day, filled with anticipation of what’s going to happen and certainly playing on the groom’s nervousness (despite what anyone claims, I’m sure that any groom is apprehensive about his role in the day). This time is an opportunity to get some interesting, fun, and sometimes touching images of the groom’s party interacting amongst themselves. The rest of the day they will be with other people and have duties to perform.

groom photography

photo by Evan Blaser

At the Church

Often the first contact I have with the groom and his party on the day is at the church (or ceremony venue). Preparations have ben done at this point and I don’t tend to ask them to stage any of the getting ready list (often photographers will ask the groom to show his cufflinks or get the best man to hold up the rings, but it’s not really my style so I tend not to start the day by making them do this).  Flowers will have been delivered to the bride’s house and the buttonholes then brought on to the church. I’ll often volunteer to take the buttonholes myself as I then know that when I arrive I’ll at least get shots of them being pinned to suits.

At the church I tend to step back initially and get reportage shots of the groomsmen performing their duties: handing out orders of service, showing people to seats, welcoming guests they know—it’s all the texture of the day. I’m moving constantly from inside to outside the church. Many different stories are playing out on both sides of the arched doorway. I’m aware that the groom and best man will be together getting instruction from the vicar/registrar. I’ll get a shot of the interaction but always from a distance; I don’t think it’s appropriate to get into people’s faces when important information is being imparted or risk distracting them.

One really important thing to do at this stage is to try to have a word with the minister/registrar to confirm what level of photography they are comfortable with during the service. I don’t just assume that I’ll be allowed to do my thing. More often than not there are restrictions. This may sound obvious but I want to appear polite and professional, so I always announce my name, shake hands, and tell them I’m the official photographer. Before they can trot out their usual rules I try to make clear the style of photography I employ: low-impact, natural light, no flash, not moving around and respectful of the most important part of the day (the marriage ceremony). This usually allays any fear they had that I might be intrusive or distracting and might mean that I get fewer restrictions than other photographers. However, some have been ‘burnt’ by photographers before and I have been faced with, “No photographs during the ceremony at all. One of the kiss and only from the back of the church on the way in and out.” And I don’t argue. I don’t want to make a fuss on someone else’s day, but I do tell the groom of the restrictions; I don’t want to be accused of not doing a proper job.

Moving from inside to outside a lot means you get to know your camera settings very well. I used to shoot every wedding on manual setting and was constantly having to commit settings to my short term memory as I flitted in and out and made adjustments on the fly. Now I know the look I want—subject isolated by narrow depth of field—so I’m on aperture priority for most of the time and can let the camera make shutter speed decisions. Just make sure that the shutter speed never drops too low (anything above 1/125 of a second is good for me). I always use Auto ISO settings, which I love, just making exposure compensation adjustments when shooting against the light; it really beats forgetting to change the ISO when moving outside and finding everything is blown out because I’m still on 1600 ISO.

If there’s time and the groom doesn’t look too stressed, there are a couple of shots I like to cross off my list before the service. I’ll aim to get a hero shot of the groom: a nice portrait in natural light. It creates a nice symmetry in an album as I have a similar single shot of the bride. Also, if I can gather all the groom’s party together (and I haven’t done it just after they were ready) I will shoot the portrait of the groom with his groomsmen. Two reasons to do it now: 1.) They look the best they are going to look all day, and 2.) I can cross it off my ‘formal’ list and don’t have to soak up time doing it later.

So by this stage of the day everyone is dressed, the groom’s at the church/ceremony room, guests are arriving (I don’t shoot everyone arriving but try to capture the build up by shooting a few happy, excited family members and friends), the bride is on her way, and the first big focal point of the day is about to happen…

About the Author:
I am a professional wedding photographer based in Staffordshire, England (you can find me on Flickr). My approach to wedding photography is to create a natural, relaxed set of images telling the story of the day. I am passionate about ‘good’ wedding photography and believe t it is the photographer’s job to create a very individual set of images of each wedding day. I live with Rachel, my wife, and shoot all over the UK.


Go to full article: Groom Preparations: Wedding Photography Tips

What are your thoughts on this article? Join the discussion on Facebook

PictureCorrect subscribers can also learn more today with our #1 bestseller: The Photography Tutorial eBook

The post Groom Preparations: Wedding Photography Tips appeared first on PictureCorrect.


from PictureCorrect https://ift.tt/2TBxBA1
via IFTTT

PictureCorrect.com: Night Portraits Tutorial with a Smartphone Flashlight

You probably don’t always carry a flash around with you. But don’t let that stop you from taking nighttime portraits. Photographer Pye Jirsa takes up the challenge of photographing portraits at night using his phone’s flashlight as a light source:

Jirsa starts by placing the subject behind a sculpture so that it creates a frame around her. He uses a stand to hold his phone, which has the flashlight on to light the subject’s face. He then shoots the image from a higher angle.

night portrait using phone flashlight

night time portrait with flashlight

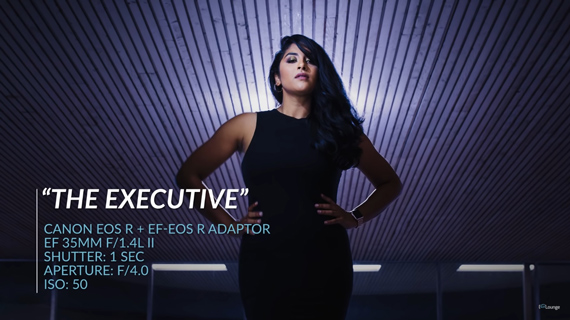
Next, Jirca has the subject stand over a ceiling light. With the camera set to take a 1-second exposure, he uses his phone’s flashlight to quickly light-paint over her one side. The result is stunning:

light painting using phone flashlight

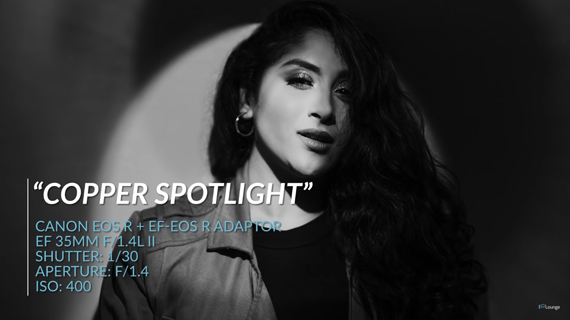
For the next shot, Jirsa has the model sit against a wall. With the camera set to take the image in timer mode, he shines the phone’s light on to the model’s face through a copper pipe. Using the copper pipe, he creates a spotlight effect to highlight the her eye.

night time portrait using smartphone light

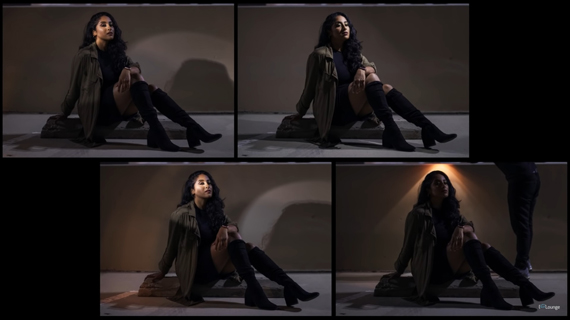
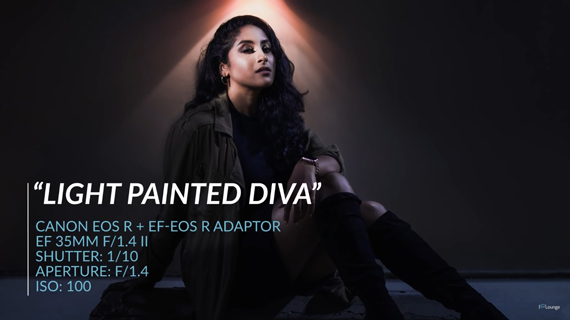
Jirsa decides to step up the game a bit for the next shot. He asks the model stay as still as possible and takes four different images. In each photo, he holds the light differently to illuminate the subject and the background. His idea is to combine these four differently lit images in Photoshop and mask in the light only where necessary.

multiple exposures light painting

light painting composite

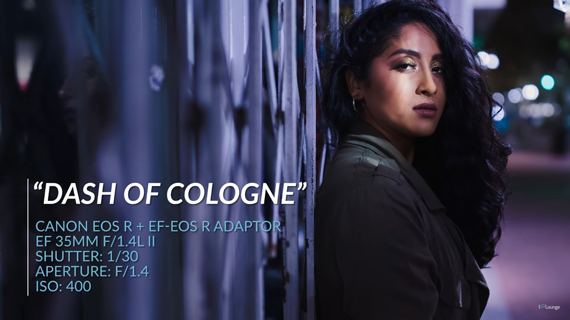
To make the images more interesting, Jirsa adds a dash of cologne to the photoshoot. By holding the cologne bottle directly in front of the phone’s flashlight, he creates different lighting patterns on the subject’s face.

light streaks using flashlight and cologne bottle

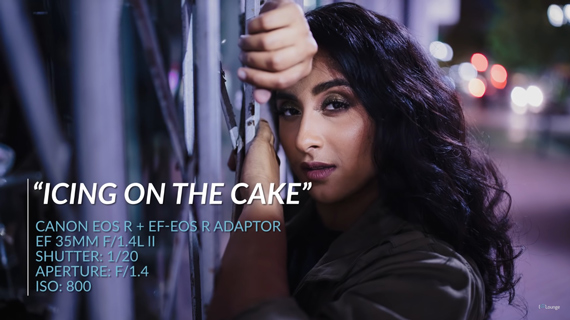
In the same location, Jirsa has the subject to lean up against a fence and sets the camera to let in as much light as possible. Then, by using a frosting tube to create a snoot for the phone’s flashlight, he adds a hint of light to the subject’s face. The snooted phone light adds a kiss of light to draw the viewer’s attention to the subject’s face.

night portrait using flashlight and small snoot

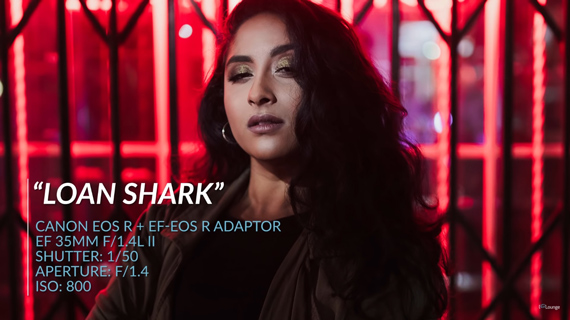
For the final image, Jirsa poses the subject in front of a red neon light. He then uses the snooted light again to brighten up the subject’s face and clear the red tint.

night portrait with phone flashlight

The fact that you can get amazing results using your phone’s flashlight is just amazing. How about giving this a try?


Go to full article: Night Portraits Tutorial with a Smartphone Flashlight

What are your thoughts on this article? Join the discussion on Facebook

PictureCorrect subscribers can also learn more today with our #1 bestseller: The Photography Tutorial eBook

The post Night Portraits Tutorial with a Smartphone Flashlight appeared first on PictureCorrect.


from PictureCorrect https://ift.tt/2V16ZKe
via IFTTT