lauantai 6. syyskuuta 2025

PictureCorrect.com: How to Use Layers in Photo Editing

In the realm of digital photo editing, layers are a revolutionary concept that has transformed the way photographers, designers, and artists work. They allow for non-destructive editing, meaning you can modify an image without permanently altering the original. This article will break down how to use layers in photo editing, enhancing your understanding and skill to allow for more complex and creative edits.

Quick reminder: only a little while left for Lightroom Editing Mastery at 80% Off
layers photo editing

Photo captured by John Thomas

Understanding Layers:

Think of layers as sheets of glass stacked on top of each other. Each sheet can hold different parts of your image, such as text, color, effects, or even another image. The magic of layers is that they can be individually modified, rearranged, or even removed without affecting the rest of the image.

Creating and Managing Layers:

Most photo editing software such as Luminar Neo or Photoshop comes with a dedicated layers panel. When you open an image, it becomes the background layer, the base of your editing canvas.

To create a new layer, you typically navigate to the layers panel and click on the “New Layer” button. Name your layers thoughtfully to keep track of what each one contains, especially when working with complex edits involving many layers.

Here’s how layers can be utilized in Photo Editing:

Non-Destructive Editing: Layers allow you to make changes to your images without altering the original photo. This means you can always revert back to the original image if needed. It’s a safer, more flexible way of editing.

Selective Adjustments: With layers, you can apply edits to just a part of your image. For example, you might want to increase the brightness of your subject without affecting the background. You can do this by creating a new adjustment layer and using a layer mask to select where the adjustment should be applied.

Blending Different Images or Effects: You can use layers to blend different images together, or to apply different effects to different parts of an image. For example, you could replace the sky in a landscape photo by placing a new sky image on a separate layer and blending it with the original photo.

Creating Complex Compositions: If you’re creating a complex composition – for example, a photo montage – you can use layers to manage the different elements of your composition. Each element can be placed on a separate layer, which you can then move, transform, or edit independently of the others.

Adjustment Layers: You can use adjustment layers to apply effects or adjustments to your entire image, or just to selected parts of it. For example, you could use an adjustment layer to increase the saturation of your entire image, or to apply a vignette effect.

Layer Opacity: Each layer has an opacity setting, which controls how transparent it is. This allows you to control how much of the layer’s effect or image is visible, and how it blends with the layers beneath it.

Layer Blending Modes: Control how the colors and tones in one layer interact with those in the layers beneath it. This can be used to create a wide range of creative effects.

Layer Masks:

Layer masks are a powerful tool for selectively hiding and revealing portions of your layer. The principle is simple: black conceals, and white reveals. Painting with black on a layer mask will hide the associated part of the layer, while painting with white will reveal it. This non-destructive method is perfect for blending images, retouching, and creating sophisticated compositions.

Using Layer Blending Modes:

Blending modes determine how the pixels on one layer interact with the pixels on the layers beneath it. They can be used to create various effects such as darken, lighten, multiply, screen, overlay, and more. Experiment with different blending modes to achieve unique results.

Conclusion:

Mastering layers can significantly enhance your photo editing prowess, offering you greater flexibility and creative control. Remember, the key to becoming proficient with layers lies in practice and experimentation. So, open your favorite photo editing software and start layering your way to stunning images.

For Further Training:

In the digital age, capturing a photo is only half the battle; the true magic happens in post-processing. This is where Lightroom Editing Mastery, an online course meticulously designed for both budding and seasoned photographers, steps in to transform the way we enhance our photographs.

lightroom mastery

Lightroom Editing Mastery (see what’s included)

For a limited time, “Lightroom Editing Mastery” is available at a significantly discounted rate, making professional-grade photo editing skills more accessible than ever.

Deal ending soon: Lightroom Editing Mastery at 80% Off


from PictureCorrect https://ift.tt/qlaBx85
via IFTTT

perjantai 5. syyskuuta 2025

PictureCorrect.com: Tips for Photographing Urban Landscapes & Cityscapes

Landscapes are an extremely rewarding type of photography, but you don’t have to venture out of town to capture sweeping panoramas or breathtaking views.

Urban landscape photography or cityscape photography is a type of scenic photography that’s quickly growing in popularity. Due to the fact that most of the world lives in or near cities, urban landscapes provide an excellent chance to photograph some landscape images without having to wait until you travel to a scenic nature spot.

Today’s guest article comes from the author of the A Modern Approach to Photographic Composition which is currently 50% for those of you working on composition.

cityscape photos

With urban landscapes, there are plenty of photo opportunities just waiting to be captured at a city near you—or maybe even right outside your door.

In order to capture the best urban landscapes possible, you’ll want to use many of the same techniques that you use when photographing traditional landscapes. But there are a few opportunities and challenges that are unique to urban settings. To help you get the most out of your cityscape photography, here are some tips to get you off to a great start.

Bring Your Gear

While you don’t want to have to pack around a bunch of heavy gear especially if you’re going on foot, try to bring along a wide angle lens if you have one. These lenses have a wider angle of view making them a great option for photographing in the city where space if often limited. They also tend to exaggerate the sense of depth and scale in an image making the foreground look closer and the background smaller, and further away. Of course, you may also want to consider bringing a telephoto if you’re interested in capturing details, or creating images that are “flatter.”

how to photograph a cityscape

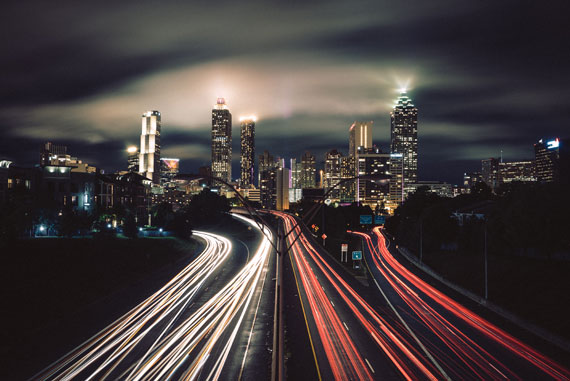
You’ll also want to bring a tripod, especially if you’re doing early morning or nighttime scenes, or any type of long exposure photography like light trails, or gently blurred clouds. Finally, don’t forget to bring along your filters—a polarizing filter will come in handy when photographing modern, glass buildings, as it will help to cut the glare from reflections.

Remember Rules of Composition

Composing cityscapes is similar to creating landscape images. The same basic rules of composition still apply and keeping them in mind will help you to create powerful photos. Look for a focal point, and try to find leading lines that will draw the viewer’s eye through the image. Be sure to balance the composition, and make sure one section isn’t too heavy. Don’t forget to use colors, contrast, patterns, and texture to help you create your images. Textures and patterns are especially prevalent in urban settings and can be found in a number of places like graffiti, brickwork, and architecture; while contrasting colors, textures, shapes—or even subjects—such as the old buildings against modern, new skyscrapers, can also be found in the city.

Consider the Time of Day

The best time of day for urban photography will depend largely upon your personal preference and the style of photography that you’re going for. Early morning is preferred by many photographers, since the lighting is often at its best just after dawn, and there are fewer distractions. The streets are usually less busy in the very early hours before rush hour, that is, and there’s less litter on the roads.

Late morning or afternoon can also produce excellent lighting though. The sun is at an angle, and side lighting is ideal for highlighting textures and showcasing details. Then, of course, you have the beautiful golden light from the evening golden hour, and as the dusk turns to night, you’ll be able to capture the beautiful city lights, or even create light trails from traffic using a long exposure—and a tripod.

urban decay photography

Aim to Capture the Vibe

Every city has a unique vibe. Your job is to capture the atmosphere and create an image that will instantly transport your viewers to the scene. Look for ways to encapsulate the setting. Before you start snapping, take a few minutes to survey the scene at hand, and soak up your surroundings. What do you notice? What catches your eye? What’s one thing that sums up the essence of the neighborhood? This will give you a great place to start and will show you what you should include in the image.

Include People

While many photographers hate it when unsuspecting pedestrians photobomb their photos, often, incorporating a human element into a composition can make for an excellent photo. People can add life and interest to a scene, and can also be used to convey a sense of scale. However, if your composition doesn’t call for people, don’t use them. Make sure you intentionally leave them out.

aerial city view

Think Unique

Although it can be challenging, look for ways to make your photos unique! If you’re photographing famous buildings, a bridge, or a well-known landmark, you’ll want to find ways to capture it in a way that’s different from every other snapshot out there. Look out for details or patterns that are easy to overlook, or find some interesting foreground to include in the image. Changing your perspective can often mean the difference between a standard snapshot and a spectacular image.

Look Up

If you’re next to tall, towering buildings and skyscrapers, don’t forget to look up! Often, angling the camera up can result in a great composition. This is another situation where a wide angle lens will come in handy, helping you to fit it all in. A wide angle will also produce the illusion that the buildings are leaning, resulting in an imposing, dynamic image.

urban landscape photography at night

Go Off the Beaten Path

Finally, not everything happens in the center of the city. While you might find the most action downtown, don’t forget to venture out a ways too. You might be surprised at how many unique things there are just waiting to be captured. You will also probably find it quieter on the outskirts of town, and you may even discover a new angle to photograph the city from.

Just remember to stay safe when venturing into new areas. Take a friend and stay alert if you’re unfamiliar with the neighborhood.

Just because well-known skylines have been captured before, doesn’t mean that you have to take the same photos. Try to think of ways that you can make your images unique. Look for new vantage points, or try to find opportunities to frame the scene in an unexpected way. Have fun hunting for unique photo opportunities, and enjoy capturing images that are all yours!

Do you enjoy photographing urban environments? We’d love to see your work! Feel free to share your images with us in the comments.

About the Author:
Jon Phillips is the founder and creator of Contrastly. While he’s a user interface and web designer by trade, as far back as he can remember he’s always had a love for photography and interesting visuals.

For Further Training:

How do we make our photographs more powerful, more pointed? Learn all about photographic composition & express yourself through effectively composed photographs with the help of this in-depth guide. We were able to negotiate an exclusive 50% off discount for our blog readers which ends soon if you want to check it out.

composition guide

New: Modern Approach to Photographic Composition

This eBook is broken down into 10 chapters that contain 90+ pages packed full with theory, techniques, concepts, advice, and tips & tricks to help you master composition.

Deal ending soon: Modern Approach to Photographic Composition at 50% Off


from PictureCorrect https://ift.tt/ye1gzdX
via IFTTT

torstai 4. syyskuuta 2025

PictureCorrect.com: Mastering Lightroom Organization: Tips for a Tidy Catalog

Organizing photos in Adobe Lightroom is essential for efficient workflow and easy navigation. Here are some of the best strategies to help you keep your photos well-organized.

This article is based on concepts from Lightroom Editing Mastery which is currently 80% off if you want to check it out.

lightroom organization

Photo captured by Joseph Pearson

Import settings:

  • Apply metadata and keywords during the import process, making it easier to sort and find your photos later.
  • Use a consistent and logical file naming convention for your images, such as date, event, or location.

Folder structure:

  • Organize your photos in a hierarchical folder structure based on the year, month, and event or project. This will help you easily locate specific photos in the future.
  • Keep the folder structure consistent across all your photo collections.

Collections and Collection Sets:

  • Use Collections to group related images or for a specific purpose, like a portfolio or blog post.
  • Use Collection Sets to organize Collections further into a hierarchy, such as grouping Collections based on a specific theme, location, or project.

Keywords and metadata:

  • Assign relevant keywords to your photos, making it easier to search and filter them later.
  • Add or update metadata like captions, titles, copyright, and other useful information to your images for better organization and future reference.

Star ratings and color labels:

  • Use star ratings (1-5) to rate your photos based on their quality or importance.
  • Apply color labels to your images to categorize them further, such as “for editing,” “to print,” or “to share.”

Flagging and rejecting photos:

  • Use flags to mark your best photos as “Picks” or reject the ones you don’t want to keep.
  • Regularly review and delete rejected photos to keep your catalog clean and organized.

Smart Collections:

  • Create Smart Collections to automatically group photos based on specific criteria, such as keywords, ratings, or capture date.

Regular maintenance:

  • Periodically review your catalog to ensure that your folder structure, collections, and keywords are up-to-date.
  • Remove duplicates and backup your catalog regularly to avoid data loss.

By implementing these strategies, you can create a well-organized and efficient Lightroom catalog that will make your photo editing and management process much smoother.

For Further Training:

In the digital age, capturing a photo is only half the battle; the true magic happens in post-processing. This is where Lightroom Editing Mastery, an online course meticulously designed for both budding and seasoned photographers, steps in to transform the way we enhance our photographs.

lightroom mastery

Lightroom Editing Mastery (see what’s included)

For a limited time, “Lightroom Editing Mastery” is available at a significantly discounted rate, making professional-grade photo editing skills more accessible than ever.

Deal ending soon: Lightroom Editing Mastery at 80% Off


from PictureCorrect https://ift.tt/7uag2bF
via IFTTT

keskiviikko 3. syyskuuta 2025

PictureCorrect.com: Tips to Speed Up Your Photo Editing Workflow

Optimizing your photo editing workflow in Adobe Lightroom can be a game-changer, especially if you’re dealing with large batches of photos or tight deadlines. Lightroom is a powerful tool, but without the right strategies, you might find yourself spending more time than necessary on each photo. The key to efficiency lies in understanding and utilizing Lightroom’s vast array of features to your advantage.

Here are several tips to help you speed up your editing process, allowing you to work smarter, not harder, and focus more on the creative aspects of your photography.

Relevant note: offer ending soon for the Fundamental Photo Editing Guide

speed workflow

Photo captured by Adrian Schwarz

  1. Use Presets: Develop your own presets for common editing styles or use pre-made ones. This can drastically reduce the time spent on basic adjustments.
  2. Batch Editing: Apply edits to multiple photos at once. This is particularly useful for photos shot under similar conditions.
  3. Keyboard Shortcuts: Learn and use keyboard shortcuts. This can save a lot of time that you would otherwise spend navigating through menus and sliders.
  4. Organize with Keywords and Collections: Use keywords and collections to organize your photos. This makes it easier to find and group similar images for editing.
  5. Use Smart Previews: Smart Previews allow you to edit photos without needing the original files locally. This can speed up the editing process, especially for large files or when working on a slower computer.
  6. Adjustment Brushes and Graduated Filters: Master the use of adjustment brushes and graduated filters for local adjustments. This is faster than editing in Photoshop for minor corrections.
  7. Optimize Lightroom’s Performance: Adjust Lightroom’s preferences for optimal performance. This includes managing cache sizes and preview settings.
  8. Flagging and Rating System: Utilize the flagging and rating system to quickly sort through photos and decide which ones to edit.
  9. Synchronize Settings: When you have multiple photos that require similar edits, you can synchronize the settings from one photo to others.
  10. Use Dual Monitors: If possible, use a dual monitor setup. Having the grid view on one screen and the develop module on another can speed up the workflow.
  11. Regularly Update Software: Keep your Lightroom updated. Adobe frequently releases updates that can improve performance and add new features.
  12. Culling Before Editing: Be selective about the photos you edit. Spend time culling to ensure you only work on the best images.
  13. Adjustment Presets for Local Adjustments: Create your own presets for frequently used local adjustments.
  14. Use Auto-Sync for Batch Processing: When working on a series of images that require the same adjustments, use the Auto Sync feature to apply changes to all selected images simultaneously.
  15. Stay Organized: Keeping a well-organized catalog can save time in the long run. Regularly back up and clean up your catalog to avoid performance issues.

Mastering the art of efficient photo editing in Lightroom is about more than just saving time; it’s about enhancing the quality of your work while minimizing the effort and stress involved in the editing process. The ultimate goal is to allow your creativity to flourish without being bogged down by tedious processes. With practice and adaptation of these strategies to your personal workflow, you’ll not only see a significant improvement in your editing speed but also in your overall satisfaction with your photography projects.

For Further Training:

This is a complete step by step guide to photographic editing from best-selling photography teacher, Kent DuFault. Fundamental editing includes edits that aren’t going to fundamentally change the concept of the original photograph. It covers the steps required to take your original photo, as it came out of the camera, and turn it into the best image that it can be without going overboard. It is currently 62% off today if you want to check it out.

fundamental photo editing

The Ultimate Guide to Fundamental Photo Editing (Take a Peek Inside)

Digital photography is so intrinsically tied to the editing process that you can’t really consider doing one without doing the other. I know many new photographers try and resist this at first. I was guilty of that myself.

Deal found here: Fundamental Photo Editing Guide at 62% Off


from PictureCorrect https://ift.tt/deRDEBy
via IFTTT

tiistai 2. syyskuuta 2025

PictureCorrect.com: How to Use the Fibonacci Spiral for Better Compositions

As a photographer, there are a lot of things we have to consider when taking photographs. One of the most important ones is composition. A photo with good composition is attractive and appealing to the human eye. It’s what will get your work recognized.

When it comes to composition, there are a lot of rules you can follow. One of the most popular ones is the rule of thirds. However, today we’re going to introduce you to a different rule: the Fibonacci spiral, also known as the golden ratio.

This article is based on concepts from A Modern Approach to Photographic Composition which is currently 50% off if you want to dig deeper for further training.

What is the Fibonacci Spiral?

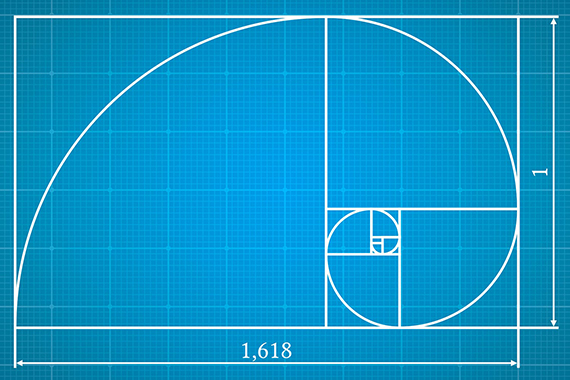
The Fibonacci spiral is a composition guide that creates a perfectly balanced and aesthetically pleasing photograph to the human eye. It stems from the mathematical principle of the golden ratio.

The golden ratio is 1.618:1, and this number is based on spirals we see in nature, such as those in ocean waves, flowers and plants. A lot of famous works of art, such as the Mona Lisa, follow the golden ratio; with the Fibonacci spiral, you’ll be able to apply it to your photography too.

Here are five tips on using the Fibonacci spiral for better compositions.

1. Place Your Subject on the Spiral End

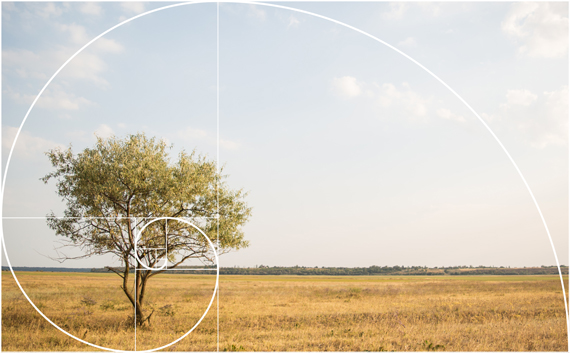
Above is the Fibonacci spiral used for photographs. You should ideally try to place your subject at the very end of the spiral for the best composition. If you really want to dig into it, try placing important details at points where different lines intersect at the end of the spiral. You can also place the details anywhere in the smallest boxes.

The spiral works by focusing the viewer’s eye on the end of the spiral and then leading them outwards to the whole scene.

So it’s an excellent technique to use when you have a single subject in a wide-angle shot or a single focal point in a landscape.

2. Don’t Stick to One Angle

The great thing about the spiral is that it works from all angles. You can mirror the original spiral, flip it upside down or place it in any direction and it will work! Many beginners think you can only use the spiral in one way, but that isn’t true.

A great tip is to pay attention to the scene you’re capturing and look at things other than your subject.

Are there elements around your subject that you want to bring into the photograph, too? If there are, choose the spiral angle, which should include them.

3. Look for Natural Curves

When it comes to the golden ratio in pictures, the Fibonacci spiral is not the only way to compose photographs. The phi grid is another way to incorporate the golden ratio.

The phi grid is best suited for photographs with many lines in them, while the spiral is excellent for scenes with natural curves.

So before using the spiral, check to see whether the scene you’re shooting has any natural curves. Natural curves can apply to anything: clouds often have natural curves, trees could be curved or even someone’s cheekbone can count as a natural curve!

If your scene is full of straight objects or lines, though, don’t try to force them into the spiral, and consider using the phi grid instead.

4. Use the Rule of Thirds to Help You

The Fibonacci spiral is a bit complex to remember, we know, and you’re not expected to remember it either! However, most cameras don’t have the spiral as a built-in grid overlay option. Instead, what they have is the rule of thirds.

Luckily, you can use the rule of thirds to help you. Turn your rule of thirds overlay option on and place your subject on the intersection of the lines. Now move your camera slightly, so your subject is a bit farther out than the intersection.

A good tip is to take many photographs, adjusting your focal point to be in a slightly different place each time. Doing so will help a lot with our next point!

5. Edit, Edit and Edit

Getting a perfect composition right off the bat is nearly impossible, especially because you don’t have the spiral with you when you’re taking photographs. To get the perfect golden ratio, you have to rely on editing.

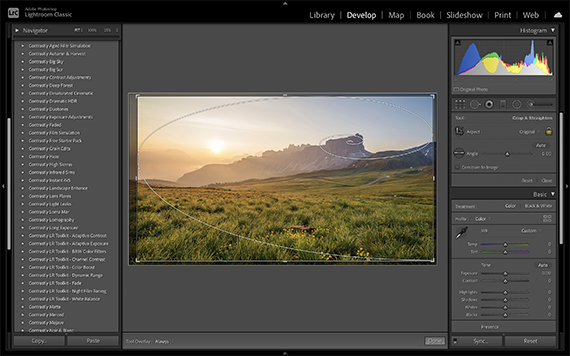
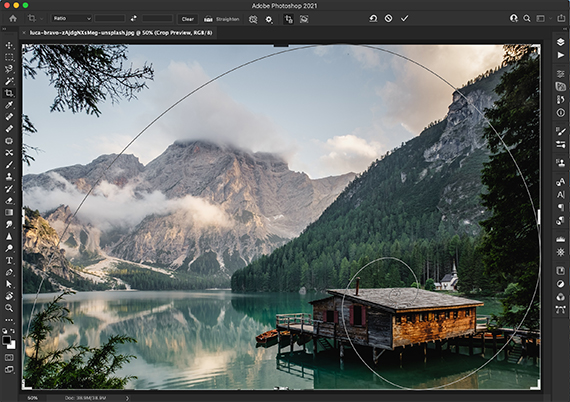
Fortunately, most photo editing software (like Lightroom Classic and Photoshop) have tools built specifically to help you get the perfect golden spiral composition. In Lightroom Classic you’ll find the golden spiral under the Crop Guide Overlay when in cropping mode. In Photoshop, you can access the overlay tools when in crop mode and cycle through the overlays by pressing the letter “O” on your keyboard.

When you click this option, a spiral overlay will display over your image, and you can move it around to ensure the fine details of your picture are at the small end of the spiral.

Once you do that, you’ll get closer to having the perfect Fibonacci spiral composition.

For Further Training:

How do we make our photographs more powerful, more pointed? Learn all about photographic composition & express yourself through effectively composed photographs with the help of this in-depth guide. We were able to negotiate an exclusive 50% off discount for our blog readers which ends soon if you want to check it out.

composition guide

New: Modern Approach to Photographic Composition

This eBook is broken down into 10 chapters that contain 90+ pages packed full with theory, techniques, concepts, advice, and tips & tricks to help you master composition.

Deal ending soon: Modern Approach to Photographic Composition at 50% Off


from PictureCorrect https://ift.tt/ejG4MoQ
via IFTTT

maanantai 1. syyskuuta 2025

PictureCorrect.com: Geomagnetic Storm in Progress: Northern Lights Continue

The night sky may soon put on one of its most dazzling displays. The NOAA Space Weather Prediction Center has issued a geomagnetic storm watch, forecasting G2 (Moderate) to G3 (Strong) storm levels between September 1 and 2, 2025. These storms are triggered by a coronal mass ejection (CME) from the sun, and when the charged particles collide with Earth’s magnetic field, they can ignite brilliant auroras across the sky. For photographers, this is more than just a scientific update—it’s a potential once-in-a-season opportunity to capture nature at its most dramatic.

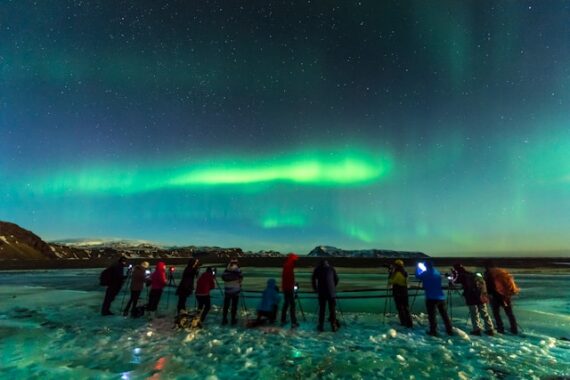
photographers aurora

Photo captured by Ken Cheung

So what can you expect? During a G2 storm, auroras are typically visible across Canada, northern Europe, and high-latitude parts of the United States. But when the storm strengthens to G3, as forecasters are predicting, the auroral oval can expand southward, giving skywatchers in more mid-latitude regions a shot at seeing shimmering curtains of green, red, and purple light dancing overhead. That means photographers in places not usually treated to the northern lights—such as the northern U.S. states, central Europe, and parts of Asia—may be in luck if skies are clear.

Preparation is key when it comes to photographing the aurora. A wide-angle lens with a fast aperture (something in the f/2.8 range or faster) will let in as much light as possible, while keeping the field of view broad enough to capture sweeping skies. Long exposures—usually between 5 and 15 seconds—paired with an ISO setting in the 800 to 3200 range tend to reveal the colors and motion of the aurora without excessive noise. Manual focus is essential; aim for infinity or lock onto a bright star if you can. And of course, a sturdy tripod and remote shutter release will keep your shots crisp during longer exposures.

Timing will depend on where you’re located. The initial activity is expected late on September 1 (UTC), with stronger storm conditions spilling into September 2. For photographers in North America, that translates into the late evening of September 1 and the early morning hours of September 2—prime aurora-hunting time. For those in Europe, the peak hours may come closer to the predawn skies of September 2. Wherever you are, the key is to escape city lights and find a dark location with a clear northern horizon. Lakes, coastlines, or open fields can add depth and reflection to your images.

Of course, the weather is the final variable. Even the most powerful auroral display is useless to photographers if cloud cover blocks the view. Keeping an eye on local forecasts and remaining flexible with your travel plans will improve your chances of success. Layering up for comfort is also wise, as chasing auroras often means long hours outdoors in chilly nighttime air.

The next few nights could deliver a rare gift from the cosmos. With the right preparation, patience, and a little luck, photographers stand to capture some of the most memorable images of the year. Whether you’re in the far north where auroras are more common or further south where they’re a rare delight, the September 1–2 geomagnetic storm is worth watching. If the skies cooperate, your camera may record more than just pictures—it could capture one of those unforgettable moments when Earth and space connect in color and light.


from PictureCorrect https://ift.tt/KhzLWv2
via IFTTT