torstai 23. tammikuuta 2025

PictureCorrect.com: Understanding Light for Photographers Guide

Light is the basic building block of ALL photography. Hearing about great light, talking about great light, and maybe even recognizing certain types of light is not the same as UNDERSTANDING light. Understanding it means you’ll know how to “accurately” manipulate light to your advantage. This popular eBook on the subject is currently 68% today if you want to check it out. Found here: The Understanding Light Guide at 68% Off

understanding light

New: The Understanding Light Guide

Without light there would be no photography. It’s as simple as that. Understanding light gives you the power to control the mood and feeling in your shots.

“If you want to be the type of photographer that creates photographs, not one who just snaps them, you must understand how light works. And, once you understand how it works, it will be to your advantage to thoroughly understand how to manipulate it. These skills will help you create photographs that you can pre-visualize in your mind.”

In this guide you’ll discover:

  • Exercises that will teach you how to light shapes and control light. (Pages 6 – 7)
  • Study Reflectance and Refraction, and you will jump leap years ahead of your competition. (Pages 14 – 16)
  • Knowing this one characteristic of light- will vastly improve your flash photography. (Pages 20 – 23)
  • Do you have trouble using “bounced” light? Fix your problems here. (Pages 25 – 31)
  • This characteristic of light practically dictates how someone will react to your photograph! (Pages 37 – 44)
  • Light bounces. Study “HOW” the surface you’re bouncing it from can vastly affect your photograph! (Pages 47 – 50)
  • These five tips on lighting will help you get a perfect shot every time! (Pages 51 – 60)
  • Light creates these- And they are just as important as the light itself! (Page 62)
  • Study the relationship between “Camera point-of-view” and the Light Source. (Pages 74 – 83)
  • How to judge Light by simply looking at it. (Pages 74 – 83)
  • And much more
light for photographers

The difference understanding light can make

“As a photographer, there is no greater achievement than bringing your imagination to life through the manipulation of light.” -Author Kent DuFault

How to Get a Discounted Copy Today (With Bonuses):

The eBook is currently 68% off today (normally $60, currently just $19). It also comes with an unbeatable 365-day, money-back guarantee so there’s no risk in trying it. Plus, you’ll get two bonus cheat sheets on light and color temperature – all of which ends soon.

Deal found here: The Understanding Light Guide at 68% Off

- - - - - - - - - - - - - - - - - - - - - - - - - - - - - - - - - - - - - - - - - - - - - - - - - - - - - - - - - - - - - - - - - - - - - - - - - -

Photography, like any art or skill, thrives on consistency. The journey to becoming an adept photographer is paved with regular practice. Learn how PictureCorrect Insiders can help.

- - - - - - - - - - - - - - - - - - - - - - - - - - - - - - - - - - - - - - - - - - - - - - - - - - - - - - - - - - - - - - - - - - - - - - - - - -

This post Understanding Light for Photographers Guide appeared on PictureCorrect.


from PictureCorrect https://ift.tt/6V24rJF
via IFTTT

keskiviikko 22. tammikuuta 2025

PictureCorrect.com: When to Apply Sharpening in the Photo Editing Process

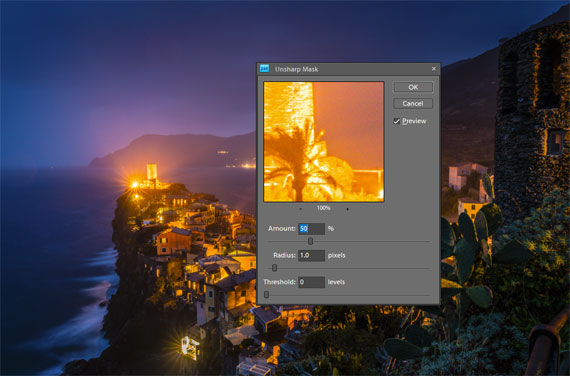
Photography, in its essence, is an art of capturing light. Once that light is captured, the journey isn’t quite over – the art of post-processing begins. Photo editing allows us to accentuate the best parts of our images, fix imperfections, and achieve a final look that’s both appealing and striking. One such technique, often left for the end, is sharpening. Let’s dive into why it’s best to apply sharpening at the end of the photo editing process.

Relevant note: on sale today is the popular Topaz Photo AI Sharpener at $30 Off

sharpen edit

1. Understanding Sharpening

Sharpening is a post-production technique that increases the contrast along the edges within an image. This accentuates details, making the image look clearer and more refined. However, like any tool, if used excessively or inappropriately, it can lead to undesirable artifacts like halos or increased noise.

2. Maintaining Image Quality

During the editing process, numerous adjustments – be it exposure, contrast, color correction, or retouching – are made to the image. Every adjustment, especially when done in raster format (like JPEG), can potentially degrade the image quality slightly. If you sharpen early and make subsequent edits, you risk exacerbating the unwanted artifacts introduced by sharpening. By sharpening at the end, you ensure that you’re applying this effect to the final version of the image, preserving maximum detail.

3. Tailored to Output

The required amount of sharpening can vary depending on where the image will be displayed. For instance, a photo meant for Instagram might need different sharpening than one intended for a large print. By leaving sharpening to the end, you can adjust according to the specific output in mind, ensuring optimal clarity.

4. Flexibility with Layers

For those using advanced photo editing software like Adobe Photoshop, sharpening at the end allows for the use of layers. This means you can adjust the sharpening intensity on a separate layer without affecting the underlying edits. This non-destructive approach offers great flexibility, as you can easily tweak or revert the sharpening without redoing the entire editing process.

5. Avoiding Cumulative Noise

Noise is the grainy or speckled appearance often seen in photos, especially those taken in low light. Editing can amplify noise, and sharpening can make it even more pronounced. If sharpening is applied early in the process, subsequent edits can amplify this noise even further. By sharpening at the end, you can better control and minimize the enhancement of noise.

6. Better Visual Judgment

After all the edits and enhancements, the image’s overall look and feel will be different from the starting point. What might have seemed like an appropriate amount of sharpening at the beginning could be overkill by the end. By waiting, you allow yourself to judge the appropriate sharpness based on the final product.

In Conclusion

While sharpening is undeniably a powerful tool in the photographer’s post-production arsenal, its timing in the editing process is crucial. By saving sharpening for the end, photographers can ensure they’re delivering the highest quality image, tailored to its intended output, with minimized artifacts and noise. Remember, photo editing is as much about the sequence of steps as it is about the steps themselves. Happy editing!

For Further Help with Image Sharpening:

In photo editing news, Topaz Photo AI was recently updated to version 3. The company has marked it down $30 off for a short time if you want to try it out.

topaz photo ai bird

New: Topaz Photo AI (see how it works)

Sharpen, remove noise, and increase the resolution of your photos with tomorrow’s technology. Topaz Photo AI supercharges your image quality so you can focus on the creative part of photography.

Deal ending soon: Topaz Photo AI at $30 Off

- - - - - - - - - - - - - - - - - - - - - - - - - - - - - - - - - - - - - - - - - - - - - - - - - - - - - - - - - - - - - - - - - - - - - - - - - -

Photography, like any art or skill, thrives on consistency. The journey to becoming an adept photographer is paved with regular practice. Learn how PictureCorrect Insiders can help.

- - - - - - - - - - - - - - - - - - - - - - - - - - - - - - - - - - - - - - - - - - - - - - - - - - - - - - - - - - - - - - - - - - - - - - - - - -

This post When to Apply Sharpening in the Photo Editing Process appeared on PictureCorrect.


from PictureCorrect https://ift.tt/Y4qZbmH
via IFTTT

maanantai 20. tammikuuta 2025

PictureCorrect.com: How to Choose the Best Color Profile in Lightroom

When you want to adjust the colors of your photograph in Lightroom, most will typically go straight for the HSL panel. This will get you satisfactory results—most of the time.

Eventually, though, you’ll come across an outlier image that just doesn’t seem to play nice with the HSL panel.

This article is a general overview of the profile lessons from the new Lightroom for Landscapes Course (only 1 day left for 70% off) if you’d like to learn more on how to master the fantastic world of Lightroom.

For example, you want to shift the reds more towards orange, but the sliders aren’t picking up on the exact pixels you wish to change.

Or perhaps your HSL adjustments are too broad and you’re shifting other hues close to red that you want to remain untouched.

Either way, your color processing is off the mark. It can become frustrating.

best color profile lightroom

Photo by Robert Katzki

What if you could decide which pixels are considered to be a specific hue? What if you had more power to include (or exclude) areas from your color adjustments?

In comes profiles, which let you go “beneath the surface” and determine how the colors in your RAW file are interpreted and displayed on your computer.

How Color Profiles Work in Lightroom

Choosing a profile is a lot like choosing a film stock for analog photography. It determines how your colors and tones are interpreted by Lightroom from the RAW file data. The RAW file needs to be “converted” by a RAW processor in order to be displayed visually—and the profile plays a role in how your colors and tones are translated.

For example, the profile can determine if a particular pixel is either primarily red or orange. Then the HSL panel (and your other color processing tools) will target those hues depending on what pixels have been assigned to that particular color.

So the practical use of profiles extends beyond creative effects. Since they control how your colors and tones are interpreted by Lightroom, you can change which pixels are being affected by your color processing tools.

For example, if you want to adjust the blues in the sky, the HSL panel may not pick up on those pixels if the hue is not “blue” enough. By changing your profile, you can also change the inherent hue of the pixel itself, which will allow your “blue” targeting tools to more easily recognize those pixels.

Profiles are Retroactive

Another fantastic benefit of camera profiles is that you can always change them at any time during your processing workflow. Sinc profiles work “under the hood” to define your colors and tones, you won’t reverse or otherwise change any processing you’ve done to your image.

This is one reason why profiles are preferred to presets, since with presets you run the risk of removing any processing you’ve done when you select a new preset.

How to Choose the Best Color Profile

Since a profile determines how your colors are translated from the RAW file, they can also be used to enhance the detail and texture of those colors—especially if they are saturated.

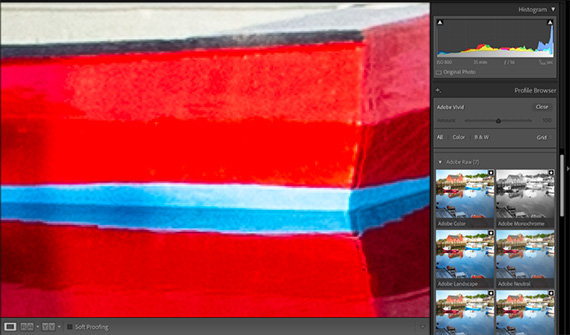
In the example image below, I zoomed into a very vibrant red boat. When my profile is set to Adobe Vivid, there is very little local contrast within that red color. The detail lacks interest and appears to be clipped.

best color profile lightroom

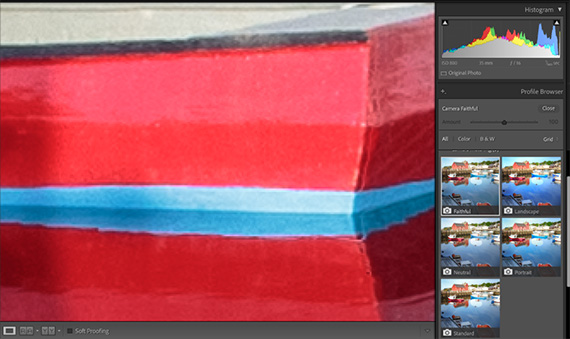
However, note what happens when I make a simple switch to the Camera Faithful profile. See how much more texture and variation of lightness there is within that red color?

best color profile lightroom

I can always add local saturation later to make this red as vibrant as Adobe Vivid, but now I have that additional light and shadow detail to work with, which was not present originally.

When choosing a profile, you should always consider the quality of your hues (how much detail is present) as opposed to the visual impact (or “wow-factor”) that your colors have. This will not only give you a higher quality image, but provides a solid foundation for your color processing later.

For Further Training:

This article is a general overview of how to choose the best profile in Lightroom, but barely scratches the surface as to what is possible. The full in-depth program will walk you through all of the extraordinary tools and techniques that Lightroom Classic has to offer.

lightroom landscapes

Complete Lightroom Training Collection

Lightroom for Landscapes is currently 70% off until tomorrow if you want to take a look. Learn a proven system for creating extraordinary, artistic photographs with complete confidence in Lightroom.

Only 1 day left: Lightroom for Landscapes at 70% Off

- - - - - - - - - - - - - - - - - - - - - - - - - - - - - - - - - - - - - - - - - - - - - - - - - - - - - - - - - - - - - - - - - - - - - - - - - -

Photography, like any art or skill, thrives on consistency. The journey to becoming an adept photographer is paved with regular practice. Learn how PictureCorrect Insiders can help.

- - - - - - - - - - - - - - - - - - - - - - - - - - - - - - - - - - - - - - - - - - - - - - - - - - - - - - - - - - - - - - - - - - - - - - - - - -

This post How to Choose the Best Color Profile in Lightroom appeared on PictureCorrect.


from PictureCorrect https://ift.tt/SQX71er
via IFTTT

sunnuntai 19. tammikuuta 2025

PictureCorrect.com: The Difference Between Contrast, Clarity & Texture in Lightroom

When it comes to adjusting your contrast in Lightroom, the overall goal is to enhance the texture and interest of your photograph in a way that both supports your creative vision and protects your tones from unintentional damage, such as clipping your shadows or highlights.

Your contrast, clarity and texture sliders are your go-to tools for manipulating the value of your tones. However, I find that many photographers aren’t aware of the differences between these three too—specifically, when it’s appropriate to use one over the other. All three are tonal adjustments, but have very different results.

This article is a general overview of the tonal slider lessons from the Lightroom for Landscapes Program (currently 70% off), if you’d like to learn more on how to master the fantastic world of Lightroom.

Contrast, Clarity and Texture are for Enhancing Detail

The first thing to understand is that contrast, clarity, and texture all accomplish the same thing: they control the contrast between your tones. Or rather, how far away they are from one another on the value scale.

Increasing contrast will push those tones further apart (making your shadows darker and highlights brighter), while decreasing contrast will bring them closer together (reducing the gap between each pixel on the value scale). This is also known as low-frequency and high-frequency detail.

The eyes are naturally drawn to areas of high frequency (or high contrast), so adding contrast is a fantastic way to accentuate certain focal points and bring more attention to them. Inversely, reducing contrast will make a focal point less obvious, which is useful for when you want to divert attention away from distracting elements in your frame.

The Contrast Slider

The contrast slider is your most brute-force adjustment to your tones because it affects the entire tonal range, pushing your shadows darker and highlights brighter and plucking away midtones in the process—and thus losing detail. Although any kind of contrast increase will essentially remove those transition values, the contrast slider can be the most damaging.

This should be reserved for only the most dramatic adjustments, when there is very little contrast in your image to begin with. A little contrast will go a very long way, and thus you can more easily damage your photo with the contrast slider.

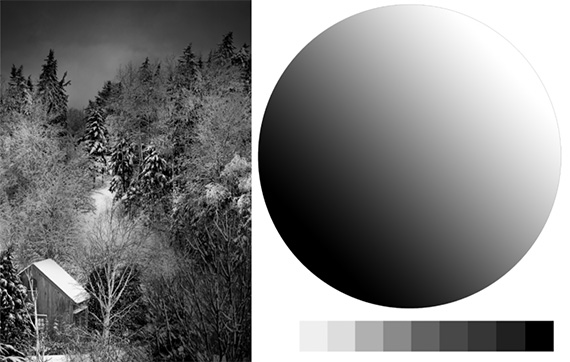
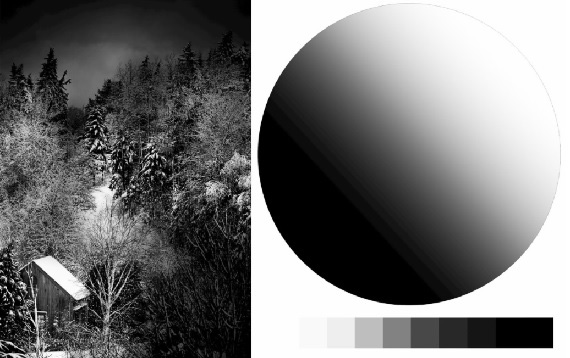
In the comparison below, you can see that contrast at 100 affects all tones globally, and is pushing some pixels beyond the dynamic range of the image (clipping detail).

lightroom contrast slider explained

The original image

lightroom contrast slider explained

The image with contrast bumped up to 100

The Clarity Slider

The clarity slider is a bit smarter, and will focus on your midtone contrast rather than all values of your image. This means that your brightest highlights and darkest shadows will be somewhat protected since clarity will not pick them up for adjustment.

Clarity will also affect the transition area between each tone (the border where a pixel of one value meets a pixel of another value) and will add local contrast along those transitions to enhance the apparent depth.

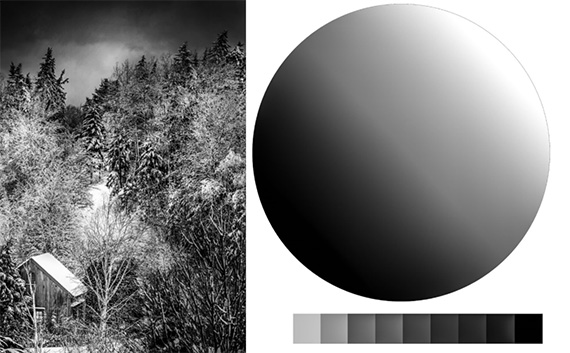
Notice in the example image below, with clarity at 100, how each swatch now has a more three-dimensional appearance, despite the pixels within each swatch being of identical value.

lightroom clarity slider explained

With the clarity slider boosted to 100

In other words, there is now variation within a specific value that enhances depth and texture. This is why the clarity slider can give your image a “glowy” or “cartoonish” appearance when used heavily.

And since clarity will target your midtones, it’s often useful to actually reduce the global contrast with the contrast slider—which will push your brightest highlights and darkest shadows more toward the midtones. This tactic can “feed” pixels into the tonal range where clarity is most effective.

The Texture Slider

Lastly, we have the texture slider. This is your finest contrast adjustment. It will enhance the detail of your midtones much like the clarity slider does, but will take it a step further and target only areas of high frequency.

If your existing texture is smooth (such as a cloudless sky or still water), adding texture will not benefit those areas, as there is no texture to begin with. The texture slider will take your existing contrast into consideration and will exclude low-frequency detail from the adjustment.

lightroom texture slider explained

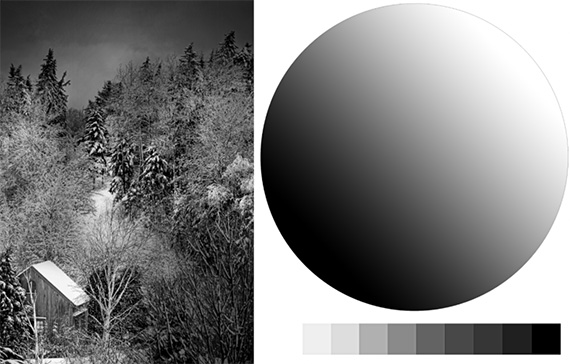
With the texture slider boosted to 100

We can see here that a texture increase of 100 has made virtually no difference in the value scale or the tonal sphere, since those areas are low-frequency (smooth with unvarying tones). The only exception, if you look closely, are the sharp transitions between each tonal swatch.

When adjusting contrast to enhance detail in Lightroom, it’s best to use the contrast slider sparingly—and only on images that have a lot of breathing room on the extreme ends of your histogram. The clarity and texture sliders will be your go-to tools for adding contrast intentionally and accurately.

For Further Training:

This article is a general overview of how to add depth and interest in Lightroom, but barely scratches the surface as to what is possible. The full in-depth program will walk you through all of the extraordinary tools and techniques that Lightroom Classic has to offer.

lightroom for landscapes

Lightroom for Landscapes (see inside)

Lightroom for Landscapes is currently 70% off today if you want to take a look. Learn a proven system for creating extraordinary, artistic photographs with complete confidence in Lightroom.

Deal ending soon: Lightroom for Landscapes at 70% Off

- - - - - - - - - - - - - - - - - - - - - - - - - - - - - - - - - - - - - - - - - - - - - - - - - - - - - - - - - - - - - - - - - - - - - - - - - -

Photography, like any art or skill, thrives on consistency. The journey to becoming an adept photographer is paved with regular practice. Learn how PictureCorrect Insiders can help.

- - - - - - - - - - - - - - - - - - - - - - - - - - - - - - - - - - - - - - - - - - - - - - - - - - - - - - - - - - - - - - - - - - - - - - - - - -

This post The Difference Between Contrast, Clarity & Texture in Lightroom appeared on PictureCorrect.


from PictureCorrect https://ift.tt/q07gF4U
via IFTTT

lauantai 18. tammikuuta 2025

PictureCorrect.com: When to Use a Lens Filter

Here’s another quick tutorial from the Camera Fundamentals Cheat Sheets (New Year Sale is ending soon)!

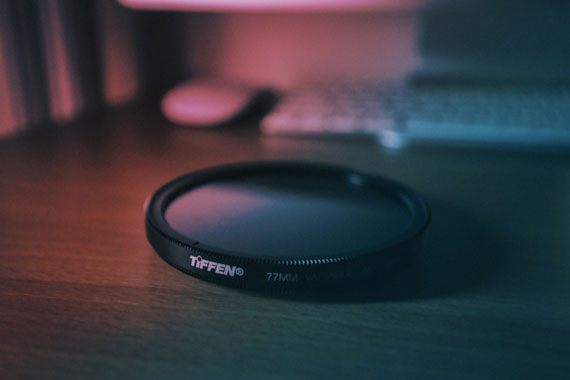
Using a lens filter on a camera lens can be a great way to enhance your photos in certain situations and protect your lens. They are not essential, but can be helpful sometimes.

lens filter

Photo captured by Chris Yang

The most common lens filters and their uses include:

UV filters: These filters block Ultraviolet light and reduce haze, making them useful for protecting your lens and improving image clarity on hazy days.

Polarizing filters: These filters reduce glare and improve color saturation, making them great for landscape and outdoor photography.

Neutral density filters: These filters reduce the amount of light entering the lens, allowing you to use longer exposure times or wider apertures without overexposing the image. They are often used for landscape and long exposure photography.

Graduated neutral density filters: These filters are clear on one half and gradually transition to a darker shade in the other half. They are often used for landscape photography to balance the exposure between the sky and the foreground.

Soft focus filters: These filters create a soft, dreamy effect by diffusing the light entering the lens. They are often used in portrait photography.

Macro filters: These filters are used for close-up photography, decreasing minimum focus distance, allowing you to focus on small objects at a very close distance.

Color Correcting filters: Also referred to as cooling and warming, color conversion, or color compensating filters, are utilized to correct and enhance the color of a scene. Warming and cooling filters are effective for adjusting indoor lighting and creating a gloomier or sunnier atmosphere, while colored filters can be used to bring out specific hues in the scene.

Lens filters can affect image sharpness, but the impact depends on the quality of the filter you are using. High-quality filters, made from good materials and with precise coatings, usually have minimal impact on image sharpness. However, low-quality filters can potentially degrade the image quality by introducing unwanted artifacts, such as:

  • Softening: A low-quality filter may cause a slight softening of the image, reducing the overall sharpness.
  • Ghosting and flaring: Poor-quality filters can introduce ghosting (duplicate reflections of bright light sources) or flaring (hazy light artifacts), which can reduce image sharpness and contrast.
  • Vignetting: Some filters, especially when stacked or used with wide-angle lenses, can cause vignetting (a gradual darkening of the image corners), which may affect image sharpness near the edges.
  • Color casts: Low-quality filters might introduce color casts, which can alter the overall color balance and make the image appear less sharp.

To minimize the impact on image sharpness, invest in high-quality lens filters from reputable manufacturers. These filters are designed to maintain optimal image quality while providing the desired effects or protection. Keep in mind that even with high-quality filters, there might be a slight impact on image quality, so it’s essential to consider when and how to use filters effectively.

For a handy cheat sheet on this subject that you can print out for reference, you may want to check out this launch sale before it is over.

Have you ever wanted to photograph an amazing moment but missed the shot because you didn’t know the right camera settings to use? That’s where some of our most popular camera cheat sheets come in. They are currently 75% off for a New Year sale if you want to check them out.

fundamental photography sheets

New: Fundamental Photography Cheat Sheets

Whether you’re a seasoned professional or just starting out, photography cheat sheets can be a valuable resource for improving your skills and taking your photography to the next level. The perfect companion for any photographer. Print one out whenever you need it.

Deal ending soon: The Fundamental Camera Cheat Sheets at 75% Off

- - - - - - - - - - - - - - - - - - - - - - - - - - - - - - - - - - - - - - - - - - - - - - - - - - - - - - - - - - - - - - - - - - - - - - - - - -

Photography, like any art or skill, thrives on consistency. The journey to becoming an adept photographer is paved with regular practice. Learn how PictureCorrect Insiders can help.

- - - - - - - - - - - - - - - - - - - - - - - - - - - - - - - - - - - - - - - - - - - - - - - - - - - - - - - - - - - - - - - - - - - - - - - - - -

This post When to Use a Lens Filter appeared on PictureCorrect.


from PictureCorrect https://ift.tt/FE0nNuR
via IFTTT

perjantai 17. tammikuuta 2025

PictureCorrect.com: Five “Hidden” Features of the Histogram in Lightroom

This article is a general overview of the histogram lessons from the Lightroom for Landscapes Tutorials if you’d like to learn more on how to master the fantastic world of Lightroom.

The Histogram is Directly Connected to Your Tonal Sliders

If you ever wondered what exact tones you are adjusting with the basic panel sliders (exposure, highlights, shadows, whites, blacks), then the histogram can be of great assistance.

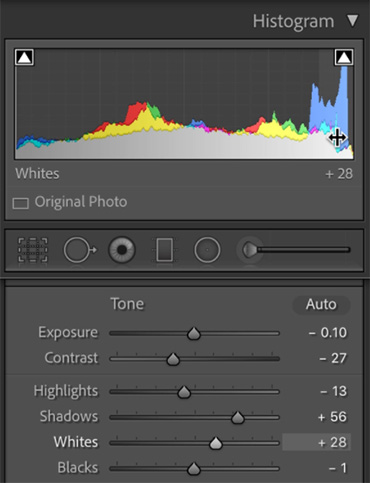
When you hover over the histogram with your mouse, notice that certain tonal groups will be highlighted. These “ranges” represent your five tonal sliders in the basic panel. They offer a visual representation of how many tones in your image are within each group.

You can also adjust these tones directly on the histogram. Place your mouse over the histogram until a tonal group becomes highlighted. Then click and drag your mouse left and right to make an adjustment to the corresponding slider in the basic panel.

lightroom histogram secrets

Histogram Tonal Groups

For example: if you hover over the “whites” group in the histogram and move to the right, your whites slider in the Basic panel will move to the right as well, thus brightening the lightness value of those particular pixels.

You Can Monitor Your Color Channels

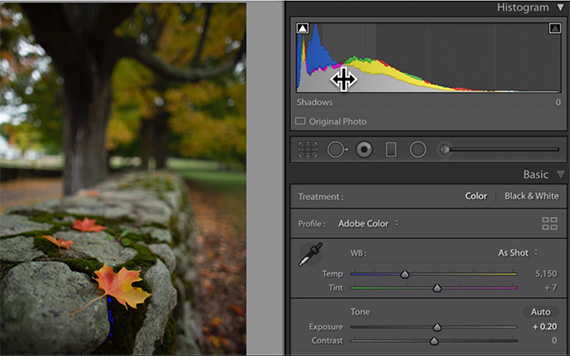
In color photographs that have not been converted to black and white, the histogram will also reflect the lightness values for each hue. This is helpful for identifying clipped detail for a specific color, which may not be reflected in the RGB (grey) histogram.

lightroom histogram secrets

For example: in the RAW file above, you can see that the blue color histogram is vastly different from the RGB histogram—especially for the shadows. This tells you that the blue color channel has more of a risk of being clipped and will need to be monitored in order to preserve detail in that color… especially when you start to make shifts in the HSL panel.

This becomes especially helpful for sunrise/sunset photographs since those environments will typically clip the yellows and reds long before your other colors.

The Tone Curve Will Show the Exact Value of a Sampled Pixel

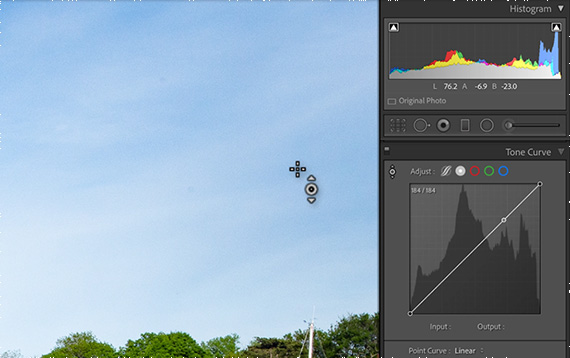
When using the tone or point curve, you’ll notice that the histogram for your selected image is in the background. While this reference is helpful for making your tonal adjustments along the curve baseline, it’s also useful for sampling the value of a specific pixel.

Select the target adjustment tool and hover over your image. You’ll see a moving dot appear on the baseline of your tone/point curve, showing you exactly where that pixel falls on the value scale (0-255).

lightroom histogram secrets

This is particularly helpful on color images, where the hue can influence how light or dark a pixel appears.

You Can Monitor Clipped Color Detail

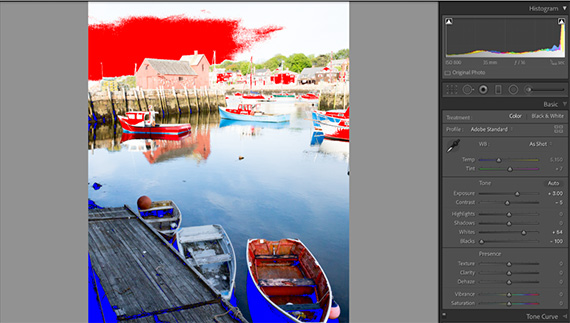
Most Lightroom users know that the histogram can help to identify clipped pixels if you turn the clipping warning indicators on. Press “J” to toggle this feature on and off, and Lightrroom will automatically show you clipped shadows as a blue overlay and clipped highlights as a red overlay.

lightroom histogram secrets

However, you can also monitor clipped highlights and shadows with a black or white mask—which is especially helpful if you want to know the exact color channel(s) a pixel is being clipped in.

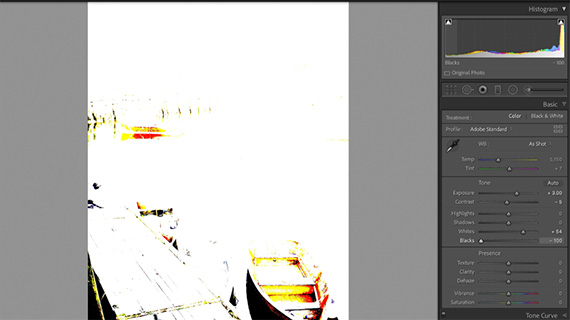
While hovering over a specific tonal group in the histogram (exposure, highlights, shadows, whites or blacks), press and hold the “Alt” key as you adjust those sliders. A black/white overlay will appear over the image, and any clipped detail will become highlighted in either white or black (or the specific color channel).

lightroom histogram secrets

While adjusting the blacks in the histogram, a white overlay will appear. Here you can see that some shadows are being clipped globally (highlighted in black), while other shadow pixels are only clipped in the red and yellow channels.

Not only will you instantly know which color channel is being clipped through live feedback, but the black/white mask makes it easier to identify those pixels.

This feature will also work when holding the “Alt” key and adjusting the corresponding sliders in the Basic panel.

You Can View the LAB Color Values

If you like to work with the LAB color space, then you’ll greatly appreciate the ability to see the LAB value of any pixel in your photograph.

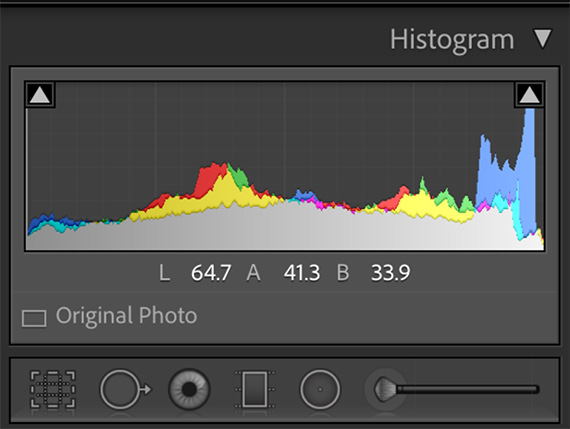
While hovering over your histogram, right-click to open up a context menu to customize the histogram. Make sure that “Show LAB Color Values” is selected, and you will now see the LAB value of a pixel when you hover over it, as seen below.

lightroom histogram secrets

Even if you do not work in the LAB color space, I still recommend using this feature as you can instantly see the Lightness value (L) of a pixel.

For Further Training:

This article is a general overview of the histogram lessons from the Lightroom for Landscapes Tutorials, but barely scratches the surface as to what is possible. The full course will walk you through all of the extraordinary tools and techniques that Lightroom Classic has to offer:

lightroom landscapes

Complete Lightroom Training Collection

Lightroom for Landscapes is currently 70% off today if you want to take a look. The offer also comes with 3 bonuses: full workflow videos, creative assignments and lifetime access with updates.

Deal ending soon: Lightroom for Landscapes at 70% Off

- - - - - - - - - - - - - - - - - - - - - - - - - - - - - - - - - - - - - - - - - - - - - - - - - - - - - - - - - - - - - - - - - - - - - - - - - -

Photography, like any art or skill, thrives on consistency. The journey to becoming an adept photographer is paved with regular practice. Learn how PictureCorrect Insiders can help.

- - - - - - - - - - - - - - - - - - - - - - - - - - - - - - - - - - - - - - - - - - - - - - - - - - - - - - - - - - - - - - - - - - - - - - - - - -

This post Five “Hidden” Features of the Histogram in Lightroom appeared on PictureCorrect.


from PictureCorrect https://ift.tt/ztBQFLx
via IFTTT

torstai 16. tammikuuta 2025

PictureCorrect.com: Demystifying Deductions & Write-Offs for Photographers

Tax season can be stressful for anyone, but it’s especially challenging for photographers juggling gear, editing software, travel, and more. The good news? Many of your professional expenses may be deductible, helping to reduce your tax burden and keep more cash in your pocket. In today’s article, we’ll explore common tax deductions and write-offs specifically relevant to photographers, along with a few strategies for staying organized year-round.

Also thanks to our new friends at finance-tips.ai, who helped us put together these valuable insights!

photography tax deductions

First—Who Can Claim These Deductions?

If you earn income as a photographer, you may qualify to deduct ordinary and necessary business expenses. This generally applies whether you’re:

A Sole Proprietor

If you haven’t formed a formal entity (like an LLC or corporation) but still earn income through your photography, you can typically file your photography income and expenses on your personal tax return (Schedule C in the U.S.).

A Single-Member LLC or Other Small Business Entity

Forming a limited liability company (LLC) or S corporation can offer certain legal protections and tax advantages, but it’s not a requirement to claim business-related deductions. However, some structures may help you separate personal and business finances more cleanly.

Regardless of your structure, the key requirement is that the expense is both ordinary (common in the photography industry) and necessary (helpful or required for running your photography business). Always keep meticulous records of what you spend and how it relates to your work.

1. Camera Equipment & Accessories

From your DSLR or mirrorless camera body and lenses to tripods, memory cards, and camera bags, essential gear directly related to your photography business is often deductible. Keep clear documentation of your purchases:

  • Receipts & Dates: Note the purchase date and cost, whether bought new or used.
  • Proper Classification: If an item is used partly for personal reasons, only the business percentage is deductible.

Pro Tip: If you’re replacing multiple pieces of major equipment in one year, consult your tax professional to determine whether to deduct the full cost in the current tax year or depreciate it over multiple years—both approaches can have different tax implications.

2. Editing Software & Subscriptions

Most photographers rely on software for post-processing, album design, or organizational tasks. These include:

  • Subscriptions: Adobe Creative Cloud, Capture One, or other editing tools
  • Apps & Online Services: Portfolio hosting platforms, cloud storage (Dropbox, Google Drive), etc.
  • Photo Editing Presets/Plugins: Purchased for business use

Maintain separate records of these ongoing costs to simplify your bookkeeping. As with gear, only the portion used for business is deductible if you also use these tools personally.

3. Home Office Deduction

If you work from home, you may be eligible for a home office deduction. This applies if:

  • You have a dedicated area exclusively used for business (e.g., a room for editing photos and meeting clients).
  • It’s the principal place of your photography operations (where most work and admin happen).

You can deduct a portion of expenses like rent, mortgage interest, utilities, and internet based on the percentage of your home’s total square footage that’s dedicated to business use. This deduction can apply whether you’re a sole proprietor or have formed an LLC—what matters is proper documentation and exclusive business use of that space.

4. Website & Marketing Costs

Your website is your digital storefront, and promoting your services is essential for growth. Potential deductions include:

  • Domain & Hosting Fees
  • Website Design & Maintenance
  • Social Media Advertisements
  • Printed Marketing Materials (business cards, brochures)

Keep detailed records of your marketing expenditures, as these costs can quickly add up over the course of a year.

5. Travel & Mileage

Photographers often travel for location shoots, weddings, or client meetings. If the travel is strictly business-related, these costs can be deductible:

  • Mileage or Transportation Costs: Keep a log of business-related miles driven or track ride-share costs (Uber, Lyft, taxi).
  • Lodging & Meals (with limits): If you travel out of town for a shoot, reasonable hotel and meal expenses may also be deductible.

Make sure you’re separating personal travel from business trips—mixed-use vacations often require nuanced documentation for partial deductions.

6. Insurance & Memberships

Many photographers carry:

  • Equipment Insurance: Protects against theft, damage, or loss.
  • Liability Insurance: Covers accidents or lawsuits related to your business.
  • Professional Organization Fees: Such as memberships in PPA (Professional Photographers of America) or local photography guilds.

These are typically considered ordinary and necessary expenses for your photography business, so they can be written off. Be sure to save policy paperwork and membership invoices.

7. Educational Expenses

Continued learning is vital in such a fast-evolving field. Online courses, seminars, and workshops geared toward improving your photography skills or running your business can be deductible. Just ensure the course content directly applies to your photography business goals.

8. Keeping Accurate Records

One of the best ways to ensure you’re claiming the right deductions—and not missing any—is to stay organized throughout the year:

  1. Use Accounting Software: Tools like QuickBooks, FreshBooks, or Wave can automatically track and categorize expenses.
  2. Separate Bank Accounts: Keep personal and business finances separate, making it easier to pull up relevant transactions.
  3. Save Your Receipts: Digital or paper, make sure you keep them all. Many apps allow you to snap photos of receipts and store them directly.

9. Consult a Professional

Tax laws can change, and each photographer’s situation is unique. What works for a wedding photographer may differ from a stock photographer. Talk to a qualified tax professional or accountant familiar with creative freelancers. They can guide you on:

  • Optimal Business Structure (sole proprietor, LLC, S corp) for your specific needs
  • Depreciation Schedules for expensive gear
  • State & Local Taxes that may affect your write-offs

By understanding and leveraging available deductions, photographers can lighten their tax load and put more resources into growing their craft. Whether you’re a part-time hobbyist making side income or a full-time pro, keep precise records and consult experts when in doubt.

Here’s to a smoother tax season—and more time spent doing what you love: capturing stunning images!

For Further Help:

Did you know that personal finance is the #1 topic students wish they had learned more about in school? Whether you’re just starting your financial journey or navigating retirement, these new Personal Finance Cheat Sheets are here to guide you every step of the way.

finance-cheat-sheets

They are designed for quick reference, so you can easily access the information you’re looking for in seconds. Plus, their printable format means you can have a physical copy at your fingertips anytime.

Found here: Personal Finance Cheat Sheets Launch Sale

- - - - - - - - - - - - - - - - - - - - - - - - - - - - - - - - - - - - - - - - - - - - - - - - - - - - - - - - - - - - - - - - - - - - - - - - - -

Photography, like any art or skill, thrives on consistency. The journey to becoming an adept photographer is paved with regular practice. Learn how PictureCorrect Insiders can help.

- - - - - - - - - - - - - - - - - - - - - - - - - - - - - - - - - - - - - - - - - - - - - - - - - - - - - - - - - - - - - - - - - - - - - - - - - -

This post Demystifying Deductions & Write-Offs for Photographers appeared on PictureCorrect.


from PictureCorrect https://ift.tt/kgSVvfU
via IFTTT