torstai 25. toukokuuta 2023

PictureCorrect.com: How to Use Generative AI Fill in Photoshop

Are you ready to elevate your Photoshop game to the next level? This video introduces Adobe Firefly, a ground-breaking generative AI technology now natively integrated into Photoshop. Brought to you by Adobe’s Photoshop guru, Russell Preston Brown, Firefly is a powerful, non-destructive feature that works by taking text prompts and transforming an existing photograph into something truly unique and exciting:

In this blog post, we’re going to guide you through the exciting process of using Adobe Firefly in Photoshop.

Starting With the Basics

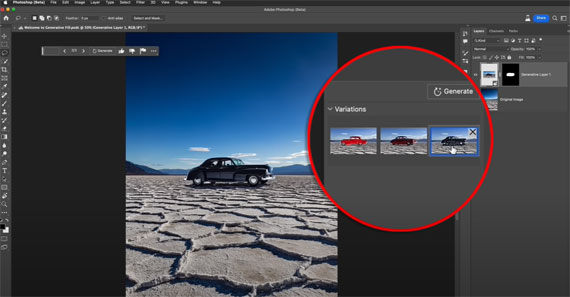
Firefly is user-friendly and straightforward to navigate. You begin with your base image – in this instance, a simple, single-layer image of the Salt Flats. With Firefly, you have the flexibility to pin your toolbar at any location on your screen. This is a handy feature when working with multiple tools.

The generative fill bar contains several accessible tools for an effortless workflow. Once you’ve made a selection on your base image, you can start with a generative fill.

How Adobe Firefly Works

Let’s consider you wish to add a classic car from the 50s to your base image. Simply type this text into Firefly and select ‘Generate.’ Firefly will then create several examples of 50s cars, from which you can choose the one that fits your artistic vision.

What’s particularly fascinating is how Firefly incorporates a car into your image. It doesn’t just place the car onto the photograph; it adds a shadow and adjusts the car’s position to make it look natural within the scene. This level of attention to detail makes Firefly an invaluable asset for realistic image manipulation.

Going Above and Beyond with Adobe Firefly

Adobe Firefly’s power is not limited to adding objects to a scene. It can also alter the environment based on your prompts. For instance, let’s say you’d like to add a reflection pool filled with blue water to the Salt Flats image. Once again, type your description into Firefly, and it will create a pool that fits seamlessly into the existing image. The program also adds reflections and shadows, enhancing the realism of the edited photograph.

generative ai

Creating Skies with Adobe Firefly

Another exceptional feature of Adobe Firefly is its ability to generate skies. By making a selection in the sky area of your image, you can prompt Firefly to add clouds to your photograph. The AI tool creates a new layer for this purpose, keeping your edits non-destructive.

Expanding Your Canvas

The real showstopper, however, is Firefly’s capability to expand your canvas and fill in the extra space intelligently. After stretching out your image to create a panoramic view, you can select the expanded work area and leave Firefly to determine what fits best in the new space. In this case, it impressively calculates and adds the sun to the newly created sky, enhancing the photograph’s overall aesthetic.

Adobe Firefly revolutionizes Photoshop’s editing capabilities, providing users with an intuitive and innovative tool for transforming ordinary images into extraordinary works of art. With its public beta now available, we encourage all digital artists and photographers to explore this advanced AI technology and discover the magic of generative fill.

- - - - - - - - - - - - - - - - - - - - - - - - - - - - - - - - - - - - - - - - - - - - - - - - - - - - - - - - - - - - - - - - - - - - - - - - - -

Did you appreciate this newsletter? Please help us keep it going by Joining Our Patreon Supporters

What are your thoughts on this article? Join the discussion on our Facebook Page

PictureCorrect subscribers can also learn more today with our #1 bestseller: The Photography Tutorial eBook

- - - - - - - - - - - - - - - - - - - - - - - - - - - - - - - - - - - - - - - - - - - - - - - - - - - - - - - - - - - - - - - - - - - - - - - - - -

The post How to Use Generative AI Fill in Photoshop appeared first on PictureCorrect.


from PictureCorrect https://ift.tt/DQlvGcM
via IFTTT

keskiviikko 24. toukokuuta 2023

PictureCorrect.com: The Photographer’s Secret Weapon: Creating Mood

A mood is created in a photograph when it allows the viewer to place themselves in the moment, or it causes them to remember a moment that stirs up an emotional reaction. It’s a complicated subject, but it’s imperative for photographers to understand how to express different moods in their images.

Getting the Right Mood Across to a Viewer

how to set mood in photos

Photo by Atikh Bana

Warm colors, including yellow, often evoke feelings of happiness, optimism and energy, which is in direct opposition to the woman’s pose in the photo above. Her expression and the choice of camera angle emit a more somber and thoughtful mood.

Critical Thought: When you’re trying to establish a mood in your photos, make sure you don’t send mixed signals to your viewer. Pay special attention to the lighting, background, pose, props and expression to ensure that they all project the mood you wish to convey.

Discovering How Color Affects Mood

Color weighs heavily upon the mood of a photo. Color theory is an entire industry. It influences everything from the paint you’ll find at local hardware stores to how a grocery store organizes their fruits and vegetables.

Photo by Emma Francis

Remember this: Here’s a shortlist that describes the psychological effect (the mood) of different colors.

  • Blue: trust, cool, cold, calm, stable, powerful, strength, reliable
  • Yellow: friendly, warm, enlightening, optimism, energetic
  • Green: natural, fresh, wealth, soothing, balance, restful
  • Red: loving, passion, danger, hunger, urgency, daring
  • Pink: compassion, faithful, beauty, love, sensitive

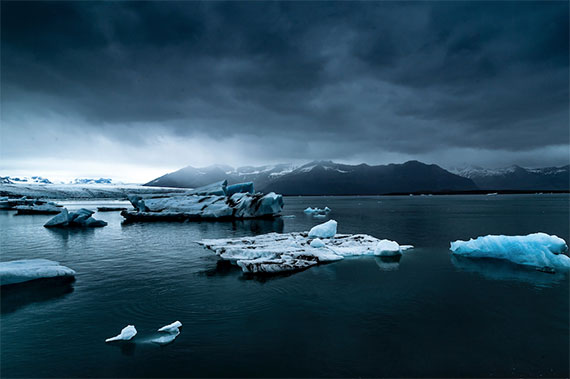
What mood does the landscape photo above create in your mind? Do you think the color of this photo was chosen to set a mood?

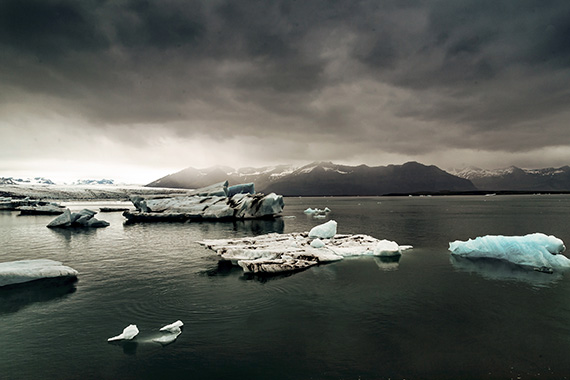
Below is the same photo with the color corrected back to what the scene really looked like. Notice how it does effectively ruin the mood.
setting mood in photos with color

By skewing the color balance toward blue, the photographer created a mood of cold, isolated beauty.

Your Turn

Pick a color from the shortlist above. Plan out a photo session where you will set the mood by incorporating your chosen color. You can accomplish this with light, background, props, camera settings and even in your post-production processing.

A photograph will hold a viewer’s attention longer and set a mood when it touches as many of the senses as possible, including sight, sound, taste, smell and feel. When a photo touches these senses, what we are talking about is the concept of mood.

Photo by Tina Hand

In the motel signage photo above, we can easily see the desolate landscape. Can you also imagine running your hand down that pole and feeling the rusty scratches? Can you hear the wind whistling across the landscape? Perhaps some of the sand hits you in the face, cuts across your lips, and you taste the earth’s saltiness.

What do you smell? When I look at this photo, I smell old grease from a diner and a faint whisper of aging pool chlorine.

This photo sets a very distinct mood, and a big part of that is in the post-processing. The tones were left flat, and the colors unsaturated to create an atmosphere of deserted isolation.

Here’s an exercise to stretch your thinking when it comes to creating a mood in photography.

Select a photograph from your portfolio that you believe has a distinctive mood. Now, using post-processing, change the feeling of the image to something completely different. When completed, share both versions with family and friends. Ask them to describe how they feel when viewing your two different versions of the same picture.

how to take moody portrait photos

Photo by Juan Ordonez

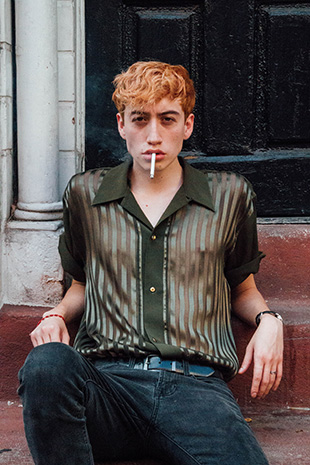
Key Thought: When photographing people, the most influential elements to establish mood are facial expression and body language.

A critical component of mood in photography is your choice of the camera angle. The right camera angle can set a mood or ruin a feeling that you’re trying to create.

Remember This: When photographing people, a camera angle that looks up at the subject sets a mood of power and control. Looking down at a subject sets a feeling of submissiveness and approachability.

Numerous mood-setting factors are working in the portrait of the young man above. They include the lighting, the chosen colors, facial expression and body language—but most importantly, the slightly lower camera angle is looking up toward the model’s eyes.

If everything were the same, except the camera angle was high and looking down on him. It would completely change the mood of the photograph.

Try this: Grab a willing subject and shoot pictures for a couple of hours. Place your model in various locations and, in each area, change the camera position to create different moods.

Weather

moody weather photography

Clockwise from top left: Photos by Hassan Ishan, Sebin Thomas and Rory Björkman

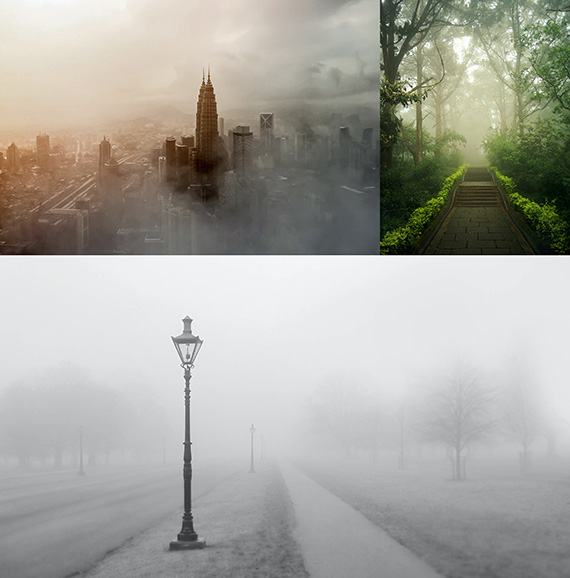
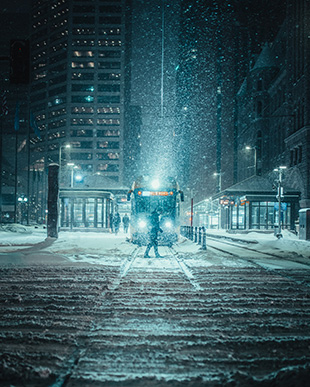
No matter what genre of photography you’re creating outdoors, weather plays a critical factor in establishing mood.

moody winter photo

Photo by Josh Hild

Critical Thought: When the weather is beautiful, it’s easy to think about getting outside and taking pictures. However, it’s bad weather that brings drama and mood to almost any scene!

Lighting & Shadow

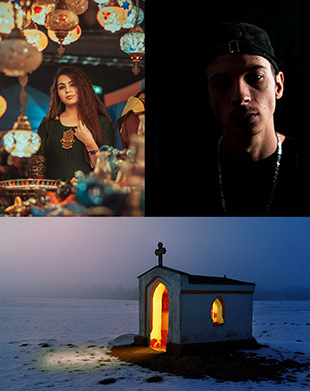
lighting shadow mood photo

Clockwise from top left: Photos by Dollar Gill, Peri Stojnic and jplenio

These three example photos evoke an intense mood—from inviting to somber to almost scary. By carefully selecting your lighting and shadow placement, you can send a strong message to a viewer.

Don’t forget that you can alter the lighting of a scene. In the example photo of the building with the cross, the photographer placed a light source inside the structure to create an eerie mood.

Idea: In the television, movie and music industries, professional lighting directors carefully select the lighting to display a mood. By paying extra attention to these example resources, you can develop your light and shadow ideas.

Space, Aspect Ratio, & Crop

The use of space is an art term that describes the arrangement of objects within your final composition.

How you use the space in your photo plays a crucial role in setting a mood.

An image with a large area of negative space could indicate a mood of open airiness and happiness. A tight crop of a photo might make a viewer feel cramped and claustrophobic. Cropping off important elements, such as a face, can create tension. Squishing a picture in or dragging out in post-production can radically set a mood.

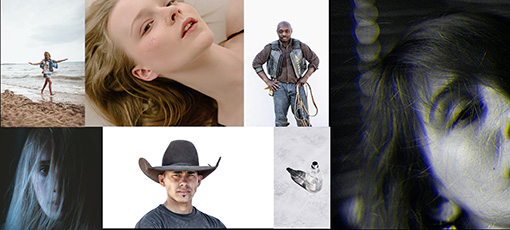
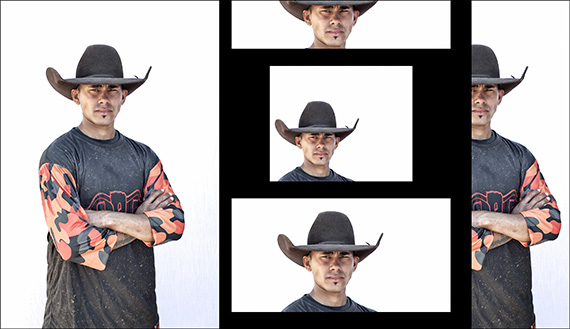
Space Experiment: Get into your photo files and select a photo that you love—but be sure to choose one that also has some negative space surrounding the subject. It doesn’t have to be a lot of space, as indicated in the cowboy portrait below.
space experiment in photos

Now, try cropping your picture into a variety of images. Use different aspect ratios. Divide up your use of space differently. Get super-creative and do what you would typically consider an oddball crop.

When you’ve created six versions, look at them side-by-side. Does the mood change? Could you also alter the color or tone of your picture for even more mood effect?

Critical Thought: Creating a mood with your photograph involves many different aspects of the process. However, one that you may overlook is the final presentation. This advice includes your use of space, aspect ratio, lens choice and cropping.

Creating Mood with Motion

mood with motion in photos

Photo by Vince Fleming

Activity, a motion of any kind, can add a definite mood to a shot. Sports or school activities are fantastic arenas to practice this form of capturing a mood.

how to set mood using motion in photos

From top: Photos by Marcis Berzins and Erik Dungan

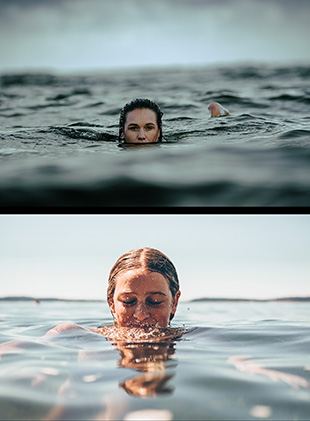
Here are two photographs involving motion that are almost identical in terms of subject matter—and yet they each convey a very different mood.

Critical Thought: When putting mood into your photographs, rarely will one suggested technique work well. It typically requires several techniques to drive your point home. The above photos both use motion. However, they differ in color, light, shadow and the use of space.

happy mood photo

Photo by Harry Quan

When trying to establish a mood, don’t be afraid to direct some motion specific to your need!

Conclusions

  • A mood is created when a viewer of your photo feels something and places themselves at the moment.
  • Color plays a significant role in setting a mood. So much so that entire industries are devoted to the study of color theory!
  • When trying to establish a mood, don’t send mixed signals. Every aspect of your shot should push toward your chosen atmosphere.
  • A photo will grab attention and signal a feeling when it touches as many of the viewer’s senses as possible: sight, sound, taste, smell and feel.
  • When photographing people, pay attention to both the facial expression and the body language when setting up a mood.
  • Your camera angle is important. Think about whether you’re looking up or down on the subject.
  • Weather is a fantastic mood-setter. Go outside when the weather is acting up!
  • When considering your use of lighting and shadow, ask, “What would a movie director do with this?”
  • Lens compression or expansion along with format ratio and cropping can drastically change the mood of a photo.
  • Motion almost always generates the potential for atmosphere. However, it must often be used in conjunction with other techniques to work fully.

It’s time to grab your camera and capture some mood!

About the Author:
Kent DuFault is an author and photographer with over 35 years of experience. He’s currently the director of content at the online photography school, Photzy.com

For Further Training:

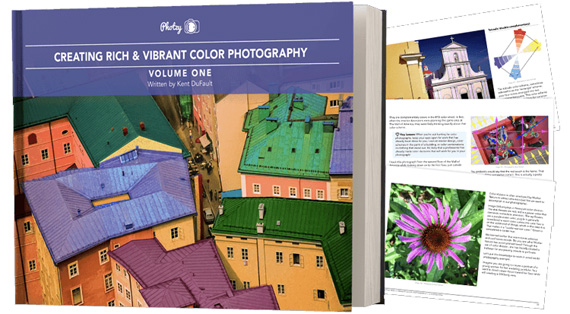
It’s a photographer’s secret weapon! Color photography can actually change the emotional state of a person viewing a particular photograph. In this in-depth eBook, you’ll uncover the true ‘story’ behind memorable, fascinating, & impressive color photography. It is currently 71% off.
color photo guide

New Educational Photography eBook (Take a Peek Inside)

Properly executed – color photography can influence a viewer in a subconscious, ingenious, and an undeniably amazing way. It’s fun to learn by doing. This 165 pages practical guide is packed with Assignments, Key Lessons, and Self-Check Quizzes.

Ending soon: The Rich & Vibrant Color Photography Guide at 71% Off

- - - - - - - - - - - - - - - - - - - - - - - - - - - - - - - - - - - - - - - - - - - - - - - - - - - - - - - - - - - - - - - - - - - - - - - - - -

Did you appreciate this newsletter? Please help us keep it going by Joining Our Patreon Supporters

What are your thoughts on this article? Join the discussion on our Facebook Page

PictureCorrect subscribers can also learn more today with our #1 bestseller: The Photography Tutorial eBook

- - - - - - - - - - - - - - - - - - - - - - - - - - - - - - - - - - - - - - - - - - - - - - - - - - - - - - - - - - - - - - - - - - - - - - - - - -

The post The Photographer’s Secret Weapon: Creating Mood appeared first on PictureCorrect.


from PictureCorrect https://ift.tt/LIyjP2U
via IFTTT

PictureCorrect.com: Interesting Photo of the Day: Cruising Through Antarctica

Most of us can only dream of going to Antarctica on a luxury cruise. Even the idea of a cruise to Antarctica, of all places, sounds crazy—right? However, if you’ve got the resources and are willing to take the challenge, you can go to Antarctica for a bit of vacation. To give you a glimpse of what you can experience, here’s an image captured by StartPuzzleheaded673, who was a crew member of a ship going through Antarctica:

“Antarctica from a Luxury Cruise” by StartPuzzleheaded673 (Via Reddit. Click image to see full size.)

It can be frightening to look around and see only ice in every direction. It even has an alien-planet vibe to it—except that there’s a ton of snowy ice everywhere instead of desolate rocks.

Looking at the conditions, it makes one wonder about the reasons why anyone would want to spend their time visiting the barren isolation. But like with any adventure, the memories are worth it—especially when captured in a photograph.

- - - - - - - - - - - - - - - - - - - - - - - - - - - - - - - - - - - - - - - - - - - - - - - - - - - - - - - - - - - - - - - - - - - - - - - - - -

Did you appreciate this newsletter? Please help us keep it going by Joining Our Patreon Supporters

What are your thoughts on this article? Join the discussion on our Facebook Page

PictureCorrect subscribers can also learn more today with our #1 bestseller: The Photography Tutorial eBook

- - - - - - - - - - - - - - - - - - - - - - - - - - - - - - - - - - - - - - - - - - - - - - - - - - - - - - - - - - - - - - - - - - - - - - - - - -

The post Interesting Photo of the Day: Cruising Through Antarctica appeared first on PictureCorrect.


from PictureCorrect https://ift.tt/DC0gNT7
via IFTTT

PictureCorrect.com: Camera Metering Modes Tutorial

It’s frustrating when an image turns out bright or darker than you would have liked. To better understand how to get correct exposures, you need to understand the different ways a camera meters light. Photographer Saurav Sinha shares his insight on three basic metering modes:

To form an image, cameras need to focus the light being reflected from the subject. The camera’s light meter evaluates this reflected light to estimate a proper exposure. Basically, there are three metering modes that you can use to expose the subjects properly.

Evaluative/Matrix Metering

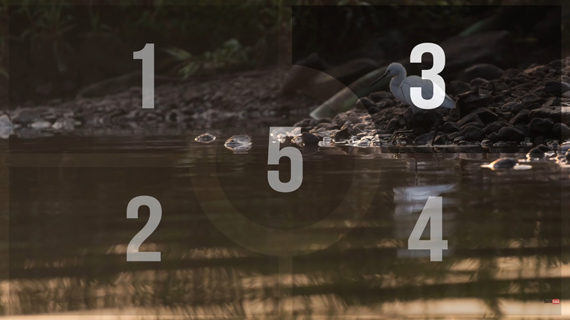
This is the most commonly used metering mode and is also set as the default option in many cameras. In this mode, the camera divides the entire scene into various zones and calculates an average exposure for the entire frame. However, a slightly greater weight is given to the zone with your focus point.

matrix or evaluative metering mode

Greater priority is given to zone 3 as the subject is in that zone

This mode works great when the lighting is uniform. For most photographers, this is the “set it and forget it” metering mode. So unless the lighting is very challenging, you can get away with using this mode.

Center-Weighted Metering

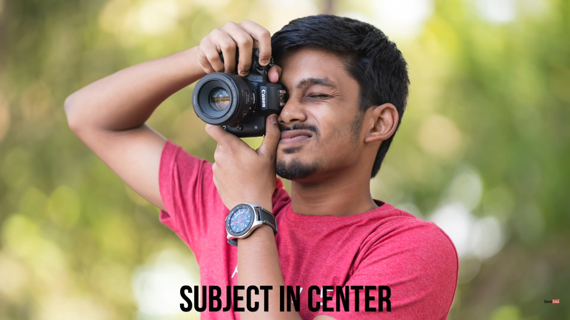
The name says it all. In this mode, the center of the frame is given the highest priority. When metering in this mode, the portion of the frame that lies at the center will be properly exposed.

You can still use this metering mode if the subject isn’t in the middle of the frame. Simply set the subject to the center of the frame once to take the exposure reading, lock the exposure, recompose with the subject placed where you want them, and take the shot.

center weighted metering mode

You can use this metering mode when the subject is backlit or in other challenging lighting situations where evaluative/matrix metering cannot function properly.

Spot Metering

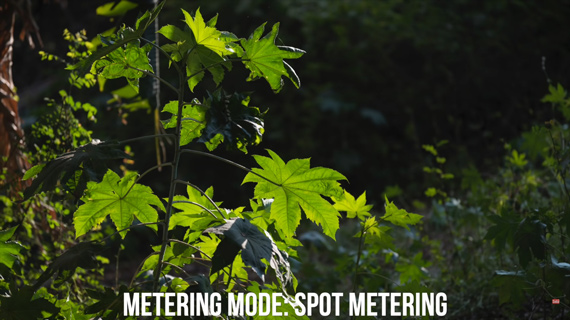
If you need to meter precisely for a very small area of the frame, spot metering is the mode to go for. This mode is more accurate than the center-weighted metering mode. Also, while center-weighted metering mode is restricted to the center of the frame, spot metering is linked with the focus point. The camera will thus ignore the rest of the scene except for the focus point.

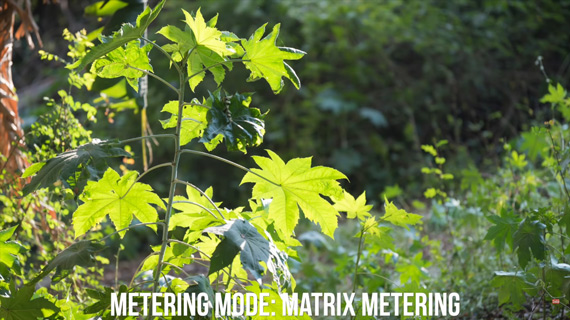
matrix metering

The leaves are overexposed when shot in matrix/evaluative metering mode.

spot metering mode

The leaves are exposed properly when shot in spot metering mode.

As with center-weighted metering mode, use the spot metering mode when the lighting is complex, and when the subject occupies a tiny area of the frame.

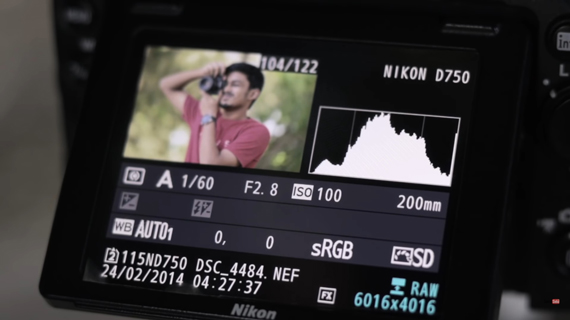
No matter what metering mode you prefer to use, always refer to the histogram. The histogram tells you exactly if the shot is properly exposed or not.

check histogram of exposure

Which metering mode do you prefer?

- - - - - - - - - - - - - - - - - - - - - - - - - - - - - - - - - - - - - - - - - - - - - - - - - - - - - - - - - - - - - - - - - - - - - - - - - -

Did you appreciate this newsletter? Please help us keep it going by Joining Our Patreon Supporters

What are your thoughts on this article? Join the discussion on our Facebook Page

PictureCorrect subscribers can also learn more today with our #1 bestseller: The Photography Tutorial eBook

- - - - - - - - - - - - - - - - - - - - - - - - - - - - - - - - - - - - - - - - - - - - - - - - - - - - - - - - - - - - - - - - - - - - - - - - - -

The post Camera Metering Modes Tutorial appeared first on PictureCorrect.


from PictureCorrect https://ift.tt/9ArMVkc
via IFTTT

tiistai 23. toukokuuta 2023

PictureCorrect.com: Interesting Photo of the Day: Tower Through the Sun

Planning is one of the greatest key elements of successful photography. When you want to get a particular shot, you must plan for it well ahead of time and have the perseverance as well. An image that lacks planning after all is a mere snapshot. Photographer Tyler McKay for instance, had to go back to the same place for twenty-five times within one and a half months to capture the sun perfectly aligned with the CN tower in Toronto, Canada:

tower through sun

“Sun Aligned with the CN Tower” by Tyler McKay (Via Reddit. Click image to see full size.)

McKay took the image with his Sony A7RIII and 100-400mm lens at 340mm, f/9, 1/250s, and ISO 100.

It’s a good thing McKay didn’t give up, and instead kept on trying until the 29th attempt. Although he used different applications and online resources to determine the perfect alignment between the sun and the CN tower, they’d be off by some bit every time. He finally got lucky on the 29th attempt. The fact that the alignment lasts only about 1-2 seconds makes this shoot even more challenging. Just imagine how prepared you’ve got to be in order to take such an image.

Besides the perfect alignment, there are other factors that make the image praiseworthy. The silhouette of the cityscape that surround the tower is equally fascinating. The unique cloud pattern in the background adds another point of interest to the image. And how can anyone miss the flock of birds near the water body. The birds flying so close to the water surface perfectly complete the image. They make the image so much more aesthetically pleasing.

“1000’s of birds starting flying across the water making the weirdest/coolest sounds I’ve ever heard. It was such an incredible thing to witness. It was a beautiful warm summers morning when I finally captured this image how I imagined and planned it. Practice patience and enjoy the moment.”

This is a great proof that photography isn’t just luck, it’s discipline as well.

- - - - - - - - - - - - - - - - - - - - - - - - - - - - - - - - - - - - - - - - - - - - - - - - - - - - - - - - - - - - - - - - - - - - - - - - - -

Did you appreciate this newsletter? Please help us keep it going by Joining Our Patreon Supporters

What are your thoughts on this article? Join the discussion on our Facebook Page

PictureCorrect subscribers can also learn more today with our #1 bestseller: The Photography Tutorial eBook

- - - - - - - - - - - - - - - - - - - - - - - - - - - - - - - - - - - - - - - - - - - - - - - - - - - - - - - - - - - - - - - - - - - - - - - - - -

The post Interesting Photo of the Day: Tower Through the Sun appeared first on PictureCorrect.


from PictureCorrect https://ift.tt/dE1h7lA
via IFTTT

PictureCorrect.com: Street Photographer Shares 5 Tips from His Career

After spending over five years diving into the world of photography, Roman Fox shares a collection of five high-level, holistic tips in his recent video. These are not your typical technical advice, like the use of the rule of thirds or understanding exposure triangle. Instead, these are tips that touch upon the ethos of being a photographer, the mindset, and the approach one needs to adopt to grow and evolve in the craft of photography. Here are the key takeaways:

In the beginning, Roman dreamed of shooting in exotic locations, just like many other budding photographers. However, he soon realized that he was wasting his time dreaming and not actually doing any photography. The solution was simple: He picked up his camera and started taking photos in and around London, where he lived.

1. Shoot Around You

The message here is to use what you have and shoot in your environment. If you are in the countryside, capture the countryside life. If you are in a city, document the urban landscape. The point is to start shooting and practicing your craft.

2. Remember Your Why

Roman highlights the importance of remembering why you started photography. His personal reason was simply to enjoy the craft and escape his day-to-day life. But as photographers progress and gain popularity, it is easy to lose sight of the initial motivation behind picking up a camera. Whether it is collaborations, commercial projects, or building an online audience, ensure that these opportunities do not overshadow your love for photography. It’s crucial to always reassess your path and protect your “why.”

3. Photography Fitness

An interesting metaphor Roman uses is comparing photography to physical fitness. Just as consistency is key in maintaining good physical shape, so is it in developing your photography skills. He recommends taking your camera everywhere with you and shooting one or two photos a day to make slow but steady progress. This habit helps you improve your skills gradually rather than rushing to take tons of photos in one go and then neglecting photography for weeks.

street photographer

4. Understand Your Creative Cycle

Roman shares that he noticed a repeating pattern in his creative journey: a cycle of experimenting, working, and resting. At times, he would experiment with new techniques, subjects, or styles. Other times, he would work on improving these new discoveries, and then there would be periods of rest when he took a break from shooting. Recognizing these cycles can help you make the most of each phase and manage creative burnout.

5. Keep It Simple

The last tip Roman shares is the importance of simplicity. This applies to everything from gear to learning and even to the photography approach. Starting with too much equipment or trying to learn everything at once can be overwhelming and often counterproductive. Instead, start with one good camera and one lens. Focus on learning one aspect of photography at a time.

- - - - - - - - - - - - - - - - - - - - - - - - - - - - - - - - - - - - - - - - - - - - - - - - - - - - - - - - - - - - - - - - - - - - - - - - - -

Did you appreciate this newsletter? Please help us keep it going by Joining Our Patreon Supporters

What are your thoughts on this article? Join the discussion on our Facebook Page

PictureCorrect subscribers can also learn more today with our #1 bestseller: The Photography Tutorial eBook

- - - - - - - - - - - - - - - - - - - - - - - - - - - - - - - - - - - - - - - - - - - - - - - - - - - - - - - - - - - - - - - - - - - - - - - - - -

The post Street Photographer Shares 5 Tips from His Career appeared first on PictureCorrect.


from PictureCorrect https://ift.tt/WpIJEs6
via IFTTT

PictureCorrect.com: Interesting Photo of the Day: Meteor Shower Exposure Stacking

Alandizzle visited Yosemite National Park during the Perseid Meteor showers in all their glory. While there, he captured this great shot on Sentinel Dome using multiple exposures. He replicated some of the meteors in the shot in post processing to give more context as to what it actually felt like watching them:

Meteor shower at Yosemite

Parade of lights at Yosemite National Park (Via Reddit. Click image to see full size.)

Alandizzle shot this on a Nikon D810, with a 14–28mm lens at f/2.8 focused to infinity. His camera was set to go off every 33 seconds using an intervalometer. He set it to 33 seconds, as each 30 second exposure takes roughly 2 seconds to process. He stacked the exposures in post processing using Starry Landscape Stacker for Mac. To add the extra meteors to the shot, alandizzle used Free Transform in Photoshop. He carefully chose to have them fall over a central area, and used a layer mask to ‘paint’ them back in. He then merged the layers with the main layer.

You need patience to create great shots like this, but once you’ve got your camera set up, you can just sit back and enjoy the light show for a few hours, as alandizzle did. It was certainly worth it!

- - - - - - - - - - - - - - - - - - - - - - - - - - - - - - - - - - - - - - - - - - - - - - - - - - - - - - - - - - - - - - - - - - - - - - - - - -

Did you appreciate this newsletter? Please help us keep it going by Joining Our Patreon Supporters

What are your thoughts on this article? Join the discussion on our Facebook Page

PictureCorrect subscribers can also learn more today with our #1 bestseller: The Photography Tutorial eBook

- - - - - - - - - - - - - - - - - - - - - - - - - - - - - - - - - - - - - - - - - - - - - - - - - - - - - - - - - - - - - - - - - - - - - - - - - -

The post Interesting Photo of the Day: Meteor Shower Exposure Stacking appeared first on PictureCorrect.


from PictureCorrect https://ift.tt/zXbWhRE
via IFTTT