perjantai 27. tammikuuta 2023

PictureCorrect.com: 10 Easy Steps to Photographing Birds for Beginners

Today’s article is based on concepts from the new Bird Settings Photography Field Pack if you want to check it out for further training.

I’d be lying if I told you that bird photography is easy. No. It isn’t. It’s one of the toughest photography genres out there – perhaps the toughest.

However, what I’m going to reveal today are ten easy steps to take better photos of birds no matter your experience and skill level. If you incorporate these ten steps into your daily routine, you’ll invariably get better results.

All that I’m asking is that you follow these ten steps and see if they work or not. If they work, great! If for some reason they don’t for you, of course feel free to look elsewhere. What I’d like you to know is that these are ten steps that I’m distilling from my eleven years of experience. So they can’t be too bad!

With all that said, here are the ten easy steps for beginners to photograph birds.

Step #1: Use a Longer Telephoto Lens

This goes without saying, but this is for those photographers who are still contemplating whether they can do good bird photography using a 70-300mm lens, a 300mm prime lens or some other short focal length lens.

While you can photograph birds using any lens you want, the shorter focal length extremely limits your photo opportunities. Unless you live in a place where birds are cooperative, which is rare, it’s best to have that longer lens.

If you’re just starting out, or you have been using a shorter focal length lens all these years, I strongly recommend you to invest in a good long telephoto lens like the Nikon 200-500mm, the Tamron/Sigma 150-600mm lens or something similar. I feel the Canon 100-400mm lens is also short. Basically, the longer the focal length, the better it is. This is because, invariably, you’ll end up using the longest focal length for most of your shooting.
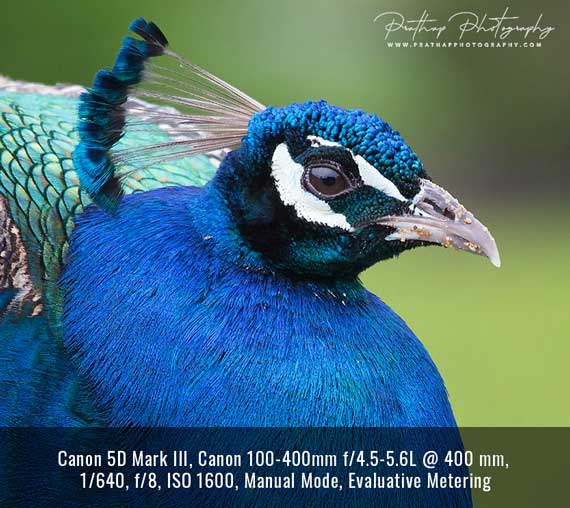
using maximum focal length for bird photography

It took me about 5-6 years to realize that almost all (>95%) of my bird photographs were taken at the maximum focal length. I mean, whenever I used 100-400mm lens, I shot invariably at 400mm. That’s because most often birds are very far and we are never satisfied with the focal length that we have.

In simple terms, the reach trumps everything else in bird photography.

Step #2: Go to Birding Hotspots

Most photographers, trying to drive home a point, say you can take great photographs simply in your backyard. That’s deceiving if you ask me. It’s like saying you can get breathtaking landscape images in your hometown, no matter where you live. If you live in a place like Bangalore, which is the Silicon Valley of India, you just can’t get a breathtaking landscape.

Location is the key to taking great images. In fact, you should always contemplate location, location, location. That should be your mantra. If you want to get some great practice and possibly good to great images, you better go to birding hotspots where you can find birds in abundance.

You want to go to a place where you have a great variety of birds and good lighting conditions. It’s better to spend a couple of days to a week in the birding hotspots once or twice a year than to do the whole year in your backyard. This is because, invariably, you’ll get great results in the birding hotspots.
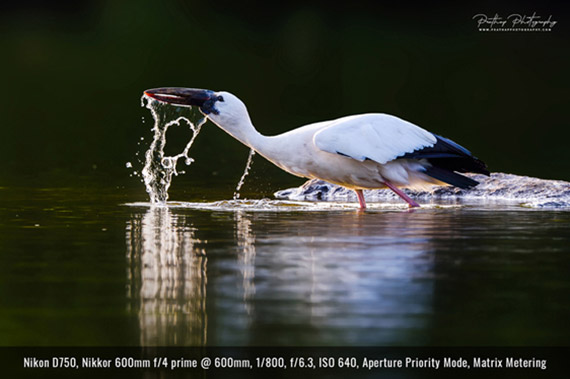
photo taken at bird sanctuary

This photo of the Open-billed Stork was taken in a Birding Hotspot called Ranganathittu Bird Sanctuary near Mysore, Karnataka, India.

Remember that almost all the professional photographers would shoot those photographs that you love in these birding hotspots. Otherwise, why would they conduct the workshops in the birding hotspots and not in their backyards?

Step #3: Always Shoot in Great Light

You might be bored of hearing that it’s best to shoot in great light. I can understand. It’s hard to escape when photographers everywhere love to talk about that great light.
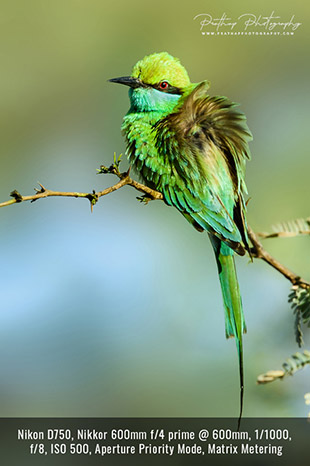
frontal light on bird

The frontal light helped me to capture all the details on the bird’s plumage as well as the great colors. Notice the catchlight in the eyes.

Instead of telling you about the quality and the direction of light, which you already might know, let me give you six solid reasons to shoot in soft frontal light for bird photography:

1. You’ll get perfect and well-balanced exposure in the soft front light.
2. You’ll get faster shutter speeds.
3. You can shoot at ISO 400 or above without really introducing too much noise.
4. Your autofocus will work like a charm due to the ideal contrast between the bird and the rest of the scene.
5. You won’t have to contend with shadows or only very soft shadows during these hours, which will help you bring out the texture and the color in the birds.
6. You’ll get catchlight in the bird’s eye, which is the critical component in making the bird look lively.

As you can see, with bird photography, there’s really no better choice than to shoot in soft frontal light.

Step #4: The Background Makes the Picture

Imagine if this black text you’re reading now was printed against a grey background. It would be very difficult to read, wouldn’t it? You’re able to read these words clearly because there’s a high level of contrast between the positive space (the text) and the negative space (the white space).

In other words, it’s the negative space (the background) which defines the positive space (the text). It’s nothing different when it comes to photography. It’s the negative space (the background) which defines the positive space (the subject like a person, a bird, a mammal, etc.).

In essence, it’s the background that makes the picture.

So, the moment you finalize on which bird to photograph, you should constantly look for the background that compliments the bird. In fact, you should look for a great background and wait for the bird to come! This is because the bird is always on the move, which is really a blessing in disguise. It’s funny that most beginner bird photographers hate the fact that the birds move, when it can actually work to their advantage.

The background should always help to emphasize the bird and to help the bird to stand out.
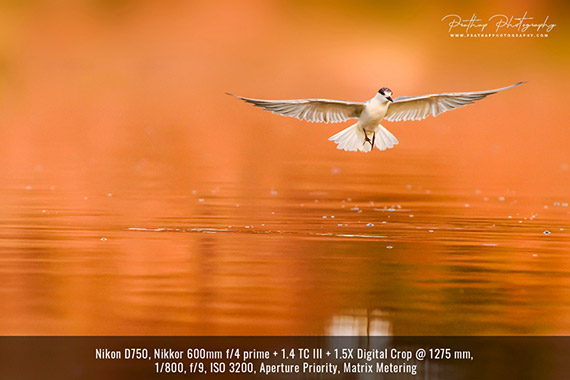
beautiful background for bird photo

While the bird itself is beautiful to watch in mid-air with its wings fully spread, it’s the setting sun’s reddish orange light reflected off of the pond that really makes this picture work.

It’s usually very easy for bird photographers to get a good background as most of our photographs would have a clear out-of-focus background. However, care should be taken to keep an eye on any distracting elements like shiny objects or branches that cut through the bird, etc. because they will ultimately distract the viewer’s eye in the photo.

All this is to say that if you can make sure to get great background, your photographs will invariably look beautiful.

Step #5: Stop Down the Aperture

If you’re shooting with a telephoto zoom lens like 100-400mm, 200-500mm, 150-600mm, etc., you might have noticed that your photos turn out to be softer at the maximum aperture opening. That’s common. Most lenses are soft when opened to the max. This effect is more pronounced with telephoto zoom lenses.

You can combat this issue by stopping down the aperture at least by 1/3 , 2/3 or 1 stop to get sharper results. For instance, if you’re using a Tamron 150-600mm f/5 to 6.3 at 600mm, try and shoot with an aperture of f/7.1-8 and see if you get sharper results.
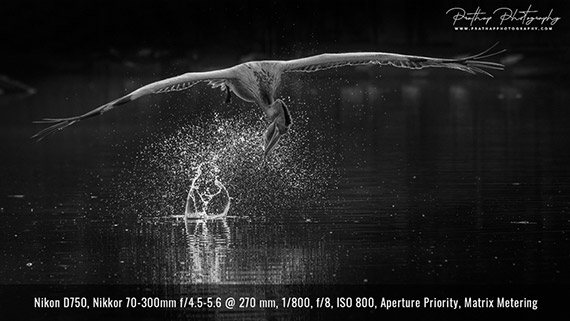
stopping down the aperture in bird photography

You can see that I’ve used a 70-300mm lens to shoot this photo. That’s because I was teaching my students and we were on a boat in this sanctuary which allows us to stay close to the birds. However, it’s interesting to note that I’m using f/8, both to make sure the image is sharp enough and to make sure the entire bird is also in sharp focus.

Of course, stopping down the aperture results in a slightly deeper depth of field, but that’s a tradeoff that you should learn to live with. If you make sure the background is far off from the bird, this shouldn’t be a problem at all.

Step #6: Shoot at ISO 400

I know this sounds crazy if you’re just starting out in bird photography because you were always taught to use the lowest ISO possible, which is usually ISO 100. But, when we are talking about fast-action photography like bird photography, we can’t always afford to shoot at ISO 100.

In fact, it wasn’t until about 5-6 years in that I started shooting at ISO 400 regularly.

The idea is this: Getting a super clean photo of a blurred bird is of no use. Instead, you should aim to get a sharper image that’s probably not ultra-clean.

If you can make sure to shoot in a great light as I mentioned before, you can safely shoot at ISO 400 and still manage to get good quality images. This is because the ISO noise is predominantly seen in the shadow regions, uniform regions, and in low light conditions. And when the light is great, you have the best-case scenario. Even if you do see some noise in the uniform regions like the sky, you can easily remove it in post-processing.

And the result of using ISO 400 is that you’ll get higher shutter speeds, which is great! Of course in bird photography, faster shutter speeds are a big boon indeed.
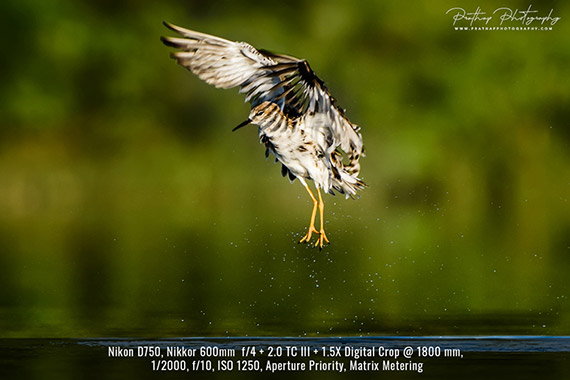
using ISO 400 for bird photography

I was using a 2.0X Teleconverter on my 600mm f/4 prime lens, which meant that I had to stop down the aperture a bit to get sharper results and also aim for a faster shutter speed to freeze the action. So, I have used an Aperture of f/10 and a higher ISO of 1250 to get a shutter speed of 1/2000th of a second. Noise wasn’t that apparent as I was using a full-frame camera and the light was great.

If you aren’t shooting at ISO 400 yet, now is your chance to crank it up and get some excellent images of birds with faster shutter speeds.

And if you’re using a full-frame camera or a pro-version camera, you might as well push it all the way up to ISO 800 whenever needed, and you’ll still pull out some good shots. But, I’d recommend you to start with ISO 400.

Step #7: Shoot from the Bird’s Eye Level

This goes without saying for a bird photographer. However, I don’t see many people doing it – especially the beginners as it’s either very awkward to lie down in front of other people, or because they don’t know the effect of shooting from the bird’s eye level.

It took me a few years before realizing it too. We were all there at some point or another.

If you want to make some intimate and gorgeous looking photographs of birds, you better shoot from the bird’s eye level. As most birds are pretty small, even tiny, shooting from a higher point of view would make them unappealing to the viewer. By lying down on the ground, which might seem a bit awkward and inconvenient, you’ll automatically separate the bird from the background because the background will be far off now instead of the ground. And once you see the results you’ll never want to shoot standing up. I guarantee it.
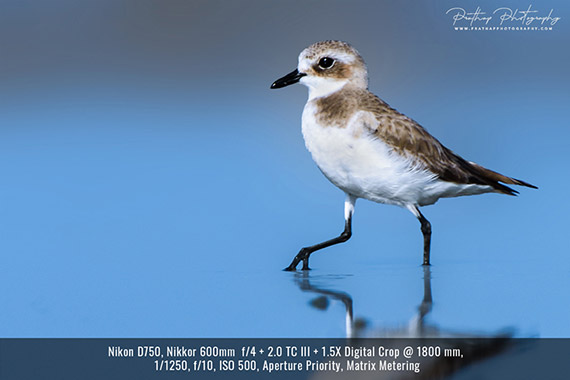
shooting bird photo at its eye level

You can see that most of my images are shot from eye level. This is another picture that gives you a clear idea of what a tiny little bird like this would look like when you lay flat on the beach and take a photo. Notice how the tiny bird has got an authoritative look and feel to it. That’s the beauty of eye-level photography.

There are several advantages to photographing a bird at eye level, but the three most important ones are:

1. You’ll invariably get a smooth out-of-focus background which resembles nothing similar to the way you have ever seen through your own eyes.
2. Viewers can connect with the birds on an intimate level as they are now looking at the bird in a whole new way.
3. Birds get comfortable in your presence when your form is not threatening which leads to some amazing opportunities.

Would you try it the next time, provided you don’t have any physical condition? I hope so.

Step #8: Follow the Rule of Thumb

Here’s a rule of thumb, which I strictly follow for shooting birds in flight:

Track — Focus — Wait — Shoot

Here’s how it works:

1. Track the bird while it’s still far off.
2. Wait for the autofocus to achieve focus on the bird.
3. Wait for the bird to assume a position where you get the best light and the background.
4. Shoot in bursts of photos.

If you follow this advice strictly, I can almost guarantee you to get sharper results of birds in flight.
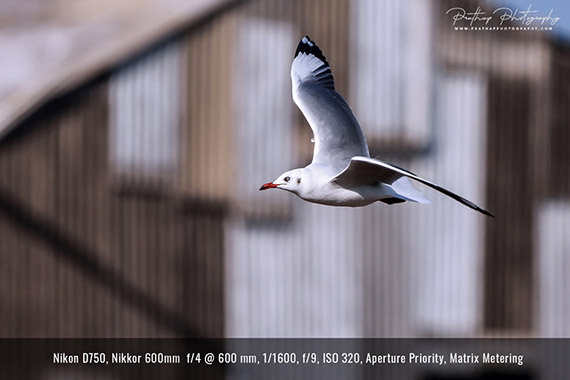
using a rule of thumb for bird photo

This photo is an excellent example of how following my rule of thumb can make your image look “thoughtfully composed” rather than just haphazardly shot. There were a few gulls flying around in this location on a beautiful morning. I spotted this old shed and liked the pattern there, so I knew I wanted to use it as the background. Then all I had to do was track the seagull, achieve the focus, wait until it came to the position I wanted, and take bursts of shots.

Step #9: Use Center Autofocus Points

Again this advice goes against the grain because normally you’re suggested to move the autofocus points to get the perfect composition in the field.

But when you’re just starting out, you’re better off concentrating on getting sharper results more than getting better composition. And in the case of bird photography, when you hardly have time to get a decent photograph, you can’t afford to meddle with the autofocus points much.

While you can focus on composing very well for the static/perched birds, which you should, in my opinion you’re better off using center autofocus points for action and flight shots. There are two vital reasons why you should use center autofocus points:

1. You never know which side the bird will move when the action is taking place.
2. The center autofocus points are the most sensitive and most accurate of all other focus points which helps in tracking the bird’s movements.

You can always compose the shot later in the post-processing stage, which is usually what most photographers would do.
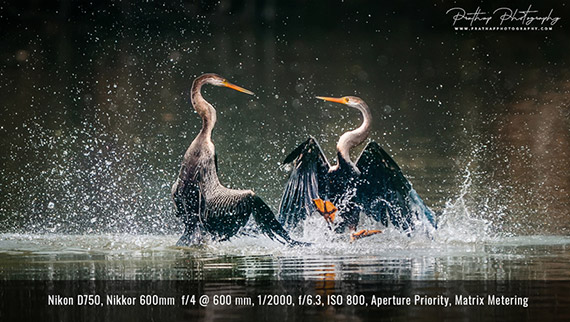
using autofocus in bird photography

While photographing birds in action, you normally don’t know which side they might move. So, you’re better off using autofocus points at the center in order to allow the autofocus system to track the movements quickly. This was a tricky situation where there were two birds involved in a fight. In such cases, it’s best to put the autofocus points on just one bird and track it throughout your shots.

Also, try to use a 5-point, 9-point or 15-point zone autofocus system for action or flight shots. You don’t want to use the 3-D tracking, 51-point or higher focus points because it’ll only confuse the autofocus system and it’ll start hunting for the bird all over the place. You just have to make sure that you have fair enough autofocus points on the bird for the autofocus to keep track of any movements.

Step #10: Learn to Post-Process Like a Pro

In the beginning, you might feel that post-processing is manipulation, not ethical and so on. There are a lot of wrong assumptions about post-processing, unfortunately.

But let me tell you that whatever is your skill in making some incredible images in the field, you have to the give final touches to it in post-processing to bring out the sheer beauty of the bird as well as its surroundings. Post-processing is a vital part of the image-making process. It’s not an afterthought and not unethical in any regard.

Learning post-processing just a few years ago when it was just Photoshop, was a mammoth task. Even if you decided to swim in the Photoshop ocean for years, you’d still be confused. But not anymore with Lightroom and other simple software. The learning curve has been reduced dramatically so that you can be up and running in a matter of hours and days. So, start embracing it today to bring out the sheer beauty in your RAW files.

Make sure to start shooting in RAW + JPEG, if you aren’t already doing so. Until you master the post-processing, you can keep sharing the JPEGs. But when you become good in post-processing, you can shoot in RAW.
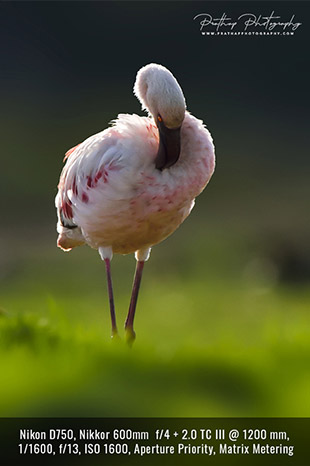
showing the importance of post processing

If you want to produce consistently good results, you have to learn to post-process like a master. This photo of the flamingo in backlight was definitely great in-camera. But what you see as the end result is not the way it was when I saw the RAW file. Your vision of how you want the end result to look is as important as what you got in the field.

Remember that getting good at post-processing can take a considerable amount of time. Just keep at it until you master it. Without post-processing, you’ll always be short of bringing the best results from your RAW files, no matter what the naysayers claim.

Don’t forget that you are expressing yourself and your vision through your photographs. And you can express yourself the best possible way through the combination of field techniques and the post-processing prowess.

Now you know my ten easy steps to photograph birds!

I hope you’re all pumped and ready to put these steps into action. I’m sure you can use them in your next visit to a birding hotspot and share those incredible images with your friends and family members.

I wish you all the very best.

One last thing, in case you’re interested – I’ve put my eleven years of field experience into a one-of-a-kind guide – Bird Photography Settings Field Pack – A Printable Pack of 50 Professional Field Techniques. While most photographers wouldn’t tell you their specific settings, I’ve distilled all my settings for 50 different field scenarios that I personally use into highly-compact, easy-to-follow, printable field cards.

bird-photography-sheets

New: The Bird Photography Settings Field Pack

All you have to do is use the settings and follow the field techniques on the cards for much easier super sharp bird photography.

Found here: Bird Photography Settings Field Pack

Any comments or questions? Please share them in the comments section.

About the Author:
Prathap is a professional photographer and founder of Nature Photography Simplified blog. He’s the go-to guy for bird, wildlife and nature photography.

- - - - - - - - - - - - - - - - - - - - - - - - - - - - - - - - - - - - - - - - - - - - - - - - - - - - - - - - - - - - - - - - - - - - - - - - - -

Did you appreciate this newsletter? Please help us keep it going by Joining Our Patreon Supporters

What are your thoughts on this article? Join the discussion on our Facebook Page

PictureCorrect subscribers can also learn more today with our #1 bestseller: The Photography Tutorial eBook

- - - - - - - - - - - - - - - - - - - - - - - - - - - - - - - - - - - - - - - - - - - - - - - - - - - - - - - - - - - - - - - - - - - - - - - - - -

The post 10 Easy Steps to Photographing Birds for Beginners appeared first in the Photography Tips category on PictureCorrect.


from PictureCorrect https://ift.tt/yrJUfw9
via IFTTT
PictureCorrect.com: Interesting Photo of the Day: Rainbow Night Sky

Editing an image can sometimes lead to exaggerated colors, textures, and light. With a lot of time and learning, editing becomes quicker and you start to get a feel for the influence that you want in your images. For landscape photography with a starry night sky, photographers often brighten the foreground and increase the color to reach the final product. Editing beyond that is sometimes criticized as overkill, but if the original shot is great, there’s no need to change much. This image shows proof of that theory:

exposure saturation contrast light

“Rainbow Road” by Marc Leatham (Via Reddit. Click image to see full size.)

Photographer Marc Leatham captured this long exposure with a Rokinon 14mm f2.8 wide angle lens on a Sony a7 camera. He noticed this scene as he was driving through the desert in Arizona and stopped to get his camera out. The settings were a 25 second exposure, f/3.2, and ISO 3200. In order to edit, he did a stack of four photos together, reduced the noise, and increased the contrast and saturation. What an amazing shot!

- - - - - - - - - - - - - - - - - - - - - - - - - - - - - - - - - - - - - - - - - - - - - - - - - - - - - - - - - - - - - - - - - - - - - - - - - -

Did you appreciate this newsletter? Please help us keep it going by Joining Our Patreon Supporters

What are your thoughts on this article? Join the discussion on our Facebook Page

PictureCorrect subscribers can also learn more today with our #1 bestseller: The Photography Tutorial eBook

- - - - - - - - - - - - - - - - - - - - - - - - - - - - - - - - - - - - - - - - - - - - - - - - - - - - - - - - - - - - - - - - - - - - - - - - - -

The post Interesting Photo of the Day: Rainbow Night Sky appeared first in the Photography Tips category on PictureCorrect.


from PictureCorrect https://ift.tt/iTFvaRY
via IFTTT

PictureCorrect.com: What Judges Look for in Wildlife Photography Competitions

Isn’t it frustrating when you participate in wildlife photography competitions but never find your name on the winners’ list? You must wonder about the parameters on which judges evaluate the submissions. In today’s insightful video, award-winning photographer and photography judge Janine Krayer shares five great wildlife photography contest tips and outlines the common mistakes that photographers make in competitions.

Photography is subjective, meaning not everyone will have the same feeling toward a particular artwork. We don’t recommend taking Krayer’s tips as gospel truth. Rather, her tips will help you to choose your best image to submit in competition and to narrow down your selection.

“At the end, it is most important that you like your image as it is, and no one can tell you not to.”

Krayer shares quite a lot of helpful tips regarding a judge’s expectations. She sheds light on the mistakes that many wildlife photographers make when composing an image. She also emphasizes the importance of negative space and cropping. She adds that it is not wrong to crop the animal, as long as it doesn’t seem accidental. It has to be intentional and the crop has to make sense.

Also, we can get rid of many distractions with cropping. But if the distraction is right behind the subject, cropping might not help. The only time to help is before you press the shutter release: ensure that there aren’t any distractions in the background or immediate foreground.

“Your background is just as important as your subject itself.”

Krayer also talks about some of the post-processing mistakes that photographers generally make. She shares some insightful tips on detail adjustments, noise reduction and sharpening. She also demonstrates how using local adjustment tools can be a better alternative to fine-tune your images.

We really hope that you’ll keep Krayer’s tips in mind when submitting your images to the next wildlife photography competition. These tips will help you out for sure to a great extent.

- - - - - - - - - - - - - - - - - - - - - - - - - - - - - - - - - - - - - - - - - - - - - - - - - - - - - - - - - - - - - - - - - - - - - - - - - -

Did you appreciate this newsletter? Please help us keep it going by Joining Our Patreon Supporters

What are your thoughts on this article? Join the discussion on our Facebook Page

PictureCorrect subscribers can also learn more today with our #1 bestseller: The Photography Tutorial eBook

- - - - - - - - - - - - - - - - - - - - - - - - - - - - - - - - - - - - - - - - - - - - - - - - - - - - - - - - - - - - - - - - - - - - - - - - - -

The post What Judges Look for in Wildlife Photography Competitions appeared first in the Photography Tips category on PictureCorrect.


from PictureCorrect https://ift.tt/Et2FaoD
via IFTTT

torstai 26. tammikuuta 2023

PictureCorrect.com: 10 Photography Tricks to Make Your Landscapes Stand Out

Landscape photography can be a challenging but rewarding hobby. In this video, photographer Mads Peter Iversen shares 10 quick and essential photography tricks for making your landscape photos stand out from the average Joe with a mobile phone:

One of the first tricks is to try different and unique perspectives. Instead of just photographing a scene from eye level, try getting low to the ground or climbing to a higher vantage point. Using a wide angle lens can also emphasize an interesting foreground.

Another important aspect of landscape photography is light. The optimal light is always relative to the scene of photographing, sometimes front light is necessary, especially if you want to photograph rainbows, sometimes side light is beneficial for highlighting shapes of mountains and sometimes backlight is what you want.

Proper placement of objects in landscape photography is essential for creating a visually pleasing and dynamic composition. The way elements are arranged within the frame can affect the overall balance and harmony of the image as well as the viewer’s eye movement and attention.

Use compositional tools, there are many compositional tools to use in landscape photography, such as lines, balance, and anchoring points.

landscape photo tricks

Landscape photographer captured by Annie Spratt

Moody overcast days with texture-rich clouds and maybe rain works great for photography although it can be meh to get out in it can deliver some absolutely insane photos photos that Average Joe is not taking because average due doesn’t go out and Rain.

“The most important thing is to never stop learning and growing.”

Keep experimenting with different perspectives, pay attention to light and shadow, and work on your compositional skills to take your landscape photography to the next level.

- - - - - - - - - - - - - - - - - - - - - - - - - - - - - - - - - - - - - - - - - - - - - - - - - - - - - - - - - - - - - - - - - - - - - - - - - -

Did you appreciate this newsletter? Please help us keep it going by Joining Our Patreon Supporters

What are your thoughts on this article? Join the discussion on our Facebook Page

PictureCorrect subscribers can also learn more today with our #1 bestseller: The Photography Tutorial eBook

- - - - - - - - - - - - - - - - - - - - - - - - - - - - - - - - - - - - - - - - - - - - - - - - - - - - - - - - - - - - - - - - - - - - - - - - - -

The post 10 Photography Tricks to Make Your Landscapes Stand Out appeared first in the Photography Tips category on PictureCorrect.


from PictureCorrect https://ift.tt/nNAtHbE
via IFTTT

PictureCorrect.com: Interesting Photo of the Day: Star Trails over the Canary Islands

A time vortex? The gateway to another world? As sci-fi as this capture looks, it’s really just the creative result of some time (six hours), several hundred still photographs (620 35-second exposures), and a little processing (in ProStack and Photoshop):

star trails photography

“Star trails over Observatorio del Teide” by Bartosz Wojczynski. (Via Imgur. Click image to see full size.)

Photographer Bartosz Wojczynski took the photographs at Teide Observatory, which is located on Tenerife, one of Spain’s Canary Islands. The observatory’s prime location (close to the equator) and clear, dark night skies offer stargazers and astrophotographers full views of the northern hemisphere. Here, Wojczyński was able to position Polaris, the North Star, at the center of his star trail rings.

He used a Nikon D5100 camera with a Samyang AE 10mm lens at f/4.8 and ISO 1600 on a Baader Astro & Nature tripod.

- - - - - - - - - - - - - - - - - - - - - - - - - - - - - - - - - - - - - - - - - - - - - - - - - - - - - - - - - - - - - - - - - - - - - - - - - -

Did you appreciate this newsletter? Please help us keep it going by Joining Our Patreon Supporters

What are your thoughts on this article? Join the discussion on our Facebook Page

PictureCorrect subscribers can also learn more today with our #1 bestseller: The Photography Tutorial eBook

- - - - - - - - - - - - - - - - - - - - - - - - - - - - - - - - - - - - - - - - - - - - - - - - - - - - - - - - - - - - - - - - - - - - - - - - - -

The post Interesting Photo of the Day: Star Trails over the Canary Islands appeared first in the Photography Tips category on PictureCorrect.


from PictureCorrect https://ift.tt/TzSG8d1
via IFTTT

keskiviikko 25. tammikuuta 2023

PictureCorrect.com: How to Improve Your Photography Composition with Any Camera

Composition has the power to make or break your photos. Photographer Marcin Lewandowski demonstrates in this short video:

Camera technology has evolved at a mind-boggling pace over the last few years. So much so that even the simplest of cameras on the market will outmatch a professional model from not so long ago. But the objective of this video is to look beyond your hardware. Lewandowski uses his smartphone to illustrate all of the composition techniques he recommends.

Frame the Scene with Your Fingers

better composition vs better camera

Look through a rectangle created by your fingers.

The camera frame is a rectangular shape, and whatever you shoot is captured within that rectangular space. A good way to visualize your image is to create a rectangle (as demonstrated above) with your fingers and look at a scene through it.

This allows you to look at something interesting from the perspective of your camera. You can practice this with or without a camera around. It’s an interesting way to look for ideas, pre-visual an image, and store references for your ‘visual vocabulary’—as Lewandowski puts it. He uses this visual vocabulary later on when he uses his camera to shoot images.

Know the Rule of Thirds

basic composition tips

Rule of Thirds

The rule of thirds is easy to understand. Look at the picture above. The frame has been cut into nine equal pieces using two vertical and two horizontal lines. Many cameras have a feature that shows these gridlines in-camera.

The fundamental goal of using this rule is to place the most important aspect of your image at one of the intersecting points.

golden rule in photography

Golden Rule

A modification of the rules of thirds is the phi grid. This also divides a frame into nine boxes but in a slightly different way, as demonstrated below.

phi grid in composition

The Phi Grid

You can check your existing images to see if they comply with the golden rule by going into Lightroom’s Development panel and clicking on the Crop tool (Shortcut R). Additionally, you can press ‘O’ and cycle between the various views.

Use of Fibonacci sequence in photography

Checking composition in Lightroom

You can also change the direction of the Fibonacci grid direction by pressing Shift + ‘O’.

Hopefully, these tips have helped you to get a better understanding of how to improve your photography. What other composition techniques do you use?

- - - - - - - - - - - - - - - - - - - - - - - - - - - - - - - - - - - - - - - - - - - - - - - - - - - - - - - - - - - - - - - - - - - - - - - - - -

Did you appreciate this newsletter? Please help us keep it going by Joining Our Patreon Supporters

What are your thoughts on this article? Join the discussion on our Facebook Page

PictureCorrect subscribers can also learn more today with our #1 bestseller: The Photography Tutorial eBook

- - - - - - - - - - - - - - - - - - - - - - - - - - - - - - - - - - - - - - - - - - - - - - - - - - - - - - - - - - - - - - - - - - - - - - - - - -

The post How to Improve Your Photography Composition with Any Camera appeared first in the Photography Tips category on PictureCorrect.


from PictureCorrect https://ift.tt/xEJIrYq
via IFTTT

tiistai 24. tammikuuta 2023

PictureCorrect.com: Storytelling Photography

A while back I visited the George Eastman Museum of Photography where there was an exhibition on travel photography. It was a great experience to see the world’s best photographs showcased in a two hour tour of the exhibition halls. After looking at most of the photos, I found an intangible element in almost all the photos. It’s the “story” behind the photo.

goa village

Photo by Ramnath Bhat.

We all have emotions within us, and a careful shot of a scene can make us laugh, cry, or even get angry. This is the magic of a photo that tells a story. When a person feels an emotion the person will hardly be able to forget the specific thing, process, or event that triggered the emotion, be it positive or negative feelings. The same holds true when a person sees a photograph. A photograph always tells us a story—actually there can be multiple stories associated with one photo. But it’s in the mind of the photographer to direct the minds of the viewers to a particular, strong, and appealing story. And if the photographer is not successful in this endeavor then the photograph loses its distinctiveness and falls under the average category.

This topic is closely linked to travel, street photography, and photo journalism, but it doesn’t have to be limited to only those fields. Actually everything that happens around us has some background story linked to it, unless you’re a computer geek sitting in front of computer and surfing the Internet for 23 hours a day. Even a photo of such a geek sitting amid gadgets and looking at the computer screen busily typing can make an excellent story-telling photo. Who knows, this might be the winner at the “Best Geek Photo” of the millennium contest. Of course, you will get “better” real life shots when you are out in a public place (street photography) or a tourist place (travel photography) or an event location (photo journalism).

harry potter photo

Photo by Brett Kiger; ISO 200, f/8, 1/800 exposure.

So now you have an idea of what a story telling photo is and why it’s so important to make the viewers feel an emotion when they look at your photos.

Now let’s get to work. First of all, story telling in itself is very creative and it’s difficult to formulate any specific “techniques” to tell good stories. But definitely there’s a structure. The same holds true for photography. The next thing to keep in mind is if you are not satisfied with the photograph’s capability of imprinting a story in your mind, it probably won’t have any effect on any other viewer’s mind either.

As any other properties of storytelling, a photo should comprise of one or more of five elements:

  1. Mood
  2. Emotion
  3. Narrative
  4. Ideas
  5. Messages

Let’s elaborate on each of these characteristics one by one.

1. Mood

Mood can be achieved using correct background (objects or effects like blurring). The background should have a “relationship” with the subject in order to bring the mood. Even the objects can be inter-linked to build up the thought process of the viewer in a particular guided path.

2. Emotion

The emotion can be demonstrated through facial expressions of a person as well as activity being performed by the subject(s).

emotional photograph

Photo by Thomas Hawk; ISO 6400, f/2, 1/100 exposure.

3. Narration

The narrative property in a photo comes to life when the viewer can easily visualize what happened “before” the shot was taken from what is happening in the photograph (similar to narrating a story to demonstrate the flow of events). This can be successfully demonstrated by including or excluding certain elements into or from your photograph. For example, a person talking to someone outside the frame. Thus it is very important to decide on what you should include in the frame and what should be excluded in order to let the viewer figure out the rest of the story that preceded the current moment of the photograph. Generally the more detailed the photo is the more narrative quality the photograph possesses.

4. Idea

The idea is kind of difficult to illustrate, but if you have something in your mind that you want to show the viewers through a photograph, it shouldn’t be too tough. The key is to already have in your mind what you’re looking for. This is more demonstrated through abstract photography which is nothing but a completely different way of looking at something very common.

5. Message

Finally the message is the “future” of what the viewer is currently seeing and conceiving in the photograph. This is often dictated by the theme of the photograph. The theme can be visual (color/pattern), style (macro/zoom/panorama), relation (objects in the photo), location (room, market, open space) or a combination of the above. In most famous photographs, the photographer intentionally leaves a lot of things unsettled so that the viewers have an open idea of what is going to happen next.

sports photography

Photo by Paul McGeiver; ISO 200, f/4, 1/1000 exposure.

The key is to grab the attention of the viewer with a subject and then instantly pass on the idea/message/narration to the viewer so that s/he can feel the same emotion and mood as the photographer felt when taking the photograph. The work of a photographer then is successful, fulfilling, and truly complete.

In conclusion, I would like to say that the creativity of building up a story in a photograph can be a difficult task, but with practice and keeping the above in mind, you will be able to generate more interesting photos that will be appreciated by the viewers.

Someone told it right: A picture is worth a thousand words.

About the Author:
Sudipta Shaw is a software professional and a self-made photographer. He also likes to teach and mentor.

- - - - - - - - - - - - - - - - - - - - - - - - - - - - - - - - - - - - - - - - - - - - - - - - - - - - - - - - - - - - - - - - - - - - - - - - - -

Did you appreciate this newsletter? Please help us keep it going by Joining Our Patreon Supporters

What are your thoughts on this article? Join the discussion on our Facebook Page

PictureCorrect subscribers can also learn more today with our #1 bestseller: The Photography Tutorial eBook

- - - - - - - - - - - - - - - - - - - - - - - - - - - - - - - - - - - - - - - - - - - - - - - - - - - - - - - - - - - - - - - - - - - - - - - - - -

The post Storytelling Photography appeared first in the Photography Tips category on PictureCorrect.


from PictureCorrect https://ift.tt/xDkWqdC
via IFTTT